构建AirTouch应用,需要集成HMS Core的服务,帮助您实现收入增长。AirTouch是个简单的应用,可以带您体验虚拟现实。AirTouch,顾名思义,就是使用过程中无需触碰屏幕。在AirTouch中,我们集成了机器学习服务(ML Kit)的人脸检测、实时语音识别和手势识别服务,还集成了位置服务(Site Kit)和AR Engine,帮助用户快速获取问题答案,做好用户的生活助手。
功能 | HMS Core服务 |
登录 | ML Kit人脸检测(微笑表情) |
声音检测 | ML Kit实时语音识别 |
应用评分 | ML Kit手势识别 |
地点详情获取 | Site Kit |
页面上下滑动 | AR Engine |
在本Codelab中,你将创建一个demo工程,使用下述接口:ML Kit人脸检测服务接口、实时语音识别服务接口、手势识别服务接口、Site Kit接口以及AR Engine接口,具体过程如下:
在本Codelab中,您将学会如何:
点击此处,了解开发准备详情。
点击"项目设置",选择"API管理",打开以下服务的开关,获取API使用权限:
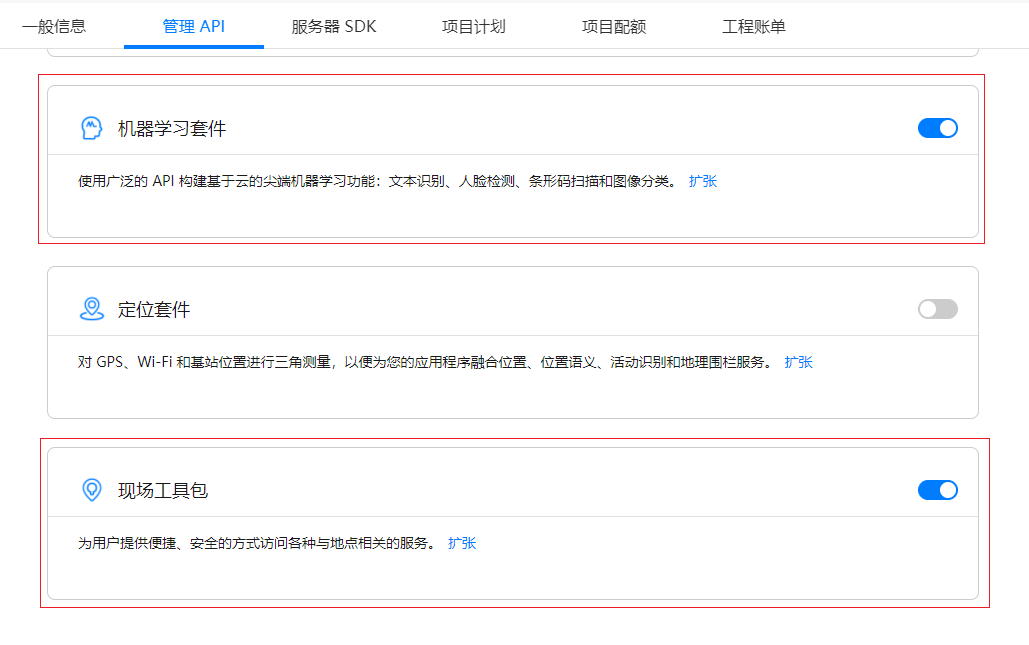
这样,上述服务就成功开启了。
ML Kit提供人脸检测服务,实现用户登录。
在应用级build.gradle文件中,添加如下依赖:
Implementation ‘com.huawei.hms:ml-computer-vision-face:2.0.5.300'
implementation ‘com.huawei.hms:ml-computer-vision-face-feature-model:2.0.5.300'
implementation ‘com.huawei.hms:ml-computer-vision-face-emotion-model:2.0.5.300'
implementation ‘com.huawei.hms:ml-computer-vision-face-shape-point-model:2.0.5.300'
步骤1:在布局文件中添加CameraSourcePreview和GraphicOverlay,该布局文件将用于构建LiveFaceDetectionHMSActivity,用户通过眨眼实现登录。
<com.huawei.touchmenot.java.hms.camera.CameraSourcePreview
	android:id="@+id/preview"
	android:layout_width="match_parent"
	android:layout_height="match_parent">

	<com.huawei.touchmenot.java.hms.camera.GraphicOverlay
		android:id="@+id/overlay"
		android:layout_width="match_parent"
		android:layout_height="match_parent" />
</com.huawei.touchmenot.java.hms.camera.CameraSourcePreview>
步骤2:在LiveFaceDetectionHMSActivity中创建createFaceAnalyzer()方法,初始化MLFaceAnalyzerSetting对象,检测人脸面部特征和表情等关键点。
Java
private MLFaceAnalyzer createFaceAnalyzer() {
	MLFaceAnalyzerSetting setting = new MLFaceAnalyzerSetting.Factory()
			.setFeatureType(MLFaceAnalyzerSetting.***TYPE_FEATURES***)
			.setPerformanceType(MLFaceAnalyzerSetting.***TYPE_SPEED***)
			.allowTracing()
			.create();
	analyzer = MLAnalyzerFactory.***getInstance***().getFaceAnalyzer(setting);

	this.analyzer.setTransactor(new FaceAnalyzerTransactor(this.mOverlay, this));
	return this.analyzer;
}
Kotlin
private fun createFaceAnalyzer(): MLFaceAnalyzer? {
	val setting = MLFaceAnalyzerSetting.Factory()
        .setFeatureType(MLFaceAnalyzerSetting.TYPE_FEATURES)
        .setPerformanceType(MLFaceAnalyzerSetting.TYPE_SPEED)
        .allowTracing()
        .create()
	analyzer = MLAnalyzerFactory.getInstance().getFaceAnalyzer(setting)
	analyzer?.setTransactor(FaceAnalyzerTransactor(mOverlay, this))
	return analyzer
}
步骤3:创建FaceAnalyzerTransactor类。
该类用于实现MLAnalyzer.MLTransactor<MLFace>接口,该接口提供的transactResult()覆写方法,可以提供MLFace对象,得出左右眼睁眼概率,检测用户眨眼动作。
Java
public static float EYE_CLOSED_THRESHOLD = 0.4f FaceAnalyzerTransactor(GraphicOverlay ocrGraphicOverlay, LiveFaceDetectionHMSActivity context) {
    this.mGraphicOverlay = ocrGraphicOverlay;
    mContext = context;
}
@Override
public void transactResult(MLAnalyzer.Result<MLFace> result) {
    this.mGraphicOverlay.clear();
    SparseArray<MLFace> faceSparseArray = result.getAnalyseList();
    for (int i = 0; i < faceSparseArray.size(); i++) {
        MLFaceFeature feature = faceSparseArray.get(i).getFeatures();
        float leftOpenScore = feature.getLeftEyeOpenProbability();
        float rightOpenScore = feature.getRightEyeOpenProbability();
        if (leftOpenScore < EYE_CLOSED_THRESHOLD && rightOpenScore < EYE_CLOSED_THRESHOLD) {
            Log.e("Eye blinked called ---", "" + feature.getLeftEyeOpenProbability()
                    + " : " + feature.getRightEyeOpenProbability());
            mContext.runOnUiThread(new Runnable() {

                @Override
                public void run() {
                    Toasty.success(mContext, "Eye blink detected. Login successful", Toast.LENGTH_SHORT, true).show();
                    new Handler().postDelayed(new Runnable() {
                        @Override
                        public void run() {
                            loadHome();
                        }
                    }, 800);
                }
            });
        }
    }
}

private void loadHome() {
    mContext.startActivity(new Intent(mContext, HomeActivity.class));
    mContext.finish();
}
Kotlin
class FaceAnalyzerTransactor internal constructor(private val mGraphicOverlay: GraphicOverlay?, private val mContext: LiveFaceDetectionHMSActivity) : MLTransactor {
    private val THREAD_DELAY = 800
    override fun transactResult(result: MLAnalyzer.Result<MLFace>) {
        mGraphicOverlay!!.clear()
        val faceSparseArray = result.analyseList
        for (i in Constants.INIT_ZERO until faceSparseArray.size()) {
            val feature = faceSparseArray[i].features
            val leftOpenScore = feature.leftEyeOpenProbability
            val rightOpenScore = feature.rightEyeOpenProbability
            if (leftOpenScore < EYE_CLOSED_THRESHOLD && rightOpenScore < EYE_CLOSED_THRESHOLD) {
                Log.d(Constants.STR_EYE_BLINKED_CALLED, feature.leftEyeOpenProbability
                        .toString() + Constants.STR_COLON + feature.rightEyeOpenProbability)
                mContext.runOnUiThread {
                    Toast.makeText(mContext, Constants.STR_EYE_BLINK_LOGIN, Toast.LENGTH_SHORT).show()
                    Handler().postDelayed({ loadHome() }, THREAD_DELAY.toLong())
                }
            }
        }
    }

    private fun loadHome() {
        mContext.startActivity(Intent(mContext, HomeActivity::class.java))
        mContext.finish()
    }

    companion object {
        private const val EYE_CLOSED_THRESHOLD = 0.4f
    }

}
运行结果: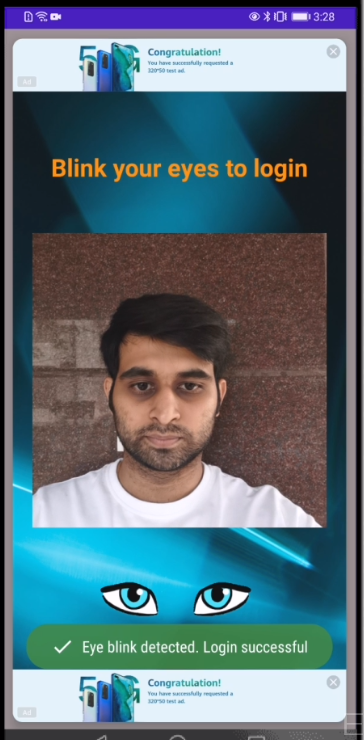
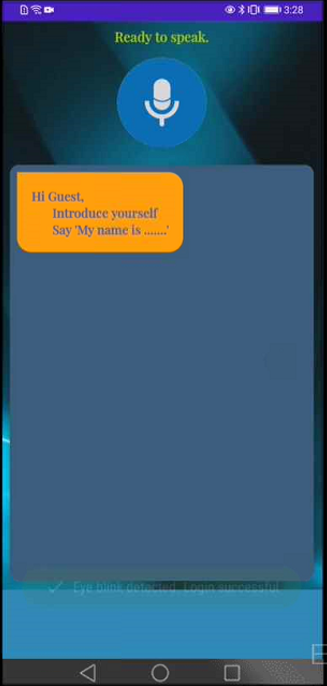
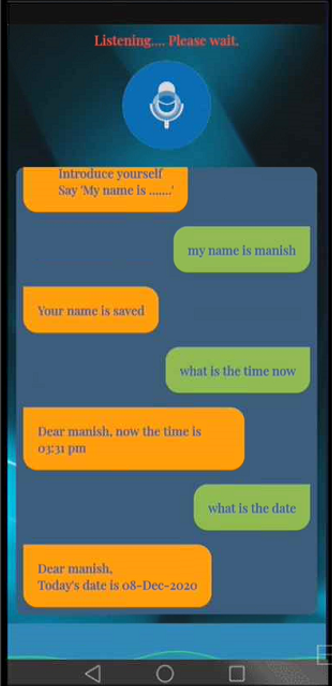
ML Kit提供实时语音识别服务。
在应用级build.gradle文件中,添加如下依赖:
implementation 'com.huawei.hms:ml-computer-voice-asr-plugin:2.2.0.300'
implementation 'com.huawei.hms:ml-computer-voice-asr:2.2.0.300'
步骤1:使用以下代码,创建语音识别器对象。
Java
MLAsrRecognizer mSpeechRecognizer = MLAsrRecognizer.createAsrRecognizer(HomeActivity.this);
Kotlin
var mSpeechRecognizer = MLAsrRecognizer.createAsrRecognizer(this@HomeActivity)
步骤2:从agconnect-service.json文件中获取API key并添加至代码。
Java
MLApplication.getInstance().setApiKey(API_KEY);
Kotlin
MLApplication.getInstance().apiKey = API_KEY
步骤3:创建语音识别结果监听器回调,将语音转成文本。该回调包含以下方法:
Java
protected class SpeechRecognitionListener implements MLAsrListener {
    @Override
    public void onStartingOfSpeech() {
        Log.e(TAG, "onStartingOfSpeech");
        start();  mTextView.setTextColor(getResources().getColor(R.color.color_red_card));
        mTextView.setText("Listening.... Please wait.");
        waveLineView.startAnim();
        // 用户开始讲话,即语音识别器检测到用户开始讲话。
    }
    @Override
    public void onVoiceDataReceived(byte[] data, float energy, Bundle bundle) {
    // 返回给用户原始的PCM音频流和音频能量。
    }
    @Override
    public void onState(int i, Bundle bundle) {
        // 通知应用状态发生改变。
        Log.e(TAG, "onState");
    }
    @Override
    public void onRecognizingResults(Bundle partialResults) {
        // 从MLAsrRecognizer接收持续语音识别的文本。

        Log.e(TAG, "onRecognizingResults");
    }
    @Override
    public void onResults(Bundle results) {
        Log.e(TAG, "onResults");
        endSpeech();
        setImage(0);
        // 语音识别的文本数据。
        String data = results.getString(MLAsrRecognizer.RESULTS_RECOGNIZED);
        mTextView.setText(data);
        displayResult(data);
        Log.e(TAG, data);
        waveLineView.stopAnim();
        // startASR();
    }
    @Override
    public void onError(int error, String errorMessage) {
        Log.e(TAG, "onError");
              mTextView.setText(error + errorMessage);
        Toast.makeText(HomeActivity.this, error + errorMessage,          Toast.LENGTH_SHORT).show();
        pauseSpeech();
        waveLineView.stopAnim();
        // waveLineView.onPause();
        mSpeechRecognizer.destroy();
        startASR();
    }
    @Override
    public void onStartListening() {
        Log.e(TAG, "onStartListening");
        // 录音器开始接收声音。
        setImage(1);
        mTextView.setText("Listening.... Please wait.");
        startSpeech();
        waveLineView.startAnim();
    }
}
Kotlin
protected inner class SpeechRecognitionListener : MLAsrListener {
    override fun onStartingOfSpeech() {
        Log.d(TAG, Constants.STR_STARTING_SPEECH)
        start()
        mTextView!!.setTextColor(resources.getColor(R.color.color_red_card))
        mTextView!!.text = Constants.STR_LISTENING_ALERT_MESSAGE
        startSpeech()
    }

    override fun onVoiceDataReceived(data: ByteArray, energy: Float, bundle: Bundle) {

        // 返回给用户原始的PCM音频流和音频能量。
    }

    override fun onState(i: Int, bundle: Bundle) {
        // 通知应用状态发生改变。
        Log.d(TAG, Constants.STR_ON_STATE)
    }

    override fun onRecognizingResults(partialResults: Bundle) {
        // 从MLAsrRecognizer接收持续语音识别的文本。
        Log.d(TAG, Constants.STR_RECOGNIZING_RESULTS)
    }

    override fun onResults(results: Bundle) {
        Log.d(TAG, Constants.STR_ON_RESULTS)
        endSpeech()
        setImage(Constants.INIT_ZERO)
        // 语音识别的文本数据。
        val data = results.getString(MLAsrRecognizer.RESULTS_RECOGNIZED)
        mTextView!!.text = data
        displayResult(data)
        Log.d(TAG, data)
        endSpeech()
    }

    override fun onError(error: Int, errorMessage: String) {
        Log.d(TAG, Constants.STR_ON_ERROR)
        // 识别发生错误时调用该接口。
        mTextView!!.text = error.toString() + errorMessage
        Toast.makeText(this@HomeActivity, error.toString() + errorMessage, Toast.LENGTH_SHORT).show()
        pauseSpeech()
        // waveLineView.onPause();
        endSpeech()
        mSpeechRecognizer!!.destroy()
        startASR()
    }

    override fun onStartListening() {
        Log.d(TAG, Constants.STR_ON_START_LISTENING)
        // 录音器开始接收语音。
        setImage(Constants.INIT_ONE)
        mTextView!!.text = Constants.STR_LISTENING_ALERT_MESSAGE
        startSpeech()
    }
}
步骤4:设置语音识别参数,传入SpeechRecognitionListener对象,开始识别语音。实时语音识别结果可从MLAsrListener接口获取。
Java
mSpeechRecognizer.setAsrListener(new SpeechRecognitionListener());
// 设置参数,启动语音设备。
Intent intentSdk = new Intent(RecognizerIntent.ACTION_RECOGNIZE_SPEECH)
        // 设置识别语言为英语,若不设置,则默认识别英语。支持设置"zh-CN":中文;"en-US":英语;"fr-FR":法语。
        .putExtra(MLAsrConstants.LANGUAGE, "en-US")
        // 设置拾音界面是否显示识别结果,若不设置,则默认显示。
        // MLAsrConstants.FEATURE_WORDFLUX:拾音界面显示识别结果。
        // MLAsrConstants.FEATURE_ALLINONE:拾音界面不显示识别结果。
        .putExtra(MLAsrConstants.FEATURE, MLAsrConstants.FEATURE_ALLINONE);
// 语音识别开始。
mSpeechRecognizer.startRecognizing(intentSdk);
mTextView.setText("Ready to speak.");
Kotlin
mSpeechRecognizer?.setAsrListener(SpeechRecognitionListener())
// 设置参数,启动语音设备。
val intentSdk = Intent(RecognizerIntent.ACTION_RECOGNIZE_SPEECH)
// 设置识别语言为英语,若不设置,则默认识别英语。支持设置"zh-CN":中文;"en-US":英语;"fr-FR":法语。
        .putExtra(MLAsrConstants.LANGUAGE, R.string.US_English)
// 设置拾音界面是否显示识别结果,若不设置,则默认显示。
        // MLAsrConstants.FEATURE_WORDFLUX:拾音界面显示识别结果。
        // MLAsrConstants.FEATURE_ALLINONE:拾音界面不显示识别结果。
        .putExtra(MLAsrConstants.FEATURE, MLAsrConstants.FEATURE_ALLINONE)
// 语音识别开始。
mSpeechRecognizer?.startRecognizing(intentSdk)
mTextView!!.text = Constants.STR_READY_TO_SPEAK
步骤5:基于实时语音识别结果,进行以下操作:
获取天气信息:
Java
 if (data.contains(Constants.STR_WEATHER)) {
            getWeatherReport(Constants.WEATHER_LAT, Constants.WEATHER_LONG);
        }
Kotlin
 if (data.contains(Constants.STR_WEATHER)) {
            getWeatherReport(Constants.WEATHER_LAT, Constants.WEATHER_LONG)
        }
打开照相机/图库:
Java
if (data.equalsIgnoreCase(Constants.STR_OPEN_CAMERA)) {
            speechData = new SpeechData();
            speechData.setResponse(userName + Constants.STR_OPENING_CAMERA);
            mAdapter.add(speechData, recyclerView);
            Handler responseHandler = new Handler();
            responseHandler.postDelayed(new Runnable() {
                @Override
                public void run() {
                    Intent cameraIntent = new Intent(android.provider.MediaStore.ACTION_IMAGE_CAPTURE);
                    startActivity(cameraIntent);
                }
            }, Constants.DELAY_MILLIS);
        } else if (data.equalsIgnoreCase(Constants.STR_OPEN_GALLERY)) {
            speechData = new SpeechData();
            speechData.setResponse(userName + Constants.STR_OPENING_CAMERA);
            mAdapter.add(speechData, recyclerView);
            Handler responseHandler = new Handler();
            responseHandler.postDelayed(new Runnable() {
                @Override
                public void run() {
                    Intent intent = new Intent();
                    intent.setType(Constants.STR_IMG_TYPE);
                    intent.setAction(Intent.ACTION_GET_CONTENT);
                    startActivity(Intent.createChooser(intent, Constants.STR_SELECT_PICTURE));
                }
            }, Constants.DELAY_MILLIS);
        }
Kotlin
if (data.equals(Constants.STR_OPEN_CAMERA, ignoreCase = true)) {
            speechData = SpeechData()
            speechData.response = userName + Constants.STR_OPENING_CAMERA
            mAdapter!!.add(speechData, recyclerView!!)
            val responseHandler = Handler()
            responseHandler.postDelayed({
	     val cameraIntent = Intent(MediaStore.ACTION_IMAGE_CAPTURE)
             startActivity(cameraIntent)
}, Constants.DELAY_MILLIS.toLong())
        } else if (data.equals(Constants.STR_OPEN_GALLERY, ignoreCase = true)) {
            speechData = SpeechData()
            speechData.response = userName + Constants.STR_OPENING_CAMERA
            mAdapter!!.add(speechData, recyclerView!!)
            val responseHandler = Handler()
            responseHandler.postDelayed({
             val intent = Intent()
             intent.type = Constants.STR_IMG_TYPE
             intent.action = Intent.ACTION_GET_CONTENT
             startActivity(Intent.createChooser(intent, Constants.STR_SELECT_PICTURE))
 }, Constants.DELAY_MILLIS.toLong())
        }
获取位置信息:
Java
 if (data.contains(Constants.STR_SEARCH)) {
            searchSitePlaces(data.replace(Constants.STR_SEARCH, "").trim());
}
Kotlin
if (data.contains(Constants.STR_SEARCH)) {
            searchSitePlaces(data.replace(Constants.STR_SEARCH, "").trim { it <= ' ' })
        }
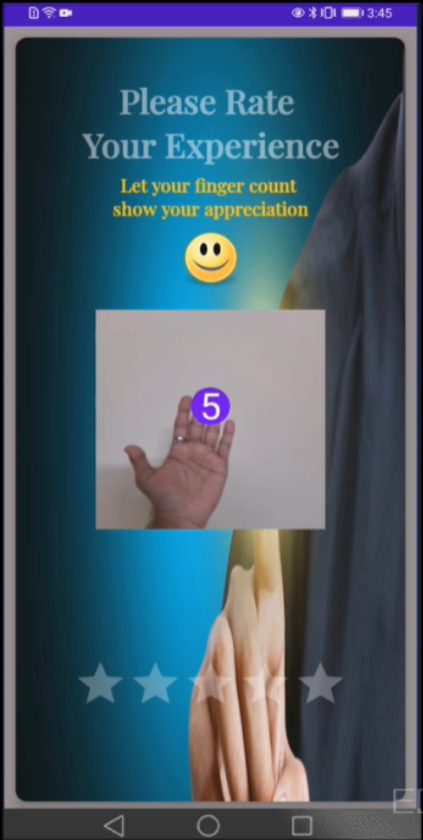
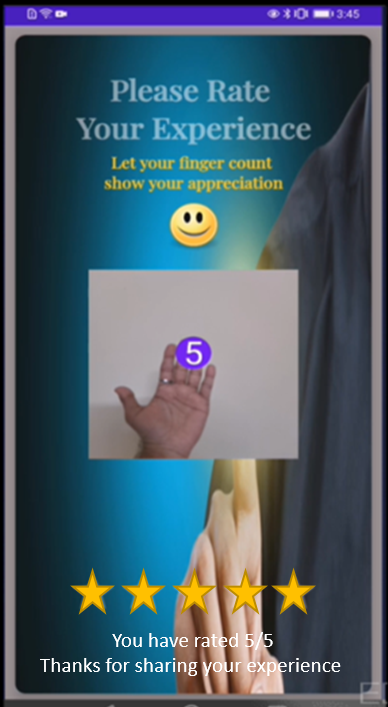
通过手势识别,进行应用评分:
Java
 if (data.contains(Constants.STR_FEEDBACK)) {
            speechData = new SpeechData();
            speechData.setResponse(Constants.STR_DEAR + userName + Constants.STR_REDIRECT_FEEDBACK);
            mAdapter.add(speechData, recyclerView);
            Handler responseHandler = new Handler();
            responseHandler.postDelayed(new Runnable() {
                @Override
                public void run() {
                    startActivityForResult(new Intent(HomeActivity.this, LiveHandKeyPointAnalyseActivity.class), REQUEST_CODE);
                }
            }, Constants.DELAY_MILLIS);
        }
Kotlin
 if (data.contains(Constants.STR_FEEDBACK)) {
            speechData = SpeechData()
            speechData.response = Constants.STR_DEAR + userName + Constants.STR_REDIRECT_FEEDBACK
            mAdapter!!.add(speechData, recyclerView!!)
            val responseHandler = Handler()
            responseHandler.postDelayed({ startActivityForResult(Intent(this@HomeActivity, LiveHandKeyPointAnalyseActivity::class.java), REQUEST_CODE) }, Constants.DELAY_MILLIS.toLong())
        }
ML Kit提供手势识别服务。
在应用级build.gradle文件中,添加如下依赖:
implementation 'com.huawei.hms:ml-computer-vision-handkeypoint:2.1.0.300'
implementation 'com.huawei.hms:ml-computer-vision-handkeypoint-model:2.1.0.300'
步骤1:在布局文件中添加LensEnginePreview和GraphicOerlay。该布局文件将用于构建LiveFaceDetectionHMSActivity,用户通过手势检测实现应用评分。
Java
<com.huawei.touchmenot.java.hms.camera.LensEnginePreview
    android:id="@+id/hand_preview"
    android:layout_width="200dp"
    android:layout_height="200dp"
    android:layout_centerHorizontal="true"
    android:layout_centerVertical="true">

    <com.huawei.touchmenot.java.hms.camera.GraphicOverlay
        android:id="@+id/hand_overlay"
        android:layout_width="match_parent"
        android:layout_height="match_parent" />
</com.huawei.touchmenot.java.hms.camera.LensEnginePreview>
Kotlin
<com.huawei.touchmenot.kotlin.hms.camera.LensEnginePreview
    android:id="@+id/hand_preview"
    android:layout_width="200dp"
    android:layout_height="200dp"
    android:layout_centerHorizontal="true"
    android:layout_centerVertical="true">

    <com.huawei.touchmenot.kotlin.hms.camera.GraphicOverlay
        android:id="@+id/hand_overlay"
        android:layout_width="match_parent"
        android:layout_height="match_parent" />
</com.huawei.touchmenot.kotlin.hms.camera.LensEnginePreview>
</com.huawei.touchmenot.kotlin.hms.camera.LensEnginePreview>
步骤2:初始化MLHandKeypointAnalyzerSetting对象,分析手部关键点。
Java
MLHandKeypointAnalyzerSetting setting =
        new MLHandKeypointAnalyzerSetting.Factory()
                .setMaxHandResults(2)
                .setSceneType(MLHandKeypointAnalyzerSetting.TYPE_ALL)
                .create();
mAnalyzer = MLHandKeypointAnalyzerFactory.getInstance().getHandKeypointAnalyzer(setting);
mAnalyzer.setTransactor(new HandAnalyzerTransactor(this, mOverlay));
Kotlin
val setting = MLHandKeypointAnalyzerSetting.Factory()
        .setMaxHandResults(Constants.INIT_TWO)
        .setSceneType(MLHandKeypointAnalyzerSetting.TYPE_ALL)
        .create()
mAnalyzer = MLHandKeypointAnalyzerFactory.getInstance().getHandKeypointAnalyzer(setting)
mAnalyzer?.setTransactor(HandAnalyzerTransactor(this, mOverlay))
步骤3:创建HandAnalyzerTransactor类。
该类用于实现MLAnalyzer.MLTransactor<MLHandKeypoints>接口,该接口提供的transactResult()覆写方法,可以提供MLHandKeyPoints对象,得出每个手部关键点的坐标信息,计算抬起的手指数量。
Java
private class HandAnalyzerTransactor implements MLAnalyzer.MLTransactor<MLHandKeypoints> {
    private GraphicOverlay mGraphicOverlay;

    WeakReference<LiveHandKeyPointAnalyseActivity> mMainActivityWeakReference;

    HandAnalyzerTransactor(LiveHandKeyPointAnalyseActivity mainActivity, GraphicOverlay ocrGraphicOverlay) {
        mMainActivityWeakReference = new WeakReference<>(mainActivity);
        this.mGraphicOverlay = ocrGraphicOverlay;
    }
@Override
    public void transactResult(MLAnalyzer.Result<MLHandKeypoints> result) {
        this.mGraphicOverlay.clear();

        SparseArray<MLHandKeypoints> handKeypointsSparseArray = result.getAnalyseList();
        List<MLHandKeypoints> list = new ArrayList<>();
        System.out.println("point list size  = " + handKeypointsSparseArray.size());
        for (int i = 0; i < handKeypointsSparseArray.size(); i++) {
            list.add(handKeypointsSparseArray.valueAt(i));
            System.out.println("point list size new  = " + handKeypointsSparseArray.valueAt(i).getHandKeypoints());
        }

        HandKeypointGraphic graphic = new HandKeypointGraphic(this.mGraphicOverlay, list, result, LiveHandKeyPointAnalyseActivity.this);
        this.mGraphicOverlay.add(graphic);
    }

    @Override
    public void destroy() {
        this.mGraphicOverlay.clear();
    }

}
Kotlin
private inner class HandAnalyzerTransactor internal constructor(mainActivity: LiveHandKeyPointAnalyseActivity, ocrGraphicOverlay: GraphicOverlay?) : MLTransactor<MLHandKeypoints> {
    private val mGraphicOverlay: GraphicOverlay?
    var mMainActivityWeakReference: WeakReference<LiveHandKeyPointAnalyseActivity>

    /**
     * Process the results returned by the analyzer.
     *
     * @param result
     */
    override fun transactResult(result: MLAnalyzer.Result<MLHandKeypoints>) {
        mGraphicOverlay!!.clear()
        val handKeypointsSparseArray = result.analyseList
        val list: MutableList<MLHandKeypoints> = ArrayList()
        println(R.string.point_list_size.toString() + handKeypointsSparseArray.size())
        for (i in Constants.INIT_ZERO until handKeypointsSparseArray.size()) {
            list.add(handKeypointsSparseArray.valueAt(i))
            println(R.string.point_list_size_new.toString() + handKeypointsSparseArray.valueAt(i).handKeypoints)
        }
        val graphic = HandKeypointGraphic(mGraphicOverlay, list, result, this@LiveHandKeyPointAnalyseActivity)
        mGraphicOverlay.add(graphic)
    }

    override fun destroy() {
        mGraphicOverlay!!.clear()
    }

    init {
        mMainActivityWeakReference = WeakReference(mainActivity)
        mGraphicOverlay = ocrGraphicOverlay
    }
}
您可以通过某一地点的Site ID来获取该地点的详细信息(如地点名称、地址详细信息、经纬度等),Site ID是地点的唯一标识符。
在应用级build.gradle文件中,添加如下依赖:
Implementation ‘com.huawei.hms:site:5.0.0.300'
步骤1:构建TextSearchRequest对象作为关键字查询的请求体,并设置query参数。
Java
TextSearchRequest textSearchRequest = new TextSearchRequest();
textSearchRequest.setQuery(queryText);
Kotlin
val textSearchRequest = TextSearchRequest()
textSearchRequest.query = queryText
步骤2:创建SearchResultListener对象,用来侦听搜索结果。通过SearchService对象调用textSearch()接口,传入TextSearchRequest对象和SearchResultListener对象。
通过创建的SearchResultListener对象,获取搜索结果TextSearchResponse对象。从TextSearchResponse对象中获取Site对象,并进行解析获取该地点的详细信息。
Java
 try {
        SearchService searchService = SearchServiceFactory.create(HomeActivity.this, URLEncoder.encode(API_KEY, "utf-8"));
        searchService.textSearch(textSearchRequest, new SearchResultListener<TextSearchResponse>() {
            @Override
            public void onSearchResult(TextSearchResponse textSearchResponse) {
                if (textSearchResponse != null && textSearchResponse.getSites() != null) {
                    for (Site site : textSearchResponse.getSites()) {
                        siteId = site.getSiteId();
                        break;
                    }
                    DetailSearchRequest request = new DetailSearchRequest();
                    request.setSiteId(siteId);
                    SearchResultListener<DetailSearchResponse> resultListener = new SearchResultListener() {
                        @Override
                        public void onSearchResult(DetailSearchResponse result) {
                            Site site;
                            if (result == null || (site = result.getSite()) == null) {

                                return;
                            }
                            site = result.getSite();


                                SpeechData speechData = new SpeechData();
                                speechData.setRequestType(TYPE_SEARCH);
								// TYPE_SEARCH = 2时表示,使用recyclerView填充搜索布局。
                                speechData.setResponse(site.getName());
                                speechData.setSiteResponse(site);
                                mAdapter.add(speechData, recyclerView);
                            Log.i("TAG", String.format("siteId: '%s', name: %s\r\n", site.getSiteId(), site.getName()));
                        }

                        @Override
                        public void onSearchError(SearchStatus status) {
                            Log.i("TAG", "Error : " + status.getErrorCode() + " " + status.getErrorMessage());
                        }
                    };
                    // 调用地点详情接口。
                    searchService.detailSearch(request, resultListener);
                } else {
                    SpeechData speechData = new SpeechData();
                    speechData.setResponse("No result found");
                    mAdapter.add(speechData, recyclerView);
                }
            }
            @Override
            public void onSearchError(SearchStatus searchStatus) {
                String val = new Gson().toJson(searchStatus);
                Log.e(TAG, val);
                Toast.makeText(HomeActivity.this, val, Toast.LENGTH_SHORT).show();
            }
        });

} catch (UnsupportedEncodingException e) {

}
Kotlin
try {
        val searchService = SearchServiceFactory.create(this@HomeActivity, URLEncoder.encode(API_KEY, Constants.STR_UTF_8))
        searchService.textSearch(textSearchRequest, object : SearchResultListener<TextSearchResponse?> {
            override fun onSearchResult(textSearchResponse: TextSearchResponse?) {
                if (textSearchResponse != null && textSearchResponse.sites != null) {
                    for (site in textSearchResponse.sites) {
                        siteId = site.siteId
                        break
                    }
                    val request = DetailSearchRequest()
                    request.siteId = siteId
                    val resultListener: SearchResultListener<DetailSearchResponse?> = object : SearchResultListener<DetailSearchResponse?> {
                        override fun onSearchResult(result: DetailSearchResponse?) {
                            var site: Site
                            if (result == null || result.site.also { site = it } == null) {
                                return
                            }
                            site = result.site
                            val speechData = SpeechData()
                            speechData.requestType = TYPE_SEARCH
							// TYPE_SEARCH = 2时表示,使用recyclerView填充搜索布局。
                            speechData.response = site.name
                            speechData.siteResponse = site
                            mAdapter!!.add(speechData, recyclerView!!)
                            Log.d(TAG, String.format("siteId: '%s', name: %s\r\n", site.siteId, site.name))
                        }

                        override fun onSearchError(status: SearchStatus?) {
                            TEMP_MESSAGE = Constants.STR_ERROR_MSG + status?.errorCode + " " + status?.errorMessage
                            Log.d(TAG, TEMP_MESSAGE)
                        }
                    }
                    // 调用地点详情接口。
                    searchService.detailSearch(request, resultListener)
                } else {
                    val speechData = SpeechData()
                    speechData.response = Constants.STR_NO_RESULT_FOUND
                    mAdapter!!.add(speechData, recyclerView!!)
                }
            }

            override fun onSearchError(searchStatus: SearchStatus) {
                val `val` = Gson().toJson(searchStatus)
                Log.d(TAG, `val`)
                Toast.makeText(this@HomeActivity, `val`, Toast.LENGTH_SHORT).show()
            }
        })
    } catch (e: UnsupportedEncodingException) {
        ExceptionHandling().PrintExceptionInfo(Constants.EXCEPTION_MSG, e)
    }
在应用级build.gradle文件中,添加以下依赖:
implementation ‘com.huawei.hms:arenginesdk:2.15.0.1'
集成ML Kit的实时语音识别服务后,您的应用可以识别语音,并将语音转为文字展示在聊天页面中。用户语音条数增多,聊天内容也会增多,用户需要滚动聊天页面获取完整内容。这种场景下,您可以集成AR Engine的手势检测服务,增加页面滚动能力(向上滑动/向下滑动)。
步骤1:检查当前设备是否安装了HUAWEI AR Engine应用。若未安装,App应主动跳转至华为应用市场(HUAWEI AppGallery)进行安装。
Java
private boolean arEngineAbilityCheck() {
    boolean isInstallArEngineApk = AREnginesApk.isAREngineApkReady(this);
    if (!isInstallArEngineApk && isRemindInstall) {
        Toast.makeText(this, Constants.STR_AGREE_MSG, Toast.LENGTH_LONG).show();
        finish();
    }
    Log.d(TAG, Constants.STR_IS_INSTALL + isInstallArEngineApk);
    if (!isInstallArEngineApk) {
        startActivity(new Intent(this, ConnectAppMarketActivity.class));
        isRemindInstall = true;
    }
    return AREnginesApk.isAREngineApkReady(this);
}
Kotlin
private fun arEngineAbilityCheck(): Boolean {
    val isInstallArEngineApk = AREnginesApk.isAREngineApkReady(this)
    if (!isInstallArEngineApk && isRemindInstall) {
        Toast.makeText(this, Constants.STR_AGREE_MSG, Toast.LENGTH_LONG).show()
        finish()
    }
    Log.d(TAG, Constants.STR_IS_INSTALL + isInstallArEngineApk)
    if (!isInstallArEngineApk) {
        startActivity(Intent(this, ConnectAppMarketActivity::class.java))
        isRemindInstall = true
    }
    return AREnginesApk.isAREngineApkReady(this)
}
步骤2:构建ARSession对象,初始化ARHandTrackingConfig类,配置手势跟踪。使用如下代码,设置功耗模式和对焦模式。
Java
mArSession = new ARSession(this);
ARHandTrackingConfig config = new ARHandTrackingConfig(mArSession);
config.setCameraLensFacing(ARConfigBase.CameraLensFacing.FRONT);
config.setPowerMode(ARConfigBase.PowerMode.ULTRA_POWER_SAVING);
mArSession.configure(config);
HandRenderManager mHandRenderManager = new HandRenderManager(this);
mHandRenderManager.setArSession(mArSession);
try {
    mArSession.resume();
} catch (ARCameraNotAvailableException e) {
    Toast.makeText(this, R.string.Camera_Fail, Toast.LENGTH_LONG).show();
    mArSession = null;
    return;
}
Kotlin
mArSession = ARSession(this)
val config = ARHandTrackingConfig(mArSession)
config.cameraLensFacing = ARConfigBase.CameraLensFacing.FRONT
config.powerMode = ARConfigBase.PowerMode.ULTRA_POWER_SAVING
mArSession?.configure(config)
var mHandRenderManager: HandRenderManager = HandRenderManager(this)

mHandRenderManager?.setArSession(mArSession)
try {
    mArSession!!.resume()
} catch (e: ARCameraNotAvailableException) {
    Toast.makeText(this, R.string.Camera_Fail, Toast.LENGTH_LONG).show()
    mArSession = null
    return
}
步骤3:进行帧处理,以分析手势。使用如下代码,获取AR Engine捕捉到的ARHand帧组。
Java
 ARFrame arFrame = mSession.update();
ARCamera arCamera = arFrame.getCamera();
// 投影矩阵大小为4x4。
float[] projectionMatrix = new float[PROJECTION_MATRIX_MAX];

// 通过ARCamera获取投影矩阵。
arCamera.getProjectionMatrix(projectionMatrix, PROJECTION_MATRIX_OFFSET, PROJECTION_MATRIX_NEAR,
        PROJECTION_MATRIX_FAR);
mTextureDisplay.onDrawFrame(arFrame);
Collection<ARHand> hands = mSession.getAllTrackables(ARHand.class);
Kotlin
val arFrame = mSession!!.update()
val arCamera = arFrame.camera

// 投影矩阵大小为4x4。
val projectionMatrix = FloatArray(PROJECTION_MATRIX_MAX)

// 通过ARCamera获取投影矩阵。
arCamera.getProjectionMatrix(projectionMatrix, PROJECTION_MATRIX_OFFSET, PROJECTION_MATRIX_NEAR,
        PROJECTION_MATRIX_FAR)
mTextureDisplay.onDrawFrame(arFrame)
val hands = mSession!!.getAllTrackables(ARHand::class.java)
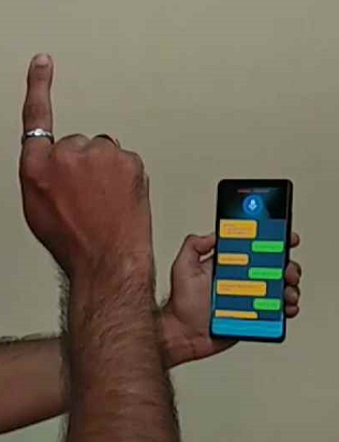
步骤4:捕捉到手部后,ARSession可以持续跟踪手势。调用ARHand.getGestureType()方法,获取手势类型,将该手势类型和页面滑动手势进行比对。
AR Engine支持如下手势类型,上述场景需要使用到Gesture 0 和Gesture 1。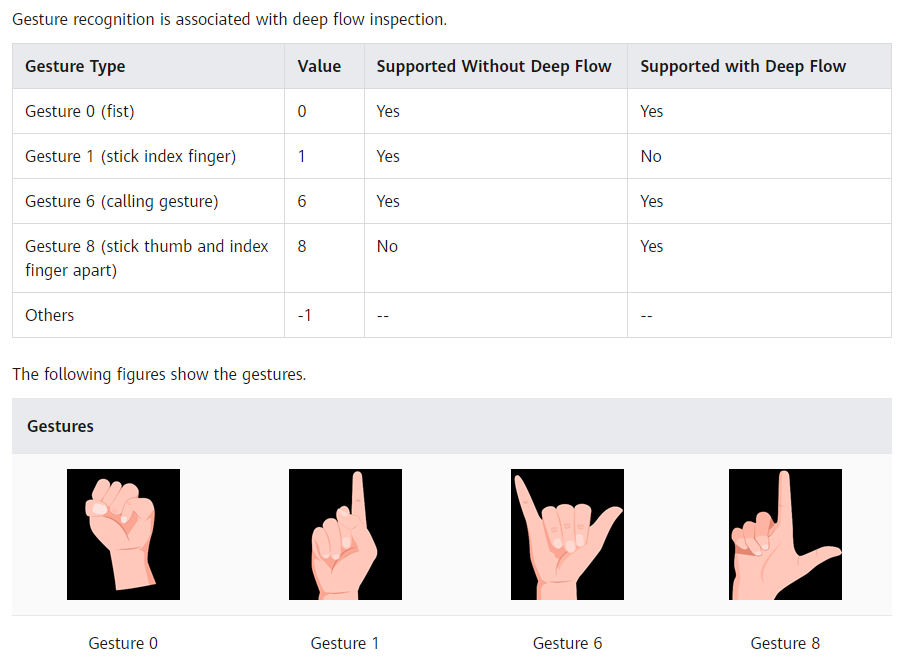
Java
for (ARHand hand : hands) {
    if (hand.getGestureType() == Constants.INIT_ONE) {
        HomeActivity.getInstance().scrollUpMethod();
    } else if (hand.getGestureType() == Constants.INIT_ZERO) {
        HomeActivity.getInstance().scrollDownMethod();
    }
}
Kotlin
for (hand in hands) {
    if (hand.gestureType == Constants.INIT_ONE) {
        HomeActivity.getInstance().scrollUpMethod()
    } else if (hand.gestureType == Constants.INIT_ZERO) {
        HomeActivity.getInstance().scrollDownMethod()
    }
}
干得好,您已经成功构建了一个智能应用,并学到了:
您可以阅读下面链接,了解更多相关信息。
您可以点击下方按钮,下载源码:
源码下载