AppGallery Connect(简称AGC)崩溃服务提供了轻量级崩溃分析服务,依据Crash SDK,可以实现零代码快速集成,您的应用能够在崩溃时自动收集崩溃报告,帮助您了解应用版本质量、对崩溃性问题进行快速跟踪定位、评估崩溃问题的影响范围等。
在本次Codelab中,您将建立一个能够集成崩溃服务的应用,并使用自定义用户标识,自定义日志,自定义键值对来自定义您的崩溃报告,最终通过手工制造一个崩溃事件进行上报,来全面了解崩溃报告信息。
集成AGC能力,需要完成以下准备工作:
dependencies {
            //配置如下地址
    implementation 'com.huawei.agconnect:agconnect-crash:1.6.2.300'
    implementation 'com.huawei.hms:hianalytics:6.3.2.300'
}

本次Codelab中您可以在Android Studio工程中创建一个布局页面,参照下图进行UI设计,新增两个Button。一个描述为"makeCrash",点击后可触发崩溃事件;一个描述为"CustomReport",点击后可触发自定义报告。
具体页面布局代码如下:
<?xml version="1.0" encoding="utf-8"?>
<LinearLayout xmlns:android="http://schemas.android.com/apk/res/android"
    android:layout_width="match_parent"
    android:layout_height="match_parent"
    android:gravity="center"
    android:orientation="vertical">

    <LinearLayout
        android:layout_width="300dp"
        android:layout_height="wrap_content"
        android:gravity="center"
        android:orientation="vertical">

        <Button
            android:id="@+id/btn_crash"
            android:layout_width="match_parent"
            android:layout_height="wrap_content"
            android:textAllCaps="false"
            android:text="makeCrash" />

        <Button
            android:id="@+id/btn_CustomReport"
            android:layout_width="match_parent"
            android:layout_height="wrap_content"
            android:textAllCaps="false"
            android:text="CustomReport" />

    </LinearLayout>
</LinearLayout>
Button btn_crash = findViewById(R.id.btn_crash);
btn_crash.setOnClickListener(new View.OnClickListener() {
    @Override
    public void onClick(View view) {
        AGConnectCrash.getInstance().testIt(MainActivity.this);
     }
});
Button btn_CustomReport = findViewById(R.id.btn_CustomReport);
btn_CustomReport.setOnClickListener(new View.OnClickListener() {
@Override
public void onClick(View v) {
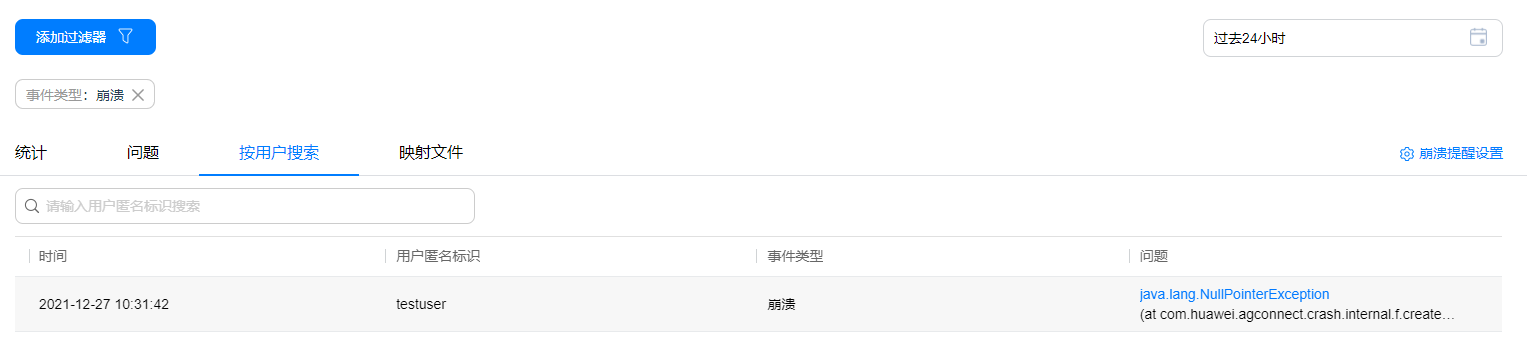
AGConnectCrash.getInstance().setUserId("testuser");
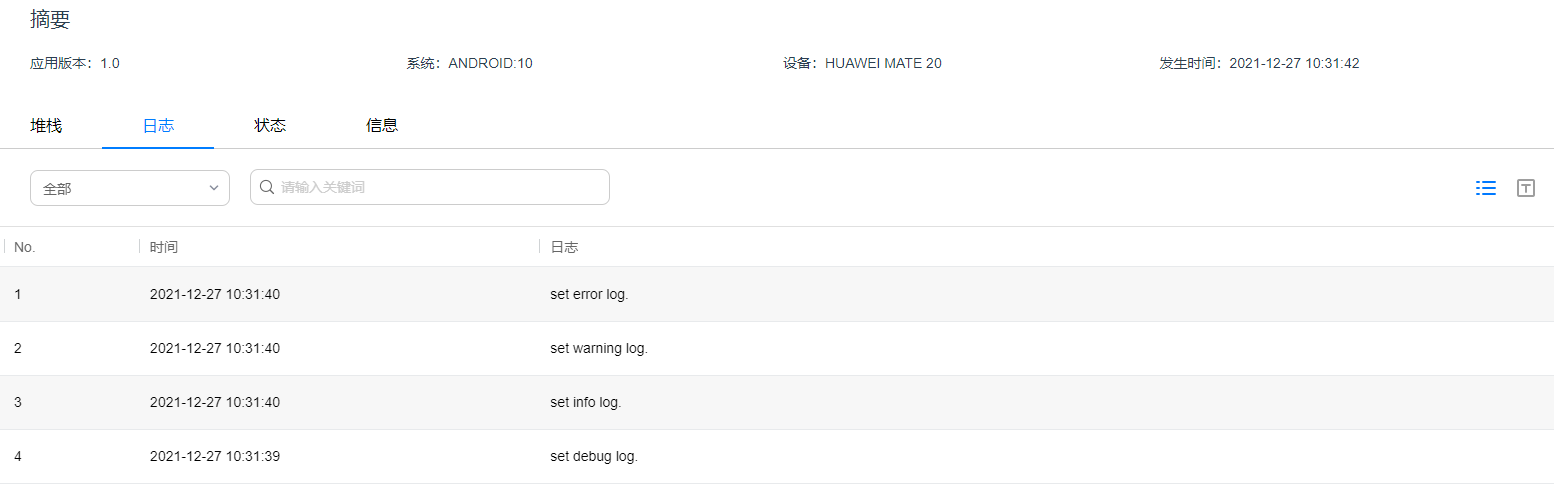
AGConnectCrash.getInstance().log(Log.DEBUG,"set debug log.");
AGConnectCrash.getInstance().log(Log.INFO,"set info log.");
AGConnectCrash.getInstance().log(Log.WARN,"set warning log.");
AGConnectCrash.getInstance().log(Log.ERROR,"set error log.");
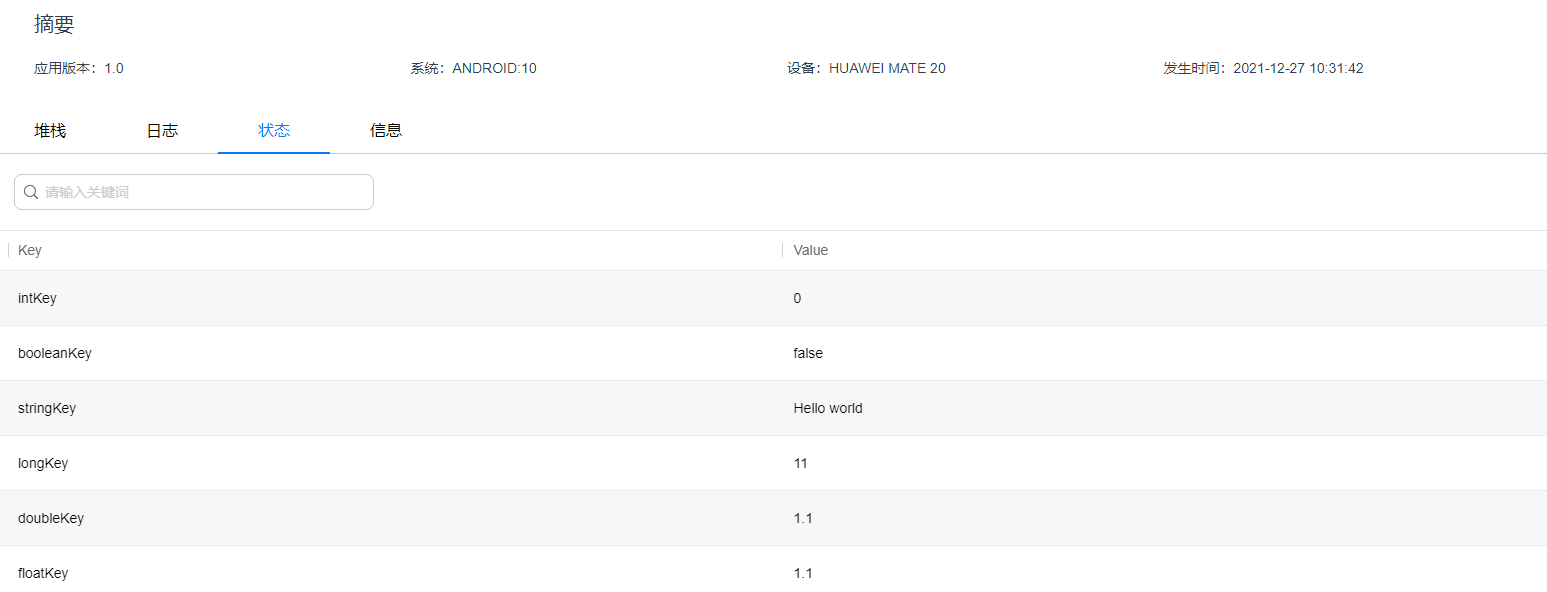
AGConnectCrash.getInstance().setCustomKey("stringKey", "Hello world");
AGConnectCrash.getInstance().setCustomKey("booleanKey", false);
AGConnectCrash.getInstance().setCustomKey("doubleKey", 1.1);
AGConnectCrash.getInstance().setCustomKey("floatKey", 1.1f);
AGConnectCrash.getInstance().setCustomKey("intKey", 0);
AGConnectCrash.getInstance().setCustomKey("longKey", 11L);
}
});

祝贺您,您已经成功地构建了您的第一个集成AGC崩溃服务的应用程序,并学到了如何通过自定义报告功能自定义崩溃信息,同时学会了在AGC崩溃服务页面查看自定义崩溃报告。您也可以根据您的需求自定义其他形式的崩溃报告,然后在AGC上查看。
AGC崩溃服务的相关API介绍请参见API索引。
本Codelab中所用demo源码下载地址如下:源码下载。