概述
沉浸式模式是指通过减少无关元素的干扰,使应用界面更加专注于内容呈现,以提升用户体验的设计模式。典型应用的全屏窗口,其UI元素包括状态栏、应用界面和底部导航条。其中,状态栏和导航条在沉浸式布局下称为避让区,避让区之外的区域称为安全区(如下图)。沉浸式页面开发通常通过将应用页面延伸至状态栏和导航条,达到以下目的:
- 视觉统一:应用页面与避让区(状态栏、导航条)色调统一,避免界面割裂,提供更好的视觉体验。
- 布局扩展:充分利用屏幕可视区域,使页面内容延伸到状态栏和导航条区域(即“安全区”之外的避让区),获得更大的布局空间。
- 沉浸体验:在游戏、视频等场景中隐藏系统元素,提供无干扰的全屏体验。
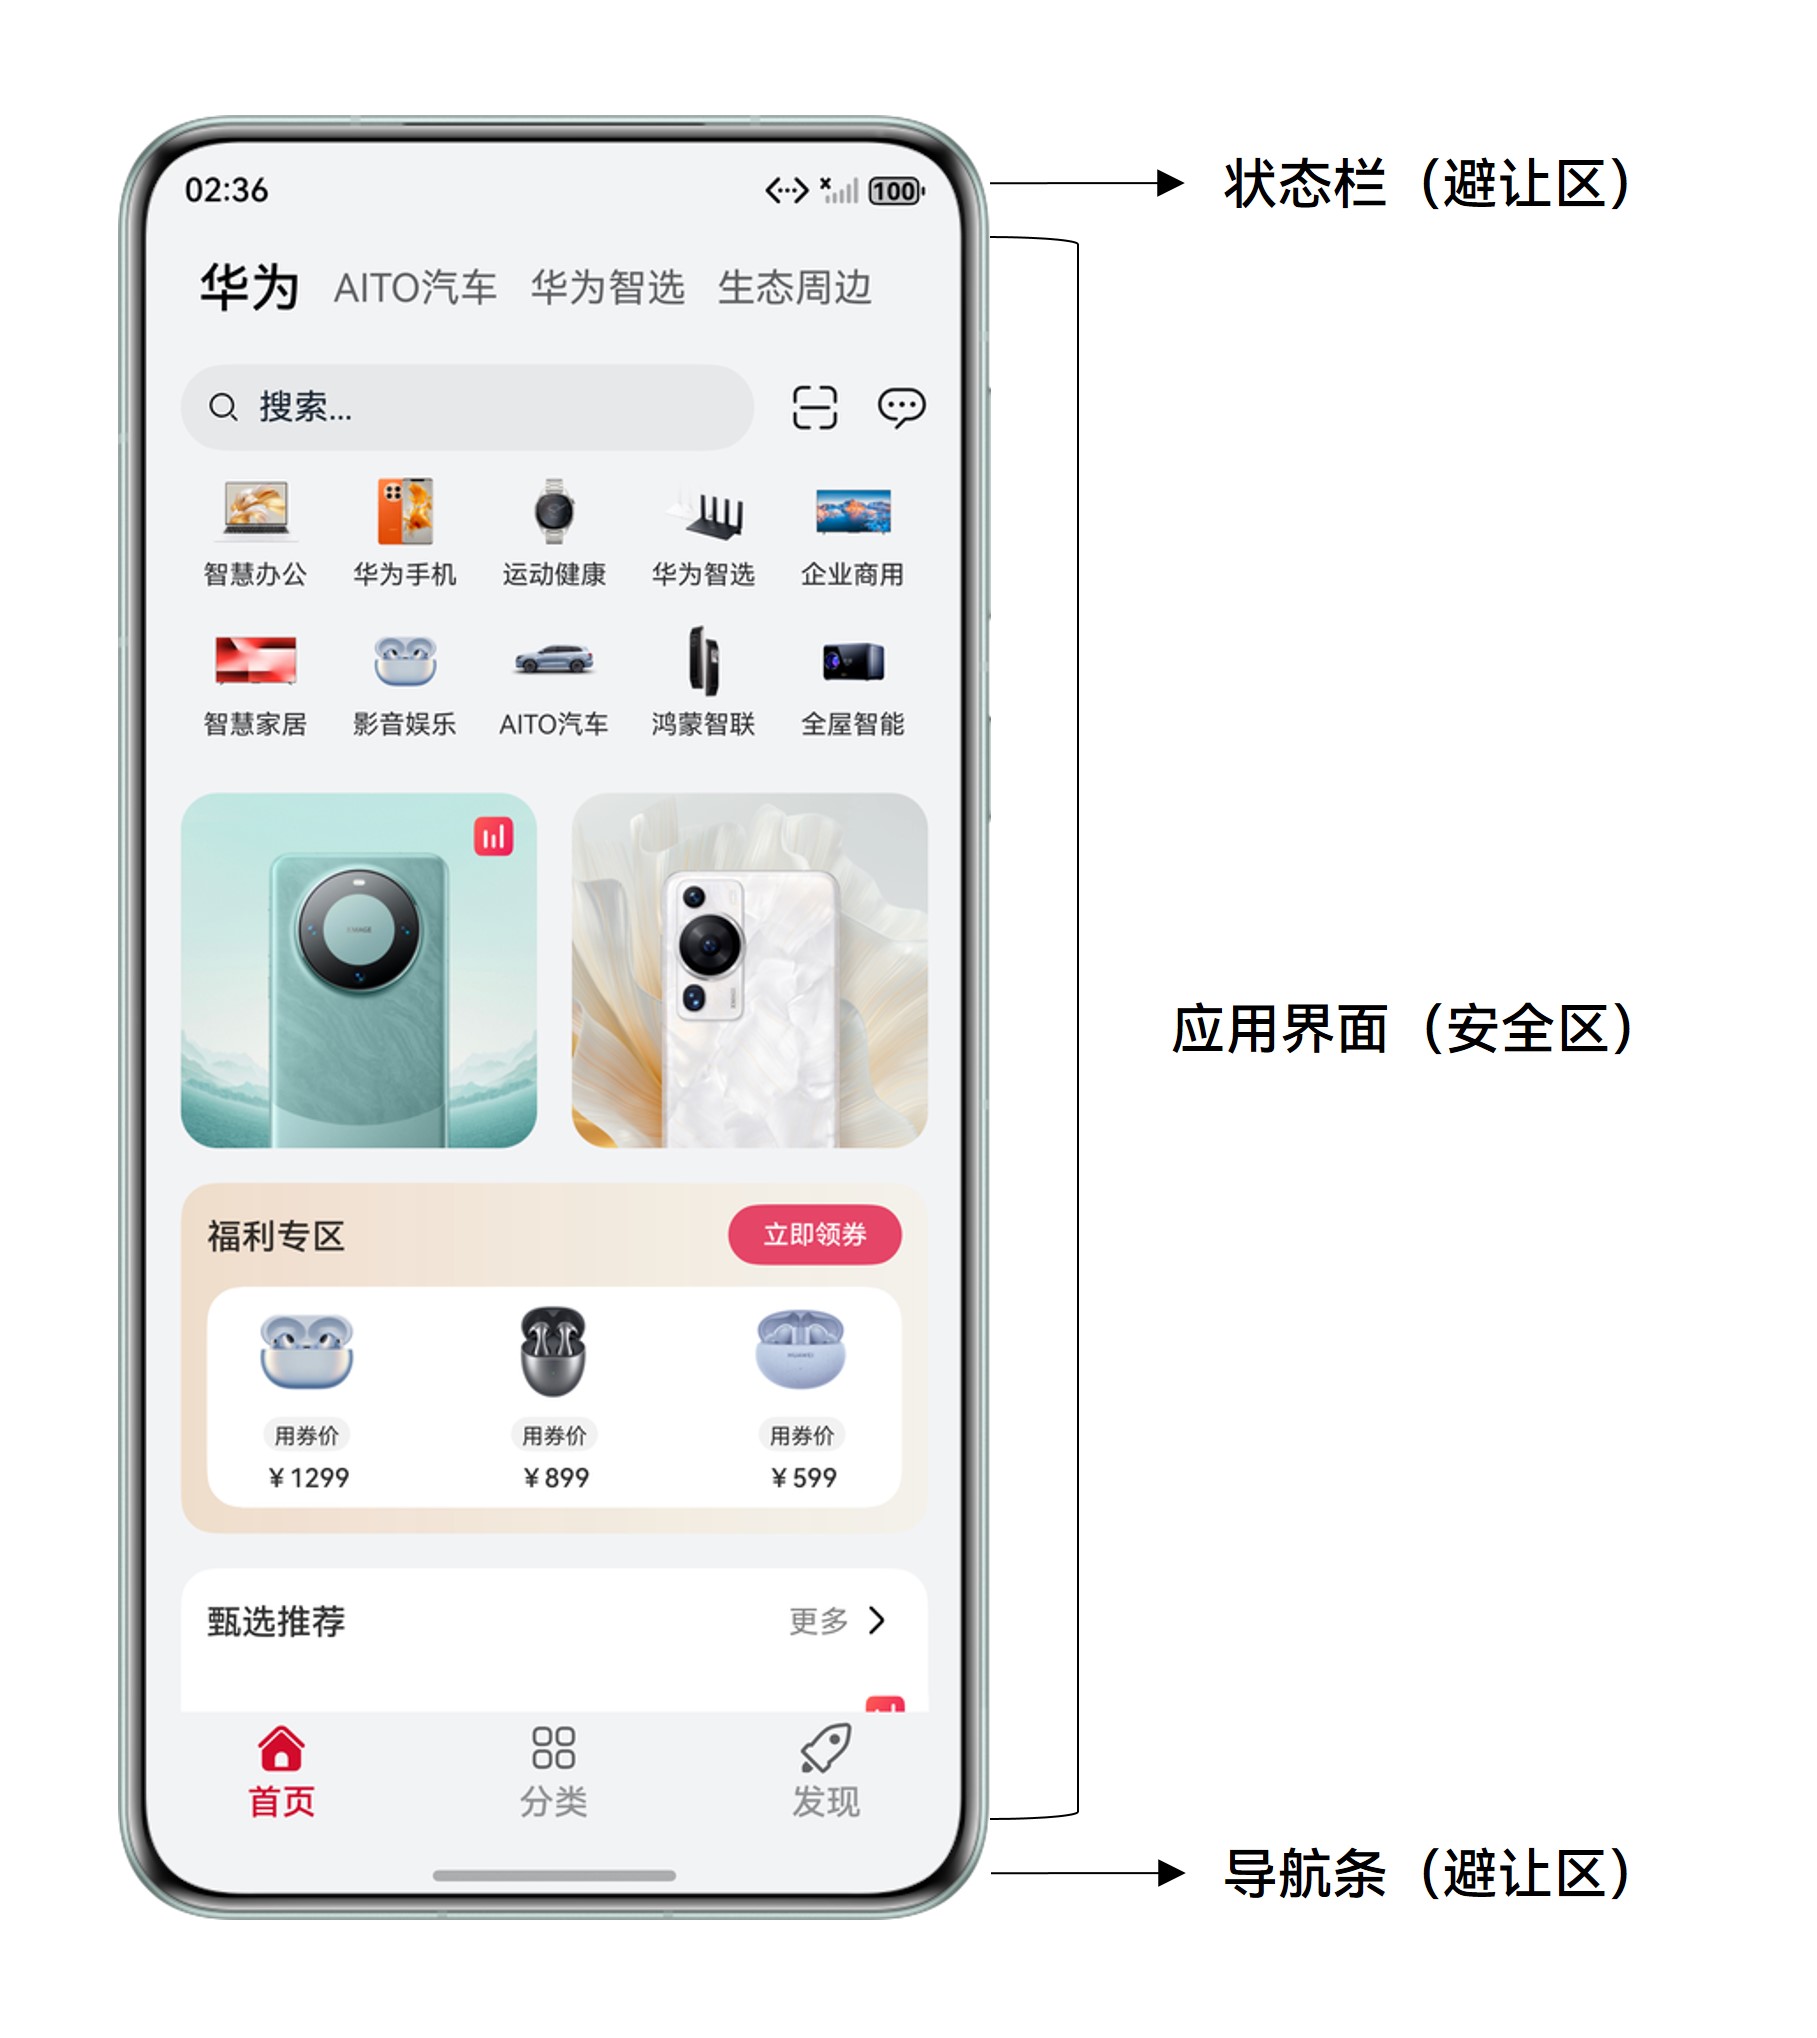
本文将介绍沉浸式原理、实现方案,并提供常见沉浸式页面开发场景下适配问题的解决方案。
实现原理
沉浸式实现主要考虑如下两个因素:
- 实现沉浸式效果:通过特定方法、属性或接口,使页面突破安全区或标题栏限制,延伸至目标区域。
页面沉浸式效果实现方案分为窗口、组件两个层级:
- 窗口级:应用级全局沉浸,作用于所有页面。
- 组件级:作用于当前组件,可针对单个页面内的多个组件分别配置。
- 避让处理:避免页面内容与避让区的系统信息(如电量、时间)、交互功能(如导航条手势)或窗口控制键(如关闭、最小化)发生遮挡和冲突。
[h2]实现沉浸式效果
- 方案一:组件设置背景沉浸(组件级)
组件与避让区边界重合时,设置组件的background()属性,将组件背景扩展至避让区,页面布局仍在安全区内。
该接口为组件级,不同组件可设置不同背景色并扩展至对应避让区(如顶部组件设置红色背景并扩展至顶部状态栏,底部组件设置蓝色背景并扩展至底部导航条)。若页面背景色统一,可设置最外层父组件的background()属性,实现页面的沉浸式效果。
此方案中,只需设置一次代码属性,即可实现同一组件在不同窗口模式、窗口方向下的沉浸效果。但界面元素仅做绘制延伸,无法单独布局至状态栏和导航条区域。当页面支持滚动时,滚动区域无法延伸至状态栏和导航条。
原始布局(设置backgroundColor()效果)
组件设置背景沉浸


- 方案二:组件设置页面沉浸(组件级)
通过设置ignoreLayoutSafeArea()并设置高度为LayoutPolicy.matchParent适应父组件,页面背景与布局均扩展至顶部状态栏和底部导航条。作为组件级的沉浸式方案,每个页面均需单独配置。当页面内容与避让区发生冲突时,需由开发者手动进行避让处理。
- 方案三:安全区域拓展(组件级)
设置组件的expandSafeArea属性,将组件的安全区域延伸至状态栏或导航条区域,同时保持子组件在安全区内布局,无需额外避让处理。支持指定系统避让区域类型(SafeAreaType)和延伸方向(SafeAreaEdge),实现沉浸式的方案可参考组件安全区方案。
原始布局
扩展至状态栏和导航条
仅扩展至状态栏
仅扩展至导航条


- 边界重合要求:组件必须与安全区域边界重合(例如顶部组件需紧贴屏幕顶部)。
- 组件尺寸限制:配置expandSafeArea属性将组件进行绘制扩展时,需要关注组件不能配置固定宽高尺寸,百分比除外。
- 滚动容器限制:当父容器是滚动容器时,expandSafeArea属性设置无效。
- 方案四:窗口设置沉浸式显示(窗口级)
调用窗口强制全屏布局接口setWindowLayoutFullScreen()设置窗口为沉浸式布局。页面布局范围从安全区域扩展为整个窗口(包括状态栏和导航条),布局范围扩展效果同组件设置页面沉浸。
该方案为窗口级沉浸方案,沉浸式布局生效时,所有页面均开启全屏模式,需要开发者在各页面进行避让处理。


各沉浸式方案对比如下:
对比维度 | 组件设置背景沉浸 | 组件设置页面沉浸 | 安全区域拓展 | 窗口设置沉浸式显示 |
|---|---|---|---|---|
级别 | 组件级 | 组件级 | 组件级 | 窗口级 |
特点 | 仅背景扩展至避让区,内容默认在安全区 | 背景与内容均扩展至避让区 | 仅背景扩展至避让区,内容默认在安全区 支持指定系统避让区域类型和延伸方向 | 所有页面布局范围扩展至全屏,不自动避让 |
使用场景 | 仅页面背景沉浸的场景 | 需组件内容完全覆盖屏幕的场景 | 需要指定延伸区域类型的局部延伸场景 | 应用所有页面均需实现沉浸式 |
优点 | 使用简单,易理解 一次配置适配不同窗口模式、窗口方向 支持多组件不同背景扩展 | 使用简单,易理解 一次配置适配不同窗口模式、窗口方向 | 能够对扩展不同的安全区域进行配置 子组件仍在安全区内布局,无需额外的避让处理 | 全局统一生效,适配逻辑集中 |
缺点 | 滚动内容无法延伸至避让区 需为每个页面单独配置 | 内容易与避让区元素冲突,需手动处理避让 需为每个页面单独配置 | 滚动内容无法延伸至避让区 参数复杂,理解成本过高 | 需手动计算避让区高度,处理所有内容避让 |
窗口沉浸式效果由不同页面的沉浸实现,页面沉浸式效果由不同组件的沉浸策略组合而成。建议通过组件沉浸方案为每个页面配置不同的沉浸策略,以实现应用的沉浸效果。
[h2]避让处理
由于避让区本身有内容展示(如状态栏中的电量、时间等系统信息),或是手势交互(如导航条点击或上滑),在实现应用页面沉浸式效果后,往往会和避让区域产生UI元素的遮挡、视觉上的违和或交互上的冲突等问题,开发者可以针对不同场景选择合适的方式进行适配。
- 使用Window.setWindowSystemBarEnable()方法或Window.setSpecificSystemBarEnabled()方法设置状态栏和导航条的显隐。
显示状态栏和导航条
隐藏状态栏和导航条


- 使用Window.getWindowAvoidArea()方法获取避让区域的高度,设置应用页面内容的上下padding实现避让状态栏和导航条。
避让前
避让后


- 使用on('avoidAreaChange')动态监听避让区变化。
- 通过AvoidAreaType.TYPE_SYSTEM获取状态栏区域信息。
- 通过AvoidAreaType.TYPE_NAVIGATION_INDICATOR获取底部导航条区域信息。
- 通过AvoidAreaType.TYPE_CUTOUT获取挖孔区信息。
[h2]自由窗口标题栏沉浸
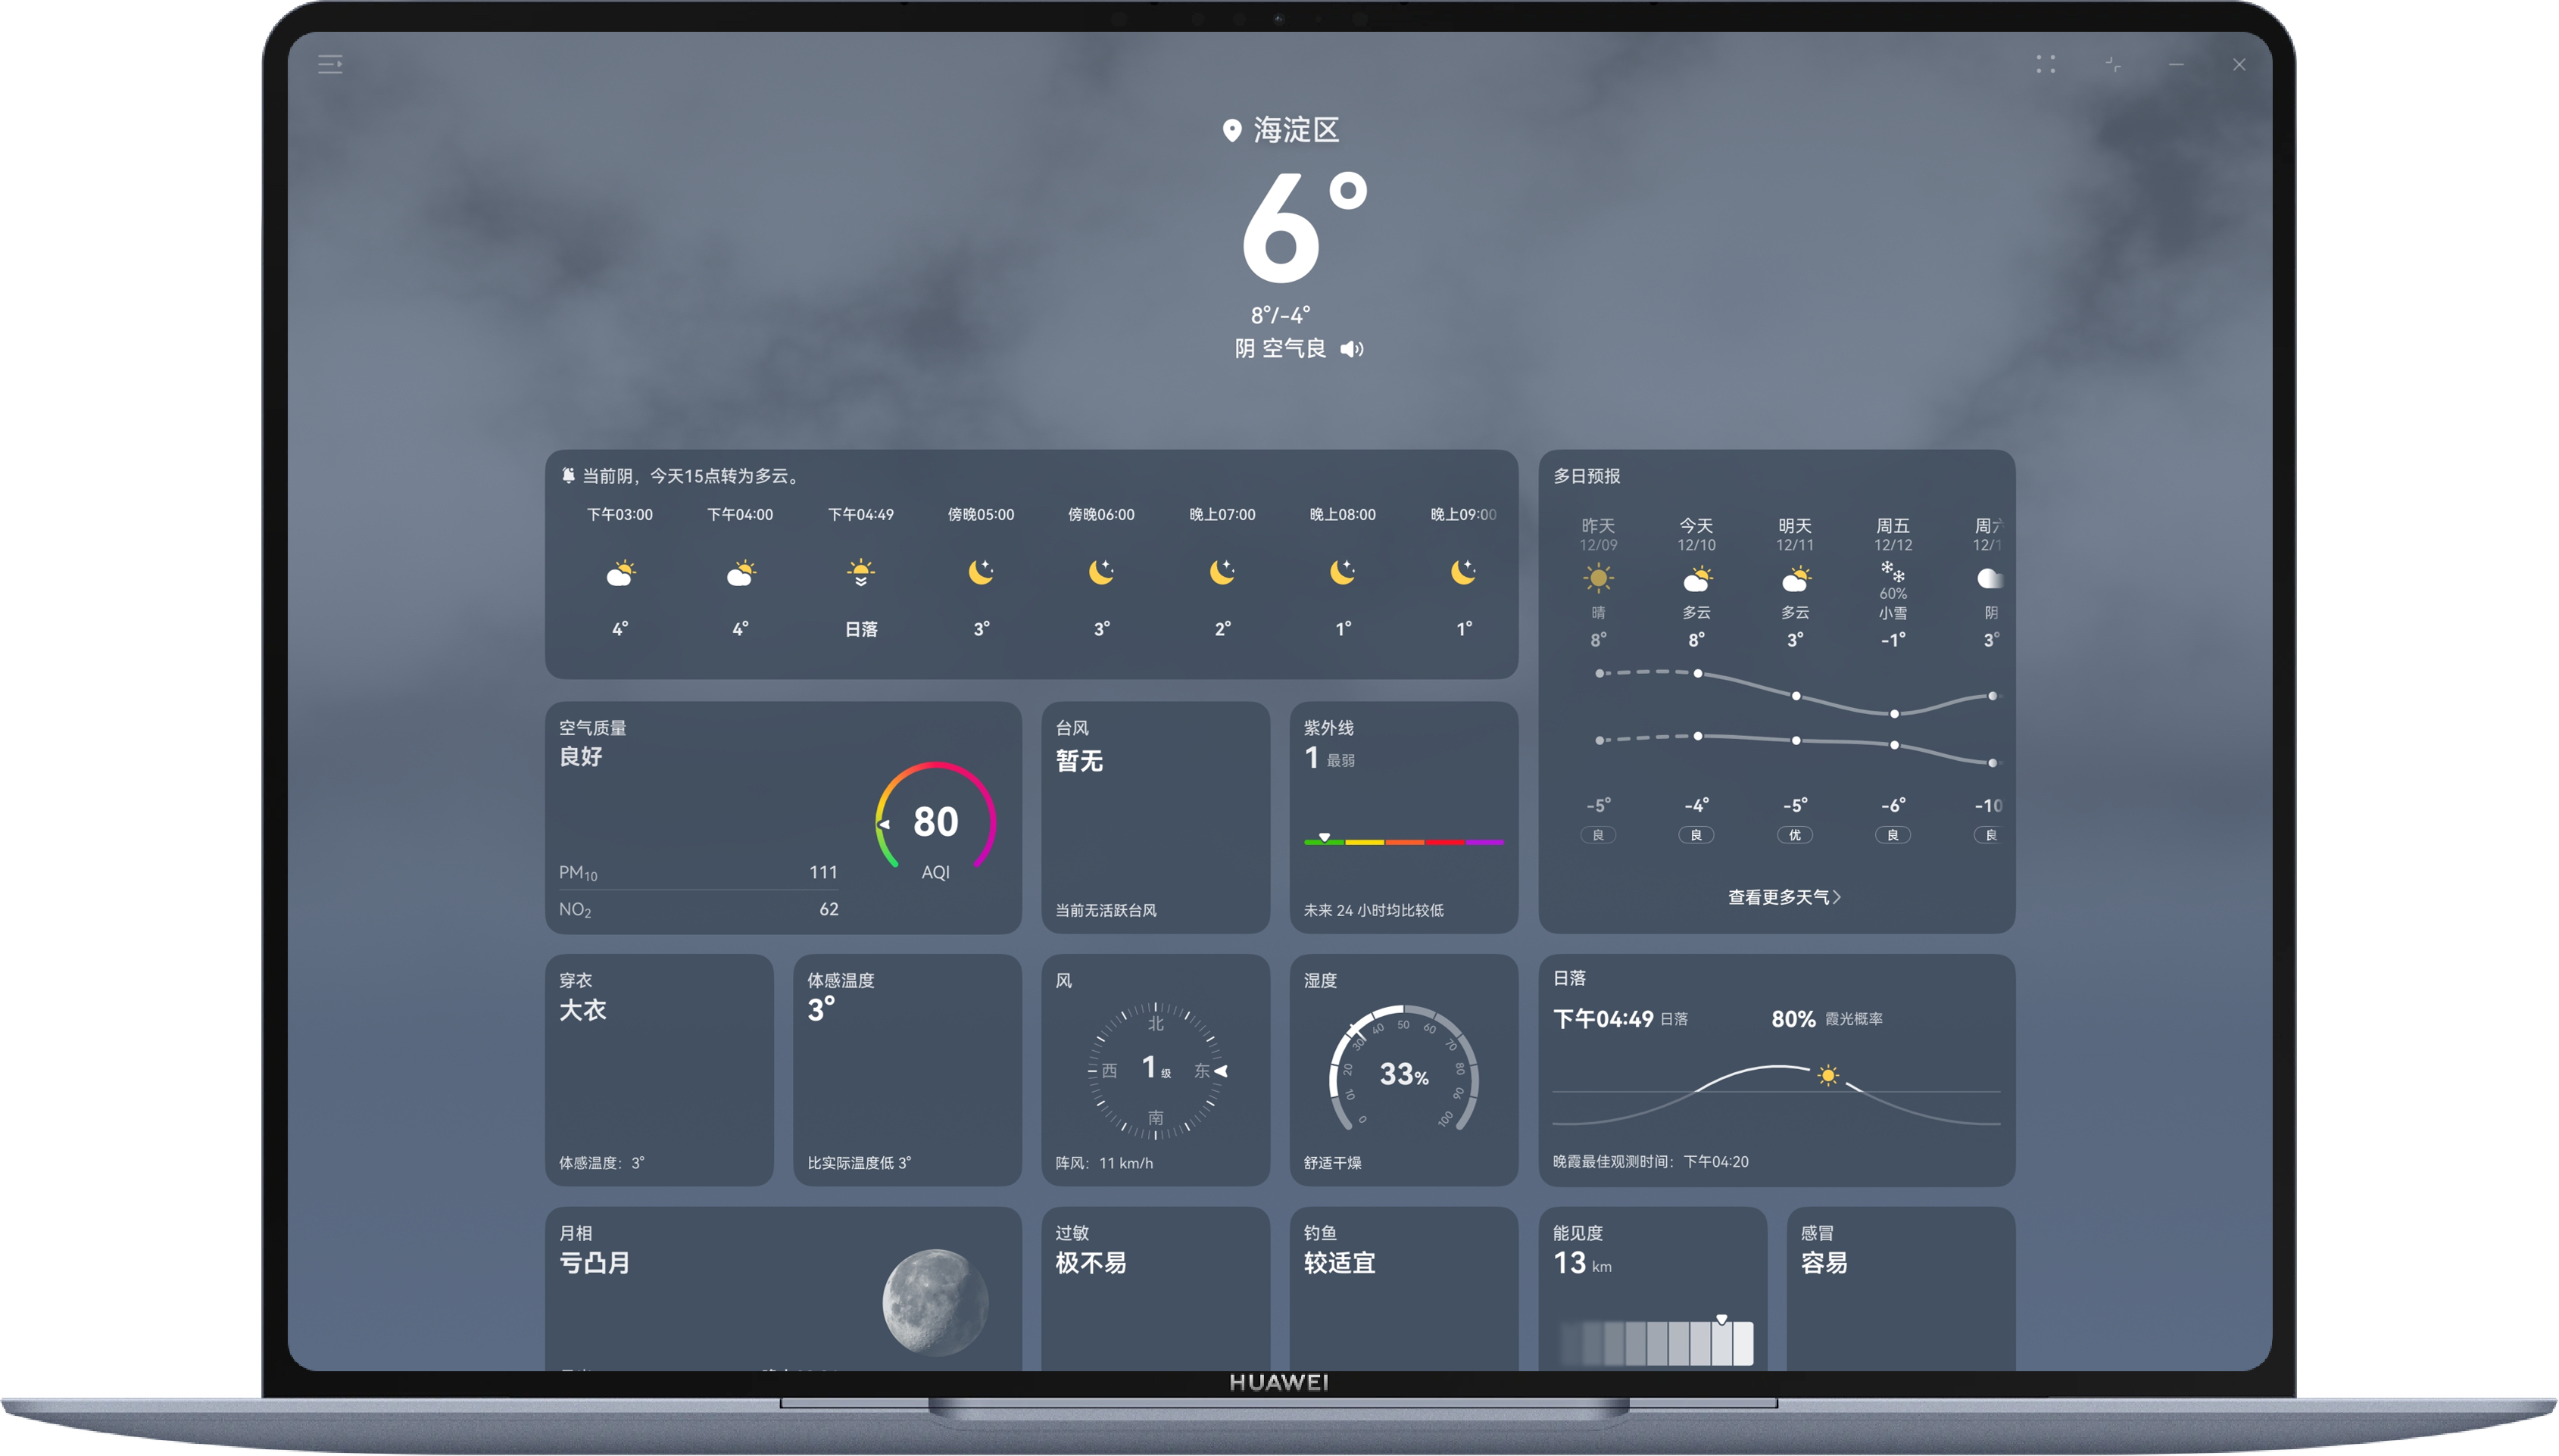
在PC设备及平板和Mate XTs设备的自由多窗模式下,开发者可以设置应用窗口的标题栏不可见,将应用页面扩展至原标题栏区域,实现窗口的沉浸式效果。组件沉浸式的策略不适用于自由窗口标题栏的沉浸,需要开发者单独适配。
自由窗口标题栏包含应用图标、应用名称和三个按钮(全屏/还原、最小化、关闭)。通过设置标题栏不可见,隐藏应用图标和应用名称,保留三键区,实现窗口的沉浸式效果。
- 使用setWindowDecorVisible(false)设置隐藏标题栏,只显示右上角三键,此时应用页面拓展至标题栏区域。
- 使用setWindowDecorHeight()接口设置标题栏高度,控制右上角三键区显示以及显示高度。
- 使用setDecorButtonStyle()接口设置右上角按钮颜色、大小、间距、圆角半径等样式。
- 使用getTitleButtonRect()获取窗口标题栏上的三键区位置和大小,用于不同场景下的页面布局避让。
- 使用on('windowTitleButtonRectChange')注册右上角三键大小变化监听。


[h2]开发步骤
- 方案一:组件设置背景沉浸
组件设置background()实现背景延伸,内容自动保留在安全区内,自动适配不同窗口模式和窗口方向下避让区的变化。
Column() { // ... } // Add a background for the component to achieve immersive background effect .background('#F1F3F5') - 方案二:组件设置页面沉浸 + 避让处理
- 通过设置ignoreLayoutSafeArea()并设置高度为LayoutPolicy.matchParent适应父组件,将页面扩展至避让区。
Column() { // ... } // Expands the layout safe area of a component. .ignoreLayoutSafeArea() .height(LayoutPolicy.matchParent) - 通过Window.getWindowAvoidArea()方法获取状态栏和导航条高度,并用状态变量avoidSystem记录。
// Get the avoid area.
this.mainWindowInfo.avoidSystem = this.mainWindow.getWindowAvoidArea(window.AvoidAreaType.TYPE_SYSTEM);
- 使用on('avoidAreaChange')事件监听避让区域的变化,在监听回调中更新状态变量avoidSystem。
public onAvoidAreaChange: (avoidOptions: window.AvoidAreaOptions) => void = (avoidOptions: window.AvoidAreaOptions) => { if (avoidOptions.type === window.AvoidAreaType.TYPE_SYSTEM) { // Default area of the system. this.mainWindowInfo.avoidSystem = avoidOptions.area; } else if (avoidOptions.type === window.AvoidAreaType.TYPE_CUTOUT) { // Cutout area. this.mainWindowInfo.avoidCutout = avoidOptions.area; this.updateAvoidPadding(avoidOptions.area); } else if (avoidOptions.type === window.AvoidAreaType.TYPE_SYSTEM_GESTURE) { // Side return gesture area. this.mainWindowInfo.avoidSystemGesture = avoidOptions.area; } else if (avoidOptions.type === window.AvoidAreaType.TYPE_KEYBOARD) { // Fixed soft keyboard area. this.mainWindowInfo.avoidKeyboard = avoidOptions.area; } else if (avoidOptions.type === window.AvoidAreaType.TYPE_NAVIGATION_INDICATOR) { // Bottom navigation bar. this.mainWindowInfo.avoidNavigationIndicator = avoidOptions.area; } }; - 设置组件的上下padding分别为状态栏和导航条的高度,使内容避让状态栏和导航条,仅在安全区域显示。
Column() {
  // ...
}
// ...
// Set the top and bottom padding to avoid status bar and navigation bar.
.padding({
  top: this.windowUtil?.mainWindowInfo.avoidSystem?.topRect.height + 'px',
  bottom: this.windowUtil?.mainWindowInfo.avoidNavigationIndicator?.bottomRect.height + 'px'
})
推荐使用上述两种方案实现,相比窗口设置沉浸显示和安全区域拓展,这两种方案实现方式简单易理解,且自动适配不同窗口模式和方向。
- 通过设置ignoreLayoutSafeArea()并设置高度为LayoutPolicy.matchParent适应父组件,将页面扩展至避让区。
[h2]场景描述
在需要充分利用屏幕可视区域的场景中,若要在状态栏显示重要信息或操作按钮,不仅需隐藏原始状态栏和导航条,还需对挖孔区域进行避让。这种情况下可以将背景全屏沉浸,内容区对挖孔区域做避让处理。
在以下场景中,挖孔区尺寸可能发生变化,因此需要监听避让区高度等信息的变化,确保UI布局及时适配调整。
- 窗口模式切换(全屏/悬浮窗/分屏等)
- 设备旋转
- 折叠状态切换(展开、折叠)
以设备旋转为例,效果图如下。
竖屏-挖孔区在顶部 | 横屏-挖孔区在左侧 | 反向竖屏-挖孔区在底部 | 反向横屏-挖孔区在右侧 |
|---|---|---|---|
|
|
|
|


[h2]开发步骤
- 使用ignoreLayoutSafeArea()和height(LayoutPolicy.matchParent),实现页面沉浸。
Column() { // ... } // Expands the layout safe area of a component. .ignoreLayoutSafeArea() .height(LayoutPolicy.matchParent) - 使用setWindowSystemBarEnable()隐藏状态栏和导航条。
// Hide the status bar and navigation bar. this.mainWindow.setWindowSystemBarEnable([]).catch((error: BusinessError) => { let err = error as BusinessError; hilog.error(0x0000, 'testLog', `setWindowSystemBarEnable failed. Code:${err.code}, message:${err.message}`); }); - 使用on('avoidAreaChange')动态监听避让区变化,通过AvoidAreaType.TYPE_CUTOUT来获取挖孔区域信息。
public onAvoidAreaChange: (avoidOptions: window.AvoidAreaOptions) => void = (avoidOptions: window.AvoidAreaOptions) => { if (avoidOptions.type === window.AvoidAreaType.TYPE_SYSTEM) { // Default area of the system. this.mainWindowInfo.avoidSystem = avoidOptions.area; } else if (avoidOptions.type === window.AvoidAreaType.TYPE_CUTOUT) { // Cutout area. this.mainWindowInfo.avoidCutout = avoidOptions.area; this.updateAvoidPadding(avoidOptions.area); } else if (avoidOptions.type === window.AvoidAreaType.TYPE_SYSTEM_GESTURE) { // Side return gesture area. this.mainWindowInfo.avoidSystemGesture = avoidOptions.area; } else if (avoidOptions.type === window.AvoidAreaType.TYPE_KEYBOARD) { // Fixed soft keyboard area. this.mainWindowInfo.avoidKeyboard = avoidOptions.area; } else if (avoidOptions.type === window.AvoidAreaType.TYPE_NAVIGATION_INDICATOR) { // Bottom navigation bar. this.mainWindowInfo.avoidNavigationIndicator = avoidOptions.area; } }; - 根据挖孔区方位,确定避让方向,并记录在状态变量avoidAreaPadding中。
- 挖孔区在顶部,则顶部避让 = 挖孔区距屏幕顶部边缘的距离 + 挖孔区域的高度。
- 挖孔区在左侧,则左侧避让 = 挖孔区距屏幕左侧边缘的距离 + 挖孔区域的宽度。
- 挖孔区在右侧,则右侧避让 = 屏幕宽度 - 挖孔区距屏幕左侧边缘的距离。
- 挖孔区在底部,则底部避让 = 屏幕高度 - 挖孔区距屏幕顶部距离。
updateAvoidPadding(area: window.AvoidArea) { const avoidAreaPadding: Padding = {}; try { // Top cutout area: set top padding. if (area.topRect.height > 0) { avoidAreaPadding.top = this.uiContext?.px2vp(area.topRect.height + area.topRect.top); } // Left cutout area: set left padding. if (area.leftRect.width > 0) { avoidAreaPadding.left = this.uiContext?.px2vp(area.leftRect.left + area.leftRect.width); } // Right cutout area: set right padding. if (area.rightRect.width > 0) { avoidAreaPadding.right = this.uiContext?.px2vp(display.getDefaultDisplaySync().width - area.rightRect.left); } // Bottom cutout area: set bottom padding. if (area.bottomRect.height > 0) { avoidAreaPadding.bottom = this.uiContext?.px2vp(display.getDefaultDisplaySync().height - area.bottomRect.top); } } catch (error) { let err = error as BusinessError; hilog.error(0x0000, 'TestLog', `Failed to set avoid padding. Code: ${err.code}, message: ${err.message}`); } this.mainWindowInfo.avoidAreaPadding = avoidAreaPadding; } - 设置组件padding,进行避让。
Column() {
  // ...
}
// ...
// Set paddings to avoid notch.
.padding(this.mainWindowInfo?.avoidAreaPadding)

[h2]开发步骤
- 使用setWindowDecorVisible(false)接口设置标题栏的隐藏,仅保留右上角的三键区。
this.mainWindow.setWindowDecorVisible(false);
- 使用setWindowDecorHeight()接口设置标题栏高度,控制右上角三键区显示高度。
this.mainWindow.setWindowDecorHeight(56);
- 使用setDecorButtonStyle()接口设置右上角按钮大小,和页面顶部icon大小保持一致。
this.mainWindow.setDecorButtonStyle({ buttonIconSize: 24 }); - 使用on('windowTitleButtonRectChange')注册右上角三键大小变化监听,用于页面布局避让。
public onWindowButtonRectChange: (titleButtonRect: window.TitleButtonRect) => void = (titleButtonRect: window.TitleButtonRect) => { // Update the rectangle information of the title bar button. this.mainWindowInfo.titleButtonRect = titleButtonRect; } - 使用padding进行布局避让。
Column() {
  // ...
}
.padding({
  right: this.mainWindowInfo.isImmersive === ImmersiveType.IMMERSIVE ? this.mainWindowInfo.titleButtonRect?.width :
    0
})