概述
本文选择游戏类应用作为典型案例,详细介绍“一多”策略在实际开发中的应用。游戏类应用由于其较强的互动性和操作性,特别重视用户的沉浸式体验,并且在大屏设备上,这类应用能够展现更广阔的视野,提供更加高效便捷的交互体验。
- 关键场景:
Native一多适配:通过监听断点变化,动态调整页面布局和元素。开发者可以从ArkTS侧获取断点值,并传入Native侧,使Native侧根据不同的断点值适配不同的页面及效果。
安全区避让:在游戏类应用中,为确保用户的沉浸式体验,导航条会自动隐藏。这不仅增加可用的屏幕空间,还减少了视觉干扰,使用户更加专注于游戏本身。
窗口旋转:由于不同游戏可能有特定的窗口方向偏好,可根据应用需求,自定义设置窗口的旋转方向,这对于游戏类应用尤其重要。
游戏类应用需要适配多种屏幕尺寸,当前游戏类应用支持的主要产品形态包括手机、折叠屏和平板三种。下文将围绕这几种产品形态展开,同时从UX设计、页面开发两个角度分析介绍“一多”游戏类应用在开发过程中的关键场景实现方案。
UX设计
断点设计策略
游戏视野的大小对用户的游戏体验是一个重要的影响因素。在不同的设备和屏幕尺寸下,合理适配视野可以为用户提供更佳的游戏体验。以下是针对不同设备和屏幕尺寸的游戏视野适配策略:
- 手机(sm)
基础视野。
- 双折叠展开态(md)
双折叠设备提供独特的挑战与机遇。在展开状态下,开发者可利用更大的屏幕空间扩展游戏视野,以增强游戏的沉浸感和信息显示,例如战绩展示。
推荐做法:
- 基于手机视野,横向适当缺失部分视野,垂直方向扩充部分视野,确保补偿和缺失的面积相似,调整后整体视野同手机相似。
- 手机与双折叠展开态的横向视野保持一致,垂直方向拓展视野或利用留黑区域显示辅助信息,而非简单留黑,以优化屏幕空间利用,提升用户体验。
- 平板(lg)平板设备的布局策略与双折叠展开态类似:
- 基于手机视野,横向适当缺失部分视野,垂直方向扩充部分视野,确保补偿和缺失的面积相似,调整后整体视野同手机相似。
- 手机与平板的横向视野保持一致,垂直方向扩展视野或使用留黑区域显示辅助信息,建议避免上下留黑。
- 特殊考虑
对于休闲类游戏,尤其是垂直屏幕模式,可在双折叠展开态和平板上适当放大游戏画面,以适应更大的屏幕空间。
通过以上策略,开发者可根据不同设备的特点优化游戏视野,进而提高游戏的可玩性和用户体验。详细设计建议参考下方的游戏类多设备响应式设计。
游戏类多设备响应式设计
游戏类的多设备响应式设计指南,点击访问。
[h2]游戏页分区
游戏类应用的首页主要展示全屏游戏区域,即游戏渲染区域。通常使用XComponent组件来渲染OpenGL绘制的图形结果。
- 从游戏页划分出游戏渲染区域,效果图如下:
示意图
sm
md
lg
效果图


- 对游戏渲染区域的实现方案包括以下三个关键场景:
- Native一多适配:通过监听断点变化,动态调整页面布局和元素。开发者可以从ArkTS侧获取断点值并传入Native侧,使Native侧能够根据不同的断点值适配相应的页面及效果。
- 安全区避让:在游戏类应用中,为确保用户的沉浸式体验,需隐藏状态栏及导航条。这样不仅增加了可用的屏幕空间,还减少了视觉干扰,使用户更加专注于游戏本身。
- 窗口旋转:不同游戏可能有特定的窗口方向偏好,可根据应用需求自定义设置窗口旋转方向,这在游戏类应用中尤为重要。
[h2]Native一多适配
在HarmonyOS上,XComponent控件常用于显示相机预览流和绘制的游戏画面。它可以通过与NativeWindow结合使用,创建OpenGL开发环境,并将OpenGL绘制的图形自定义渲染到页面的XComponent控件中进行展示。为了确保游戏在不同设备和屏幕尺寸下的适配效果,可以采取以下两种方法:
- 获取断点信息以适配不同页面效果 :在HarmonyOS中,可以通过监听设备屏幕尺寸的变化来获取断点信息。这些信息能够帮助开发者根据屏幕尺寸的变化调整游戏的画面布局和元素大小。
- 监听surface大小变化并调整绘制区域:在使用OpenGL进行绘制时,surface的尺寸直接影响绘制区域的大小。因此,监听surface尺寸的变化,并据此调整绘制区域的大小,是实现多设备适配的关键。
获取断点信息
将从ArkTS侧获取的断点值传递给Native侧,Native侧可以根据游戏设计需求,在不同的断点下实现不同的页面效果。本案例仅展示断点值的传递过程,适配过程可根据不同需求在Native侧自行完成。
- 使用UIContext中提供的getWindowWidthBreakpoint()和getWindowHeightBreakpoint()接口,在EntryAbility文件的windowStage.loadContent()页面加载函数中直接获取横向和纵向的断点值,并监听窗口大小变化以获取新的断点值。更多获取断点策略可参考断点实现原理。
export default class EntryAbility extends UIAbility { public uiContext?: UIContext; public onWindowSizeChange: (windowSize: window.Size) => void = (windowSize: window.Size) => { let widthBp: WidthBreakpoint = this.uiContext!.getWindowWidthBreakpoint(); AppStorage.setOrCreate('currentWidthBreakpoint', widthBp); let heightBp: HeightBreakpoint = this.uiContext!.getWindowHeightBreakpoint(); AppStorage.setOrCreate('currentHeightBreakpoint', heightBp); AppStorage.setOrCreate('windowHeight', windowSize.height); AppStorage.setOrCreate('windowWidth', windowSize.width); }; // ... onWindowStageCreate(windowStage: window.WindowStage) { // Main window is created, set main page for this ability // ... windowStage.loadContent('pages/Index', (err, data) => { // ... windowStage.getMainWindow((err: BusinessError, data) => { if (err.code) { Logger.error('Failed to obtain the main window. Cause: %{public}s', JSON.stringify(err) ?? ''); return; } // Window size acquisition and monitoring. let properties = data.getWindowProperties(); AppStorage.setOrCreate('windowHeight', properties.windowRect.height); AppStorage.setOrCreate('windowWidth', properties.windowRect.width); // Breakpoint acquisition and listening. this.uiContext = data.getUIContext(); let widthBp: WidthBreakpoint = this.uiContext.getWindowWidthBreakpoint(); let heightBp: HeightBreakpoint = this.uiContext.getWindowHeightBreakpoint(); AppStorage.setOrCreate('currentWidthBreakpoint', widthBp); AppStorage.setOrCreate('currentHeightBreakpoint', heightBp); data.on('windowSizeChange', this.onWindowSizeChange); // ... }) }); } // ... }; - 页面获取断点值,监听断点变化并传入Native侧。
@Entry
@Component
struct Index {
  // ...
  // Define the variables passed into the Native side.
  @State cutoutAreas: Areas = {
    top: 0,
    right: 0,
    bottom: 0,
    left: 0,
    heightBreakpoint: 0,
    widthBreakpoint: 0
  };
  // ...
  // Watching the changes in horizontal and vertical breakpoint values.
  @StorageLink('currentHeightBreakpoint') @Watch('breakPointChange') heightBreakpoint: HeightBreakpoint =
    HeightBreakpoint.HEIGHT_SM;
  @StorageLink('currentWidthBreakpoint') @Watch('breakPointChange') widthBreakpoint: WidthBreakpoint =
    WidthBreakpoint.WIDTH_XS;
  // ...

  // Breakpoint change, triggering value transfer.
  breakPointChange() {
    this.cutoutAreas.heightBreakpoint = this.heightBreakpoint;
    this.cutoutAreas.widthBreakpoint = this.widthBreakpoint;
    // Encapsulate the Native method and pass in a breakpoint.
    tetrahedron_napi.objectPassing(this.cutoutAreas);
  }
  // ...
}
监听Surface大小变化
XComponent持有一个Surface,该Surface的默认位置及大小与XComponent组件相同。在Native层获取Native XComponent实例,作为ArkTS层和Native层XComponent绑定的桥梁。利用Native XComponent提供的接口注册XComponent的生命周期和事件回调,最后通过调用NativeWindow等接口开发自定义绘制内容,并申请和提交Buffer到图形队列,以此方式将自定义绘制内容传送至XComponent持有的Surface。具体XComponent的开发流程可参考自定义渲染。
在Native XComponent的事件回调中,OnSurfaceCreated()和OnSurfaceChanged()两个接口分别在Surface创建和Surface大小变化时进行回调,因此在适配不同屏幕尺寸设备时,应重点关注这两个接口。
- OnSurfaceCreated():Surface创建时进行回调。
- OnSurfaceChanged():Surface大小变化时进行回调。具体使用场景包括游戏横竖屏切换导致的Surface宽高变化,或双折叠设备在折叠和展开状态变化下的Surface大小变化。
在OnSurfaceCreated()和OnSurfaceChanged()回调中,使用OH_NativeXComponent_GetXComponentSize()获取XComponent持有的Surface的大小,且每次Surface改变后都会重新获取对应的宽高,并通过自定义的reSizeWindow()方法,重新设置OpenGL绘制区域的大小,以实现对不同设备和屏幕尺寸的良好适配。
void AppNapi::OnSurfaceCreated(OH_NativeXComponent* component, void* window)
{
    LOGE("AppNapi::OnSurfaceCreated");
    OH_NativeXComponent_RegisterOnFrameCallback(component, OnFrameCB);
    // Get surface size.
    int32_t ret = OH_NativeXComponent_GetXComponentSize(component, window, &width_, &height_);
    // Draw the image to be displayed on the window and set the size of the drawing area.
    LOGE("Offset : x = %{public}f, y = %{public}f ", x_, y_);
    if (ret == OH_NATIVEXCOMPONENT_RESULT_SUCCESS) {
        tetrahedron_->Init(window, width_, height_);
        tetrahedron_->reSizeWindow(width_, height_);
        tetrahedron_->Update(angleX_, angleY_);
        isCreated_++;
        xcHeight_ = height_;
        xcWidth_ = width_;

        LOGE("AppNapi::OnSurfaceCreated success ");
    } else {
        LOGE("AppNapi::OnSurfaceCreated failed");
    }
}

void AppNapi::OnSurfaceChanged(OH_NativeXComponent* component, void* window)
{
    LOGE("AppNapi::OnSurfaceChanged");
    // Retrieve surface size again
    int32_t ret = OH_NativeXComponent_GetXComponentSize(component, window, &width_, &height_);
    int32_t ret1;

    // Set the size of the drawing area.
    if (ret == OH_NATIVEXCOMPONENT_RESULT_SUCCESS) {
        tetrahedron_->reSizeWindow(width_, height_);
        xcHeight_ = height_;
        xcWidth_ = width_;
        LOGE("after width = %{public}d, height = %{public}d", xcWidth_, xcHeight_);
        ret1= OH_NativeXComponent_GetXComponentOffset(component, window, &x_, &y_);
        off_x = x_;
        off_y = y_;
        // ...
    }
} 为了获得更好的游戏体验,游戏应用不仅需要设置沉浸式界面,还需要扩展布局并隐藏避让区,即隐藏状态栏和导航条(示意图所示的导航条在真实使用场景下已隐藏)。界面元素示意图如下所示:
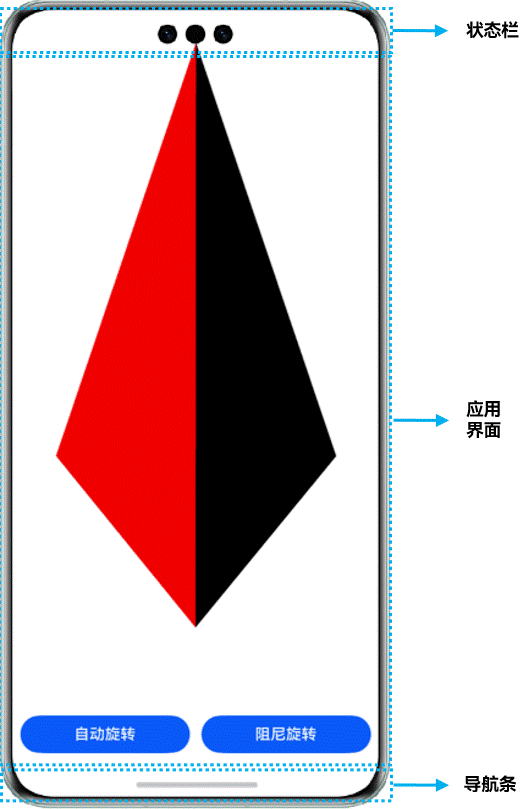
在这样的场景下,挖孔区(即摄像头区域)可能会遮挡部分页面信息或用户操作按钮。因此,为了优化用户体验,操作按钮需要移动到挖孔区的另一侧,同时避免侧边出现大量留白,需要获取挖孔区域并进行相应的避让设计。具体步骤分为以下三步:
应用扩展布局,隐藏避让区
首先调用setWindowLayoutFullScreen()接口设置窗口布局为沉浸式布局,接着调用setWindowSystemBarEnable()接口设置状态栏和导航条的具体显示/隐藏状态,此场景下将其设置为隐藏。
onWindowStageCreate(windowStage: window.WindowStage) {
  // ...

  try {
    // Set the main window to immersive and hide the navigation bar.
    windowStage.getMainWindowSync().setWindowLayoutFullScreen(true);
    windowStage.getMainWindowSync().setWindowSystemBarEnable([]);
  } catch (error) {
    let err = error as BusinessError;
    hilog.error(0x0000, 'EntryAbility',
      `Failed to set the window state. Error code=${err.code}, message=${err.message}`);
  }

  // ...
}
挖孔区获取
- 使用getWindowAvoidArea()接口获取刘海屏区域,一般为前置摄像头位置,并使用on('avoidAreaChange')监听其位置信息的变化。
public onAvoidAreaChange: (avoidArea: window.AvoidAreaOptions) => void = (avoidArea: window.AvoidAreaOptions) => { if (avoidArea.type === window.AvoidAreaType.TYPE_CUTOUT) { AppStorage.setOrCreate('cutout', avoidArea); } } // ... onWindowStageCreate(windowStage: window.WindowStage) { // ... windowStage.getMainWindow((err: BusinessError, data) => { // ... windowStage.loadContent('pages/Index', (err, data) => { // ... // Monitor changes in the location of the cutout area. let avoidArea: window.AvoidArea = data.getWindowAvoidArea(window.AvoidAreaType.TYPE_CUTOUT); this.onAvoidAreaChange({ type: window.AvoidAreaType.TYPE_CUTOUT, area: avoidArea }); data.on('avoidAreaChange', this.onAvoidAreaChange); }) }); } - 监听到挖孔区位置变化后,计算避让区域的top、bottom、left和right。
@StorageLink('cutout') @Watch('cutoutChange') avoidAreas: window.AvoidAreaOptions | undefined = undefined;
@StorageLink('windowHeight') windowHeight: number = 0;
@StorageLink('windowWidth') windowWidth: number = 0;
// ...
cutoutChange() {
  let topPX = getTop(this.avoidAreas);
  let rightPX = getRight(this.avoidAreas, this.windowWidth);
  let bottomPX = getBottom(this.avoidAreas, this.windowHeight);
  let leftPX = getLeft(this.avoidAreas);

  // ...
}
function getTop(avoidArea: window.AvoidAreaOptions | undefined): number { let result: number = 0; if (avoidArea !== undefined) { if (avoidArea.area.topRect.height) { result = avoidArea.area.topRect.top + avoidArea.area.topRect.height; } } else { hilog.error(0x0000, '3D', 'Can not get TopSafeAreaPixel, avoidArea visible false'); } return result; } function getBottom(avoidArea: window.AvoidAreaOptions | undefined, windowHeight: number): number { let result: number = 0; if (avoidArea !== undefined) { if (avoidArea.area.bottomRect.height) { result = windowHeight - avoidArea.area.bottomRect.top; } } else { hilog.error(0x0000, '3D', 'Can not get BottomSafeAreaPixel, avoidArea visible false'); } return result; } function getLeft(avoidArea: window.AvoidAreaOptions | undefined): number { let result: number = 0; if (avoidArea !== undefined) { if (avoidArea.area.leftRect.width) { result = avoidArea.area.leftRect.left + avoidArea.area.leftRect.width; } } else { hilog.error(0x0000, '3D', 'Can not get LeftSafeAreaPixel, avoidArea visible false'); } return result; } function getRight(avoidArea: window.AvoidAreaOptions | undefined, windowWidth: number): number { let result: number = 0; if (avoidArea !== undefined) { if (avoidArea.area.rightRect.width) { result = windowWidth - avoidArea.area.rightRect.left; } } else { hilog.error(0x0000, '3D', 'Can not get RightSafeAreaPixel, avoidArea visible false'); } return result; }
安全区域避让
在获得挖孔避让区域后,可以在Native侧的surface上设置避让,或者在ArkTS侧进行避让。本篇文章将采用ArkTS侧避让,并将避让区域的值传递到Native侧。开发者可以根据游戏设计需求,使用传入的值在Native侧自行适配。
- ArkTS侧避让
获取到挖孔区域位置后,设置页面的padding值为该区域大小,可实现安全区域避让的效果。
@State localPadding: LocalizedPadding = { top: LengthMetrics.vp(0), start: LengthMetrics.vp(0) }; // ... @StorageLink('cutout') @Watch('cutoutChange') avoidAreas: window.AvoidAreaOptions | undefined = undefined; // ... cutoutChange() { let topPX = getTop(this.avoidAreas); let rightPX = getRight(this.avoidAreas, this.windowWidth); let bottomPX = getBottom(this.avoidAreas, this.windowHeight); let leftPX = getLeft(this.avoidAreas); // ... this.localPadding = { top: LengthMetrics.px(topPX), end: LengthMetrics.px(rightPX), bottom: LengthMetrics.px(bottomPX), start: LengthMetrics.px(leftPX) } // ArkTS2Native tetrahedron_napi.objectPassing(this.cutoutAreas); } // ... build() { // ... .padding(this.localPadding) } - Native侧避让
定义数据传递函数,用于将避让区域从ArkTS侧传输到Native侧,后续可根据应用需求自定义实现区域避让。更多数据交互可参考object类型数据交互。
// Responsible for transferring data from ArkTS to Native.
static napi_value objectPassingTs2Napi(napi_env env, napi_callback_info info)
{
    size_t argc = 1;
    napi_value args[1];
    napi_get_cb_info(env, info, &argc, args, NULL, NULL);

    if (argc < 1) {
        napi_throw_error(env, NULL, "Wrong number of arguments");
        return NULL;
    }

    napi_value obj = args[0];
    napi_value keys;
    napi_get_property_names(env, obj, &keys); // Get all attribute names.

    uint32_t length;
    napi_get_array_length(env, keys, &length); // Obtain the number of attributes.

    for (uint32_t i = 0; i < length; ++i) {
        napi_value key;
        napi_get_element(env, keys, i, &key); // Get the i-th attribute name.

        // Convert attribute names to strings.
        char keyStr[128];
        size_t keyLen;
        napi_get_value_string_utf8(env, key, keyStr, sizeof(keyStr), &keyLen);

        // Get attribute values.
        napi_value value;
        napi_get_property(env, obj, key, &value);

        // Determine the type of attribute value and process it.
        napi_valuetype type;
        napi_typeof(env, value, &type);

        if (type == napi_string) {
            char valueStr[4];
            size_t valueLen;
            napi_get_value_string_utf8(env, value, valueStr, sizeof(valueStr), &valueLen);
        }
        if (type == napi_number) {
            double num;
            napi_get_value_double(env, value, &num);
        }
    }
    return NULL;
}

// Define data transfer function.
static napi_value objectPassing(napi_env env, napi_callback_info info)
{
    objectPassingTs2Napi(env, info);
    return nullptr;
}
[h2]窗口旋转
由于不同游戏可能有特定的窗口方向偏好,通常仅支持横屏或竖屏,因此可以根据应用需求,使用setPreferredOrientation()接口自定义设置窗口的旋转方向。这一点对于游戏类应用较为重要。本篇文章以仅支持竖屏旋转为例,介绍如何实现游戏类应用的窗口旋转设置。
// Automatically rotate vertically following the sensor.
let orientation = window.Orientation.AUTO_ROTATION_PORTRAIT;
try {
  windowClass.setPreferredOrientation(orientation, (err: BusinessError) => {
    if (err.code) {
      Logger.error('Failed to set window orientation. Cause: %{public}s', JSON.stringify(err) ?? '');
      return;
    }
    Logger.info('Succeeded in setting window orientation. Data: %{public}s');
  })
} catch (exception) {
  Logger.error('Failed to set window orientation. Cause: %{public}s', JSON.stringify(exception) ?? '');
}