20mins remaining

CG Kit (Occlusion Culling Plug-in)

20mins remaining
Read mode

1. Introduction

Overview

The Occlusion Culling SDK provides a high-performance software occlusion culling solution. That is, objects can be occluded on the CPU to offload the rendering workload on the GPU and improve the overall rendering performance.
To use the Occlusion Culling plug-in, you need to:

What You Will Create

In this codelab, you will use the demo project to call the Occlusion Culling SDK APIs. Through this demo project, you will:

  • Try out Occlusion Culling capabilities and configuration.

What You Will Learn

  • Integrate the Occlusion Culling SDK.
  • Call Occlusion Culling APIs.
  • Explain functions of API parameters.

2. What You Will Need

Hardware Requirements

  • A (desktop or laptop) computer
  • Huawei smartphone powered by Android 8.0 or later (with USB connection support)

Software Requirements

  • APP_PLATFORM 24 or later
  • Native Development Kit (NDK) 21 or later

Required Knowledge

  • Android Debug Bridge (adb) command basics
  • NDK build basics
  • Development basics in C++
  • Graphics basics

3. Integrating the Occlusion Culling SDK

  1. Download the SDK package and decompress it. Copy the extracted cgsdk-plugin-occlusionculling folder to the directory where Android.mk is located.
  2. Configure Android.mk, where, LOCAL_SRC_FILES is the path of the .so files in the directory where Android.mk is located.
  3. Configure Application.mk, where, APP_PLATFORM should be at least android-24.

4. Executing Occlusion Culling

Initialize a HiCulling object before calling the Occlusion Culling APIs.

HiCulling *obj = HcCreate(true);

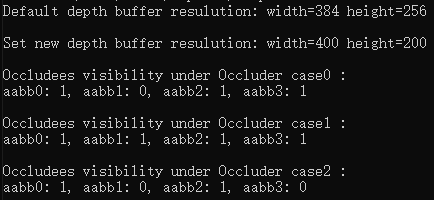
Call HcSetResolution to set the depth buffer resolution. The resolution argument passed to the call must be a multiple of 2. Otherwise, the setting is invalid and an error code defined in HcErrorCode is returned.

const unsigned int alignedWidth = 400; const unsigned int alignedHeight = 200; CHECK_RESULT(HcSetResolution(obj, alignedWidth, alignedHeight));

HcOccluderMeshType contains the following configurable items:

  • bWinding: triangle winding order. When bWinding is HC_CCW, counterclockwise winding order is considered to be the rear face of a triangle and the rear face will not be rasterized to the depth buffer.
  • idxType: type of triangle vertex index, selected from unsigned byte, unsigned short, and unsigned int.
  • vtxStride: stride (in float components) between location attributes in the vertex buffer.
    HcOccluderMeshType occluders = { .numMesh = 1, .meshes = &mesh, .bWinding = HC_CCW, .idxType = HC_UNSIGNED_SHORT, .vtxStride = case0VtxStride, .nearClipDistance = 0.1f };

Execute Occlusion Culling upon preparation completion. The sample code is as follows.

// Add occluders to the Occlusion Culling plug-in. CHECK_RESULT(HcAddOccluderMeshes(obj, occluders)); // Rasterize occluders to the depth buffer CHECK_RESULT(HcRasterizeOccluder(obj)); // Use the depth buffer to query the AABB of occludees. CHECK_RESULT(HcTestOccludeesAABB(obj, occludees, result)); // Clear the depth buffer after the occlusion query is complete. CHECK_RESULT(HcClearBuffer(obj));

You can print result to view the Occlusion Culling result.

bool visibility[4] = { true }; bool *result[] = { &visibility[0], &visibility[1], &visibility[2], &visibility[3] }; CHECK_RESULT(HcTestOccludeesAABB(obj, occludees, result)); printf("aabb0: %d, aabb1: %d, aabb2: %d, aabb3: %d\n\n", visibility[0], visibility[1], visibility[2], visibility[3]);

In Sample, result is the pointer to visibility. Print visibility to view the result.

printf("aabb0: %d, aabb1: %d, aabb2: %d, aabb3: %d\n\n", visibility[0], visibility[1], visibility[2], visibility[3]);

5. Build and Run

  1. Run the ndk-build NDK_PROJECT_PATH=. NDK_APPLICATION_MK=Application.mk APP_BUILD_SCRIPT=Android.mk command in the Sample directory to build.
  2. Run the adb push command to push the libthirdpartyengine_plugin_oc.so and Sample files in the Sample\obj\local\arm64-v8a folder to the /data/local/tmp directory of the smartphone.
  3. Run the export LD_LIBRARY_PATH=/data/local/tmp command in the shell.
  4. Run the chmod a+x Sample command in the /data/local/tmp directory.
  5. Run the ./Sample command in the /data/local/tmp directory.
The command output similar to the following is displayed.

6. Congratulations

Well done. You have successfully completed this codelab and learned how to:

  • Integrate the Occlusion Culling SDK.
  • Call Occlusion Culling APIs.
  • Explain functions of some API parameters.

7. Reference

For more information, click the following links:

Related documents
Download the demo source code used in this codelab from the following address:

Download source code

Code copied