This codelab describes how to generate common QR codes, identify QR codes in images, and scan QR codes.
Scenarios
The procedure is as follows:
The code structure is described as follows:
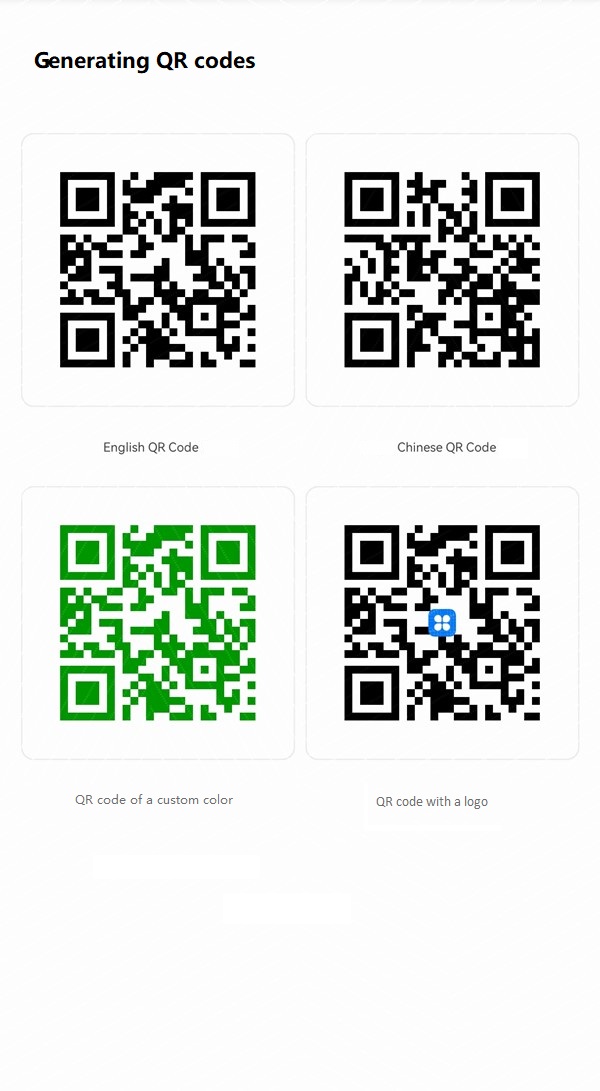
The preceding figure shows typical QR codes: QR codes in different languages (for example, Chinese and English), QR code of a custom color, and QR code with a logo.
Use the IBarcodeDetector class to generate a byte array for a QR code image, and then use the ImageSource class to decode the byte array into a PixelMap.
Step 1 - Call the VisionManager.init() method to connect to the capability engine. Define the ConnectionCallback method. If the capability engine is connected, the onServiceConnect() method is called. Instantiate IBarcodeDetector in this method. The sample code is as follows:
private IBarcodeDetector barcodeDetector;

private void initManager(Context context) {
    ConnectionCallback connectionCallback = new ConnectionCallback() {
                @Override
                public void onServiceConnect() {
                    barcodeDetector = VisionManager.getBarcodeDetector(context);
                }
                @Override
                public void onServiceDisconnect() {
                }
            };
    VisionManager.init(context, connectionCallback);
}
Step 2 - Define the content of the string and the size of the image generated by the QR code. Call IBarcodeDetector.detect() to generate a byte array of the QR code image. The sample code is as follows:
private byte[] generateQR(String content, int size) {
    byte[] byteArray = new byte[size * size * BYTE_SIZE];
    String val = content;
    try {
        // Resolve the problem that Chinese characters cannot be identified.
        val = new String(content.getBytes("UTF-8"), "ISO8859-1");
    } catch (UnsupportedEncodingException e) {
        QRCodeUtil.error("error");
    }
    barcodeDetector.detect(val, byteArray, size, size);
    return byteArray;
}
Step 3 - Call the ImageSource.create(byte[] data, ImageSource.SourceOptions opts) method to create an ImageSource object. In this method, data indicates the byte array of the generated QR code, and opts indicates the decoding options. Then call the ImageSource.createPixelmap() method to obtain a PixelMap object. The sample code is as follows:
public PixelMap generateCommonQRCode(String content, int size) {
    byte[] data = generateQR(content, size);
    ImageSource source = ImageSource.create(data, null);
    ImageSource.DecodingOptions opts = new ImageSource.DecodingOptions();
    opts.editable = true;
    PixelMap pixelMap = source.createPixelmap(opts);
    return pixelMap;
}
—-End
By default, the generated PixelMap images are in black, with the color value 0xFF000000. To generate a QR code of a custom color, you only need to change the color value to the custom one.
Step 1 - Call the PixelMap.getImageInfo() method to obtain the size of the pixel map and cyclically traverse each pixel.
Size size = pixelMap.getImageInfo().size;
for (int i = 0; i < size.width; i++) {
    for (int j = 0; j < size.height; j++) {
        // Change the pixel value.
    }
}
Step 2 - Call the PixelMap.readPixel(Position pos) method to read the color value of a specific position, which is specified using image coordinates. The default color value is 0xFF000000.
int color = pixelMap.readPixel(new Position(i, j));
if (color == 0xFF000000) {
    // Write the color value at the specified position.
}
Step 3 - Define the variable whose color needs to be changed, and call the PixelMap.writePixel(Position pos, int color) method to write data to the specified position.
public static final int QR_COLOR = 0xFF009900;
pixelMap.writePixel(new Position(i, j), QR_COLOR);
—-End
Generating a QR code with a logo is the process of drawing the PixelMap object corresponding to the logo in the middle of the generated QR code PixelMap object.
Step 1 - Call the getResourceManager().getResource() method to read the resource image in the resources/base/media/ directory and create a PixelMap object.
InputStream  resource = getResourceManager().getResource(ResourceTable.Media_icon);
ImageSource logoSource = ImageSource.create(resource, null);
PixelMap logoMap = logoSource.createPixelmap(null);
Step 2 - Obtain the size of the QR code PixelMap, and zoom the logo PixelMap out to 0.14. The sample code is as follows:
Size size = pixelMap.getImageInfo().size;

PixelMap.InitializationOptions opts =new PixelMap.InitializationOptions();
opts.size = new Size((int) (size.width * 0.14),(int) (size.height * 0.14));
PixelMap logoPixelMap = PixelMap.create(logoMap, opts);
Step 3 - Use Canvas to draw the logo PixelMap in the middle of the QR code PixelMap. The sample code is as follows:
Canvas canvas = new Canvas(new Texture(pixelMap));
int centerX = size.width / 2- logoSize.width / 2;
int centerY = size.height / 2- logoSize.height / 2;
canvas.drawPixelMapHolder(new PixelMapHolder(logoPixelMap), centerX, centerY, new Paint());
—-End
|
|
|
|
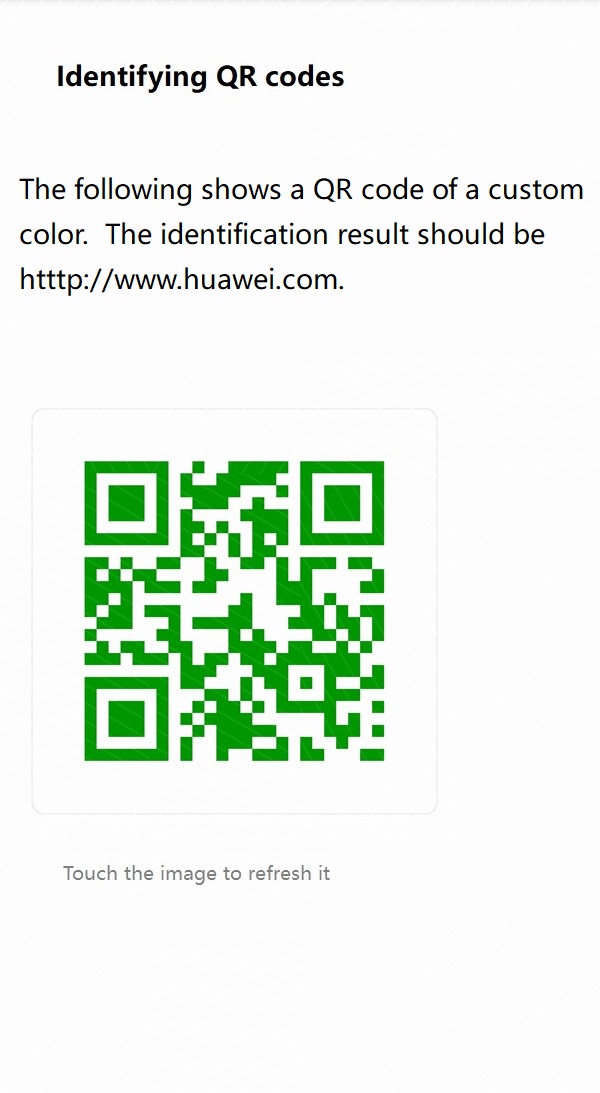
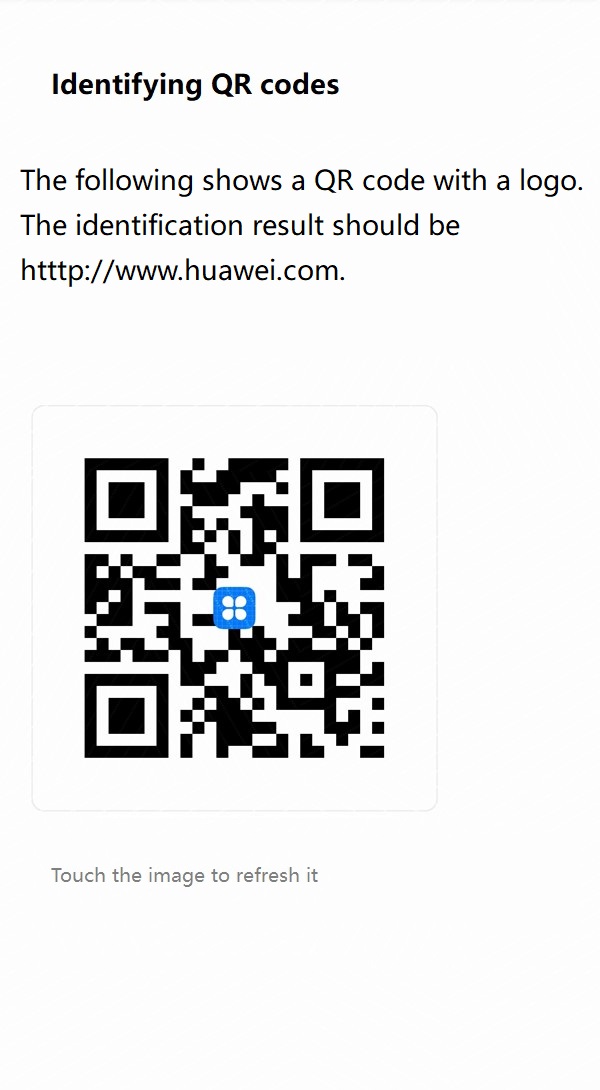
The QR codes in the preceding figures are generated based on the instructions provided in 4 Generating QR Codes. Now, you need to check whether these QR codes can be identified correctly as shown in the figure.
To identify these QR codes, convert each image into a PixelMap object and introduce a third-party library file. The procedure is as follows:
Step 1 - Add libiconv.so, libzbarjni.so, and zbar.jar to the libs folder.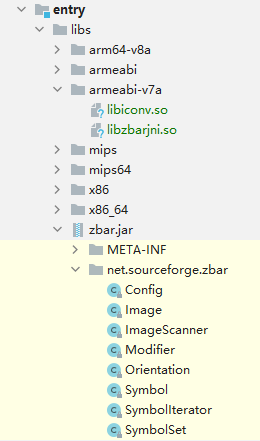
Step 2 - Load the PixelMap object data of an image to the net.sourceforge.zbar.Image object. The sample code is as follows:
private Image processImage(PixelMap pixelMap) {
    int pWidth = pixelMap.getImageInfo().size.width;
    int pHeight = pixelMap.getImageInfo().size.height;
    // Initialize an Image object.
    Image barcode = new Image(pWidth, pHeight, "RGB4");
    int[] pix = new int[pWidth * pHeight];
    // Write the pixel map data to the Image object.
    pixelMap.readPixels(pix, 0, pWidth, new ohos.media.image.common.Rect(0, 0, pWidth, pHeight));
    barcode.setData(pix);

    return barcode.convert("Y800");
}
Step 3 - Initialize the ImageScanner object. The sample code is as follows:
private ImageScanner mScanner;

private void initImageScanner() {
    mScanner = new ImageScanner();
    mScanner.setConfig(0, Config.X_DENSITY, CONFIG_SIZE);
    mScanner.setConfig(0, Config.Y_DENSITY, CONFIG_SIZE);
}
Step 4 - Call the ImageScanner.scanImage() method to process the Image object and call the Image.getResults() method to obtain the QR code identification result. The sample code is as follows:
private String processData(Image barcode) {
    String symData = null;
    if (mScanner.scanImage(barcode) == 0) {
        return symData;
    }
    for (Symbol symbol : mScanner.getResults()) {
        // Continue to traverse the formats that cannot be identified.
        if (symbol.getType() == Symbol.NONE) {
            continue;
        }
        symData = new String(symbol.getDataBytes(), StandardCharsets.UTF_8);
        // Continue to traverse empty data.
        if (QRCodeUtil.isEmpty(symData)) {
            continue;
        }
        return symData;
    }
    return symData;
}
—-End
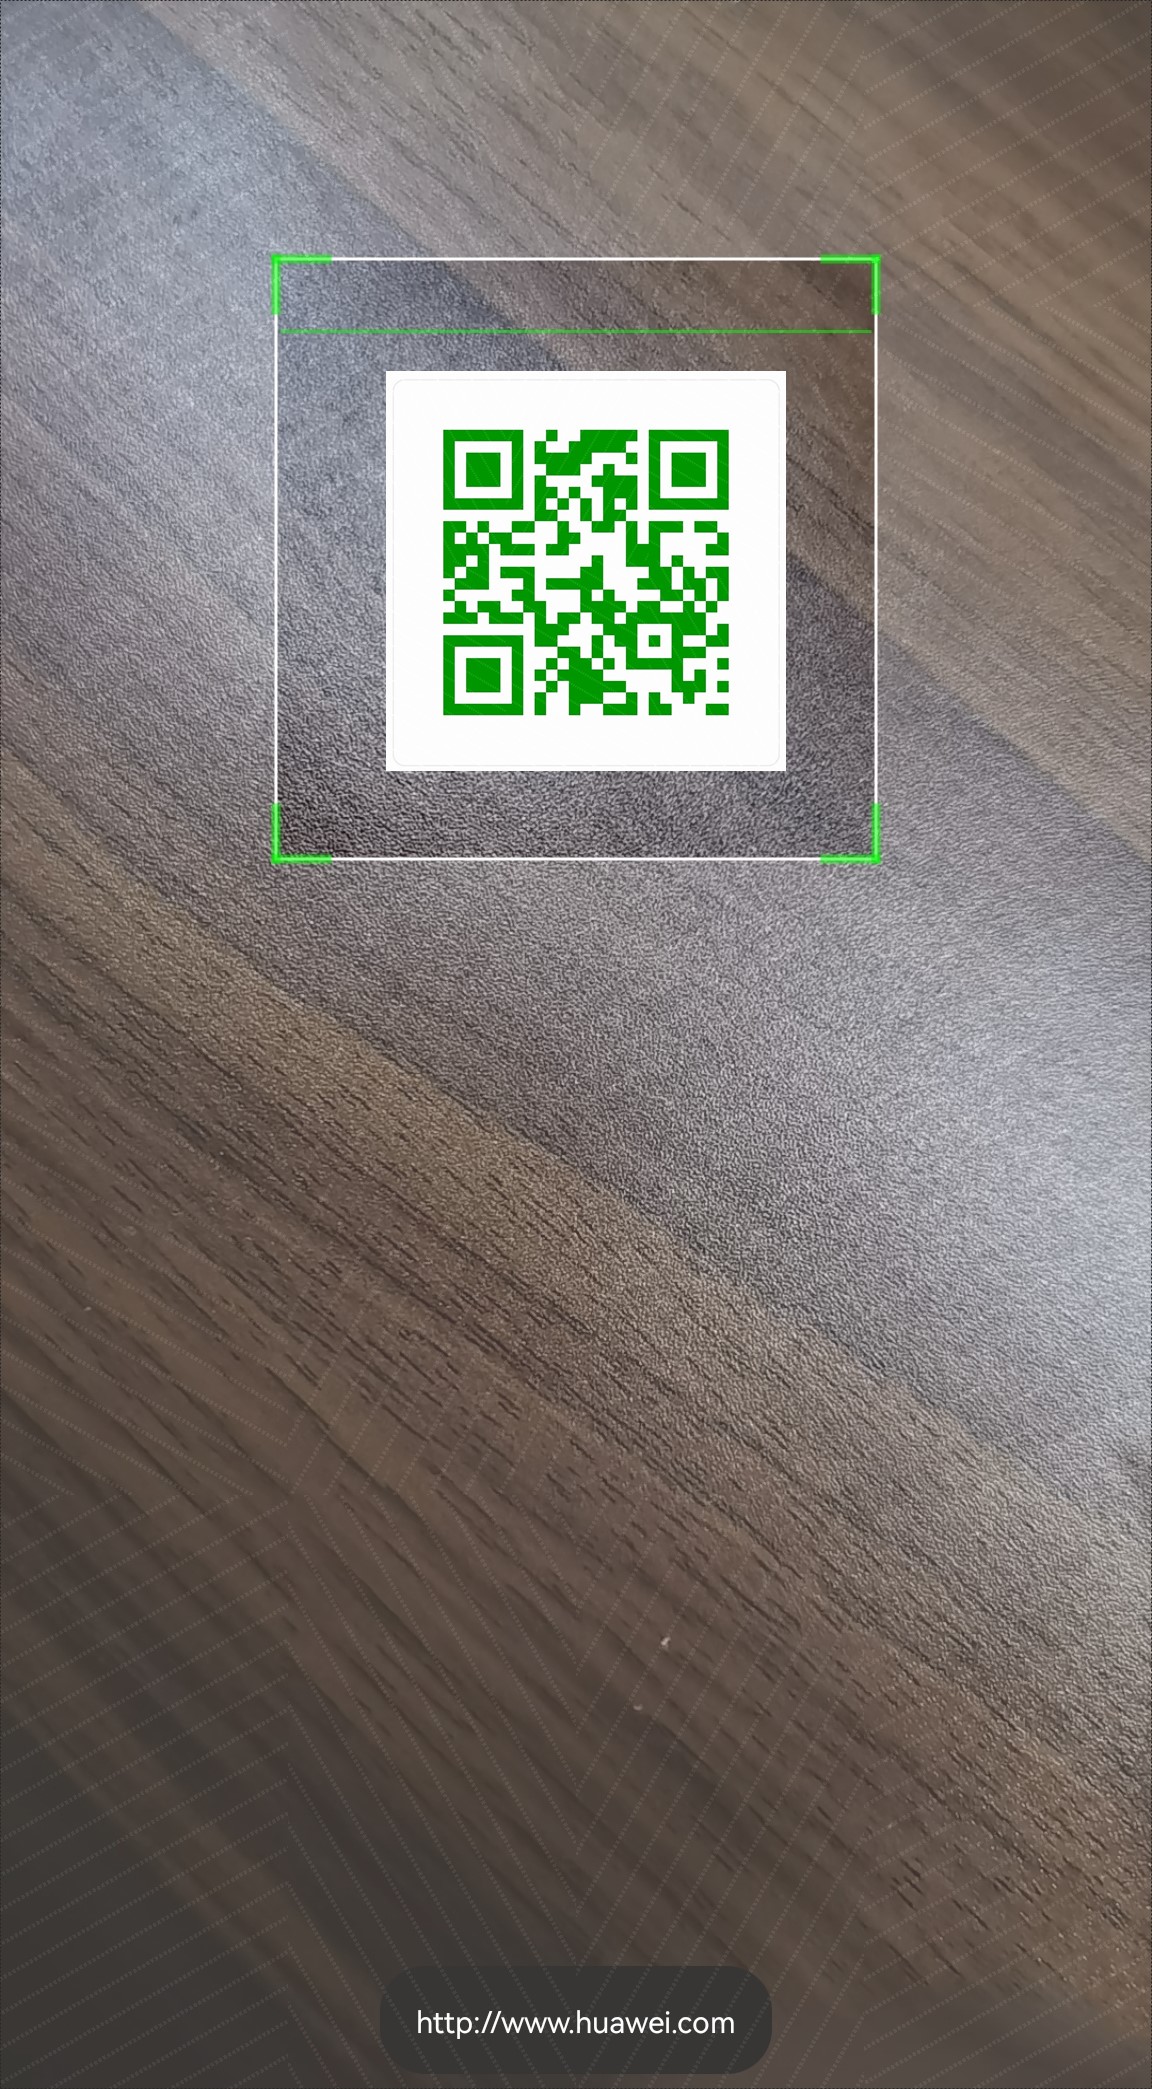
This figure shows the camera screen with a QR code in the scan box and the identification result at the bottom. To do so, collect camera data, convert it into a PixelMap object, and then use QR code recognition.
Step 1 - Extend the SurfaceProvider class, call the getSurfaceOps().get().addCallback(this) function, and call getSurfaceOps().surfaceCreated() to obtain a Surface object to display the camera window. The sample code is as follows:
public class CameraPreview extends SurfaceProvider implements SurfaceOps.Callback {
    private Surface previewSurface;

    public CameraPreview(Context context) {
        super(context);
        getSurfaceOps().get().addCallback(this);
    }

    @Override
    public void surfaceCreated(SurfaceOps surfaceOps) {
        previewSurface = surfaceOps.getSurface();
    }
}
Step 2 - Use the CameraKit.getInstance() method to obtain a CameraKit object and call the CameraKit.createCamera() method to create a Camera object. The sample code is as follows:
private void openCamera() {
    CameraKit cameraKit = CameraKit.getInstance(getContext());
    String[] cameraIds = cameraKit.getCameraIds();
    cameraKit.createCamera(cameraIds[0], new CameraStateCallbackImpl()
            new EventHandler(EventRunner.create("qr")));
}
Step 3 - Define the CameraStateCallback class. After the Camera object is created, the onCreated() method is called. Call the CameraConfig.Builder.addSurface() method to configure the camera Surface. The sample code is as follows:
private class CameraStateCallbackImpl extends CameraStateCallback {
    @Override
    public void onCreated(Camera camera) {
        super.onCreated(camera);
        CameraConfig.Builder cameraBuilder = camera.getCameraConfigBuilder();

        cameraBuilder.addSurface(previewSurface);

        camera.configure(cameraBuilder.build());
    }
}
—-End
Use the ImageReceiver class to receive each frame of data from the camera and convert each frame of data into a PixelMap object. The procedure is as follows:
Step 1 - Define the ImageReceiver.IImageArrivalListener class and call the onImageArrival() method to process each frame of data. The sample code is as follows:
private ImageReceiver.IImageArrivalListener imageArrivalListener = new ImageReceiver.IImageArrivalListener() {
    @Override
    public void onImageArrival(ImageReceiver imageReceiver) {
        // Receive each frame of data.
    }
};
Step 2 - Initialize the ImageReceiver object, with the third parameter to ImageFormat.JPEG, and set an IImageArrivalListener. The sample code is as follows:
ImageReceiver imageReceiver = ImageReceiver.create(SCREEN_HEIGHT, SCREEN_WIDTH, ImageFormat.JPEG, IMAGE_RCV_CAPACITY);
imageReceiver.setImageArrivalListener(imageArrivalListener);
Step 3 - Call the ImageReceiver.getRecevingSurface() method to obtain a Surface object and configure it in CameraConfig.Builder to receive each frame of data from the camera. The sample code is as follows:
@Override
public void onCreated(Camera camera) {
    super.onCreated(camera);
    CameraConfig.Builder cameraBuilder = camera.getCameraConfigBuilder();
    Surface imageSurface = imageReceiver.getRecevingSurface();
    cameraBuilder.addSurface(imageSurface);
}
Step 4 - Call the ImageReceiver.readNextImage() method to obtain an ohos.media.image.Image, and then call the ohos.media.image.Image.Component.read() method to read the image data to a byte array. The sample code is as follows:
@Override
public void onImageArrival(ImageReceiver imageReceiver) {
    ohos.media.image.Image image = imageReceiver.readNextImage();
    ohos.media.image.Image.Component component = image.getComponent(ImageFormat.ComponentType.JPEG);
    byte[] data = new byte[component.remaining()];
    component.read(data);
}
Step 5 - Use ImageSource to decode the byte array to obtain a PixelMap object. The sample code is as follows:
ImageSource.SourceOptions sourceOptions = new ImageSource.SourceOptions();
sourceOptions.formatHint = "image/jpg";
ImageSource imageSource = ImageSource.create(data, sourceOptions);
PixelMap pixelMap = imageSource.createPixelmap(null);
—-End
Well done. You have completed this codelab and learned how to generate, identify, and scan QR codes.
The main skills are as follows:
You can download the complete sample code at Codelabs.