
HUAWEI HiAI is an open artificial intelligence (AI) capability platform for smart devices, which adopts a "chip-device-cloud" architecture, opening up chip, app, and service capabilities for a fully intelligent ecosystem. This assists developers in delivering an optimal smart app experience for users, by fully leveraging Huawei's powerful AI processing capabilities.
In order to open up app capabilities, HUAWEI HiAI Engine provides a wide range of AI capabilities that can be integrated into apps. Table recognition, one such AI capability, empowers apps to:
For more information, please visit our official website at the following URL:
https://developer.huawei.com/consumer/en/hiai
In this codelab, you can use this AI capability to create an Android app that recognizes table content in an image and generates an Excel file based on results, for less costly and time-consuming app development.
For example:
The following is a table image.
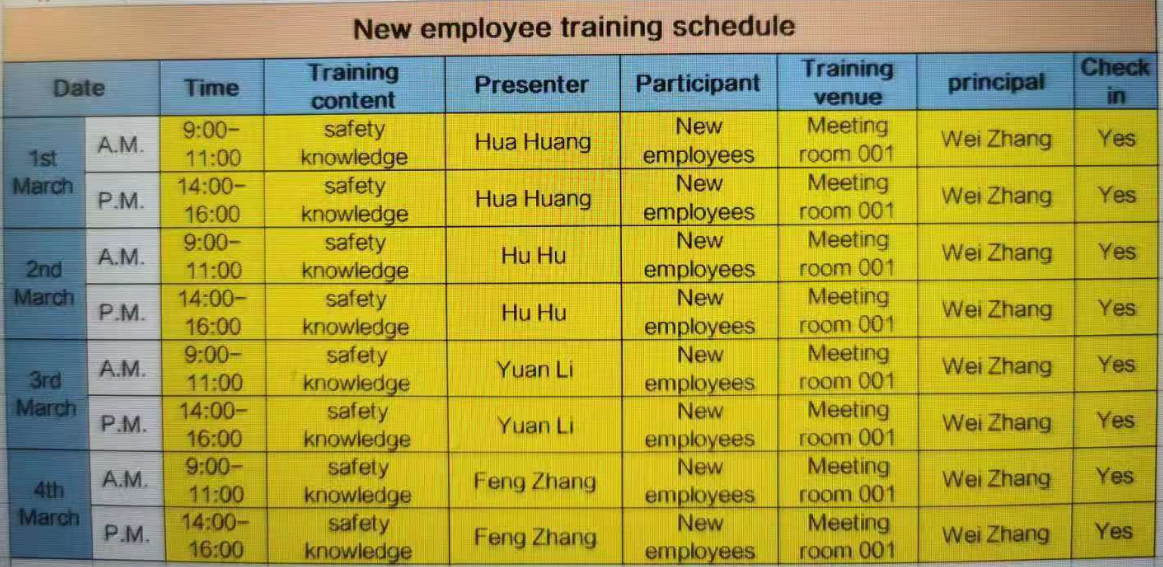
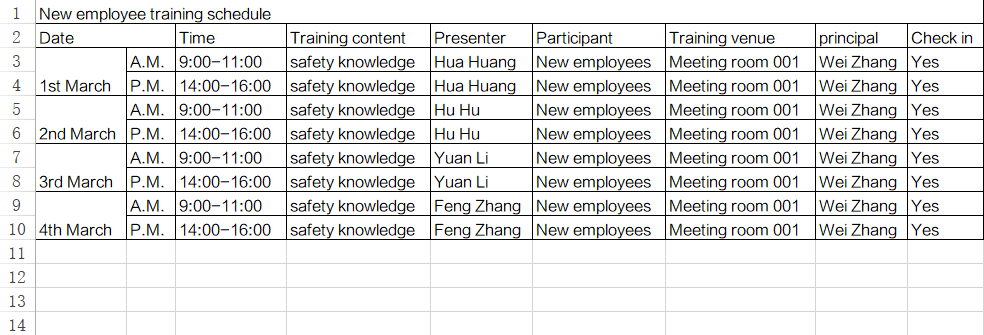
The app recognizes the table content, and can generate an Excel file as follows.
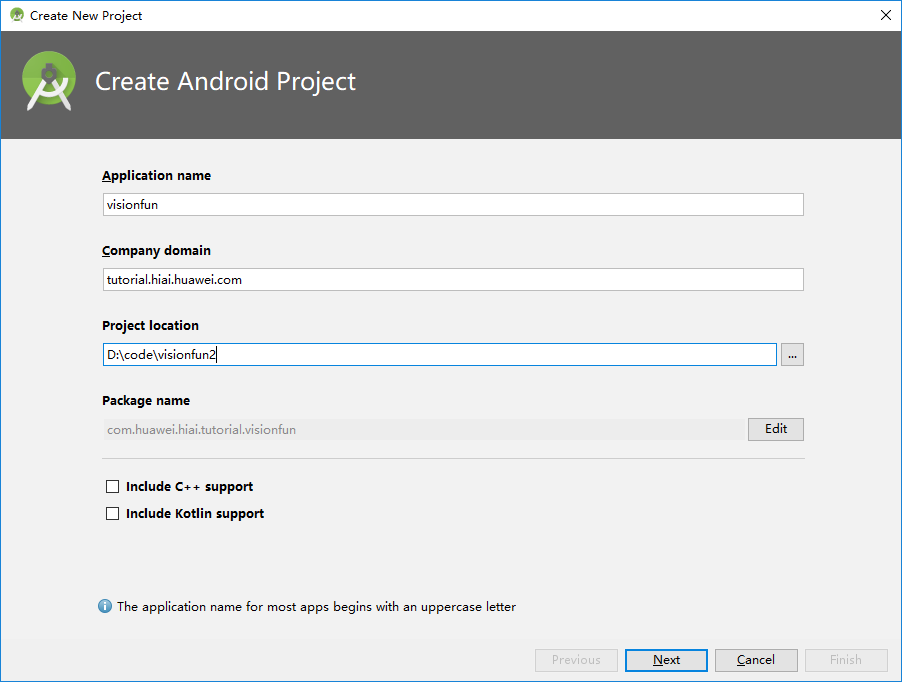
Set Application name to a user-defined app name, for example, visionfun.
Set Company domain to a user-defined company or organization domain name, for example, hiai.plx.huawei.com.
Set Project location to a user-defined project directory, for example, D:/code/visionfun.
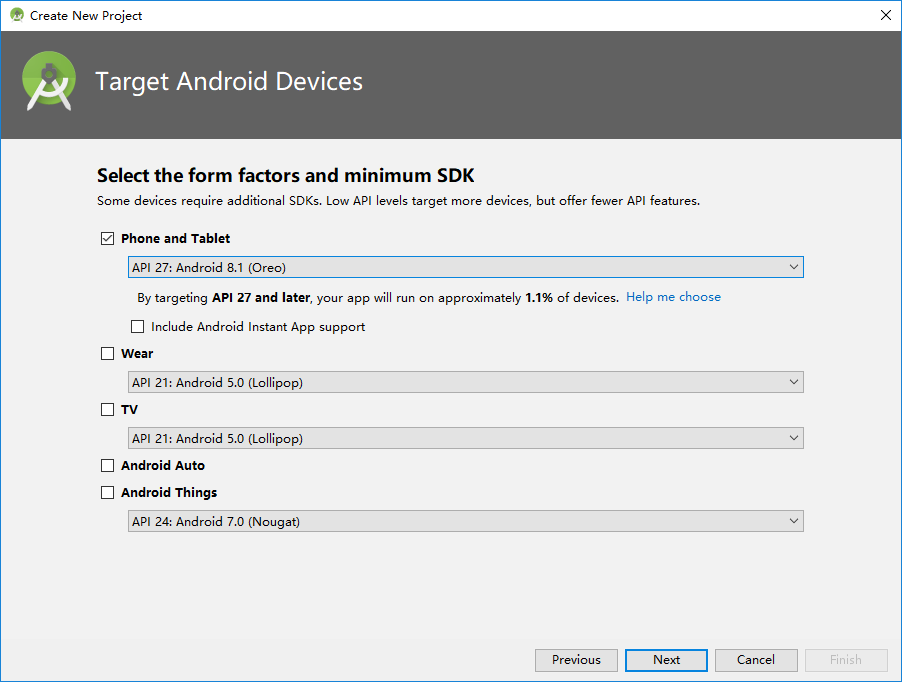
Select an API whose version number is later than 26, and click Next.
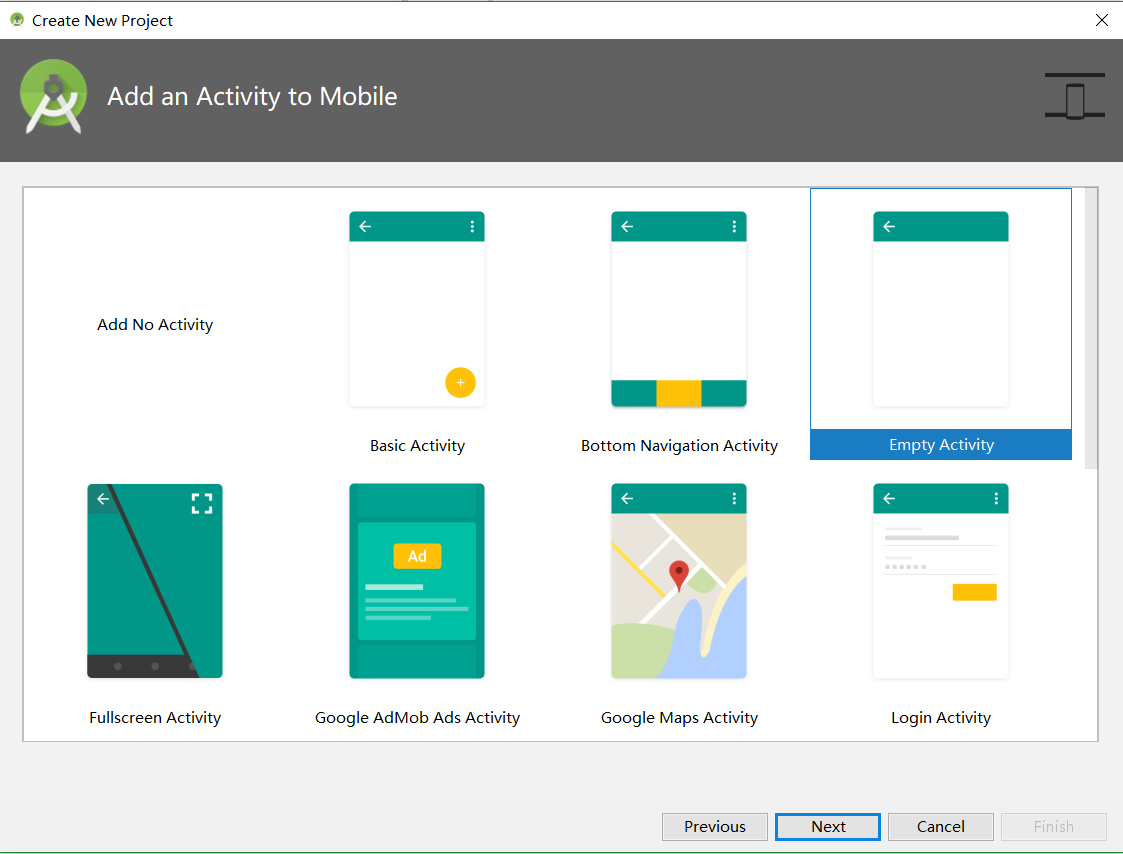
Select Empty Activity as the default window and click Next.
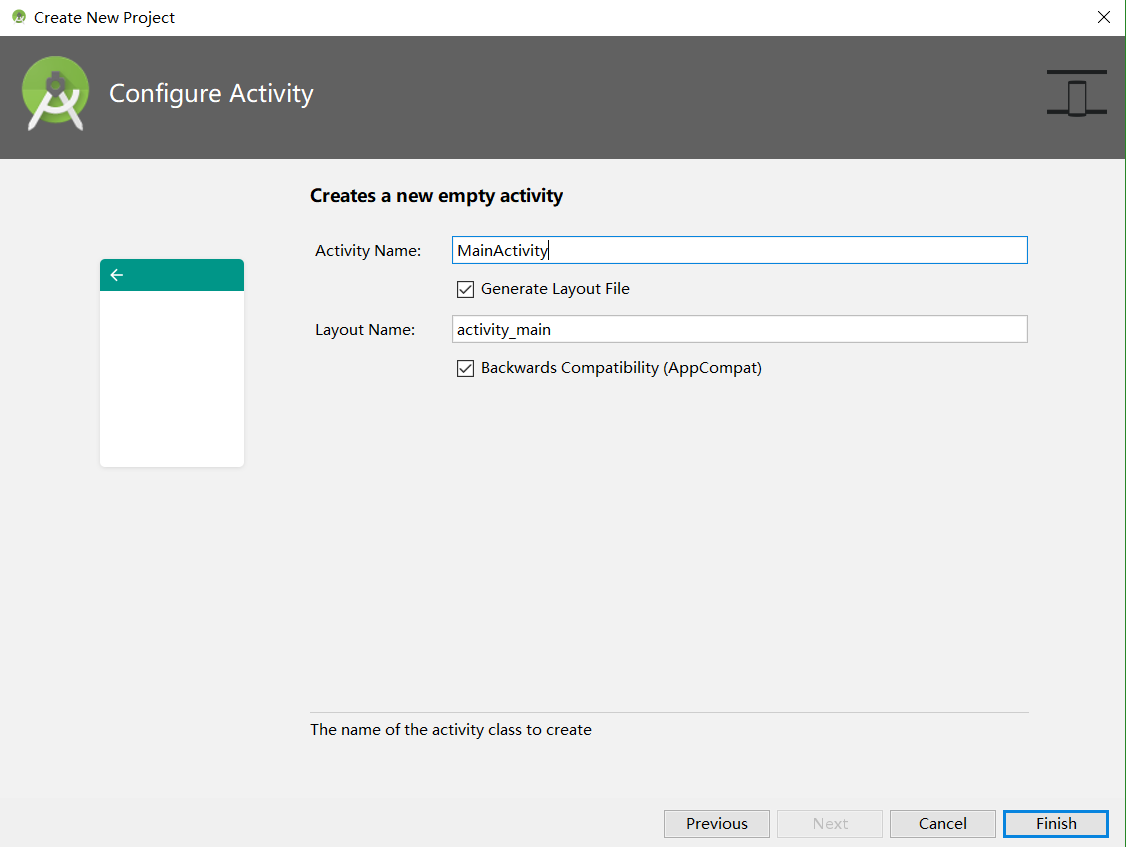
Set Activity Name to the default value MainActivity.
Set Layout Name to the default value activity_main and click Finish.
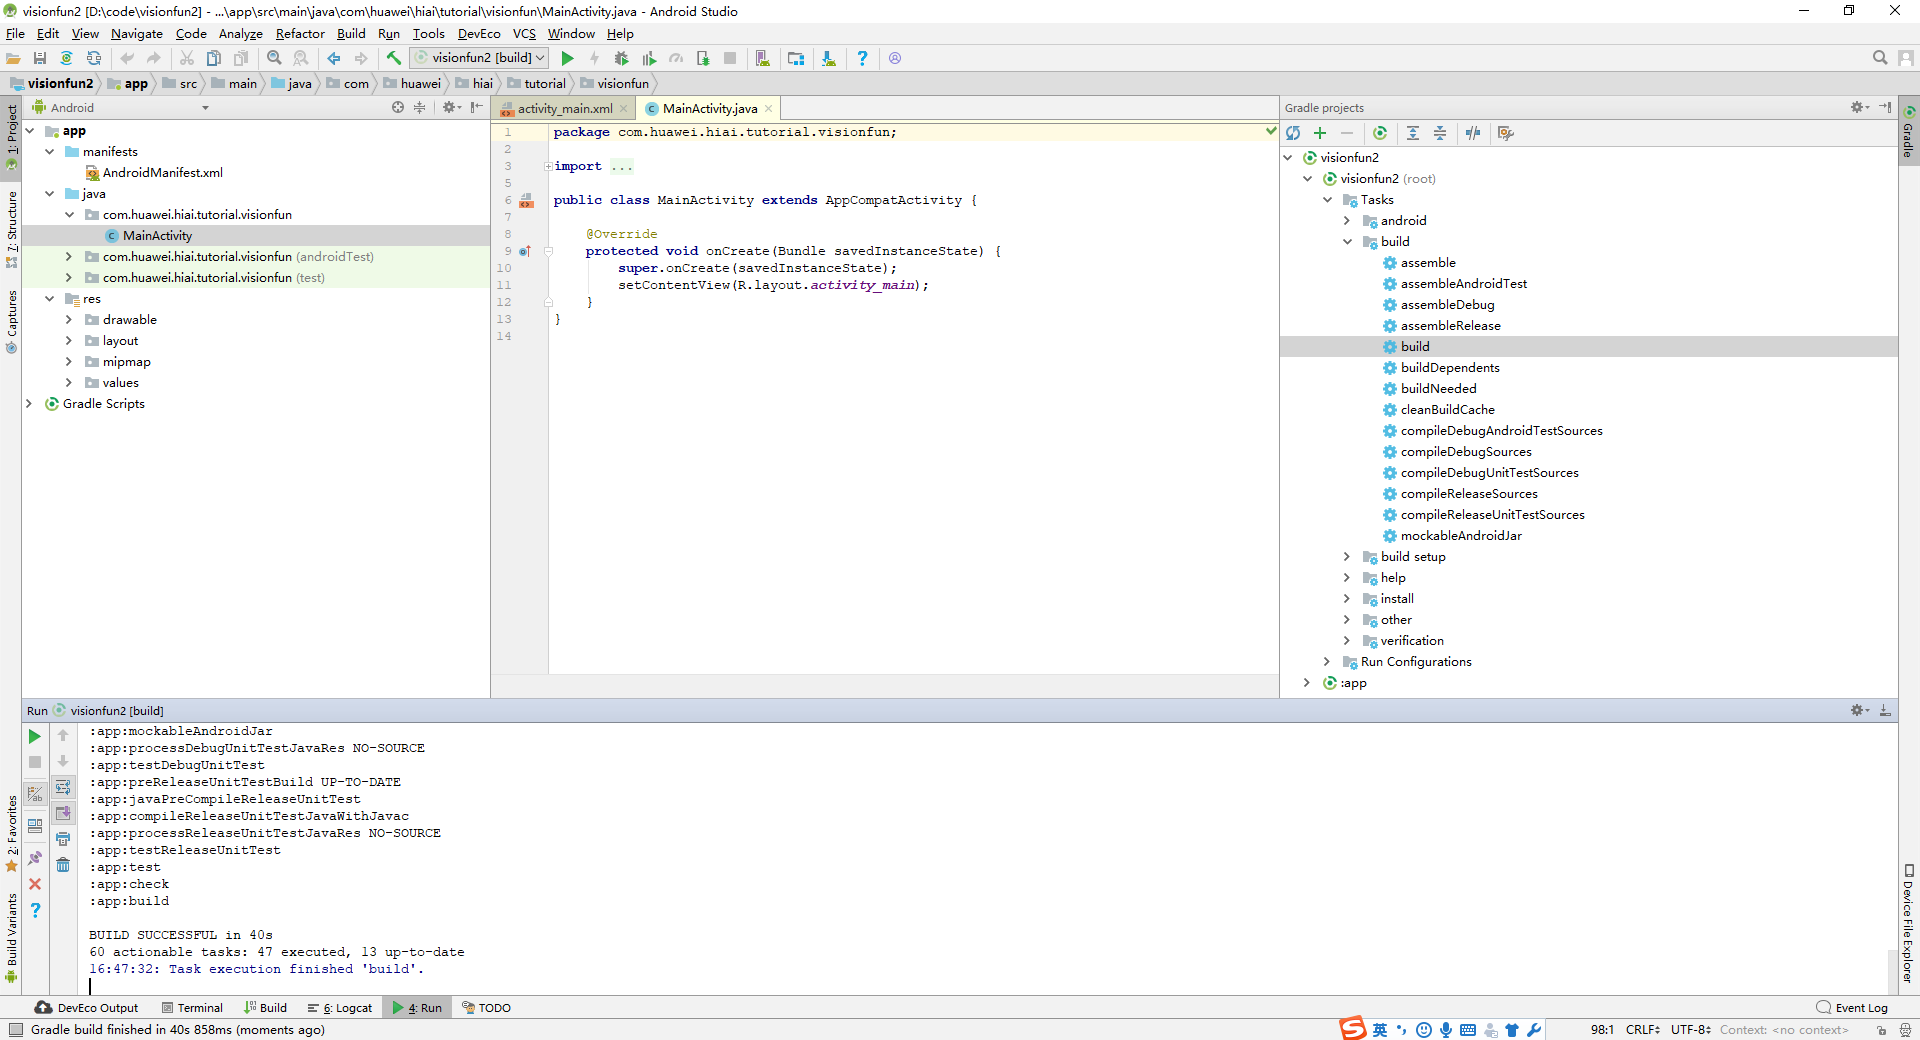
Android Studio will then create and compile the project code.

When the message "Gradle build finished" displays in the lower left corner, the project compilation has been completed. Otherwise, some errors may occur, such as the network connection error. In this case, check the network connection, proxy settings, and digital certificate.
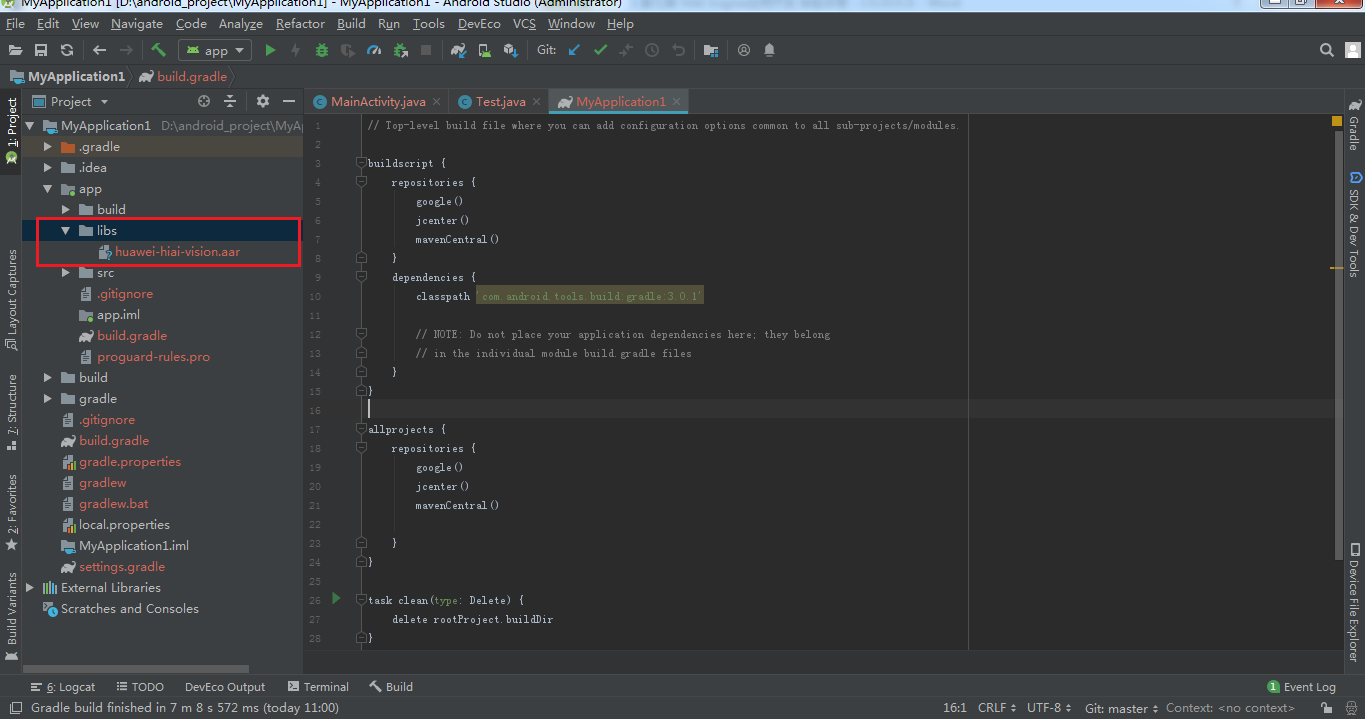
Make sure that the build.gradle file contains Google Maven repository.
allprojects {
    repositories {
        google()
        ...
        mavenLocal()
    }
}
Make sure that the build.gradle file contains the following content:
android {
    compileSdkVersion 28
    defaultConfig {
        ...
        targetSdkVersion 28
        ...
    }
    repositories{
        flatDir {
            dirs 'libs'
        }
    }
}
dependencies {
    ...
    implementation (name: 'huawei-hiai-vision', ext: 'aar')
    implementation 'com.google.code.gson:gson:2.8.2'
    ...
}
Add the camera access permission configuration to the app > manifests > AndroidManifest.xml file for your app in Android Studio.
<?xml version="1.0" encoding="utf-8"?>
<manifest xmlns:android="http://schemas.android.com/apk/res/android"
xmlns:tools="http://schemas.android.com/tools"
package="..." >

...
<uses-permission android:name="android.permission.WRITE_EXTERNAL_STORAGE" />
<uses-permission android:name="android.permission.READ_EXTERNAL_STORAGE" />
<uses-permission android:name="android.permission.CAMERA" />
...
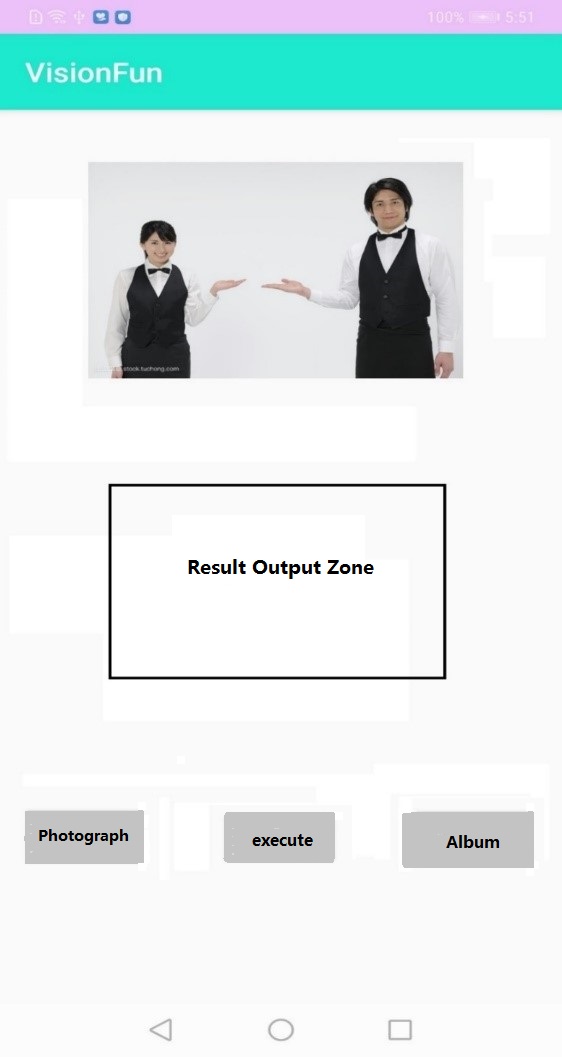
You can refer to the following example, when designing the UI.
public class MainActivity extends AppCompatActivity {
...

    @Override
    protected void onCreate(Bundle savedInstanceState) {
        super.onCreate(savedInstanceState);
        setContentView(R.layout.activity_main);
        //To connect vision service
        VisionBase.init(getApplicationContext(), new ConnectionCallback() {
            @Override
            public void onServiceConnect() {
                Log.i(TAG, "onServiceConnect ");
            }

            @Override
            public void onServiceDisconnect() {
                Log.i(TAG, "onServiceDisconnect");
            }
        });
...
    }
}
public class MainActivity extends AppCompatActivity {

    Button btnCamera;
    Button btnGallery;
    Button btnRun;
    ImageView imgMain;
    Thread mThread;
    Bitmap mBitmap;
    Bitmap mBitmapSR;
    private Uri imageUri;
    ...
    @Override
    protected void onCreate(Bundle savedInstanceState) {
           ...
        imgMain = (ImageView) findViewById(R.id.img_main);
        btnCamera = (Button) findViewById(R.id.btn_camera);
        btnGallery = (Button) findViewById(R.id.btn_gallery);
        btnRun = (Button) findViewById(R.id.btn_run);

        btnCamera.setOnClickListener(new View.OnClickListener() {
            @Override
            public void onClick(View v) {
                onCameraClick();
            }
        });
        btnGallery.setOnClickListener(new View.OnClickListener() {
            @Override
            public void onClick(View v) {
                onGalleryClick();
            }
        });
        btnRun.setOnClickListener(new View.OnClickListener() {
            @Override
            public void onClick(View v) {
                mThread = new Thread(r);
                mThread.start();
            }
        });
        requestPermissions();
    }
public class MainActivity extends AppCompatActivity {
...
    private void requestPermissions(){
        try {
            if (Build.VERSION.SDK_INT >= Build.VERSION_CODES.M) {
                int permission = ActivityCompat.checkSelfPermission(this, Manifest.permission.WRITE_EXTERNAL_STORAGE);
                if(permission != PackageManager.PERMISSION_GRANTED) {
                    ActivityCompat.requestPermissions(this,
                            new String[] {Manifest.permission.WRITE_EXTERNAL_STORAGE, Manifest.permission.READ_EXTERNAL_STORAGE},
                            REQUEST_IMAGE_GALLERY);
                }

                permission = ActivityCompat.checkSelfPermission(this, Manifest.permission.CAMERA);
                if(permission != PackageManager.PERMISSION_GRANTED) {
                    ActivityCompat.requestPermissions(this,
                            new String[] {Manifest.permission.CAMERA},
                            REQUEST_IMAGE_CAPTURE);
                }
            }
        } catch (Exception e) {
            e.printStackTrace();
        }
    }
    @Override
    public void onRequestPermissionsResult(int requestCode, String[] permissions, int[] grantResults) {
        super.onRequestPermissionsResult(requestCode, permissions,  grantResults);
    }
}
public class MainActivity extends AppCompatActivity {
...
            private void onCameraClick() {
                  takePictureFromCamera();
            }

           private void onGalleryClick() {
                 chooseImageFromStorage();
           }
}
The takePictureFromCamera() and chooseImageFromStorage() methods are used respectively, to take a picture and select an image from gallery. Define them as follows:
public class MainActivity extends AppCompatActivity {
...
    private void takePictureFromCamera() {
    File fileImage = new File(getExternalCacheDir(), "image.jpg");
    try {
        if (fileImage.exists()){
            fileImage.delete();
        }
        fileImage.createNewFile();
    } catch (IOException e) {
        e.printStackTrace();
    }
    if (Build.VERSION.SDK_INT >= 24){
        imageUri = FileProvider.getUriForFile(MainActivity.this, "com.huawei.hiai.tutorial.visionfun.fileProvider", fileImage);
    } else {
        imageUri = Uri.fromFile(fileImage);
    }
    Intent intent = new Intent(MediaStore.ACTION_IMAGE_CAPTURE);
    intent.putExtra(MediaStore.EXTRA_OUTPUT, imageUri);
    if (intent.resolveActivity(getPackageManager()) != null) {
        startActivityForResult(intent, REQUEST_IMAGE_CAPTURE);
    }
  }

  private void chooseImageFromStorage() {
    Intent intent = new Intent(Intent.ACTION_GET_CONTENT);
    intent.setType("image/*");
    if(intent.resolveActivity(getPackageManager() )!= null){
        startActivityForResult(intent, REQUEST_IMAGE_GALLERY);
    }
  }
}
In the preceding code, the getExternalCacheDir() method is used to obtain the directory for storing cache data of the current app in the SD card.
The getUriForFile() method is used to receive the Context object, any unique character string, and the File object. On Android 7.0or later, the real local directory cannot be used because the system considers it insecure and will throw the FileExposedException exception if it is used. The FileProvider class is a special content provider that protects data using a mechanism similar to that of the content provider.
Register FileProvider with the AndroidManifest.xml file and add the following provider section to the application section:
<provider
    android:name="android.support.v4.content.FileProvider"
    android:authorities="com.huawei.hiai.tutorial.visionfun.fileProvider"
    android:exported="false"
    android:grantUriPermissions="true">
    <!-- Specify the shared path for Uri -->
    <meta-data
        android:name="android.support.FILE_PROVIDER_PATHS"
        android:resource="@xml/file_provider_paths" />
</provider>
In the code, meta-data references xml to specify the shared directory.
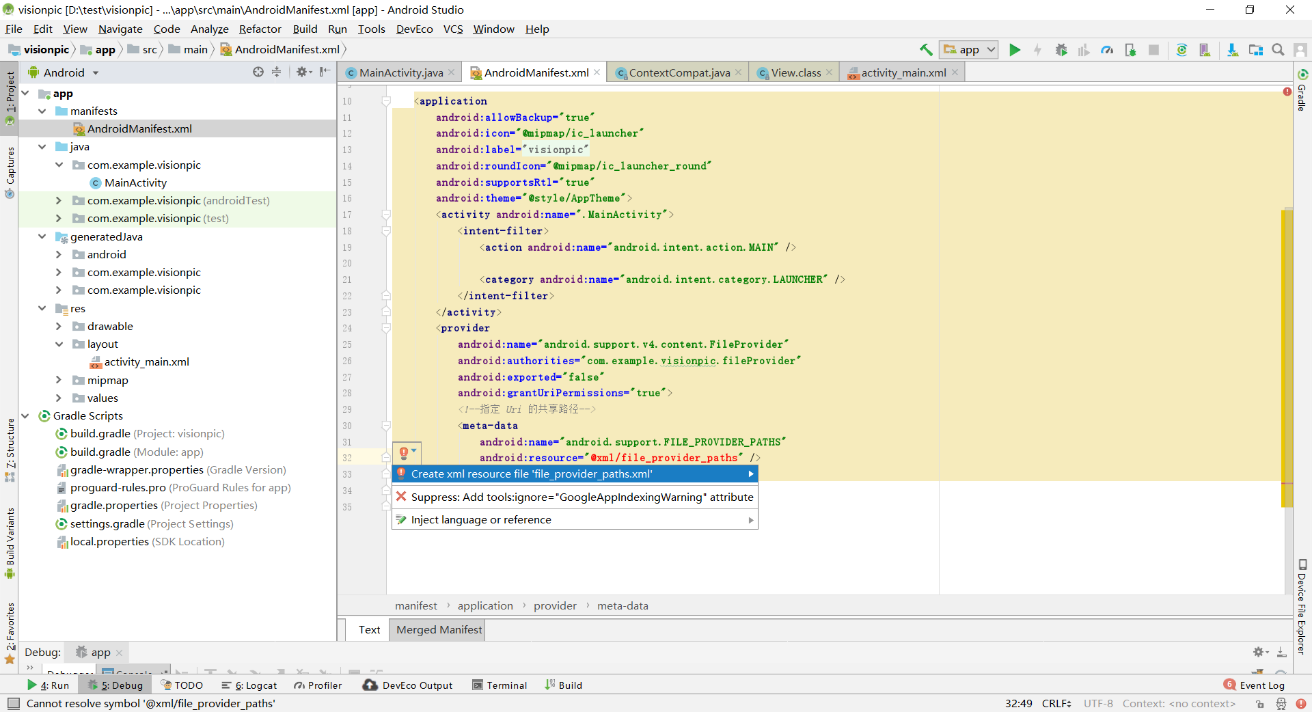
Hover the mouse pointer over the missing resource definition (@xml/file_provider_paths in red). When a bulb icon displays at the beginning of this line, click the drop-down arrow and select Create xml resource "file_provider_path.xm"**".
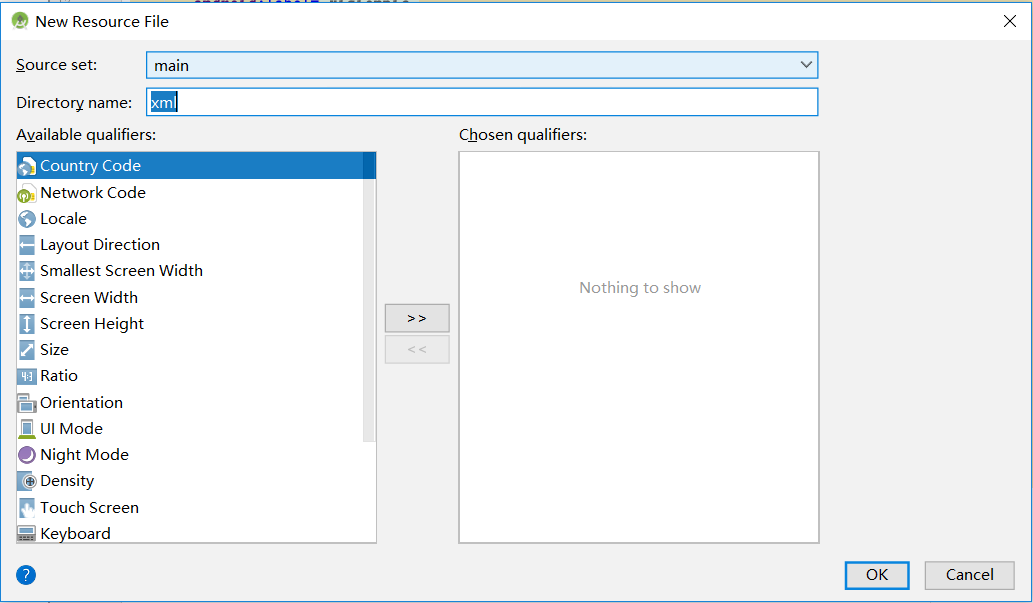
Click OK and add the following definition to the XML file that is created:
<external-path name="img" path=""/>
The following figure shows the configuration effect.

Define the onActivityResult() method to receive the result of taking a picture or selecting an image.
@Override
protected void onActivityResult(int requestCode, int resultCode, Intent data) {
    //super.onActivityResult(requestCode, resultCode, data);
    if(resultCode == RESULT_CANCELED)
        return;
    if (resultCode == RESULT_OK){
        try {
            if (requestCode == REQUEST_IMAGE_CAPTURE)
                mBitmap = BitmapFactory.decodeStream(getContentResolver().openInputStream(imageUri));
            imgMain.setImageBitmap(mBitmap);
            else if (requestCode == REQUEST_IMAGE_GALLERY)
                mBitmap = BitmapFactory.decodeStream(getContentResolver().openInputStream(data.getData()));
            imgMain.setImageBitmap(mBitmap);
        }catch (FileNotFoundException e) {
            e.printStackTrace();
        }
    }
}
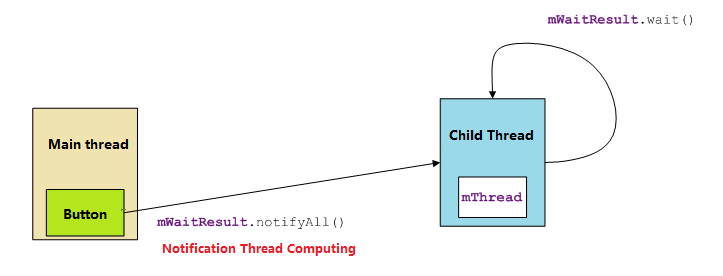
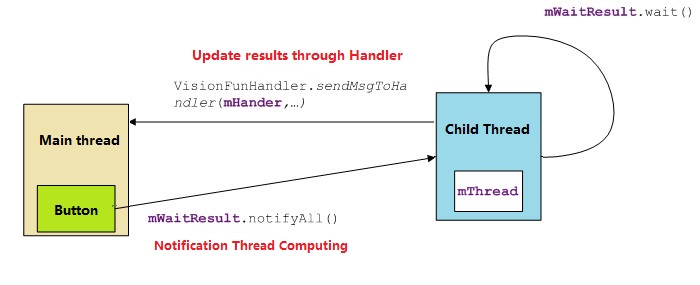
The mThread runs as a child thread independent from the main thread. During the running, the mThread waits for the notify event of the mWaitResult object. Each time the mThread obtains the event, it calls the specified CV HiAI model or algorithm to process the image synchronously. After the processing has completed, the result will display.
The Java Handler message mechanism (mHander) uses a message to asynchronously send the processing result to the main thread, which improves the system scalability and facilitates future maintenance.
public class MainActivity extends AppCompatActivity {
...
    private Runnable r = new Runnable() {
        @Override
        public void run() {

            if (mBitmap == null)
                return;
            Log.e("tag", "start");
            Frame frame = new Frame();
            frame.setBitmap(mBitmap);
            TableDetector mTableDetector = new TableDetector(MainActivity.this);
            JSONObject json = mTableDetector.detect(frame, null);
            String newJson = json.toString().replaceAll("\\\\", "");
            Log.e("tag", " json=" + newJson);
            Table table = mTableDetector.convertResult(json);
            if (table == null) {
                return;
            }

            Log.e("tag", " table=" + table);
            int count = table.getTableCount();
            List<TableContent> Listtc = table.getTableContent();
            StringBuilder sbTableCell = new StringBuilder();
            List<TableCell> tableCell = Listtc.get(0).getBody();
            for (TableCell c : tableCell) {
                List<String> words = c.getWord();
                StringBuilder sb = new StringBuilder();
                for (String s : words) {
                    sb.append(s).append(",");
                }
                String cell = c.getStartRow() + ":" + c.getEndRow() + ": " + c.getStartColumn() + ":" +
                        c.getEndColumn() + "; " + sb.toString();
                sbTableCell.append(cell).append("\n");
            }


            Log.e("tag", " tableCOunt=" + count);
            Log.e("tag", " sbTableCell=" + sbTableCell.toString());

            // Return messages to the main thread through Handler
            Message msg = new Message();
            msg.what = 100;
            msg.obj = sbTableCell.toString();
            mHander.sendMessage(msg);
        }

    };
}
public class MainActivity extends AppCompatActivity {
 ...
    private Handler mHander = new Handler()
    @Override
    public void handleMessage(Message msg) {
        super.handleMessage(msg);
        int status = msg.what;
        switch (status) {
        ...
            case 100:
                if (msg.obj == null) {
                    return;
                }
                String result = (String) msg.obj;
// Execute your actions after you get the results

                break;
...
        }

    };
}
To verify that your Huawei mobile phone has been successfully connected to the computer through a USB cable, start the command console and run the following command:
adb devices
You can expect for the serial number of your mobile phone to display. An example of the output is as follows:
List of devices attached
The preceding information indicates that the mobile phone has successfully connected.
In Android Studio, click Run. Then, select your mobile phone as the deployment target and click OK to start the app on the mobile phone.
Well done. You have successfully completed this codelab, and learned:
For more information about HUAWEI HiAI, please visit our official website at the following URL: