Site Kit is the most common service in lifestyle apps. An app can use the nearby place search capability in Site Kit to search for places nearby the pinpointed user and obtain details about a place. This kit can be combined with Awareness Kit in order to assign several barriers to make a smarter app.
On the other hand, Nearby Service has three main features including Nearby Connection, Nearby Message and Nearby Wi-Fi Sharing. Using Nearby Message apps can communicate with Bluetooth beacons placed nearby. The beacons can provide the app with more interactive actions which can be very useful for the users. Text to Speech (TTS) feature of ML Kit can vocalize the context which is provided by the app. This can be used to vocalize the messages retrieved from the beacons.
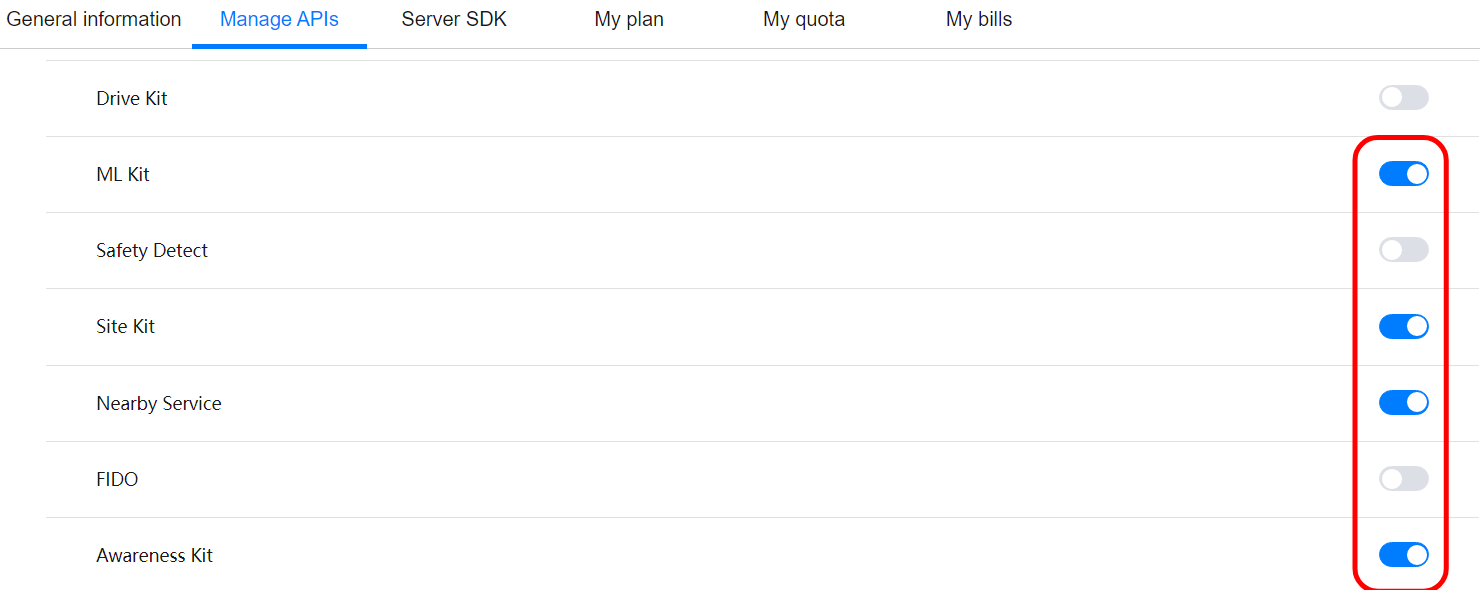
To use those kits, you will need to:
In this codelab, you will create an Android project with MVVM architecture and implement Nearby Service and ML Kit- Text To Speech for Virtual Guide, also Site Kit and Awareness Kit for a notification system and a search system.
Through the demo project, you will:
In this codelab, you will learn How to:
Create an app in AppGallery Connect and obtain the project configuration file agconnect-services.json. The procedure is as follows:
For Android Studio, Huawei provides the HMS Core SDK that can be integrated by using the Maven repository. Before developing your app, you will need to integrate the HMS Core SDK into your Android Studio project.
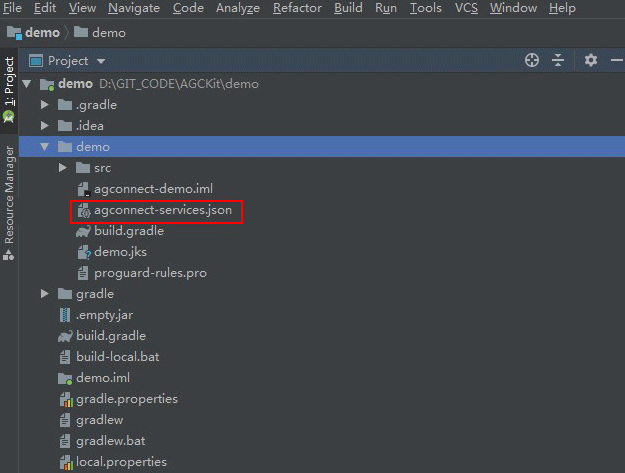
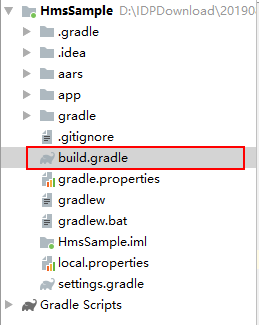
allprojects {
    repositories {
        google()
        jcenter()
        maven {url 'https://developer.huawei.com/repo/'}
    }
}

buildscript {
    repositories {
        google()
        jcenter()

        maven {url 'https://developer.huawei.com/repo/'}
    }
}

buildscript {
    dependencies {
        classpath 'com.android.tools.build:gradle:3.4.2'
        classpath 'com.huawei.agconnect:agcp:1.4.1.300'
    }
}
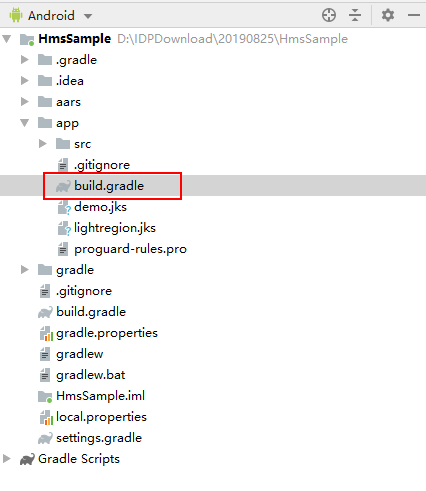
apply plugin: 'com.huawei.agconnect'

dependencies {
     implementation 'com.huawei.hms:site:{version}'
     implementation 'com.huawei.hms:awareness:{version}'
     implementation 'com.huawei.hms:nearby:{version}'
	implementation 'com.huawei.hms:ml-computer-voice-tts:{version}'

}
android.buildFeatures.dataBinding = true

Open proguard-rules.pro, the obfuscation configuration file of your Android Studio project.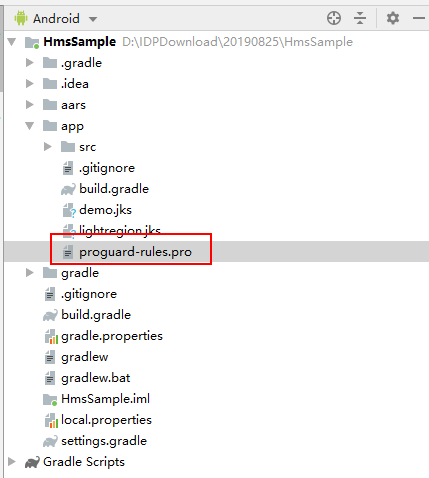
-ignorewarnings
-keepattributes *Annotation*
-keepattributes Exceptions
-keepattributes InnerClasses
-keepattributes Signature
-keepattributes SourceFile,LineNumberTable
-keep class com.hianalytics.android.**{*;}
-keep class com.huawei.updatesdk.**{*;}
-keep class com.huawei.hms.**{*;}
In this codelab, we will create a search page with a recycler view to show the nearby museums, a range slider and a search button. Also, a virtual guide page where the exhibit information is presented will be designed.
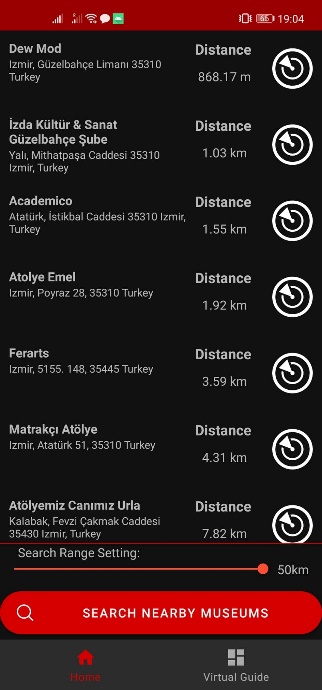
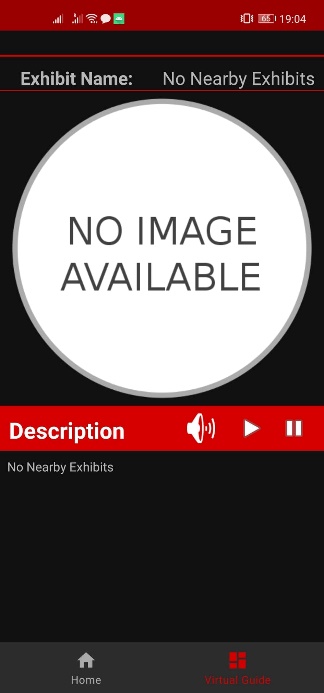
Step 1 Set Site Kit Nearby Search feature properties. Since this app is meant to search museums, set PoiType as LocationType.Museum and user location should be set as the location. User location can be retrieved with Location Kit. For more information on how to integrate, please refer toLocation Kit-Development Guide. In addition, preferred language, radius and page size can be set here. Site Kit Nearby Search is working with pagination logic.
Kotlin:
fun searchMuseums(location: Location, radius: Int, pageIndex: Int, museumSearchResultListener: ResultListener) {
    // TODO : Set nearby search properties
    val apiKey = URLEncoder.encode(context.getString(R.string.api_key), "UTF-8")
    val searchService = SearchServiceFactory.create(context, apiKey)
    val request = NearbySearchRequest()
    request.setLocation(Coordinate(location.latitude, location.longitude))
    request.setRadius(radius * 1000)
    request.setPoiType(LocationType.MUSEUM)
    request.setLanguage("en")
    request.setPageSize(20)
    request.setPageIndex(pageIndex)
Java:
public void searchMuseums(Location location, int radius, int pageIndex, MuseumSearchResultListener museumSearchResultListener) throws UnsupportedEncodingException {
    // TODO : Set nearby search properties
    String api_key = URLEncoder.encode(context.getString(R.string.api_key), "UTF-8");
    SearchService searchService = SearchServiceFactory.create(context, api_key);
    NearbySearchRequest request = new NearbySearchRequest();
    request.setLocation(new Coordinate(location.getLatitude(), location.getLongitude()));
    request.setRadius(radius * 1000);
    request.setPoiType(LocationType.MUSEUM);
    request.setLanguage("en");
    request.setPageSize(20);
    request.setPageIndex(pageIndex);
Step 2 Set a result listener which handles the search results. The recycler view adapter is updated when the search result is retrieved.
Kotlin:
    // TODO : Set a result listener which handles the results
val resultListener: SearchResultListener = object : SearchResultListener {
    override fun onSearchResult(results: NearbySearchResponse?) {
        if (results == null || results.totalCount <= 0) {
            return
        }
        val sites = results.getSites()
        if (sites == null || sites.size == 0) {
            return
        }
        viewModel.isLoading.postValue(false)
        museumSearchResultListener.onResult(sites)
    }

    override fun onSearchError(searchStatus: SearchStatus) {
        Log.e(TAG, "Error : " + searchStatus.errorCode + " " + searchStatus.errorMessage)
        viewModel.isLoading.postValue(false)
        museumSearchResultListener.onFailure(Exception(searchStatus.errorMessage))
    }
}
Java:
// TODO : Set a result listener which handles the results
SearchResultListener resultListener = new SearchResultListener() {
    @Override
    public void onSearchResult(NearbySearchResponse results) {
        if (results == null || results.totalCount <= 0) {
            return;
        }
        List sites = results.getSites();
        if (sites == null || sites.size() == 0) {
            return;
        }
        viewModel.isLoading.postValue(false);
        museumSearchResultListener.onResult(sites);
    }

    @Override
    public void onSearchError(SearchStatus searchStatus) {
        Log.e(TAG, "Error : " + searchStatus.errorCode + " " + searchStatus.errorMessage);
        viewModel.isLoading.postValue(false);
        museumSearchResultListener.onFailure(searchStatus.errorMessage);
    }
};
Step 3 Start Search Service with the request and listener parameters.
Kotlin:
// TODO : Start Search Service
searchService.nearbySearch(request, resultListener)
Java:
// TODO : Start Search Service
searchService.nearbySearch(request, resultListener);
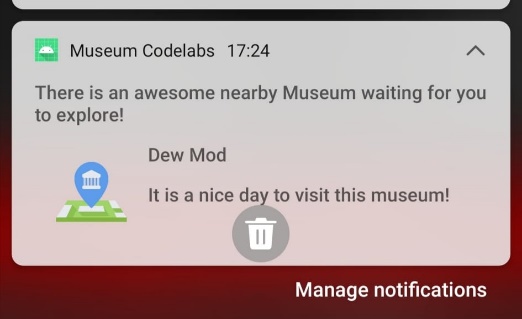
Step 1 In order to build the notification system with Awareness Service, we need to implement a foreground service which sends a notification when it is triggered. Override onHandleIntent to check barrier status and send a notification when the user triggers the barrier. Also, override onCreate function to create a notification channel.
Kotlin:
class AwarenessServiceManager : IntentService("AwarenessService") {
    override fun onHandleIntent(intent: Intent?) {
        //TODO: Check Barrier Status and Send Notification
        if (intent == null) {
            Log.e("Barrier Service:", "Intent is null")
            return
        }
        // Barrier information is transferred through intents. Parse the barrier information using the Barrier.extract method.
        val barrierStatus = BarrierStatus.extract(intent)
        // Obtain the label and current status of the barrier through BarrierStatus.
        val barrierLabel = barrierStatus.barrierLabel
        val status = barrierStatus.presentStatus
        if (status == BarrierStatus.TRUE)
            MuseumNotificationManager.sendNotification(this, "There is an awesome nearby Museum waiting for you to explore! ", barrierLabel)
    }

    override fun onCreate() {
        //TODO: Create Notification Channel
        super.onCreate()
        if (Build.VERSION.SDK_INT >= Build.VERSION_CODES.O) {
            if (getSystemService(NotificationManager::class.java) == null) return
            val notification = Notification.Builder(this, MuseumNotificationManager.CHANNEL_ID).build()
            startForeground(1, notification)
        }
    }
}
Java:
public class AwarenessServiceManager extends IntentService {
    public AwarenessServiceManager() {
        super("AwarenessService");
    }
    @Override
    protected void onHandleIntent(@Nullable Intent intent) {
        //TODO: Check Barrier Status and Send Notification
        if (intent == null) {
            Log.e("Barrier Service:", "Intent is null");
            return;
        }
        // Barrier information is transferred through intents. Parse the barrier information using the Barrier.extract method.
        BarrierStatus barrierStatus = BarrierStatus.extract(intent);
        // Obtain the label and current status of the barrier through BarrierStatus.
        String barrierLabel = barrierStatus.getBarrierLabel();
        int status = barrierStatus.getPresentStatus();
        if(status == BarrierStatus.TRUE)
            MuseumNotificationManager.sendNotification(this, "There is an awesome nearby Museum waiting for you to explore! ", barrierLabel);

    }
    @Override
    public void onCreate() {
        //TODO: Create Notification Channel
        super.onCreate();
        if (Build.VERSION.SDK_INT >= Build.VERSION_CODES.O) {
            if(getSystemService(NotificationManager.class) == null)
                return;
            Notification notification = new Notification.Builder(this, MuseumNotificationManager.CHANNEL_ID).build();
            startForeground(1, notification);
        }
    }
}
Step 2 Set all barrier properties according to your preferences. You can combine more than one barriers as it is shown below. Create an intent as the Awareness Service we defined before. Afterwards, you can retrieve a service as the type of PendingIntent using the AwaranessServiceManager intent you created before. You will assign this pending intent object while updating the barriers. Please note that you need to use foreground service for Android 8.0 or later.
Kotlin:
fun addBarrierToAwarenessKit(site: Site, radius: Double, duration: Long) {
    //TODO : Add Location Barrier to the Site Location, combine it with time barrier
    if (ActivityCompat.checkSelfPermission(context, Manifest.permission.ACCESS_FINE_LOCATION) != PackageManager.PERMISSION_GRANTED) {
        return
    }
    val stayBarrier = LocationBarrier.stay(site.location.lat, site.location.lng, radius, duration)
    val timeBarrier = TimeBarrier.inTimeCategory(TimeBarrier.TIME_CATEGORY_NIGHT)
    val combinedBarrier = AwarenessBarrier.and(stayBarrier, AwarenessBarrier.not(timeBarrier))
    val pendingIntent: PendingIntent
    val intent = Intent(context, AwarenessServiceManager::class.java)

    pendingIntent = if (Build.VERSION.SDK_INT >= Build.VERSION_CODES.O) {
        //In Android 8.0 or later, only foreground services can be started when the app is running in the background.
        PendingIntent.getForegroundService(context, 0, intent, PendingIntent.FLAG_UPDATE_CURRENT)
    } else {
        PendingIntent.getService(context, 0, intent, PendingIntent.FLAG_UPDATE_CURRENT)
    }
    updateBarrier(site.name, combinedBarrier, pendingIntent)
}
Java:
public void addBarrierToAwarenessKit(Site site, double radius, long duration) {
    //TODO : Add Location Barrier to the Site Location, combine it with time barrier
    if (ActivityCompat.checkSelfPermission(context, Manifest.permission.ACCESS_FINE_LOCATION) != PackageManager.PERMISSION_GRANTED) {
        return;
    }
    AwarenessBarrier stayBarrier = LocationBarrier.stay(site.location.lat, site.location.lng, radius, duration);
    AwarenessBarrier timeBarrier = TimeBarrier.inTimeCategory(TimeBarrier.TIME_CATEGORY_NIGHT);
    AwarenessBarrier combinedBarrier = AwarenessBarrier.and(stayBarrier, AwarenessBarrier.not(timeBarrier));
    PendingIntent pendingIntent;
    Intent intent = new Intent(context, AwarenessServiceManager.class);
    if (Build.VERSION.SDK_INT >= Build.VERSION_CODES.O) {
        //In Android 8.0 or later, only foreground services can be started when the app is running in the background.
        pendingIntent = PendingIntent.getForegroundService(context, 0, intent, PendingIntent.FLAG_UPDATE_CURRENT);
    } else {
        pendingIntent = PendingIntent.getService(context, 0, intent, PendingIntent.FLAG_UPDATE_CURRENT);
    }
    updateBarrier(site.name, combinedBarrier, pendingIntent);
}
Step 3 Update the barrier using the barrier and pending intent we created last step.
Kotlin:
private fun updateBarrier(label: String, barrier: AwarenessBarrier, pendingIntent: PendingIntent) {
    //TODO : Update Barrier
    val request = BarrierUpdateRequest.Builder()
            .addBarrier(label, barrier, pendingIntent)
            .build()
    Awareness.getBarrierClient(context.applicationContext).updateBarriers(request).addOnSuccessListener {
        Toast.makeText(context, "Add Barrier is successful", Toast.LENGTH_SHORT).show()
        Log.i("AddBarrier", "add barrier success")
    }.addOnFailureListener { e: Exception? ->
        Toast.makeText(context, "Add Barrier is failed", Toast.LENGTH_SHORT).show()
        Log.e("AddBarrier", "add barrier failed", e)
    }
}
Java:
private void updateBarrier(String label, AwarenessBarrier barrier, PendingIntent pendingIntent) {
    //TODO : Update Barrier
    BarrierUpdateRequest request = new BarrierUpdateRequest.Builder()
            .addBarrier(label, barrier, pendingIntent)
            .build();
    Awareness.getBarrierClient(context.getApplicationContext()).updateBarriers(request).addOnSuccessListener(aVoid -> {
                Toast.makeText(context, "Add Barrier is successful", Toast.LENGTH_SHORT).show();
                Log.i("AddBarrier", "add barrier success");
            }
    ).addOnFailureListener(e -> {
        Toast.makeText(context, "Add Barrier is failed", Toast.LENGTH_SHORT).show();
        Log.e("AddBarrier", "add barrier failed", e);
    });
}
HUAWEI Nearby Service provides two methods for managing beacons. One is to call RESTful APIs. To download the sample code for API calls, please refer to the Beacon Management Sample Code. The other is to manage beacons on the web portal provided by Huawei. In this demo, I will explain the configurations and the use of Beacon Manager app. Please note that you need to enable Nearby Service and select data storage for the project in order to register and manage beacons. For the details about selecting a data storage, please refer to Setting a Data Storage Location.
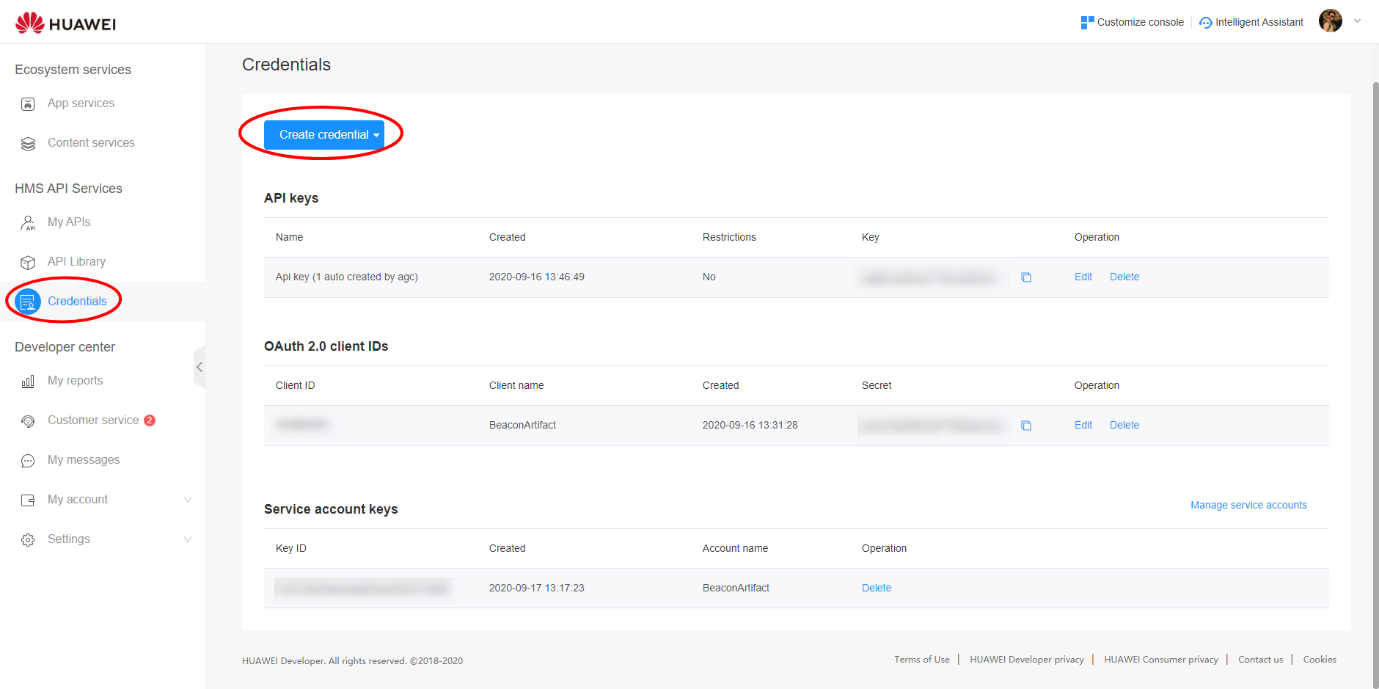
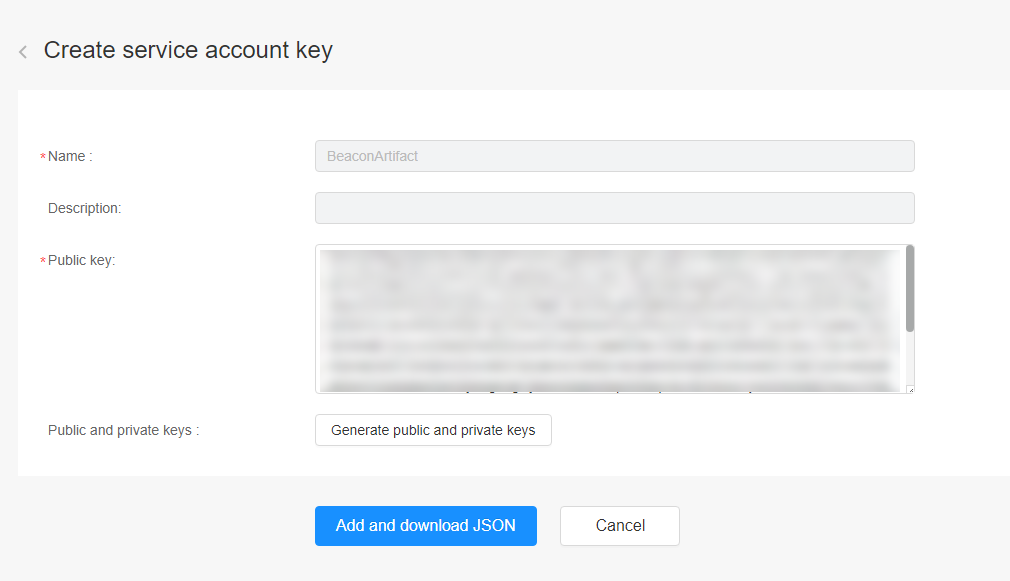
Step -1 Create a service account key. Sign in to HUAWEI Developers, go to Console > HMS API Services > Credentials, select your project, and click Create Credential. Then, click the Service Account Key. Create a service account key and download the JSON file. We will use this JSON file while running the Beacon Manager app.
Step-2 Run the Beacon Manager app on your device. For detailed instructions, you can find the Readme.md file inside the project folder of the Beacon Manager app. In order to run Beacon Manager without any problems, follow these steps:

-	productFlavors {
    product {
        dimension "mode"
        //Germany nearby server
        buildConfigField("String", "MESSAGE_HOST", '"nearby-message-dre.platform.hicloud.com"')
        buildConfigField("String", "MESSAGE_PORT", '""')
    }

    // for test
    mirror {
        dimension "mode"
        versionName = defaultConfig.versionName + ".mirror"
        buildConfigField("String", "MESSAGE_HOST", '"nearby-message-dre.platform.hicloud.com"')
        buildConfigField("String", "MESSAGE_PORT", '""')
    }
}
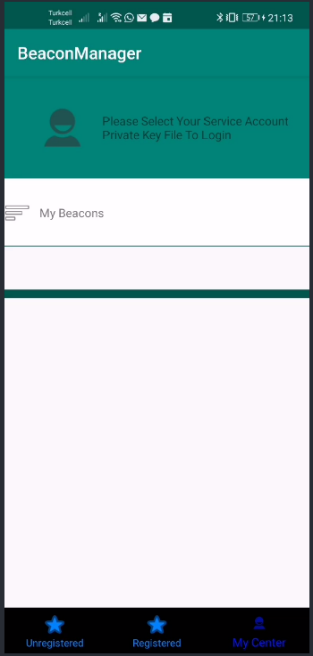
Step-3 Sign in to Beacon Manager app. Access My Center, tap your profile image and use the JSON key file downloaded in Step 1 to sign in.
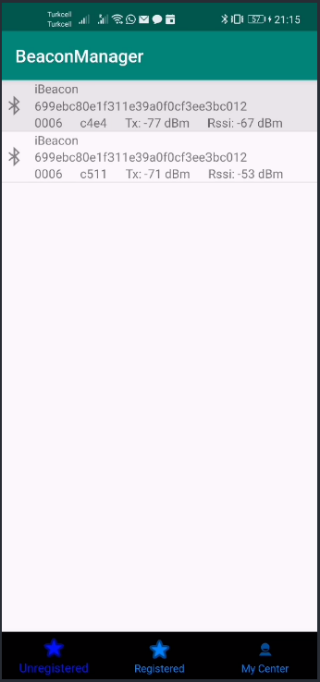
Step-4 Register beacons. Go to Unregistered, refresh the page to discover new beacons Artifact 1 and Artifact 2, and tap each beacon to register it.
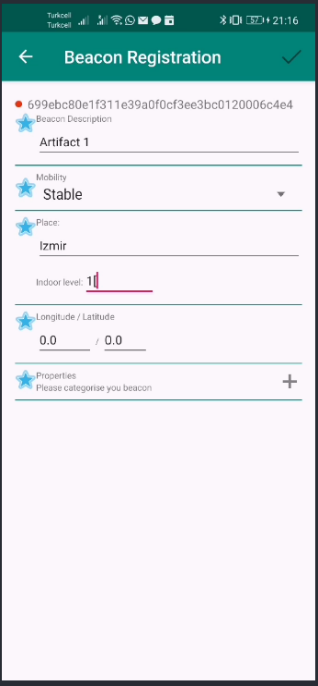
Step-5 Configure message attachments. Go to Registered, tap each beacon, and configure message attachments.
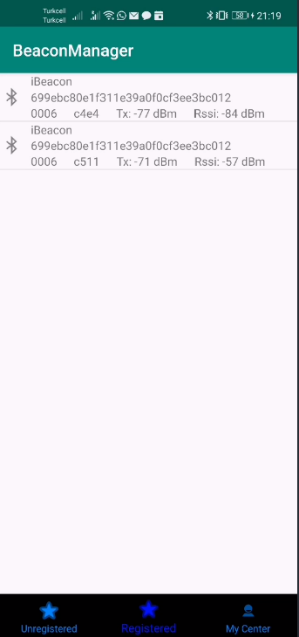
Configure message attachments for each exhibit beacon. These messages are delivered to the application with Nearby Service whenever these beacons are discovered by the device.
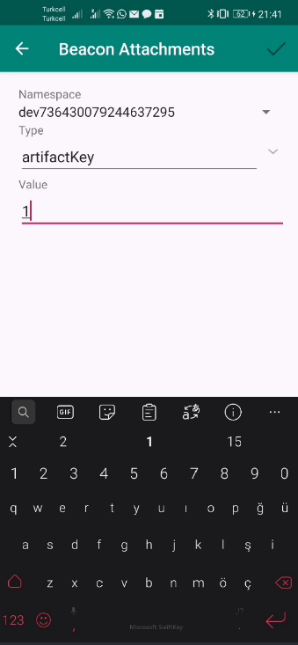
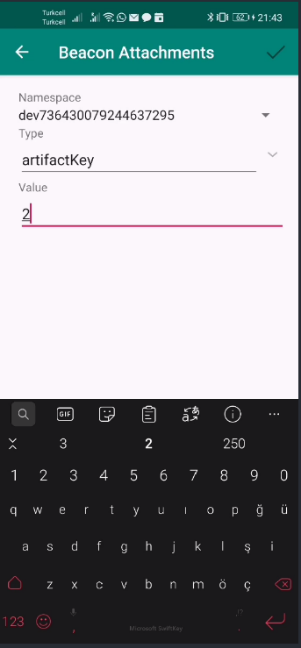
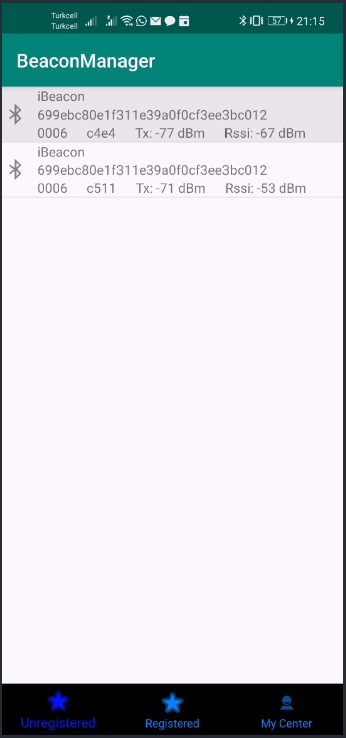
The first beacon: Major: 6 Minor: 50404
The second beacon: Major: 6 Minor: 50449
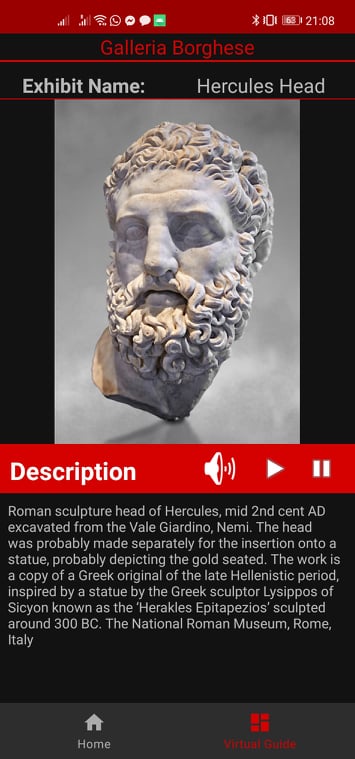
Step 1: Set Message Engine and Message Handler. Override onFound, onLost and onDistanceChanged. onFound will be triggered when a beacon is discovered, onLost will be triggered when a beacon signal is lost and onDistanceChanged will be triggered when the distance between the beacon and the device has changed. All of these functions provide the message which is retrieved from the beacon. onDistanceChanged also provides distance information of the beacon.
Kotlin:
//TODO : Set Message Engine and Set Message Handler
messageEngine = Nearby.getMessageEngine(activity)
messageEngine!!.registerStatusCallback(StatusCallback())
mMessageHandler = object : MessageHandler() {
    override fun onFound(message: Message) {
        super.onFound(message)
        doOnFound(message)
    }

    override fun onLost(message: Message) {
        super.onLost(message)
        doOnLost(message)
    }

    override fun onDistanceChanged(message: Message, distance: Distance) {
        super.onDistanceChanged(message, distance)
        doOnDistanceChanged(message, distance)
    }
}
Java:
//TODO : Set Message Engine and Set Message Handler
messageEngine = Nearby.getMessageEngine(activity);
messageEngine.registerStatusCallback(new StatusCallback());

mMessageHandler = new MessageHandler() {
    @Override
    public void onFound(Message message) {
        super.onFound(message);
        doOnFound(message);
    }

    @Override
    public void onLost(Message message) {
        super.onLost(message);
        doOnLost(message);
    }

    @Override
    public void onDistanceChanged(Message message, Distance distance) {
        super.onDistanceChanged(message, distance);
        doOnDistanceChanged(message, distance);
    }
};
Step 2: Build MessagePicker and Policy variables, and use these variables to build GetOption. Afterwards, use GetOption with to create a task which captures the messages from the beacons. You can attach onSuccesListener and onFailureListener to the task.
Kotlin:
//TODO: Set properties and registration task of the message engine
val msgPicker = MessagePicker.Builder().includeAllTypes().build()
val policy = Policy.Builder()
	.setTtlSeconds(Policy.POLICY_TTL_SECONDS_INFINITE).build()
val getOption = GetOption.Builder().setPicker(msgPicker).setPolicy(policy).build()
val task = Nearby.getMessageEngine(activity)[mMessageHandler, getOption]


task.addOnSuccessListener { Toast.makeText(activity.applicationContext, "SUCCESS", Toast.LENGTH_SHORT).show() }
        .addOnFailureListener { e: Exception? ->
            Log.e("Beacon", "register failed:", e)
            if (e is ApiException) {
                when (e.statusCode) {
                    StatusCode.STATUS_MESSAGE_AUTH_FAILED -> {
                        Toast.makeText(activity.applicationContext, "configuration_error", Toast.LENGTH_SHORT).show()
                    }
                    StatusCode.STATUS_MESSAGE_APP_UNREGISTERED -> {
                        Toast.makeText(activity.applicationContext, "permission_error", Toast.LENGTH_SHORT).show()
                    }
                    else -> {
                        Toast.makeText(activity.applicationContext, "start get beacon message failed", Toast.LENGTH_SHORT)
                                .show()
                    }
                }
            } else {
                Toast.makeText(activity.applicationContext, "start get beacon message failed", Toast.LENGTH_SHORT)
                        .show()
            }
        }
Java:
//TODO: Set some properties and registration task of the message engine
MessagePicker msgPicker = new MessagePicker.Builder().includeAllTypes().build();
Policy policy = new Policy.Builder().setTtlSeconds(Policy.POLICY_TTL_SECONDS_INFINITE).build();
GetOption getOption = new GetOption.Builder().setPicker(msgPicker).setPolicy(policy).build();
Task task = Nearby.getMessageEngine(activity).get(mMessageHandler, getOption);

task.addOnSuccessListener(aVoid -> Toast.makeText(activity.getApplicationContext(), "SUCCESS", Toast.LENGTH_SHORT).show())
            .addOnFailureListener(e -> {
                Log.e("Beacon", "register failed:", e);
                if (e instanceof ApiException) {
                    switch (((ApiException) e).getStatusCode()) {
                        case StatusCode.STATUS_MESSAGE_AUTH_FAILED: {
                            Toast.makeText(activity.getApplicationContext(), "configuration_error", Toast.LENGTH_SHORT).show();
                            break;
                        }
                        case StatusCode.STATUS_MESSAGE_APP_UNREGISTERED: {
                            Toast.makeText(activity.getApplicationContext(), "permission_error", Toast.LENGTH_SHORT).show();
                            break;
                        }
                        default: {
                            Toast.makeText(activity.getApplicationContext(), "start get beacon message failed", Toast.LENGTH_SHORT)
                                    .show();
                            break;
                        }
                    }
                } else {
                    Toast.makeText(activity.getApplicationContext(), "start get beacon message failed", Toast.LENGTH_SHORT)
                            .show();
                }
            });
}
Step 3: Although beacon detection range varies according to the device model, generally it is around 75 meters. This function downloads the exhibit information from the preferred database as soon as the beacon is discovered.
Kotlin:
private fun doOnFound(message: Message?) {
    // TODO: Get Exhibit Information when a beacon discovered
    the message?.let {
        val type = it.type
        val messageContent = String(it.content)
        Log.wtf("Beacon", "New Message:\$messageContent type:\$type")
        if (type.equals("No", ignoreCase = true)) downloadArtifact(messageContent)
    }
}
Java:
private void doOnFound(Message message) {
    // TODO: Get Exhibit Information when a beacon discovered
    if (message == null) {
        return;
    }
    String type = message.getType();
    String messageContent = new String(message.getContent());
    Log.wtf("Beacon", "New Message:$messageContent type:$type");
    if (type.equalsIgnoreCase("No"))
        downloadArtifact(messageContent);
}
Step 4: Implement doOnLost function to clear unnecessary beacon information when the signal is lost.
Kotlin:
private fun doOnLost(message: Message?) {
    //TODO: Remove unnecessary exhibit information when the beacon signal is lost
    the message?.let {
        val messageContent = String(it.content)
        val id = messageContent.toInt()
        exhibitDistances.remove(id)
        downloadedExhibits.remove(id)
        if(downloadedExhibits.size == 0)
            viewModel.currentExhibit.postValue(null)
    }
}
Java:
private void doOnLost(Message message) {
    //TODO: Remove unnecessary exhibit information when the beacon signal is lost
    if (message == null) {
        return;
    }
    String messageContent = new String(message.getContent());
    int id = Integer.parseInt(messageContent);
    exhibitDistances.remove(id);
    downloadedExhibits.remove(id);
    if(downloadedExhibits.size()==0)
        viewModel.currentExhibit.postValue(null);
}
Step 5: Whenever distance of any beacons change, find the closest one among all beacons. Afterwards compare it to the threshold to make sure if the user is close enough to the beacon. If the user is closer than the threshold, update the UI with the exhibit information. Otherwise, update the UI with the information telling the user there are no exhibits nearby.
Kotlin:
private fun doOnDistanceChanged(message: Message?, distance: Distance) {
    //TODO : Handle On Distance Changed Messagethe
message?.let {
        val type = it.type
        val messageContent = String(it.content)
        Log.wtf("Beacon", "New Message:" + messageContent + " type:" + type + "Distance: " + distance.meters)
        if (type.equals("No", ignoreCase = true))
        operateOnDistanceChanged(messageContent, distance)
    }
}

private fun operateOnDistanceChanged(messageContent: String, distance: Distance) {
    //TODO : Find the closest exhibit, compare it to the threshold and update UI
    val id = messageContent.toInt()
    exhibitDistances[id] = distance
    val closestIndex = findClosest()
    val exhibitRange = Constant.EXHIBIT_DETECT_RANGE
    if (closestIndex!!.value.meters < exhibitRange) {
        val closestInfo = findExhibitInformation(closestIndex.key)
        updateUI(closestInfo)
    } else {
        viewModel.currentExhibit.postValue(null)
    }
}

private fun findClosest(): Map.Entry? {
    //TODO : Find closest Exhibit
    var closest: Map.Entry? = null
    for (entry in exhibitDistances.entries) {
        if (closest == null || entry.value < closest.value) {
            closest = entry
        }
    }
    return closest
}
Java:
private void doOnDistanceChanged(Message message, Distance distance) {
    //TODO : Handle On Distance Changed Message
    if (message == null) {
        return;
    }
    String type = message.getType();
    String messageContent = new String(message.getContent());
    Log.wtf("Beacon", "New Message:" + messageContent + " type:" + type + "Distance: " + distance.getMeters());
    if (type.equalsIgnoreCase("No"))
        operateOnDistanceChanged(messageContent, distance);
}

private void operateOnDistanceChanged(String messageContent, Distance distance) {
    //TODO : Find the closest exhibit, compare it to threshold and update UI
    int id = Integer.parseInt(messageContent);
    exhibitDistances.put(id, distance);

    Map.Entry closestIndex = findClosest();

    double exhibitRange = Constant.EXHIBIT_DETECT_RANGE;

    if (closestIndex.getValue().getMeters() < exhibitRange) {
        Exhibit closestInfo = findExhibitInformation(closestIndex.getKey());
        updateUI(closestInfo);
    } else {
        viewModel.currentExhibit.postValue(null);
    }
}

private Map.Entry findClosest() {
    //TODO : Find closest Exhibit
    Map.Entry closest = null;
    for (Map.Entry entry : exhibitDistances.entrySet()) {
        if (closest == null || entry.getValue().compareTo(closest.getValue()) < 0) {
            closest = entry;
        }
    }
    return closest;
}
Step 1: Initialize MLTtsConfig according to your preferences. Use MLTtsConfig to retrieve MLTtsEngine.
Kotlin:
MLApplication.getInstance().apiKey = api_key
mlTtsConfig = MLTtsConfig()
        .setLanguage(MLTtsConstants.TTS_EN_US)
        .setPerson(MLTtsConstants.TTS_SPEAKER_FEMALE_EN)
        .setSpeed(Constant.TTS_SPEED)
        .setVolume(Constant.TTS_VOLUME)
mlTtsEngine = MLTtsEngine(mlTtsConfig)
Java:
// TODO : Set Machine Learning TTS properties
MLApplication.getInstance().setApiKey(api_key);

mlTtsConfig = new MLTtsConfig()
        .setLanguage(MLTtsConstants.TTS_EN_US)
        .setPerson(MLTtsConstants.TTS_SPEAKER_FEMALE_EN)
        .setSpeed(Constant.TTS_SPEED)
        .setVolume(Constant.TTS_VOLUME);
mlTtsEngine = new MLTtsEngine(mlTtsConfig);
mlTtsEngine.updateConfig(mlTtsConfig);
Step 2: Set a callback for TTS. You will have full control of TTS with this callback.
Kotlin:
// TODO : Set a callback for TTS
val callback: MLTtsCallback = object : MLTtsCallback {
    override fun onError(s: String, mlTtsError: MLTtsError) {
        //onError Implementation
    }

    override fun onWarn(s: String, mlTtsWarn: MLTtsWarn) {
        //No need for onWarn
    }

    override fun onRangeStart(s: String, i: Int, i1: Int) {
        //No need for onRangeStart
    }

    override fun onAudioAvailable(s: String, mlTtsAudioFragment: MLTtsAudioFragment, i: Int, pair: Pair, bundle: Bundle) {
        //No need for onAudioAvailable
    }

    override fun onEvent(s: String, i: Int, bundle: Bundle) {
        when (i) {
            MLTtsConstants.EVENT_PLAY_START -> {
            }
            MLTtsConstants.EVENT_PLAY_STOP ->
                // Called when playback stops.
                bundle.getBoolean(MLTtsConstants.EVENT_PLAY_STOP_INTERRUPTED)
            MLTtsConstants.EVENT_PLAY_RESUME -> {
            }
            MLTtsConstants.EVENT_PLAY_PAUSE -> {
            }
            else -> {
            }
        }
    }
}
mlTtsEngine.setTtsCallback(callback)
Java:
// TODO : Set a callback for TTS
MLTtsCallback callback = new MLTtsCallback() {
    @Override
    public void onError(String s, MLTtsError mlTtsError) {
        //onError Implementation
    }

    @Override
    public void onWarn(String s, MLTtsWarn mlTtsWarn) {
        //No need for onWarn
    }

    @Override
    public void onRangeStart(String s, int i, int i1) {
        //No need for onRangeStart
    }

    @Override
    public void onAudioAvailable(String s, MLTtsAudioFragment mlTtsAudioFragment, int i, Pair pair, Bundle bundle) {
        //No need for onAudioAvailable
    }

    @Override
    public void onEvent(String s, int i, Bundle bundle) {
        switch (i) {
            case MLTtsConstants.EVENT_PLAY_START:
                // Called when playback starts.
                break;
            case MLTtsConstants.EVENT_PLAY_STOP:
                // Called when playback stops.
                bundle.getBoolean(MLTtsConstants.EVENT_PLAY_STOP_INTERRUPTED);
                break;
            case MLTtsConstants.EVENT_PLAY_RESUME:
                // Called when playback resumes.
                break;
            case MLTtsConstants.EVENT_PLAY_PAUSE:
                // Called when playback pauses.
                break;
            default:
                break;
        }
    }
};
mlTtsEngine.setTtsCallback(callback);
Step 3: TTS has a character limit to vocalize the content. To overcome this limit, you can split the content by sentences and append every sentence one by one to TTS. TTS will vocalize the content respectively.
Kotlin:
fun startTTS(text: String) {
    //TODO : Start TTS reading. Split the context by sentences in order to overcome the character limit of the TTS.
    // Append all sentences one by one
    mlTtsEngine.let {
        it.stop()
        val sentences = text.split("\n|\\.(?!\\d)|(?
Java:
public void startTTS(String text) {
    //TODO : Start TTS reading. Split the context by sentences in order to overcome the character limit of the TTS.
    // Append all sentences one by one
    if (mlTtsEngine != null) {
        mlTtsEngine.stop();
        String[] sentences = text.split("\n|\\.(?!\\d)|(?
Step 4: Define stop TTS and destroy TTS engine functions.
Kotlin:
fun stopTTS() {
    //TODO: Stop TTS function
    mlTtsEngine.stop()
}
fun destroyTTS() {
    //TODO: Destroy TTS engine function
    mlTtsEngine.shutdown()
}
Kotlin:
public void stopTTS() {
    //TODO: Stop TTS function
    if (mlTtsEngine != null) {
        mlTtsEngine.stop();
    }
}
public void destroyTTS() {
    if (mlTtsEngine != null) {
        mlTtsEngine.shutdown();
    }
}
Upon completing the essential parts of the code, connect your mobile device to the PC and enable the USB debugging mode. In the Android Studio window, click  icon to run the project you have created in Android Studio to generate an APK. Then install the APK on the mobile device.
 icon at the end of an item to add an Awareness barrier.

Well done. You have successfully completed this codelab and learned:
HUAWEI Site Kit
HUAWEI Awareness Kit
HUAWEI Nearby Service
HUAWEI ML Kit
You can download the codelab at https://github.com/huaweicodelabs/MuseumApplication/tree/master/