HUAWEI Wear Engine provides open APIs to help developers quickly integrate the capabilities of Wear Engine into services or apps on phones and watches. By calling these APIs, apps on the phones and watches will be able to communicate and transmit data with each other. Wear Engine provides a simple way for integration in which you do not need to take any action for cross-device interactions.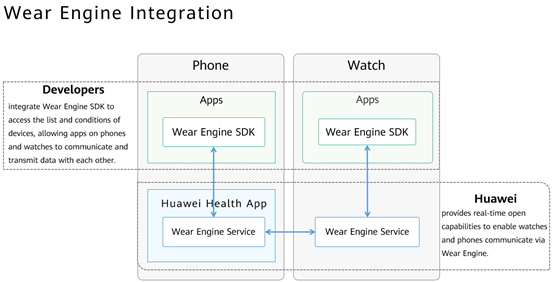
This codelab provides a basic app development sample. You can use Wear Engine to implement message communication and data transmission between phones and watches.
In this codelab, you will learn how to:
buildscript {
repositories {
    maven { url 'http://developer.huawei.com/repo/' }
    google()
    jcenter()
}
dependencies {
    classpath 'com.android.tools.build:gradle:3.5.3'
}
}
allprojects {
repositories {
    maven { url 'http://developer.huawei.com/repo/' }
    google()
    jcenter()
}
}
implementation ‘com.huawei.hms:wearengine:5.0.0.300'private void initData() {
HiWear.getAuthClient(this).requestPermission(new AuthCallback() {
@Override
public void onOk(Permission[] permissions) {
Log.d(TAG, "getAuthClient onOk");
}
@Override
public void onCancel() {
Log.e(TAG, "getAuthClient onCancel");
}
}, Permission.DEVICE_MANAGER);
}
private void initData() {
HiWear.getAuthClient(this).requestPermission(new AuthCallback() {
    @Override
    public void onOk(Permission[] permissions) {
        Log.d(TAG, "getAuthClient onOk");
    }

    @Override
    public void onCancel() {
        Log.e(TAG, "getAuthClient onCancel");
    }
}, Permission.DEVICE_MANAGER);
p2pClient = HiWear.getP2pClient(this);
deviceClient = HiWear.getDeviceClient(this);
p2pClient.setPeerPkgName("com.watch.wearengine");
p2pClient.setPeerFingerPrint("*******");
}
Fingerprint information on the watch:
com.watch.wearengine_BC1bSGDxiTcUEkNGNztsD6sLBFgFWQm9lPl05ktD1R8Bx8SvYQNhjlIMJJGRkf8yVYNxMnwNCbxToR5xerVCp+o=
Call the send method to send the file to the watch.
Add codes to build a file message in sendFile of the WearEngineMainActivity class file and call the send method to send the file to the watch.
public void sendFile(String sendFilePath) {
File sendFile = new File(sendFilePath);
Message.Builder builder = new Message.Builder();
builder.setPayload(sendFile);
Message fileMessage = builder.build();
String[] fileInfo = sendFilePath.split("/");
final String filename = fileInfo[fileInfo.length - 1];
Log.e(TAG, "file name is " + filename);
p2pClient.send(selectedDevice, fileMessage, new SendCallback() {
    @Override
    public void onSendResult(int resultCode) {
        printOperationResult(Calendar.getInstance().getTime() + SEND_MESSAGE_TO + selectedDevice.getName()
            + DEVICE_NAME_OF + PEER_PKG_NAME + STRING_RESULT + resultCode);
    }
    @Override
    public void onSendProgress(long progress) {
        printOperationResult(Calendar.getInstance().getTime() + SEND_MESSAGE_TO + selectedDevice.getName()
            + DEVICE_NAME_OF + PEER_PKG_NAME + " progress:" + progress);
        if (progress == 100) {
            sendMessageResult(filename);
        }
    }
}).addOnSuccessListener(new OnSuccessListener<Void>() {
    @Override
    public void onSuccess(Void success) {
        printOperationResult(
            SEND_MESSAGE_TO + selectedDevice.getName() + DEVICE_NAME_OF + PEER_PKG_NAME + SUCCESS);
    }
}).addOnFailureListener(new OnFailureListener() {
    @Override
    public void onFailure(Exception error) {
        printOperationResult(
            SEND_MESSAGE_TO + selectedDevice.getName() + DEVICE_NAME_OF + PEER_PKG_NAME + FAILURE);
    }
});
}
After the project is synced, select your device as the deployment target, click the run icon, install and start the sample app on the device, and start the experience test.
See the running result in the figure below.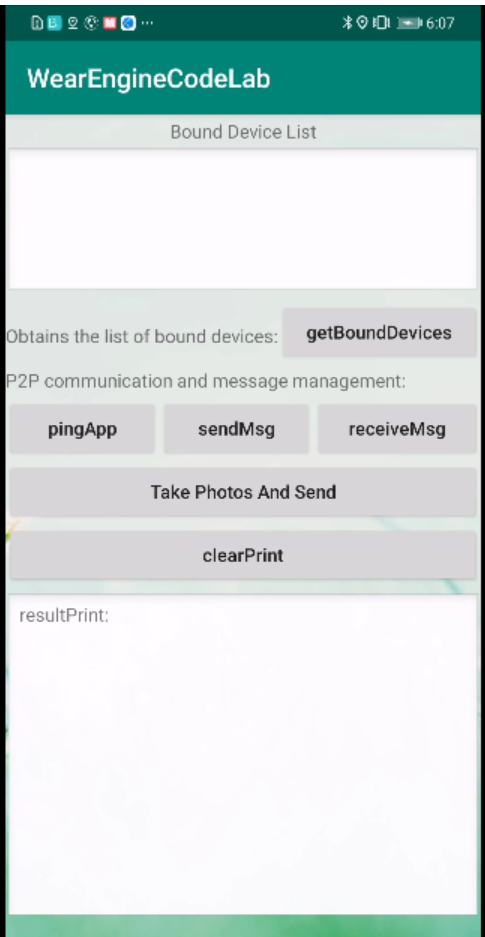
Well done. You have successfully completed this codelab and learned how to:
For more information about HUAWEI Wear Engine, please visit our official website:
Wear Engine
To download the sample code, please click the button below: