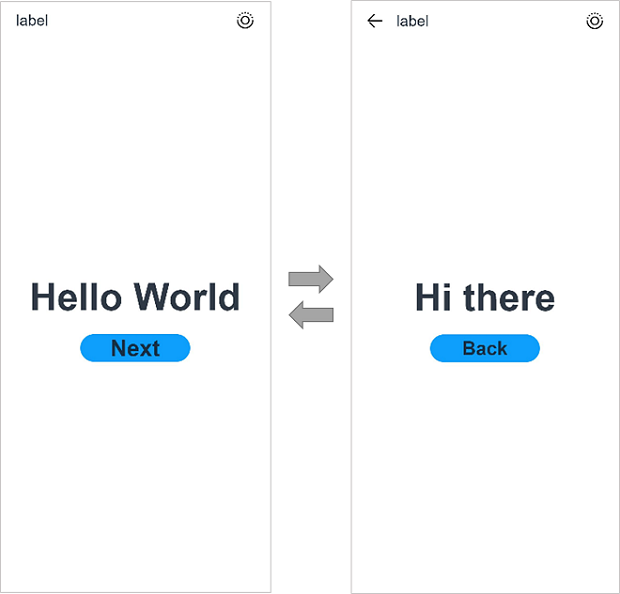
This section describes how to build two pages of an atomic service and implement page redirection based on the preset service logic.
Building the First Page
- Use the Text component.
After the project synchronization is complete, choose entry > src > main > ets > pages in the Project window and open the Index.ets file. You can see that the page contains a Text component.
In this document, texts and buttons are used to implement page redirection and return. You can use the Row and Column components to create the page layout. In scenarios where more complex elements should be aligned, you can use the RelativeContainer component to set up the layout.
Create a navigation home page.
Use Navigation to create a navigation home page and create a NavPathStack as the navigation controller to enable transitions between different pages.
The sample code in the Index.ets file is shown below:
import { authentication } from '@kit.AccountKit'; import { BusinessError } from '@kit.BasicServicesKit'; import { hilog } from '@kit.PerformanceAnalysisKit'; @Entry @Component struct NavigationDemo { @Provide('pathInfos') pathInfos: NavPathStack = new NavPathStack(); @State message: string = 'Hello World' build() { Column() { Navigation(this.pathInfos) { Column() { Text(this.message) .fontSize(50) .fontWeight(FontWeight.Bold) } .width('100%') .height('100%') .justifyContent(FlexAlign.Center) .alignItems(HorizontalAlign.Center) } .width('100%') .mode(NavigationMode.Auto) } .size({ width: '100%', height: '100%' }) .backgroundColor(0xf4f4f5) } aboutToAppear() { hilog.info(0x0000, 'testTag', '%{public}s', 'Ability onCreate'); this.loginWithHuaweiID(); } /** * Sample code for using HUAWEI ID to log in to atomic service. * According to the Atomic Service Review Guide, when an atomic service has an account system, * the option to log in with a HUAWEI ID must be provided. * The following presets the atomic service to use the HUAWEI ID silent login function. * To enable the atomic service to log in successfully using the HUAWEI ID, please refer * to the HarmonyOS HUAWEI ID Access Guide to configure the client ID and fingerprint certificate. */ private loginWithHuaweiID() { // Create a login request and set parameters let loginRequest = new authentication.HuaweiIDProvider().createLoginWithHuaweiIDRequest(); // Whether to forcibly launch the HUAWEI ID login page when the user is not logged in with the HUAWEI ID loginRequest.forceLogin = false; // Execute login request let controller = new authentication.AuthenticationController(); controller.executeRequest(loginRequest).then((data) => { let loginWithHuaweiIDResponse = data as authentication.LoginWithHuaweiIDResponse; let authCode = loginWithHuaweiIDResponse.data?.authorizationCode; // Send authCode to the backend in exchange for unionID, session }).catch((error: BusinessError) => { hilog.error(0x0000, 'testTag', 'error: %{public}s', JSON.stringify(error)); if (error.code == authentication.AuthenticationErrorCode.ACCOUNT_NOT_LOGGED_IN) { // HUAWEI ID is not logged in, it is recommended to jump to the login guide page } }); } }- Add a Button component to the default page. The sample code in the Index.ets file is shown below:
import { authentication } from '@kit.AccountKit';
import { BusinessError } from '@kit.BasicServicesKit';
import { hilog } from '@kit.PerformanceAnalysisKit';

@Entry
@Component
struct NavigationDemo {
  @Provide('pathInfos') pathInfos: NavPathStack = new NavPathStack();
  @State message: string = 'Hello World'

  build() {
    Column() {
      Navigation(this.pathInfos) {
        Column() {
          Text(this.message)
            .fontSize(50)
            .fontWeight(FontWeight.Bold)
          // Add a button to respond to user clicks.
          Button() {
            Text('Next')
              .fontSize(30)
              .fontWeight(FontWeight.Bold)
          }
          .type(ButtonType.Capsule)
          .margin({ top: 20 })
          .backgroundColor('#0D9FFB')
          .width('40%')
          .height('5%')
        }
        .width('100%')
        .height('100%')
        .justifyContent(FlexAlign.Center)
        .alignItems(HorizontalAlign.Center)
      }
      .width('100%')
      .mode(NavigationMode.Auto)
    }
    .size({ width: '100%', height: '100%' })
    .backgroundColor(0xf4f4f5)
  }

  aboutToAppear() {
    hilog.info(0x0000, 'testTag', '%{public}s', 'Ability onCreate');
    this.loginWithHuaweiID();
  }

  /**
   * Sample code for using HUAWEI ID to log in to atomic service.
   * According to the Atomic Service Review Guide, when an atomic service has an account system,
   * the option to log in with a HUAWEI ID must be provided.
   * The following presets the atomic service to use the HUAWEI ID silent login function.
   * To enable the atomic service to log in successfully using the HUAWEI ID, please refer
   * to the HarmonyOS HUAWEI ID Access Guide to configure the client ID and fingerprint certificate.
   */
  private loginWithHuaweiID() {
    // Create a login request and set parameters
    let loginRequest = new authentication.HuaweiIDProvider().createLoginWithHuaweiIDRequest();
    // Whether to forcibly launch the HUAWEI ID login page when the user is not logged in with the HUAWEI ID
    loginRequest.forceLogin = false;
    // Execute login request
    let controller = new authentication.AuthenticationController();
    controller.executeRequest(loginRequest).then((data) => {
      let loginWithHuaweiIDResponse = data as authentication.LoginWithHuaweiIDResponse;
      let authCode = loginWithHuaweiIDResponse.data?.authorizationCode;
      // Send authCode to the backend in exchange for unionID, session

    }).catch((error: BusinessError) => {
      hilog.error(0x0000, 'testTag', 'error: %{public}s', JSON.stringify(error));
      if (error.code == authentication.AuthenticationErrorCode.ACCOUNT_NOT_LOGGED_IN) {
        // HUAWEI ID is not logged in, it is recommended to jump to the login guide page

      }
    });
  }
}
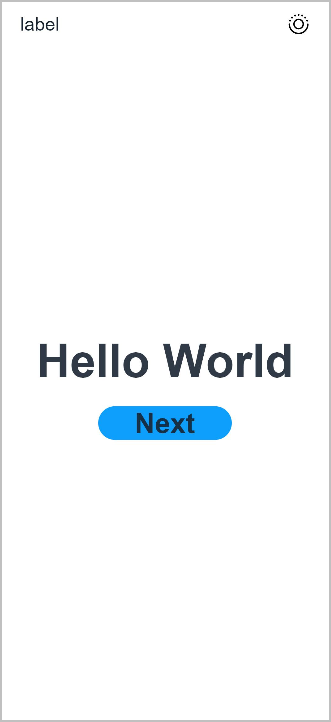
Connect a real device to a computer. For details, see Running Your App on a Local Real Device. The following figure shows the effect of the first page.
Building the Second Page
-
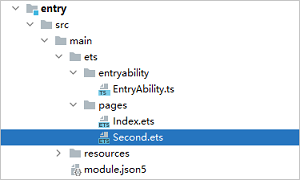
Create the second page file: Choose entry > src > main > ets > pages in the Project window. Right-click pages and choose New > ArkTS File from the shortcut menu, name it as Second, and press Enter. Below shows the directory structure.
Configure the route for the second page. In the Project window, choose entry > src > main > resources > base > profile, and add the routerMap configuration to the router_map.json file. The following is an example:
{
  "routerMap" : [
    {
      "name" : "second",
      "pageSourceFile"  : "src/main/ets/pages/Second.ets",
      "buildFunction" : "PageSecondBuilder"
    }
  ]
}
Add the routerMap configuration to the module.json5 file and set its address to the location of the routing table.
"routerMap": "$profile:router_map"
Add Text and Button components.
Add Text, Button, and other components and set their styles, as you do for the first page.
Create a navigation subpage using NavDestination. Create a navigation controller NavPathStack and initialize it when onReady is triggered. Obtain the current navigation controller to enable transitions between different pages.
The sample code in the Second.ets file is shown below:
// Second.ets
@Builder
export function PageSecondBuilder() {
  PageSecond();
}

@Component
export struct PageSecond {
  pathInfos: NavPathStack = new NavPathStack();
  @State message: string = 'Hi there';


  build() {
    Row() {
      NavDestination() {
        Column() {
          Text(this.message)
            .fontSize(50)
            .fontWeight(FontWeight.Bold)

          Button() {
            Text('Back')
              .fontSize(30)
              .fontWeight(FontWeight.Bold)
          }
          .type(ButtonType.Capsule)
          .margin({ top: 20 })
          .backgroundColor('#0D9FFB')
          .width('40%')
          .height('7%')
        }
        .width('100%')
        .height('75%')
        .justifyContent(FlexAlign.Center)
        .alignItems(HorizontalAlign.Center)
      }
      .width('100%')
      .onReady((ctx: NavDestinationContext) => {
        this.pathInfos = ctx.pathStack;
      });
    }
    .size({ width: '100%', height: '100%' })
    .backgroundColor(0xf4f4f5)
  }
}
Implementing Page Redirection
You can implement page navigation through the Navigation component. It is recommended that you use NavPathStack for page redirection.
Add the onClick method to the Button component, and use the pushPathByName method of the navigation controller NavPathStack in it. This allows the component to navigate from the current page to the page corresponding to the provided name parameter in the routing table when clicked.
Implement redirection from the first page to the second page.
In the Index.ets file of the first page, bind the onClick event to the Next button so that clicking the button redirects the user to the second page. The sample code in the Index.ets file is shown below:
import { authentication } from '@kit.AccountKit';
import { BusinessError } from '@kit.BasicServicesKit';
import { hilog } from '@kit.PerformanceAnalysisKit';

@Entry
@Component
struct NavigationDemo {
  @Provide('pathInfos') pathInfos: NavPathStack = new NavPathStack();
  @State message: string = 'Hello World'

  build() {
    Column() {
      Navigation(this.pathInfos) {
        Column() {
          Text(this.message)
            .fontSize(50)
            .fontWeight(FontWeight.Bold)
          // Add a button to respond to user clicks.
          Button() {
            Text('Next')
              .fontSize(30)
              .fontWeight(FontWeight.Bold)
          }
          .type(ButtonType.Capsule)
          .margin({ top: 20 })
          .backgroundColor('#0D9FFB')
          .width('40%')
          .height('5%')
          .onClick(() => {
            this.pathInfos.pushPathByName('second', 'custom_param');
          })
        }
        .width('100%')
        .height('100%')
        .justifyContent(FlexAlign.Center)
        .alignItems(HorizontalAlign.Center)
      }
      .width('100%')
      .mode(NavigationMode.Auto)
    }
    .size({ width: '100%', height: '100%' })
    .backgroundColor(0xf4f4f5)
  }

  aboutToAppear() {
    hilog.info(0x0000, 'testTag', '%{public}s', 'Ability onCreate');
    this.loginWithHuaweiID();
  }

  /**
   * Sample code for using HUAWEI ID to log in to atomic service.
   * According to the Atomic Service Review Guide, when an atomic service has an account system,
   * the option to log in with a HUAWEI ID must be provided.
   * The following presets the atomic service to use the HUAWEI ID silent login function.
   * To enable the atomic service to log in successfully using the HUAWEI ID, please refer
   * to the HarmonyOS HUAWEI ID Access Guide to configure the client ID and fingerprint certificate.
   */
  private loginWithHuaweiID() {
    // Create a login request and set parameters
    let loginRequest = new authentication.HuaweiIDProvider().createLoginWithHuaweiIDRequest();
    // Whether to forcibly launch the HUAWEI ID login page when the user is not logged in with the HUAWEI ID
    loginRequest.forceLogin = false;
    // Execute login request
    let controller = new authentication.AuthenticationController();
    controller.executeRequest(loginRequest).then((data) => {
      let loginWithHuaweiIDResponse = data as authentication.LoginWithHuaweiIDResponse;
      let authCode = loginWithHuaweiIDResponse.data?.authorizationCode;
      // Send authCode to the backend in exchange for unionID, session

    }).catch((error: BusinessError) => {
      hilog.error(0x0000, 'testTag', 'error: %{public}s', JSON.stringify(error));
      if (error.code == authentication.AuthenticationErrorCode.ACCOUNT_NOT_LOGGED_IN) {
        // HUAWEI ID is not logged in, it is recommended to jump to the login guide page

      }
    });
  }
}
Implement redirection from the second page to the first page.
On the second page, bind the onClick event to the back button. Within this event, call the pop method of NavPathStack. It pops the top element from the route stack when the button is clicked, enabling navigation back to the first page.
The sample code in the Second.ets file is shown below:
// Second.ets
@Builder
export function PageSecondBuilder() {
  PageSecond();
}

@Component
export struct PageSecond {
  pathInfos: NavPathStack = new NavPathStack();
  @State message: string = 'Hi there';


  build() {
    Row() {
      NavDestination() {
        Column() {
          Text(this.message)
            .fontSize(50)
            .fontWeight(FontWeight.Bold)

          Button() {
            Text('Back')
              .fontSize(30)
              .fontWeight(FontWeight.Bold)
          }
          .type(ButtonType.Capsule)
          .margin({ top: 20 })
          .backgroundColor('#0D9FFB')
          .width('40%')
          .height('7%')
          .onClick(() => {
            this.pathInfos.pop();   // Back to the previous page
          })
        }
        .width('100%')
        .height('75%')
        .justifyContent(FlexAlign.Center)
        .alignItems(HorizontalAlign.Center)
      }
      .width('100%')
      .onReady((ctx: NavDestinationContext) => {
        this.pathInfos = ctx.pathStack;
      });
    }
    .size({ width: '100%', height: '100%' })
    .backgroundColor(0xf4f4f5)
  }
}
The figure below shows the effect.