















华为云 OpenClaw 简介
华为云 OpenClaw 和腾讯云 OpenClaw 类似,为用户做了两方面的工作:
- 相比于非 OpenClaw 镜像的云服务器,安装了 OpenClaw 环境
- 在控制台提供了一个「应用管理」Tab,提供 OpenClaw 的管理,包括模型配置、通道配置、技能配置等一些基础配置
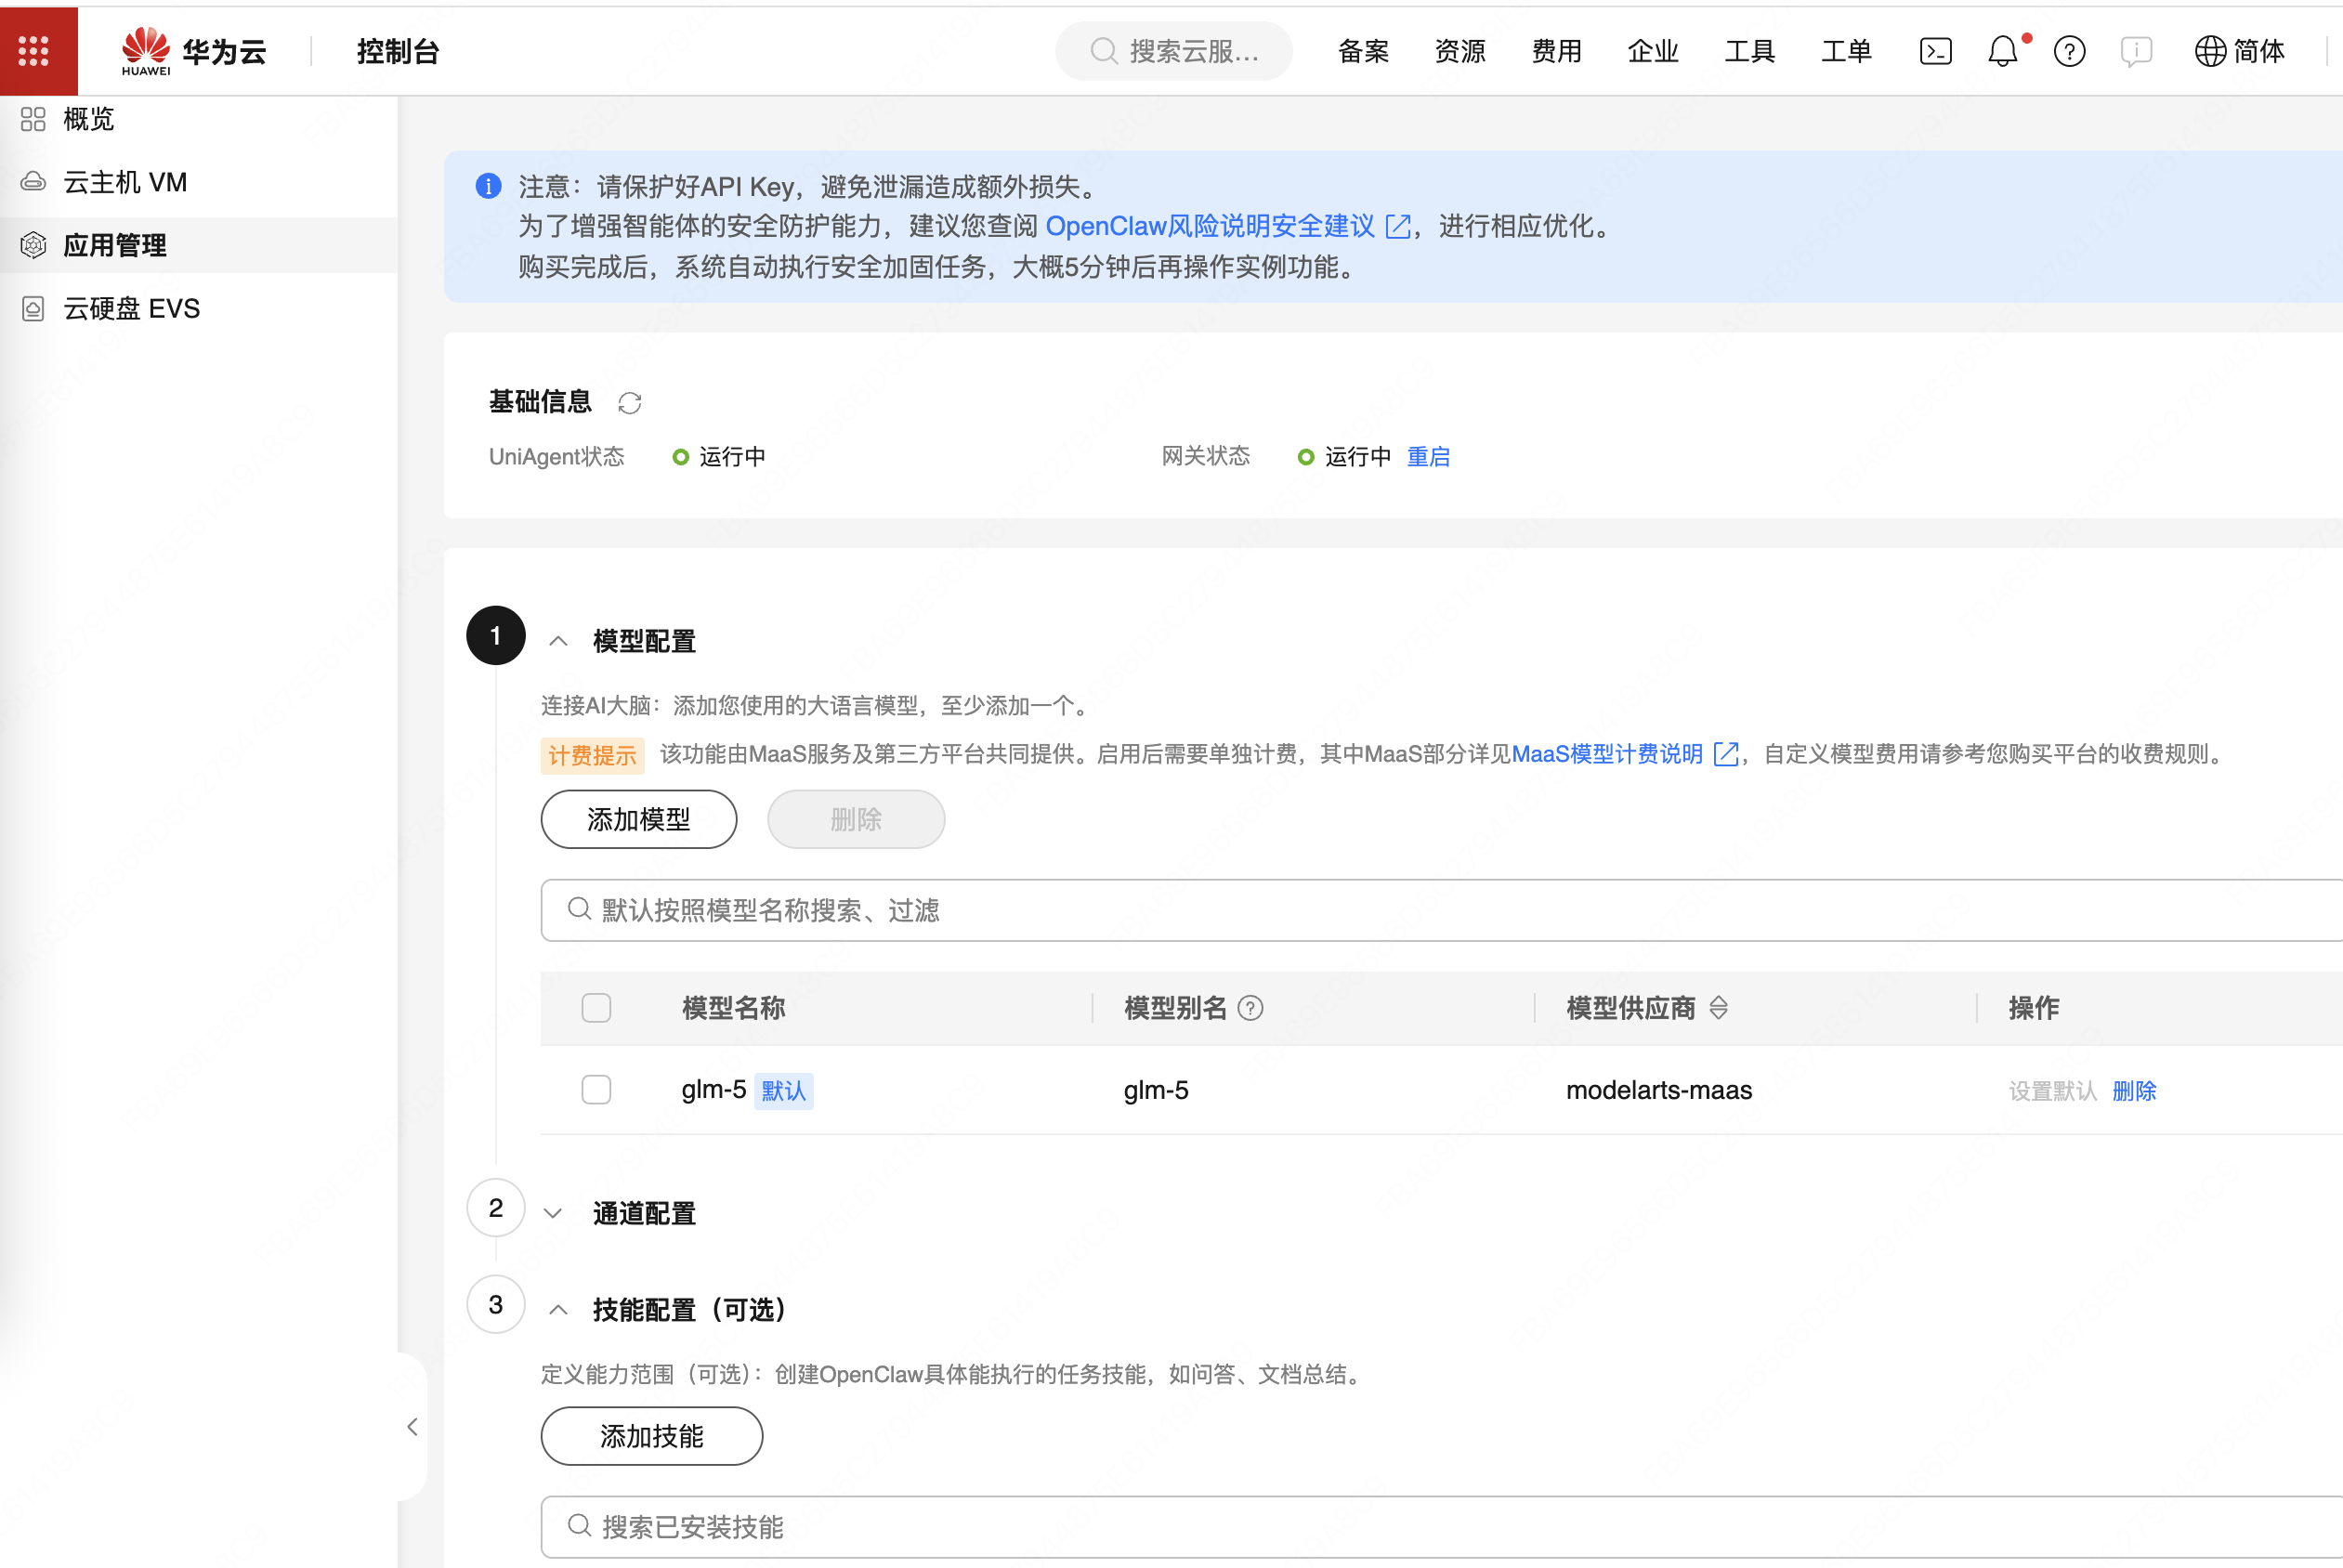
相对来说腾讯云做的更完善一些,除了这些基础配置外,还提供了 Token 用量、记忆管理、龙虾医院等内容。
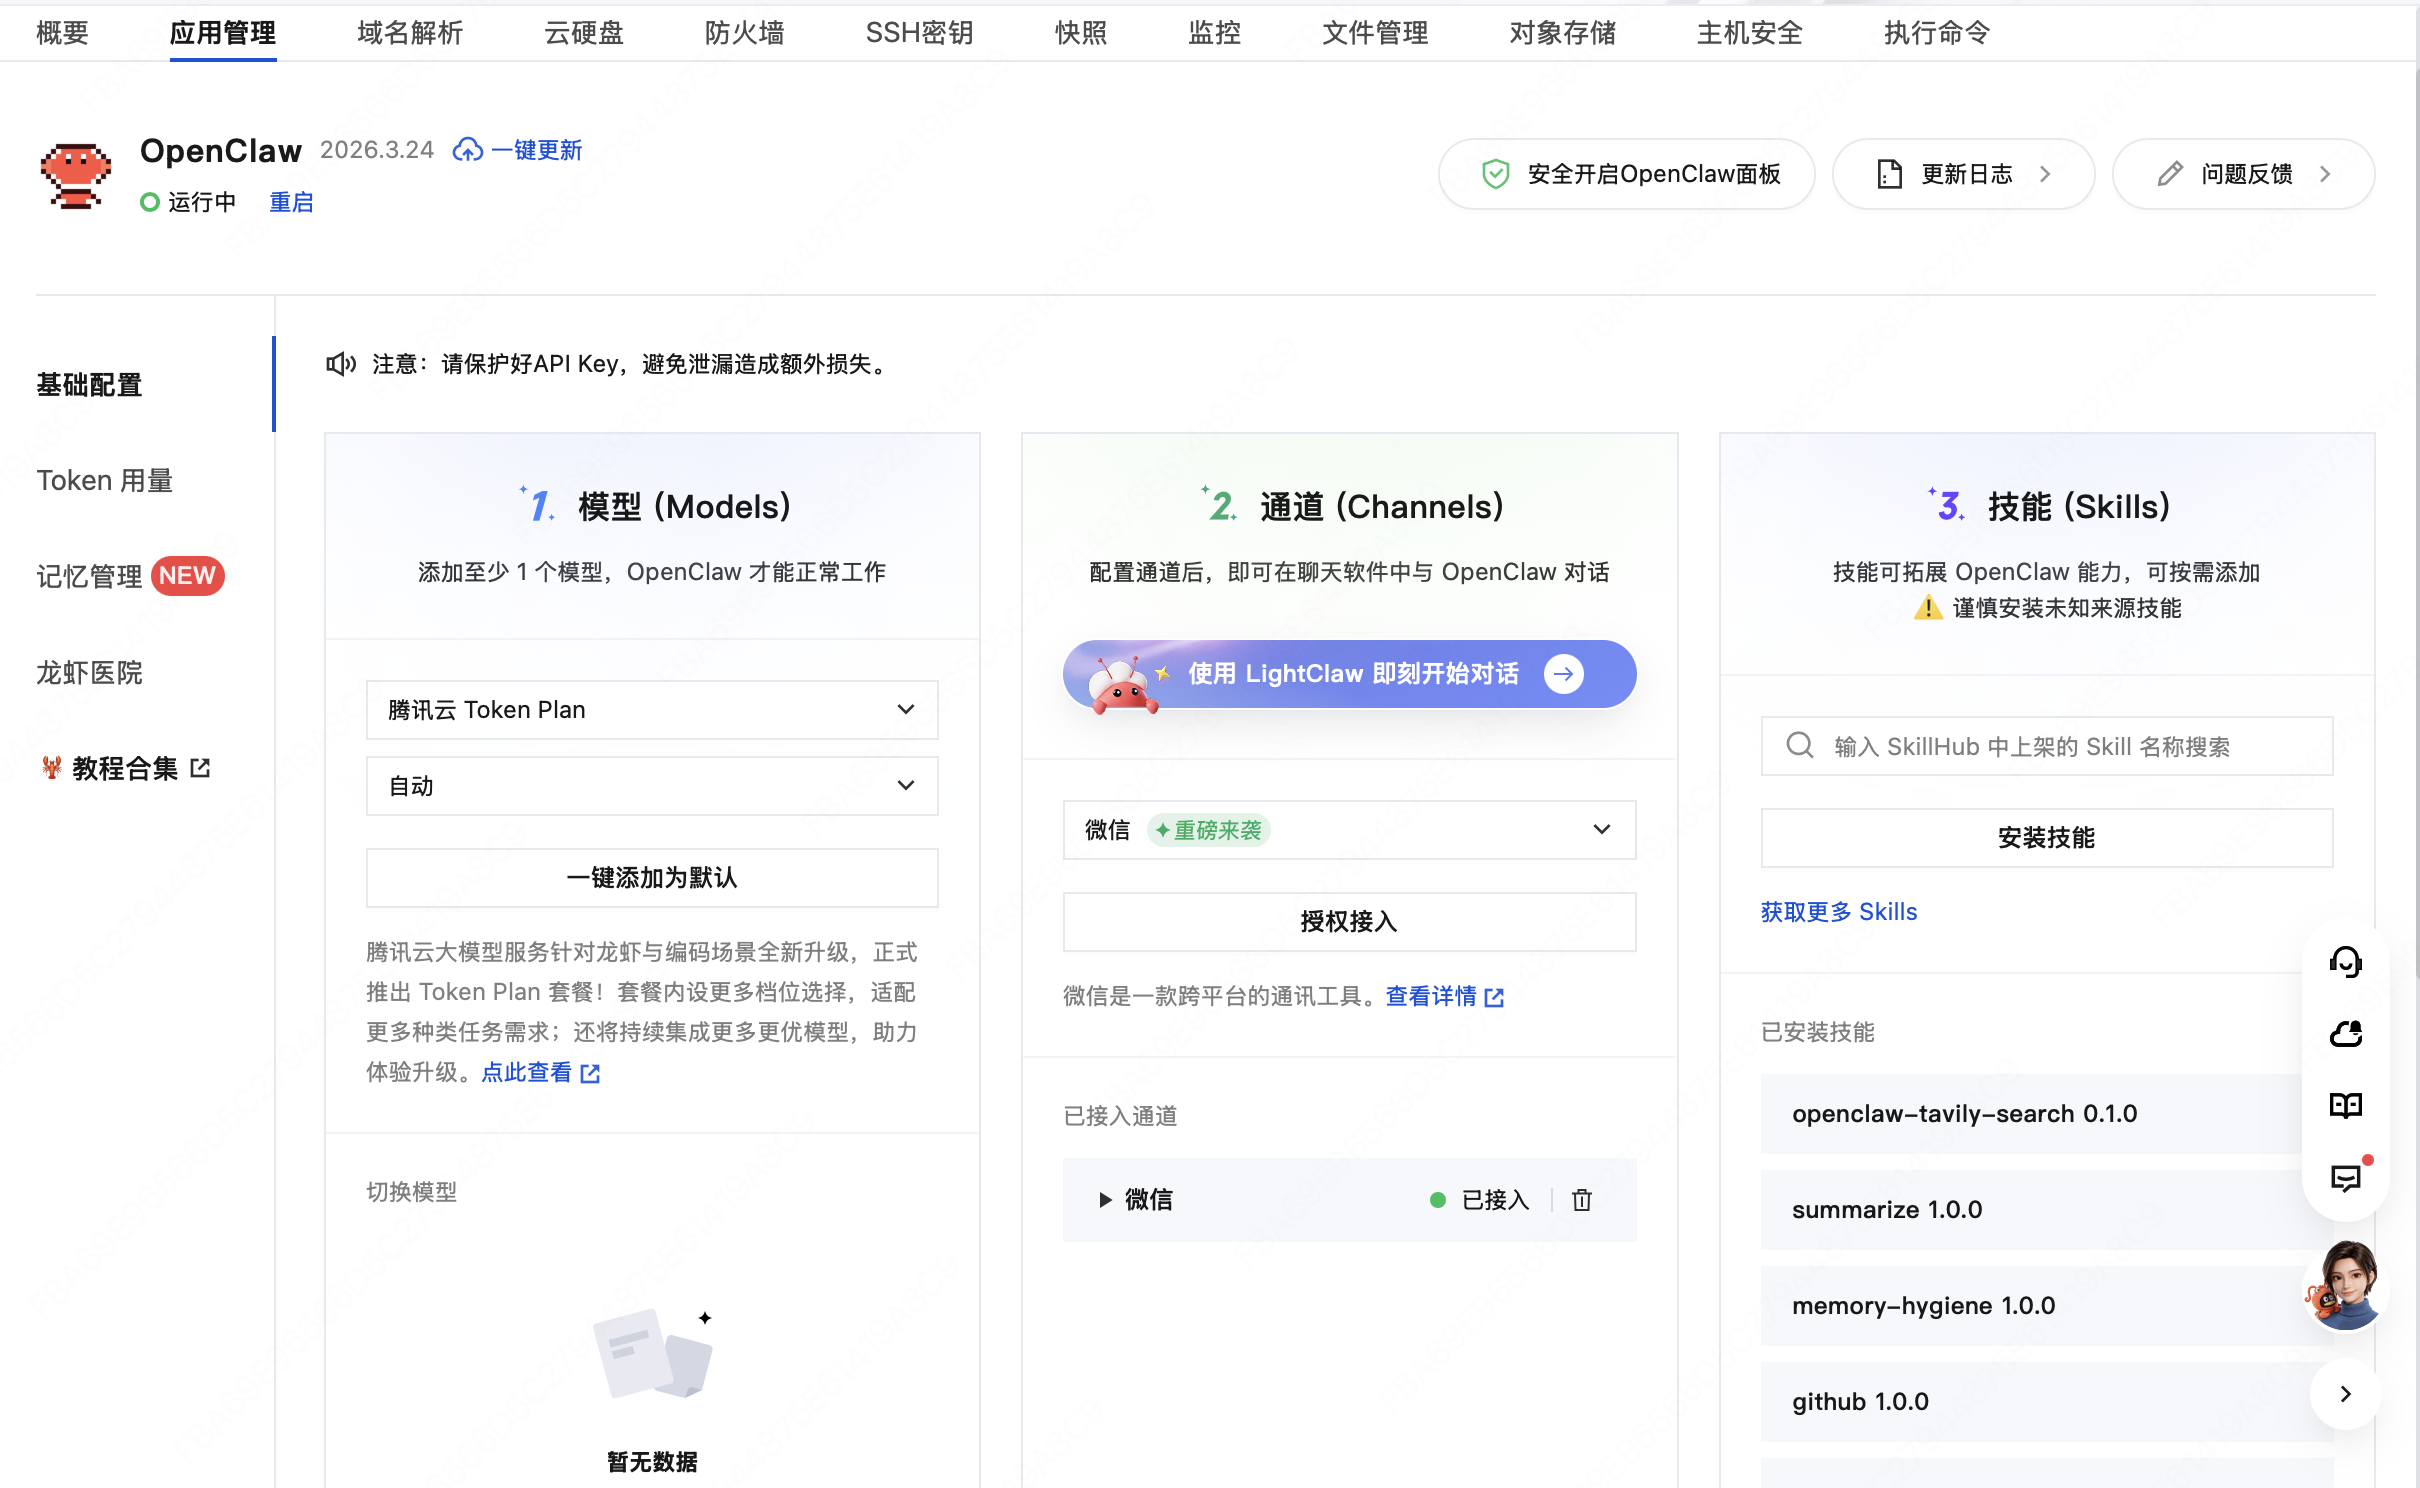
目的就是提供更简便的操作,降低用户使用 OpenClaw 的成本。不过华为云 OpenClaw 也在持续的迭代中,这次和我第一次使用相比已经改版过,后续应该会更完善。
重点概括
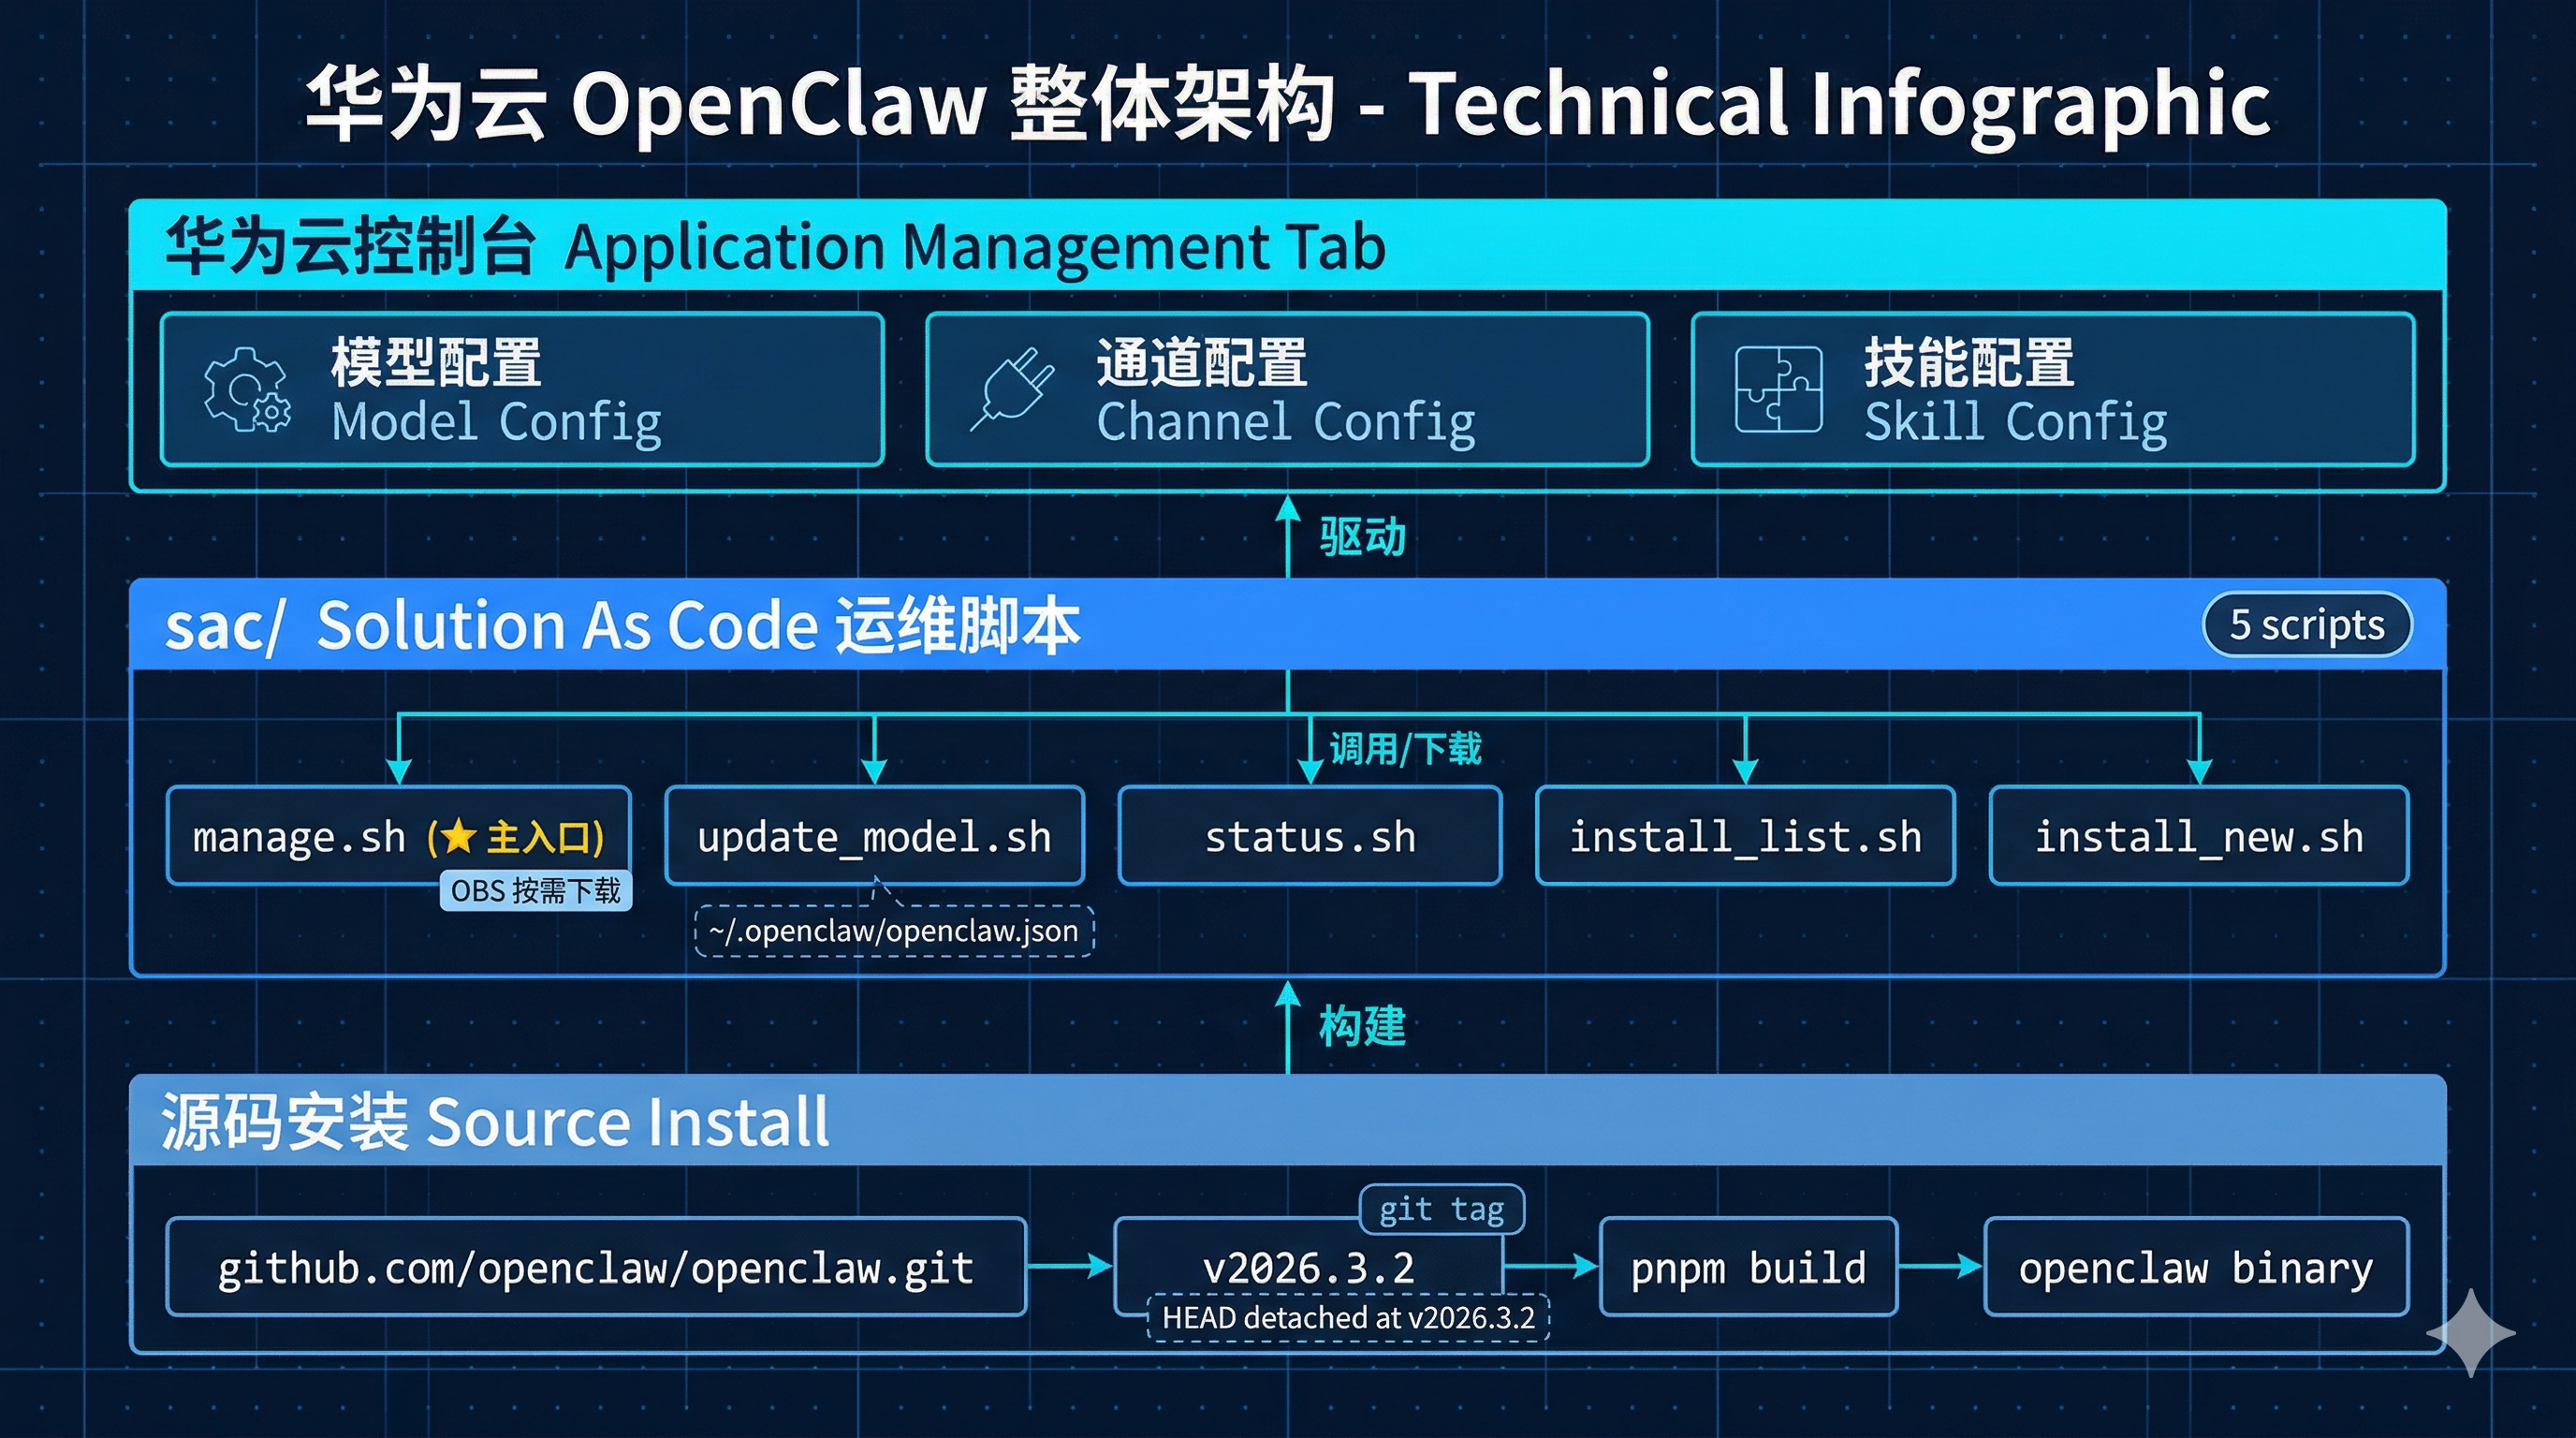
- 华为云 OpenClaw 由三层构成:底层通过 git clone 源码 + pnpm 构建安装 OpenClaw,中层是
sac/运维脚本,顶层是控制台「应用管理」提供的可视化配置入口 - 应用管理功能的底层是 5 个 shell 脚本:
manage.sh(主入口)统一驱动update_model.sh(模型配置)、status.sh(健康探测)、install_list.sh(技能列表)、install_new.sh(技能安装)四个子脚本,脚本本体按需从华为云 OBS 远程下载
使用的 OpenClaw 版本
当前使用的是 2026.3.2,我第一次安装使用时,记得是 2026.3.1 版本,说明也在持续更新过程中。
openclaw@hcss-ecs-bd16:~$ openclaw -v
2026.3.2
安装方式
华为云上的 OpenClaw 版本还是比较老旧的,离最新版本有较大差距,相对来说腾讯云就更新到比较快,并且维护了专门的(更新日志)。
下面具体看下华为云 OpenClaw 是如何安装维护的。通过查看本地目录,可以看到当前 openclaw 用户目录下有个 openclaw 的文件夹,里面放的是 openclaw 的源代码:
openclaw@hcss-ecs-bd16:~/openclaw$ pwd
/home/openclaw/openclaw
openclaw@hcss-ecs-bd16:~/openclaw$ ls
AGENTS.md                   docs.acp.md                pnpm-lock.yaml                ui
appcast.xml                 extensions                 pnpm-workspace.yaml           vendor
apps                        fly.private.toml           pyproject.toml                VISION.md
assets                      fly.toml                   README.md                     vitest.channels.config.ts
CHANGELOG.md                git-hooks                  render.yaml                   vitest.config.ts
CLAUDE.md                   LICENSE                    scripts                       vitest.e2e.config.ts
CONTRIBUTING.md             maas.sh                    SECURITY.md                   vitest.extensions.config.ts
dist                        maas.sh.bak                setup-podman.sh               vitest.gateway.config.ts
docker-compose.yml          node_modules               skills                        vitest.live.config.ts
Dockerfile                  openclaw-channel-dingtalk  src                           vitest.scoped-config.ts
Dockerfile.sandbox          openclaw.mjs               Swabble                       vitest.unit.config.ts
Dockerfile.sandbox-browser  openclaw.podman.env        test                          zizmor.yml
Dockerfile.sandbox-common   package.json               tsconfig.json
docker-setup.sh             packages                   tsconfig.plugin-sdk.dts.json
docs                        patches                    tsdown.config.ts
openclaw@hcss-ecs-bd16:~/openclaw$ git remote -v
origin  https://github.com/openclaw/openclaw.git (fetch)
origin  https://github.com/openclaw/openclaw.git (push)
openclaw@hcss-ecs-bd16:~/openclaw$ git branch
* (HEAD detached at v2026.3.2)
  main
通过查看 git 分支可以看到是切换到了 v2026.3.2 这个 Tag 上,和 openclaw 的版本也能对应上,因此可以看出华为云上的 OpenClaw 是通过源码方式安装的,使用官方的如下命令:
git clone https://github.com/openclaw/openclaw.git
cd openclaw
pnpm install && pnpm ui:build && pnpm build
pnpm link --global
openclaw onboard --install-daemon
通过查看 openclaw 的命令也可以看出是执行本地的 pnpm 安装包:
openclaw@hcss-ecs-bd16:~/openclaw$ which openclaw
/home/openclaw/.local/share/pnpm/openclaw
华为云 OpenClaw 应用管理功能
模型配置
提供可视化的 OpenClaw 使用的大模型配置,可以在这里创建或者选择对应模型的 APIKey。
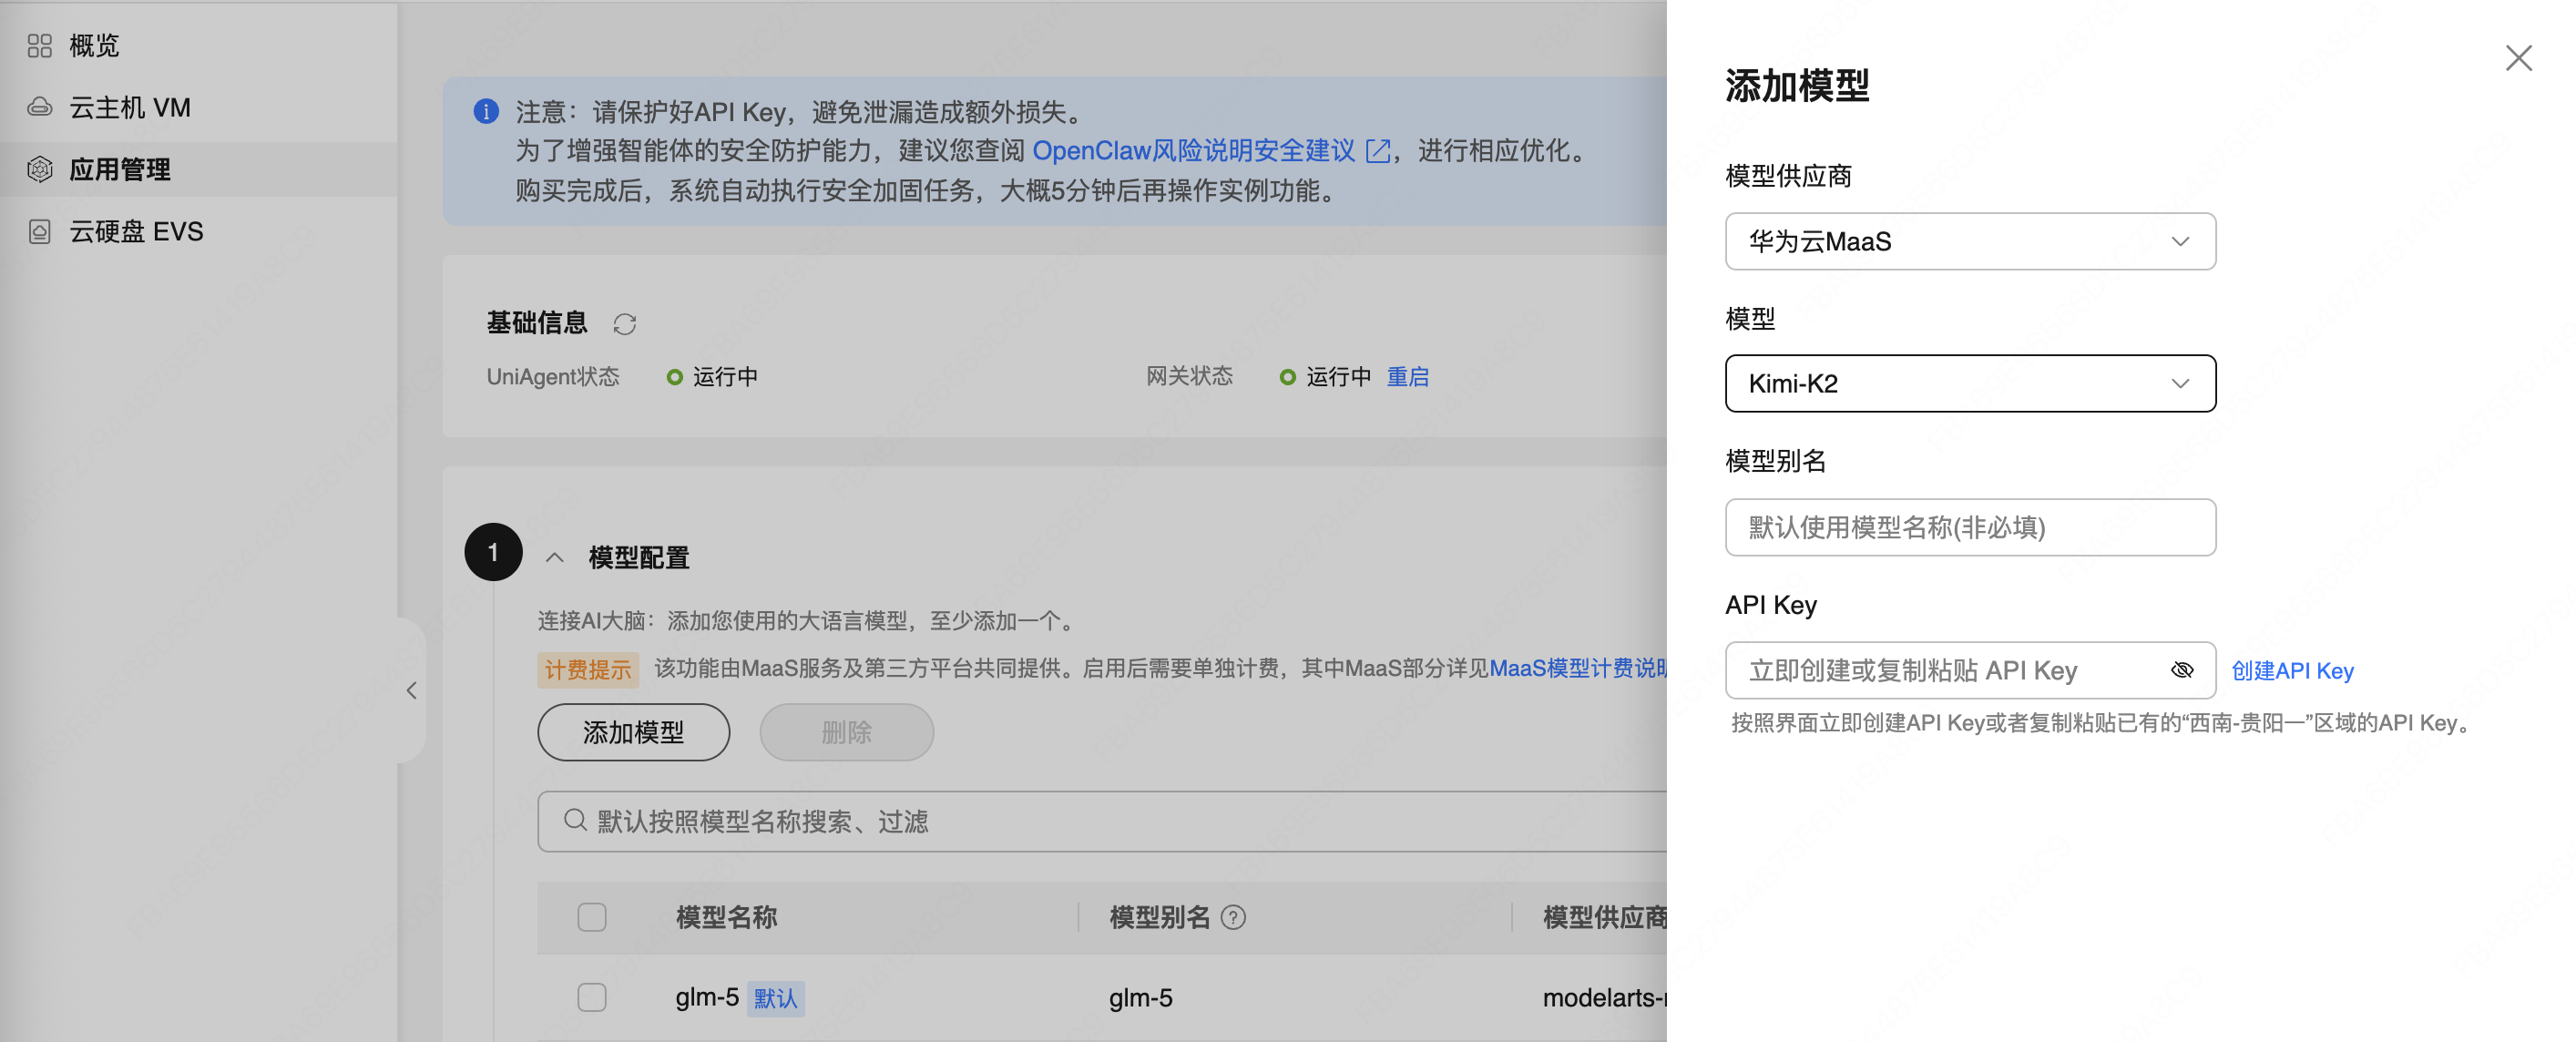
点击确认后,应用管理自动帮忙配置到 ~/.openclaw/openclaw.json 文件中:
diff --git a/openclaw.json b/openclaw.json
index 6194723..a6543ea 100644
--- a/openclaw.json
+++ b/openclaw.json
@@ -42,13 +42,25 @@
             "maxTokens": 8192
           }
         ]
+      },
+      "modelarts-maas": {
+        "baseUrl": "https://api.modelarts-maas.com/v2",
+        "apiKey": "[API_KEY]",
+        "api": "openai-completions",
+        "models": [
+          {
+            "id": "Kimi-K2",
+            "name": "Kimi-K2",
+            "contextWindow": 100000
+          }
+        ]
       }
     }
   },
   "agents": {
     "defaults": {
       "model": {
-        "primary": "hwc_maas/<model_name>"
+        "primary": "modelarts-maas/Kimi-K2"
       },
       "models": {
         "volcengine-plan/ark-code-latest": {},
@@ -57,6 +69,9 @@
         },
         "hwc_maas/<model_name>": {
           "alias": "<model_name>"
+        },
+        "modelarts-maas/Kimi-K2": {
+          "alias": "Kimi-K2"
         }
       },
       "workspace": "/home/openclaw/.openclaw/workspace",
通道配置
提供可视化的 OpenClaw 使用的通道配置,相关通道的依赖已经默认安装好,配置后,会自动更新 ~/.openclaw/openclaw.json 文件。
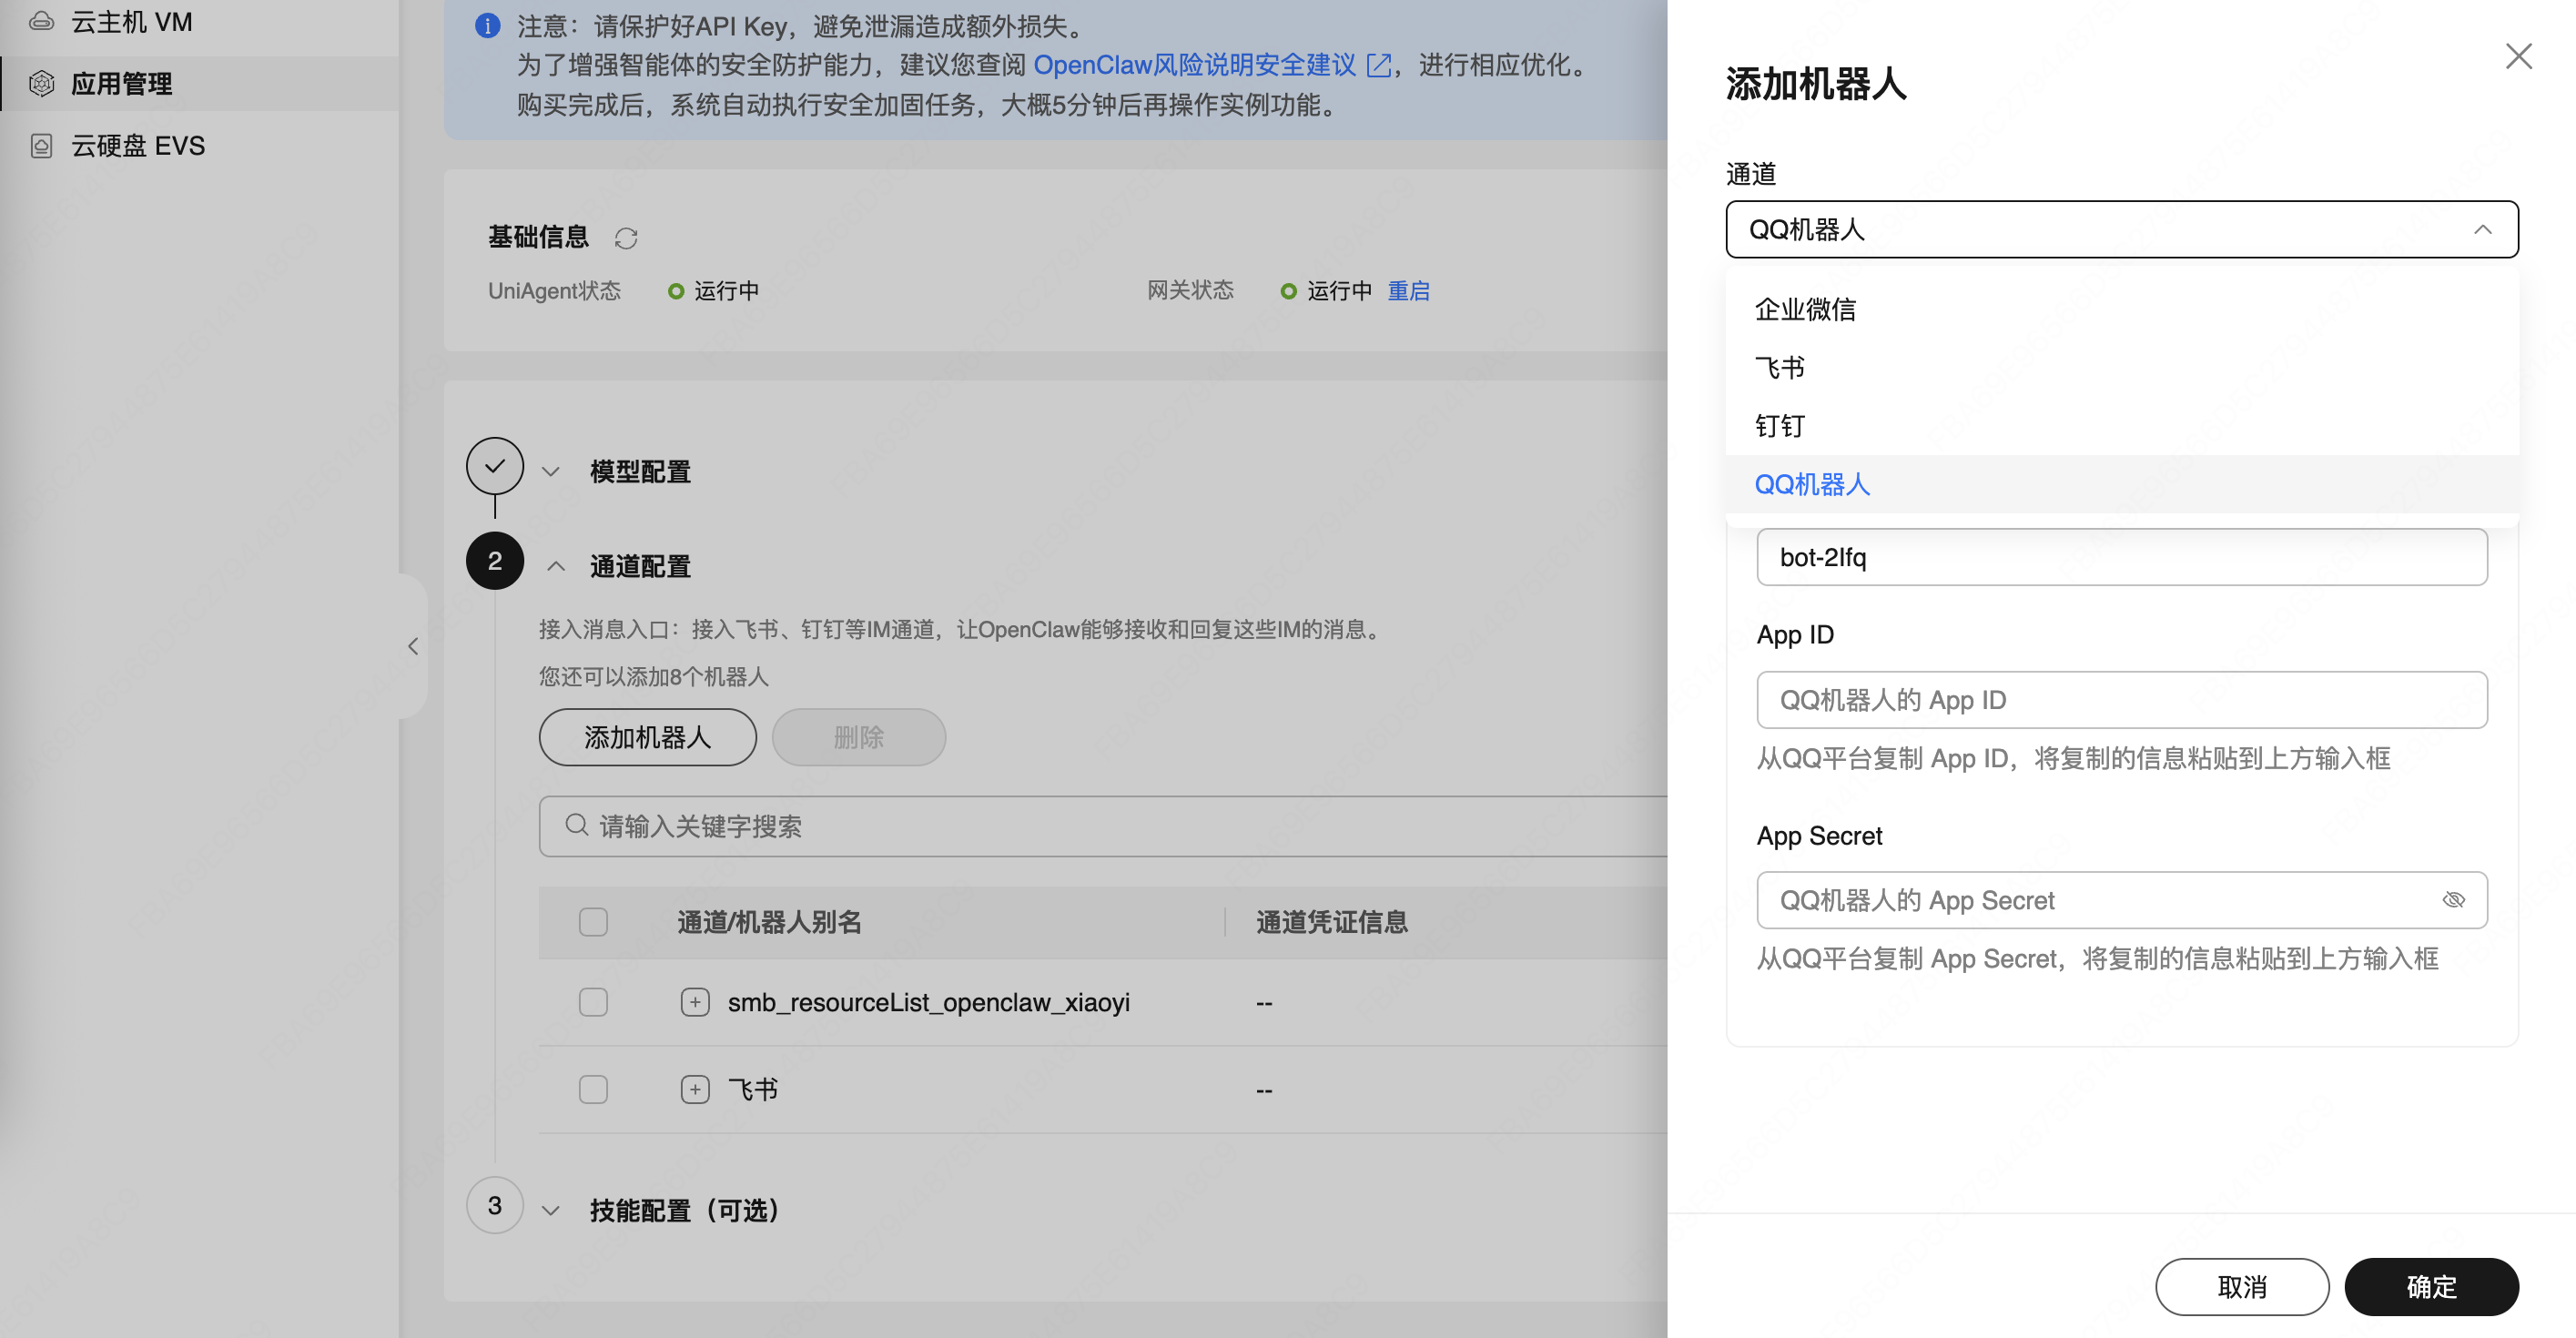
可以看到,小艺通道虽然安装了依赖,但还没有提供配置入口,需要手动配置,具体可以参考上一篇文章《OpenClaw 接入鸿蒙小艺全流程:华为云搭建 + 小艺配置》。
技能配置(可选)
提供可视化的技能配置,一方面列出当前已经安装的技能,另外一方面可以安装新的技能。
点击「安装技能」按钮,会弹出安装技能的对话框,默认是安装 OpenClaw 官方 clawhub 上的技能:
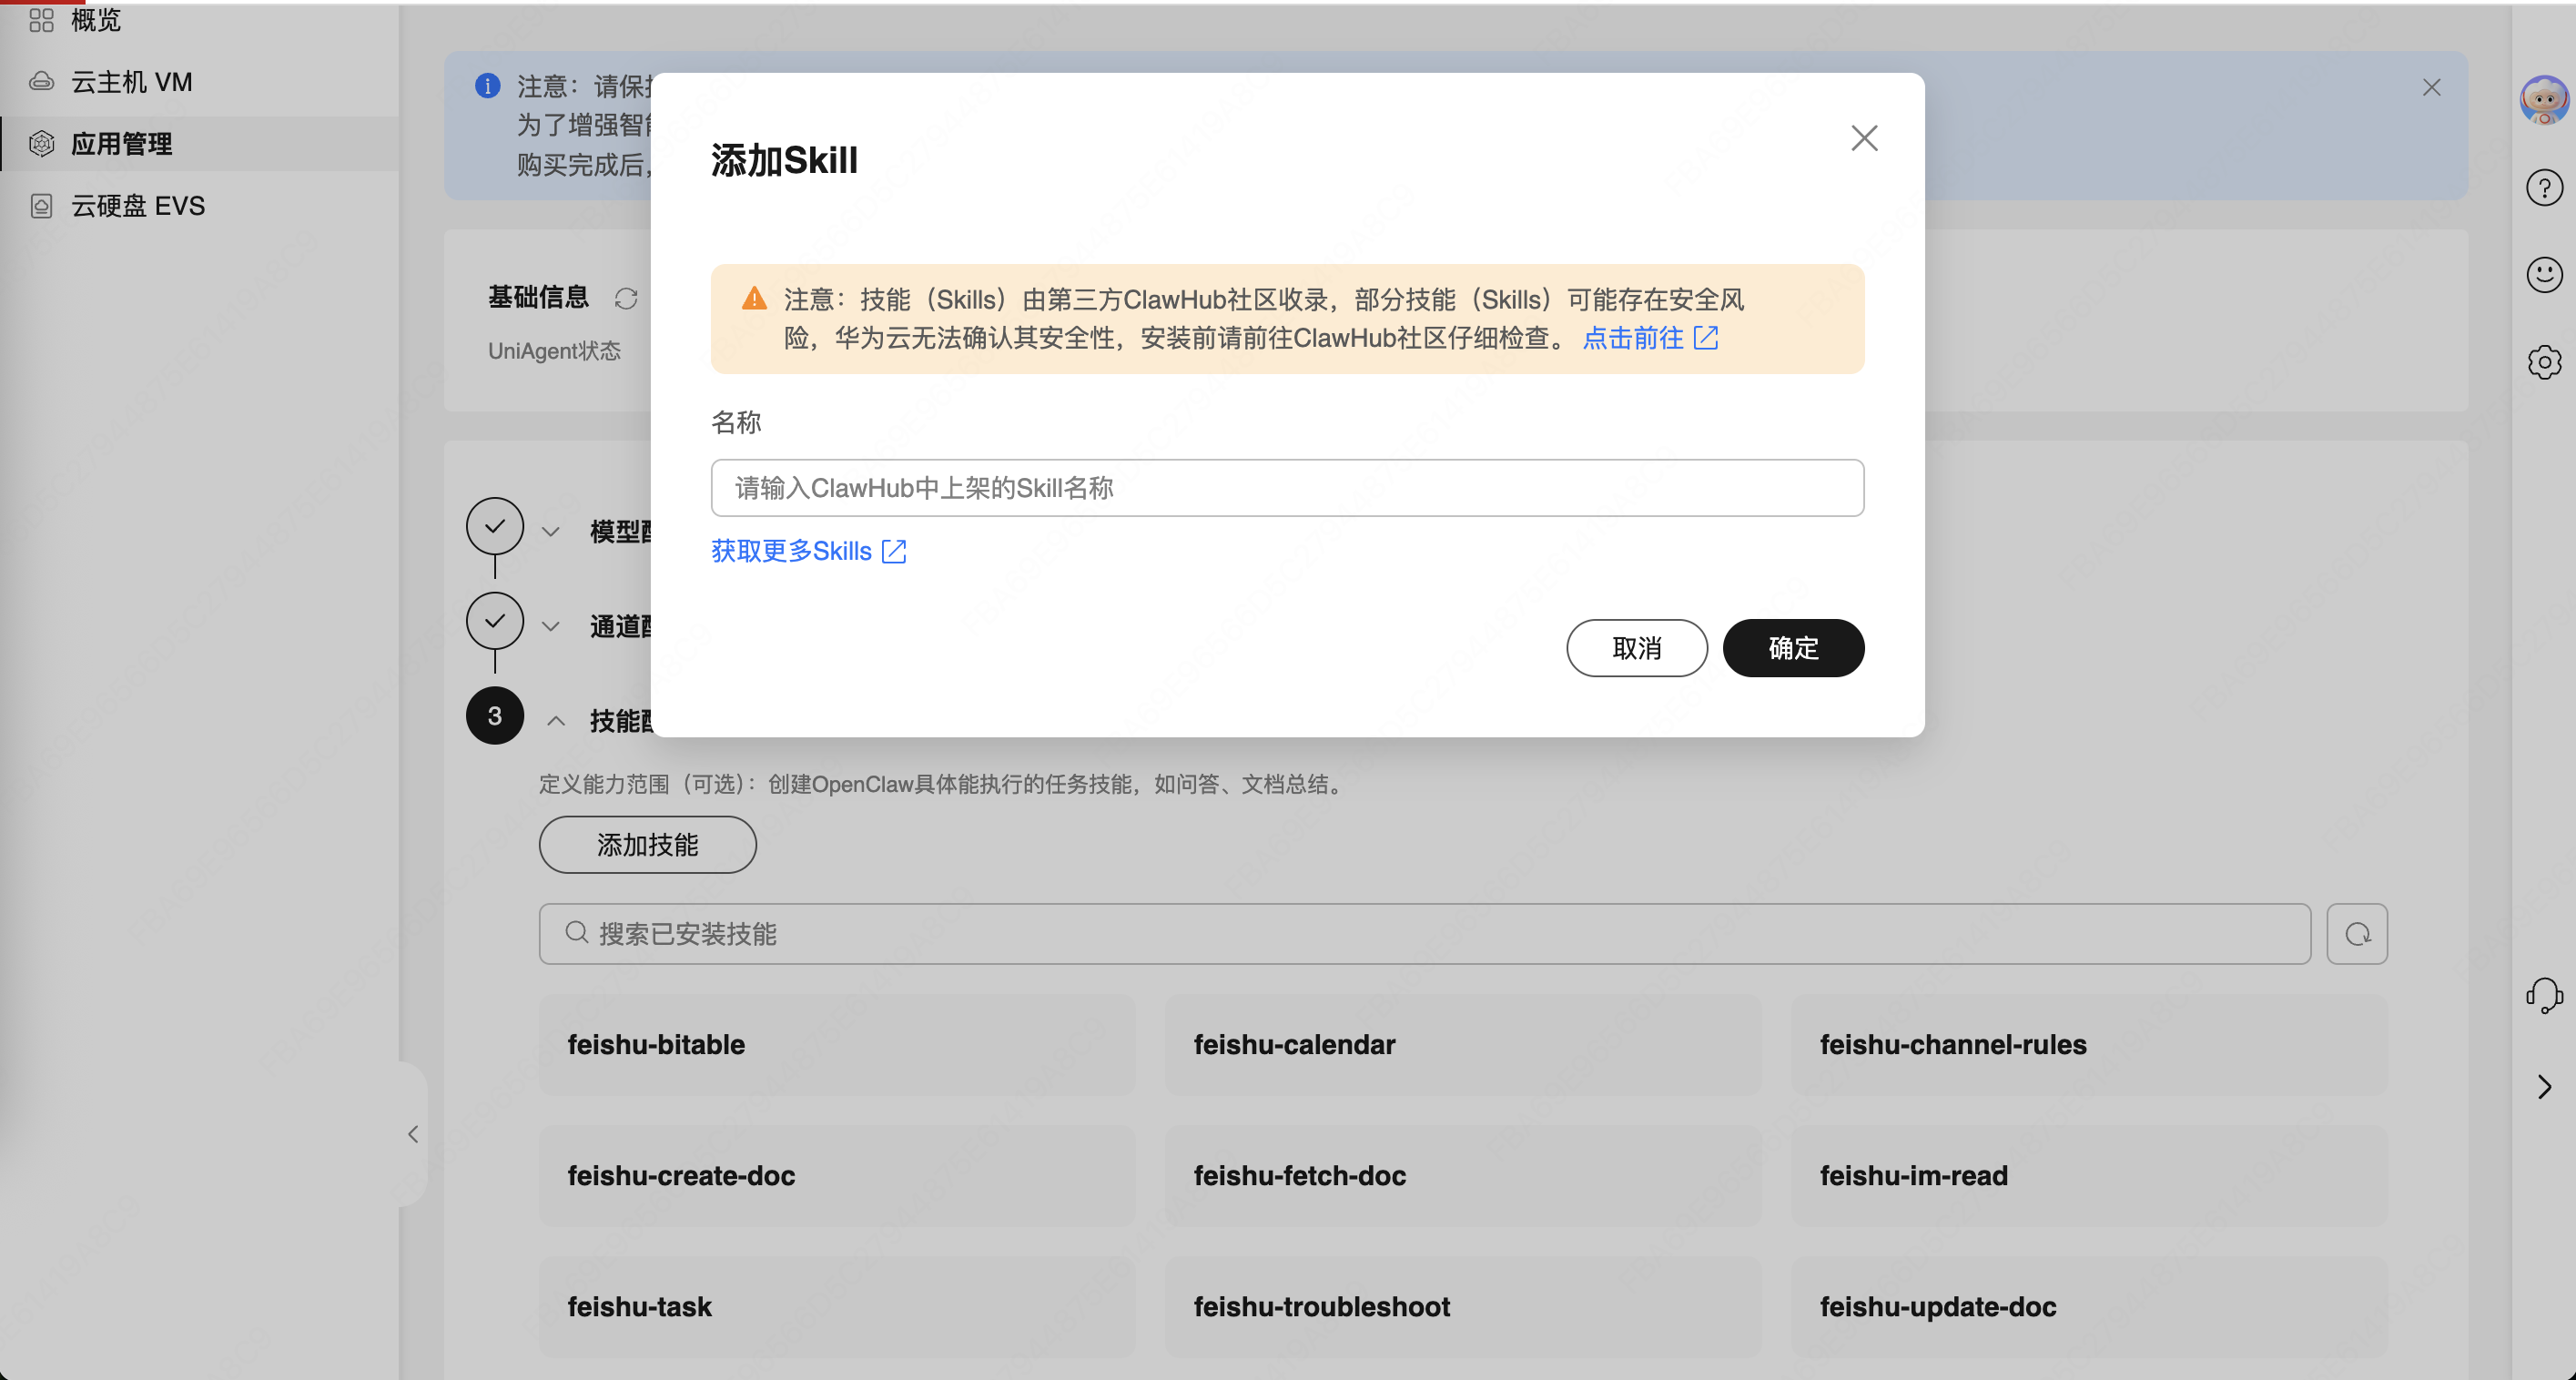
点击会打开 clawhub 技能广场 页面,选择一个技能,复制技能的名称,例如:self-improving-agent,粘贴到上面截图中添加技能的输入框里,点击确定就会开始安装。
安装会跳转到华为的「云运维中心 COC」,通过执行 smb_openclaw_install_skill 脚本的方式进行安装:
--2026-04-06 21:30:26--  https://documentation-samples.obs.cn-north-4.myhuaweicloud.com/solution-as-code-publicbucket/solution-as-code-moudle/deploying-clawdbot-agents/userdata/install_skill.sh
Resolving documentation-samples.obs.cn-north-4.myhuaweicloud.com (documentation-samples.obs.cn-north-4.myhuaweicloud.com)...
Connecting to documentation-samples.obs.cn-north-4.myhuaweicloud.com (documentation-samples.obs.cn-north-4.myhuaweicloud.com)|... connected.
HTTP request sent, awaiting response... 200 OK
Length: 5010 (4.9K) [binary/octet-stream]
Saving to: '/home/openclaw/sac/install_new.sh'

     0K ....                                                  100%  975M=0s

2026-04-06 21:30:27 (975 MB/s) - '/home/openclaw/sac/install_new.sh' saved [5010/5010]

===================================
开始安装技能: self-improving-agent
===================================
⚙️ 执行: clawhub install self-improving-agent --force
-----------------------------------
- Resolving self-improving-agent
✖ Rate limit exceeded
Error: Rate limit exceeded
-----------------------------------
⚙️ 执行: skillhub install self-improving-agent --force
-----------------------------------
Downloading: https://lightmake.site/api/v1/download?slug=self-improving-agent
Installed: self-improving-agent -> /home/openclaw/.openclaw/skills/self-improving-agent
-----------------------------------
✅ self-improving-agent 安装成功

📋 当前已安装技能:
feishu-bitable
feishu-calendar
feishu-channel-rules
feishu-create-doc
feishu-fetch-doc
feishu-im-read
feishu-task
feishu-troubleshoot
feishu-update-doc
clawhub
coding-agent
github
gog
healthcheck
nano-pdf
notion
obsidian
skill-creator
summarize
tmux
weather
Browser
self-improvement
api-gateway
feishu-wiki
find-skills
skillhub-preference
应用管理功能的底层实现
上面提到华为云 OpenClaw 应用管理主要提供了模型配置、通道配置、技能配置等功能,下面具体看下这些配置是如何实现的。
在当前用户目录下还可以看到一个叫做 sac 的文件夹:
openclaw@hcss-ecs-bd16:~/sac$ pwd
/home/openclaw/sac
openclaw@hcss-ecs-bd16:~/sac$ ls -al
total 36
drwxr-xr-x  2 openclaw openclaw 4096 Apr  6 21:30 .
drwxr-x--- 14 openclaw openclaw 4096 Apr  6 21:40 ..
-rwxr-xr-x  1 openclaw openclaw  603 Mar 28 10:29 install_list.sh
-rwxr-xr-x  1 openclaw openclaw 5010 Mar 28 18:36 install_new.sh
-rwxr-xr-x  1 openclaw openclaw 7113 Mar 12 18:39 manage.sh
-rwxrwxr-x  1 openclaw openclaw 1283 Mar 29 21:19 status.sh
-rwxrwxr-x  1 openclaw openclaw 2047 Mar 29 21:19 update_model.sh
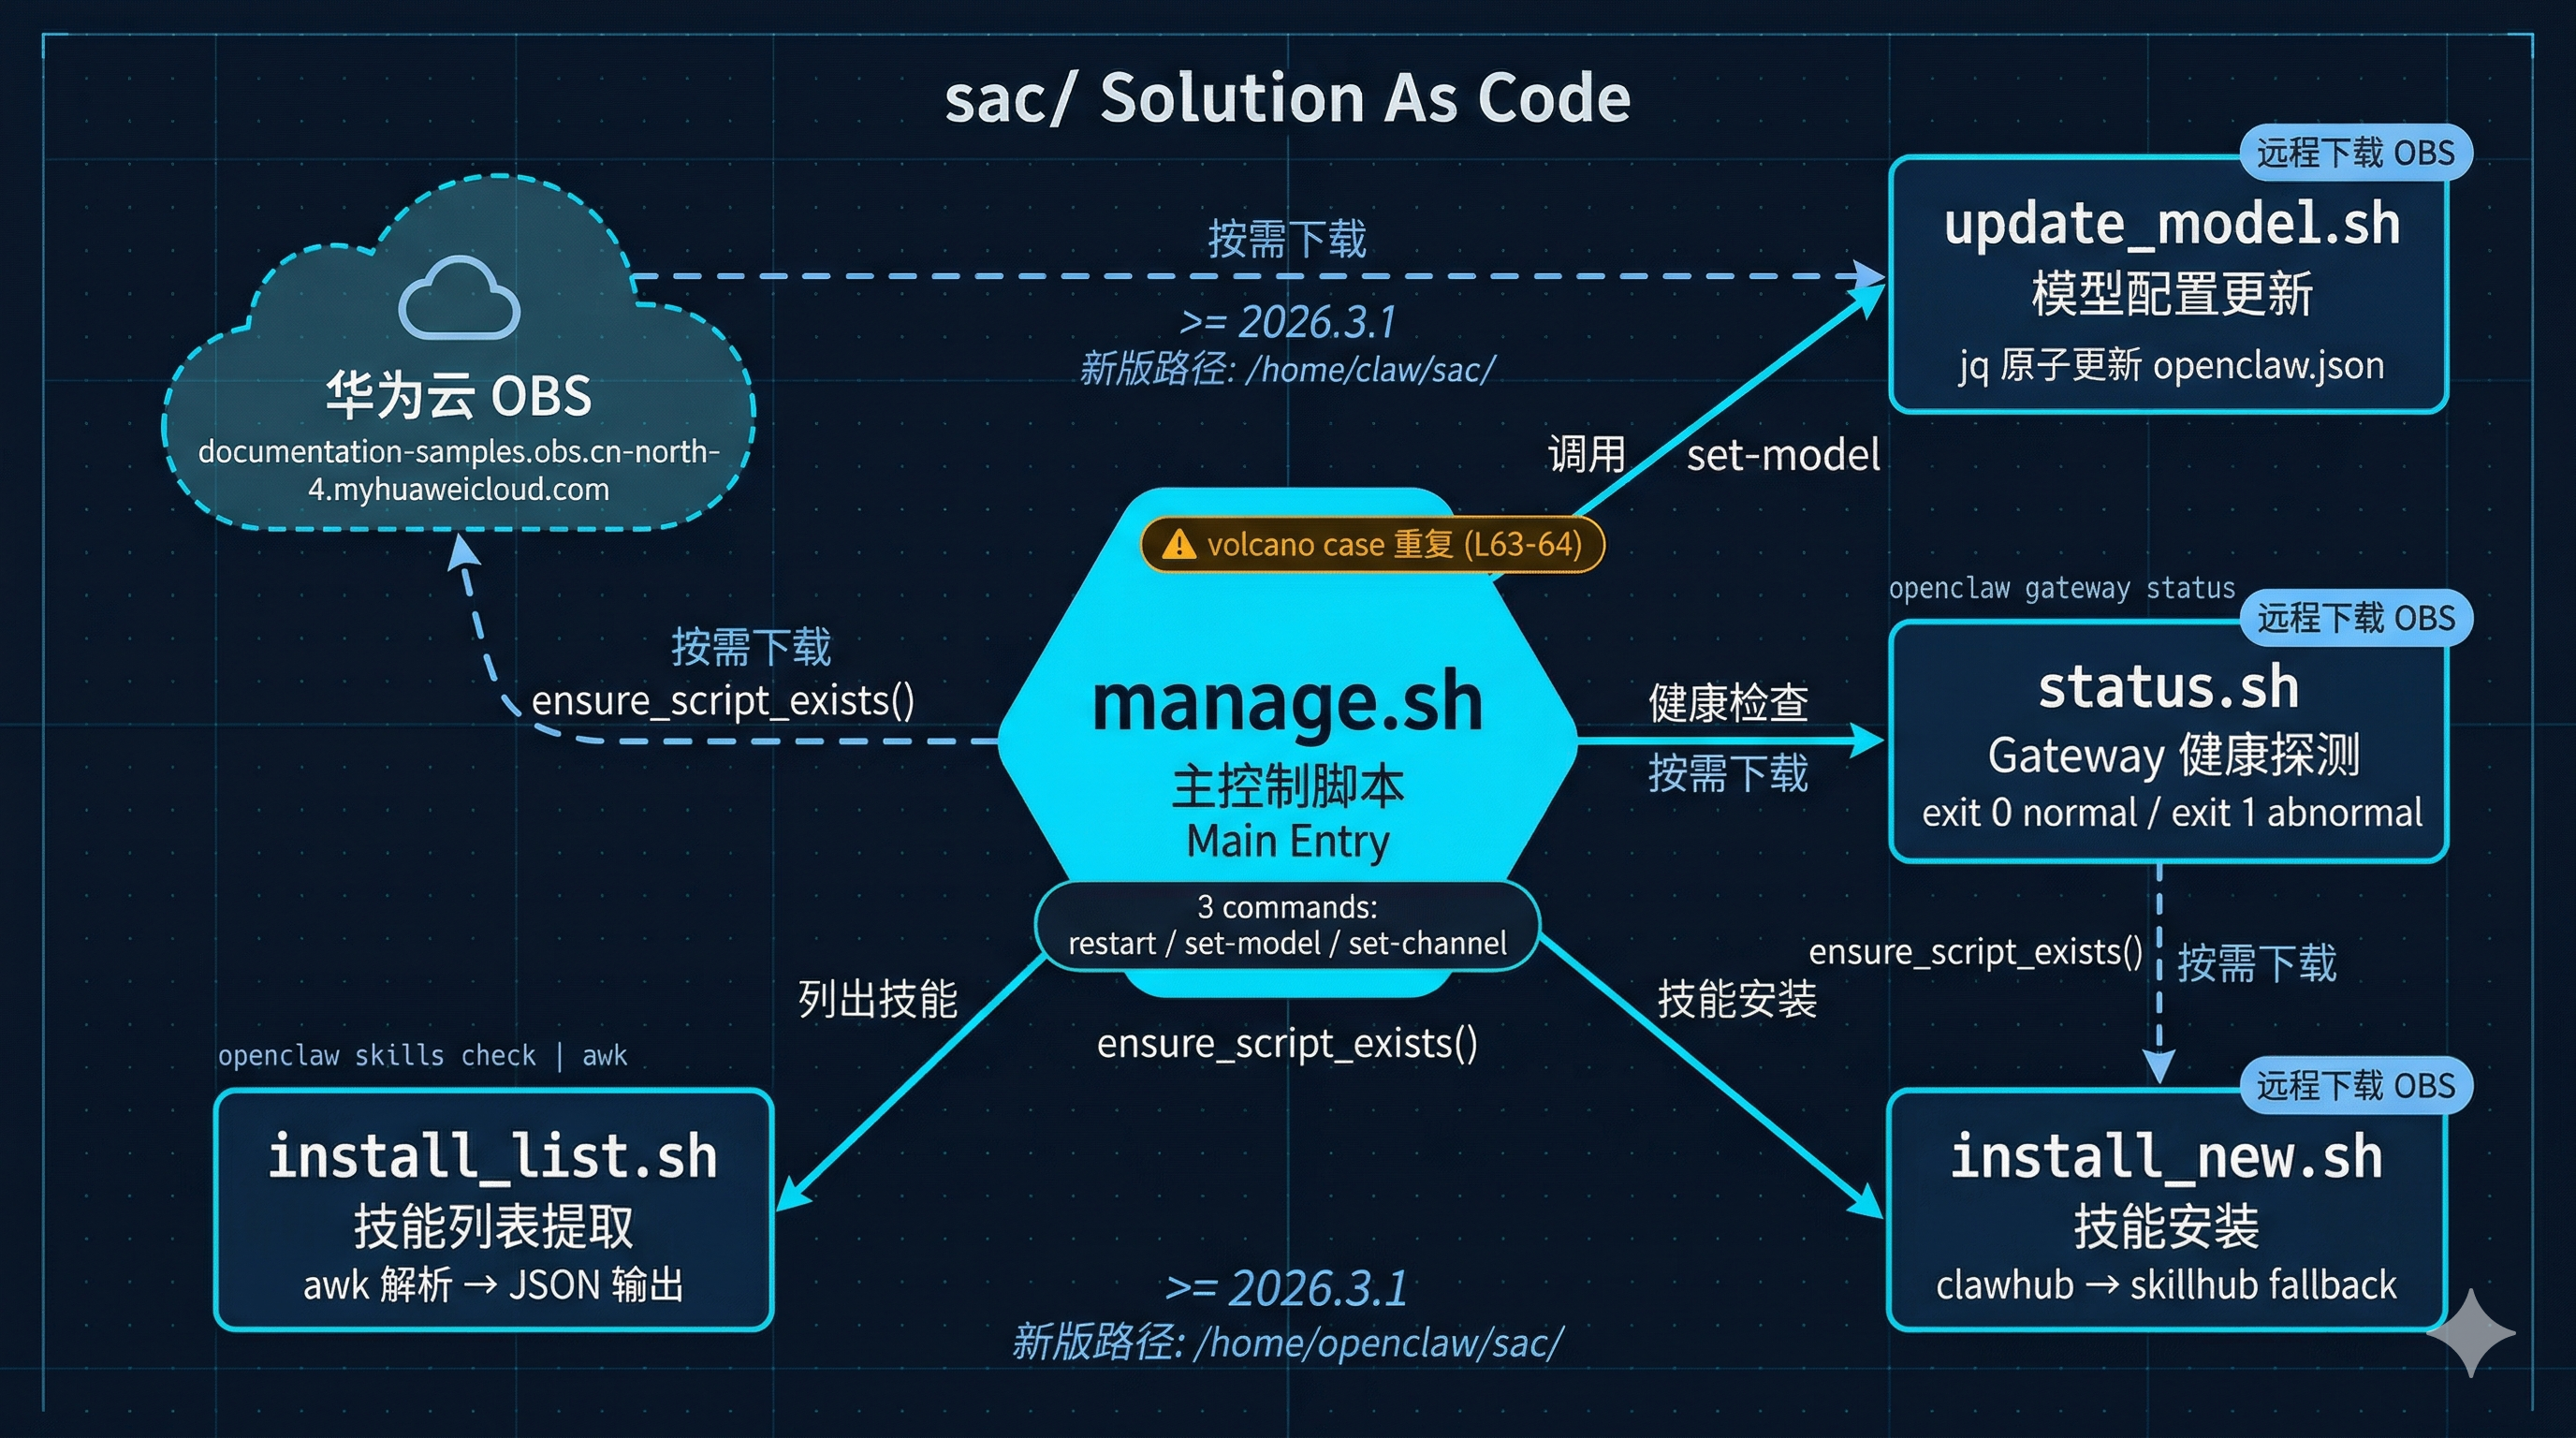
sac 推断是 Solution As Code 的缩写,这是一套用于部署和管理 OpenClaw 网关的运维脚本。四个脚本分工如下:
| 脚本 | 大小 | 职责 |
|---|---|---|
manage.sh |
主入口 | 安装/下载依赖脚本、设置模型、配置消息渠道 |
update_model.sh |
子脚本 | 用 jq 原子更新 ~/.openclaw/openclaw.json 的模型配置(远程下载) |
status.sh |
子脚本 | 探测 gateway 健康状态,正常返回 0,异常返回 1(远程下载) |
install_list.sh |
子脚本 | 列出已就绪的 skills |
install_new.sh |
子脚本 | 下载安装新的 skills(远程下载) |
脚本间调用关系:
manage.sh ── 下载 ──► update_model.sh (远程版本)
           ── 下载 ──► status.sh (远程版本)
           ── 调用 ──► update_model.sh

status.sh ────────► 调用 openclaw gateway status

install_list.sh ────────► 调用 openclaw skills check
install_new.sh  ────────► 安装新的 Skills
1. manage.sh — 主控制脚本
#!/bin/bash

# --- 初始化:5 个远端脚本的本地路径和 OBS 下载 URL ---
UPDATE_SCRIPT="/root/sac/update_model.sh"
DOWNLOAD_URL="https://documentation-samples.obs.cn-north-4.myhuaweicloud.com/.../openai-api-compatible.sh"
# ... 其余 4 个脚本路径和 URL 类似 ...

# --- 环境初始化:根据用户类型设置 pnpm/nvm 路径 ---
if [ -d "/home/openclaw" ]; then
    export PNPM_HOME="/home/openclaw/.local/share/pnpm"
    export NVM_DIR="/home/openclaw/.nvm"
else
    export PNPM_HOME="/root/.local/share/pnpm"
    export NVM_DIR="/root/.nvm"
fi
export PATH="$PNPM_HOME:$PATH"
[ -s "$NVM_DIR/nvm.sh" ] && \. "$NVM_DIR/nvm.sh"

# --- 版本判断:>= 2026.3.1 切换到 openclaw 用户路径 ---
APP_VERSION=$(openclaw --version)
if printf '%s\n' "2026.3.1" $APP_VERSION | sort -V -C; then  # new version
    UPDATE_SCRIPT="/home/openclaw/sac/update_model.sh"
    GATEWAY_STATUS="/home/openclaw/sac/status.sh"
fi

# --- 核心工具函数:按需从 OBS 下载脚本 ---
ensure_script_exists() {
    local script_path="$1"
    local download_url="$2"
    if [ ! -f "$script_path" ]; then
        curl -s -o "$script_path" "$download_url" && chmod +x "$script_path"
    fi
}

# --- 9 家厂商 URL 映射(huawei/aliyun/volcano/hunyuan/deepseek/zhipu/minimax/moonshot/xiaomi)---
get_url_mapping() { ... }

# --- 主命令分发 ---
case "$1" in
"restart")
    openclaw gateway restart
    ;;
"set-model")
    # 确保子脚本存在 → 映射 provider 到 BASE_URL → 调用 update_model.sh
    ensure_script_exists $UPDATE_SCRIPT $DOWNLOAD_URL
    BASE_URL=$(get_url_mapping "$2" "$3")
    "$UPDATE_SCRIPT" "$3" "$BASE_URL" "$4"
    ;;
"set-channel")
    case "$2" in
    "feishu")
        openclaw config set channels.feishu.appId "$3"
        openclaw config set channels.feishu.appSecret "$4"
        openclaw config set channels.feishu.enabled true
        # 新版(>= 2026.3.1)额外设置 dmPolicy 和 allowFrom
        if printf '%s\n' "2026.3.1" $APP_VERSION | sort -V -C; then
            openclaw config set channels.feishu.dmPolicy open
            openclaw config set channels.feishu.allowFrom '["*"]' --strict-json
        fi
        ;;
    "wecom")
        # 旧版:需要 HAProxy 外部脚本 + 手动重启;新版直接 config set
        if printf '%s\n' $APP_VERSION "2026.3.1" | sort -V -C; then  # old version
            bash $UPDATE_WECOM "$3" "$4" && openclaw gateway restart
        else
            openclaw config set channels.wecom.botId "$3"
            openclaw config set channels.wecom.secret "$4"
            openclaw config set channels.wecom.enabled true
        fi
        ;;
    # qq / dingtalk / xiaoyi 类似,均调用 openclaw config set ...
    esac
    ;;
esac
manage.sh 是整个 sac/ 目录的核心入口,提供 3 个管理命令。
初始化阶段(1-36 行)
- 设置 5 个远端脚本的默认路径和下载 URL(指向华为云 OBS 桶)
- 根据
/home/openclaw是否存在,决定用 openclaw 用户还是 root 用户的 nvm/pnpm 环境 - 检查 openclaw 是否存在,获取版本号。如果版本 >= 2026.3.1,将脚本路径切换为
/home/openclaw/sac/下
三个工具函数
| 函数 | 作用 |
|---|---|
restart_service() |
调用 openclaw gateway restart |
get_url_mapping(provider, model) |
将厂商名映射为 API 基地址,支持 9 家厂商;如果传入的是完整 URL 则直接返回 |
ensure_script_exists(path, url) |
如果本地脚本不存在,从远端 curl 下载并 chmod +x |
三个命令说明
restart:直接重启 gateway。
set-model <provider> <model_id> <api_key>:
- 确保
update_model.sh和status.sh已下载到本地 - 将 provider 映射为
BASE_URL(或直接使用传入的 URL) - 调用
update_model.sh "$MODEL_ID" "$BASE_URL" "$API_KEY",由后者原子更新~/.openclaw/openclaw.json
set-channel <channel> <arg1> <arg2> [arg3],根据不同渠道做配置:
| 渠道 | 参数 1 | 参数 2 | 参数 3 | 备注 |
|---|---|---|---|---|
| feishu | appId | appSecret | - | 新版本额外设置 dmPolicy 和 allowFrom |
| wecom | botId | secret | - | 旧版走 update_wecom.sh + HAProxy;新版直接 config set |
| token 前半 | token 后半 | - | 用 channels add 命令 | |
| dingtalk | clientId | clientSecret | - | - |
| xiaoyi | ak | sk | agentId | 唯一用 3 个参数的渠道 |
版本分界逻辑很关键:
- 旧版(< 2026.3.1):企业微信需要外部脚本 + HAProxy 配置 + 手动重启
- 新版(>= 2026.3.1):所有渠道统一用
openclaw config set配置,不再需要重启
已知 bug:第 63-64 行
volcanocase 重复,同一个"volcano"分支出现了两次,第二次永远不会执行。
2. update_model.sh — 模型配置更新脚本
#!/bin/bash

# 1. 检查并自动安装 jq(apt 或 yum)
# 2. 校验参数:<model_id> <base_url> <api_key>

# 3. 参数清洗:从 URL 提取 provider 名
CLEANED_URL="${BASE_URL%/chat/completions}"          # 去掉路径尾缀,只留基础域
PROVIDER=$(echo "$DOMAIN" | awk -F. '{print $(NF-1)}')  # 例: dashscope.aliyuncs.com → aliyun
MODEL_PATH="${PROVIDER}/$MODEL_ID"                   # 拼接完整路径,如 aliyun/qwen-max

# 4. jq 原子更新:一条指令同时完成 4 件事
UPDATED_JSON=$(jq \
    '.models.providers[$provider] = {          # 写入 provider 配置
        baseUrl: $url, apiKey: $key,
        api: "openai-completions",
        models: [{id: $id, name: $id, contextWindow: 100000}]
    } |
    .agents.defaults.model.primary = $mpath |  # 设为主模型
    .agents.defaults.models[$mpath].alias = $id' # 设置别名
    "$TARGET_FILE")

# 5. 安全写盘(原子替换,避免写入中断导致 JSON 损坏)
[ $? -eq 0 ] && echo "$UPDATED_JSON" > "$TARGET_FILE"
被 manage.sh set-model 调用,负责用 jq 原子性地修改 ~/.openclaw/openclaw.json 中的模型配置。
执行流程:
- 检查 jq 是否安装 → 没有就自动装(apt 或 yum)
- 校验参数 → 必须 3 个:
<model_id> <base_url> <api_key> - 清洗 URL + 提取 provider 名
- 用 jq 原子更新 JSON
- 安全写盘
参数清洗(20-29 行)
CLEANED_URL="${BASE_URL%/chat/completions}"   # 去掉路径尾缀,只留域
PROVIDER=$(echo "$DOMAIN" | awk -F. '{print $(NF-1)}')  # 从域名提取厂商标识
# 例: dashscope.aliyuncs.com → aliyun
MODEL_PATH="${PROVIDER}/$MODEL_ID"            # 拼接完整路径,如 aliyun/qwen-max
jq 原子更新(33-50 行),一条 jq 指令同时完成 4 件事:
# 1) 确保结构存在
.models //= {} | .models.providers //= {} |
.agents //= {} | .agents.defaults //= {} |
.agents.defaults.model //= {} | .agents.defaults.models //= {} |

# 2) 写入/覆盖 provider 配置
.models.providers[$provider] = {
    baseUrl: $url,
    apiKey: $key,
    api: "openai-completions",
    models: [{id: $id, name: $id, contextWindow: 100000}]
} |

# 3) 设为主模型
.agents.defaults.model.primary = $mpath |

# 4) 设置别名
.agents.defaults.models[$mpath].alias = $id
3. status.sh — Gateway 健康探测脚本
#!/bin/bash

# 执行 gateway 状态查询,捕获输出和退出码
GATEWAY_STATUS_OUTPUT=$(openclaw gateway status 2>&1)
QUERY_EXIT_CODE=$?

# 双重校验:退出码为 0 且输出包含健康关键字
NORMAL_KEYWORDS=("Runtime: running" "RPC probe: ok")
if [ $QUERY_EXIT_CODE -ne 0 ]; then
    echo "abnormal"; exit 1
fi
for KEYWORD in "${NORMAL_KEYWORDS[@]}"; do
    if echo "$GATEWAY_STATUS_OUTPUT" | grep -qi "$KEYWORD"; then
        echo "normal"; exit 0
    fi
done
echo "abnormal"; exit 1
功能很单纯:执行 openclaw gateway status,判断是否正常,正常输出 normal + exit 0,异常输出 abnormal + exit 1,方便外部监控系统调用。
两层校验逻辑:
- 第一层 — 命令本身执行是否成功(退出码是否为 0)
- 第二层 — 输出内容是否包含健康关键字(
grep -qi不区分大小写匹配)
两层都通过才判定为 normal,否则 abnormal。
4. install_list.sh — 技能列表提取脚本
#!/bin/bash
# 环境初始化(pnpm/nvm,同 manage.sh)...

# 核心:解析 openclaw skills check 输出,提取 "Ready to use" 区间,输出为 JSON 数组
openclaw skills check | awk '
    /Ready to use:/      { f=1; next }   # 开始采集
    /Missing requirements:/ { f=0 }      # 停止采集
    f && NF { arr[++n] = "\"" $NF "\"" } # 取最后一列加引号
    END { printf "{\"skills\":["; for(i=1;i<=n;i++) printf "%s%s", arr[i], i<n?",":""; printf "]}\n" }
'
这个脚本先用 openclaw skills check 获取技能状态,再用 awk 解析输出,最终生成一个 JSON 数组。
awk 逐段解析:
# 1. 遇到 "Ready to use:" 行 → 打开开关,开始采集
/Ready to use:/ { f=1; next }

# 2. 遇到 "Missing requirements:" 行 → 关闭开关,停止采集
/Missing requirements:/ { f=0 }

# 3. 当开关打开(f=1) 且 行非空(NF>0) → 采集最后一个字段,加双引号存入数组
f && NF {
    arr[++n] = "\"" $NF "\""
}

# 4. 结束时 → 拼接成 JSON {"skills":["skill-a","skill-b","skill-c"]}
END {
    printf "{\"skills\":["
    for (i=1; i<=n; i++) {
        printf "%s%s", arr[i], i<n ? "," : ""
    }
    printf "]}\n"
}
输出一个 JSON 对象,包含所有「Ready to use」状态的 skill 名称:
{"skills":["skill-a","skill-b","skill-c"]}
这段 awk 脚本实现了区间提取 + JSON 格式化的功能——从表格状输出中截取两个标记行之间的内容,取出最后列的值,拼接成标准 JSON,方便上层系统解析。
5. install_new.sh — 技能安装脚本
#!/bin/bash
# 环境初始化(pnpm/nvm,同 manage.sh)...

SKILL_NAME=$1

# --- 第一条路径(首选):clawhub install ---
CLAWHUB_INSTALL_OUTPUT=$(clawhub install "$SKILL_NAME" --force 2>&1)
if [ $? -eq 0 ]; then
    openclaw gateway restart   # 安装成功后重启网关
    exit 0
fi

# --- 第二条路径(fallback):skillhub install ---
# 如果 skillhub 不存在,先从华为云 OBS 下载安装
if [ ! -f "~/.local/bin/skillhub" ]; then
    curl -fsSL https://documentation-samples.obs.cn-north-4.myhuaweicloud.com/.../install_skillhub.sh | bash
fi

skillhub --dir ~/.openclaw/skills install "$SKILL_NAME" --force
if [ $? -eq 0 ]; then
    # root 用户额外处理:开启 full 模式,清理 plugins.allow 白名单
    jq '.tools.profile = "full" | del(.plugins.allow)' openclaw.json > openclaw.json.tmp
    cp -p openclaw.json.tmp openclaw.json
    exit 0
fi

# 两条路径均失败
echo "❌ $SKILL_NAME 安装失败"
echo "$CLAWHUB_INSTALL_OUTPUT" | grep -q "Rate limit" && echo "⚠️ 检测到 GitHub API 速率限制"
exit 1
这个脚本专门负责安装 OpenClaw 技能,比如 tavily-search、github、weather 等。
两条安装路径:
第一条(首选):clawhub install
clawhub install "$SKILL_NAME" --force
成功后自动 openclaw gateway restart,然后 clawhub list 显示结果。
第二条(fallback):skillhub install
当 clawhub 失败或不存在时,脚本会:
- 检查 skillhub 二进制是否存在(
~/.local/bin/skillhub) - 不存在则自动下载并执行
install_skillhub.sh(来自华为云 OBS) - 执行
skillhub --dir .../skills install "$SKILL_NAME" --force
两条路径的区别主要在于安装目录和用户环境:
/home/openclaw用户:skill 安装到/home/openclaw/.openclaw/skills- root 用户:skill 安装到
/root/.openclaw/skills
root 用户的特殊处理(104-117 行)
root 用户在 skillhub 安装成功后,额外做了两件事:
- 检查
plugins.allow中是否已有skillhub,没有则添加 - 清理配置:将工具配置设为
full模式,同时删除plugins.allow(因为不再需要白名单了)
jq '.tools.profile = "full" | del(.plugins.allow)' openclaw.json
OpenClaw 面板(Control UI)配置
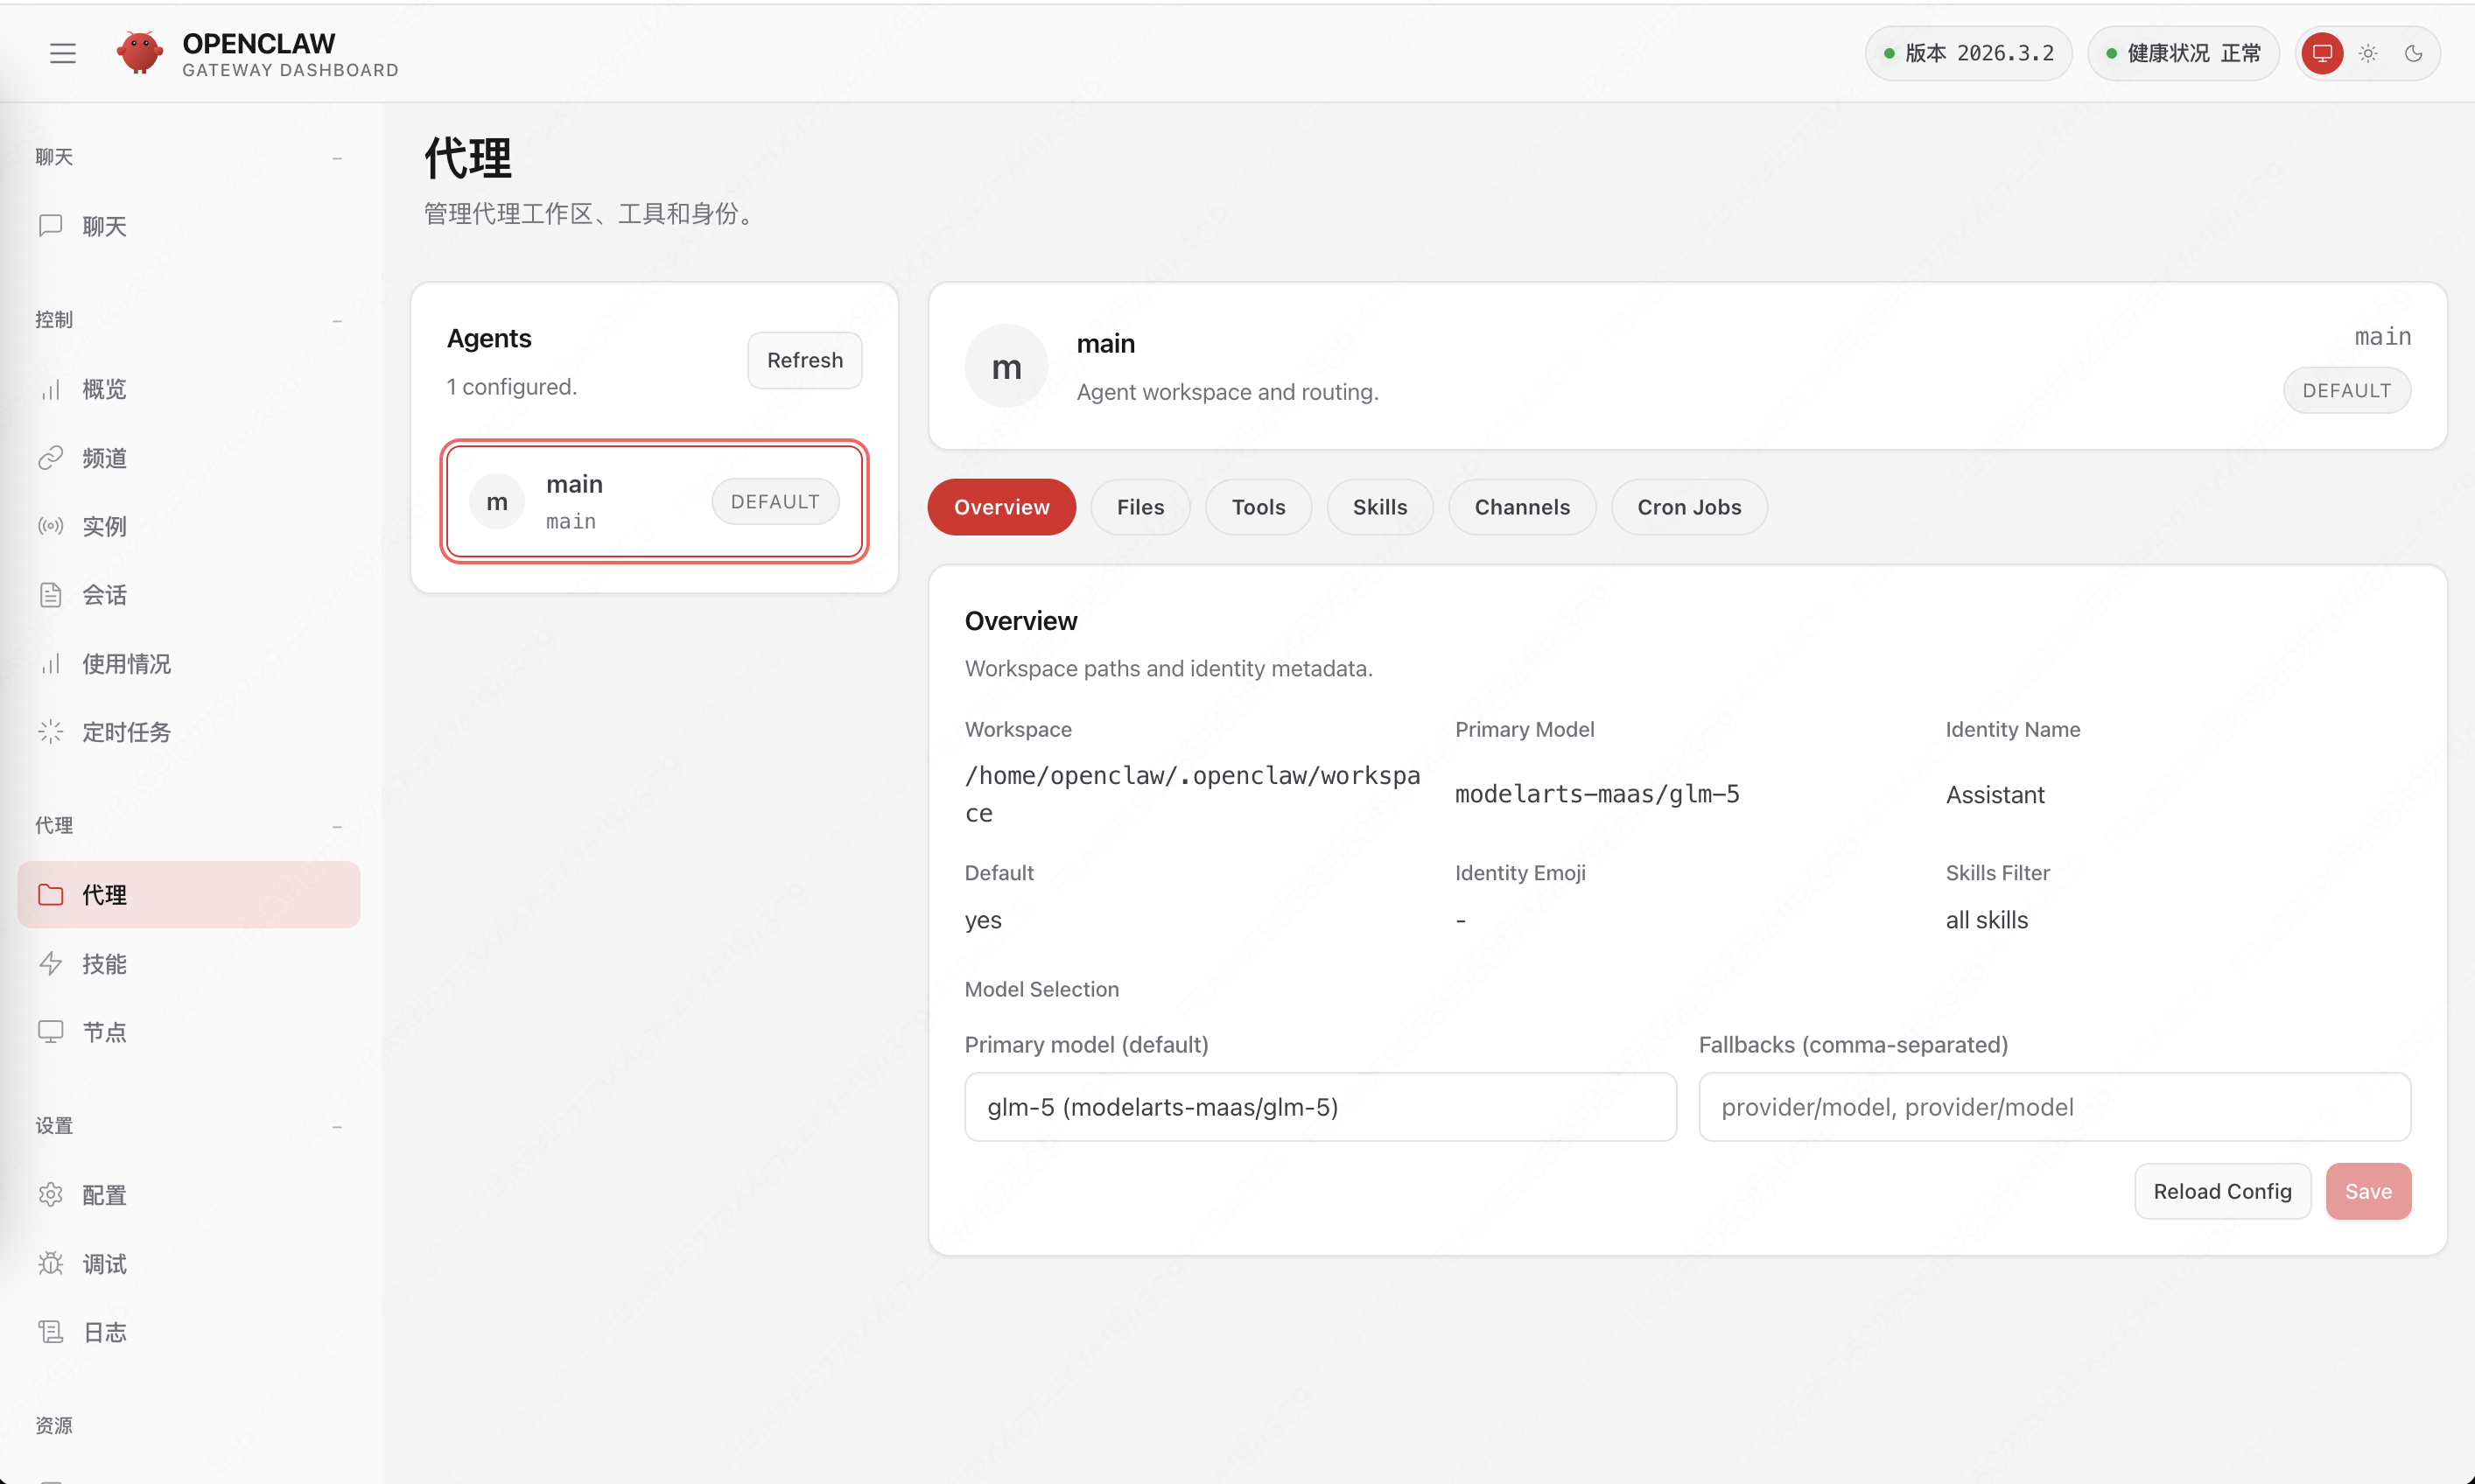
下面介绍一个华为云 OpenClaw 上默认还没有提供入口(腾讯云 OpenClaw 有),但实际使用中可能需要用到的功能:如何配置打开 OpenClaw 面板(Control UI)。
OpenClaw 面板是官方提供的 Web 形式的 UI 界面,可以用来管理模型、技能、通道等,也可以用来和 Agent 进行对话。
OpenClaw 面板默认只在本地提供(127.0.0.1 或者 localhost)访问,如果需要远程 IP 访问,需要通过配置进行开启。
配置步骤
执行 openclaw configure --section gateway,按提示选择:
- Where will the Gateway run?:Local (this machine)
- Gateway port:可以把默认的端口号 18789 改成自定义的
- Gateway bind mode:LAN (All interfaces)
- Gateway auth:Token
配置命令执行过程为:
openclaw@hcss-ecs-bd16:~$ openclaw configure --section gateway
                  🦞 OPENCLAW 🦞

┌  OpenClaw configure
│
◇  Existing config detected ─────────╮
│                                    │
│  workspace: ~/.openclaw/workspace  │
│  model: modelarts-maas/glm-5       │
│  gateway.mode: local               │
│  gateway.port: yyyyy               │
│  gateway.bind: lan                 │
│  skills.nodeManager: npm           │
│                                    │
├────────────────────────────────────╯
│
◇  Where will the Gateway run?
│  Local (this machine)
│
◇  Gateway port
│  yyyyy
│
◇  Gateway bind mode
│  LAN (All interfaces)
│
◇  Gateway auth
│  Token
│
◇  Tailscale exposure
│  Off
│
◇  Gateway token (blank to generate)
Updated ~/.openclaw/openclaw.json
│
◇  Control UI ──────────────────────────────────────────────────────────────────────╮
│                                                                                   │
│                                                                                   │
│  Web UI: http://xxx:yyyyy/                                                        │
│  Gateway WS: ws://xxx:yyyyy                                                       │
│  Gateway: not detected (SECURITY ERROR: Gateway URL "ws://xxxx:yyyyy" uses        │
│  plaintext ws:// to a non-loopback address.)                                      │
│  Docs: https://docs.openclaw.ai/web/control-ui                                    │
│                                                                                   │
├───────────────────────────────────────────────────────────────────────────────────╯
│
└  Configure complete.
开启远程访问后的配置
开启 allowedOrigins、allowInsecureAuth 和 token 后,/home/openclaw/.openclaw/openclaw.json 的 gateway 相关项配置如下:
"gateway": {
    "controlUi": {
          "allowedOrigins": [
                "http://server_public_ip:port"
          ],
          "allowInsecureAuth": true,
          "dangerouslyDisableDeviceAuth": true
    },
    "auth": {
      "mode": "token",
      "token": "xxxx"
    }
}
配置好后的访问链接格式为:http://server_public_ip:port/overview?token=xxxx,打开后就可以在 Web UI 界面看到 OpenClaw 面板了。
总结
通过学习华为云 OpenClaw 的配置,了解云服务平台如何管理和使用 OpenClaw。
后续计划
- 升级 OpenClaw 版本到最新版本
- 全新安装 OpenClaw,对比全新安装和华为云安装的差异
- 后续可以对比下其他云平台如腾讯云对 OpenClaw 的管理
- 研究小艺 Channel 的实现


 上一篇


 苏公安网备 32011402010933号