构建Serverless架构的应用需要用到后端服务工具。AppGallery Connect为您提供了云存储,云数据库,云函数等诸多常用服务。利用这些服务,并在AppGallery Connect上启用按量付费,就可以构建一款聊天应用。
通过构建一款聊天应用,您可以了解到华为生态系统的组成部分,如认证服务,云存储,云数据库和云函数等Serveless服务。此外,您还会了解到分享位置这一聊天应用的重要特性是如何利用定位服务,地图服务,和位置服务实现的。用户的注册流程会涉及手机号登录,动态口令(OTP认证),以及将用户资料存储到数据库中。
在这个Codelab中,我们将使用如下华为移动服务来实现应用的相关功能:
应用功能 |
华为移动服务 |
|---|---|
| 手机号登录 | 认证服务 |
| 聊天 | 云存储 |
| 分享图片 | 云存储和云数据库 |
| 推送通知 | 推送服务 |
| 分享当前位置或附近地标 | 地图服务,定位服务,和位置服务 |
在这个Codelab中,您将会建立一个聊天应用的示例工程,调用前述服务的接口,并能学习到MVVM(Model–view–viewmodel)架构模式概念,以及将分享的消息和文件存储在云数据库中。您的应用可以:
|
|
|
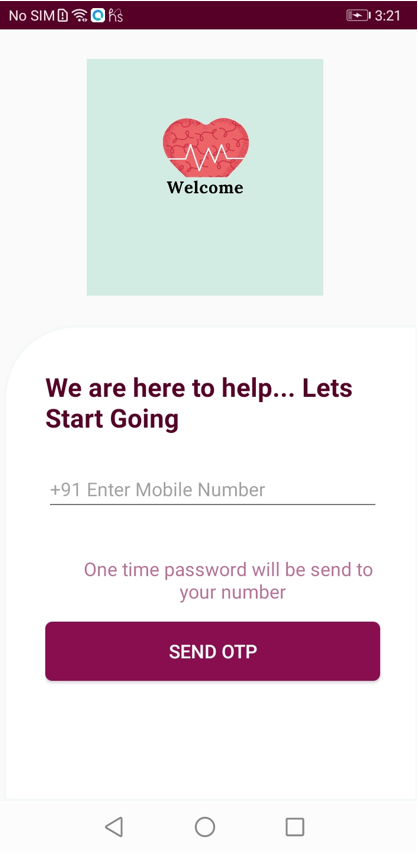
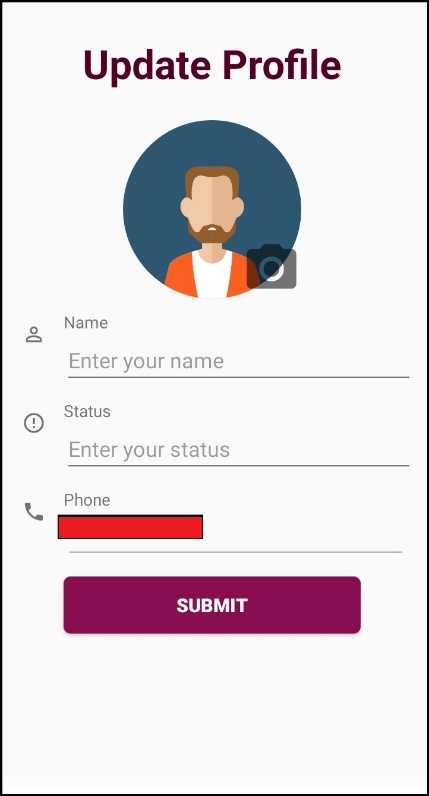
|
|
|
|
|
|
|
|
分享成功后的聊天窗口如下图所示。
|
|
|
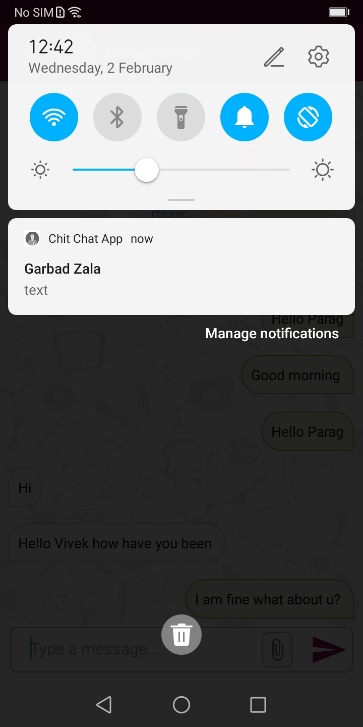
用户会收到消息通知,如下图所示。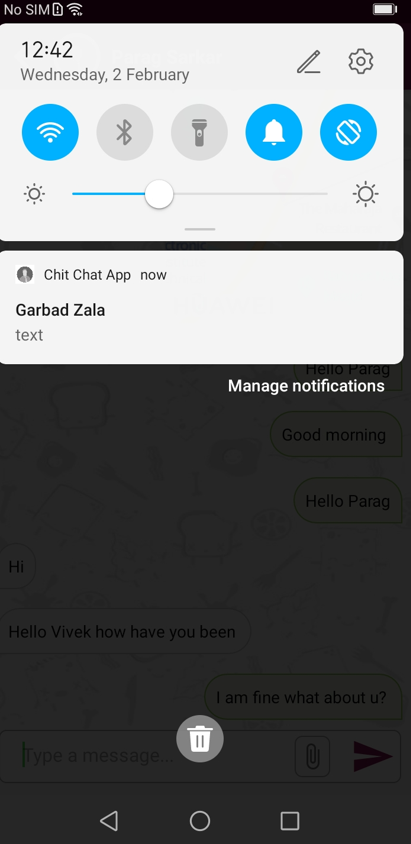
注意:为保护用户隐私,本文档中涉及用户个人信息的图片都已做了模糊处理。
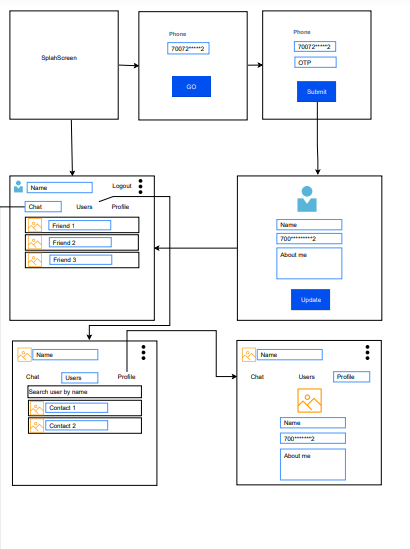
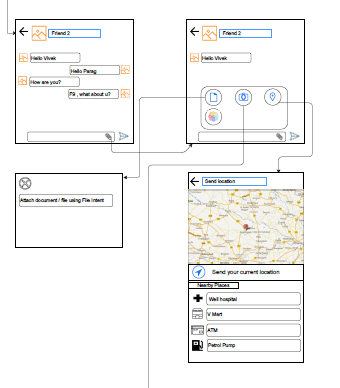
在这个Codelab中,您将学到:
要集成HMS Core相关服务,需要完成以下准备:
具体操作,请按照HMS Core集成准备中的详细说明来完成。
前往"项目设置"页面,选择"API管理"并开通下述服务:
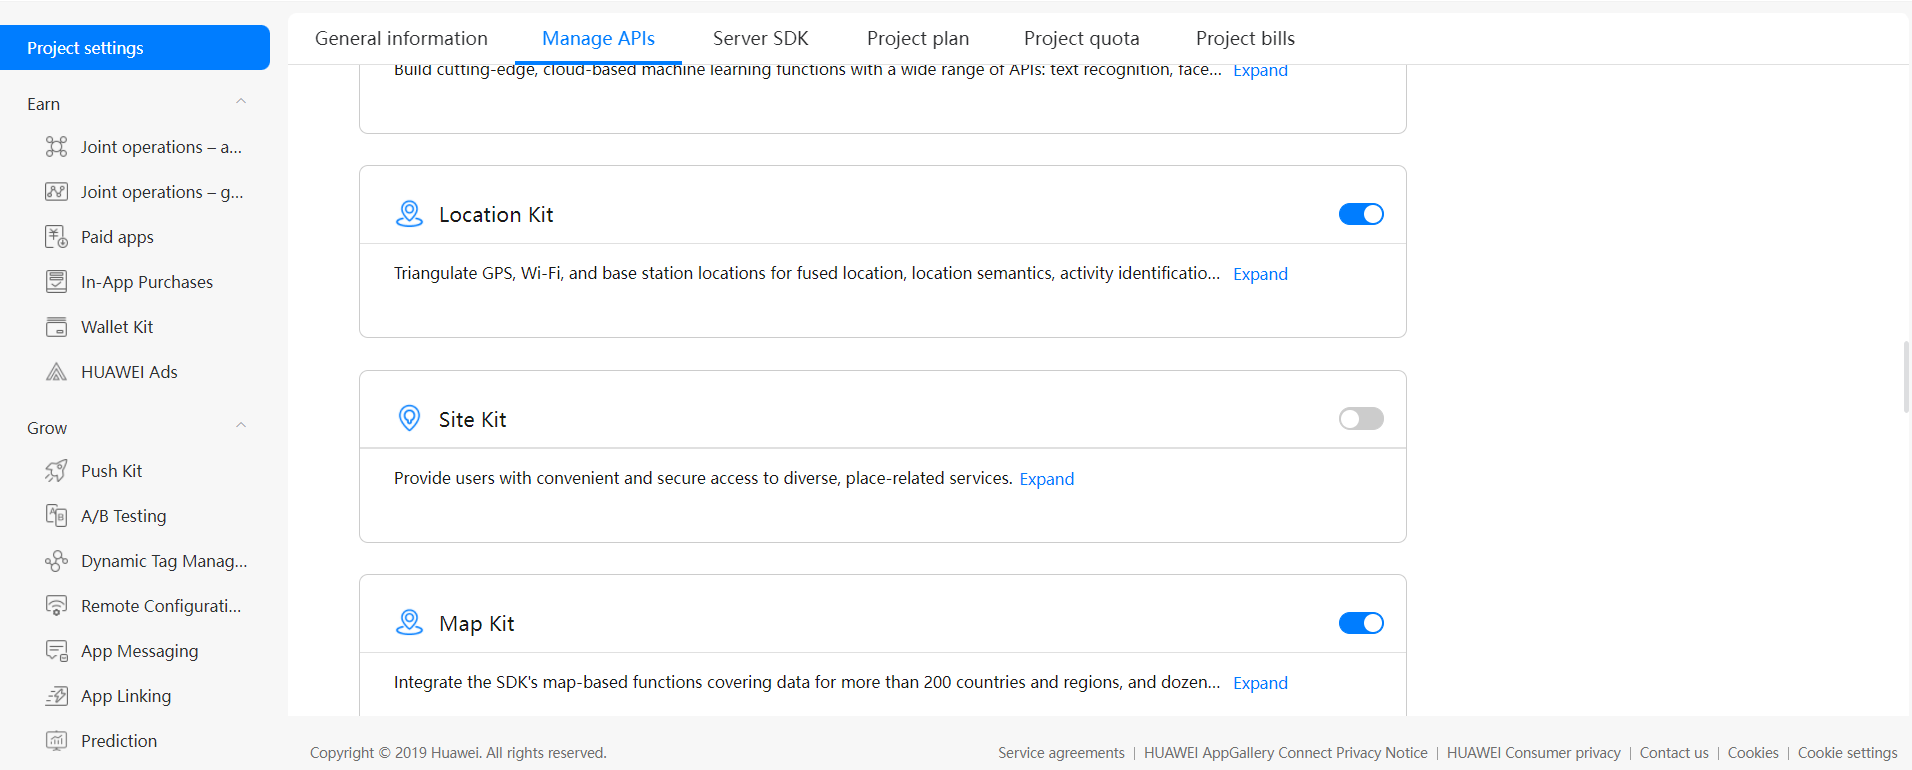
认证服务提供多种登录模式,用户可使用手机号,微信账号,微博账号等登录应用。本次Codelab中的示例应用的将启用手机号登录模式,这样我们可以接收动态口令。
添加如下依赖:
implementation 'com.huawei.agconnect:agconnect-auth: <auth_service_version>'说明:请集成最新版本的SDK,示例集成的是1.6.0.300版本。
用户使用手机号注册应用账号需要提供验证码。验证码将会发送到用户的手机上,验证成功则证明当前确为用户本人在操作。首先调用VerifyCodeSettings.Builder设置验证码功能,接着调用AGConnectAuth.requestVerifyCode申请验证码。
导入认证服务需要用到的相关类:
    import com.huawei.agconnect.auth.AGConnectAuth;
    import com.huawei.agconnect.auth.PhoneUser;
    import com.huawei.agconnect.auth.VerifyCodeResult;
    import com.huawei.agconnect.auth.VerifyCodeSettings;
AuthServiceViewModel.java
    public void getOTP(String countryCodeStr, String phoneNumberStr) {
        VerifyCodeSettings settings = new VerifyCodeSettings.Builder()
                .action(VerifyCodeSettings.ACTION_REGISTER_LOGIN)
                .sendInterval(30)
                .locale(Locale.getDefault())
                .build();

        Task<VerifyCodeResult> task = AGConnectAuth.getInstance().requestVerifyCode(countryCodeStr, phoneNumberStr, settings);
        task.addOnSuccessListener(TaskExecutors.immediate(), verifyCodeResult -> {
            if (null != verifyCodeResult) {
                verifyCodeResultMutableLiveData.postValue(verifyCodeResult);
            }
        });
        task.addOnFailureListener(e ->
                AppLog.logE(TAG, "onFailure: " + e.getCause()));
    }
LoginFragment.Java
使用如下代码段实现登录按钮:
    Util.showProgressBar(getActivity());
        bundle.putString(Constants.PHONE_NUMBER, etPhoneNumber.getText().toString());
        bundle.putString(Constants.COUNTRY_CODE, "+91");
        authServiceViewModel.getOTP("+91", etPhoneNumber.getText().toString());
        authServiceViewModel.verifyCodeResultMutableLiveData.observe(requireActivity(), verifyCodeResult -> {
            loginPhoneFragmentListener.setLoginPhoneFragmentListener(bundle);
            Util.stopProgressBar();
        });

    } else {
        Toast.makeText(requireContext(), "Please enter number", Toast.LENGTH_SHORT).show();
    }
AuthServiceViewModel.java
    public void verifyContactDetails(String countryCodeStr, String phoneNumberStr, String code) {
        PhoneUser = new PhoneUser.Builder()
                .setCountryCode(countryCodeStr)
                .setPhoneNumber(phoneNumberStr)
                .setVerifyCode(code)
                .build();
        AGConnectAuth.getInstance().createUser(phoneUser)
                .addOnSuccessListener(signInResult -> {
                    if (signInResult != null) {
                        User user = new User();
                        user.setUsername(signInResult.getUser().getDisplayName());
                        user.setPhoneNumber(phoneNumberStr);
                        userMutableLiveData.postValue(user);
                    }
                })
                .addOnFailureListener(e -> {
                    AppLog.logE(TAG, "verifyContactDetails: " + e.getStackTrace());
                    User user = new User();
                    user.setPhoneNumber(phoneNumberStr);
                    userMutableLiveData.setValue(user);
                });
    }
LoginWithOTPFragment.java
    Util.showProgressBar(getActivity());
        Bundle bundle = new Bundle();
        bundle.putString(Constants.COUNTRY_CODE, strCountryCode);
        bundle.putString(Constants.PHONE_NUMBER, strPhone);
        if (otpEditText.length() == 6) {
            authServiceViewModel.verifyContactDetails(strCountryCode, strPhone, otpEditText.getText().toString());
            authServiceViewModel.userMutableLiveData.observe(requireActivity(), user -> {
                if (user != null) {
                    loginWithOTPFragmentListener.setLoginWithOTPFragmentListener(bundle);
                }
                Util.stopProgressBar();
            });

        }
    });
若手机号验证成功:
    @Override
    public void setLoginWithOTPFragmentListener(Bundle bundle) {
        String number = bundle.getString(Constants.PHONE_NUMBER);
        Intent intent = new Intent(LoginActivity.this, UserProfileActivity.class);
        intent.putExtra(Constants.PHONE_NUMBER, number);
        intent.addFlags(Intent.FLAG_ACTIVITY_CLEAR_TOP | Intent.FLAG_ACTIVITY_CLEAR_TASK);
        startActivity(intent);
        ActivityCompat.finishAffinity(LoginActivity.this);
    }
应用将打开用户资料填写界面,用户需要填写姓名,手机号,状态等信息。
    dependencies {
        implementation 'com.huawei.agconnect:agconnectdatabase:<cloud_DB_zone≶'

        }
说明:请集成最新版本的SDK,示例集成的是1.2.3.301版本。
关于使用云数据库,请参考官方文档。
final StorageReference storageReference = ChitChatApplication.getStorageManagement().getStorageReference(fileName + name);
创建一个User类用来和云数据库传递用户信息:
    package com.huawei.chitchatapp.dbcloud;
    import com.huawei.agconnect.cloud.database.CloudDBZoneObject;
    import com.huawei.agconnect.cloud.database.Text;
    import com.huawei.agconnect.cloud.database.annotations.DefaultValue;
    import com.huawei.agconnect.cloud.database.annotations.NotNull;
    import com.huawei.agconnect.cloud.database.annotations.Indexes;
    import com.huawei.agconnect.cloud.database.annotations.PrimaryKeys;


    @PrimaryKeys({"user_phone"})
    @Indexes({"user_id:user_id", "user_phone_id:user_phone,user_id"})
    public final class User extends CloudDBZoneObject {
        private Integer user_id;

        private String user_phone;

        private String user_name;

        private String user_status;

        private String user_login_status;

        private String user_push_token;

        private String user_profile_url;

        public User() {
            super(User.class);
        }

        public void setUserId(Integer user_id) {
            this.user_id = user_id;
        }

        public Integer getUserId() {
            return user_id;
        }

        public void setUserPhone(String user_phone) {
            this.user_phone = user_phone;
        }

        public String getUserPhone() {
            return user_phone;
        }

        public void setUserName(String user_name) {
            this.user_name = user_name;
        }

        public String getUserName() {
            return user_name;
        }

        public void setUserStatus(String user_status) {
            this.user_status = user_status;
        }

        public String getUserStatus() {
            return user_status;
        }

        public void setUserLoginStatus(String user_login_status) {
            this.user_login_status = user_login_status;
        }

        public String getUserLoginStatus() {
            return user_login_status;
        }

        public void setUserPushToken(String user_push_token) {
            this.user_push_token = user_push_token;
        }

        public String getUserPushToken() {
            return user_push_token;
        }

        public void setUserProfileUrl(String user_profile_url) {
            this.user_profile_url = user_profile_url;
        }

        public String getUserProfileUrl() {
            return user_profile_url;
        }

    }
}
CloudDBHelper.java
    import android.content.Context;
    import com.huawei.agconnect.cloud.database.AGConnectCloudDB;
    import com.huawei.agconnect.cloud.database.CloudDBZone;
    import com.huawei.agconnect.cloud.database.CloudDBZoneConfig;
    import com.huawei.agconnect.cloud.database.exceptions.AGConnectCloudDBException;
    import com.huawei.chitchatapp.dbcloud.ObjectTypeInfoHelper;
    import com.huawei.chitchatapp.utils.AppLog;
    import com.huawei.chitchatapp.utils.Constants;
    import com.huawei.chitchatapp.utils.OnDBZoneOpen;
    import com.huawei.hmf.tasks.Task;
    private AGConnectCloudDB agConnectCloudDB;
    private CloudDBZone cloudDBZone;
    private static final String TAG = CloudDBHelper.class.getSimpleName();

    private static CloudDBHelper cloudDBHelper;

    public static CloudDBHelper getInstance() {
        if (cloudDBHelper == null) {
            cloudDBHelper = new CloudDBHelper();
        }
        return cloudDBHelper;
    }
    public void init(Context context) {
        AGConnectCloudDB.initialize(context);
        try {
            agConnectCloudDB = AGConnectCloudDB.getInstance();
            agConnectCloudDB.createObjectType(ObjectTypeInfoHelper.getObjectTypeInfo());
        } catch (AGConnectCloudDBException e) {
            e.printStackTrace();
        }
    }
    public void openDb(OnDBZoneOpen onDBZoneOpen) {
        CloudDBZoneConfig mConfig = new CloudDBZoneConfig(Constants.DB_ZONE_NAME,
                CloudDBZoneConfig.CloudDBZoneSyncProperty.CLOUDDBZONE_CLOUD_CACHE,
                CloudDBZoneConfig.CloudDBZoneAccessProperty.CLOUDDBZONE_PUBLIC);
        mConfig.setPersistenceEnabled(true);
        Task openDBZoneTask = agConnectCloudDB.openCloudDBZone2(mConfig, true);
        openDBZoneTask.addOnSuccessListener(cloudDBZone -> {
            AppLog.logI(TAG, "cloudDBZOne Open");
            this.cloudDBZone = cloudDBZone;
            onDBZoneOpen.isDBZoneOpen(true, this.cloudDBZone);
        }).addOnFailureListener(e -> {
            AppLog.logW(TAG, "open cloudDBZone failed for " + e.getMessage());
            onDBZoneOpen.isDBZoneOpen(false, null);
        });
    }
    public void closeDb(Context context) {
        try {
            agConnectCloudDB.closeCloudDBZone(cloudDBZone);
        } catch (AGConnectCloudDBException e) {
            AppLog.logW(TAG,"close the DBZone "+e.getMessage());
        }
    }
    private void updateProfileData(String name, String status, Uri profileUri) {

        ChitChatSharedPref.initializeInstance(UserProfileActivity.this);
        User user = new User();
        user.setUserId(userId);
        user.setUserPushToken(pushToken);
        user.setUserPhone(phoneNumber);
        user.setUserName(name);
        user.setUserLoginStatus(Constants.STATUS_ONLINE);
        user.setUserStatus(status);
        user.setUserProfileUrl(String.valueOf(profileUri));

        userProfile.saveUser(user, UserProfileActivity.this);
        userProfile.userMutableLiveData.observe(UserProfileActivity.this, aBoolean -> {
            if (aBoolean) {
                ChitChatSharedPref.initializeInstance(getApplicationContext());
                ChitChatSharedPref.getInstance().putString(Constants.PHONE_NUMBER, phoneNumber);
                ChitChatSharedPref.getInstance().putString(Constants.USER_NAME, name);
                ChitChatSharedPref.getInstance().putString(Constants.ALREADY_LOGIN, "1");
                Toast.makeText(UserProfileActivity.this, getString(R.string.showMessageSuccess), Toast.LENGTH_SHORT).show();
                Intent intent = new Intent(UserProfileActivity.this, MainActivity.class);
                startActivity(intent);
            } else {
                Toast.makeText(UserProfileActivity.this, getString(R.string.showMessageFailed), Toast.LENGTH_SHORT).show();
            }
        });
    }
    public void saveUser(User user, Context context) {
        CloudDBHelper.getInstance().openDb((isConnected, cloudDBZone) -> {
            if (isConnected && cloudDBZone != null) {
                if (cloudDBZone == null) {
                    return;
                } else {
                    Task insertTask = cloudDBZone.executeUpsert(user);
                    insertTask.addOnSuccessListener(integer -> {
                        userMutableLiveData.setValue(true);
                        CloudDBHelper.getInstance().closeDb(context);
                    }).addOnFailureListener(e -> {
                        userMutableLiveData.setValue(false);
                        CloudDBHelper.getInstance().closeDb(context);
                    });
                }
            }
        });
    }

添加如下依赖:
    dependencies{
        implementation "com.huawei.agconnect:agconnect-storage:"
    }
说明: 请集成最新版本的SDK,示例集成的是1.3.1.100版本。
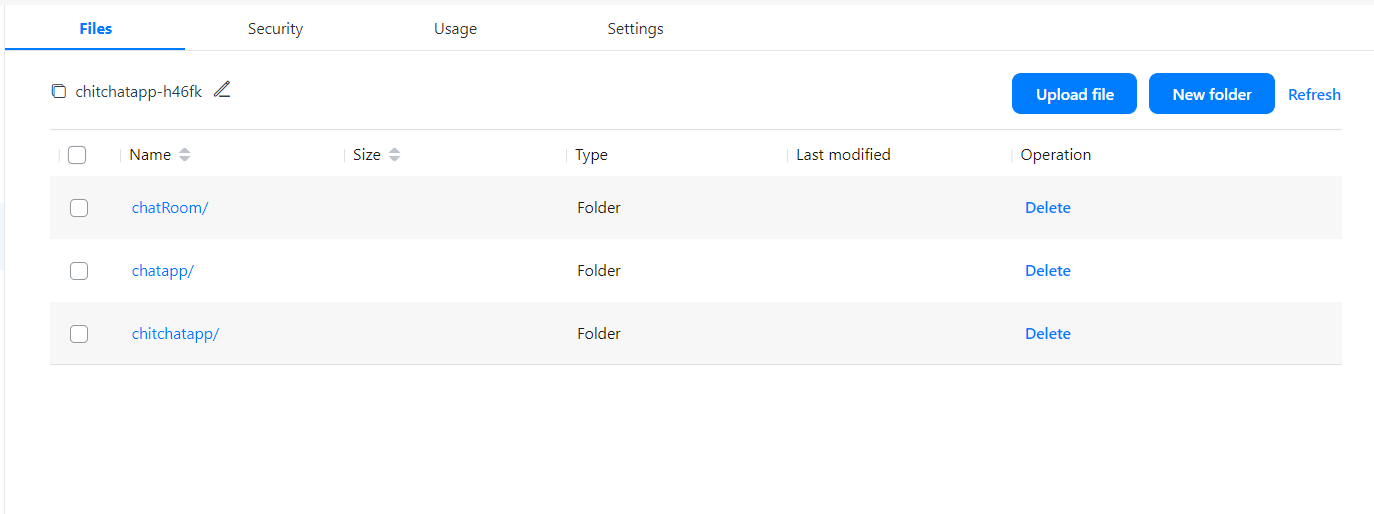
关于使用云存储,请参考官方文档。
final StorageReference storageReference = ChitChatApplication.getStorageManagement().getStorageReference(fileName + name);
    public class ChitChatStorageViewModel extends ViewModel {

        private static final String TAG = "ChitChatStorageViewModel";

        private MutableLiveData<Uri≶ uploadFileLiveData;

        private OnApiError onApiError;

        public LiveData<Uri≶ uploadFileLiveData() {
            if (uploadFileLiveData == null) {
                uploadFileLiveData = new MutableLiveData<≶();
            }
            return uploadFileLiveData;
        }

        public void uploadFile(StorageReference reference, String fileName, File filePath, OnApiError onApiError) {
            this.onApiError = onApiError;
            UploadTask task = reference.putFile(filePath);
            task.addOnSuccessListener(uploadSuccessListener)
                    .addOnFailureListener(uploadFailureListener);

        }

        OnSuccessListener<UploadTask.UploadResult≶ uploadSuccessListener = new OnSuccessListener<UploadTask.UploadResult≶() {
            @Override
            public void onSuccess(UploadTask.UploadResult uploadResult) {
                uploadResult.getStorage().getDownloadUrl().addOnSuccessListener(downloadLink)
                        .addOnFailureListener(downloadUriFailureListener);
            }
        };

        OnSuccessListener<Uri≶ downloadLink = new OnSuccessListener<Uri≶() {
            @Override
            public void onSuccess(Uri uri) {
                uploadFileLiveData.postValue(uri);
            }
        };

        OnFailureListener uploadFailureListener = new OnFailureListener() {
            @Override
            public void onFailure(Exception e) {
                if (onApiError != null) {
                    onApiError.onError("Error in uploading file to server", e);
                }
            }
        };

        OnFailureListener downloadUriFailureListener = new OnFailureListener() {
            @Override
            public void onFailure(Exception e) {
                onApiError.onError("Failed in getting uri", e);
            }
        };
    }
上传文件代码如下所示:
    public void uploadImage(File path) {
        userProfileImage.uploadFileLiveData().observe(UserProfileActivity.this, uri -> {
            updateProfileData(mName.getText().toString(), mStatus.getText().toString(), uri);
        });

        final String name = phoneNumber + ".png";
        final StorageReference storageReference = ChitChatApplication.getStorageManagement().getStorageReference("chitchatapp/profile_pic/" + name);


        userProfileImage.uploadFile(storageReference,
                phoneNumber + ".png", path,
                (errorMessage, e) -> AppLog.logE("ProfileFragment", "filePAth--->Error" + e));
    }
推送服务搭建云端和设备端之间的消息通道,为您处理消息的推送。集成推送服务后,您的应用可以实时向用户推送消息,这有助于您和您的用户维持更紧密的联系,并帮助您提升用户活跃度与粘度。使用推送服务推送消息流程如下图所示。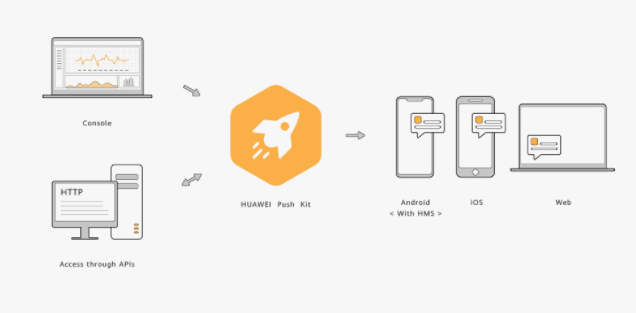

添加如下依赖:
    dependencies {
        implementation 'com.huawei.hms:push:<lastest_push_kit_version≶'
    }
说明:请集成最新版本的kit,示例集成的是5.1.1.301版本。
在AndroidManifest.xml文件的appliction中注册自己的"service"来接收透传消息和获取相关Token。该"service"需继承HmsMessageService类并重写其中的方法。此处以类名为DemoHmsMessageService的"service"为例(类名由您自定义)。Android
11版本修改了用于查询和交互用户设备上其他应用的方法。如果targetSdkVersion大于或等于30,在AndroidManifest.xml文件中的manifest元素下添加queries元素来让您的应用访问HMS
Core(APK)。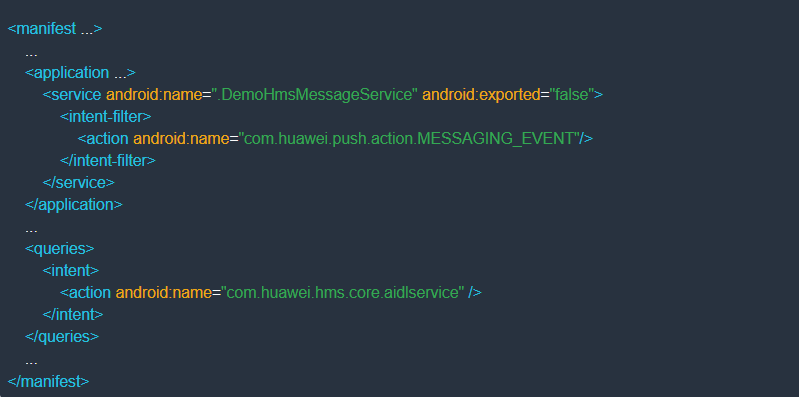
获取Token:
在AndroidManifest.xml文件中的appliction下添加meta-data元素。
    <meta-data
    android:name="push_kit_auto_init_enabled"
    android:value="true"
    />
    public class ChitChatPushService extends HmsMessageService {

        private static final String TAG = ChitChatPushService.class.getSimpleName();
        private static final String CHANNEL1 = "Push_Channel_01";
        private Data data = null;
        private Bitmap mBitmap;

        @Override
        public void onNewToken(String s) {
            super.onNewToken(s);
        }

    }
在Android 10及以上版本,您也可以使用下方的代码库来接收Token。在activity中可以调用AsyncTask。
    public class  GetToken extends AsyncTask {

        private static final String TAG = GetToken.class.getSimpleName();
        @SuppressLint("StaticFieldLeak")
        private Context context;
        private String appId;

        private GetTokenListener getTokenListener;

        public GetToken(String appId, Context context) {
            this.appId = appId;
            this.context = context;
        }

        public void setGetTokenListener(GetTokenListener getTokenListener) {
            this.getTokenListener = getTokenListener;
        }

        @Override
        protected void onPreExecute() {
            super.onPreExecute();
        }

        @Override
        protected String doInBackground(Void... voids) {
            try {
                String pushToken = HmsInstanceId.getInstance(context).getToken(appId, HmsMessaging.DEFAULT_TOKEN_SCOPE);
                AppLog.logD(TAG, pushToken);
                getTokenListener.getToken(pushToken);
                return pushToken;
            } catch (ApiException e) {
                AppLog.logE(TAG,e.getMessage());
            }
            return null;
        }

        @Override
        protected void onPostExecute(String s) {
            super.onPostExecute(s);

        }
    }
接收到Token后您可以采用如下代码处理消息通知和图片通知:
    public class ChitChatPushService extends HmsMessageService {

        private static final String TAG = ChitChatPushService.class.getSimpleName();
        private static final String CHANNEL1 = "Push_Channel_01";
        private Data data = null;
        private Bitmap mBitmap;

        @Override
        public void onNewToken(String s) {
            super.onNewToken(s);
        }

        @Override
        public void onMessageReceived(RemoteMessage remoteMessage) {
            super.onMessageReceived(remoteMessage);
            AppLog.logE(TAG, remoteMessage.getData());
            try {
                JSONObject jsonObject = new JSONObject(remoteMessage.getData());
                data = new Gson().fromJson(jsonObject.toString(), Data.class);
            } catch (JSONException e) {
                AppLog.logE(TAG,e.getMessage());
            }

            NotificationManager mNotificationManager = (NotificationManager) this.getSystemService(Context.NOTIFICATION_SERVICE);
            if (Build.VERSION.SDK_INT >= Build.VERSION_CODES.O) {
                int importance = NotificationManager.IMPORTANCE_HIGH;

                NotificationChannel mChannel = new NotificationChannel(
                        CHANNEL1, CHANNEL1, importance);
                if (mNotificationManager != null) {
                    mNotificationManager.createNotificationChannel(mChannel);
                    if (Objects.requireNonNull(remoteMessage.getDataOfMap().get("message")).equalsIgnoreCase(Constants.MESSAGE_TYPE_TEXT)) {
                        Intent notificationIntent = new Intent(getApplicationContext(), MessageActivity.class);
                        notificationIntent.putExtra("roomId", remoteMessage.getDataOfMap().get("roomId"));
                        notificationIntent.putExtra("name",remoteMessage.getDataOfMap().get("sender_name"));
                        notificationIntent.putExtra("phone",remoteMessage.getDataOfMap().get("sender_phone"));
                        notificationIntent.addFlags(Intent.FLAG_ACTIVITY_CLEAR_TOP | Intent.FLAG_ACTIVITY_SINGLE_TOP);
                        PendingIntent intent = PendingIntent.getActivity(getApplicationContext(), 0,
                                notificationIntent, 0);
                        NotificationCompat.Builder mBuilder;
                        mBuilder = new NotificationCompat.Builder(getApplicationContext(), CHANNEL1)
                                .setSmallIcon(R.drawable.profile)
                                .setContentTitle(remoteMessage.getDataOfMap().get("sender_name"))
                                .setContentText(remoteMessage.getDataOfMap().get("message_data"));

                        mBuilder.setContentIntent(intent);
                        mBuilder.setAutoCancel(true);
                        mNotificationManager.notify(0, mBuilder.build());
                    } else if (Objects.requireNonNull(remoteMessage.getDataOfMap().get("message")).equalsIgnoreCase(Constants.MESSAGE_TYPE_IMAGE)) {
                        new GeneratePictureStyleNotification(this, data).execute();
                    } else if (Objects.requireNonNull(remoteMessage.getDataOfMap().get("message")).equalsIgnoreCase(Constants.MESSAGE_TYPE_MAP)) {
                        Intent notificationIntent = new Intent(getApplicationContext(), MessageActivity.class);
                        Bundle passBundle = new Bundle();
                        passBundle.putString("roomId", remoteMessage.getDataOfMap().get("roomId"));
                        PendingIntent intent = PendingIntent.getActivity(getApplicationContext(), 0,
                                notificationIntent, 0);
                        NotificationCompat.Builder mBuilder;
                        mBuilder = new NotificationCompat.Builder(getApplicationContext(), CHANNEL1)
                                .setSmallIcon(R.drawable.profile)
                                .setContentTitle(remoteMessage.getDataOfMap().get("sender_name"))
                                .setContentText(Constants.LOCATION_DATA);

                        mBuilder.setContentIntent(intent);
                        mBuilder.setAutoCancel(true);
                        mNotificationManager.notify(0, mBuilder.build());
                    }
                }

            }
        }

        private class GeneratePictureStyleNotification extends AsyncTask<String, Void, Bitmap> {
            Context mContext;
            private Data data;

            public GeneratePictureStyleNotification(Context context, Data data) {
                super();
                this.mContext = context;
                this.data = data;
            }

            @Override
            protected Bitmap doInBackground(String... params) {
                Glide.with(mContext)
                        .asBitmap()
                        .load(data.messageData)
                        .into(new CustomTarget<Bitmap>() {
                            @Override
                            public void onResourceReady(@NonNull Bitmap resource, @Nullable Transition transition) {
                                mBitmap = resource;
                                if (Build.VERSION.SDK_INT >= Build.VERSION_CODES.N) {
                                    showNotification(data);
                                }
                            }

                            @Override
                            public void onLoadCleared(@Nullable Drawable placeholder) {
                            }
                        });
                return null;
            }

            @Override
            protected void onPostExecute(Bitmap result) {
                super.onPostExecute(result);


            }
        }

        private void showNotification(Data data) {
            NotificationManager mNotificationManager = (NotificationManager) this.getSystemService(Context.NOTIFICATION_SERVICE);
            int notificationId = 1;

            // String channelName = CHANNEL1;
            if (Build.VERSION.SDK_INT >= Build.VERSION_CODES.O) {
                int importance = NotificationManager.IMPORTANCE_HIGH;

                NotificationChannel mChannel = new NotificationChannel(
                        CHANNEL1, CHANNEL1, importance);
                if (mNotificationManager != null) {
                    mNotificationManager.createNotificationChannel(mChannel);

                    Intent notificationIntent = new Intent(getApplicationContext(), MessageActivity.class);
                    Bundle passValue = new Bundle();
                    passValue.putString("roomId", data.getRoomId());
                    notificationIntent.setAction("android.intent.action.MAIN");
                    notificationIntent.addCategory("android.intent.category.LAUNCHER");
                    notificationIntent.putExtras(passValue);
                    notificationIntent.addFlags(Intent.FLAG_ACTIVITY_CLEAR_TOP | Intent.FLAG_ACTIVITY_SINGLE_TOP);
                    PendingIntent intent = PendingIntent.getActivity(getApplicationContext(), 0, notificationIntent, PendingIntent.FLAG_UPDATE_CURRENT);
                    NotificationCompat.Builder mBuilder;

                    if (mBitmap != null) {
                        NotificationCompat.BigPictureStyle style = new NotificationCompat.BigPictureStyle()
                                .bigPicture(mBitmap);

                        mBuilder = new NotificationCompat.Builder(getApplicationContext(), CHANNEL1)
                                .setSmallIcon(R.mipmap.ic_launcher)
                                .setContentTitle(getResources().getString(R.string.app_name))
                                .setLargeIcon(mBitmap)
                                .setStyle(style)
                                .setContentText(data.getMessageData());
                    } else {
                        mBuilder = new NotificationCompat.Builder(getApplicationContext(), CHANNEL1)
                                .setSmallIcon(R.mipmap.ic_launcher)
                                .setContentTitle(getResources().getString(R.string.app_name))
                                .setContentText(data.getMessageData());
                    }

                    mBuilder.setContentIntent(intent);
                    mBuilder.setAutoCancel(true);
                    mNotificationManager.notify(notificationId, mBuilder.build());
                }


            } else {
                Intent notificationIntent = new Intent(getApplicationContext(), MessageActivity.class);
                Bundle passValue = new Bundle();
                passValue.putString("roomId", data.getRoomId());
                notificationIntent.setAction("android.intent.action.MAIN");
                notificationIntent.addCategory("android.intent.category.LAUNCHER");
                notificationIntent.putExtras(passValue);
                notificationIntent.addFlags(Intent.FLAG_ACTIVITY_CLEAR_TOP | Intent.FLAG_ACTIVITY_SINGLE_TOP);
                PendingIntent intent = PendingIntent.getActivity(getApplicationContext(), 0, notificationIntent, PendingIntent.FLAG_UPDATE_CURRENT);


                NotificationCompat.Builder mBuilder = new NotificationCompat.Builder(this);
                Uri soundUri = RingtoneManager.getDefaultUri(RingtoneManager.TYPE_NOTIFICATION);

                if (mBitmap != null) {
                    NotificationCompat.BigPictureStyle style = new NotificationCompat.BigPictureStyle()
                            .bigPicture(mBitmap);
                    mBuilder.setSmallIcon(R.mipmap.ic_launcher).setContentTitle(getString(R.string.app_name))
                            .setStyle(style)
                            .setLargeIcon(mBitmap).setAutoCancel(true).setSound(soundUri);
                } else {
                    mBuilder.setSmallIcon(R.mipmap.ic_launcher).setContentTitle(getString(R.string.app_name))
                            .setStyle(new NotificationCompat.BigTextStyle()
                                    .bigText(data.message)).setContentText(data.getMessage()).setAutoCancel(true).setSound(soundUri);
                }

                mBuilder.setAutoCancel(true);
                NotificationCompat.InboxStyle inBoxStyle = new NotificationCompat.InboxStyle();
                inBoxStyle.setBigContentTitle(getString(R.string.app_name));

                mBuilder.setContentIntent(intent);
                mBuilder.setStyle(inBoxStyle);
                Notification notification = mBuilder.build();
                notification.flags |= Notification.FLAG_AUTO_CANCEL;
                mNotificationManager.notify(notificationId, notification);
            }
        }
    }
采用如下代码实现通知的推送:
    public class PushApis {

        private Context context;
        private static final String TAG = PushApis.class.getSimpleName();

        public PushApis(Context context) {
            this.context = context;
        }

        public void sendPushNotification(String chatId, String message, String appId, String messageData, String userPushTokens) {
            try {
                StrictMode.ThreadPolicy policy = new StrictMode.ThreadPolicy.Builder().permitAll().build();
                StrictMode.setThreadPolicy(policy);
                String response = "";
                URL url = new URL(Constants.TOKEN_URL);
                HttpURLConnection connection = (HttpURLConnection) url.openConnection();
                connection.setDoOutput(true);
                connection.setInstanceFollowRedirects(false);
                connection.setRequestMethod("POST");
                connection.setRequestProperty("Content-Type", "application/x-www-form-urlencoded");
                connection.setRequestProperty("POST", "/oauth2/v3/token   HTTP/1.1");
                connection.setRequestProperty("Host", "oauth-login.cloud.huawei.com");
                HashMap<String, String> params = new HashMap<>();
                params.put("grant_type", "client_credentials");
                params.put("client_secret", Constants.CLIENT_SECRET);
                params.put("client_id", Constants.CLIENT_ID);
                String postDataLength = getDataString(params);
                OutputStream os = connection.getOutputStream();
                BufferedWriter writer = new BufferedWriter(
                        new OutputStreamWriter(os, "UTF-8"));
                writer.write(postDataLength);
                writer.flush();
                writer.close();
                os.close();
                int responseCode = connection.getResponseCode();
                if (responseCode == HttpsURLConnection.HTTP_OK) {
                    String line;
                    BufferedReader br = new BufferedReader(new InputStreamReader(connection.getInputStream()));
                    while ((line = br.readLine()) != null) {
                        response += line;
                    }
                } else {
                    response = "";
                }
                AppLog.logE("Response", response);
                Gson gson = new Gson();
                BearerRequest bearerRequest = gson.fromJson(response, BearerRequest.class);
                triggerPush(bearerRequest.getAccessToken(), appId, chatId, message, messageData, userPushTokens);
            } catch (Exception e) {
                AppLog.logE(TAG, e.getMessage());
            }
        }

        private String getDataString(HashMap<String, String> params) throws UnsupportedEncodingException {
            StringBuilder result = new StringBuilder();
            boolean first = true;
            for (Map.Entry<String, String> entry : params.entrySet()) {
                if (first) {
                    first = false;
                } else {
                    result.append("&");
                }
                result.append(URLEncoder.encode(entry.getKey(), "UTF-8"));
                result.append("=");
                result.append(URLEncoder.encode(entry.getValue(), "UTF-8"));
            }
            return result.toString();
        }

        private void triggerPush(String bearer, String appId, String chatId, String messageType, String messageData, String userPushTokens) {
            try {
                StrictMode.ThreadPolicy policy = new StrictMode.ThreadPolicy.Builder().permitAll().build();
                StrictMode.setThreadPolicy(policy);
                String response = null;
                URL url = new URL("https://push-api.cloud.huawei.com/v1/" + appId + "/messages:send");
                HttpURLConnection connection = (HttpURLConnection) url.openConnection();
                connection.setDoOutput(true);
                connection.setInstanceFollowRedirects(false);
                connection.setRequestMethod("POST");
                connection.setDoOutput(true);
                connection.setRequestProperty("Content-Type", "application/x-www-form-urlencoded");
                connection.setRequestProperty("Authorization", "Bearer " + bearer);
                connection.setRequestProperty("Host", "oauth-login.cloud.huawei.com");
                connection.setRequestProperty("POST", "/oauth2/v2/token   HTTP/1.1");
                OutputStream os = connection.getOutputStream();
                Data data = new Data();
                data.message = messageType;
                data.roomId = chatId;
                data.messageData = messageData;
                data.sender_name = "xxxx xxxx";
                data.sender_phone = "xxxxxxxx";
                data.title = context.getResources().getString(R.string.app_name);

                ArrayList<String> token = new ArrayList><();
                token.add(userPushTokens);

                Message message = new Message();
                message.tokens = token;
                message.data = data.toString();

                PushMessageRequest pushMessageRequest = new PushMessageRequest();

                pushMessageRequest.message = message;
                pushMessageRequest.validate_only = false;

                BufferedWriter writer = new BufferedWriter(
                        new OutputStreamWriter(os, "UTF-8"));

                Gson gson = new Gson();
                JSONObject jsonObject = new JSONObject(gson.toJson(pushMessageRequest, PushMessageRequest.class));
                writer.write(jsonObject.toString());
                writer.flush();
                writer.close();
                os.close();
                int responseCode = connection.getResponseCode();
                String line = null;
                BufferedReader br = new BufferedReader(new InputStreamReader(connection.getInputStream()));
                while ((line = br.readLine()) != null) {
                    response += line;
                }
                AppLog.logE(TAG, response);
            } catch (Exception e) {
                AppLog.logE(TAG, e.getMessage());
            }
        }
    }
添加如下依赖:
    dependencies {
        implementation 'com.huawei.hms:location:<latest_version_code>'
    }
说明: 请集成最新版本的kit,示例集成的是6.0.0.302版本。
在Manifest文件中添加如下权限:
    <uses-permission android:name="android.permission.ACCESS_FINE_LOCATION" / >
    <uses-permission android:name="android.permission.ACCESS_COARSE_LOCATION" / >
添加运行时权限:
    if (checkLocationPermission()) {
        Intent intent = new Intent(MessageActivity.this, LocationActivity.class);
        launcherForLocation.launch(intent);
    } else {
        requestPermissionForLocation();
    }
添加checkLocationPermission()所需的检查权限和requestPermissionforLocation()所需的请求权限:
checkLocationPermission():
    private boolean checkLocationPermission() {
        int locationPermission = ContextCompat.checkSelfPermission(this.getApplicationContext(), Manifest.permission.ACCESS_FINE_LOCATION);
        int coursePermission = ContextCompat.checkSelfPermission(this.getApplicationContext(), Manifest.permission.ACCESS_COARSE_LOCATION);
        return locationPermission == PackageManager.PERMISSION_GRANTED && coursePermission == PackageManager.PERMISSION_GRANTED;
    }
requestPermissionForLocation():
    private void requestPermissionForLocation() {
        if (Build.VERSION.SDK_INT >= Build.VERSION_CODES.M) {
            requestPermissions(new String[]{Manifest.permission.ACCESS_COARSE_LOCATION, Manifest.permission.ACCESS_FINE_LOCATION
            }, Constants.LOCATION_PERMISSION);
        }
    }
}
处理权限:
    @Override
    public void onRequestPermissionsResult(int requestCode, @NonNull String[] permissions, @NonNull int[] grantResults) {
        super.onRequestPermissionsResult(requestCode, permissions, grantResults);
        switch (requestCode) {
            case Constants.LOCATION_PERMISSION:
                if (grantResults.length > 0) {
                    boolean fineLoc = grantResults[0] == PackageManager.PERMISSION_GRANTED;
                    boolean coarseLoc = grantResults[1] == PackageManager.PERMISSION_GRANTED;
                    if (fineLoc && coarseLoc) {
                        Intent intent = new Intent(MessageActivity.this, LocationActivity.class);
                        launcherForLocation.launch(intent);
                    } else {
                        Toast.makeText(this, getResources().getString(R.string.allow_location_permission), Toast.LENGTH_SHORT).show();
                    }
                }
        }
    }
    public void getCurrentLocation(Context context) {
        FusedLocationProviderClient mFusedLocationProviderClient = LocationServices.getFusedLocationProviderClient(context);
        SettingsClient mSettingsClient = LocationServices.getSettingsClient(context);
        LocationRequest mLocationRequest = new LocationRequest();
        mLocationRequest.setInterval(5000);
        mLocationRequest.setPriority(LocationRequest.PRIORITY_HIGH_ACCURACY);

        mFusedLocationProviderClient.getLastLocation().addOnSuccessListener(location -> {
            AppLog.logD(TAG,
                    "Lat long--->Fushed" + location.getLongitude()
                            + "," + location.getLatitude() + "," + location.getAccuracy());
            if (location != null) {
                locationMutableLiveData.postValue(location);
            }
        }).addOnFailureListener(e -> {
            AppLog.logE(TAG, "error" + e.getMessage());
        });

    }
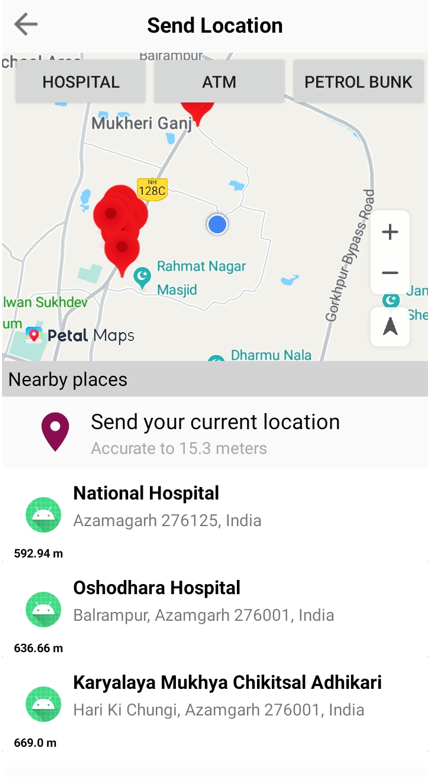
地图上的蓝色标记表示当前位置。
地图服务SDK提供了诸多用于开发安卓应用地图功能的接口,涵盖中国大陆以外大部分国家或地区的地图信息,并支持多语言功能。地图服务采用WGS84 GPS坐标系,满足绝大多数中国大陆以外地图开发的需求。您可以轻松地为您的安卓应用接入地图相关功能。
登录AppGallery Connect,点击"我的项目"。
在项目列表中选择您的项目,在项目中点击需要开通地图服务的应用。
添加如下依赖:
    dependencies {
        implementation 'com.huawei.hms:maps:<map_service>'
    }
说明: 请集成最新版本的kit,示例集成的是6.0.0.31版本。
在Manifest文件中声明如下权限:
    <uses-permission android:name="android.permission.ACCESS_COARSE_LOCATION"/>
    <uses-permission android:name="android.permission.ACCESS_FINE_LOCATION"/>
    <uses-permission android:name="android.permission.INTERNET"/>
    <uses-permission android:name="android.permission.ACCESS_NETWORK_STATE"/>
在布局资源中添加Mapview:
    <com.huawei.hms.maps.MapView xmlns:map="http://schemas.android.com/apk/res-auto"
    android:id="@+id/mapView"
    android:layout_width="match_parent"
    android:layout_height="match_parent"
    map:cameraTargetLat="51"
    map:cameraTargetLng="10"
    map:cameraZoom="8.5"
    map:mapType="normal"
    map:uiCompass="true"
    map:uiZoomControls="true" />
在java文件中实现如下代码:
    @Override
    protected void onCreate(Bundle savedInstanceState) {
        super.onCreate(savedInstanceState);
        setContentView(R.layout.activity_location);
        stMapView(savedInstanceState);
    }

    private void stMapView(Bundle savedInstanceState) {

        Bundle mapViewBundle = null;
        if (savedInstanceState != null) {
            mapViewBundle = savedInstanceState.getBundle(Constants.MAP_VIEW_BUNDLE_KEY);
        }

        MapsInitializer.setApiKey(Constants.MAP_VIEW_API_KEY);
        mMapView.onCreate(mapViewBundle);
        mMapView.getMapAsync(this);
    }

    @Override
    public void onMapReady(HuaweiMap huaweiMap) {
        hMap = huaweiMap;
        hMap.setMyLocationEnabled(true);
        hMap.getUiSettings().setMyLocationButtonEnabled(true);
    }

位置服务SDK提供更加便利的位置查询等服务,帮助您的应用吸引更多的用户。通过集成Site Kit的核心能力,您可以快速构建基于位置服务的产品,在以下场景中满足用户对探索周边地点的需求:
本次Codelab中将要用到周边搜索功能。
添加如下依赖:
    dependencies {
        implementation 'com.huawei.hms:site:<site_kit_lastest_code>'
    }

创建一个搜索对象:
    private SearchService searchService;

    try {
        searchService = SearchServiceFactory.create(this, URLEncoder.encode(Constants.MAP_VIEW_API_KEY, "utf-8"));
    } catch (UnsupportedEncodingException e) {
        AppLog.logE(TAG, "encode apikey error");
    }
创建一个用于获取所有附近区域的函数:
    public void getNearbyData(double latitude, double longitude, SearchService searchService, String locationType) {
        NearbySearchRequest request = new NearbySearchRequest();
        Coordinate location = new Coordinate(latitude, longitude);
        request.setLocation(location);
        request.setQuery(locationType);
        request.setRadius(5);
        request.setHwPoiType(HwLocationType.ADDRESS);
        request.setLanguage("en");
        request.setPageIndex(1);
        request.setPageSize(10);
        request.setStrictBounds(false);
        SearchResultListener<NearbySearchResponse> resultListener = new SearchResultListener<NearbySearchResponse>() {
            @Override
            public void onSearchResult(NearbySearchResponse results) {
                arrayListMutableLiveData.postValue(new ArrayList<>(results.getSites()));
            }

            @Override
            public void onSearchError(SearchStatus status) {
                AppLog.logE("TAG", "Error : " + status.getErrorCode() + " " + status.getErrorMessage());
            }
        };
        searchService.nearbySearch(request, resultListener);
    }
}
在使用位置服务获取到位置后,在activity中获取LiveData:
    private void updateDetails(Location location) {
        float zoom = 14.0f;
        LatLng latLng1 = new LatLng(location.getLatitude(), location.getLongitude());
        CameraUpdate cameraUpdate = CameraUpdateFactory.newLatLngZoom(latLng1, zoom);
        hMap.animateCamera(cameraUpdate);
        currentLocationAccuracy.setText(String.format("Accurate to %s meters", location.getAccuracy()));
        Util.stopProgressBar();
    }
}

干得好,您已成功构建出一款聊天应用并学到了:
您可以通过下方链接,了解更多相关信息。
免责声明:本Codelab可用做单项目中集成多个HMS服务的参考。您需要验证并确认相关源码是否合法和安全。
本Codelab中的示例代码下载地址如下:
源码下载