目前电商等各类应用中,大多数应用存在账号登录系统。对于现在的网络环境,安全问题,是开发者和用户都看重的问题。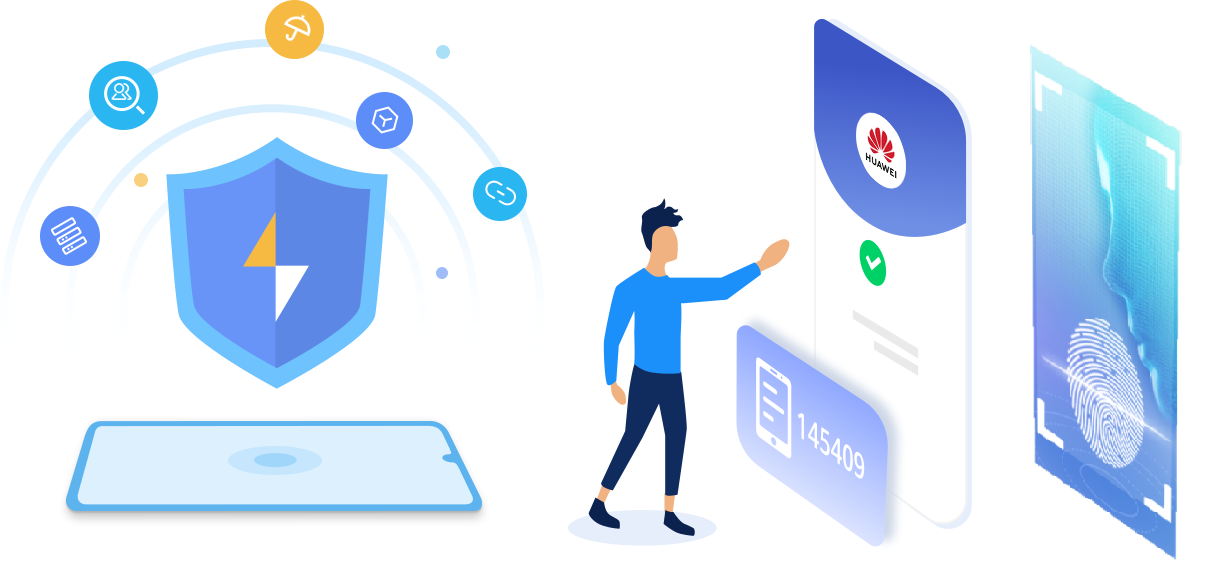
华为帐号服务(HUAWEI Account Kit)可以为您提供了简单、安全的登录授权功能,方便用户快捷登录。用户不必输入帐号、密码和繁琐验证,就可以通过"华为帐号登录"快速登录,即刻使用您的App。
安全检测服务可为您提供多种安全检测接口,其虚假用户检测,可以帮助您的App防范批量注册、撞库攻击、活动"薅羊毛"、内容爬虫等行为。
线上快速身份验证服务为应用提供安全可信的本地生物特征认证和安全便捷的线上快速身份验证能力。用户可使用指纹、人脸快捷登录手机上的个人应用,应用登录更安全便捷。
在这个Codelab中,您将实现通过华为帐号服务,安全检测服务,线上快速身份验证服务实现:
集成HUAWEI HMS Core能力,需要完成以下准备工作
具体操作,请按照《HUAWEI HMS Core集成准备》中详细说明来完成。
华为帐号服务可以通过如下方式一开通,Safety Detect和FIDO服务可以通过如下两种方式开通,具体开通实现如下:
在华为开发者联盟 AppGallery Connect中选择"我的项目",在项目列表中选择创建的应用,在"项目设置"页面中选择"API管理"。
打开Account Kit、Safety Detect、FIDO服务。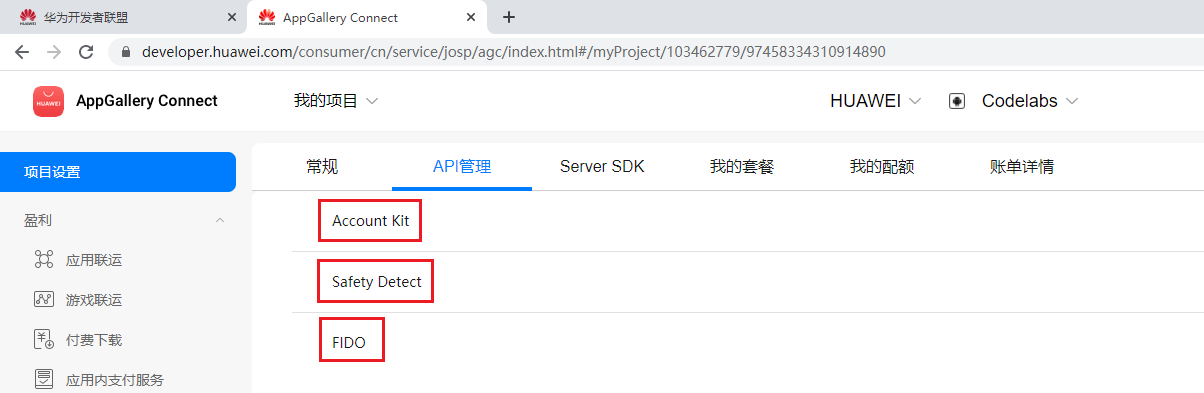
在华为开发者联盟控制台中,在页面侧边栏,选择"HMS API服务"->"API库",并选择对应项目。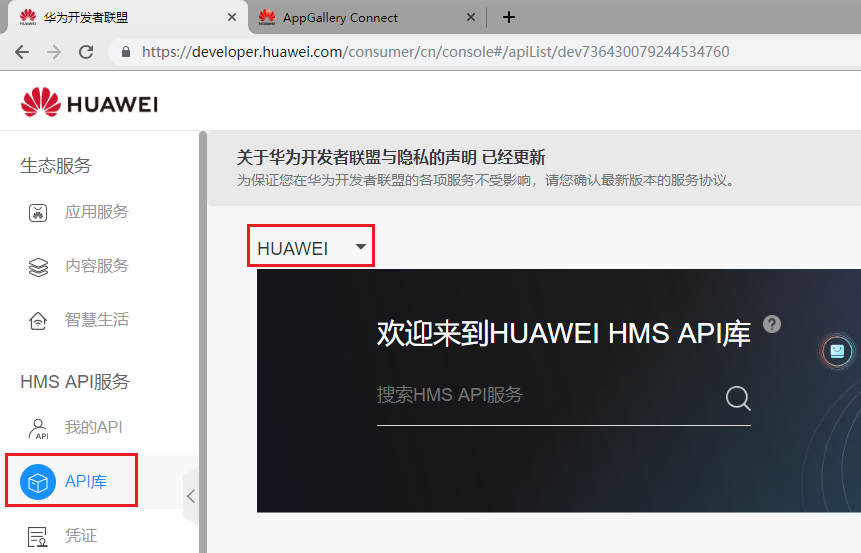
在"API总量"卡片列表中点击"安全检测服务" 卡片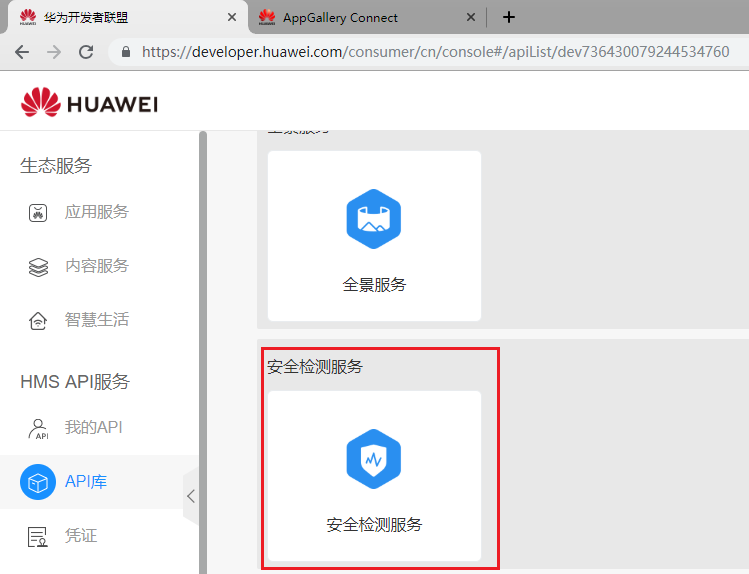
进入卡片中,点击"启用"按钮,即可开通服务。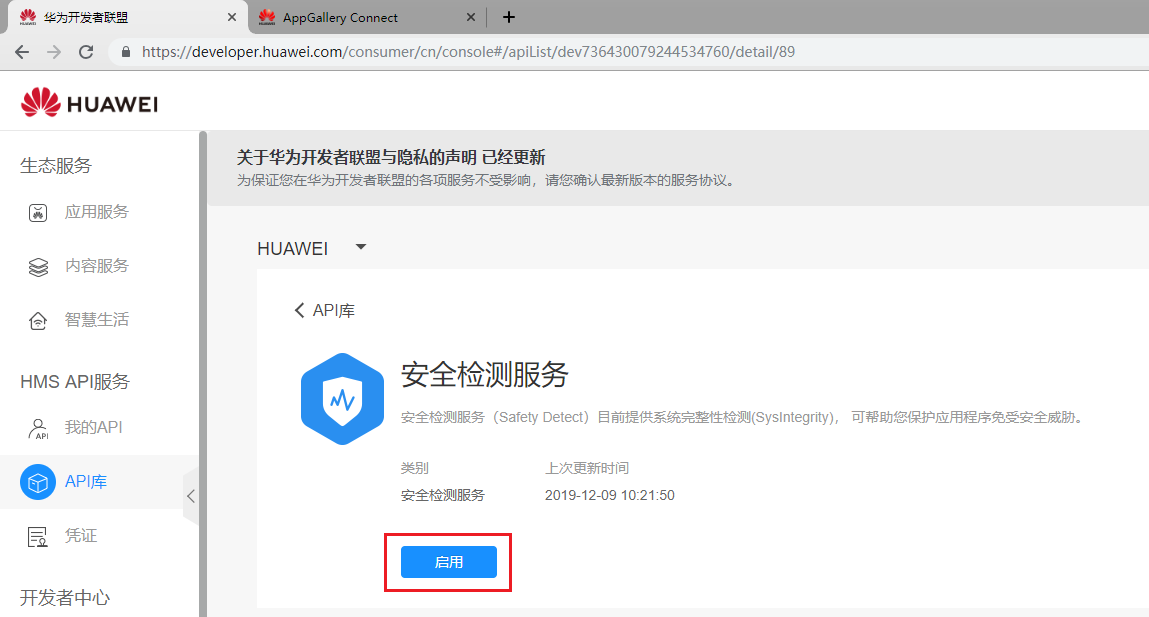
启用服务后,显示如下图所示: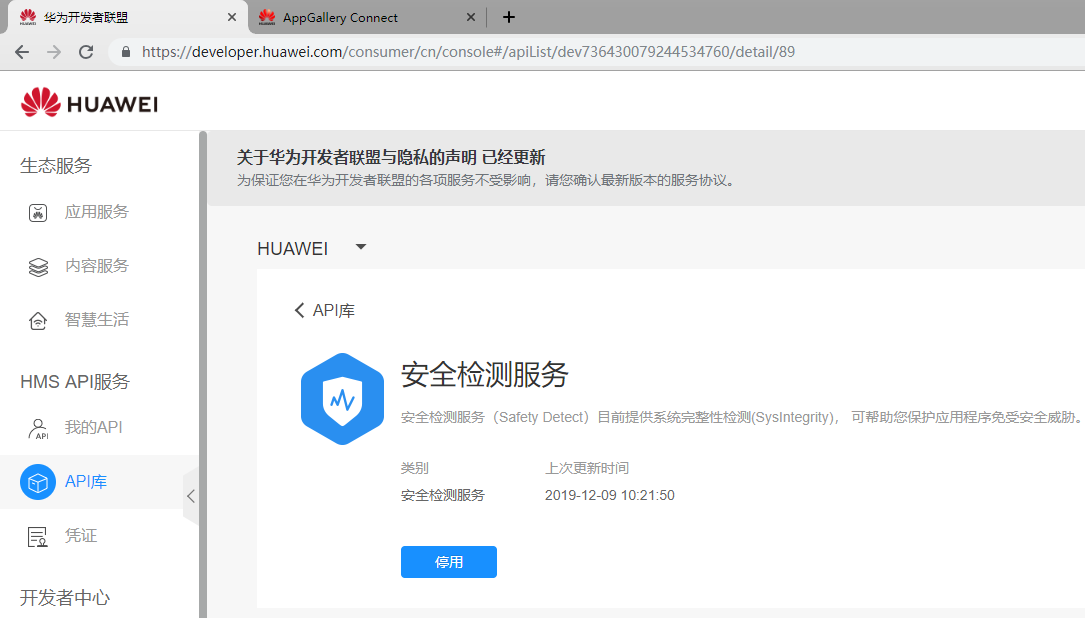
在"API总量"卡片列表中点击"线上快速身份验证服务" 卡片。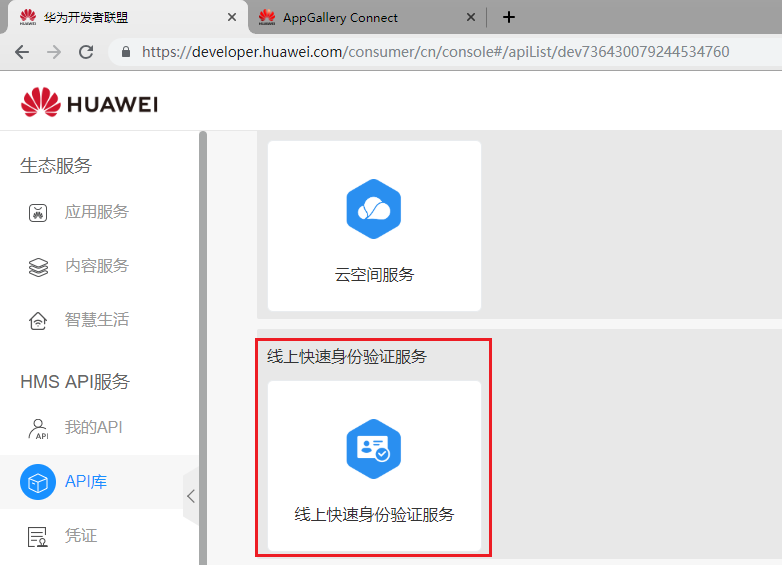
进入卡片中,点击"启用"按钮,开通服务。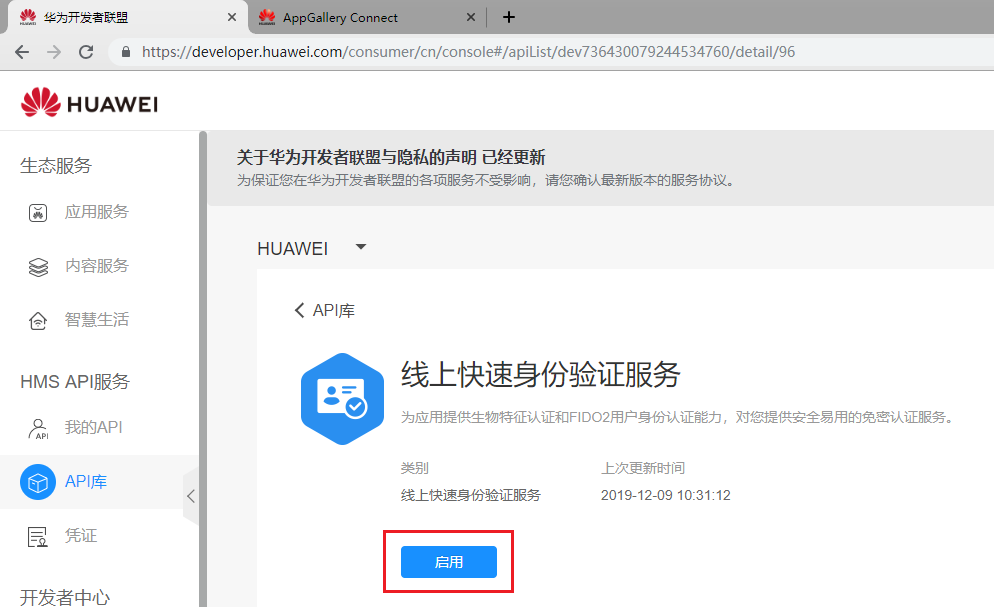
启用服务后,显示如下图所示: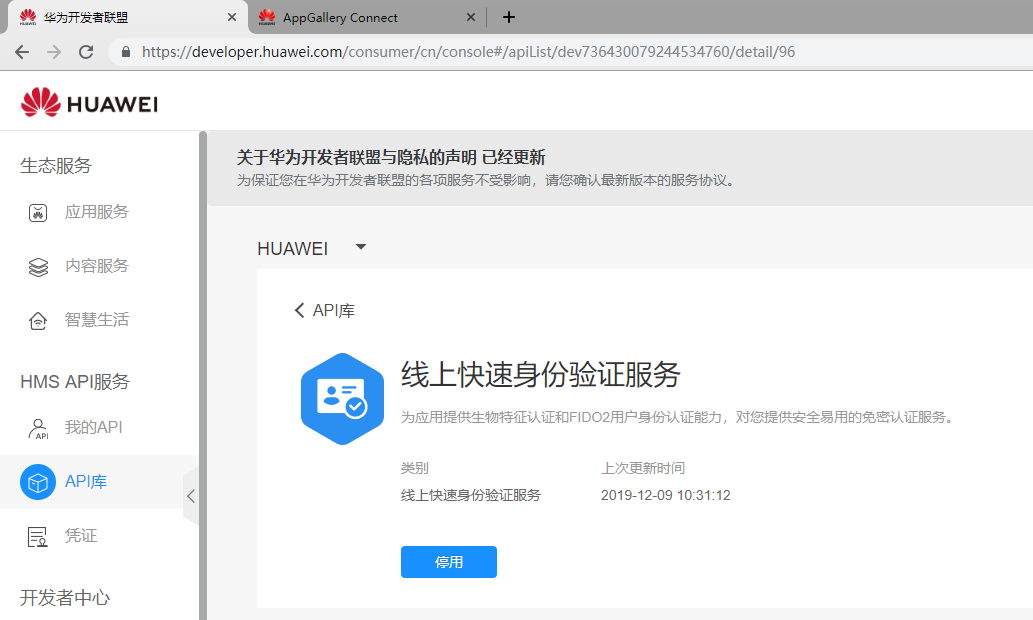
打开华为开发者联盟AppGallery Connect选择"我的项目",在项目列表中选择创建的应用,在"项目设置"页面中选择"常规",并在项目数据存储位置点击设置按钮。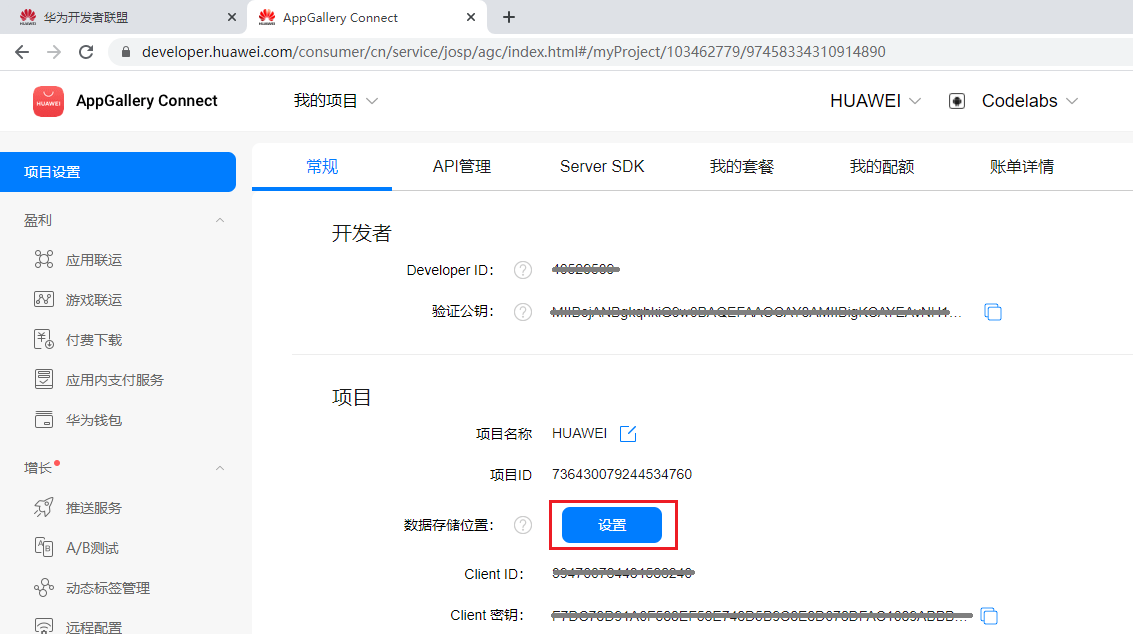
根据应用实际情况,设置对应数据存储位置,然后点击确认按钮。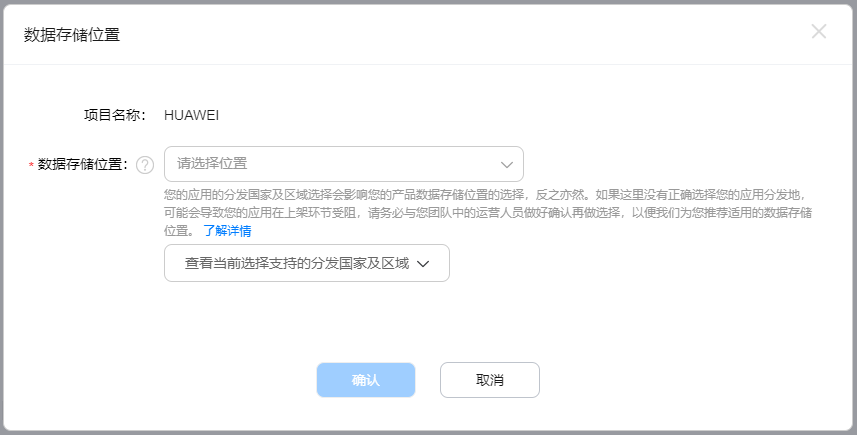
下载应用中的"agconnect-services.json"文件。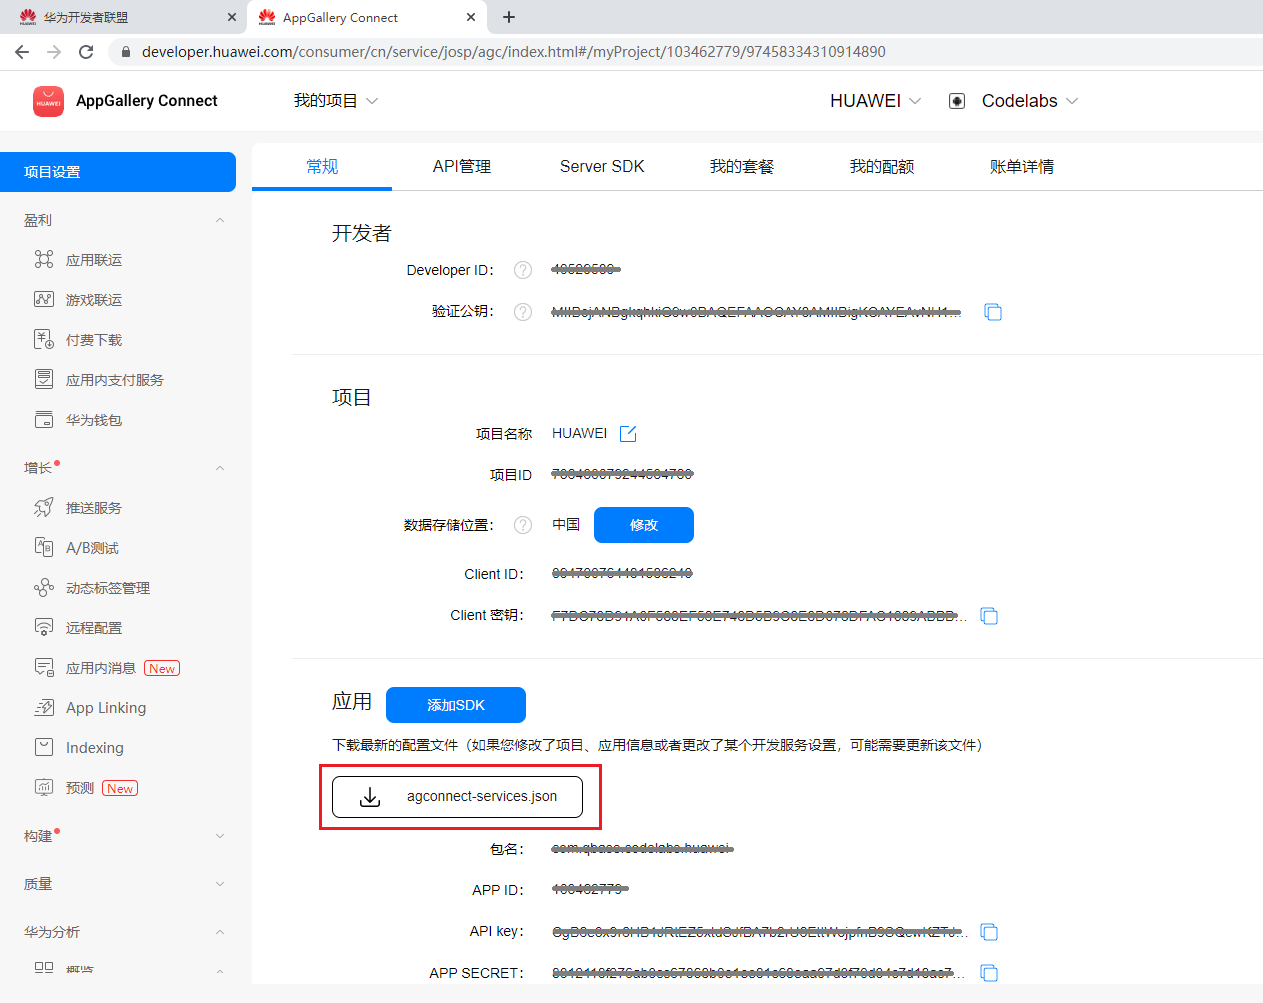
将 "agconnect-services.json"文件移至Android Studio开发工程应用模块的根目录。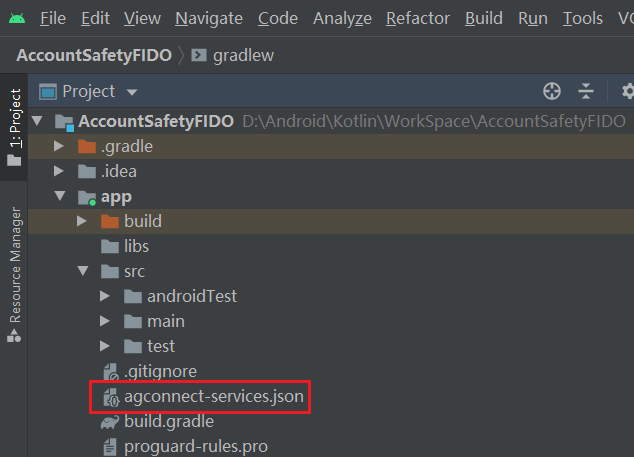
打开应用级的build.gradle文件。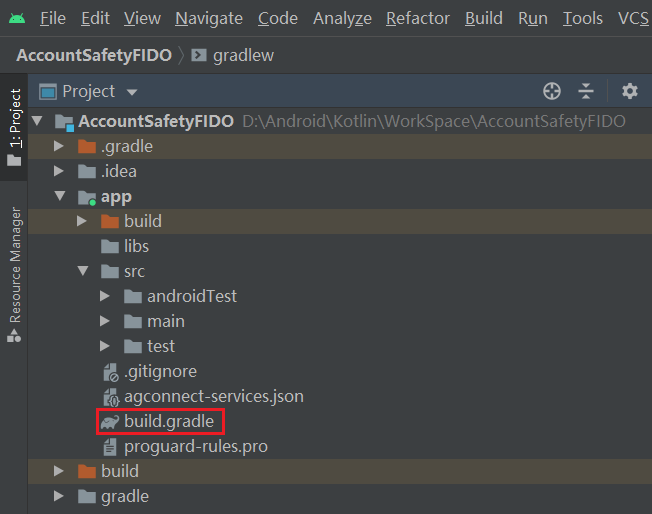
在"dependencies"中添加Account、Safety Detect、FIDO SDK依赖
dependencies {
    // HMS Core - Account Kit
    implementation 'com.huawei.hms:hwid:{version}'
    // HMS Core - Safety Detect
    implementation 'com.huawei.hms:safetydetect:{version}'
    // HMS Core - FIDO BioAuthn
    implementation 'com.huawei.hms:fido-bioauthn-androidx:{version}'
}
点击Sync Now 同步工程。
-ignorewarnings
-keepattributes *Annotation*
-keepattributes Exceptions
-keepattributes InnerClasses
-keepattributes Signature
-keepattributes SourceFile,LineNumberTable
-keep class com.huawei.hianalytics.**{*;}
-keep class com.huawei.updatesdk.**{*;}
-keep class com.huawei.hms.**{*;}
"R.string.hms*",
"R.string.connect_server_fail_prompt_toast",
"R.string.getting_message_fail_prompt_toast",
"R.string.no_available_network_prompt_toast",
"R.string.third_app_*",
"R.string.upsdk_*",
"R.layout.hms*",
"R.layout.upsdk_*",
"R.drawable.upsdk*",
"R.color.upsdk*",
"R.dimen.upsdk*",
"R.style.upsdk*",
"R.string.agc*"
调用UserDetect API分为三步骤:
步骤1 初始化安全检测;
步骤2 客户端发起检测请求:调用UserDetect API的userDetection()方法以发起虚假用户检测请求,API会返回一个responseToken;
步骤3 服务端获取检测结果:使用步骤2获取response token调用接口获取检测结果。
在登录页面初始化虚假用户检测功能。UserDetect提供了行为检测能力,如果您希望您的虚假用户检测功能具备该能力,可以通过调用initUserDetect()接口初始化虚假用户检测。
Java代码
/**
 * init safety detect
 */
private void initSafetyDetect() {
    // init SafetyDetect
    SafetyDetectClient client = SafetyDetect.getClient(this);
    client.initUserDetect().addOnSuccessListener(new OnSuccessListener<Void>() {
        @Override
        public void onSuccess(Void aVoid) {
            // init success
        }
    }).addOnFailureListener(new OnFailureListener() {
        @Override
        public void onFailure(Exception e) {
            // init fail
        }
    });
}
Kotlin代码
/**
 * init safety detect
 */
private fun initSafetyDetect() {
    // init SafetyDetect
    val client = SafetyDetect.getClient(this)
    client.initUserDetect().addOnSuccessListener {
        // init success
    }.addOnFailureListener {
        // init fail
    }
}
点击登录按钮,首先通过调用userDetection发起检测,传入您申请的app_id作为该方法的参数。
分别添加OnSuccessListener和OnFailureListener实例作为监听器。
Java代码
String app_Id = AGConnectServicesConfig.fromContext(this).getString("client/app_id");
SafetyDetectClient client = SafetyDetect.getClient(this);
client.userDetection(app_Id).addOnSuccessListener(new OnSuccessListener<UserDetectResponse>() {
    @Override
    public void onSuccess(UserDetectResponse userDetectResponse) {
        // String responseToken = userDetectResponse.getResponseToken();
        // if (!responseToken.isEmpty()) {
        // Send the response token to your app server, and call the cloud API of
        // HMS Core on your server to obtain the fake user detection result.
        // }
    }
}).addOnFailureListener(new OnFailureListener() {
    @Override
    public void onFailure(Exception e) {
        Log.e(TAG, "user detect fail");
    }
});
Kotlin代码
val appId = AGConnectServicesConfig.fromContext(this).getString("client/app_id")
val client = SafetyDetect.getClient(this)
client.userDetection(appId).addOnSuccessListener {
    // String responseToken = userDetectResponse.getResponseToken();
    // if (!responseToken.isEmpty()) {
    // Send the response token to your app server, and call the cloud API of
    // HMS Core on your server to obtain the fake user detection result.
    // }
}.addOnFailureListener {
    Log.e(TAG, "user detect fail")
}
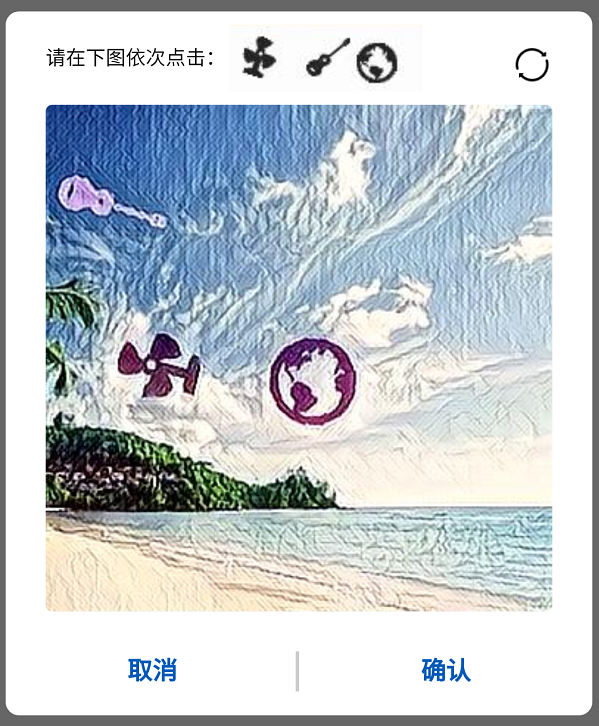
调用userDetection,会进行人机智能验证检测,弹出需要确认页面
使用客户端检测结果的responseToken,调用云端获取检测结果:中国大陆地区调用nocaptcha云侧接口获取检测结果,海外地区通过verify云侧接口获取检测结果。
服务端主要分为两步:
步骤1 获取accessToken,详细请参见开放平台鉴权相关内容描述。
步骤2 调用云侧API获取检测结果。
消息请求示例如下所示:
POST https://hirms.cloud.huawei.com/rms/v1/userRisks/verify?appId=123456 HTTP/1.1
Content-Type: application/json;charset=utf-8
{
    "accessToken":"AAWWHI94sgUR2RU5_P1ZptUiwLq7W8XWJO2LxaAPuXw4_HOJFXnBlN-q5_3bwlxVW_SHeDPx_s5bWW-9DjtWZsvcm9CwXe1FHJg0u-D2pcQPcb3sTxDTJeiwEb9WBPl_9w",
    "response":"1_55d74c04eab36a0a018bb7a879a6f49f072b023690cba936"
}
进入登录页面,添加华为帐号登录按钮。
<com.huawei.hms.support.hwid.ui.HuaweiIdAuthButton
    android:id="@+id/login_huaweiAccount"
    android:layout_width="wrap_content"
    android:layout_height="wrap_content"
    android:layout_centerHorizontal="true"
    android:layout_gravity="center_horizontal"
    app:layout_constraintBottom_toBottomOf="parent"
    app:layout_constraintEnd_toEndOf="parent"
    app:layout_constraintStart_toStartOf="parent"
    app:layout_constraintTop_toBottomOf="@+id/login_otherLogin"
    app:layout_constraintVertical_bias="0.2"
    tools:ignore="MissingConstraints" />
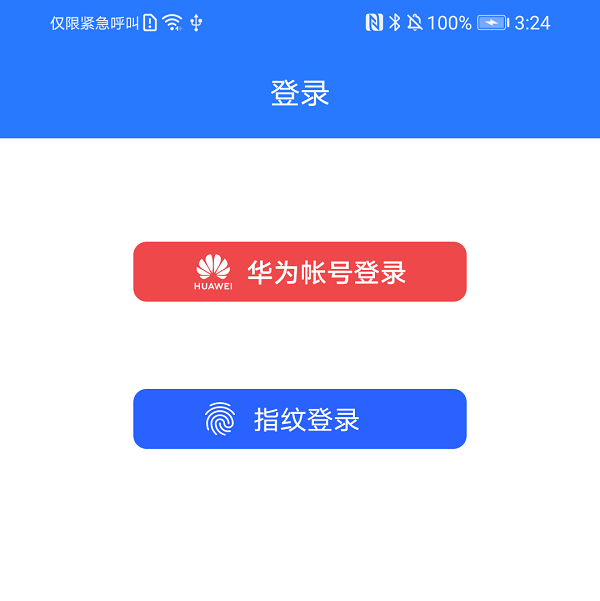
登录页面如图显示。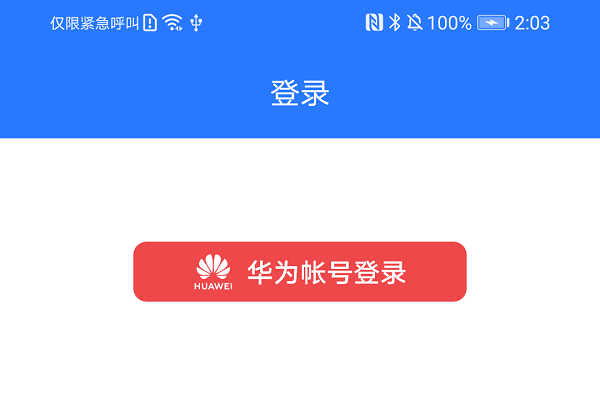
华为帐号登录按钮添加点帐号登录逻辑。
Java代码
/**
 * HUAWEI Account Login in
 */
private void onHuaweiAccountLogin() {
    AccountAuthParams authParams = new AccountAuthParamsHelper(AccountAuthParams.DEFAULT_AUTH_REQUEST_PARAM)
            .setIdToken().createParams();
    AccountAuthService mAuthService = AccountAuthManager.getService(this, authParams);
    startActivityForResult(mAuthService.getSignInIntent(), REQUEST_CODE);
}
Kotlin代码
/**
 * HUAWEI Account Login in
 */
private fun onHuaweiAccountLogin() {
    val authParams: AccountAuthParams = AccountAuthParamsHelper(AccountAuthParams.DEFAULT_AUTH_REQUEST_PARAM)
        .setIdToken().createParams()
    val mAuthService: AccountAuthService = AccountAuthManager.getService(this, authParams)
    startActivityForResult(mAuthService.signInIntent, REQUEST_CODE)
}
登录授权页面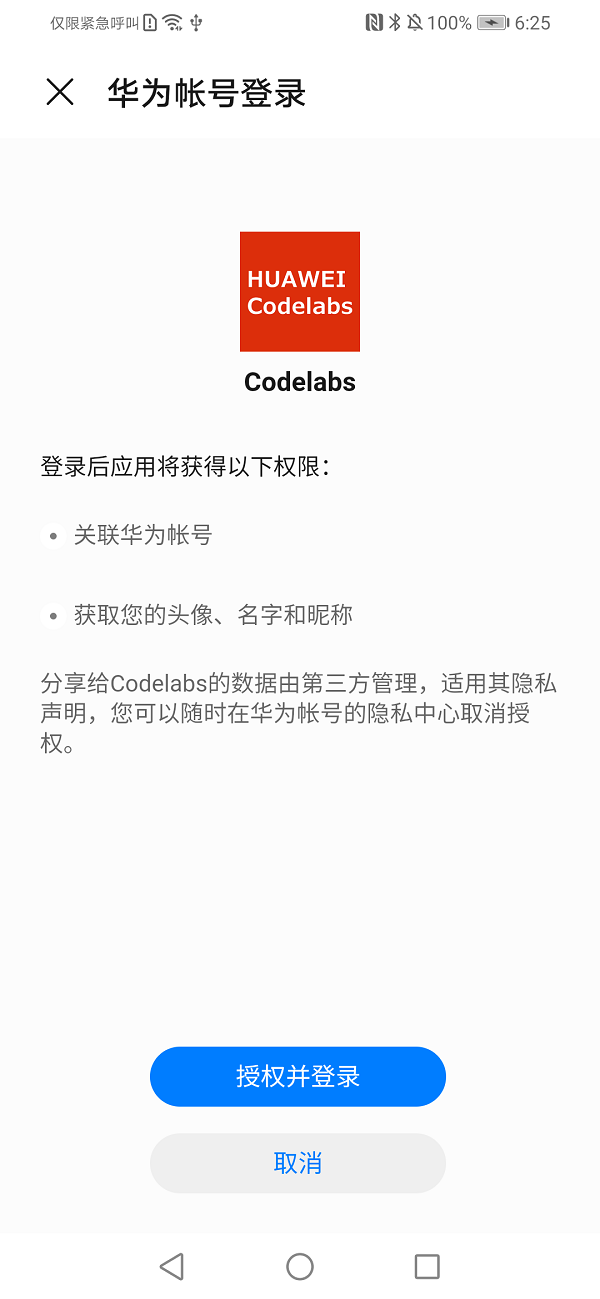
授权成功后处理。
Java代码
@Override
protected void onActivityResult(int requestCode, int resultCode, @Nullable Intent data) {
    super.onActivityResult(requestCode, resultCode, data);
    if (requestCode == REQUEST_CODE) {
        Task<AuthAccount> authAccountTask = AccountAuthManager.parseAuthResultFromIntent(data);
        if (authAccountTask.isSuccessful()) {
            //login success
            AuthAccount authAccount = authAccountTask.getResult();
            onHuaweiIdLoginSuccess(authAccount);
        } else {
            Log.e(TAG, "sign in failed : " + ((ApiException) authAccountTask.getException()).getStatusCode());
        }
    }
}
Kotlin代码
override fun onActivityResult(requestCode: Int, resultCode: Int, data: Intent?) {
    super.onActivityResult(requestCode, resultCode, data)
    if (requestCode == REQUEST_CODE) {
        val authAccountTask = AccountAuthManager.parseAuthResultFromIntent(data)
        if (authAccountTask.isSuccessful) {
            //login success
            val authAccount = authAccountTask.result
            onHuaweiIdLoginSuccess(authAccount)
        } else {
            Log.e(TAG, "sign in failed : " + (authAccountTask.exception as ApiException).statusCode)
        }
    }
}
授权登录成功后处理华为帐号信息。
Java代码
/**
 * HUAWEI Account Login success
 */
private void onHuaweiIdLoginSuccess(AuthAccount authAccount) {
    String openId = authAccount.getOpenId();
    Log.i(TAG, "OpenId : " + openId);
    SPUtil.put(this, SPConstants.KEY_OPENID, openId);
    // save user info
    UserBean userBean = UserUtil.getLocalUser(this, openId);
    if (userBean == null) {
        userBean = new UserBean();
        userBean.setAvatar(authAccount.getAvatarUriString());
        userBean.setDisplayName(authAccount.getDisplayName());
        String localStr = new Gson().toJson(userBean);
        SPUtil.put(this, openId, localStr);
    }
    startActivity(new Intent(this, HomeAct.class));
    finish();
}
Kotlin代码
/**
 * HUAWEI Account Login success
 */
private fun onHuaweiIdLoginSuccess(authAccount: AuthAccount) {
    val openId = authAccount.openId
    Log.i(TAG, "OpenId : $openId")
    // is login
    SPUtil.put(this, SPConstants.KEY_OPENID, openId)
    var userBean: UserBean? = UserUtil.getLocalUser(this, openId)
    if (userBean == null) {
        userBean = UserBean(authAccount.displayName, authAccount.avatarUriString)
        val localStr = Gson().toJson(userBean)
        SPUtil.put(this, openId, localStr)
    }
    startActivity(Intent(this, HomeAct::class.java))
    finish()
}
登录成功后,用户信息展示。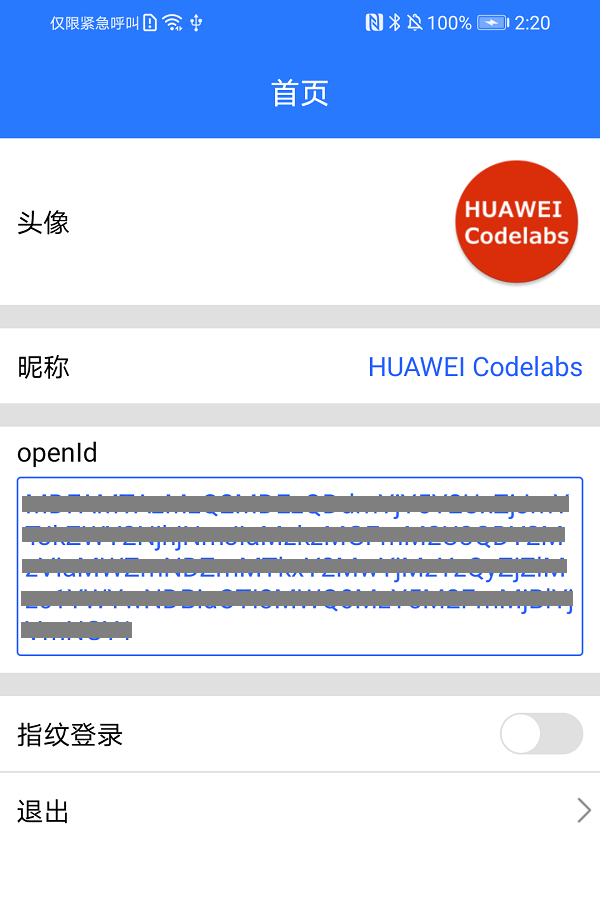
通过指纹认证能力,完成应用使用指纹登录功能,应用主要完成如下步骤。
用户使用华为帐号登录,并通过openId保存用户信息。
校验是否支持指纹认证,如果支持,可以进行下一步骤集成,校验方式:
Java代码
// check fingerprint is support
BioAuthnManager bioAuthnManager = new BioAuthnManager(this);
int errorCode = bioAuthnManager.canAuth();
if (errorCode != 0) {
    // not support
    SPUtil.put(HomeAct.this, SPConstants.FINGER_PRINT_LOGIN_SWITCH, true);
    return;
}
Kotlin代码
// check fingerprint is support
val bioAuthnManager = BioAuthnManager(this@HomeAct)
val errorCode = bioAuthnManager.canAuth()
if (errorCode != 0) {
    // not support
    return
}
步骤1 添加控件,控制指纹认证和登录。
在页面添加一个SwitchCompat控件,来开通指纹登录能力,在未开通前,控件处于关闭状态。
<androidx.appcompat.widget.SwitchCompat
    android:id="@+id/setting_fingerprint"
    android:layout_width="wrap_content"
    android:layout_height="wrap_content"
    android:layout_marginEnd="@dimen/dimen_10"
    android:checked="false"
    android:thumb="@drawable/switch_circle_bg"
    app:track="@drawable/switch_bg" />
对添加的开通指纹登录SwitchCompat控件,添加事件监听。
Java代码
mSwitchCompat.setOnClickListener(new View.OnClickListener() {
    @Override
    public void onClick(View v) {
        if (mSwitchCompat.isChecked()) {
            // open fingerprint
            onFingerprintOpenCheck();
        } else {
            // close fingerprint
            onFingerprintCloseCheck();
        }
    }
});
Kotlin代码
home_fingerprint.setOnClickListener {
    if (home_fingerprint.isChecked) {
        // open fingerprint
        onFingerprintOpenCheck();
    } else {
        // close fingerprint
        onFingerprintCloseCheck();
    }
}
步骤2 生成加密Cipher。
根据加密的Key(加密Key可根据对称或者非对称加密方式生成),生成对应的Cipher实体。
Java代码
/**
 * get Encrypt Cipher
 */
public Cipher getEncryptCipher() {
    Cipher cipher = null;
    try {
        cipher = Cipher.getInstance(JAVA_TRANSFORMATION);
        cipher.init(Cipher.ENCRYPT_MODE, getKey());
    } catch (Exception e) {
        e.printStackTrace();
    }
    return cipher;
}
Kotlin代码
/**
 * get Encrypt Cipher
 */
fun getEncryptCipher(): Cipher? {
    var cipher: Cipher? = null
    try {
        cipher = Cipher.getInstance(KOTLIN_TRANSFORMATION)
        cipher.init(Cipher.ENCRYPT_MODE, getKey())
    } catch (e: java.lang.Exception) {
        e.printStackTrace()
    }
    return cipher
}
步骤3 生成CryptoObject。
获取com.huawei.hms.support.api.fido.bioauthn.CryptoObject实体。
Java代码
// get cryptoObject
CryptoObject cryptoObject = new CryptoObject(KeyHelper.getInstance().getEncryptCipher());
bioAuthnPrompt.auth(info, cryptoObject);
Kotlin代码
// get cryptoObject
val cryptoObject = KeyHelper.getInstance().getEncryptCipher()?.let { CryptoObject(it) }
if (cryptoObject != null) {
    bioAuthnPrompt.auth(info, cryptoObject)
}
步骤4 调用指纹认证。
Java代码
/**
 * open fingerprint
 */
private void onFingerprintOpen() {
    BioAuthnPrompt bioAuthnPrompt = new BioAuthnPrompt(this, ContextCompat.getMainExecutor(this), authCallback);
    BioAuthnPrompt.PromptInfo.Builder builder = new BioAuthnPrompt.PromptInfo.Builder()
            .setTitle("This is the title.")
            .setSubtitle("This is the subtitle")
            .setDescription("This is the description");
    builder.setNegativeButtonText("This is the 'Cancel' button.");
    BioAuthnPrompt.PromptInfo info = builder.build();
    // get cryptoObject
    CryptoObject cryptoObject = new CryptoObject(KeyHelper.getInstance().getEncryptCipher());
    bioAuthnPrompt.auth(info, cryptoObject);
}
Kotlin代码
/**
 * open fingerprint
 */
private fun onFingerprintOpen() {
    val bioAuthnPrompt = BioAuthnPrompt(this, ContextCompat.getMainExecutor(this), authCallback)
    val builder = BioAuthnPrompt.PromptInfo.Builder()
        .setTitle("This is the title.")
        .setSubtitle("This is the subtitle")
        .setDescription("This is the description")
    builder.setNegativeButtonText("This is the 'Cancel' button.")
    val info = builder.build()
    // get cryptoObject
    val cryptoObject = KeyHelper.getInstance().getEncryptCipher()?.let { CryptoObject(it) }
    if (cryptoObject != null) {
        bioAuthnPrompt.auth(info, cryptoObject)
    }
}
调用成功会显示一个刷指纹的Dialog。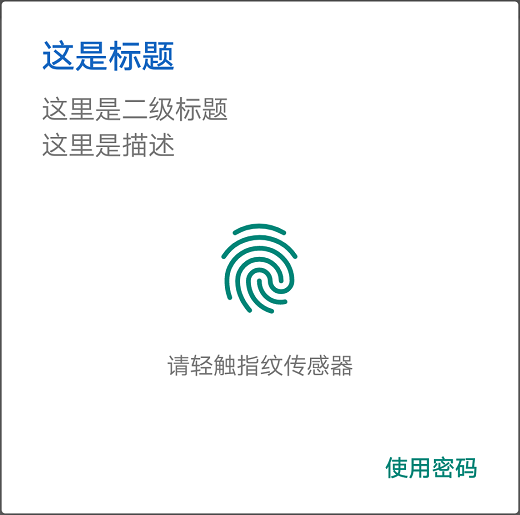
在您成功刷了指纹后,程序用通过authCallback回调,并在回调成功方法onAuthSucceeded(@NotNull BioAuthnResult result)保存OpenId。
Java代码
// call back
BioAuthnCallback authCallback = new BioAuthnCallback() {
    @Override
    public void onAuthError(int errMsgId, @NonNull CharSequence errString) {
        Log.e(TAG, "auth error : " + errString);
        onFingerprintOpenResult(false);
    }

    @Override
    public void onAuthSucceeded(@NonNull BioAuthnResult result) {
        // Auth Success
        try {
            CryptoObject cryptoObject = result.getCryptoObject();
            if (null == cryptoObject) {
                Log.e(TAG, "auth success cryptoObject is null");
                onFingerprintOpenResult(false);
                return;
            }
            Cipher cipher = result.getCryptoObject().getCipher();
            if (null == cipher) {
                Log.e(TAG, "auth success cipher is null");
                onFingerprintOpenResult(false);
                return;
            }
            String openId = (String) SPUtil.get(HomeAct.this, SPConstants.KEY_OPENID, "");
            byte[] bytes = cipher.doFinal(openId.getBytes());
            // save Encode
            FingerprintHelper.put(HomeAct.this, SPConstants.KEY_SAVE_ENCODE, Base64.encodeToString(bytes, Base64.URL_SAFE));
            // save IV
            byte[] iv = cipher.getIV();
            FingerprintHelper.put(HomeAct.this, SPConstants.KEY_SAVE_IV, Base64.encodeToString(iv, Base64.URL_SAFE));
            Log.i(TAG, "auth success");
            onFingerprintOpenResult(true);
        } catch (Exception e) {
            e.printStackTrace();
        }
    }

    @Override
    public void onAuthFailed() {
        Log.e(TAG, "auth failed");
        onFingerprintOpenResult(false);
    }
};
Kotlin代码
// call back
private var authCallback: BioAuthnCallback = object : BioAuthnCallback() {
    override fun onAuthError(errMsgId: Int, errString: CharSequence) {
        Log.e("authCallback", "auth error : $errString")
        onFingerprintOpenResult(false);
    }

    override fun onAuthSucceeded(result: BioAuthnResult) {
        // Auth Success
        try {
            val cryptoObject = result.cryptoObject
            if (null == cryptoObject) {
                Log.e("authCallback", "auth success cryptoObject is null")
                onFingerprintOpenResult(false);
                return
            }
            val cipher = result.cryptoObject!!.cipher
            if (null == cipher) {
                Log.e("authCallback", "auth success cipher is null")
                onFingerprintOpenResult(false);
                return
            }
            val openId = SPUtil[this@HomeAct, SPConstants.KEY_OPENID, ""] as String
            val bytes = cipher.doFinal(openId.toByteArray())
            // save Encode
            FingerprintHelper.put(this@HomeAct, SPConstants.KEY_SAVE_ENCODE, Base64.encodeToString(bytes, Base64.URL_SAFE))
            // save IV
            val iv = cipher.iv
            FingerprintHelper.put(this@HomeAct, SPConstants.KEY_SAVE_IV, Base64.encodeToString(iv, Base64.URL_SAFE))
            Log.i("authCallback", "auth success")
            onFingerprintOpenResult(true);
        } catch (e: Exception) {
            e.printStackTrace()
        }
    }

    override fun onAuthFailed() {
        Log.e("authCallback", "auth failed")
        onFingerprintOpenResult(false);
    }
}
步骤1 在登录页,添加指纹登录按钮:
<androidx.appcompat.widget.AppCompatTextView
    android:id="@+id/login_fingerprint"
    android:layout_width="200dp"
    android:layout_height="36dp"
    android:layout_gravity="center_vertical"
    android:background="@drawable/bg_fingerprint"
    android:drawableStart="@drawable/fingerprint"
    android:drawablePadding="@dimen/dimen_8"
    android:gravity="center_vertical"
    android:paddingStart="@dimen/dimen_40"
    android:text="@string/fingerprint"
    android:textColor="@color/white"
    android:textSize="@dimen/text_16"
    android:visibility="gone"
    app:flow_horizontalAlign="start"
    app:layout_constraintBottom_toBottomOf="parent"
    app:layout_constraintEnd_toEndOf="@+id/login_huaweiAccount"
    app:layout_constraintStart_toStartOf="@+id/login_huaweiAccount"
    app:layout_constraintTop_toBottomOf="@+id/login_huaweiAccount"
    app:layout_constraintVertical_bias="0.1"
    tools:ignore="MissingConstraints,RtlSymmetry" />
步骤2 调用指纹登录。
调用登录方法。
Java代码
/**
 * Fingerprint login
 */
private void onFingerprintLogin() {
    BioAuthnPrompt bioAuthnPrompt = new BioAuthnPrompt(this, ContextCompat.getMainExecutor(this), loginCallback);
    BioAuthnPrompt.PromptInfo.Builder builder =
            new BioAuthnPrompt.PromptInfo.Builder().setTitle("This is the title.")
                    .setSubtitle("This is the subtitle")
                    .setDescription("This is the description");
    builder.setNegativeButtonText("This is the 'Cancel' button.");
    BioAuthnPrompt.PromptInfo info = builder.build();
    // save IV
    String ivStr = FingerprintHelper.get(this, SPConstants.KEY_SAVE_IV);
    byte[] iv = Base64.decode(ivStr, Base64.URL_SAFE);
    CryptoObject cryptoObject = new CryptoObject(KeyHelper.getInstance().getDecryptCipher(iv));
    bioAuthnPrompt.auth(info, cryptoObject);
}
Kotlin代码
/**
 * Fingerprint login
 */
private fun onFingerprintLogin() {
    val bioAuthnPrompt = BioAuthnPrompt(this, ContextCompat.getMainExecutor(this), loginCallback)
    val builder = BioAuthnPrompt.PromptInfo.Builder().setTitle("This is the title.")
        .setSubtitle("This is the subtitle")
        .setDescription("This is the description")
    builder.setNegativeButtonText("This is the 'Cancel' button.")
    val info = builder.build()
    // save IV
    val ivStr = FingerprintHelper[this, SPConstants.KEY_SAVE_IV]
    val iv = Base64.decode(ivStr, Base64.URL_SAFE)
    val cryptoObject = CryptoObject(getInstance().getDecryptCipher(iv)!!)
    bioAuthnPrompt.auth(info, cryptoObject)
}
获取解密的Cipher。
Java代码
/**
 * get decrypt cipher
 */
public Cipher getDecryptCipher(byte[] initializeVector) {
    Cipher cipher = null;
    try {
        cipher = Cipher.getInstance(JAVA_TRANSFORMATION);
        IvParameterSpec ivParameterSpec = new IvParameterSpec(initializeVector);
        cipher.init(Cipher.DECRYPT_MODE, getKey(), ivParameterSpec);
    } catch (Exception e) {
        e.printStackTrace();
    }
    return cipher;
}
Kotlin代码
/**
 * get decrypt cipher
 */
fun getDecryptCipher(initializeVector: ByteArray?): Cipher? {
    var cipher: Cipher? = null
    try {
        cipher = Cipher.getInstance(KOTLIN_TRANSFORMATION)
        val ivParameterSpec = IvParameterSpec(initializeVector)
        cipher.init(Cipher.DECRYPT_MODE, getKey(), ivParameterSpec)
    } catch (e: Exception) {
        e.printStackTrace()
    }
    return cipher
}
调用成功会显示一个刷指纹的Dialog。
在您成功刷了指纹后,程序通过loginCallback回调,
在回调成功方法onAuthSucceeded(@NotNull BioAuthnResult result)中获取OpenId。
Java代码
// call back
BioAuthnCallback loginCallback = new BioAuthnCallback() {
    @Override
    public void onAuthError(int errMsgId, @NonNull CharSequence errString) {
        // TODO Login Auth Error
        Log.e("loginCallback", "login auth error : " + errString);
    }

    @Override
    public void onAuthSucceeded(@NonNull BioAuthnResult result) {
        try {
            CryptoObject cryptoObject = result.getCryptoObject();
            if (null == cryptoObject) {
                Log.e(TAG, "auth success cryptoObject is null");
                return;
            }
            Cipher cipher = result.getCryptoObject().getCipher();
            if (null == cipher) {
                Log.e(TAG, "cipher is null");
                return;
            }
            String saveEncode = FingerprintHelper.get(LoginAct.this, SPConstants.KEY_SAVE_ENCODE);
            byte[] input = Base64.decode(saveEncode, Base64.URL_SAFE);
            byte[] bytes = cipher.doFinal(input);
            String saveString = new String(bytes);
            Log.i(TAG, "auth success openId:" + saveString);
            onFingerprintLoginSuccess(saveString);
        } catch (Exception e) {
            e.printStackTrace();
        }
    }

    @Override
    public void onAuthFailed() {
        // TODO Auth Failed
        Log.e(TAG, "auth failed");
    }
};
Kotlin代码
// call back
private var loginCallback: BioAuthnCallback = object : BioAuthnCallback() {
    override fun onAuthError(errMsgId: Int, errString: CharSequence) {
        // TODO Login Auth Error
        Log.e("loginCallback", "login auth error : $errString")
    }

    override fun onAuthSucceeded(result: BioAuthnResult) {
        try {
            val cryptoObject = result.cryptoObject
            if (null == cryptoObject) {
                Log.e("loginCallback", "auth success cryptoObject is null")
                return
            }
            val cipher = result.cryptoObject!!.cipher
            if (null == cipher) {
                Log.e(TAG, "cipher is null")
                return
            }
            val saveEncode = FingerprintHelper[this@LoginAct, SPConstants.KEY_SAVE_ENCODE]
            val input = Base64.decode(saveEncode, Base64.URL_SAFE)
            val bytes = cipher.doFinal(input)
            val saveString = String(bytes)
            Log.i(TAG, "auth success save openId:$saveString")
            onFingerprintLoginSuccess(saveString)
        } catch (e: Exception) {
            e.printStackTrace()
        }
    }

    override fun onAuthFailed() {
        // TODO Auth Failed
        Log.e("loginCallback", "auth failed")
    }
}
步骤3 登录,进入首页:
Java代码
/**
 * fingerprint login success
 */
private void onFingerprintLoginSuccess(String openId) {
    SPUtil.put(this, SPConstants.KEY_OPENID, openId);
    startActivity(new Intent(this, HomeAct.class));
}
Kotlin代码
/**
 * fingerprint login success
 */
private fun onFingerprintLoginSuccess(openId: String) {
    SPUtil.put(this, SPConstants.KEY_OPENID, openId)
    startActivity(Intent(this, HomeAct::class.java))
}
指纹登录成功后,用户信息展示。
干得好,您已经成功完成了Codelab并学到了:
您可以阅读下面链接,了解更多相关的信息。
您可以点击下方按钮下载源码。