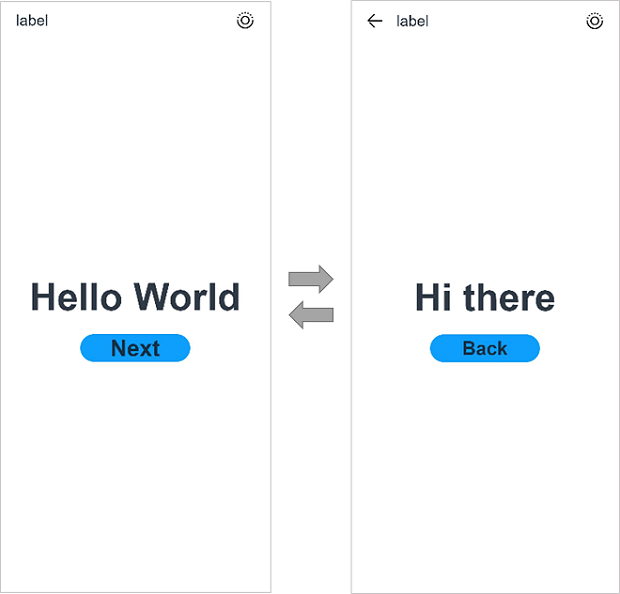
下面我们将构建元服务的两个页面,并按预定的业务逻辑,实现页面间跳转。
构建元服务的第一个页面
使用文本组件。
工程同步完成后,在“Project”窗口,单击“entry > src > main > ets > pages”,打开“Index.ets”文件,可以看到页面由Text组件组成。
针对本文中使用文本/按钮来实现页面跳转/返回的应用场景,页面均使用Row和Column组件来组建布局。对于更多复杂元素对齐的场景,可选择使用RelativeContainer组件进行布局。
“Index.ets”文件的示例如下:
import { authentication } from '@kit.AccountKit';
import { BusinessError } from '@kit.BasicServicesKit';
import { hilog } from '@kit.PerformanceAnalysisKit';

@Entry
@Component
struct Index {
  @State message: string = 'Hello World';

  build() {
    Row() {
      Column() {
        Text(this.message)
          .fontSize(50)
          .fontWeight(FontWeight.Bold)
      }
      .width('100%')
    }
    .height('100%')
  }

  aboutToAppear() {
    hilog.info(0x0000, 'testTag', '%{public}s', 'Ability onCreate');
    this.loginWithHuaweiID();
  }

  /**
   * Sample code for using HUAWEI ID to log in to atomic service.
   * According to the Atomic Service Review Guide, when a atomic service has an account system,
   * the option to log in with a HUAWEI ID must be provided.
   * The following presets the atomic service to use the HUAWEI ID silent login function.
   * To enable the atomic service to log in successfully using the HUAWEI ID, please refer
   * to the HarmonyOS HUAWEI ID Access Guide to configure the client ID and fingerprint certificate.
   */
  private loginWithHuaweiID() {
    // Create a login request and set parameters
    let loginRequest = new authentication.HuaweiIDProvider().createLoginWithHuaweiIDRequest();
    // Whether to forcibly launch the HUAWEI ID login page when the user is not logged in with the HUAWEI ID
    loginRequest.forceLogin = false;
    // Execute login request
    let controller = new authentication.AuthenticationController();
    controller.executeRequest(loginRequest).then((data) => {
      let loginWithHuaweiIDResponse = data as authentication.LoginWithHuaweiIDResponse;
      let authCode = loginWithHuaweiIDResponse.data?.authorizationCode;
      // Send authCode to the backend in exchange for unionID, session

    }).catch((error: BusinessError) => {
      hilog.error(0x0000, 'testTag', 'error: %{public}s', JSON.stringify(error));
      if (error.code == authentication.AuthenticationErrorCode.ACCOUNT_NOT_LOGGED_IN) {
        // HUAWEI ID is not logged in, it is recommended to jump to the login guide page

      }
    });
  }
}
添加按钮。
在默认页面基础上,我们添加一个Button组件。“Index.ets”文件的示例如下:import { authentication } from '@kit.AccountKit'; import { BusinessError } from '@kit.BasicServicesKit'; import { hilog } from '@kit.PerformanceAnalysisKit'; @Entry @Component struct Index { @State message: string = 'Hello World'; build() { Row() { Column() { Text(this.message) .fontSize(50) .fontWeight(FontWeight.Bold) // 添加按钮,以响应用户点击 Button() { Text('Next') .fontSize(30) .fontWeight(FontWeight.Bold) } .type(ButtonType.Capsule) .margin({ top: 20 }) .backgroundColor('#0D9FFB') .width('40%') .height('5%') } .width('100%') } .height('100%') } aboutToAppear() { hilog.info(0x0000, 'testTag', '%{public}s', 'Ability onCreate'); this.loginWithHuaweiID(); } /** * Sample code for using HUAWEI ID to log in to atomic service. * According to the Atomic Service Review Guide, when a atomic service has an account system, * the option to log in with a HUAWEI ID must be provided. * The following presets the atomic service to use the HUAWEI ID silent login function. * To enable the atomic service to log in successfully using the HUAWEI ID, please refer * to the HarmonyOS HUAWEI ID Access Guide to configure the client ID and fingerprint certificate. */ private loginWithHuaweiID() { // Create a login request and set parameters let loginRequest = new authentication.HuaweiIDProvider().createLoginWithHuaweiIDRequest(); // Whether to forcibly launch the HUAWEI ID login page when the user is not logged in with the HUAWEI ID loginRequest.forceLogin = false; // Execute login request let controller = new authentication.AuthenticationController(); controller.executeRequest(loginRequest).then((data) => { let loginWithHuaweiIDResponse = data as authentication.LoginWithHuaweiIDResponse; let authCode = loginWithHuaweiIDResponse.data?.authorizationCode; // Send authCode to the backend in exchange for unionID, session }).catch((error: BusinessError) => { hilog.error(0x0000, 'testTag', 'error: %{public}s', JSON.stringify(error)); if (error.code == authentication.AuthenticationErrorCode.ACCOUNT_NOT_LOGGED_IN) { // HUAWEI ID is not logged in, it is recommended to jump to the login guide page } }); } }
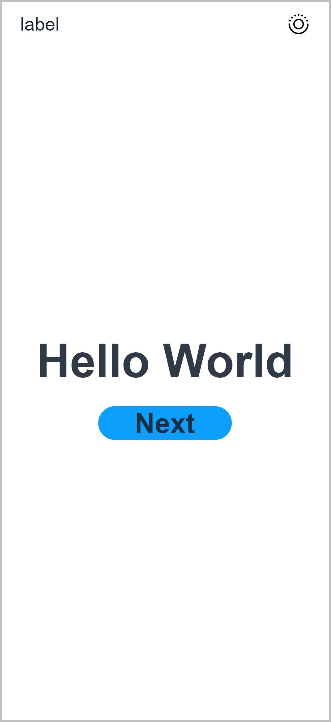
在编辑窗口右上角的侧边工具栏,单击Previewer,打开预览器。第一个页面效果如下图所示。
构建元服务的第二个页面
创建第二个页面。
新建第二个页面文件。在“Project”窗口,打开“entry > src > main > ets”,右键单击“pages”文件夹,选择“New > ArkTS File”,命名为“Second”,回车。可以看到文件目录结构如下所示。
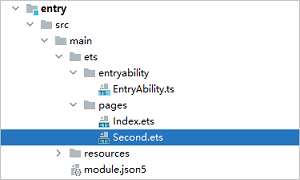

开发者也可以在右键点击“pages”文件夹时,选择“New > Page”,则无需手动配置相关页面路由。
配置第二个页面的路由。在“Project”窗口,打开“entry > src > main > resources > base > profile”,在main_pages.json文件中的“src”下配置第二个页面的路由“pages/Second”。示例如下:
{
  "src": [
    "pages/Index",
    "pages/Second"
  ]
}
添加文本及按钮。
参照第一个页面,在第二个页面添加Text组件、Button组件等,并设置其样式。“Second.ets”文件的示例如下:
@Entry
@Component
struct Second {
  @State message: string = 'Hi there'

  build() {
    Row() {
      Column() {
        Text(this.message)
          .fontSize(50)
          .fontWeight(FontWeight.Bold)
        Button() {
          Text('Back')
            .fontSize(25)
            .fontWeight(FontWeight.Bold)
        }
        .type(ButtonType.Capsule)
        .margin({
          top: 20
        })
        .backgroundColor('#0D9FFB')
        .width('40%')
        .height('5%')
      }
      .width('100%')
    }
    .height('100%')
  }
}
第一个页面跳转到第二个页面。
在第一个页面中,跳转按钮绑定onClick事件,点击按钮时跳转到第二页。“Index.ets”文件的示例如下:
import { authentication } from '@kit.AccountKit';
import { BusinessError } from '@kit.BasicServicesKit';
import { hilog } from '@kit.PerformanceAnalysisKit';
import { router } from '@kit.ArkUI';

@Entry
@Component
struct Index {
  @State message: string = 'Hello World';

  build() {
    Row() {
      Column() {
        Text(this.message)
          .fontSize(50)
          .fontWeight(FontWeight.Bold)
        // 添加按钮,以响应用户点击
        Button() {
          Text('Next')
            .fontSize(30)
            .fontWeight(FontWeight.Bold)
        }
        .type(ButtonType.Capsule)
        .margin({
          top: 20
        })
        .backgroundColor('#0D9FFB')
        .width('40%')
        .height('5%')
        // 跳转按钮绑定onClick事件,点击时跳转到第二页
        .onClick(() => {
          router.pushUrl({ url: 'pages/Second' })
        })
      }
      .width('100%')
    }
    .height('100%')
  }

  aboutToAppear() {
    hilog.info(0x0000, 'testTag', '%{public}s', 'Ability onCreate');
    this.loginWithHuaweiID();
  }

  /**
   * Sample code for using HUAWEI ID to log in to atomic service.
   * According to the Atomic Service Review Guide, when a atomic service has an account system,
   * the option to log in with a HUAWEI ID must be provided.
   * The following presets the atomic service to use the HUAWEI ID silent login function.
   * To enable the atomic service to log in successfully using the HUAWEI ID, please refer
   * to the HarmonyOS HUAWEI ID Access Guide to configure the client ID and fingerprint certificate.
   */
  private loginWithHuaweiID() {
    // Create a login request and set parameters
    let loginRequest = new authentication.HuaweiIDProvider().createLoginWithHuaweiIDRequest();
    // Whether to forcibly launch the HUAWEI ID login page when the user is not logged in with the HUAWEI ID
    loginRequest.forceLogin = false;
    // Execute login request
    let controller = new authentication.AuthenticationController();
    controller.executeRequest(loginRequest).then((data) => {
      let loginWithHuaweiIDResponse = data as authentication.LoginWithHuaweiIDResponse;
      let authCode = loginWithHuaweiIDResponse.data?.authorizationCode;
      // Send authCode to the backend in exchange for unionID, session

    }).catch((error: BusinessError) => {
      hilog.error(0x0000, 'testTag', 'error: %{public}s', JSON.stringify(error));
      if (error.code == authentication.AuthenticationErrorCode.ACCOUNT_NOT_LOGGED_IN) {
        // HUAWEI ID is not logged in, it is recommended to jump to the login guide page

      }
    });
  }
}
第二个页面返回到第一个页面。
在第二个页面中,返回按钮绑定onClick事件,点击按钮时返回到第一页。“Second.ets”文件的示例如下:
import { router } from '@kit.ArkUI'

@Entry
@Component
struct Second {
  @State message: string = 'Hi there'

  build() {
    Row() {
      Column() {
        Text(this.message)
          .fontSize(50)
          .fontWeight(FontWeight.Bold)
        Button() {
          Text('Back')
            .fontSize(25)
            .fontWeight(FontWeight.Bold)
        }
        .type(ButtonType.Capsule)
        .margin({
          top: 20
        })
        .backgroundColor('#0D9FFB')
        .width('40%')
        .height('5%')
        // 返回按钮绑定onClick事件,点击按钮时返回到第一页
        .onClick(() => {
          router.back()
        })
      }
      .width('100%')
    }
    .height('100%')
  }
}
打开Index.ets文件,单击预览器中的
 按钮进行刷新。效果如下图所示: