默认界面扫码能力提供系统级体验一致的扫码界面,包含相机预览流,相册扫码入口,暗光环境闪光灯开启提示。Scan Kit默认界面扫码对系统相机权限进行了预授权且调用期间处于安全访问状态,无需开发者再次申请相机权限。适用于不同扫码场景的元服务开发。
场景介绍
默认界面扫码能力提供了默认的扫码界面以及相册扫码入口,支持单码和多码识别,支持多种码类型,请参见ScanType。无需使用三方库就可快速帮助元服务处理各种扫码场景。
默认界面扫码UX:

-
用户可以点击“进一步了解”查看安全访问相机说明,也可以关闭隐私横幅,关闭后重新打开元服务的扫码界面将不再显示隐私横幅提醒,显示安全访问提示,3s后消失。
-
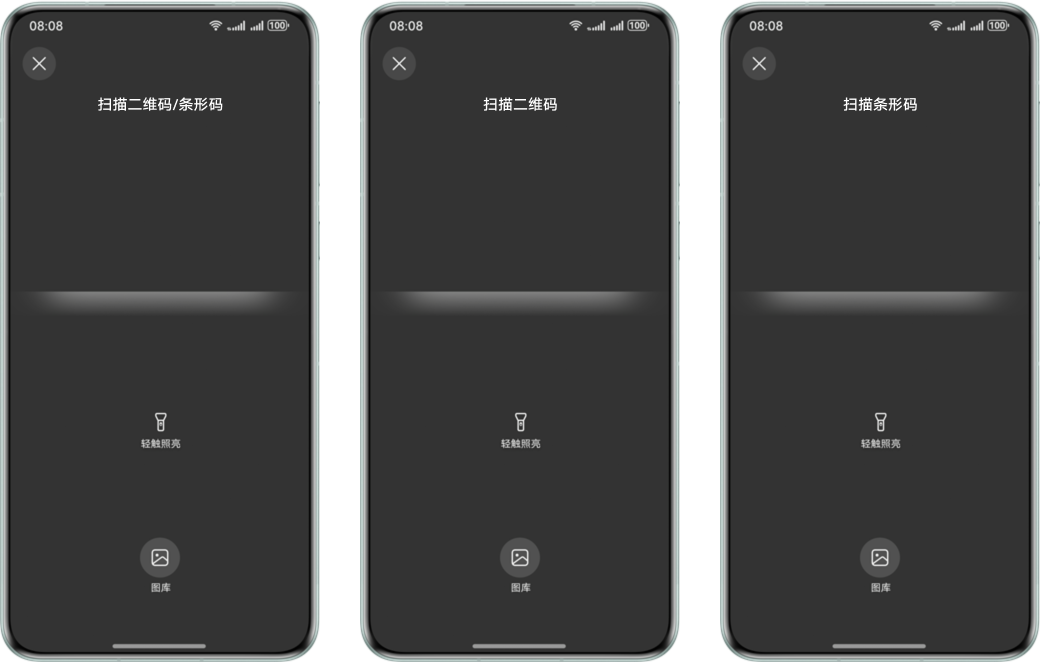
从API版本6.1.0(23)开始,默认界面扫码的标题支持根据ScanOptions的scanTypes进行动态显示。
- 在API版本6.1.0(23)之前,标题统一显示为“扫描二维码/条形码”。
- 在API版本6.1.0(23)及之后:
- scanTypes为ALL、FORMAT_UNKNOWN,或同时包含条形码和二维码类型,标题显示为“扫描二维码/条形码”。
- scanTypes未设置,标题显示为“扫描二维码/条形码”。
- scanTypes仅包含条形码类型,标题显示为“扫描条形码”。
- scanTypes仅包含二维码类型,标题显示为“扫描二维码”。
约束与限制
-
从API版本26.0.0开始,支持使用isDefaultScanSupported接口查询当前设备是否支持默认界面扫码。
-
从API版本6.1.0(23)开始,默认界面扫码的标题支持根据ScanOptions的scanTypes进行动态显示。
-
从API版本6.1.0(23)开始,默认界面扫码能力支持带后置相机的Wearable,可以通过getSupportedCameras接口查询是否带后置相机。

接口说明
接口有两种返回形式:Callback和Promise。Callback和Promise只是返回值方式不一样,功能相同。startScanForResult接口打开的是元服务内呈现的扫码界面样式。具体API说明详见接口文档。
| 接口名 | 描述 |
|---|---|
| startScanForResult(context: common.Context, options?: ScanOptions): Promise<ScanResult> | 启动默认界面扫码,通过ScanOptions进行扫码参数设置,返回扫码结果。使用Promise异步回调。 |
| startScanForResult(context: common.Context, options: ScanOptions, callback: AsyncCallback<ScanResult>): void | 启动默认界面扫码,通过ScanOptions进行扫码参数设置,返回扫码结果。使用callback异步回调。 |
| startScanForResult(context: common.Context, callback: AsyncCallback<ScanResult>): void | 启动默认界面扫码,返回扫码结果。使用callback异步回调。 |

开发步骤
Scan Kit提供了调用默认界面进行扫码的能力,由扫码接口直接控制相机实现最优的相机放大控制、自适应的曝光调节、自适应对焦调节等操作,保障流畅的扫码体验,减少开发者的工作量。
以下示例为调用Scan Kit的startScanForResult接口跳转扫码页面。
-
导入默认界面扫码模块,scanCore提供扫码类型定义,scanBarcode提供拉起默认界面扫码的方法和参数,导入方法如下。
import { scanCore, scanBarcode } from '@kit.ScanKit'; // 导入默认界面扫码需要的日志模块和错误码模块 import { hilog } from '@kit.PerformanceAnalysisKit'; import { BusinessError } from '@kit.BasicServicesKit'; -
调用startScanForResult方法拉起默认界面扫码。
- 通过Promise方式得到扫码结果。
@Entry @Component struct ScanBarCodePage { build() { Column() { Row() { Button("Promise with options") .backgroundColor('#0D9FFB') .fontSize(20) .fontColor($r('sys.color.comp_background_list_card')) .fontWeight(FontWeight.Normal) .align(Alignment.Center) .type(ButtonType.Capsule) .width('90%') .height(40) .margin({ top: 5, bottom: 5 }) .onClick(() => { // 定义扫码参数options let options: scanBarcode.ScanOptions = { scanTypes: [scanCore.ScanType.ALL], enableMultiMode: true, enableAlbum: true }; scanBarcode.startScanForResult(this.getUIContext().getHostContext(), options) .then((data: scanBarcode.ScanResult) => { hilog.info(0x0001, '[Scan CPSample]', `Succeeded in getting scanResult by promise with options, scanType: ${data.scanType}`); }) .catch((err: BusinessError) => { hilog.error(0x0001, '[Scan CPSample]', `Failed to get scanResult by promise with options. Code: ${err.code}, message: ${err.message}`); }); }) } .height('100%') } .width('100%') } } - 通过Callback回调函数得到扫码结果。
@Entry
@Component
struct ScanBarCodePage {
  build() {
    Column() {
      Row() {
        Button('Callback with options')
          .backgroundColor('#0D9FFB')
          .fontSize(20)
          .fontColor($r('sys.color.comp_background_list_card'))
          .fontWeight(FontWeight.Normal)
          .align(Alignment.Center)
          .type(ButtonType.Capsule)
          .width('90%')
          .height(40)
          .margin({ top: 5, bottom: 5 })
          .onClick(() => {
            // 定义扫码参数options
            let options: scanBarcode.ScanOptions = {
              scanTypes: [scanCore.ScanType.ALL],
              enableMultiMode: true,
              enableAlbum: true
            };
            // 启动扫码,拉起扫码界面
            scanBarcode.startScanForResult(this.getUIContext().getHostContext(), options,
              (err: BusinessError, data: scanBarcode.ScanResult) => {
                if (err) {
                  hilog.error(0x0001, '[Scan CPSample]',
                    `Failed to get scanResult by callback with options. Code: ${err.code}, message: ${err.message}`);
                  return;
                }
                hilog.info(0x0001, '[Scan CPSample]',
                  `Succeeded in getting scanResult by callback with options, scanType: ${data.scanType}`);
              });
          })
      }
      .height('100%')
    }
    .width('100%')
  }
}
- 通过Promise方式得到扫码结果。
模拟器开发
从API版本6.0.0(20)开始,模拟器支持默认界面扫码能力开发,模拟器使用指导请参见使用模拟器运行应用。
模拟器中默认界面扫码的相机流存在镜像问题,且由于仅支持固定分辨率比例,画面会出现上下黑边。