[h2]UX设计
在智能穿戴设备协同导航实践中,涉及手机与智能穿戴设备的互联通信,双方协同完成导航功能,因此UX设计需要同时考虑手机端与智能穿戴设备端。手机端UX设计以地图展示页为核心,智能穿戴设备端UX设计以地图展示页、导航页为核心,具体设计如下表所示。
手机侧页面 | 效果图(手机) | 效果图(智能穿戴设备) |
|---|---|---|
首页(地图展示页) |
|
|
导航页 | 不涉及 |
|


[h2]UI交互
智能穿戴设备协同导航的UI交互设计主要包含以下关键特性:
- 导航提醒:手表通过振动反馈提示用户。
- 双端同步:目的地选择在手机与手表端实时同步。
- 常亮显示:导航过程中保持手表屏幕常亮,导航结束后关闭常亮。
- 交互控制:支持通过旋转表冠缩放地图视图。


[h2]地图操作
地图操作主要涉及地图展示以及地图绘制两个功能,地图展示能力开发者可以参考显示地图。
智能穿戴设备协同导航的地图绘制功能通过MapComponentController实现,具体包含以下核心操作:
地图点击(目的地标记):
图1 地图点击操作时序图
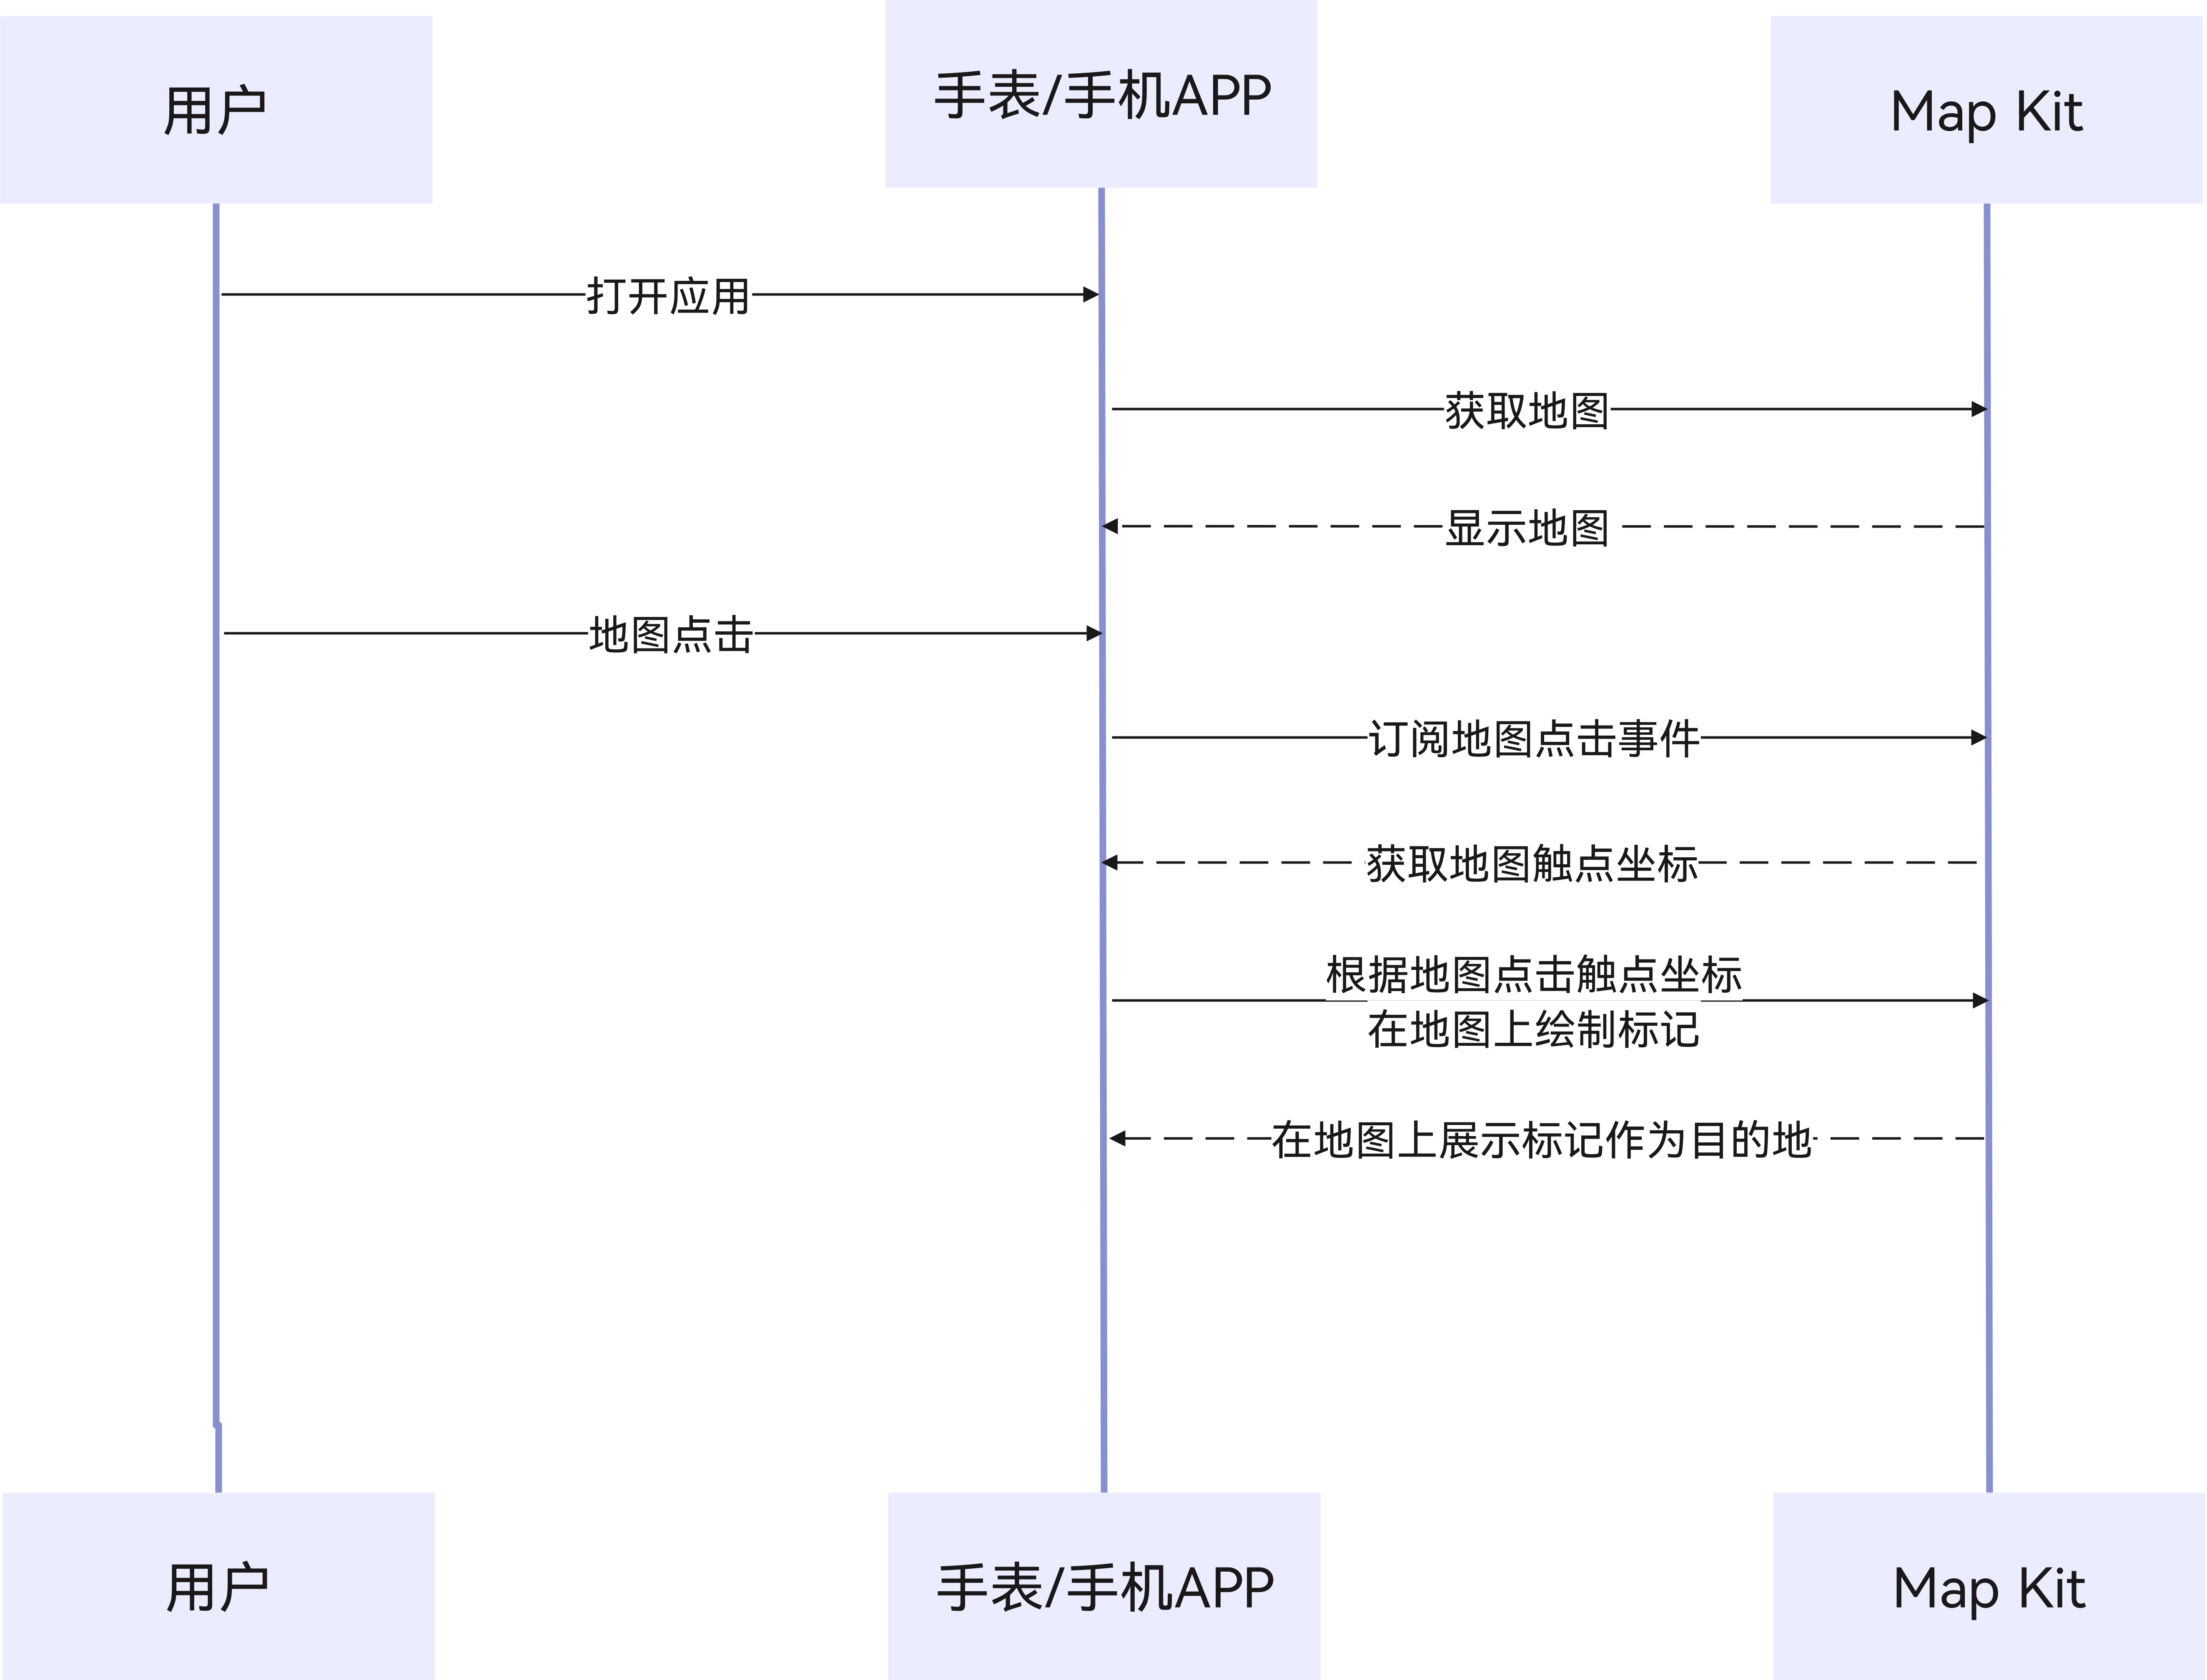
开发步骤如下:
- 注册地图点击事件监听器,在回调函数中将触点的地理坐标持久化存储至destination_Position状态变量中。
// Destination location information obtained based on the map click event. @StorageLink('destination_Position') @Watch('changeDestinationPositionMark') destination_Position: mapCommon.LatLng = { longitude: 0, latitude: 0 }; // ... aboutToAppear(): void { // ... // Map initialization callback this.callback = async (err, mapController) => { if (!err) { // ... let mapOnclickCallBack = async (position: mapCommon.LatLng) => { if (this.isStartNavigation) { // If the navigation has started, you are not allowed to click on the mobile phone. this.isBarShow = false; } else { // Send destination information to the watch for synchronization this.connectUtils.sendMessage(JSON.stringify(new CommunicationInformation(1, undefined, position))); // Modify destination_Position to trigger changeDestinationPositionMark // To refresh the destination mark on the map. this.destination_Position = position; this.isBarShow = true; } }; this.mapEventManager.on('mapLoad', mapLoadCallback); this.mapEventManager.on('mapClick', mapOnclickCallBack); } }; // Obtains the connected watch device and subscribes to the watch's message sending event. this.connectUtils.getConnectedDevices(); try { this.connectUtils.notifyClient = wearEngine.getNotifyClient(this.getUIContext().getHostContext()); } catch (err) { hilog.error(0x0000, TAG, `Failed to get notify client. Cause code: ${err.code}, message: ${err.message}`); } } - 监听destination_Position变化,调用addMarker()动态更新目的地地图标记。
// Destination location information obtained based on the map click event.
@StorageLink('destination_Position') @Watch('changeDestinationPositionMark') destination_Position: mapCommon.LatLng =
  {
    longitude: 0,
    latitude: 0
  };
// ...
/*
 * Triggered when destination_Position changes.
 * Used to refresh the destination marker on the map when the destination changes.
 */
async changeDestinationPositionMark() {
  if (this.mapController) {
    this.mapController.clear();
    let markerOptions: mapCommon.MarkerOptions = {
      position: this.destination_Position,
      rotation: 0,
      visible: true,
      zIndex: 0,
      alpha: 1,
      anchorU: 0.5,
      anchorV: 1,
      clickable: true,
      draggable: true,
      flat: false,
    };
    try {
      await this.mapController.addMarker(markerOptions);
    } catch (err) {
      hilog.error(0x0000, TAG,
        `Failed to add marker. Cause code: ${err.code}, message: ${err.message}`);
    }
  }
}
路径导航:
- 根据当前位置与目的地位置,生成导航路线信息。
Button($r('app.string.DrawRoute')) .width(158) .height(40) .onClick(async () => { let params: navi.RouteParams = { origins: [ { latitude: this.myLocation.latitude, longitude: this.myLocation.longitude } ], destination: this.destination_Position, language: 'zh_CN' }; const result = await navi.getWalkingRoutes(params); let drawRouteUtil: DrawRouteUtils = new DrawRouteUtils(); // Draw a route on a map using navigation route information. drawRouteUtil.drawRoute(this.mapController, result.routes[0].steps[0].roads) }) - 通过调用addPolyline()接口,结合导航路线信息,绘制可视化路径。
/*
 * Draw a navigation route on a map
 * The first parameter needs to be transferred to MapComponentController to operate the map.
 * The second parameter needs to pass in the navigation information to draw the navigation route.
 * @param mapController : map controller for drawing markers or routes on a map.
 * @param steps : Navigation route information obtained through the Map Kit
 */
async drawRoute(mapController: map.MapComponentController | undefined, steps: Array<navi.RouteRoad>) {
  if (mapController === undefined) {
    hilog.info(0X0000, TAG, 'Drawing failed');
    return;
  }
  let roads: Array<mapCommon.LatLng> = [];
  let des_arr: RouteInfomation[] = [];
  for (let index = 0; index < steps.length; index++) {
    for (let i = 0; i < steps[index].polyline.length; i++) {
      roads.push(steps[index].polyline[i]);
      des_arr.push(new RouteInfomation(steps[index].action as string, steps[index].distance, steps[index].duration))
    }
  }

  // The route segment information is stored in the AppStorage and then sent to the watch through the WearEngine.
  AppStorage.setOrCreate('routeInfomation', des_arr);

  let polylineOption: mapCommon.MapPolylineOptions = {
    points: roads,
    color: 0xFF089C57,
    jointType: mapCommon.JointType.ROUND,
    width: 24
  };

  // Use MapComponentController to draw a route on a map
  mapController.addPolyline(polylineOption).catch((error: Error) => {
    let err = error as BusinessError;
    if (err.code) {
      hilog.error(0x0000, TAG,
        `Failed to add poly line. Cause code: ${err.code}, message: ${err.message}`);
    }
  }).then(() => {
    hilog.info(0X0000, TAG, 'Drawing success');
  });
}

[h2]互联通信
智能穿戴设备协同导航系统通过设备间通信协议实现双端数据同步,各类消息通过头部TAG标志位进行区分,具体消息类型定义如下表所示:
消息类型 | TAG标志位取值 | 作用 |
|---|---|---|
路线信息 | 0 | 用于同步导航路线信息。 |
目的地定位 | 1 | 用于同步目的地定位信息。 |
信号信息 | 2及以上 | 用于信号,包括手机侧告知手表侧导航已开启、手表侧告知手机侧导航结束等。 |
在对端消息监听(手机端与智能穿戴设备端均使用,监听对方发来的消息)的回调中,会对发送的消息进行转码,并根据TAG标志位进行数据的存储,分别用于不同的逻辑。
/**
 * Callback Method for Listening to Peer Communication.
 */
private onMsgCallback: Callback<wearEngine.P2pMessage> = (data: wearEngine.P2pMessage): void => {
  let str: string = '';
  // Decodes the intercepted content into a character string.
  if (canIUse('SystemCapability.Utils.Lang')) {
    let decoder: util.TextDecoder = util.TextDecoder.create();
    str = decoder.decodeToString(data.content);
  }
  // Convert the JSON character string to the CommunicationInformation type.
  let communicationInformation: CommunicationInformation = JSON.parse(str);
  // Determine the information type based on the tag.
  if (communicationInformation.tag === 0) {
    // When tag is set to 0,Indicates that the transferred information is path description information,
    // which is stored in AppStorage to refresh the watch navigation page.
    AppStorage.setOrCreate('route_information', communicationInformation.routeInfomation);
  } else if (communicationInformation.tag === 1) {
    // When tag is set to 1, Indicates that the transferred information is destination location information
    // and is saved to the AppStorage for synchronizing the destination logo of the mobile phone and watch.
    AppStorage.setOrCreate('destination_Position', communicationInformation.location);
  } else if (communicationInformation.tag === 2) {
    // Signal sent from your phone to your watch when navigation starts, indicating that navigation starts.
    AppStorage.setOrCreate('isStartNavigation', true);
  } else {
    // Signal sent from your watch to your phone when navigation ends, indicating that navigation ends.
    AppStorage.setOrCreate('isStartNavigation', false);
  }
} 
[h2]消息通知
在导航启动阶段,手机端需通过WearEngine提供的notify()接口向智能穿戴设备端发送通知消息,告知手表端导航开始。
/*
 * Method of notifying a message to watch.
 */
notifyMessage() {
  // Configure the notification content.
  // Including the package name of the notification source, notification title, and notification content.
  let type1Notification: wearEngine.Notification = {
    type: wearEngine.NotificationType.NOTIFICATION_WITHOUT_BUTTONS,
    bundleName: 'com.example.smartwatchmapnavigation',
    title: 'smartwatchmapnavigation',
    text: 'walk navigation start',
  }
  let options: wearEngine.NotificationOptions = {
    notification: type1Notification,
    onAction: (feedback: wearEngine.NotificationFeedback) => {
      hilog.info(0x000, TAG,
        `one button notify get feedback is ${feedback.action ? feedback.action : feedback.errorCode}`);
    }
  }

  // Sends a notification to the watch based on notifyClient.
  // This method can be invoked only by apps on mobile phones.
  this.notifyClient!.notify(this.deviceRandomId, options).then(result => {
    hilog.info(0x000, TAG, `Succeeded in sending notification.`);
  }).catch((error: BusinessError) => {
    hilog.error(0x000, TAG, `Failed to send notification. Code is ${error.code}, message is ${error.message}`);
  })
} 
[h2]振感提示
在导航过程中,智能穿戴设备需要使用振动向开发者提供振感提示。
// Vibration Tools Class
export class VibratorUtil {
  /*
   * The method of  Vibration.
   */
  Vibrator() {
    try {
      // Use the startVibration method to enable vibration and set the duration.
      vibrator.startVibration({
        type: 'time',
        duration: 1000,
      }, {
        id: 0,
        usage: 'alarm'
      }, (error: BusinessError) => {
        if (error) {
          hilog.error(0x0000, TAG, `Failed to start vibration. Code: ${error.code}, message: ${error.message}`);
          return;
        }
        hilog.info(0x0000, TAG, 'Succeed in starting vibration');
      });
    } catch (err) {
      let e: BusinessError = err as BusinessError;
      hilog.error(0x00000, TAG, `An unexpected error occurred. Code: ${e.code}, message: ${e.message}`);
    }
  }
} 