智能客服
你问我答,随时在线为你解决问题
随着HarmonyOS应用的持续发展,应用的功能将越来越丰富,实际上80%的用户使用时长都会集中在20%的特性上,其余的功能可能也仅仅是面向部分用户。为了避免用户首次下载应用耗时过长,及过多占用用户空间,应用市场服务提供按需分发的能力,支持用户按需动态下载自己所需的增强特性。
按需分发:一个应用程序被打包成多个安装包,安装包包含了所有的应用程序代码和静态资源。用户从应用市场下载的应用只包含基本功能的安装包,当用户需要使用增强功能时,相应安装包将会从服务器下载到设备上(应用发布请参考发布HarmonyOS应用)。
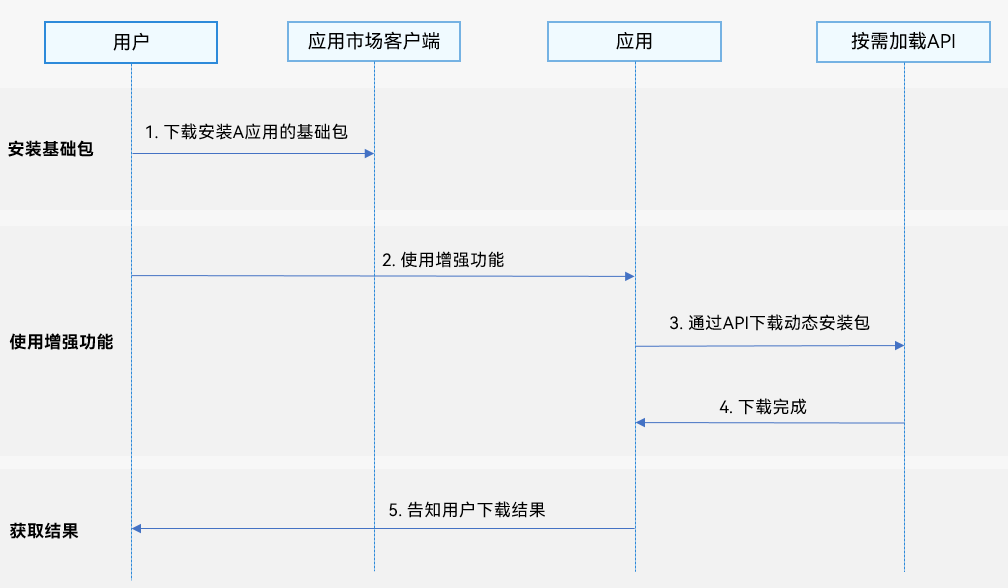
产品特性按需分发场景提供以下接口,具体API说明详见接口文档。
接口名 | 描述 |
|---|---|
getInstalledModule(moduleName: string): InstalledModule | 查询模块安装信息接口。 |
createModuleInstallRequest(context: common.UIAbilityContext | common.ExtensionContext): ModuleInstallRequest | 创建按需加载请求对象。 |
addModule((moduleName: string): ReturnCode | 添加要按需加载的模块名。 |
fetchModules(moduleInstallRequest: ModuleInstallRequest): Promise<ModuleInstallSessionState> | 按需加载请求接口,异步返回结果。 |
cancelTask(taskId: string): ReturnCode | 取消下载任务接口。 |
showCellularDataConfirmation(context: common.UIAbilityContext | common.ExtensionContext, taskId: string): ReturnCode | 流量提醒弹窗接口。 |
on(type: 'moduleInstallStatus', callback: Callback<ModuleInstallSessionState>, timeout: number): void | 监听当前应用下载任务的进度。 |
off(type: 'moduleInstallStatus', callback?: Callback<ModuleInstallSessionState>): void | 取消监听当前应用下载任务的进度。 |
- import { moduleInstallManager } from '@kit.StoreKit';
- const moduleName: string = 'AModule';
- const moduleInfo: moduleInstallManager.InstalledModule = moduleInstallManager.getInstalledModule(moduleName);
- import { moduleInstallManager } from '@kit.StoreKit';
- import type { common } from '@kit.AbilityKit';
- const context: common.UIAbilityContext | common.ExtensionContext = getContext(this) as common.UIAbilityContext;
- const myModuleInstallProvider: moduleInstallManager.ModuleInstallProvider = new moduleInstallManager.ModuleInstallProvider();
- const myModuleInstallRequest: moduleInstallManager.ModuleInstallRequest = myModuleInstallProvider.createModuleInstallRequest(context);
- import type { common } from '@kit.AbilityKit';
- import { hilog } from '@kit.PerformanceAnalysisKit';
- import { moduleInstallManager } from '@kit.StoreKit';
- const moduleNameA: string = 'AModule';
- const moduleNameB: string = 'BModule';
- let myModuleInstallRequest: moduleInstallManager.ModuleInstallRequest;
- try {
- const myModuleInstallProvider: moduleInstallManager.ModuleInstallProvider = new moduleInstallManager.ModuleInstallProvider();
- const context: common.UIAbilityContext | common.ExtensionContext = getContext(this) as common.UIAbilityContext;
- myModuleInstallRequest = myModuleInstallProvider.createModuleInstallRequest(context);
- const aResult: moduleInstallManager.ReturnCode = myModuleInstallRequest.addModule(moduleNameA);
- const bResult: moduleInstallManager.ReturnCode = myModuleInstallRequest.addModule(moduleNameB);
- hilog.info(0, 'TAG', 'aResult:' + aResult + ' bResult:' + bResult);
- } catch (error) {
- hilog.error(0, 'TAG', `addModule onError.code is ${error.code}, message is ${error.message}`);
- }
-
- try {
- moduleInstallManager.fetchModules(myModuleInstallRequest)
- .then((data: moduleInstallManager.ModuleInstallSessionState) => {
- hilog.info(0, 'TAG', 'Succeeded in fetching Modules data.');
- })
- } catch (error) {
- hilog.error(0, 'TAG', `fetching Modules onError.code is ${error.code}, message is ${error.message}`);
- }
假如应用A由entry.hap、AModulelib.hsp两个包组成,其中entry是基础包,AModulelib扩展是功能包(创建方式请参考应用程序包开发与使用)。通过应用市场下载安装只会下载安装entry包,在entry包里面可以通过fetchModules接口动态下载AModulelib包,并使用动态import技术调用AModulelib里的方法和组件。
AModulelib中主要实现如下:
- {
- "module": {
- "name": "AModulelib",
- "deliveryWithInstall": false
- }
- }
Calc.ets定义如下:
- export function add(a:number, b:number) {
- return a + b;
- }
- @Component
- struct DateComponent {
- build() {
- Column() {
- Text('我是AModulelib中的组件')
- .margin(10);
- }
- .width(300).backgroundColor(Color.Yellow);
- }
- }
-
- @Builder
- export function showDateComponent() {
- DateComponent()
- }
- export { add } from './src/main/ets/utils/Calc';
- export { showDateComponent } from './src/main/ets/components/DateComponent';
entry中主要实现如下:
- {
- "dynamicDependencies": {
- "AModulelib": "file:../AModulelib"
- }
- }
- import { moduleInstallManager } from '@kit.StoreKit';
- import { hilog } from '@kit.PerformanceAnalysisKit';
- import { BusinessError, Callback } from '@kit.BasicServicesKit';
- import { common } from '@kit.AbilityKit';
- import { promptAction } from '@kit.ArkUI';
-
- const TAG: string = 'TAG';
-
- @Entry
- @Component
- struct Index {
- @BuilderParam AModulelibComponent: Function;
- @State countTotal: number = 0;
- @State isShow: boolean = false;
-
- build() {
- Row() {
- Column() {
- Button(`调用增量模块中的add功能:3+6`)
- .onClick(() => {
- this.initAModulelib(() => {
- import('AModulelib').then((ns: ESObject) => {
- this.countTotal = ns.add(3, 6);
- }).catch((error: BusinessError) => {
- hilog.error(0, 'TAG', `add onError.code is ${error.code}, message is ${error.message}`);
- })
- })
- });
- Text('计算结果:' + this.countTotal)
- .margin(10);
- Button(`调用增量模块中的showDateComponent功能`)
- .onClick(() => {
- this.initAModulelib(() => {
- import('AModulelib').then((ns: ESObject) => {
- this.AModulelibComponent = ns.showDateComponent;
- this.isShow = true;
- }).catch((error: BusinessError) => {
- hilog.error(0, 'TAG', `showDateComponent onError.code is ${error.code}, message is ${error.message}`);
- })
- })
- }).margin({
- top: 10, bottom: 10
- });
- if (this.isShow) {
- this.AModulelibComponent()
- }
- }
- .width('100%')
- }
- .height('100%')
- }
-
- private showToastInfo(msg: string) {
- promptAction.showToast({
- message: msg,
- duration: 2000
- });
- }
-
- /**
- * 检查是否已加载AModulelib包
- *
- * @param successCallBack 回调
- */
- private initAModulelib(successCallBack: Callback<void>): void {
- try {
- const result: moduleInstallManager.InstalledModule = moduleInstallManager.getInstalledModule('AModulelib');
- if (result?.installStatus === moduleInstallManager.InstallStatus.INSTALLED) {
- hilog.info(0, TAG, 'AModulelib installed');
- successCallBack && successCallBack();
- } else {
- // AModulelib模块未安装, 需要调用fetchModules下载AModulelib模块。
- hilog.info(0, TAG, 'AModulelib not installed');
- this.fetchModule('AModulelib', successCallBack)
- }
- } catch (error) {
- hilog.error(0, 'TAG', `getInstalledModule onError.code is ${error.code}, message is ${error.message}`);
- }
- }
-
- /**
- * 添加监听事件
- *
- * @param successCallBack 回调
- */
- private onListenEvents(successCallBack: Callback<void>): void {
- const timeout = 3 * 60; //单位秒, 默认最大监听时间为30min(即30*60秒)
- moduleInstallManager.on('moduleInstallStatus', (data: moduleInstallManager.ModuleInstallSessionState) => {
- // 返回成功
- if (data.taskStatus === moduleInstallManager.TaskStatus.INSTALL_SUCCESSFUL) {
- successCallBack && successCallBack();
- this.showToastInfo('install success');
- }
- }, timeout)
- }
-
- /**
- * 加载指定包
- *
- * @param moduleName 需要加载的安装包名称
- * @param successCallBack 回调
- */
- private fetchModule(moduleName: string, successCallBack: Callback<void>) {
- try {
- hilog.info(0, TAG, 'handleFetchModules start');
- const context = getContext(this) as common.UIAbilityContext;
- const moduleInstallProvider: moduleInstallManager.ModuleInstallProvider =
- new moduleInstallManager.ModuleInstallProvider();
- const moduleInstallRequest: moduleInstallManager.ModuleInstallRequest =
- moduleInstallProvider.createModuleInstallRequest(context);
- if (!moduleInstallRequest) {
- hilog.warn(0, TAG, 'moduleInstallRequest is empty');
- return;
- }
- moduleInstallRequest.addModule(moduleName);
- moduleInstallManager.fetchModules(moduleInstallRequest)
- .then((data: moduleInstallManager.ModuleInstallSessionState) => {
- hilog.info(0, TAG, 'Succeeded in fetching Modules result.');
- if (data.code === moduleInstallManager.RequestErrorCode.SUCCESS) {
- this.onListenEvents(successCallBack)
- } else {
- hilog.info(0, TAG, 'fetchModules failure');
- }
- })
- .catch((error: BusinessError) => {
- hilog.error(0, 'TAG', `fetchModules onError.code is ${error.code}, message is ${error.message}`);
- })
- } catch (error) {
- hilog.error(0, 'TAG', `handleFetchModules onError.code is ${error.code}, message is ${error.message}`);
- }
- }
- }
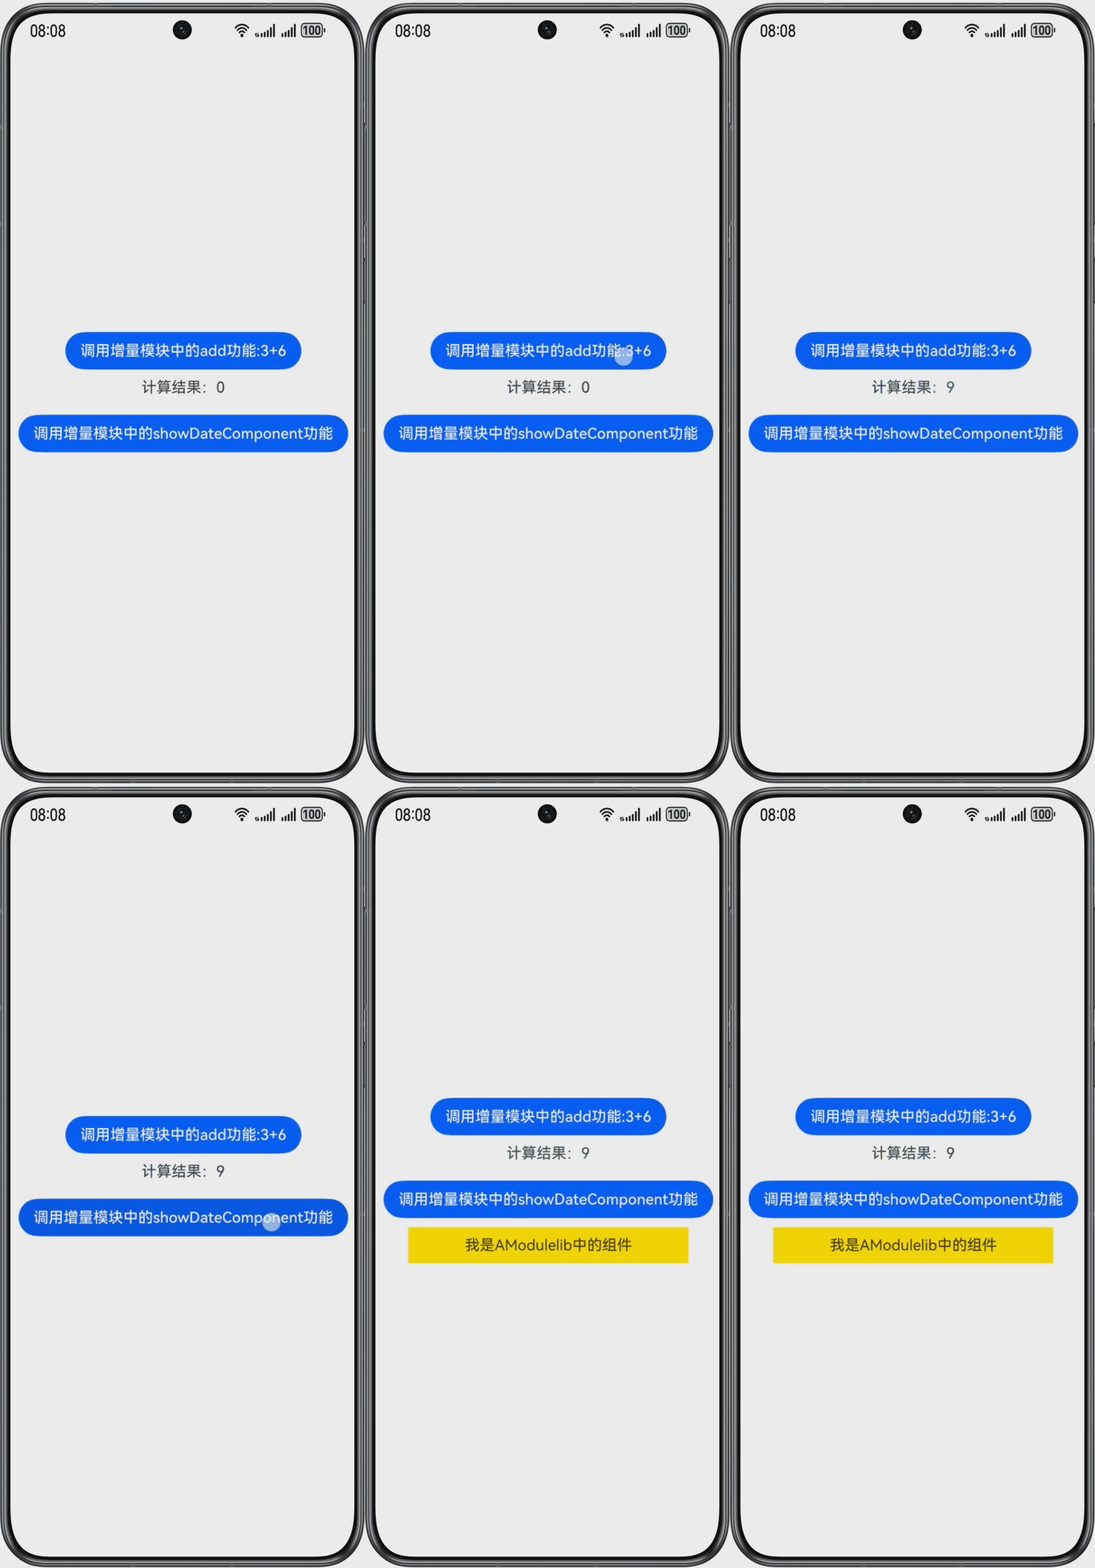
运行结果效果图: