














 HMOSer
【官方总结】HarmonyOS应用开发FAQ汇总-Java UI
1. Component如何设置背景的颜色(Java)(API 6)
1.element文件夹下创建color.json,参考代码如下:
{
"color": [
{
"name": "primary",
"value": "#FF0000"
}
]
}
2.通过setRgbColor设置颜色,setBackground设置背景,参考代码如下:
ResourceManager resManager = this.getResourceManager();
try {
int color = resManager.getElement(ResourceTable.Color_primary).getColor();
ShapeElement shapeElement = new ShapeElement();
shapeElement.setRgbColor(RgbColor.fromArgbInt(color));
toolBar.setBackground(shapeElement);
} catch (IOException e) {
HiLog.error(LABEL_LOG, e.getMessage());
} catch (NotExistException e) {
HiLog.error(LABEL_LOG, e.getMessage());
} catch (WrongTypeException e) {
HiLog.error(LABEL_LOG, e.getMessage());
}
2. HarmonyOS中如何获取图片的矩阵对象进行缩放操作(Java)(API 6)
在HarmonyOS中可以通过Image组件设置图片的缩放,XML代码如下:
<Image
ohos:id="$+id:image"
ohos:width="match_content"
ohos:height="match_content"
ohos:layout_alignment="center"
ohos:image_src="$media:plant"
ohos:scale_x="0.5"
ohos:scale_y="0.5"/>
Java代码可以通过Image对象中的setScale(float x, float y )同时设置图片X和Y方向的缩放,如果单独设置X或者Y方向的缩放,可以使用setScaleX(float scaleX)或者setScaleY(float scaleY)。
另外也可以通过PixelMap实现图片的缩放,代码如下:
public void setPictureScale() {
ImageSource imageSource;
PixelMap pixelMap;
try {
imageSource = ImageSource.create(getResourceManager().getResource(ResourceTable.Media_ic_camera_photo), null);
ImageSource.DecodingOptions decodingOpts = new ImageSource.DecodingOptions();
decodingOpts.desiredSize = new Size(803, 470);
decodingOpts.desiredRegion = new Rect(0, 0, 0, 0);
decodingOpts.desiredPixelFormat = PixelFormat.ARGB_8888;
pixelMap = imageSource.createPixelmap(decodingOpts);
Image sclyImage = (Image) findComponentById(ResourceTable.Id_sclyImage);
sclyImage.setPixelMap(pixelMap);
} catch (IOException e) {
HiLog.info(LABEL_LOG, "IOException");
} catch (NotExistException e) {
HiLog.info(LABEL_LOG, "NotExistException");
}
}
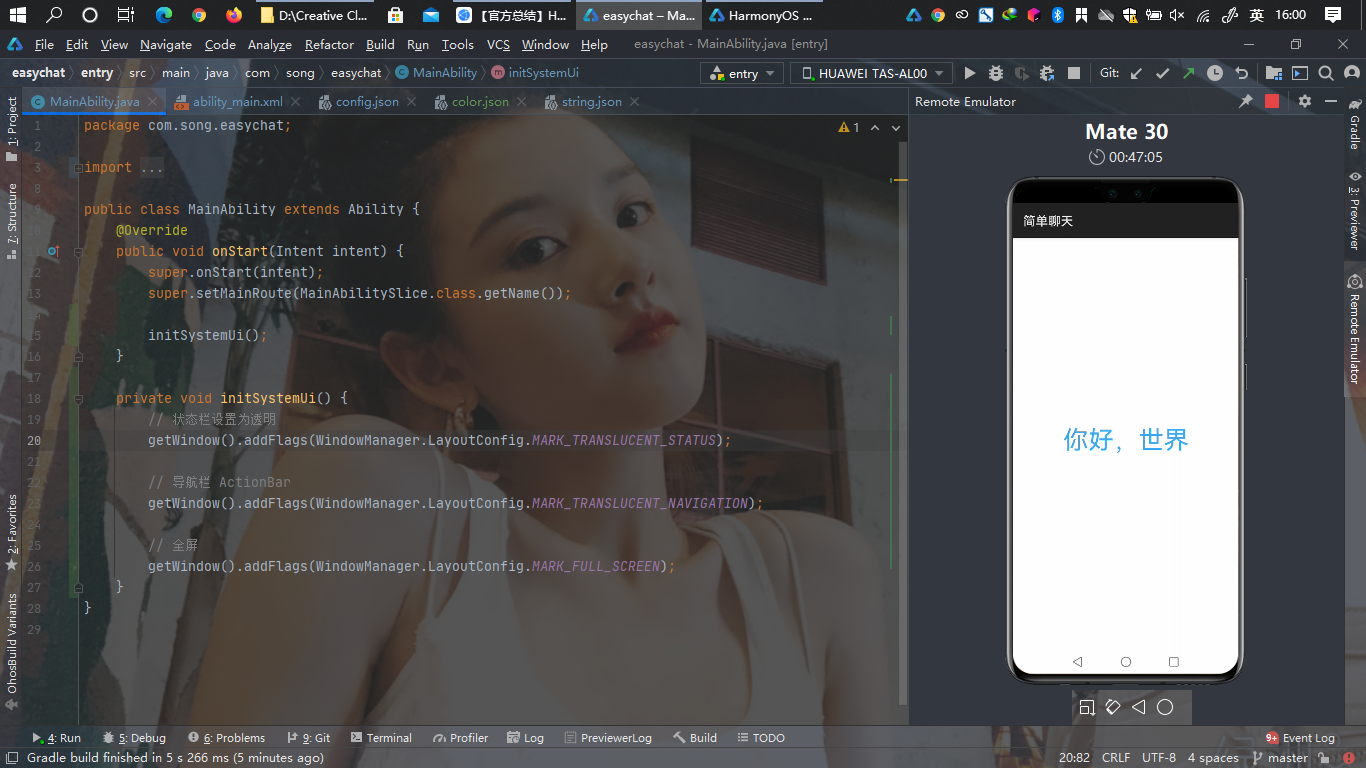
3. 如何实现沉浸式状态栏,比如左右渐变或者一张图片的左右渐变(Java)(API 6)
沉浸式状态栏设置如下:
private void initSystemUi() {
// 状态栏设置为透明
getWindow().addFlags(WindowManager.LayoutConfig.MARK_TRANSLUCENT_STATUS);
// 导航栏 ActionBar
getWindow().addFlags(WindowManager.LayoutConfig.MARK_TRANSLUCENT_NAVIGATION);
// 全屏
getWindow().addFlags(WindowManager.LayoutConfig.MARK_FULL_SCREEN);
}
如果要实现图片的渐变需要参看API编码,参考如下方案:
自定义view,包括scrollview、rootlayout与image,通过Ctrl类进行管理。
图片的渐变过程可通过scrollview的setScrolledListener进行处理,部分代码如下:
public ActionBarViewCtrl(Context context) {
ctx = context;
scrollView = (ScrollView) LayoutScatter.getInstance(context)
.parse(ResourceTable.Layout_view_bar_layout, null, false);
image = (Image) rootLayout.findComponentById(ResourceTable.Id_BarImage);
scrollView.setScrolledListener((component, i, i1, i2, i3) -> {
if (element == null) {
return;
}
final int height = image.getHeight();
final float ratio = (float) Math.min(Math.max(i1, 0), height) / height;
final int newAlpha = (int) (ratio * 255);
element.setAlpha(newAlpha);
});
}
public void setBarBgInt(int id) {
this.element = new ShapeElement(ctx, id);
this.element.setAlpha(0);
image.setImageElement(this.element);
}
4. 渐变背景色如何设置(Java)(API 6)
可参考以下代码来实现矩形渐变背景色的效果:
// 设置背景色和渐变(从下端角到上端角)
ShapeElement gradientbackgroundtextelement = initChildShapeElement(this);
gradientbackgroundtextelement.setShape(ShapeElement.RECTANGLE);
RgbColor[] rgbColors = new RgbColor[]{new RgbColor(34, 197, 255), new RgbColor(255, 197, 34)};gradientbackgroundtextelement.setRgbColors(rgbColors);
gradientbackgroundtextelement.setGradientOrientation(ShapeElement.Orientation.BOTTOM_END_TO_TOP_START);
// 这个组件显示的效果是"渐变背景"矩形
Text gradientbackgroundtext = initText(this, "带渐变效果的矩形背景");
gradientbackgroundtext.setBackground(gradientbackgroundtextelement);
5. ScrollHelper.startScroll() 方法无效(Java)(API 6)
问题现象
ScrollHelper.startScroll()方法无效,无法为内容滑动提供滚动动画时长。
解决措施
HarmonyOS的ScrollHelper.startScroll()目前暂不支持设置动画时长。如果想实现滚动动画时长可以使用AnimatorValue。
了解动画时长可以参考:http://developer.harmonyos.com/cn/docs/documentation/doc-guides/ui-java-animation-0000000000580278
6. ListContainer如何插入和删除数据(Java)(API 6)
ohos.agp.components.BaseItemProvider有以下2个API用于处理插入和删除数据的操作。
插入指定区间的数据,从startPos位置开始,数量为countItems的数据,public void notifyDataSetItemRangeInserted(int startPos, int countItems)。
插入用法部分示例代码:
private void insert() {
ArrayList<String> dataSet = mProvider.getData();
if (dataSet != null && !dataSet.isEmpty()) {
for (int i = 1; i <= count; i++) {
dataSet.add(i, "插入第" + i + "行");
}
mProvider.notifyDataSetItemRangeInserted(1, count);
}
}
删除指定区间的数据,从startPos位置开始,数量为countItems的数据,public void notifyDataSetItemRangeRemoved(int startPos, int countItems)。
删除用法部分示例代码:
private void delete() {
ArrayList<String> dataSet = mProvider.getData();
if (dataSet != null && !dataSet.isEmpty()) {
ArrayList<String> delList = new ArrayList<>();
for (int i = 1; i <= count; i++) {
if (dataSet.size() > i) {
delList.add(dataSet.get(i));
}
}
dataSet.removeAll(delList);
mProvider.notifyDataSetItemRangeRemoved(1, delList.size());
}
}
7. Slider控件如何设置颜色(Java)(API 6)
改变进度条的颜色可以参考如下:
在XML中设置:
<Slider...ohos:progress_color="#FF8C00"/>
在代码中设置:
slider.setProgressColor(new Color(Color.getIntColor("#FF8C00")));
8. Component如何获取在窗口中的坐标(Java)(API 6)
HarmonyOS获取窗口坐标的相关方法如下:
int[] count = new Component(this).getLocationOnScreen();
int x = count[0]; // 横坐标
int y = count[1]; // 纵坐标
9. Text如何设置字体、下划线、删除线、加粗、斜体(Java)(API 6)
设置字体、斜体、加粗的代码如下:
// 自定义字体
Font font = new Font.Builder("myfont")
.makeItalic(true)
.setWeight(Font.BOLD)
.build();
txtSet.setFont(font);
// 使用系统定义字体
txtSet.setFont(Font.SANS_SERIF);
暂不支持设置下划线和删除线。
10. Text 一行显示不下如何用省略号显示(Java)(API 6)
参考如下代码设置:
ohos:truncation_mode="ellipsis_at_start" 在开始位置设置省略号
ohos:truncation_mode="ellipsis_at_middle" 在中间位置设置省略号
ohos:truncation_mode="ellipsis_at_end" 在结束位置设置省略号
ohos:truncation_mode="auto_scrolling" 设置跑马灯效果
text.startAutoScrolling() 开启跑马灯效果
11. 如何对位图进行亮度、饱和度等的调整(Java)(API 6)
对位图进行操作的示例如下:
private void handleImgeEffect(float saturation, float lum, ImageSource imageSource) {
// 饱和度
ColorMatrix saturationMatrix = new ColorMatrix(); // 创建颜色矩阵
saturationMatrix.setSaturation(saturation);
// 亮度
ColorMatrix lumMatrix = new ColorMatrix(); // 创建颜色矩阵
lumMatrix.setScale(lum,lum,lum,1); // R,G,B,A
// 旋转
ImageSource.DecodingOptions decodingOpts = new ImageSource.DecodingOptions();
decodingOpts.rotateDegrees = 90;
PixelMap degreesPixelMap = imageSource.createPixelmap(decodingOpts);
}
12. HarmonyOS中有类似观察者的用法吗(Java)(API 6)
在HarmonyOS中DataAbility可以实现数据的订阅。若实现IDataAbilityObserver,可自行重写onChange方法,并调用DataAbilityHelper的registerObserver方法注册观察者,示例代码如下:
private void registerObserver() {
dataAbilityHelper = DataAbilityHelper.creator(this);
IDataAbilityObserver dataAbilityObserver = new IDataAbilityObserver() {
@Override
public void onChange() {
LogUtil.info("dataAbilityObserver", "data changed!");
}
};
dataAbilityHelper.registerObserver(dataAbilityUri, dataAbilityObserver); // dataAbilityUri为要订阅数据的地址
}
13. Java UI中滚动布局如何设置(Java)(API 6)
NestedScrollView继承自Scrollview,两者均支持垂直和水平方向滚动,内嵌layout,orientation可设置为vertical或horizontal。
NestedScrollView还支持在父类滚动内容中继续嵌套滚动内容。
14. base目录的资源只能通过resourceTable引用吗(Java)(API 6)
base目录的资源还有其他格式,比如:
element/string.json
graphic/button_element.xml
layout/main_layout.xml
media/image1.jpg或者media/music1.mp3
rawfile/musice.mp4
其引用各不相同
l element/string.json
用于自定义英文字符串来隐藏中文字符:
{
"name":"load_image",
"value":"加载网络图片"
}
在布局文件中,设置Button组件名字为加载网络图片:
ohos:text="$string:load_image"
l graphic/button_element.xml
布局文件中Button样式的加载如下:
ohos:background_element="$graphic:button_element"
l layout/main_layout.xml
代码中布局的加载:
setUIContent(ResourceTable.Layout_main_layout);
l media/image1.jpg或者media/music1.mp3
代码中引用图片资源或者mp3:
image.setPixelMap(ResourceTable.Media_loading);
sound_1 = soundPlayer.createSound(context, ResourceTable.Media_music1);
l rawfile/musice.mp4
代码中引用视频播放路径:
Player player = new Player(this);
RawFileDescriptor fileDescriptor = getResourceManager().getRawFileEntry("resources/rawfile/aod_video.mp4").openRawFileDescriptor();
Source source = new Source(fileDescriptor.getFileDescriptor(), fileDescriptor.getStartPosition(), fileDescriptor.getFileSize());
player.setSource(source);
player.setVideoSurface(surface);
player.prepare();
player.play();
15. HarmonyOS如何创建并使用Vector矢量图(Java)(API 6)
HarmonyOS支持定义XML文件来绘制矢量图。
1.在工程目录下\entry\src\main\resources\base\graphic\文件夹中新建后缀为 .xml 的文件。
2.在vector.xml文件中添加如下代码:
<?xml version="1.0" encoding="utf-8"?>
<vector xmlns:ohos="http://schemas.huawei.com/res/ohos"
ohos:height="100vp"
ohos:width="100vp"
ohos:alpha="1"
ohos:viewportHeight="100"
ohos:viewportWidth="100">
<path
ohos:pathData="M25 25v50h50v-50h-50z"
ohos:fillColor="#000000"/>
</vector>
layout文件中引用矢量图的方法:
<Image
ohos:width="300vp"
ohos:height="300vp"
ohos:background_element="#C1C1C1"
ohos:image_src="$graphic:vector"/>
16. HarmonyOS如何使用HsvColor(Java)(API 6)
请参考如下实现:
private static final int INITPARAM = 0x0000FF;
private static final int HUE = 180;
private static final float SATURATION = 180;
private static final int VALUE = 180;
@Override
public void onStart(Intent intent) {
super.onStart(intent);
super.setMainRoute(MainAbilitySlice.class.getName());
HsvColor hsvColor = HsvColor.toHSV(INITPARAM);
hsvColor.setHue(HUE); // 色度
hsvColor.setSaturation(SATURATION); // 饱和度
hsvColor.setValue(VALUE); // 亮度
RgbColor rgb = ColorConverter.toRgb(hsvColor);
WindowManager.getInstance().getTopWindow().get().setNavigationBarColor(rgb.asArgbInt());
}
17. picker如何默认选中的是第一条数据(Java)(API 6)
JAVA可以做如下设置:
picker.setValue(0);
picker.setWheelModeEnabled(false);
JS参考如下文档:设置selected属性。
18. HarmonyOS中组件如何获取所在布局的长宽数据(Java)(API 6)
以按钮为例,获取按钮所在布局的长宽,代码如下:
if (componentButton instanceof Button) {
Button button1 = (Button) componentButton;
button1.setClickedListener(listener -> { // 按钮绑定监听事件
ComponentContainer componentContainer = (ComponentContainer) button1.getComponentParent(); // 获取按钮所在布局对象
int width = componentContainer.getWidth(); // 按钮所在布局宽度
int height = componentContainer.getHeight(); // 按钮所在布局高度
});
}
19. PageSlider监听事件不执行(Java)(API 6)
问题现象
在第一次布局文件生成时,无法进入PageSlider.PageChangedListener监听。
@Override
public void onPageSliding(int position, float positionOffset, int positionOffsetPixels)
解决措施
onPageSliding方法只有在界面滑动时触发,在初始化时并不会触发,在界面滑动时进入PageSlider的监听。
20. shape xml样式如何单独设置圆角、尺寸(Java)(API 6)
请参考如下实现:
<?xml version="1.0" encoding="UTF-8" ?>
<shape
xmlns:ohos="http://schemas.huawei.com/res/ohos"
ohos:shape="rectangle">
<solid ohos:color="#00FF00"/>
// 设置shape尺寸
<bounds
ohos:bottom="12vp"
ohos:left="0"
ohos:right="12vp"
ohos:top="0"/>
// 单独设置圆角
<corners
ohos:left_bottom_x="18vp"
ohos:left_bottom_y="18vp"
ohos:right_bottom_x="18vp"
ohos:right_bottom_y="18vp"/>
</shape>
21. 智能穿戴UX设计里面的滚动条是什么控件(Java)(API 6)
问题现象
初次进入界面/弹框/可滚动界面,若界面内容超出显示区域,显示竖向滚动条,无任何操作,2秒后消失。滚动条高度为动态高度:滚动条长度反映当前可视内容占整个内容的高度比例,高度是动态变化的,内容高度越长,滚动条高度越短。如何实现这种效果?
解决措施
该组件是ListContainer,如下设置可以实现上诉的效果:
ListContainer.enableScrollBar(Component.AXIS_Y, true);
ListContainer.setScrollbarRoundRect(true);
ListContainer.setScrollbarColor(Color.GREEN);
ListContainer.setMode(Component.RECT_MODE);
22. 开发Component时如何实现orientation监听事件,跟随OS方向变化布局(Java)(API 6)
横竖屏切换监听具体示例如下:
在MainAbilitySlice.java中重写onOrientationChanged方法。
public class MainAbilitySlice extends AbilitySlice {
private static final HiLogLabel LABEL_LOG = new HiLogLabel(0, 0, "MainAbilitySlice");
@Override
protected void onOrientationChanged(AbilityInfo.DisplayOrientation displayOrientation) {
super.onOrientationChanged(displayOrientation);
HiLog.info(LABEL_LOG, "this orientation is: " + displayOrientation.name());
}
}
在config.json中添加配置(该配置与skills对象同级)。
"abilities": [
{
"configChanges": [
"orientation"
]
}
]
23. 如何设置FA字体不随系统字体设置的大小变化(Java)(API 6)
需要给带文字的组件增加上allow-scale属性(设置成false)来做限制。
24. 如何设置FA不随桌面旋转而旋转(Java)(API 6)
在config.json中的abilities下面新增一项 "orientation": "portrait"。
25. HarmonyOS自定义控件中如何刷新Canvas(Java)(API 6)
问题现象
自定义控件通过addDrawTask在DrawTask中使用Canvas进行绘制,需要刷新Canvas实现动画效果,通过哪个方法进行刷新?
解决措施
customView为自定义组件,刷新组件方法如下:
customView.invalidate();
26. TextField的气泡如何删除(Java)(API 6)
方案1:设置ohos:text_cursor_visible="false",不显示cursor,这种方式删除气泡后,光标也将不显示。
方案2:使用element_cursor_bubble属性自定义bubble样式,颜色设为透明:
ohos:element_cursor_bubble="$graphic:cursor_bubble"
在graphic目录下创建cursor_bubble.xml,内容如下:
<?xml version="1.0" encoding="UTF-8" ?>
<shape xmlns:ohos="http://schemas.huawei.com/res/ohos" ohos:shape="oval">
<solid ohos:color="#00000000"/>
</shape>
27. HarmonyOS的尺寸单位vp如何跟px适配(Java)(API 6)
px转vp方法:
public static int px2vp(Context context, int size) {
int density = context.getResourceManager().getDeviceCapability().screenDensity / DeviceCapability.SCREEN_MDPI;
return size / density;
}
28. HarmonyOS如何实现多点触控(Java)(API 6)
getPointerCount()获取一次事件中触控或轨迹追踪的指针数量。
getPointerId(int index)获取一次事件中,指针的唯一标识Id。
请参考如下文档:
29. 如何解决手机设置横屏后左侧有黑边以及如何获取手机横竖屏状态(Java)(API 6)
通过以下方式隐藏黑边:
getWindow().addFlags(WindowManager.LayoutConfig.MARK_TRANSLUCENT_STATUS);
getWindow().addFlags(WindowManager.LayoutConfig.MARK_TRANSLUCENT_NAVIGATION);
getWindow().addFlags(WindowManager.LayoutConfig.MARK_FULL_SCREEN);
通过以下方法获取手机横竖屏状态:
Ability: 重写onConfigurationUpdated方法来获取状态。
public class MainAbility extends Ability {
private static final HiLogLabel LABEL_LOG = new HiLogLabel(3, 0xD001100, "MainAbility");
@Override
public void onConfigurationUpdated(Configuration configuration) {
int direction = configuration.direction;
HiLog.info(LABEL_LOG, "direction:",direction);
}
}
AbilitySlice: 重写onOrientationChanged方法来获取状态。
@Override
protected void onOrientationChanged(AbilityInfo.DisplayOrientation displayOrientation) {
String name = displayOrientation.name();
HiLog.info(LABEL_LOG,"ordinal", name);
}
30. 如何判断ListContainer滑动到顶部和底部(Java)(API 6)
滑动到底部暂时没有对应的API,滑动到顶部的实现如下:
listContainer.setScrolledListener((component, i, i1, i2, i3) -> {
// 如果i1为0则滑动到顶部了
if (i1 == 0) {
HiLog.info(LABEL_LOG,"滑动到顶部了");
}
});
31. 如何正确使用PathMeasure.getPosTan方法获取路径的坐标值(Java)(API 6)
参考如下实现获取坐标值,注意getPosTan的tangent参数不能为空,否则会导致getPosTan方法的返回值为false,获取到的x轴,y轴坐标值都为0。
private static final float X_COOR = 0.0f;
private static final float Y_COOR = 0.0f;
private static final float X_COOR_0 = 100.0f;
private static final float Y_COOR_0 = -300.0f;
private static final float X_COOR_1 = 0.0f;
private static final float Y_COOR_1 = -600.0f;
private static final float LINE_X_COOR = -600.0f;
private static final float LINE_Y_COOR = -1476.0f;
private static final int ARRAY_LENGTH = 2;
@Override
public void onStart(Intent intent) {
super.onStart(intent);
super.setUIContent(ResourceTable.Layout_ability_main);
Path path = new Path();
path.moveTo(X_COOR, Y_COOR);
path.quadTo(X_COOR_0, Y_COOR_0, X_COOR_1, -Y_COOR_1);
path.rLineTo(LINE_X_COOR, LINE_Y_COOR);
PathMeasure mPathMeasure = new PathMeasure(path, false);
float length = mPathMeasure.getLength();
float[] mPathPositionGetter = new float[ARRAY_LENGTH];
float[] tangent = new float[ARRAY_LENGTH];
if (mPathMeasure.getPosTan(length, mPathPositionGetter, tangent)) {
float x1 = mPathPositionGetter[0];
float y1 = mPathPositionGetter[1];
HiLog.info(LABEL_LOG, "yLocation: ", y1);
}
}
32. 通过Component获取背景得到的Element如何转换成PixelMap(Java)(API 6)
以Text组件为例:
1. 在xml定义Text组件的背景属性为“resourses/graphic”下的文件时,即ohos:background_element="$graphic:background_ability_main",
在java层获取的Element对象是ShapeElement实例。
Text text = (Text) findComponentById(ResourceTable.Id_text_helloworld);
Element element = text.getBackgroundElement();
if (element instanceof ShapeElement) {
ShapeElement shapeElement = (ShapeElement) element;
}
2. 在xml定义Text组件的背景属性为“resourses/media”下的文件时,即ohos:background_element="$media:icon",
在java层获取的Element对象是PixelMapElement实例,这时可以获取到PixeMap。
Text text = (Text) findComponentById(ResourceTable.Id_text_helloworld);
Element element = text.getBackgroundElement();
if (element instanceof PixelMapElement) {
PixelMapElement pixelMapElement = (PixelMapElement) element;
PixelMap pixelMap = pixelMapElement.getPixelMap();
}
33. 如何实现隐藏stackLayout布局的Button组件(Java)(API 6)
请参考如下代码:
StackLayout testLayout = (StackLayout) findComponentById(ResourceTable.Id_test_layout);
Button button = (Button) findComponentById(ResourceTable.Id_btn);
testLayout.setTouchEventListener((component, touchEvent) -> {
switch (touchEvent.getAction()) {
case TouchEvent.PRIMARY_POINT_UP:
button.setVisibility(Component.HIDE);
break;
default:
break;
}
return true;
});
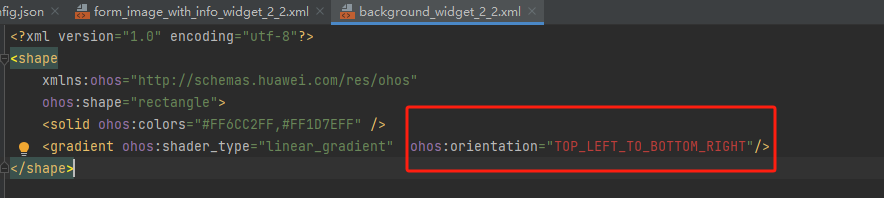
34. HarmonyOS如何通过shape绘制渐变色(Java)(API 6)
shape通过XML文件配置,生成简单的图形element,绘制渐变色。代码示例如下:
<?xml version="1.0" encoding="utf-8"?>
<shape xmlns:ohos="http://schemas.huawei.com/res/ohos"
ohos:shape="rectangle">
<solid
ohos:colors="#FF0000,#00FF00,#0000FF,#FFFFFF,#000000"/>
<corners
ohos:radius="40vp"/>
<gradient
ohos:shader_type="linear_gradient"
ohos:orientation="TOP_LEFT_TO_BOTTOM_RIGHT"/>
<bounds
ohos:left="10vp"
ohos:top="10vp"
ohos:right="190vp"
ohos:bottom="190vp"/>
</shape>
35. WebView中JAVA如何调用JS方法(Java)(API 6)
通过executeJs方法实现。如果是初始化执行的JS方法,需要在加载监听onPageLoaded里面执行。
webview.setWebAgent(new WebAgent() {
@Override
public void onPageLoaded(WebView webView, String url) {
super.onPageLoaded(webView, url);
// 通过executeJs调用JS方法
webview.executeJs("callFuncInWeb()", new AsyncCallback<String>() {
@Override
public void onReceive(String msg) {
// 在此确认返回结果
}
});
}
});
36. HarmonyOS中组件隐藏显示的属性是什么(Java)(API 6)
ohos:visibility="hide"
37. TabList中的Tab如何通过seticonElement方法设置图片资源文件(Java)(API 6)
setIconElement方法需要传入Element对象,将图片资源转为Element对象进行设置,参考如下代码:
private static Map<String, PixelMap> imageResourceCache = new TreeMap<>();
private static final String IMAGE_TYPE = "image/jpg";
private static final int BYTE_SIZE = 1024;
private static final int FLAG = -1;
@Override
public void onStart(Intent intent) {
super.onStart(intent);
super.setUIContent(ResourceTable.Layout_ability_main);
if (findComponentById(ResourceTable.Id_table_list) instanceof TabList) {
TabList tabList = (TabList) findComponentById(ResourceTable.Id_table_list);
TabList.Tab tab = tabList.new Tab(getContext());
tab.setText("Image");
tabList.addTab(tab);
setTabIcon(this,tab,ResourceTable.Media_shanghai);
}
}
/**
*
* @param slice AbilitySlice
* @param tab TabList.Tab
* @param resourceId 图片资源:例如resources/media目录下的icon文件,则为ResourceTable.Media_icon
*/
public static void setTabIcon(AbilitySlice slice, TabList.Tab tab, int resourceId) {
//创建PixelMapElement用于设置资源图片
Optional<PixelMap> pixelMap;
if (imageResourceCache.containsKey(String.valueOf(resourceId))) {
LogUtils.debug(TAG, "get pixelmap success from cache");
pixelMap = Optional.of(imageResourceCache.get(String.valueOf(resourceId)));
}else {
ResourceManager manager = slice.getResourceManager();
byte[] data = null;
try {
Resource resource = manager.getResource(resourceId);
data = readBytes(resource);
resource.close();
} catch (IOException | NotExistException e) {
LogUtils.error(TAG, "get pixelmap failed, read resource bytes failed, " );
pixelMap = Optional.empty();
}
ImageSource.SourceOptions srcOpts = new ImageSource.SourceOptions();
srcOpts.formatHint = IMAGE_TYPE;
ImageSource imageSource = ImageSource.create(data, srcOpts);
ImageSource.DecodingOptions decodingOpts = new ImageSource.DecodingOptions();
decodingOpts.desiredSize = new Size(0, 0);
decodingOpts.desiredRegion = new Rect(0, 0, 0, 0);
decodingOpts.desiredPixelFormat = PixelFormat.ARGB_8888;
PixelMap value = imageSource.createPixelmap(decodingOpts);
imageResourceCache.put(String.valueOf(resourceId), value);
pixelMap = Optional.ofNullable(value);
}
PixelMapElement bitmapDrawable = new PixelMapElement(pixelMap.get());
tab.setIconElement(bitmapDrawable);
}
private static byte[] readBytes(Resource resource) {
byte[] bytes = null;
ByteArrayOutputStream outputStream = null;
try {
byte[] array = new byte[BYTE_SIZE];
outputStream = new ByteArrayOutputStream(BYTE_SIZE);
int len = 0;
while ((len = resource.read(array)) != FLAG) {
outputStream.write(array, 0, len);
}
outputStream.flush();
bytes = outputStream.toByteArray();
outputStream.close();
resource.close();
} catch (IOException e) {
HiLog.error(LABEL_LOG,"IOException:",e.getMessage());
}
return bytes;
}
38. 对于Button、Checkbox、RadioButton有多种状态(如:pressed、checked、selected等)的控件,其不同状态对应的Element如何实现(Java)(API 6)
方案1:代码中使用StateElement方法设置状态。
方案2:在resource的graphic目录创建xml状态选择器checkbox_check_element.xml文件。
<state-container xmlns:ohos="http://schemas.huawei.com/res/ohos">
<item ohos:element="#19FF3B" ohos:state="component_state_pressed"/>
<item ohos:element="#DEFF26" ohos:state="component_state_hovered"/>
<item ohos:element="#79FFC4" ohos:state="component_state_focused"/>
<item ohos:element="#2026FF" ohos:state="component_state_selected"/>
<item ohos:element="#FF4029" ohos:state="component_state_disabled"/>
<item ohos:element="#12FF2D" ohos:state="component_state_checked"/>
<item ohos:element="#B1F8FF" ohos:state="component_state_empty"/>
</state-container>
在layout目录下XML文件中通过加载状态选择器设置状态。
<Checkbox
...
ohos:check_element="$graphic:checkbox_check_element" />
39. FA卡片如何动态更换图片(Java)(API 6)
使用componentProvider.setImagePixelMap方法改变图片,然后调用updateForm方法才能卡片,关于获取ComponentProvider对象及赋值可参考如下代码:
/**
* 获取ComponentProvider对象
*
* @param form 卡片信息(自定义类)
* @param context context
* @return ComponentProvider
*/
public static ComponentProvider getComponentProvider(Form form, Context context) {
int layoutId = ResourceTable.Layout_form_image_with_info_datecard_2_2;
if (form.getDimension() == 3) {
layoutId = ResourceTable.Layout_form_image_with_info_form_card_2_4;
}
ComponentProvider componentProvider = new ComponentProvider(layoutId, context);
setComponentProviderValue(componentProvider,context);
return componentProvider;
}
private static void setComponentProviderValue(ComponentProvider componentProvider,Context context) {
Calendar now = Calendar.getInstance();
int second = now.get(Calendar.SECOND);
int imgId = ResourceTable.Media_icon;
if(second%2 == 0){
imgId = ResourceTable.Media_step;
}
componentProvider.setImagePixelMap(ResourceTable.Id_img,getPixelMap(imgId,context));
}
/**
* 通过资源ID获取位图对象
**/
private static PixelMap getPixelMap(int drawableId,Context context) {
InputStream drawableInputStream = null;
try {
drawableInputStream = context.getResourceManager().getResource(drawableId);
ImageSource.SourceOptions sourceOptions = new ImageSource.SourceOptions();
sourceOptions.formatHint = "image/jpg";
ImageSource imageSource = ImageSource.create(drawableInputStream, sourceOptions);
ImageSource.DecodingOptions decodingOptions = new ImageSource.DecodingOptions();
decodingOptions.desiredSize = new Size(0, 0);
decodingOptions.desiredRegion = new Rect(0, 0, 0, 0);
decodingOptions.desiredPixelFormat = PixelFormat.ARGB_8888;
PixelMap pixelMap = imageSource.createPixelmap(decodingOptions);
return pixelMap;
} catch (Exception e) {
e.printStackTrace();
} finally {
try{
if (drawableInputStream != null){
drawableInputStream.close();
}
}catch (Exception e) {
e.printStackTrace();
}
}
return null;
}
40. 如何对CommonDialog的蒙层设置dim值(Java)(API 6)
请参考如下实现:
Optional<WindowManager.LayoutConfig> layoutConfig = commonDialog.getWindow().getLayoutConfig();
LogUtil.i(TAG, "layoutconfig dim before is " + layoutConfig.get().dim);
layoutConfig.get().dim = 0.2f;
commonDialog.show();
LogUtil.i(TAG, "layoutconfig dim after is " + layoutConfig.get().dim);
41. 如何使用WebView组件打开目标网址(Java)(API 6)
1.config.json中配置网络权限
"reqPermissions": [
...
{ "name": "ohos.permission.INTERNET" }
]
2.通过定制加载网址可在WebView中打开目标网址,参考代码如下:
MainAbilitySlice
public class MainAbilitySlice extends AbilitySlice {
private static final String EXAMPLE_URL = "https://www.huawei.com/cn/";
@Override
public void onStart(Intent intent) {
super.onStart(intent);
super.setUIContent(ResourceTable.Layout_ability_main);
WebView webView = new WebView(getContext());
webView.setWidth(ComponentContainer.LayoutConfig.MATCH_PARENT);
webView.setHeight(ComponentContainer.LayoutConfig.MATCH_PARENT);
webView.setWebAgent(new ExampleWebAgent()); // 定制网址加载方式
DirectionalLayout component = (DirectionalLayout) findComponentById(ResourceTable.Id_root_dir_layout);
component.addComponent(webView);
webView.load(EXAMPLE_URL);
}
/***
* web代理样例
*
* @since 2021-06-23
*/
private class ExampleWebAgent extends WebAgent {
@Override
public boolean isNeedLoadUrl(WebView webView, ResourceRequest request) {
Uri uri = request.getRequestUrl();
if (EXAMPLE_URL.equals(uri.getDecodedHost())) {
// 由WebView通过默认方式处理
return false;
}
// 增加开发者自定义逻辑
return super.isNeedLoadUrl(webView, request);
}
}
}
详细信息请参考官方文档:https://developer.harmonyos.com/cn/docs/documentation/doc-guides/ui-java-component-webview-0000001092715158
42. 如何解决TextField点击后被键盘遮挡的问题(Java)(API 6)
设置键盘的弹出模式为INPUT_ADJUST_PAN能够解决此问题,参考如下代码:
Window window = getWindow();
window.setInputPanelDisplayType(WindowManager.LayoutConfig.INPUT_ADJUST_PAN);
WindowManager.LayoutConfig请参考:https://developer.harmonyos.com/cn/docs/documentation/doc-references/windowmanager_layoutconfig-0000001054120018
43. 如何在XML布局文件中嵌套另一个XML布局文件(Java)(API 6)
使用include元素实现XML布局文件嵌套,参考如下示例,test.xml嵌套scroll_view.xml:
test.xml代码:
<DirectionalLayout xmlns:ohos="http://schemas.huawei.com/res/ohos"
ohos:height="match_parent"
ohos:width="match_parent"
ohos:orientation="vertical">
<DirectionalLayout
ohos:height="match_parent"
ohos:width="match_parent"
ohos:orientation="horizontal">
<include
ohos:height="match_content"
ohos:width="match_content"
ohos:layout_alignment="vertical_center"
ohos:layout="$layout:scroll_view"
/>
</DirectionalLayout>
</DirectionalLayout>
scroll_view.xml代码:
<?xml version="1.0" encoding="utf-8"?>
<DirectionalLayout
xmlns:ohos="http://schemas.huawei.com/res/ohos"
ohos:id="$+id:template_popup_layout"
ohos:height="match_parent"
ohos:width="match_parent"
ohos:orientation="vertical"
ohos:background_element="$graphic:background_ability_main">
<ScrollView
ohos:id="$+id:scrollview"
ohos:height="300vp"
ohos:width="300vp"
ohos:background_element="#FFDEAD"
ohos:top_margin="32vp"
ohos:bottom_padding="16vp"
ohos:layout_alignment="horizontal_center">
<DirectionalLayout
ohos:height="match_content"
ohos:width="match_content">
<Image
ohos:id="$+id:img_1"
ohos:width="300vp"
ohos:height="match_content"
ohos:top_margin="16vp"
ohos:image_src="$media:2"/>
<Image
ohos:id="$+id:img_2"
ohos:width="300vp"
ohos:height="match_content"
ohos:top_margin="16vp"
ohos:image_src="$media:2"/>
<Image
ohos:id="$+id:img_4"
ohos:width="300vp"
ohos:height="match_content"
ohos:top_margin="16vp"
ohos:image_src="$media:2"/>
<Image
ohos:id="$+id:img_5"
ohos:width="300vp"
ohos:height="match_content"
ohos:top_margin="16vp"
ohos:image_src="$media:2"/>
</DirectionalLayout>
</ScrollView>
</DirectionalLayout>
44. 如何自定义PopupDialog的位置(Java)(API 6)
使用PopupDialog.showOnCertainPosition(int gravity, int x, int y)在特定位置强制显示对话框。
gravity:指示对齐方式,例如左对齐、右对齐和垂直居中。参数设置请参考:TableLayout.Alignment中的静态常量。
x:指示对话框的X坐标位置(单位:像素点)。
y:指示对话框的Y坐标位置(单位:像素点)。
45. WebView中设置UserAgent(Java)(API 6)
使用setUserAgent(String userAgent)方法可以设置UserAgent。
46. 如何使用从资源文件中读取到的长度值设置组件的宽高(Java)(API 6)
以Text组件为例,请参考以下实现:
在resources\base\element目录下新建integer.json资源文件。
{
"integer":[
{
"name":"integer_1",
"value":100
},
{
"name":"text_size",
"value":50
}
]
}
ability_main.xml布局文件如下:
<?xml version="1.0" encoding="utf-8"?>
<DirectionalLayout
xmlns:ohos="http://schemas.huawei.com/res/ohos"
ohos:height="match_parent"
ohos:width="match_parent"
ohos:alignment="center"
ohos:orientation="vertical">
<Text
ohos:id="$+id:text"
ohos:height="match_content"
ohos:width="match_content"
ohos:layout_alignment="horizontal_center"
ohos:text="Hello HarmonyOS"
ohos:text_size="40vp"
/>
</DirectionalLayout>
MainAbilitySlice.java文件示例代码如下:
public class MainAbilitySlice extends AbilitySlice {
private static final HiLogLabel TAG = new HiLogLabel(3, 0xD001100, "MainAbilitySlice");
@Override
public void onStart(Intent intent) {
super.onStart(intent);
super.setUIContent(ResourceTable.Layout_ability_main);
try {
ohos.global.resource.ResourceManager resManager = this.getResourceManager();
int textSize = resManager.getElement(ResourceTable.Integer_text_size).getInteger(); // 获取资源文件中定义的size
Text text = (Text) findComponentById(ResourceTable.Id_text);
text.setTextSize(textSize);
} catch (IOException e) {
HiLog.error(TAG, "IOException");
} catch (NotExistException e) {
HiLog.error(TAG, "NotExistException");
} catch (WrongTypeException e) {
HiLog.error(TAG, "WrongTypeException");
}
}
@Override
public void onActive() {
super.onActive();
}
@Override
public void onForeground(Intent intent) {
super.onForeground(intent);
}
}
47. 如何动态设置Slider组件圆点滑块的大小(Java)(API 6)
请参考以下实现:
mProgressBar = (Slider) playerController.findComponentById(ResourceTable.Id_progress);
ShapeElement shapeElement = new ShapeElement();
shapeElement.setRgbColor(new RgbColor(THUMB_RED, THUMB_GREEN, THUMB_BLUE));
shapeElement.setBounds(0, 0, THUMB_WIDTH, THUMB_HEIGHT); //动态设置圆点大小
shapeElement.setCornerRadius(THUMB_RADIUS);
mProgressBar.setThumbElement(shapeElement);
48. 当组件宽高设置为match_parent或match_content时如何获取实际宽高(Java)(API 6)
当组件宽高设置为match_parent或match_content时,在界面渲染完成后才能获取其对应的宽高。
通过添加监听事件,在组件渲染完成后获取宽高,请参考以下代码实现:
@Override
public void onStart(Intent intent) {
super.onStart(intent);
super.setUIContent(ResourceTable.Layout_ability_main);
findComponentById(ResourceTable.Id_text_helloworld).setClickedListener(new Component.ClickedListener() {
@Override
public void onClick(Component component) {
int width = findComponentById(ResourceTable.Id_text_helloworld).getWidth();
int height = findComponentById(ResourceTable.Id_text_helloworld).getHeight();
}
});
}
49. ListContainer使用TableLayoutManager.setRowCount设置行数不起作用(Java)(API 6)
使用TableLayoutManager.setRowCount设置行数时,需要同时使用TableLayoutManager.setOrientation设置布局方向。
50. 如何在使用Font设置字体的同时设置斜体(Java)(API 6)
请参考如下代码实现:
Text text = new Text(this);
TextForm textForm = new TextForm();
textForm.setUnderline(true);
Font font = new Font.Builder("font")
.makeItalic(true)
.setWeight(Font.BOLD)
.build();
textForm.setTextFont(font);
RichText richText = new RichTextBuilder(textForm)
.addText("设置字体和斜体")
.build();
text.setRichText(richText);
51. 如何用一张比较小的图片重复铺满整个component背景(Java)(API 6)
Java UI中暂无直接设置对应样式的属性,结合PixelMap实现,请参考以下代码:
MainAbilitySlice:
public class MainAbilitySlice extends AbilitySlice {
private static final HiLogLabel LABEL_LOG =
new HiLogLabel(4, 0xD001100, "info");
@Override
public void onStart(Intent intent) {
super.onStart(intent);
super.setUIContent(ResourceTable.Layout_ability_main);
if (findComponentById(ResourceTable.Id_test_id) instanceof Text) {
Text text = (Text) findComponentById(ResourceTable.Id_test_id);
PixelMap imagePixelMap = getPixelMapByResPath(getContext(), "entry/resources/base/media/icon.png");
// 创建新位图,用于拼接图片
PixelMap pixelMap = getPixelMapByResPath(getContext(), "entry/resources/base/media/bg_image.png");
updateLogoImage(pixelMap, imagePixelMap);
text.setBackground(new PixelMapElement(pixelMap));
}
}
private void updateLogoImage(PixelMap pixelMap, PixelMap logoMap) {
// 在二维码位图的中间生成logo图标的位图
Canvas canvas = new Canvas(new Texture(pixelMap));
Paint paint = new Paint();
canvas.drawPixelMapHolder(new PixelMapHolder(logoMap), 0, 0, paint);
canvas.drawPixelMapHolder(new PixelMapHolder(logoMap), 0, 120, paint);
canvas.drawPixelMapHolder(new PixelMapHolder(logoMap), 0, 240, paint);
canvas.drawPixelMapHolder(new PixelMapHolder(logoMap), 0, 360, paint);
canvas.drawPixelMapHolder(new PixelMapHolder(logoMap), 0, 480, paint);
canvas.drawPixelMapHolder(new PixelMapHolder(logoMap), 0, 600, paint);
canvas.drawPixelMapHolder(new PixelMapHolder(logoMap), 120, 0, paint);
canvas.drawPixelMapHolder(new PixelMapHolder(logoMap), 120, 120, paint);
canvas.drawPixelMapHolder(new PixelMapHolder(logoMap), 120, 240, paint);
canvas.drawPixelMapHolder(new PixelMapHolder(logoMap), 120, 360, paint);
canvas.drawPixelMapHolder(new PixelMapHolder(logoMap), 120, 480, paint);
canvas.drawPixelMapHolder(new PixelMapHolder(logoMap), 120, 600, paint);
}
public static PixelMap getPixelMapByResPath(Context context, String src) {
PixelMap pixelMap = null;
InputStream resource = null;
try {
RawFileEntry rawFileEntry =
context.getResourceManager().getRawFileEntry(src);
resource = rawFileEntry.openRawFile();
ImageSource.SourceOptions opts = new ImageSource.SourceOptions();
ImageSource imageSource = ImageSource.create(resource, opts);
ImageSource.DecodingOptions decodingOpts =
new ImageSource.DecodingOptions();
pixelMap = imageSource.createPixelmap(decodingOpts);
resource.close();
} catch (IOException e) {
HiLog.info(LABEL_LOG, "error");
} finally {
try {
if (resource != null) {
resource.close();
}
} catch (IOException e) {
e.printStackTrace();
}
}
return pixelMap;
}
}
ability_main.xml:
<?xml version="1.0" encoding="utf-8"?>
<DirectionalLayout
xmlns:ohos="http://schemas.huawei.com/res/ohos"
ohos:height="match_parent"
ohos:orientation="vertical"
ohos:width="match_parent">
<Text
ohos:id="$+id:test_id"
ohos:height="120vp"
ohos:width="400vp"
ohos:text="测试背景"
ohos:text_color="red"
ohos:text_size="20vp"
ohos:text_alignment="center"/>
</DirectionalLayout>
52. 为什么TextField横、竖屏时输入样式差别很大(Java)(API 6)
TextField的width和height属性设置为match_parent时,会根据屏幕宽高自动适配,故横、竖屏时TextField尺寸会发生改变,样式差别很大。若设置固定大小,横竖屏切换不会改变尺寸。
53. 如何使应用不支持多窗口特性(Java)(API 6)
可以在config.json文件“module”节点下增加属性标识“resizeable”: false。
54. Fraction如何在子线程中更新UI(Java)(API 6)
通过EventHandler的方式更新UI,请参考如下代码实现:
public class MeFraction extends Fraction {
public void execute(Text text) {
EventHandler handler = new EventHandler(EventRunner.current()) {
@Override
protected void processEvent(InnerEvent event) {
super.processEvent(event);
if (event == null) {
return;
}
if (event.eventId == 100) {
text.setText("更新UI");
}
}
};
new Thread(() -> handler.sendEvent(InnerEvent.get(100))).start();
}
}
55. 在Fraction中如何使用getColor()获取Color.json文件定义的颜色值(Java)(API 6)
请参考如下代码实现:
public class MeFraction extends Fraction {
public int getColor(int colorId) {
try {
return getFractionAbility().getResourceManager().getElement(colorId).getColor();
} catch (Exception e) {
e.printStackTrace();
}
return 0;
}
}
56. 如何获取国际化语言资源并动态修改text的文本(Java)(API 6)
动态修改text的文本必须要在国际化资源文件中有定义,请参考如下代码实现:
public class CDETestAbilitySlice extends AbilitySlice {
private TextField textField;
@Override
public void onStart(Intent intent) {
super.onStart(intent);
super.setUIContent(ResourceTable.Layout_ability_cdetest);
if (findComponentById(ResourceTable.Id_local_text_field) instanceof TextField) {
textField = (TextField) findComponentById(ResourceTable.Id_local_text_field);
textField.setText(ResourceTable.String_cde_test);
}
findComponentById(ResourceTable.Id_local_button).setClickedListener(component -> {
if (textField.getText().equals(getString(ResourceTable.String_cde_test))) {
updateLocal(Locale.ENGLISH);
textField.setText(getString(ResourceTable.String_cde_test));
} else {
updateLocal(Locale.ENGLISH);
textField.setText(getString(ResourceTable.String_cde_test1));
}
});
findComponentById(ResourceTable.Id_change_button).setClickedListener(component -> {
if (textField.getText().equals(getString(ResourceTable.String_cde_test))) {
textField.setText(ResourceTable.String_cde_test1);
} else {
textField.setText(ResourceTable.String_cde_test);
}
});
}
private void updateLocal(Locale locale) {
ResourceManager resourceManager = getResourceManager();
Configuration configuration = resourceManager.getConfiguration();
configuration.setLocaleProfile(new LocaleProfile(new Locale[]{locale}));
resourceManager.updateConfiguration(configuration, resourceManager.getDeviceCapability());
}
}
xml布局文件:
<?xml version="1.0" encoding="utf-8"?>
<DirectionalLayout
xmlns:ohos="http://schemas.huawei.com/res/ohos"
ohos:height="match_content"
ohos:width="match_parent"
ohos:alignment="center"
ohos:orientation="vertical"><Button
ohos:id="$+id:local_button"
ohos:height="50vp"
ohos:width="150vp"
ohos:background_element="$graphic:background_ability_main"
ohos:left_padding="10vp"
ohos:right_padding="10vp"
ohos:text="国际化"
ohos:text_size="18vp"/><TextField
ohos:id="$+id:local_text_field"
ohos:height="50vp"
ohos:width="150vp"
ohos:text_size="18vp"/><Button
ohos:id="$+id:change_button"
ohos:height="50vp"
ohos:width="150vp"
ohos:background_element="$graphic:background_ability_main"
ohos:left_padding="10vp"
ohos:right_padding="10vp"
ohos:text="切换内容"
ohos:text_size="18vp"/>
</DirectionalLayout>
57. 进行动画开发,执行后没有效果(Java)(API 6)
动画效果必须绑定在一个事件上面,例如点击事件。
动画相关文档请参考:https://developer.harmonyos.com/cn/docs/documentation/doc-guides/ui-java-animation-0000000000580278
58. 如何通过代码使能横幅展示消息功能(Java)(API 6)
NotificationSlot的级别设置为LEVEL_HIGH。
NotificationSlot slot = new NotificationSlot("slot_001", "slot_default", NotificationSlot.LEVEL_HIGH);
59. 将UI操作切换到主线程(Java)(API 6)
所有的UI操作都需要在主线程操作,切换到主线程的方法如下:
context.getUITaskDispatcher().asyncDispatch(new Runnable() {
@Override
public void run() {
//UI操作
}
});
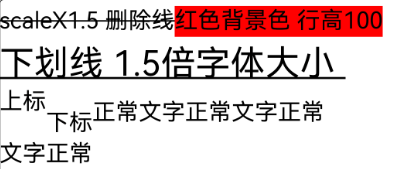
60. RichText 组件设置上标下标,背景色,前边距不生效(Java)(API 6)
背景色、前边距,上下标是在RichTextLayout里实现,直接调用richText接口不生效,使用方法如下:
text.addDrawTask((component, canvas) -> {
Paint tempPaint = new Paint();
tempPaint.setTextSize(100);
tempPaint.setColor(Color.RED);
tempPaint.setMultipleLine(true);
tempPaint.setTextAlign(TextAlignment.LEFT);
RichTextBuilder builder = new RichTextBuilder();
builder.mergeForm(new TextForm().setTextSize(60).setTextColor(Color.BLACK.getValue()));
builder.mergeForm(new TextForm().setScaleX(1.5f).setStrikethrough(true));
builder.addText("scaleX1.5 删除线");
builder.revertForm();
builder.mergeForm(new TextForm().setTextBackgroundColor(Color.RED.getValue()).setLineHeight(100));
builder.addText("红色背景色 行高100");
builder.revertForm();
builder.mergeForm(new TextForm().setUnderline(true).setRelativeTextSize(1.5f));
builder.addText("下划线 1.5倍字体大小\n");
builder.revertForm();
builder.mergeForm(new TextForm().setSuperscript(true));
builder.addText("上标");
builder.revertForm();
builder.mergeForm(new TextForm().setSubscript(true));
builder.addText("下标");
builder.revertForm();
builder.addText("正常文字正常文字正常\n文字正常");
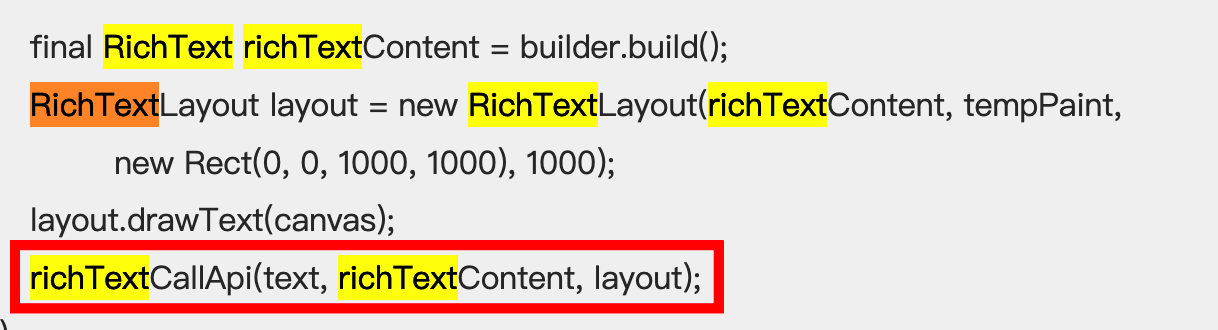
final RichText richTextContent = builder.build();
RichTextLayout layout = new RichTextLayout(richTextContent, tempPaint,
new Rect(0, 0, 1000, 1000), 1000);
layout.drawText(canvas);
richTextCallApi(text, richTextContent, layout);
});
效果如下:
61. 组件焦点发生变化时,ComponentTreeObserver.GlobalFocusUpdatedListener无法监听焦点变更事件(Java)(API 6)
触屏模式下和不可点击状态下,组件默认无法获焦。通过点击或者触摸监听组件获焦状态,需配置如下两个属性:
ohos:focusable_in_touch="true"
ohos:clickable="true"
62. Switch组件如何设置thumb高度超出track(Java)(API 6)
Switch testSwitch = (Switch) findComponentById(ResourceTable.Id_test_switch);
ShapeElement trackOn = new ShapeElement();
trackOn.setShape(ShapeElement.PATH);
trackOn.setRgbColor(RgbPalette.BLUE);
Path pathOn = new Path();
pathOn.addRoundRect(new RectFloat(0.0f, 10.0f, 200.0f, 90.0f), 40.0f, 40.0f, Path.Direction.CLOCK_WISE);
trackOn.setBounds(0, 0, 100, 200);
trackOn.setPath(pathOn);
ShapeElement trackOff = new ShapeElement();
trackOff.setShape(ShapeElement.PATH);
trackOff.setRgbColor(RgbPalette.GRAY);
Path pathOFF = new Path();
pathOFF.addRoundRect(new RectFloat(0.0f, 10.0f, 200.0f, 90.0f), 40.0f, 40.0f, Path.Direction.CLOCK_WISE);
trackOff.setBounds(0, 0, 100, 200);
trackOff.setPath(pathOFF);
StateElement stateElement = new StateElement();
stateElement.addState(new int[]{ComponentState.COMPONENT_STATE_CHECKED}, trackOn);
stateElement.addState(new int[]{ComponentState.COMPONENT_STATE_EMPTY}, trackOff);
testSwitch.setTrackElement(stateElement);
效果如下:

63. Image.setCornerRadii设置圆角不生效(Java)(API 6)
setCornerRadii 接口入参数组长度约束是8,否则不生效。
使用示例如下:
private float[] CORNERS = {30.0f, 30.0f, 0.0f, 0.0f, 30.0f, 30.0f, 0.0f, 0.0f};
image.setCornerRadii(CORNERS);
64. FA卡片如何动态更换图片(Java)(API 6)
使用setImageContent接口设置图片时,涉及到资源id,需要在/base/profile中新建remote.xml配置文件,内容如下:
<?xml version="1.0" encoding="UTF-8"?>
<remoteresources>
<item>$media:test</item>
</remoteresources>
其中,test是需要设置的图片名。
65. PopupDialog如何设置透明背景(Java)(API 6)
Popupdialog透明需同时设置Popupdialog的颜色透明以及内部自定义组件的透明,使用如下:
PopupDialog popupDialog = new PopupDialog(getContext(), mButton, 700,-2);
Text text = new Text(getContext());
text.setText("This is a transparent popupdialog.");
text.setTextSize(15, Text.TextSizeType.FP);
text.setTextColor(Color.WHITE);
text.setWidth(700);
text.setHeight(-2);
text.setMultipleLine(true);
text.setBackground(new ShapeElement() {{
setRgbColor(RgbPalette.TRANSPARENT); //设置popupDialog内部组件透明
}});
popupDialog.setCustomComponent(text);
popupDialog.setHasArrow(true);
popupDialog.setArrowSize(50,30);
popupDialog.setArrowOffset(100);
popupDialog.setMode(LayoutAlignment.LEFT | LayoutAlignment.BOTTOM);
popupDialog.setAutoClosable(true);
popupDialog.setBackColor(Color.TRANSPARENT); //设置popupDialog透明
popupDialog.show();
66. 如何设置字体,字体文件放在哪个路径(Java)(API 6)
字体文件(.ttf)放在resources/rawfile/data目录下,调用Text.setFont设置字体。
String path = "/system/fonts/xxx.ttf";
text.setFont(new Font.Builder(new File(path)).build());
67. ProgressBar的infinite设置为true时,无法设置进度条的背景色(Java)(API 6)
infinite和infinite_element属性需配合使用,配置 infinite=true后需配置infinite_element,该场景下无法设置背景色。
68. 在模拟器运行app之后,onTouchEvent不能监听到UP事件,另外一个Down事件可以监听(Java)(API 6)
组件是否分发touch事件依赖于onForwardTouch接口的返回值,是否消费touch事件依赖于onTouchEvent接口的返回值。
以root+parent+child布局为例,touch事件分发、消费流程如下:
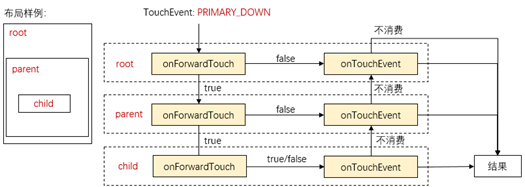
一个完整的touch动作包含Down、Move、Up三部分。Down作为touch事件的第一部分,只要上层root/parent组件不拦截touch事件分发(默认不拦截),child组件都会收到Down事件;child组件是否响应Up事件依赖其onTouchEvent接口的返回值,返回true表示自身消费本次事件,返回false表示自身不消费本次事件。
相关接口:
public void setForwardTouchListener(ForwardTouchListener listener) //注册是否分发事件的回调
public void setTouchEventListener(TouchEventListener listener) //注册是否消费事件的回调
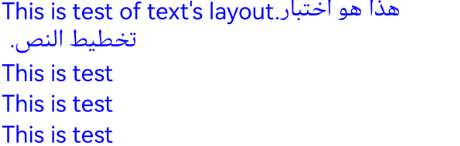
69. SimpleTextLayout如何使用,文本里包含\n无法换行(Java)(API 6)
private static final String TEXT_SOURCE = "This is test of text's layout.هذا هو اختبار تخطيط النص.\n" +
"This is test\nThis is test\n" +
"This is test";
Text text = (Text)findComponentById(ResourceTable.Id_text_for_layout);
text.addDrawTask(new Component.DrawTask() {
@Override
public void onDraw(Component component, Canvas canvas) {
Paint tempPaint = new Paint();
tempPaint.setTextSize(60);
tempPaint.setColor(Color.BLUE);
tempPaint.setMultipleLine(true);
Path highlight = new Path();
highlight.moveTo(0, 0);
highlight.lineTo(0, 1000);
highlight.lineTo(1080, 1000);
highlight.lineTo(1080, 0);
Paint highlightPaint = new Paint();
highlightPaint.setColor(Color.TRANSPARENT);
Rect rect = new Rect(0, 0, 1080, 1000);
SimpleTextLayout layout = new SimpleTextLayout(TEXT_SOURCE, tempPaint, rect, 1080);
layout.drawHighlight(canvas, highlight, highlightPaint, 0);
layout.drawText(canvas);
}
});
效果如下:
70. TextField组件底部对齐时,输入内容后组件会被软键盘遮挡(Java)(API 6)
调用Component的setLayoutRefreshedListener监听,在回调中通过getWindowVisibleRect获取可视区域,根据可视区域算出textField需要移动的距离,使textField不被软件盘遮挡。
使用示例:
Component componentByIdLayout = findComponentById(ResourceTable.Id_directionlayout);
if (componentByIdLayout instanceof DirectionalLayout) {
mLayout = (DirectionalLayout) componentByIdLayout;
}
Component componentByIdTextField = findComponentById(ResourceTable.Id_text_field);
if (componentByIdTextField instanceof TextField) {
mTextField = (TextField) componentByIdTextField;
}
mLayout.setLayoutRefreshedListener(new Component.LayoutRefreshedListener() {
@Override
public void onRefreshed(Component component) {
Rect rect = new Rect();
boolean result = mTextField.getWindowVisibleRect(rect);
if (!result) {
HiLog.error(TAG, "getWindowVisibleRect fail");
return;
}
if (mTempVisibleHeight == 0 || mTempVisibleHeight == rect.bottom) {
mTempVisibleHeight = rect.bottom;
return;
}
int inputHeight = mTempVisibleHeight - rect.bottom;
mTempVisibleHeight = rect.bottom;
if (inputHeight > 0) {
mTextField.setText("input method height is " + inputHeight);
mTextField.setTranslationY(0 - inputHeight);
}
if (inputHeight < 0) {
mTextField.setText("input method height is 0");
mTextField.setTranslationY(0);
}
}
});
71. CommonDialog层与底层之间的阴影层如何变透明(Java)(API 6)
dialog.show();
Optional<WindowManager.LayoutConfig> configOpt = dialog.getWindow().getLayoutConfig();
configOpt.ifPresent(config -> {
config.dim = 0.0f;
dialog.getWindow().setLayoutConfig(config);
});
在dialog.show()后配置对应window的属性即可。








- 为了保障您的信息安全,请勿上传您的敏感个人信息(如您的密码等信息)和您的敏感资产信息(如关键源代码、签名私钥、调试安装包、业务日志等信息),且您需自行承担由此产生的信息泄露等安全风险。
- 如您发布的内容为转载内容,请注明内容来源。
我要发帖子


 苏公安网备 32011402010933号