














 FFFFF
#HarmonyOS征文# 如何开发一个用户高度可以自定义的服务卡片
如何开发一个可以有高度用户自定义的精美卡片?
- 为什么需要自定义?
现在的手机大多数人都会使用主题,这导致背景可能会与卡片十分的不融合,影响美观,卡片自定义可以让用户自定义卡片使之与自己的主题背景相融合。
如果可以,也可以使用卡片背景模糊来融合(不过我按着官方文档来弄没有实现过模糊的效果........希望有大佬可以出个详细教程)
由于论坛插图片比较难搞,位置很难调,所以以下只会提供设计思路,没有图片展示,这是一个十分简单的例子,也不太需要图片的参考。
- 首先,先简单的了解如何创建一个卡片,并且更新卡片上的数据,下面将以JS框架的纪念日卡片为例。
①创建好一个JS工程后,在main->java->com.xxx.xxx文件夹上右键,选择New->Ability->Empty(JS) Ability,起名为 cardTest ,下面的JS Component Name同样起名cardTest。
随后就可以在js的文件夹下看到一个新的文件夹 js->cardTest。
在config.json文件中在“js”中找到 "name":“cardTest”的属性,在这里添加“type”:“form”属性,说明这个js页面是卡片。
{
"pages": [
"pages/index/index"
],
"name": "cardTest",
"window": {
"autoDesignWidth": true//选择true可以适应多种卡片尺寸
},
"type": "form"
}
并且在config.json的上端”Ability”属性内找到你要添加卡片的Ability,找到"name": "com.example.test.cardTest",在这个{}内添加卡片的一些配置参数:
"forms": [
{
"name": "cardTest",
"isDefault": true,
"description": "",
"colorMode": "auto",
"supportDimensions": [
"1*2",
"2*2",
"2*4",
"4*4"
],
"defaultDimension": "2*4",
"updateEnabled": true,
"scheduledUpdateTime": "00:00",//此处为定时刷新时间,设为0点
"updateDuration": 1,
"type": "JS",
"jsComponentName": "cardTest"//此处需要填写上面创建的js页面的名称
}
],
"formsEnabled": true
至此一个卡片的前期准备工作完成了。
②为卡片设计界面
打开js->cardTest->pages->index.hml,同时点开右侧的preview,供实时查看卡片设计情况,点开2*4作为参考
同时打开index.css(可以在上方的文件名中右键选择Split Vertically将页面分为左右,方便设计噢)
初步设计卡片外观:
-----hml文件-------------------------------
<div class="container">
<text class="title">{{days}}</text>
</div>
-------------------------------------------
-----css文件-------------------------------
.container {
flex-direction: column;
border-radius: 16px;
padding: 20px;
}
.title{
width: 100%;
height: 100%;
text-align: center;
font-size: 50px;
border-radius: 16px;
background-color: #f0f0f0;
}
--------------------------------------------
---------js文件-----------------------------
export default {
data: {
days: "360天"
},
}
---------------------------------------------
注:如果卡片想要在外圈有描边效果,border-radius要开16px噢,因为卡片默认有16px的圆角
这样子就可以得到一个不错的初步效果。
③更新卡片信息
打开main->java->com.xxx.xxx->cardTest.java文件
在class内部重写以下函数
protected ProviderFormInfo onCreateForm(Intent intent) {
//通过这个函数可以设置卡片在被用户拉起创建的时候显示什么信息
ZSONObject data = new ZSONObject();
data.put("days","100天");
FormBindingData formBindingData = new FormBindingData(data);
ProviderFormInfo formInfo = new ProviderFormInfo();
formInfo.setJsBindingData(formBindingData);
return formInfo;
}
@Override
protected void onDeleteForm(long formId) {
// 删除卡片实例数据
super.onDeleteForm(formId);
}
@Override
protected void onUpdateForm(long formId) {
// 若卡片支持定时更新/定点更新/卡片使用方主动请求更新功能,则提供方需要覆写该方法以支持数据更新
super.onUpdateForm(formId);
}
@Override
protected void onTriggerFormEvent(long formId, String message) {
// 若卡片支持触发事件,则需要覆写该方法并实现对事件的触发
super.onTriggerFormEvent(formId, message);
}
完成此步,即可让卡片在拉起时显示100天的信息,但是作为一个记录纪念日的卡片,我们必须知道起始日期是什么时候,因此必须添加设置页面,供用户设置起始时间。
④添加设置页面
和第一步通过同样的操作新建一个Ability,命名为cardSetting,js component name同名。
同时需要将这个ability关联到该卡片的设置页面上,我们需要在config.json刚才添加的ability内的卡片属性增加
"formConfigAbility": "ability://cardSetting"
这时在页面的卡片上长按,便会出现编辑的按钮,点击编辑以后如何打开我们想要的设置页面呢
打开java->com.xxx.xxx->cardSetting.java文件
在onStart的函数内在super.onStart(intent);前添加代码
formID = intent.getLongParam(AbilitySlice.PARAM_FORM_IDENTITY_KEY,-1);
if(formID != -1){
IntentParams intentParams = new IntentParams();
intentParams.setParam("formID",formID);
// …从数据库读取卡片的起始日期
Preferences store = (new DatabaseHelper(getApplicationContext())).getPreferences(“cardInfo”);
String startDate = Store.getString(String.valueOf(formID),””);
intentParams.setParam(“startDate”,startDate);
setInstanceName("cardSetting");
setPageParams("pages/index/index",intentParams);
}
这里当js的设置页面打开后,页面便能在data获取到formID和startDate两个量。可以在该页面添加picker组件来修改起始日期,修改完成需要保存日期,这个日期不能使用js的API来进行保存,这样用java是读取不到的,故我们需要利用FA调用PA的能力来进行信息的存储,这一部分可以查看官方文档
这里提供大致示例仅供参考:会的可以直接跳到后面噢
public class StorageAbility extends Ability {
public static final int GET = 0;
public static final int SET = 1;
public static final int DELETE = 2;
public static final int CLEAR = 3;
private static final HiLogLabel LABEL_LOG = new HiLogLabel(3, 0xD001100, "--StorageInfo--");
private static DatabaseHelper databaseHelper = null;
private final StorageRemote remote = new StorageRemote();
private static boolean prepared = false;
@Override
protected void onStart(Intent intent) {
reDatabase();
HiLog.info(LABEL_LOG,"storage build success");
prepared = true;
super.onStart(intent);
}
private void reDatabase(){
if(databaseHelper == null)
databaseHelper = new DatabaseHelper(getApplicationContext());
}
@Override
public IRemoteObject onConnect(Intent intent) {
super.onConnect(intent);
return remote.asObject();
}
public Map<String, Object> StorageEvent(int code,ZSONObject data){
Map<String, Object> result = new HashMap<String, Object>();
reDatabase();
try {
Preferences store = databaseHelper.getPreferences("Storage");
switch (code) {
case GET: {
if (prepared) {
HiLog.info(LABEL_LOG, "-----code GET-----");
HiLog.info(LABEL_LOG,
"-----key:" + data.getString("key") + "-----");
result.put("code", 0);
String value = store.getString(data.getString("key"),data.getString("ifNone"));
HiLog.info(LABEL_LOG,"-----value:" + value + "-----");
result.put("data", value);
} else {
result.put("code", 1);
result.put("data", "dataBase is not prepared");
}
break;
}
case SET: {
if (prepared) {
HiLog.info(LABEL_LOG, "-----code SET-----");
HiLog.info(LABEL_LOG,
"-----key:" + data.getString("key") + "-----");
HiLog.info(LABEL_LOG,
"-----value:" + data.getString("value") + "-----");
result.put("code", 0);
store.putString(data.getString("key"),
data.getString("value"));
if (store.flushSync()) {
result.put("code", 0);
} else {
result.put("code", 1);
result.put("data", "set error");
HiLog.info(LABEL_LOG,
"-----error:set fail" + "-----");
}
} else {
result.put("code", 1);
result.put("data", "dataBase is not prepared");
}
break;
}
case DELETE: {
if (prepared) {
HiLog.info(LABEL_LOG, "-----code DELETE-----");
HiLog.info(LABEL_LOG,
"-----key:" + data.getString("key") + "-----");
store.delete(data.getString("key"));
if (store.flushSync()) {
result.put("code", 0);
} else {
result.put("code", 1);
result.put("data", "delete error");
}
} else {
result.put("code", 1);
result.put("data", "dataBase is not prepared");
}
break;
}
case CLEAR: {
if (prepared) {
HiLog.info(LABEL_LOG, "-----code CLEAR-----");
HiLog.info(LABEL_LOG,
"-----key:" + data.getString("key") + "-----");
store.clear();
if (store.flushSync()) {
result.put("code", 0);
} else {
result.put("code", 1);
result.put("data", "clear error");
}
} else {
result.put("code", 1);
result.put("data", "dataBase is not prepared");
}
break;
}
default:
result.put("code", 1);
result.put("data", "wrong code");
}
}catch (Exception e){
e.printStackTrace();
HiLog.error(LABEL_LOG,e.toString());
}
return result;
}
class StorageRemote extends RemoteObject implements IRemoteBroker {
StorageRemote(){
super("Storage_Service");
}
@Override
public boolean onRemoteRequest(int code, MessageParcel data, MessageParcel reply, MessageOption option) {
Map<String, Object> result;
ZSONObject datas = ZSONObject.stringToZSON(data.readString());
HiLog.info(LABEL_LOG,datas.toString());
try {
HiLog.info(LABEL_LOG, "-----Storage ing-----");
result = StorageEvent(code,datas);
HiLog.info(LABEL_LOG, "---writeBack-----");
HiLog.info(LABEL_LOG, ZSONObject.toZSONString(result));
reply.writeString(ZSONObject.toZSONString(result));
}catch (Exception e){
HiLog.error(LABEL_LOG,e.toString());
return false;
}
return true;
}
@Override
public IRemoteObject asObject() {
return this;
}
}
@Override
public void onDisconnect(Intent intent) {
}
}
在js方调用:
callFunction: function(code,data){
return FeatureAbility.callAbility({
bundleName : 'com.example.course',
abilityName : 'com.example.course.StorageAbility',
messageCode : code,
data : data,
abilityType : 0,
syncOption : 0
})
}
setStorage: async function(key,value){
let res = await this.callFunction(SET,{
key: key,
value: value
})
return JSON.parse(res)
}
调用setStorage函数即可进行存储。
这样便完成了卡片起始日期的设置以及存储,那如何更新卡片的日期数据呢。
⑤更新卡片数据
我们需要重写cardTest.java文件里的onUpdateForm(long formID)函数
@Override
protected void onUpdateForm(long formId) {
// 若卡片支持定时更新/定点更新/卡片使用方主动请求更新功能,则提供方需要覆写该方法以支持数据更新
super.onUpdateForm(formId);
DatabaseHelper db = new DatabaseHelper(getApplicationContext());
Preferences store = db.getPreferences(“cardInfo”);
String startDate = store.get(String.valueOf(formID),””);
ZSONObject data = new ZSONObject();
if(startDate == “”){
data.put(“days”:”请设置日期”);
}else{
LocalDate start = LocalDate.parse(startDate);
LocalDate now = LocalDate.now();
long days = now.toEpochDay() - start.toEpochDay();
data.put(“days”,days + “天”);
}
FormBindingData bindingData = new FormBindingData(data);
try {
updateForm(formId,bindingData);
} catch (FormException e) {
e.printStackTrace();
}
}
这样卡片就会在每天的零点执行更新程序,更新卡片上的日期天数了,到此,卡片的基本功能已经完成。
2.如何自定义卡片外观呢?
回到最初的问题,在创建完一个完整的卡片后,需要设计它的自定义功能了,自定义的大致思路是打开设置界面,可以设置卡片属性,当卡片更新时同时更新样式属性,这样就可以完成自定义的功能了。下面以自定义卡片底色为例:
①修改卡片hml的设置,将hml文件修改为:
<div class="container">
<text class="title">{{days}} style="background-color:{{set['底色']}}"</text>
</div>
同时将js文件中加入set属性
data: {
days: "360天",
set:{
'底色':'#f0f0f0'
}
},
这样我们只需要将传入的set更改,就可以更改卡片的底色了。
②修改设置页面以设置底色:
仅需要添加相关组件修改颜色,同时在修改完后以同样的方式存储这个数据,在更新卡片时读取该数据并传入卡片中即可。
但目前JS没有colorPicker的组件,想要实现颜色的选择还是有一定难度,需要自己手写一个颜色选择组件噢,要求不高的话可以直接用文本框如何颜色16进制值。
3.为了可以让属性的设置更加轻松简便,添加属性快速,可以自己定义属性的类型,比如说有整数型、颜色型、布尔型等等,打开设置页面的时候可以直接根据这些类型进行页面的绘制。
set:{
‘底色’:{
value: ‘#f0f0f0’,
type: ‘color’
},
‘字体大小’:{
value: 20,
type: ‘number’,
min: 5,
max: 50
}
}
在设置页面的js文件中,可以在onInit这样写:
onInit(){
this.keys = Object.keys(this.set)
}
在hml页面可以这样写:
<div>
<div for=”{{key in keys}}”>
<div if=”{{set[key].type == ‘color’}}”>
...
</div>
<div if=”{{set[key].type == ‘number’}}”>
...
</div>
<div if=”{{set[key].type == ‘boolean’}}”>
...
</div>
</div>
</div>
这样,就可以快速地为卡片添加更多的修改属性,让用户可以有更高的自由度。
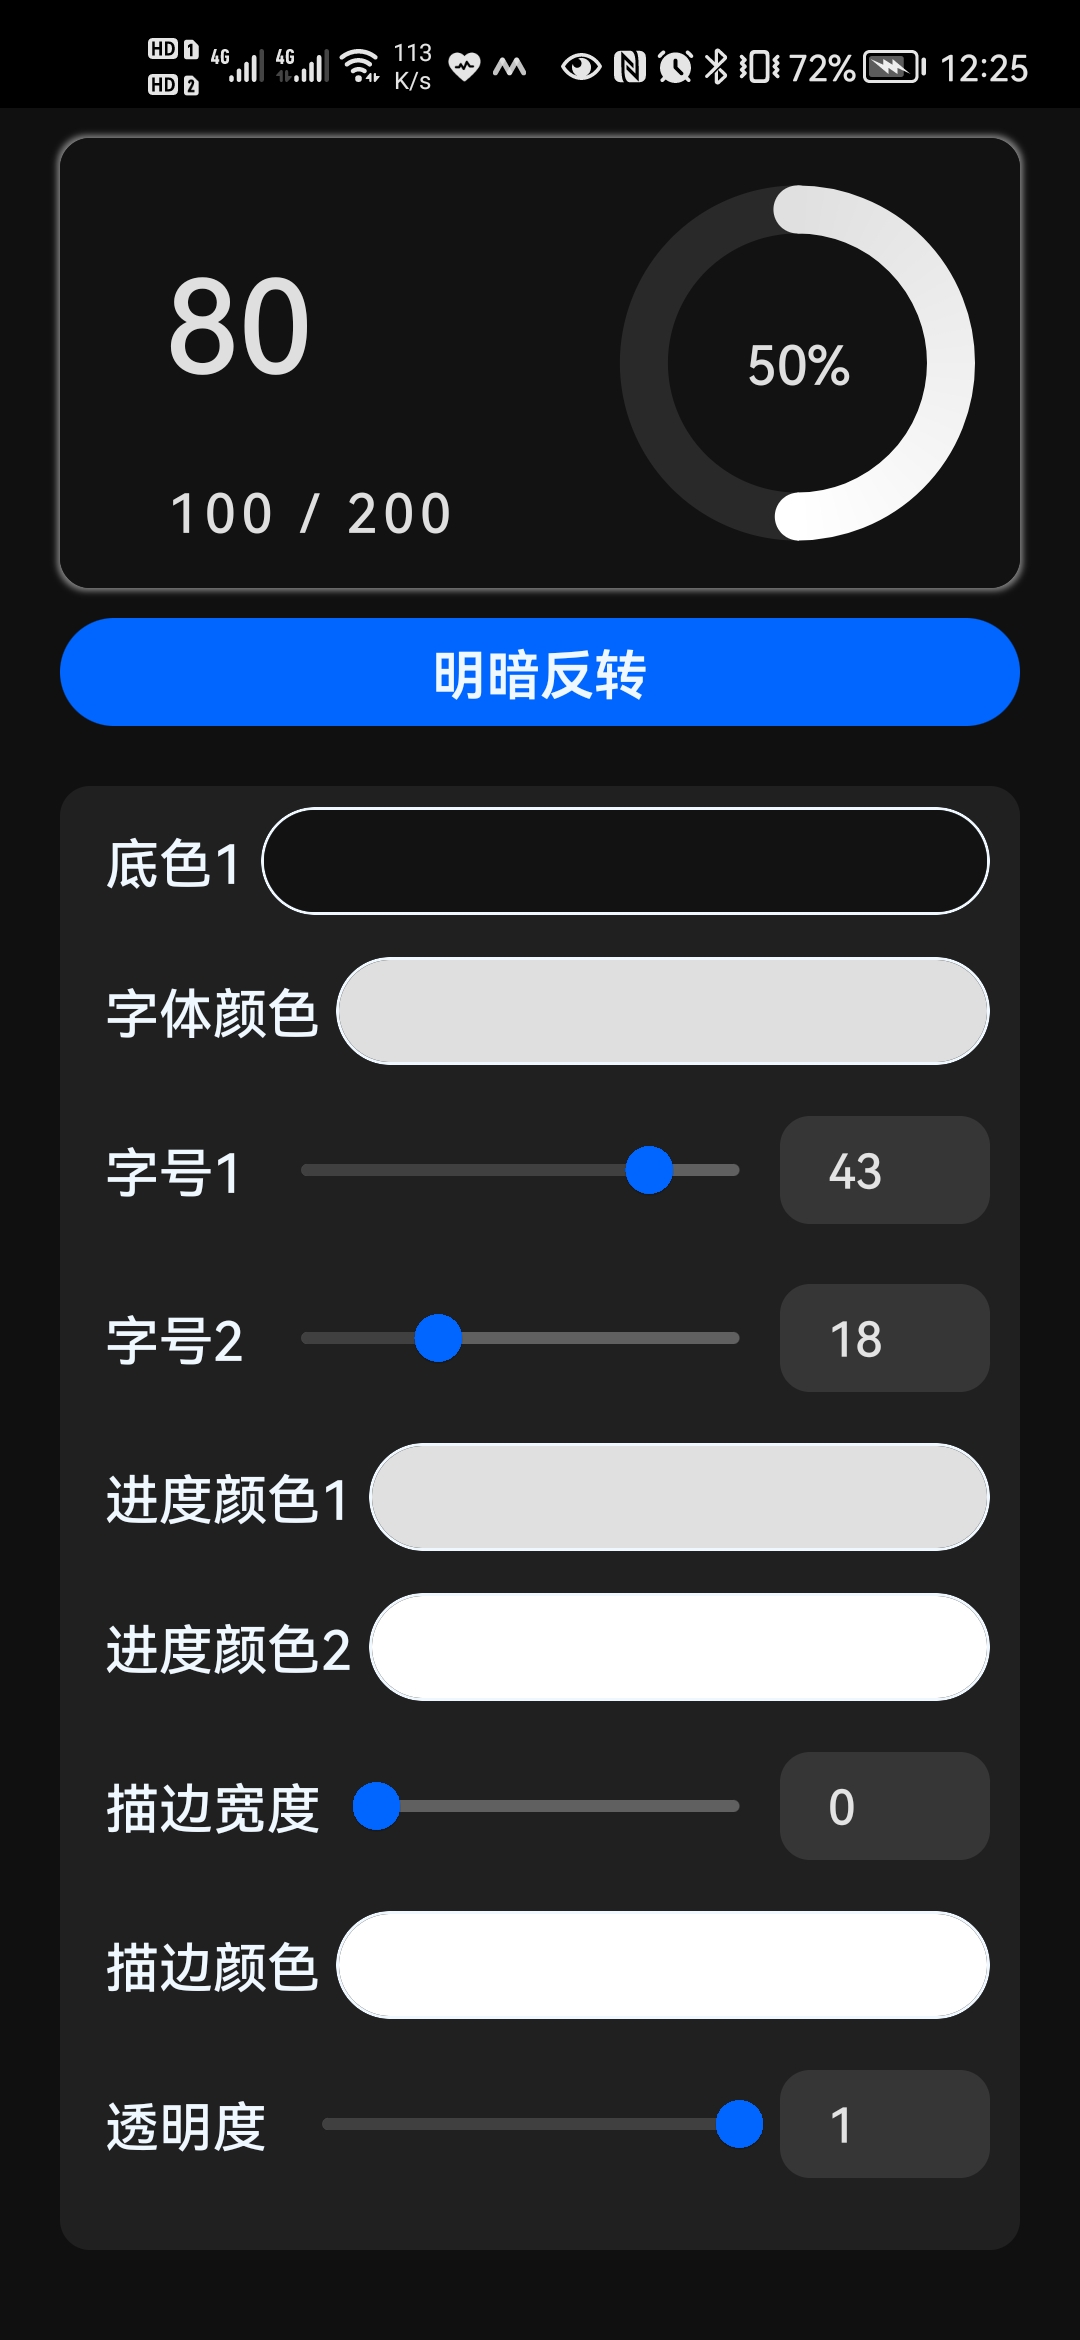
最后简单展示一下完整的成果





- 为了保障您的信息安全,请勿上传您的敏感个人信息(如您的密码等信息)和您的敏感资产信息(如关键源代码、签名私钥、调试安装包、业务日志等信息),且您需自行承担由此产生的信息泄露等安全风险。
- 如您发布的内容为转载内容,请注明内容来源。
我要提问题


 苏公安网备 32011402010933号