












 大大
#HarmonyOS技术训练营第四期#基于HarmonyOS ArkUI 3.0 框架的渐变色盘
效果图
| 预览器 | 模拟器 |
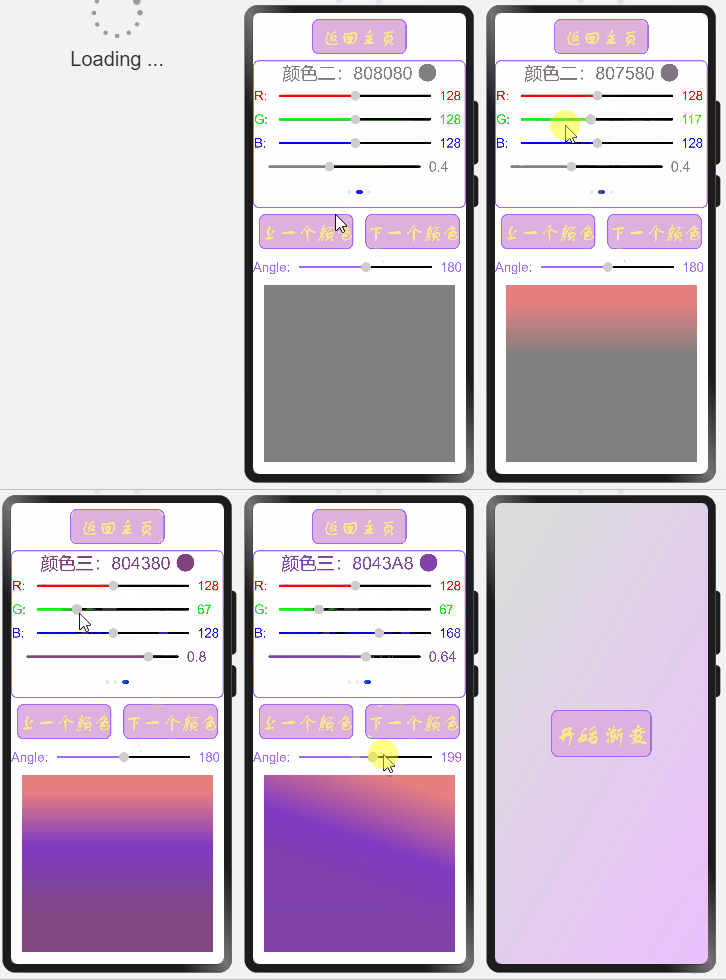 | 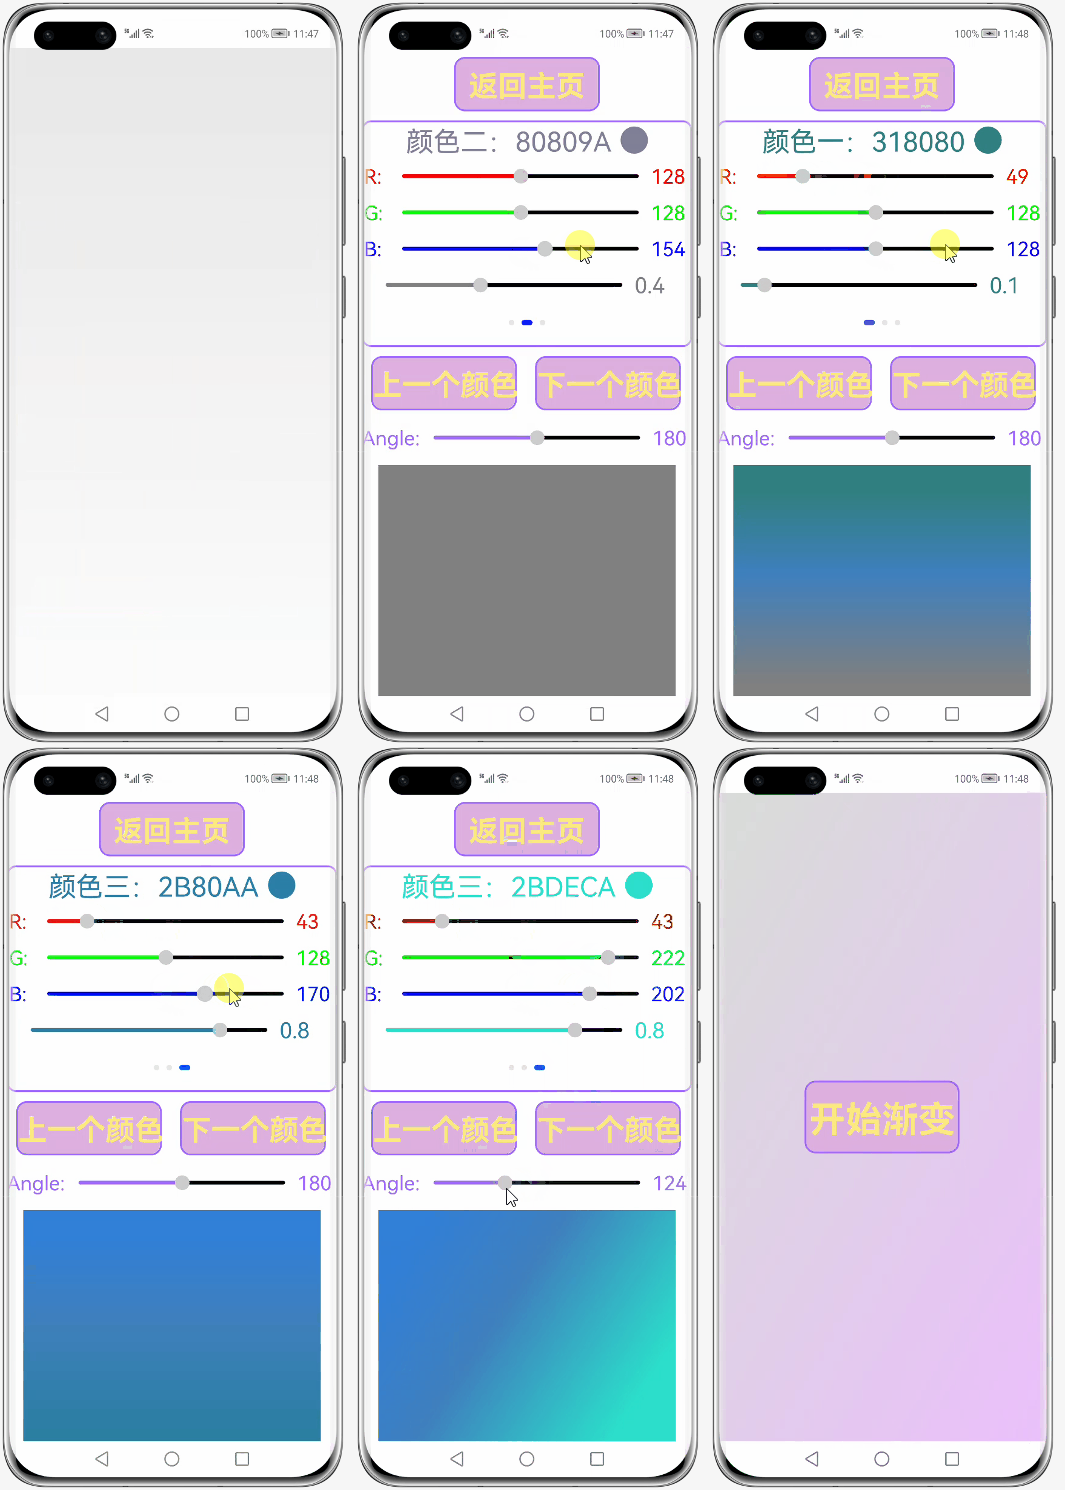 |
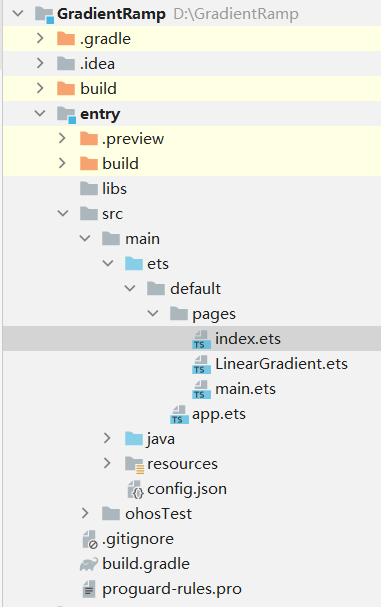
代码文件结构
正文
一、创建一个空白的工程
1. 安装和配置DevEco Studio 3
2. 创建一个Empty Phone应用
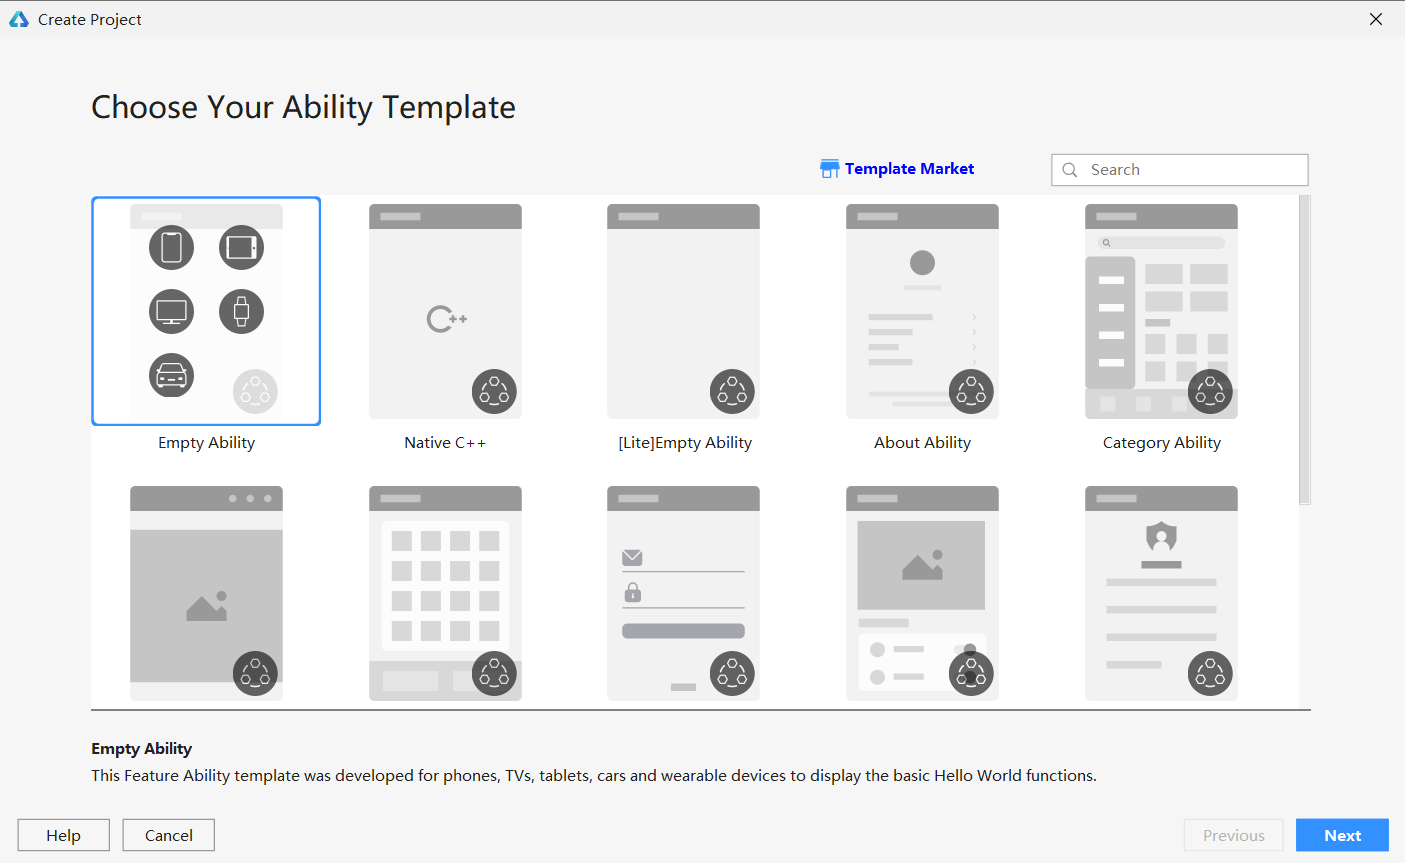
DevEco Studio下载安装成功后,打开DevEco Studio,点击左上角的File,点击New,再选择New Project,选择Empty Ability选项,点击Next按钮。
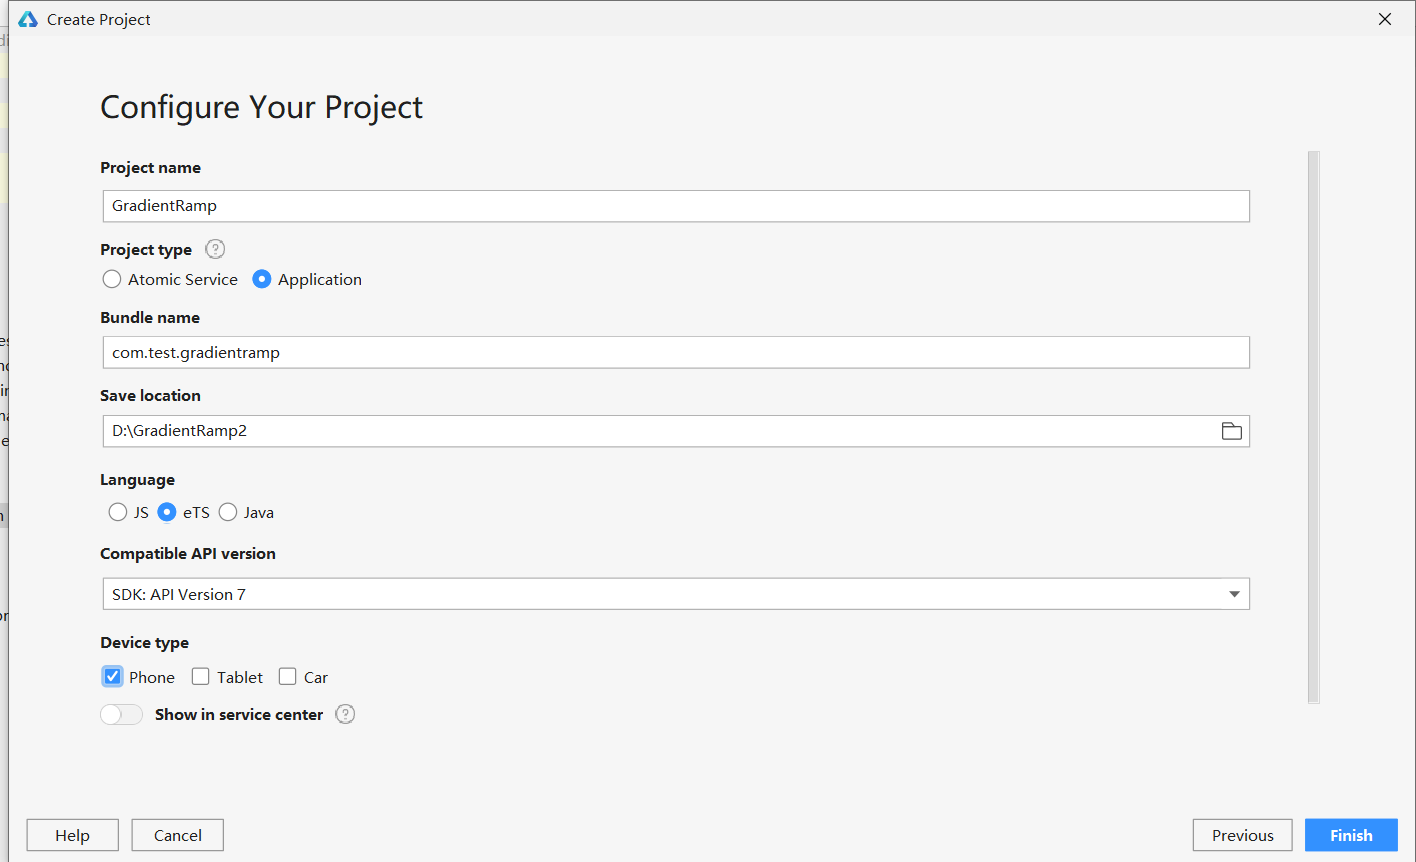
将文件命名为GradientRamp(文件名不能出现中文或者特殊字符,否则将无法成功创建项目文件),Project Type勾选Application,选择保存路径,Language勾选eTS,选择API7,设备勾选Phone,最后点击Finish按钮。
3. 准备工作
在entry>src>main>config.json文件中最下方"launchType": "standard"的后面添加以下代码,这样就可以实现去掉应用上方的标签栏了。
config.json最下方部分代码:
"metaData": { "customizeData": [ { "name": "hwc-theme", "value": "androidhwext:style/Theme.Emui.Light.NoTitleBar", "extra": "" } ] }二、编写代码
1. 欢迎页面
index.ets:
// @ts-nocheckimport router from '@system.router'import Curves from '@ohos.curves'@Entry@Componentstruct Index { @State private opacityValue: number = 0 @State private scaleValue: number = 0 private curve1 = Curves.cubicBezier(0.1, 0.2, 1, 1) build() { Flex({ justifyContent: FlexAlign.Center, alignItems: ItemAlign.Center, direction: FlexDirection.Column }) { Column(){ Text('渐变色盘') .fontColor('#cf6cc9') .fontSize(60) .fontStyle(FontStyle.Italic) .fontWeight(700) .fontFamily('华文行楷') .textAlign(TextAlign.Center) Text('一个懂你的调色盘') .fontColor('#ee609c') .fontSize(40) .fontStyle(FontStyle.Italic) .fontWeight(600) .fontFamily('华文行楷') .textAlign(TextAlign.Center) .margin({ top: -5 }) } .scale({ x: this.scaleValue, y: this.scaleValue }) .opacity(this.opacityValue) .onAppear(() => { animateTo({ duration: 2000, curve: this.curve1, delay: 100, onFinish: () => { setTimeout(() => { router.replace({ uri: "pages/main" }) }, 1500); } }, () => { this.opacityValue = 1 this.scaleValue = 1 }) }) } .width('100%') .height('100%') .linearGradient({ angle: 120, colors: [['#d9ded8', 0], ["#ebc0fd", 1]] }) }}2. 主页面
main.ets:
import router from '@system.router'@Entry@Componentstruct Main { private swiperController: SwiperController = new SwiperController() build() { Flex({ justifyContent: FlexAlign.Center, alignItems: ItemAlign.Center, direction: FlexDirection.Column }) { Button({ type: ButtonType.Normal, stateEffect: true }){ Text('开始渐变') .fontFamily('方正舒体') .fontSize(40) .fontWeight(800) .fontColor('#FDEB82') } .width(170) .height(80) .borderRadius(10) .borderColor('#A168FE') .borderWidth(2) .backgroundColor('#DEB0DF') .onClick(() => { router.push({ uri: 'pages/LinearGradient' }) }) } .width('100%') .height('100%') .linearGradient({ angle: 120, colors: [['#d9ded8', 0], ["#ebc0fd", 1]] }) }}3. 渐变页面
LinearGradient.ets:
import router from '@system.router'@Entry@Componentstruct LinearGradient { private swiperController: SwiperController = new SwiperController() @State Color1:string = '#808080' @State Point1:number = 0.1 @State Color2:string = '#808080' @State Point2:number = 0.4 @State Color3:string = '#808080' @State Point3:number = 0.8 @State Angle:number = 180 build() { Column() { Button({ type: ButtonType.Normal, stateEffect: true }){ setText({ str:'返回主页'}) } .width(160) .height(60) .borderRadius(10) .borderColor('#A168FE') .borderWidth(2) .backgroundColor('#DEB0DF') .margin(10) .onClick(() => { router.back() }) Swiper(this.swiperController) { colorPlate({ strColor:$Color1, str:'一', inSetValue:$Point1 }) colorPlate({ strColor:$Color2, str:'二', inSetValue:$Point2 }) colorPlate({ strColor:$Color3, str:'三', inSetValue:$Point3 }) } .width('100%') .height(250) .borderRadius(10) .borderColor('#A168FE') .borderWidth(2) .index(1) .autoPlay(false) .indicator(true) .loop(false) Row(){ Button({ type: ButtonType.Normal, stateEffect: true }){ setText({ str:'上一个颜色'}) } .width(160) .height(60) .borderRadius(10) .borderColor('#A168FE') .borderWidth(2) .backgroundColor('#DEB0DF') .margin(10) .onClick(() => { this.swiperController.showPrevious() }) Button({ type: ButtonType.Normal, stateEffect: true }){ setText({ str:'下一个颜色'}) } .width(160) .height(60) .borderRadius(10) .borderColor('#A168FE') .borderWidth(2) .backgroundColor('#DEB0DF') .margin(10) .onClick(() => { this.swiperController.showNext() }) } .width('100%') Row(){ Text('Angle:') .width('18%') .fontSize(22) .fontColor('#A168FE') Slider({ value: this.Angle, min: 0, max: 359, step: 1, style: SliderStyle.OutSet }) .width('70%') .blockColor(0xCCCCCC) .trackColor(Color.Black) .selectedColor('#A168FE') .showSteps(false) .showTips(false) .onChange((value: number) => { this.Angle = value }) Text(this.Angle.toFixed(0)) .width('12%') .fontSize(22) .fontColor('#A168FE') } Flex(){ } .width('90%') .height(300) .margin(10) .linearGradient({ angle: this.Angle, colors: [[this.Color1, this.Point1], [this.Color2, this.Point2], [this.Color3, this.Point3]] }) } .width('100%') .height('100%') }}@Componentstruct colorPlate{ private str: number = 1 @Link inSetValue: number @State strR: string = '80' @State strG: string = '80' @State strB: string = '80' @Link strColor: string aboutToAppear(){ setInterval(() => { this.strColor = '#' + this.strR + this.strG + this.strB }, 200) } build(){ Column(){ Row(){ Text('颜色' + this.str + ':' + this.strR + this.strG + this.strB) .fontSize(30) .fontColor('#' + this.strR + this.strG + this.strB) Circle({ width: 30, height: 30}) .fill('#' + this.strR + this.strG + this.strB) .margin({ left:10 }) } setSlider({ str:$strR, text:'R', color:'#FF0000' }) setSlider({ str:$strG, text:'G', color:'#00FF00' }) setSlider({ str:$strB, text:'B', color:'#0000FF' }) Row(){ Slider({ value: this.inSetValue * 100, min: 0, max: 100, step: 1, style: SliderStyle.OutSet }) .width('80%') .blockColor(0xCCCCCC) .trackColor(Color.Black) .selectedColor(this.strColor) .showSteps(false) .showTips(false) .onChange((value: number) => { this.inSetValue = parseFloat(value == 0 ? '0' : value == 100 ? '1' : '0.' + value) }) Text(this.inSetValue.toString()) .width('14%') .fontSize(24) .fontColor(this.strColor) } } }}@Componentstruct setSlider{ @State inSetValue: number = 128 @Link str: string private text: string private color: string sexadecimal(number){ let num1 = Math.floor(number / 16) let num2 = Math.ceil(number - num1 * 16) return this.takeCharacter(num1) + this.takeCharacter(num2) } takeCharacter(number){ if(number < 10){ return number.toString() }else if(number == 10){ return 'A' }else if(number == 11){ return 'B' }else if(number == 12){ return 'C' }else if(number == 13){ return 'D' }else if(number == 14){ return 'E' }else{ return 'F' } } build(){ Row(){ Text(this.text + ':') .width('8%') .fontSize(22) .fontColor(this.color) Slider({ value: this.inSetValue, min: 0, max: 255, step: 1, style: SliderStyle.OutSet }) .width('80%') .blockColor(0xCCCCCC) .trackColor(Color.Black) .selectedColor(this.color) .showSteps(false) .showTips(false) .onChange((value: number) => { this.inSetValue = value this.str = this.sexadecimal(value) }) Text(this.inSetValue.toFixed(0)) .width('12%') .fontSize(22) .fontColor(this.color) } }}@Componentstruct setText{ private str: string build(){ Text(this.str) .fontFamily('方正舒体') .fontSize(32) .fontWeight(800) .fontColor('#FDEB82') }}写在最后
HarmonyOS ArkUI 3.0的将简开发真的太方便了,爱了爱了(ㅎ-ㅎ;)←

3

1

1


浏览1062 发布于2021-12-07 03:59未知归属地
全部评论
最多点赞
最新发布
最早发布


写回答
所见即所得编辑器, editor1
工具栏
新增插入模板功能
一键使用模板,快速填写内容,轻松发帖~
知道了
- 为了保障您的信息安全,请勿上传您的敏感个人信息(如您的密码等信息)和您的敏感资产信息(如关键源代码、签名私钥、调试安装包、业务日志等信息),且您需自行承担由此产生的信息泄露等安全风险。
- 如您发布的内容为转载内容,请注明内容来源。
我要发帖子
目录 收起
效果图
代码文件结构
正文
一、创建一个空白的工程
1. 安装和配置DevEco Studio 3
2. 创建一个Empty Phone应用
3. 准备工作
二、编写代码
1. 欢迎页面
2. 主页面
3. 渐变页面
写在最后
了解社区公约,与您携手共创和谐专业的开发者社区。


 苏公安网备 32011402010933号