

1. Introduction
Overview
Cloud Functions enables serverless computing. It provides the Function as a Service (FaaS) capabilities to simplify app development and O&M so your functions can be implemented more easily and your service capabilities can be built more quickly.
- Cloud Functions provides an efficient and reliable framework for developing and running functions. It frees you from complex traditional development and O&M of apps. Server configuration and management, code deployment, load balancing, autoscaling, and high reliability assurance are now streamlined. You only need to focus on service logic and function code to build reliable and scalable serverless apps.
- As the core of serverless computing, Cloud Functions also works with other cloud services like building blocks to implement your service logic.
What You Will Create
In this codelab, you can build a function that can use Cloud Functions to interact with your app. The process includes:
- Create a function of calculating a Chinese zodiac sign by year in AppGallery Connect.
- Test the new function.
- Call the new function in your app, and enter a year to obtain the corresponding Chinese zodiac sign.
What You Will Learn
- Create a function as a cloud function in AppGallery Connect.
- Test the new function.
- Integrate the Cloud Functions SDK and call the cloud function locally.
2. What You Will Need
Development Environment and Skill Requirements
- Android Studio
- Skills in Java and Android Studio
Device Requirements
A device running Android 4.2 or a later version
3. Integration Preparations
To integrate Cloud Functions of AppGallery Connect, you must complete the following preparations:
- Create an app in AppGallery Connect.
- Create an Android Studio project.
- Add the app package name.
- Add the AppGallery Connect plugin and Maven repository address.
- Synchronize the project.
4. Configuring the Development Environment
Enabling the Service
- Sign in to AppGallery Connect and click My projects.
- Click the project for which you need to enable Cloud Functions.
- Go to Build > Cloud Functions.
- Click Enable now in the upper right corner of the page displayed.
Integrating the SDK
If you are using Android Studio, you can integrate the SDK into your Android Studio project by using the Maven repository before development.
- Click My projects in AppGallery Connect, click your project card, and select your app for which you want to enable Cloud Functions from the drop-down list on the top.
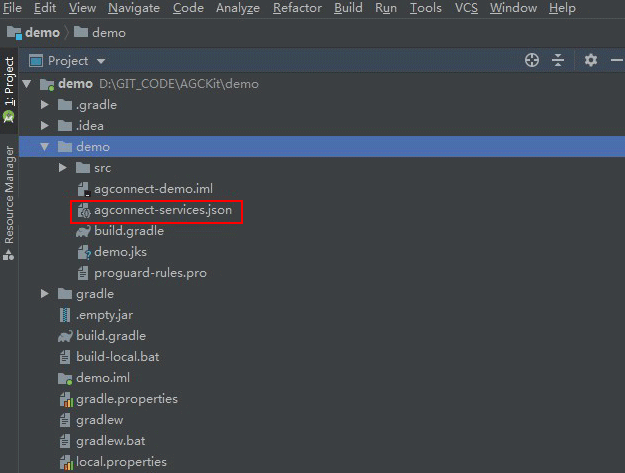
- Go to Project settings > General information. In the App information area, click agconnect-services.json to download it.
- Copy the agconnect-services.json file to your app's module directory.
- Open the app-level build.gradle file and add the following code to integrate the Cloud Functions SDK:
// Configure the following address: apply plugin:'com.huawei.agconnect' dependencies { // Configure the following address: implementation 'com.huawei.agconnect:agconnect-function:1.4.1.300' } - Click Sync Now to synchronize the configuration.

5. Configuring a Cloud Function
Creating a Cloud Function
- Click + New Function. The Create Function page is displayed.

- Define the function on the page that is displayed.
- Enter a name and description of the function.
- Set Code Entry Type to Edit code inline.
- Enter the deployment information. You can retain the default values.
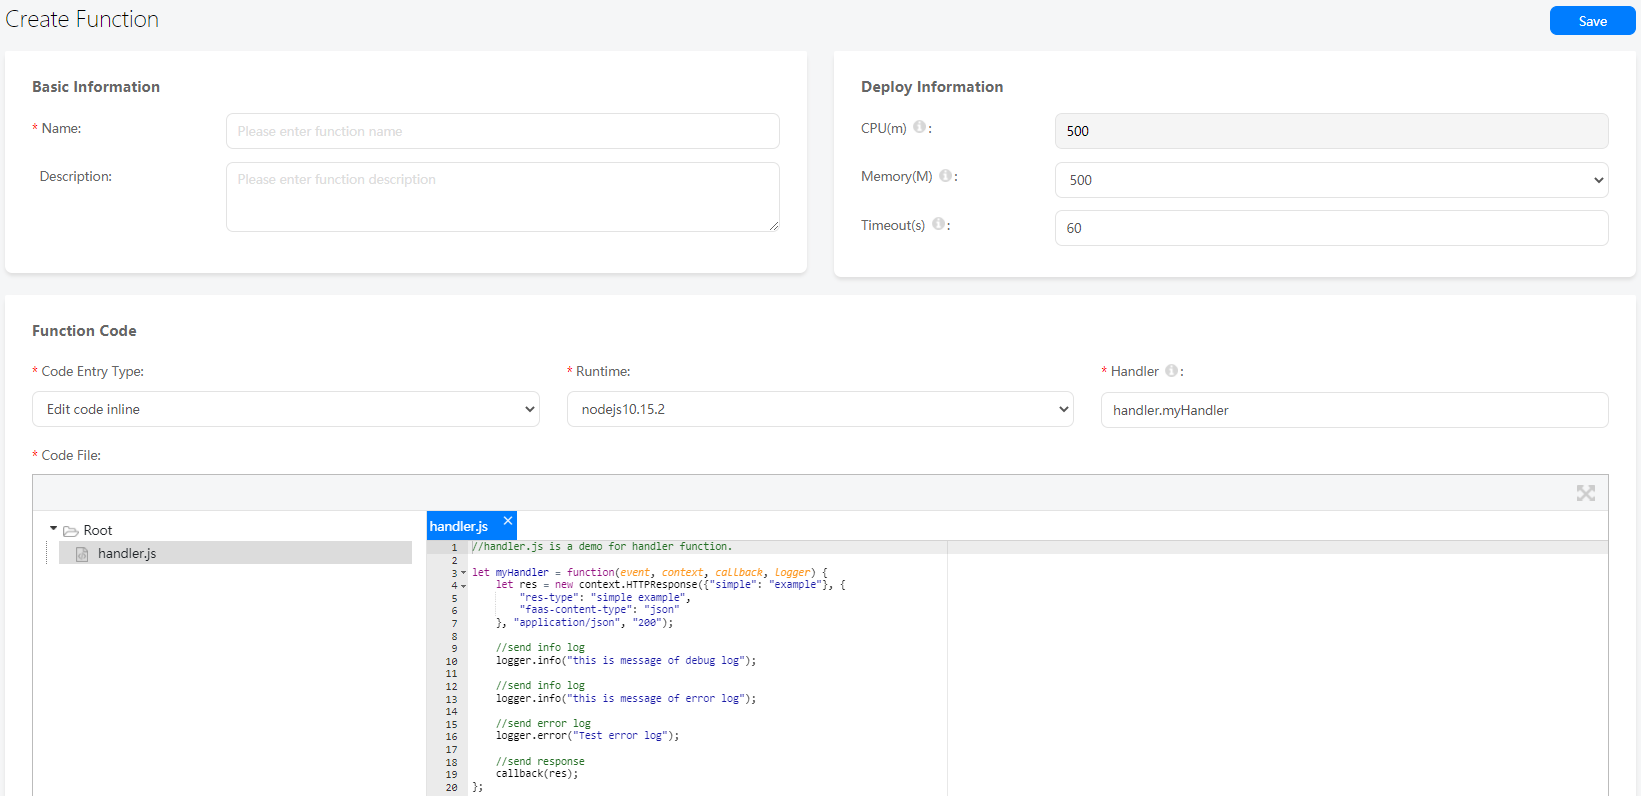
- Add the following code to the handler.js file:
let myHandler = function(event, context, callback, logger)

{
    var res = new context.HTTPResponse(context.env, {
            "res-type":"context.env",
        "faas-content-type":"json",
},"application/json", "200");

    var year;
    if (event.body) {
        var _body = JSON.parse(event.body);
        year = _body.year;
    } else {
        year = event.year;
    }

    var body = {
            result:''
};

    body.result = animal(year);
    res.body = body;
    context.callback(res);

    function animal (inputYear) {
        var resultString;
    if (!isNumber(inputYear)) {
        resultString = "input is not a number";
    } else {
        var remainder = inputYear % 12;
        switch (remainder) {
            case 0:
                resultString = "Monkey";
                break;
            case 1:
                resultString = "Chicken";
                break;
            case 2:
                resultString = "Dog";
                break;
            case 3:
                resultString = "Pig";
                break;
            case 4:
                resultString = "Mouse";
                break;
            case 5:
                resultString = "Cow";
                break;
            case 6:
                resultString = "Tiger";
                break;
            case 7:
                resultString = "Rabbit";
                break;
            case 8:
                resultString = "Dragon";
                break;
            case 9:
                resultString = "Snake";
                break;
            case 10:
                resultString = "Horse";
                break;
            case 11:
                resultString = "Sheep";
                break;
            default:
                resultString = "No symbolic animal";
        }
    }
    return resultString;
}

    function isNumber (input) {
    if (parseInt(input).toString == "NaN") {
        return false;
    } else {
        return true;
    }
}
}

;

module.exports.myHandler =myHandler;
Testing a Function
- You can go to the function test page in either of the following ways:
- Click Test in the upper right corner of the function details page.
- Choose Functions from the navigation tree on the left and click the Test tab.
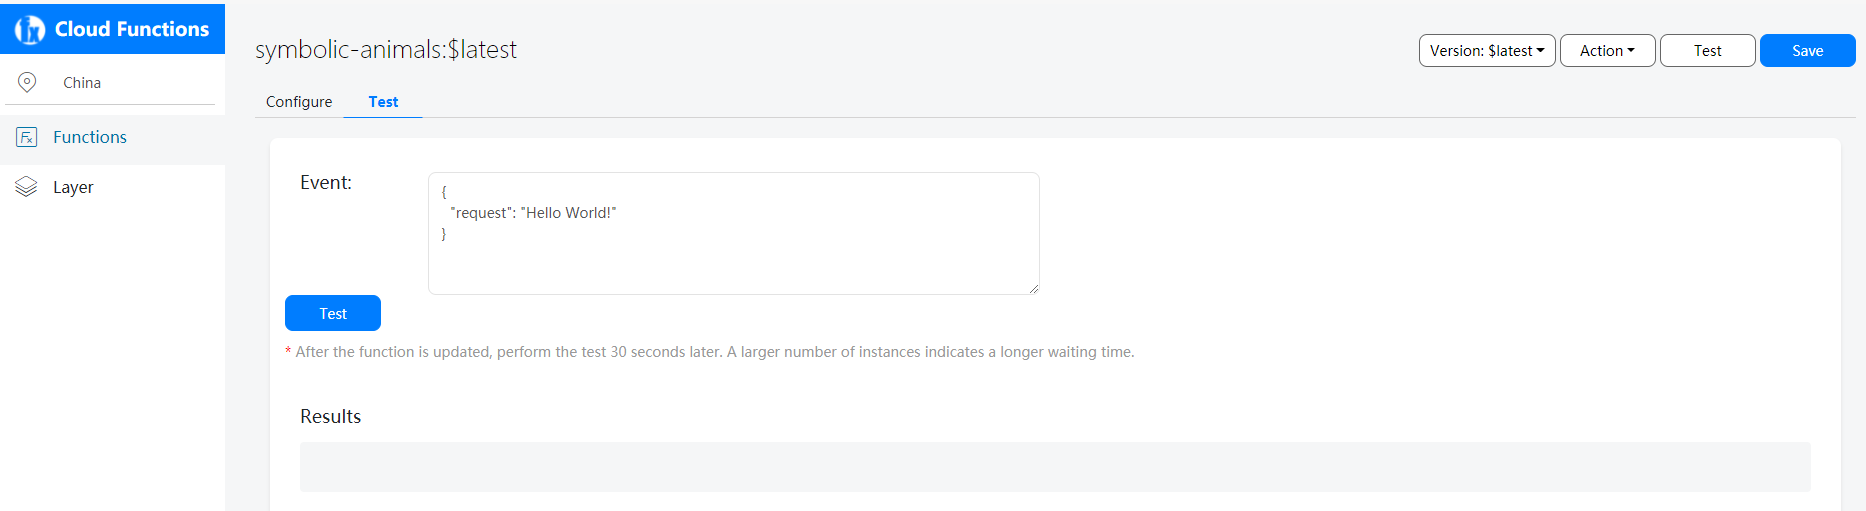
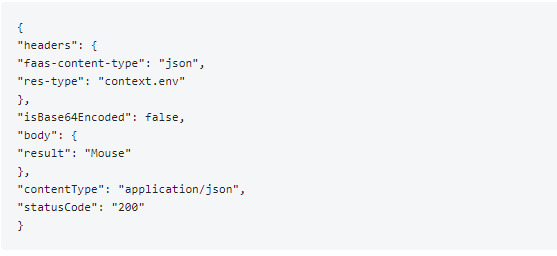
- Select the created function and its version, and enter the following code in the event:
{ "year": 2020 } - Check whether the command output is the same as the following.
Adding a Trigger
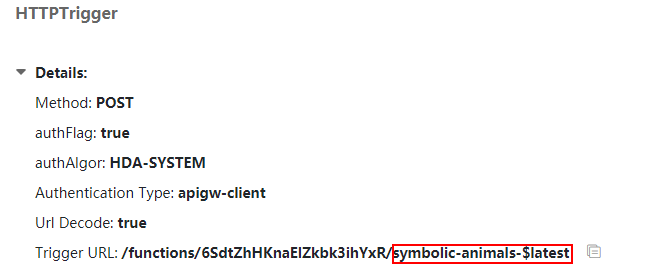
- On the function list page, click the name of a function to go to its details page. If you click the function alias, the page for configuring the function alias will be displayed.
- Click Add Trigger on the Configure tab page. The page for adding a trigger is displayed.
- In the config trigger area, complete the configurations. Here, HTTP and POST are selected for Trigger Type and Method, respectively.
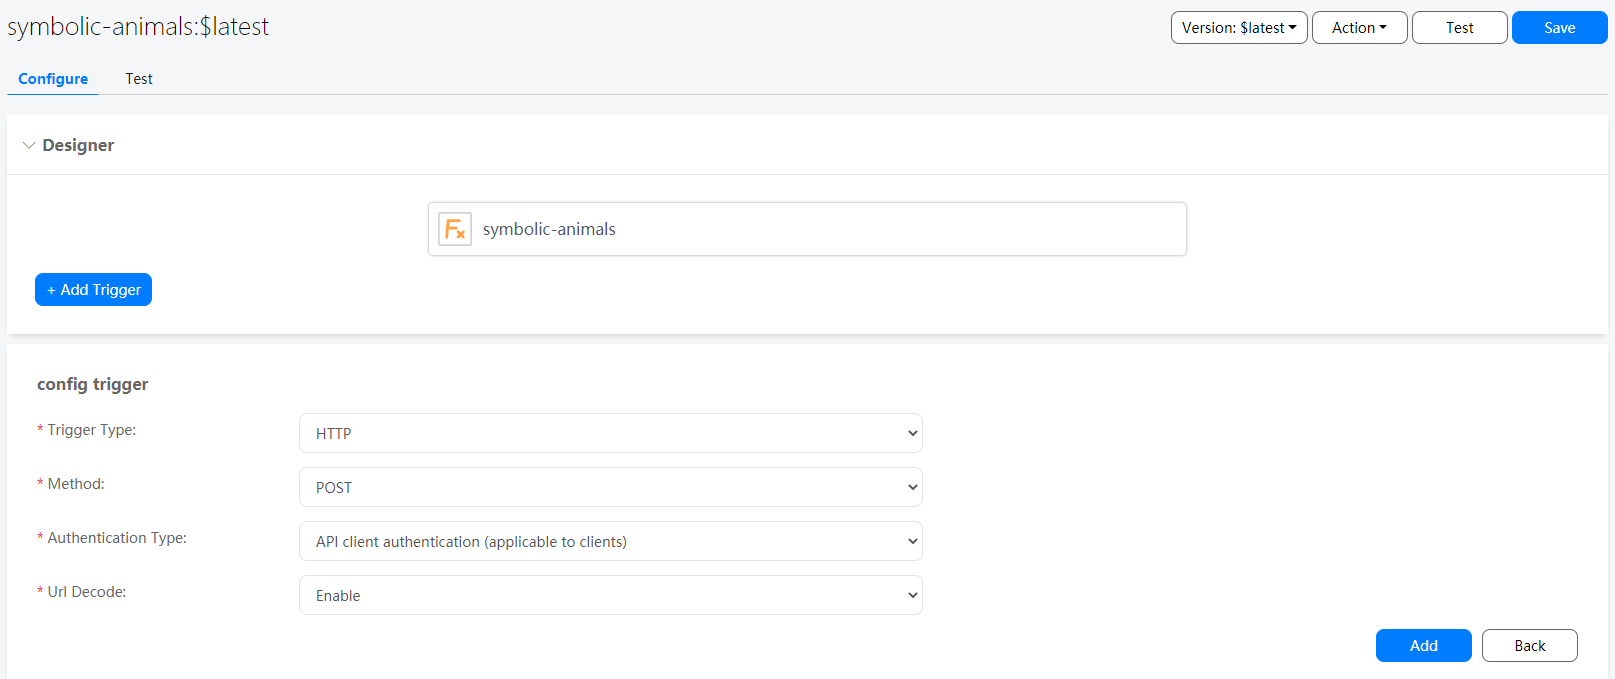
- Click Add and then Save.
- Save the suffix following the last slash (/) in the value of Trigger URL in the Details area as the trigger identifier of future app requests.
Parameter | Description |
Trigger Type | Set this parameter to HTTP. |
Method | Set this parameter to POST. Currently, HTTP triggers support only the POST method. |
Authentication Type | Authentication type of the HTTP trigger to be added.API client authentication (applicable to clients): gateway authentication on the client, which is applicable only to function calls from the app client.API client authentication (applicable to Server): gateway authentication on the cloud, which is applicable only to function calls from the app server. |
Url Decode | Indicates whether to use the URLDecoder to decode the body of an HTTP-based function trigger request whose contentType is application/x-www-form-urlencoded and forward the decoded result to the function. |
6. Designing the UI
In this codelab, you can create a layout shown in the following figure in your Android Studio project. On the page, a result returned by a cloud function is displayed after a year is entered.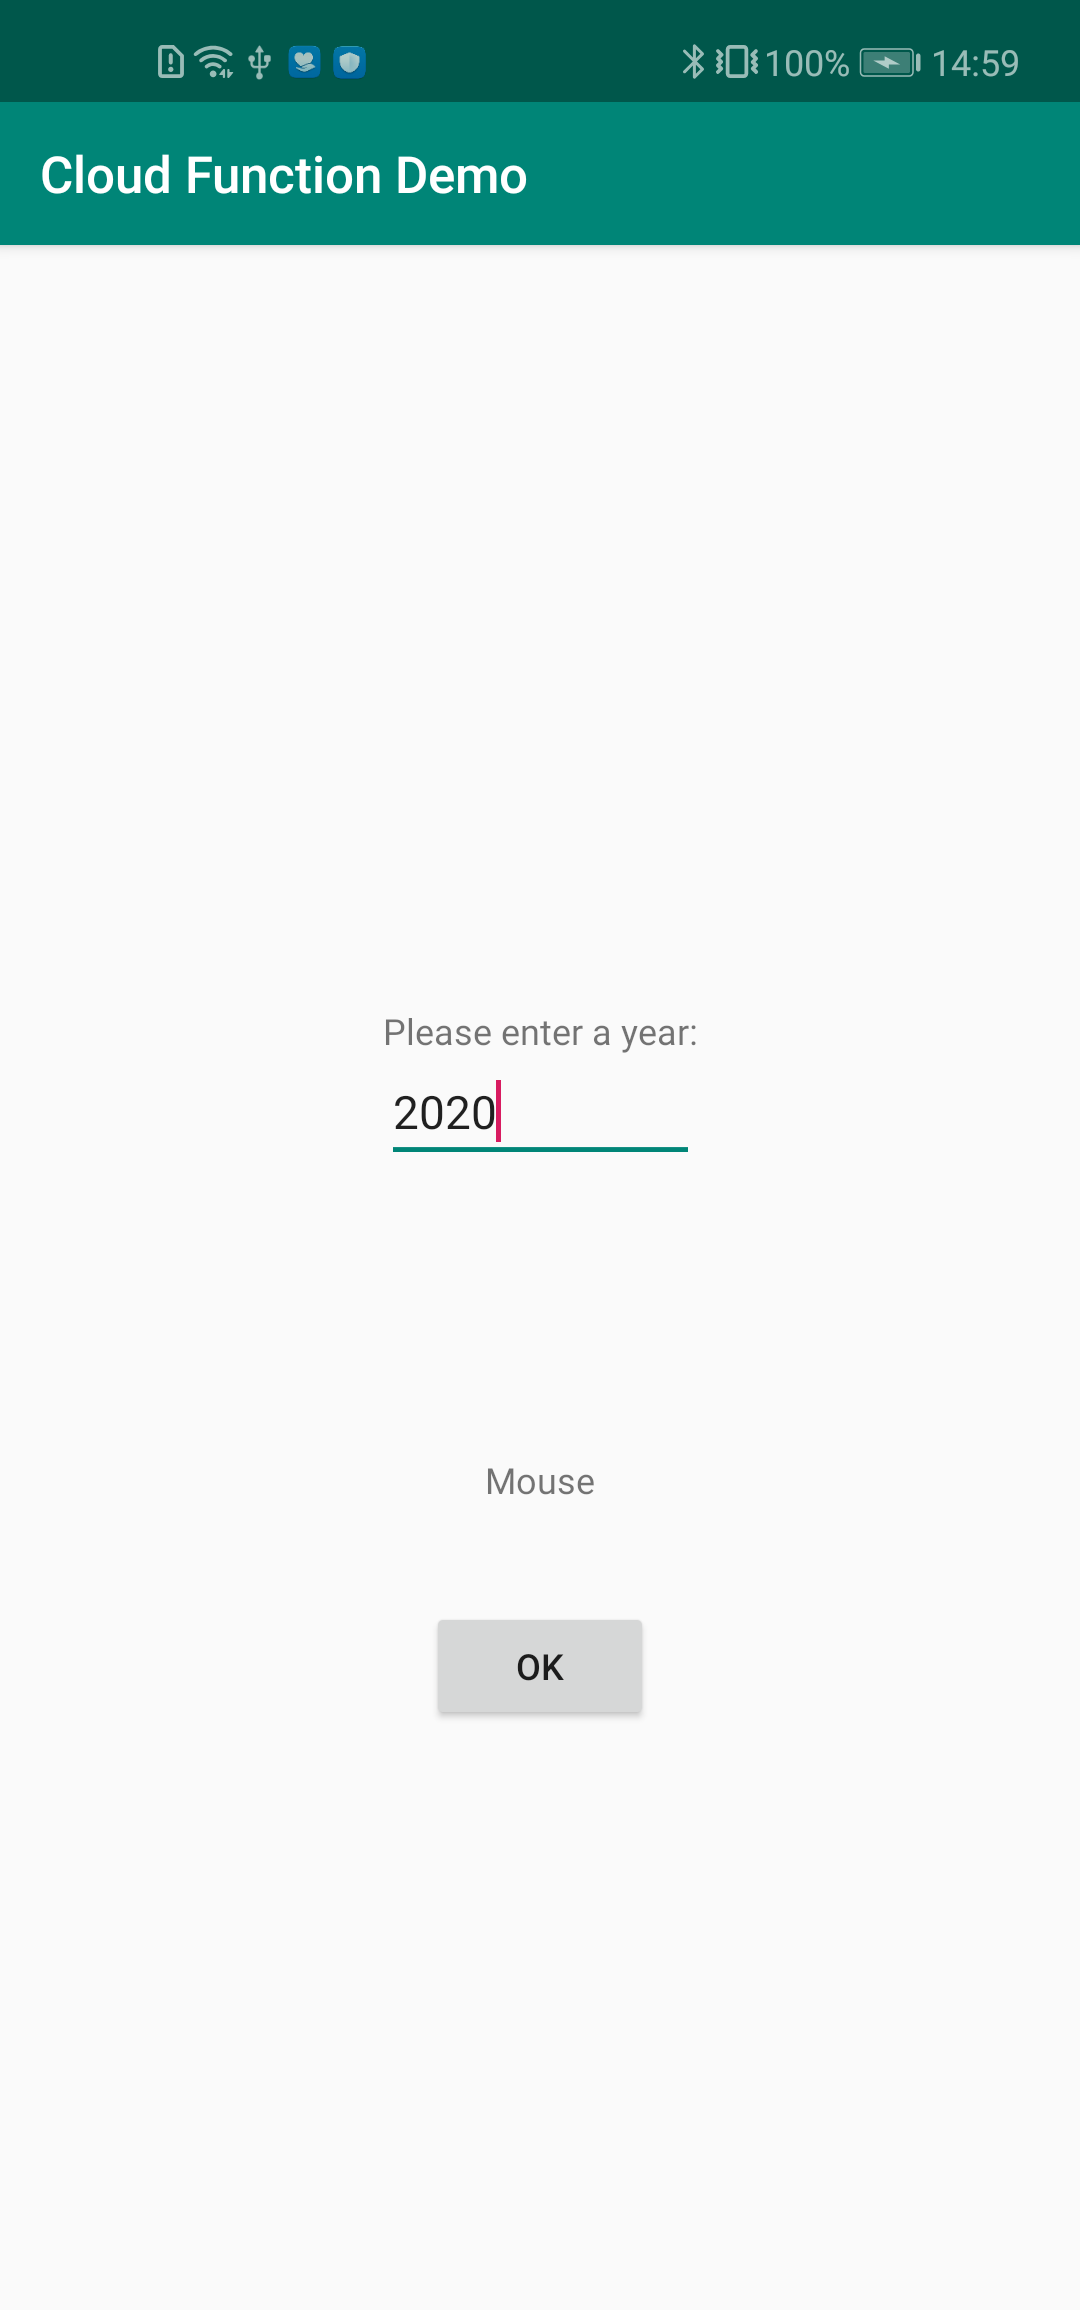
For details about the layout, please refer to the following code in the activity_main.xml file:
<LinearLayout
    android:layout_width="wrap_content"
    android:layout_height="wrap_content"
    android:orientation="vertical"
    app:layout_constraintBottom_toBottomOf="parent"
    app:layout_constraintLeft_toLeftOf="parent"
    app:layout_constraintRight_toRightOf="parent"
    app:layout_constraintTop_toTopOf="parent"
    app:layout_constraintVertical_bias="0.4">
        <TextView
            android:layout_width="wrap_content"
            android:layout_height="wrap_content"
            android:text="@string/instruction"/>
        <EditText
            android:id="@+id/year_text"
            android:layout_width="match_parent"
            android:layout_height="wrap_content"/>
</LinearLayout>

<TextView
    android:id="@+id/rst_text"
    android:layout_width="wrap_content"
    android:layout_height="wrap_content"
    android:text="@string/instruction_result"
    app:layout_constraintBottom_toBottomOf="parent"
    app:layout_constraintLeft_toLeftOf="parent"
    app:layout_constraintRight_toRightOf="parent"
    app:layout_constraintTop_toTopOf="parent"
    app:layout_constraintVertical_bias="0.6"/>

<Button
    android:id="@+id/rst_btn"
    android:layout_width="wrap_content"
    android:layout_height="wrap_content"
    android:text="@string/OK_button"
    app:layout_constraintBottom_toBottomOf="parent"
    app:layout_constraintLeft_toLeftOf="parent"
    app:layout_constraintRight_toRightOf="parent"
    app:layout_constraintTop_toTopOf="parent"
    app:layout_constraintVertical_bias="0.7"/>
7. Developing a Cloud Function
- Obtain the control instance and set the button tap event in the onCreate method.
@Override protected void onCreate(Bundle savedInstanceState) { super.onCreate(savedInstanceState); setContentView(R.layout.activity_main); resultBtn = findViewById(R.id.rst_btn); resultText = findViewById(R.id.rst_text); inputYear = findViewById(R.id.year_text); resultBtn.setOnClickListener(new ButtonClickListener()); } - In the button tap event, obtain the input value in the text box, check whether the value is empty, and verify the value.
String inputText = inputYear.getText().toString();
if (inputText.equals("") || !isInputLegit(inputText)){
resultText.setText(R.string.year_error);
return;
}
IsInputLegit method:
private boolean isInputLegit(String input){ for (int i = 0; i < input.length(); i++){ System.out.println(input.charAt(i)); if (!Character.isDigit(input.charAt(i))){ return false; } } return true; } - Initialize Cloud Functions.
AGConnectFunction function = AGConnectFunction.getInstance(); - Generate a map object of the event in Cloud Functions. In this demo, set the key to year, which is consistent with the key set for the event in the cloud function.
HashMap<String, String> map = new HashMap<>(); map.put("year", inputText); - Call the wrap method in the Cloud Functions SDK to specify a trigger. Use the call method to pass map of the event as a parameter, send the HTTP request of the event, and use Cloud Functions for calculation. Add the callback of the request to receive the result returned by Cloud Functions and display the result in Textview.
function.wrap("symbolic-animals-$latest").call(map)
.addOnCompleteListener(new OnCompleteListener<FunctionResult>() {
@Override
public void onComplete(Task<FunctionResult> task) {
    if (task.isSuccessful()){
        String value = task.getResult().getValue();
        try {
            JSONObject object = new JSONObject(value);
            String result = (String)object.get("result");
            resultText.setText(result);
        } catch (JSONException e) {
            e.printStackTrace();
        }
        Log.i(TAG, value);
    } else {
        Exception e = task.getException();
        if (e instanceof AGCFunctionException){
            AGCFunctionException functionException = (AGCFunctionException)e;
            int errCode = functionException.getCode();
            String message = functionException.getMessage();
            Log.e(TAG, "errorCode: " + errCode + ", message: " + message);
        }
    }
}
});
8. Packaging and Testing
- Run the Android Studio project to generate an APK and install the APK on the test mobile phone.
- Enter a year in the text box and check whether the Chinese zodiac sign of the year is displayed on the page.
9. Congratulations
Well done. You have successfully built your first app that integrates Cloud Functions and learned how to:
- Build a cloud function in AppGallery Connect and test it.
- Call the new cloud function by triggering in your app.