

1. Introduction
Overview
There are up to one billion HUAWEI ID users across the globe. Apps with HUAWEI Account Kit integrated allow users to sign in using their HUAWEI IDs with just a tap. By integrating Account Kit, you can attract new users, by leveraging the enormous HUAWEI ID user base. Account Kit complies with the OAuth 2.0 and OpenID Connect protocols.
To use this Kit, you will need to:
- Register a HUAWEI ID on HUAWEI Developers. Then, create an app, configure app information, and enable Account Kit in AppGallery Connect.
- Create a project in Android Studio and integrate the Account SDK.
- Call and debug the APIs of Account Kit by following the instructions in its development guide.
What You Will Create
In this codelab, we provide a demo project for you to call the APIs of Account Kit. Through the demo project, you'll be able to implement the following functions:
- Requesting authorization from users and signing them in if authorized
- Obtaining basic user information such as the user ID, nickname, and profile picture
- Enabling users to revoke their authorization to your app
What You Will Learn
In this codelab, you will learn how to:
- Create an app in AppGallery Connect.
- Enable Account Kit.
- Integrate the Account SDK.
- Call the APIs of Account Kit.
2. What You Will Need
Hardware Requirements
- A computer (desktop or laptop) for app development
- A Huawei phone with HMS Core (APK) 4.0.0.300 or later, which will be used for running and debugging the demo app
Software Requirements
- JDK version: 1.8 or later
- Android Studio version: 3.X or later
- minSdkVersion: 17 or later
- targetSdkVersion: 31 (recommended)
- compileSdkVersion: 31 (recommended)
- Gradle version: 4.6 or later (recommended)
Required Knowledge
Android app development basics
3. Registering as a Huawei Developer
Before you get started, you must register as a Huawei developer and complete identity verification on HUAWEI Developers. For details, please refer to Registration and Verification.
4. Integration Preparations
To integrate Account Kit, you must complete the following preparations:
- Create an app in AppGallery Connect.
- Create an Android Studio project.
- Generate a signing certificate.
- Generate a signing certificate fingerprint.
- Configure the signing certificate fingerprint.
- Save the configuration file.
- Configure the Maven repository and AppGallery Connect plugin.
- Configure the signing certificate in Android Studio.
5. Enabling Account Kit
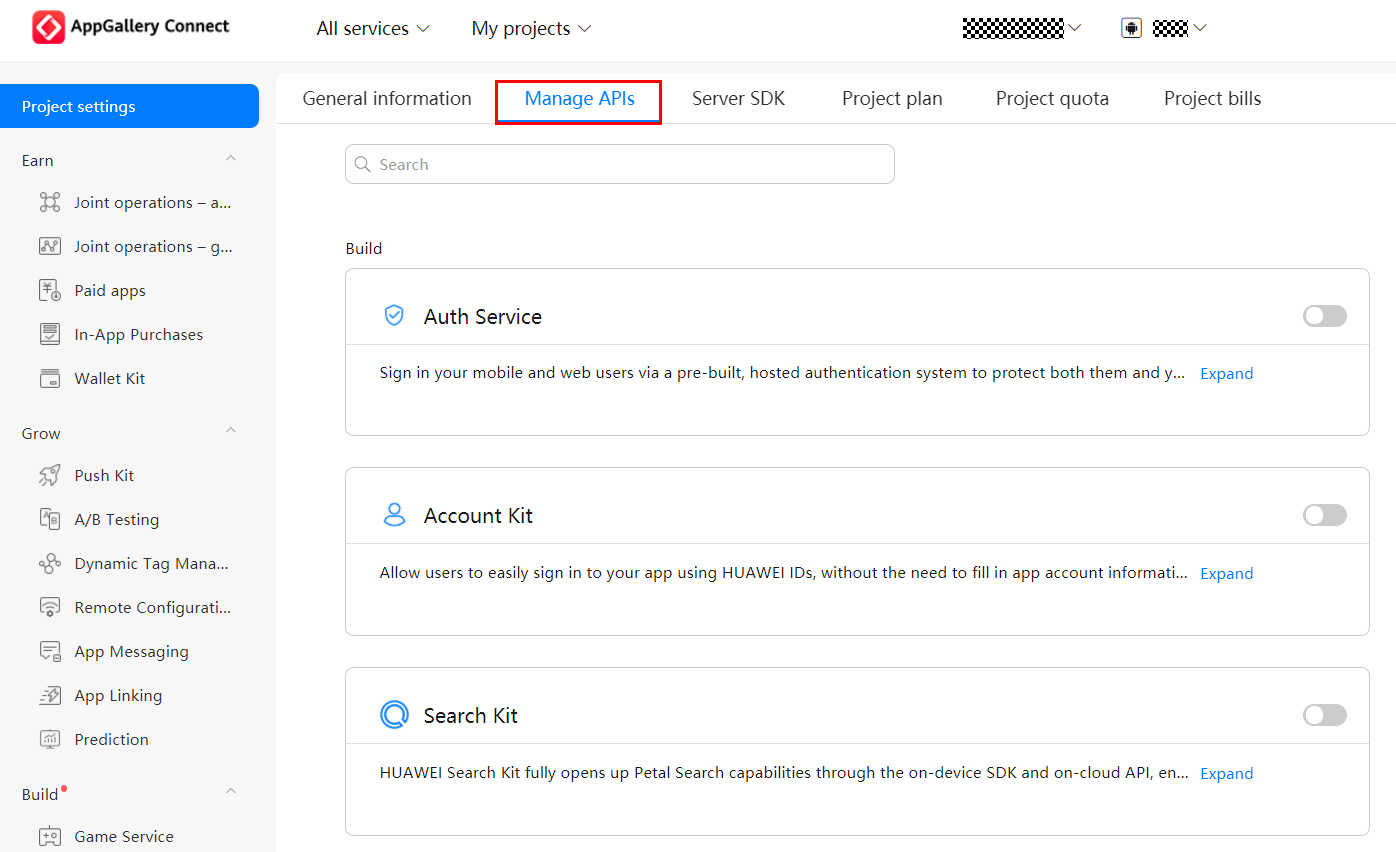
- Sign in to AppGallery Connect, click My projects, find your project, and click your desired app. Then, go to Project settings > Manage APIs.
- Click the toggle switch next to Account Kit to turn it on.
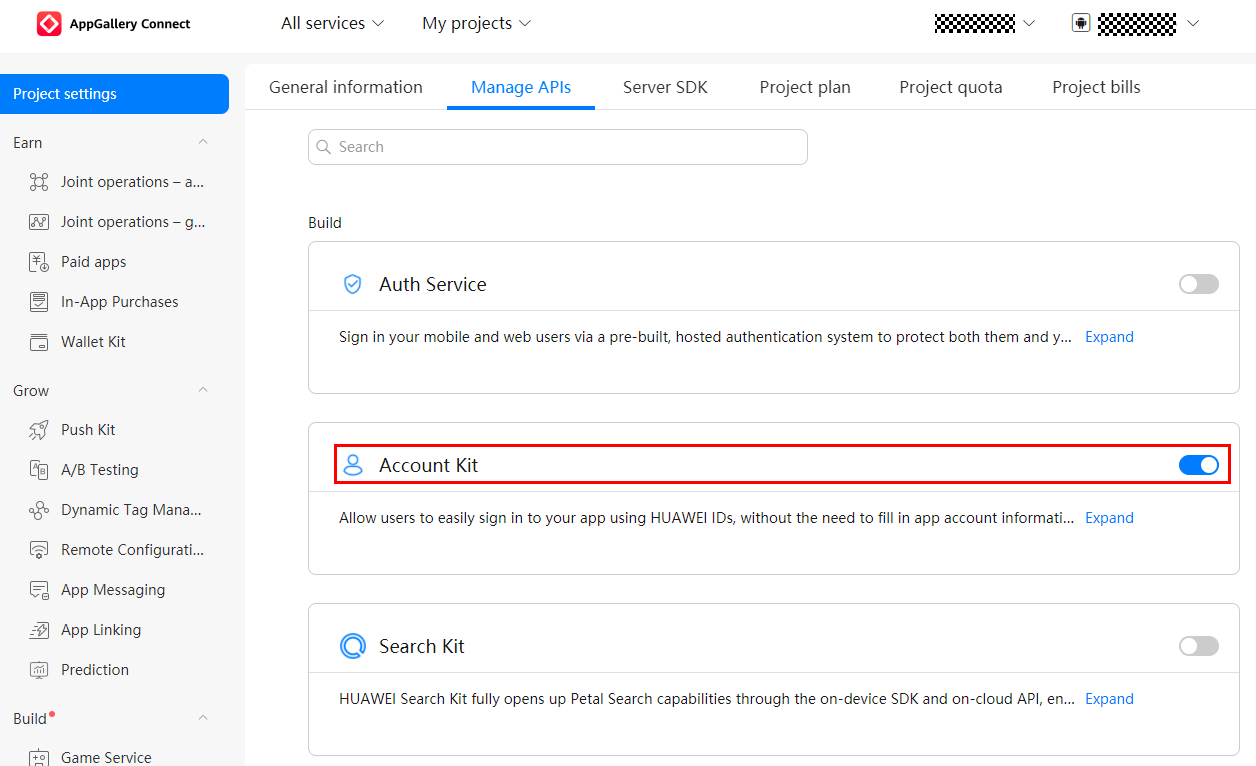
Now, you have successfully enabled Account Kit for your app.
6. Integrating the Account SDK
Obtaining the Configuration File
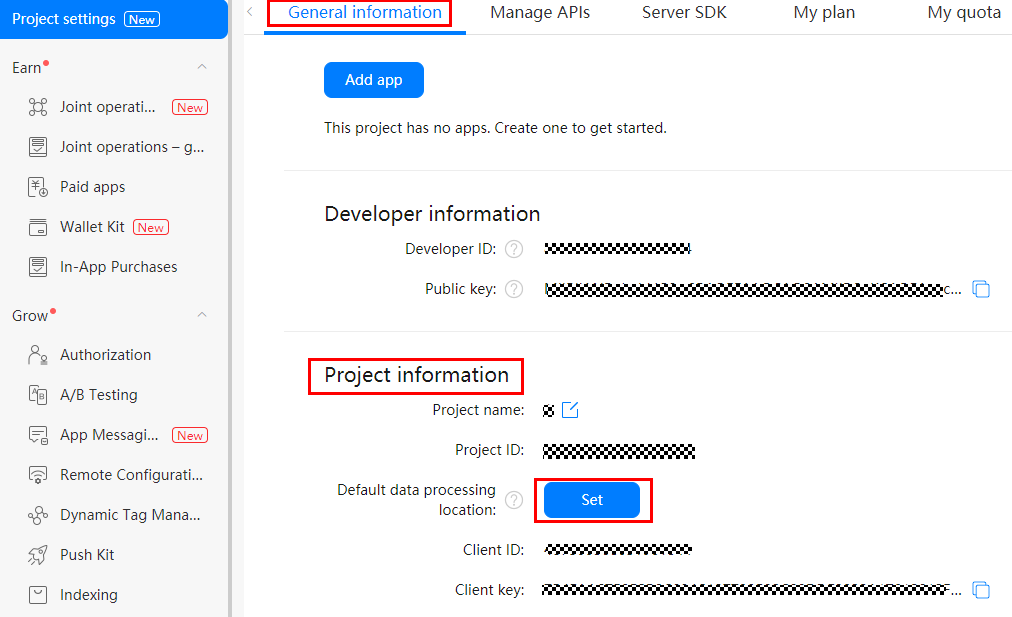
- Sign in to AppGallery Connect, click My projects, find your project, and click your desired app. Then, go to Project settings > General information. In the Project information area, click Set next to Default data processing location to set a location.
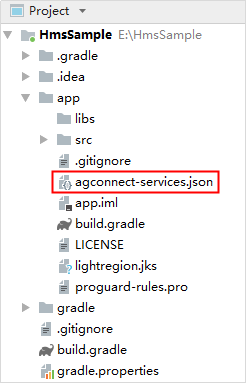
- In the App information area, click agconnect-services.json to download the file.
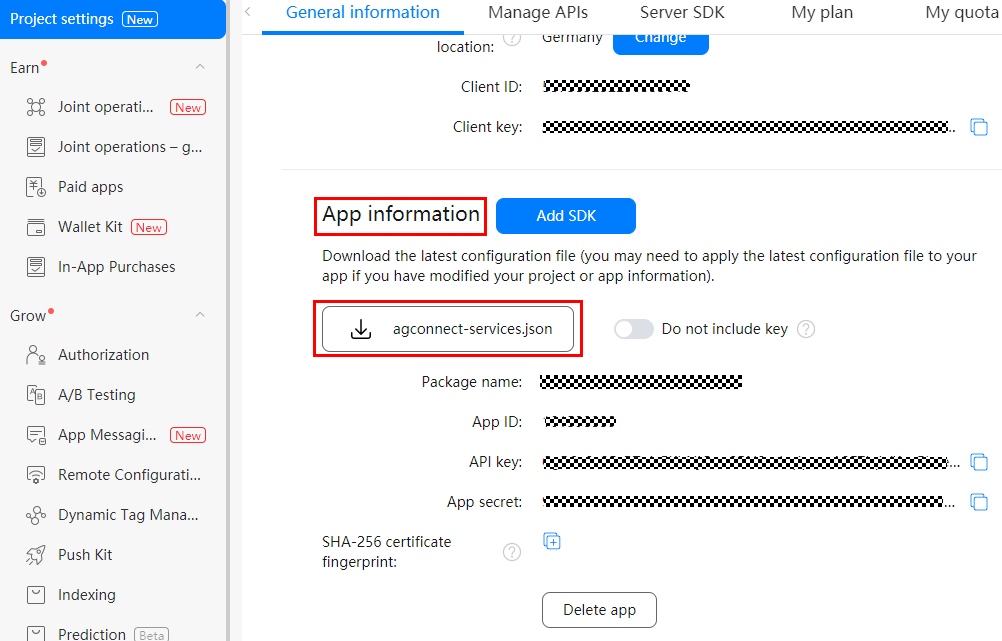
- Copy the agconnect-services.json file to the app directory of your project.
Adding a Dependency on the Account SDK
- Open your app-level build.gradle file.
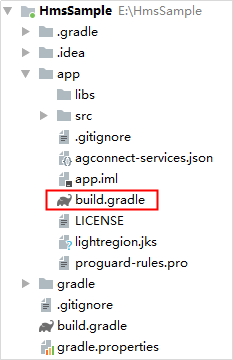
- Add a dependency on the Account SDK in the dependencies block. Replace {version} with the desired version number, such as 6.7.0.300.
dependencies { implementation 'com.huawei.hms:hwid:{version}' } Click Sync Now to synchronize the project.
Configuring the Maven Repository Address for the HMS Core SDK
The procedure for configuring the Maven repository address in Android Studio is different for Gradle plugin earlier than 7.0, Gradle plugin 7.0, and Gradle plugin 7.1 or later. Click a relevant link below to find the configuration procedure for the specific Gradle plugin version.
Gradle plugin earlier than 7.0 | Gradle plugin 7.0 | Gradle plugin 7.1 or later |
Gradle plugin earlier than 7.0
a. Open the build.gradle file in the root directory of your Android Studio project.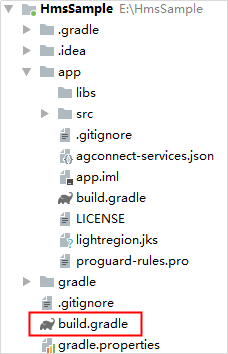
b. Add the AppGallery Connect plugin and the Maven repository.
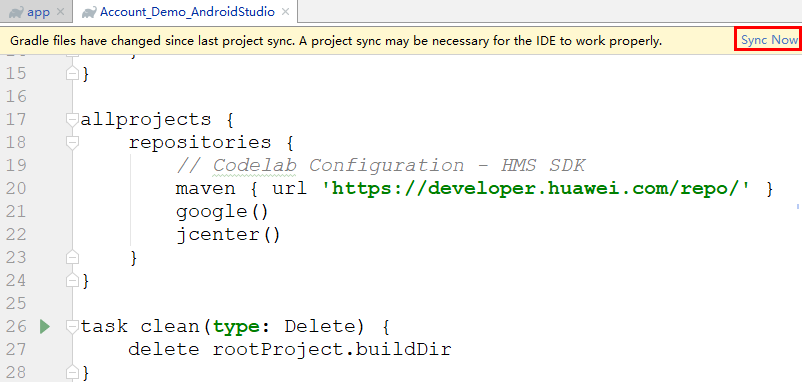
- Go to buildscript > repositories and configure the Maven repository address for the HMS Core SDK.
- Go to allprojects > repositories and configure the Maven repository address for the HMS Core SDK.
- If the agconnect-services.json file has been added to the app, go to buildscript > dependencies and add the AppGallery Connect plugin configuration.
buildscript {
    repositories {
        google()
        jcenter()
        // Configure the Maven repository address for the HMS Core SDK.
        maven {url 'https://developer.huawei.com/repo/'}
    }
    dependencies {
        ...
        // Add the AppGallery Connect plugin configuration. You are advised to use the latest plugin version.
        classpath 'com.huawei.agconnect:agcp:1.6.0.300'
    }
}

allprojects {
    repositories {
        google()
        jcenter()
        // Configure the Maven repository address for the HMS Core SDK.
        maven {url 'https://developer.huawei.com/repo/'}
    }
}
Gradle plugin 7.0
a. Open the build.gradle file in the root directory of your Android Studio project.
b. Add the AppGallery Connect plugin and the Maven repository.
- Go to buildscript > repositories and configure the Maven repository address for the HMS Core SDK.
- If the agconnect-services.json file has been added to the app, go to buildscript > dependencies and add the AppGallery Connect plugin configuration.
buildscript {
    repositories {
        google()
        jcenter()
        // Configure the Maven repository address for the HMS Core SDK.
        maven {url 'https://developer.huawei.com/repo/'}
    }
    dependencies {
        ...
        // Add the AppGallery Connect plugin configuration. You are advised to use the latest plugin version.
        classpath 'com.huawei.agconnect:agcp:1.6.0.300'
    }
}
c. Open the project-level settings.gradle file and configure the Maven repository address for the HMS Core SDK.
dependencyResolutionManagement {
    ...
    repositories {
        google()
        jcenter()
        // Configure the Maven repository address for the HMS Core SDK.
        maven {url 'https://developer.huawei.com/repo/'}
    }
}
Gradle plugin 7.1 or later
a. Open the build.gradle file in the root directory of your Android Studio project.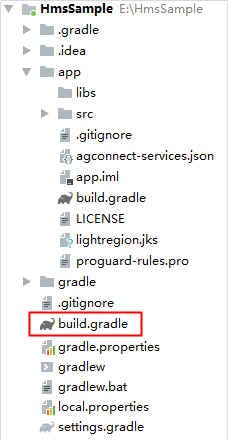
b. If the agconnect-services.json file has been added to the app, go to buildscript > dependencies and add the AppGallery Connect plugin configuration.
buildscript {
    dependencies {
        ...
        // Add the AppGallery Connect plugin configuration. You are advised to use the latest plugin version.
        classpath 'com.huawei.agconnect:agcp:1.6.0.300'
    }
}
c. Open the project-level settings.gradle file and configure the Maven repository address for the HMS Core SDK.
pluginManagement {
    repositories {
        gradlePluginPortal()
        google()
        mavenCentral()
        // Configure the Maven repository address for the HMS Core SDK.
        maven { url 'https://developer.huawei.com/repo/' }
    }
}
dependencyResolutionManagement {
    ...
    repositories {
        google()
        mavenCentral()
        // Configure the Maven repository address for the HMS Core SDK.
        maven { url 'https://developer.huawei.com/repo/' }
    }
}
Configuring Obfuscation Scripts
Open the obfuscation configuration file proguard-rules.pro in the app directory of your project.
Add configurations to exclude the HMS Core SDK from obfuscation.
-ignorewarnings -keepattributes *Annotation* -keepattributes Exceptions -keepattributes InnerClasses -keepattributes Signature -keepattributes SourceFile,LineNumberTable -keep class com.huawei.hianalytics.**{*;} -keep class com.huawei.updatesdk.**{*;} -keep class com.huawei.hms.**{*;}- If you are using AndResGuard, add its trustlist to the build.gradle file in the app directory of your project.
"R.string.hms*",
"R.string.connect_server_fail_prompt_toast",
"R.string.getting_message_fail_prompt_toast",
"R.string.no_available_network_prompt_toast",
"R.string.third_app_*",
"R.string.upsdk_*",
"R.layout.hms*",
"R.layout.upsdk_*",
"R.drawable.upsdk*",
"R.color.upsdk*",
"R.dimen.upsdk*",
"R.style.upsdk*",
"R.string.agc*"
Adding Permissions
The Account SDK requires permissions to obtain the network status and Wi-Fi status. Declare the permissions in the AndroidManifest.xml file:
<!--check network permissions-->
<uses-permission android:name="android.permission.ACCESS_NETWORK_STATE" />
<!--check wifi state-->
<uses-permission android:name="android.permission.ACCESS_WIFI_STATE" />
7. Designing the UI
Account Kit provides APIs for normal sign-in, silent sign-in, sign-out, and authorization revoking. In this codelab, you can create a UI in your Android Studio project. An example is shown in the following figure.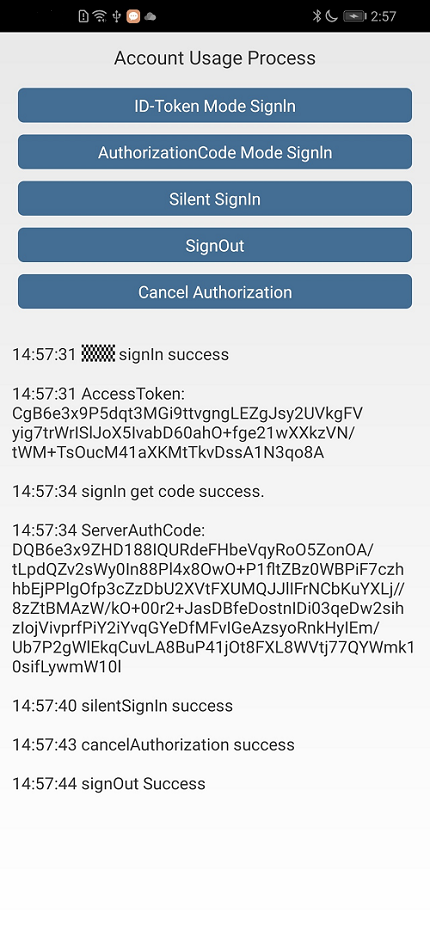
8. Developing Functions
Signing In with an ID in ID Token Mode
Service Process
- A user taps the sign-in button to request to sign in with an ID.
- The Account SDK brings up the authorization screen, explicitly notifying the user of the content to be authorized based on the authorization scopes contained in the sign-in request.
- After the user authorizes your app to access the requested content, the Account SDK returns an ID token to your app.
- Your app verifies the ID token locally or using the Account Kit server.
Sample Code
- Display the ID sign-in button.
Your app displays the ID sign-in button on the sign-in screen. If you want to design a HUAWEI ID sign-in button, check relevant specifications in HUAWEI ID Sign-In Button Usage Rules. Call thesetIdTokenn method ofAccountAuthParamsHelperr to request authorization.
JavaAccountAuthParams authParams = new AccountAuthParamsHelper(AccountAuthParams.DEFAULT_AUTH_REQUEST_PARAM).setIdToken().createParams();Kotlin
val authParams : AccountAuthParams = AccountAuthParamsHelper(AccountAuthParams.DEFAULT_AUTH_REQUEST_PARAM).setIdToken().createParams()- Call the getService method of AccountAuthManager to initialize the AccountAuthService object.
JavaAccountAuthService service = AccountAuthManager.getService(MainActivity.this, authParams);Kotlin
val service : AccountAuthService = AccountAuthManager.getService(this@MainActivity, authParams) - Call the getSignInIntent method of AccountAuthService to bring up the authorization screen.
JavastartActivityForResult(service.getSignInIntent(), 8888);Kotlin
startActivityForResult(service.signInIntent, 8888) - Process the authorization result.
Java@Override protected void onActivityResult(int requestCode, int resultCode, @Nullable Intent data) { // Process the authorization result and obtain an ID token from AuthAccount. super.onActivityResult(requestCode, resultCode, data); if (requestCode == 8888) { Task<AuthAccount> authAccountTask = AccountAuthManager.parseAuthResultFromIntent(data); if (authAccountTask.isSuccessful()) { // The sign-in is successful, and the user's ID information and ID token are obtained. AuthAccount authAccount = authAccountTask.getResult(); Log.i(TAG, "idToken:" + authAccount.getIdToken()); } else { // The sign-in failed. No processing is required. Logs are recorded for fault locating. Log.e(TAG, "sign in failed : " +((ApiException) authAccountTask.getException()).getStatusCode()); } } }Kotlin
override fun onActivityResult(requestCode: Int, resultCode: Int, data: Intent?) {
    // Process the authorization result and obtain an ID to**AuthAccount**thAccount.
    super.onActivityResult(requestCode, resultCode, data)
    if (requestCode == 8888) {
        val authAccountTask = AccountAuthManager.parseAuthResultFromIntent(data)
        if (authAccountTask.isSuccessful) {
            // The sign-in is successful, and the user's ID information and ID token are obtained.
            val authAccount = authAccountTask.result
            Log.i(TAG, "idToken:" + authAccount.idToken)
        } else {
            // The sign-in failed. No processing is required. Logs are recorded for fault locating.
            Log.e(TAG, "sign in failed : " + (authAccountTask.exception as ApiException).statusCode)
        }
    }
}
Signing In with an ID in Authorization Code Mode
Account Kit also allows for sign-in using an ID in authorization code mode. Use this mode when you have your own app server.
Service Process
- A user taps the sign-in button to request to sign in with an ID.
- The Account SDK brings up the authorization screen, explicitly notifying the user of the content to be authorized based on the authorization scopes contained in the sign-in request.
- After the user authorizes your app to access the requested content, the Account SDK returns an authorization code to your app.
- Based on the authorization code, your app obtains the access token, refresh token, and ID token from the Account Kit server.
- If the access token or ID token has expired, your app server will obtain a new access token or ID token using the refresh token.
Sample Code
- Display the ID sign-in button.
Your app displays the ID sign-in button on the sign-in screen. If you want to design a HUAWEI ID sign-in button, check relevant specifications in HUAWEI ID Sign-In Button Usage Rules. Call the setAuthorizationCode method of AccountAuthParamsHelper to request authorization.
JavaAccountAuthParams authParams = new AccountAuthParamsHelper(AccountAuthParams.DEFAULT_AUTH_REQUEST_PARAM).setAuthorizationCode().createParams();Kotlin
val authParams : AccountAuthParams = AccountAuthParamsHelper(AccountAuthParams.DEFAULT_AUTH_REQUEST_PARAM).setAuthorizationCode().createParams()- Call the getService method of AccountAuthManager to initialize the AccountAuthService object.
JavaAccountAuthService service = AccountAuthManager.getService(MainActivity.this, authParams);Kotlin
val service : AccountAuthService = AccountAuthManager.getService(this@MainActivity, authParams) - Call the getSignInIntent method of AccountAuthService to bring up the authorization screen.
JavastartActivityForResult(service.getSignInIntent(), 8888);Kotlin
startActivityForResult(service.signInIntent, 8888) - Process the authorization result.
Java@Override protected void onActivityResult(int requestCode, int resultCode, @Nullable Intent data) { // Process the authorization result and obtain an authorization code from AuthAccount. super.onActivityResult(requestCode, resultCode, data); if (requestCode == 8888) { Task<AuthAccount> authAccountTask = AccountAuthManager.parseAuthResultFromIntent(data); if (authAccountTask.isSuccessful()) { // The sign-in is successful, and the user's ID information and authorization code are obtained. AuthAccount authAccount = authAccountTask.getResult(); Log.i(TAG, "serverAuthCode:" + authAccount.getAuthorizationCode()); } else { // The sign-in failed. Log.e(TAG, "sign in failed:" + ((ApiException) authAccountTask.getException()).getStatusCode()); } } }Kotlin
override fun onActivityResult(requestCode: Int, resultCode: Int, data: Intent?) { // Process the authorization result and obtain an authorization c**AuthAccount**thAccount. super.onActivityResult(requestCode, resultCode, data) if (requestCode == 8888) { val authAccountTask = AccountAuthManager.parseAuthResultFromIntent(data) if (authAccountTask.isSuccessful) { // The sign-in is successful, and the user's ID information and authorization code are obtained. val authAccount = authAccountTask.result Log.i(TAG, "serverAuthCode:" + authAccount.authorizationCode) } else { // The sign-in failed. Log.e(TAG, "sign in failed:" + (authAccountTask.exception as ApiException).statusCode) } } } - Your app reports the obtained authorization code to your app server. Then, your app server will call the /oauth2/v3/token API to request the ID token, access token, and refresh token from the Account Kit server.
- The access token has a short validity period (currently, 60 minutes). When the access token has expired or is about to expire, request a new access token from the Account Kit server by sending the refresh token through the /oauth2/v3/token API.
Request example:POST /oauth2/v3/token HTTP/1.1 Host: oauth-login.cloud.huawei.com Content-Type: application/x-www-form-urlencoded grant_type=refresh_token client_id=12345 client_secret=bKaZ0VE3EYrXaXCdCe3d2k9few refresh_token=CF2Mm03n0aos9iZZ8nIhfyDtoXy74CXeBi50gVVhMpB0IUzlv9ZwizEvTBhVoF820ZPim0JwNR9j2p1qgEQWnIVYZRlp4T6ezMgekUnsHBkvNev5rd2MdfQMLPResponse example:
HTTP/1.1 200 OK
 Content-Type: application/json;charset=UTF-8
 Cache-Control: no-store
 Pragma: no-cache
 {
"access_token": "CFyJ4J\/l6wuwcFqYOJG4maq2ca8RAV+g0i+mel6qCV5lvqH0PYtW0+BNwfHWg0AqMnW6ZdBvUgs7ijkxMFh1xVP\/B+vQXz3PWsivkKCuL78XtbLt7vs=",

"id_token": "eyJhbGciOiJSUzI1NiIsImtpZCI6IjExOGRmMjU0YjgzNzE4OWQxYmMyYmU5NjUwYTgyMTEyYzAwZGY1YTQiLCJ0eXAiOiJKV1QifQ.eyJpc3MiOiJodHRwczovL2FjY291bnRzLmdvb2dsZS5jb20iLCJhenAiOiI3ODI0NTY2Njc4OTgtc2M0MzE3Y2l0NGEwMjB0NzdrbGdsbWo1ZjA4YWtnMWIuYXBwcy5nb29nbGV1c2VyY29udGVudC5jb20iLCJhdWQiOiI3ODI0NTY2Njc4OTgtN2NkNGJpYWRkaGVwNGc4cnZic2VlOGtwcDA5Zm1hNzIuYXBwcy5nb29nbGV1c2VyY29udGVudC5jb20iLCJzdWIiOiIxMDE3MTIxMzkwMzgwNDE2MDc0MTQiLCJlbWFpbCI6Inh1ZXpoZW5odWF0anVAc2luYS5jb20iLCJlbWFpbF92ZXJpZmllZCI6dHJ1ZSwicGljdHVyZSI6Imh0dHBzOi8vbGg1Lmdvb2dsZXVzZXJjb250ZW50LmNvbS8tMm9lTTllT09zNTAvQUFBQUFBQUFBQUkvQUFBQUFBQUFBQkkvMVpOSC0xdmxxc3cvczk2LWMvcGhvdG8uanBnIiwiaWF0IjoxNTYxNDUxMTUyLCJleHAiOjE1NjE0NTQ3NTJ9.Eo9IHMkid596jvt1YYzNsRtDq9c9K9dbougkU41Noh7TXNiko86_RuWwHID6k1kDg398AwC3wwH-t2hLcUjgrXPNd9XYU96Jp4-UxdDszP6ywEJgvvBCyTHzsi2auvKt_MnfSrs3qOKfh7noJvXq8AY-Hi3vqSUks5kGqbZKVzCHhBDO3RD9Fs9YHsB6w0XVKZojPOBDaAT_TiijoChn-Q-e8NbSGUx52OgeH-Nw5lOj6JVb_7fb6ucWRzlhiQuzFjklevLVw2pjw1MxKbl1vfRp0X699uZBVjgl9hj1L7LSDObuPzLiXF7ojji5JKYC6zIwAtZQUZ_VUmSk01GDLQ",
"expires_in": 3600,
"scope": "openid profile email",
"token_type": "Bearer"
 }
Silently Signing In with an ID
Service Process
- A user triggers silent sign-in in a specific scenario. (You can define the scenario as needed.)
- Your app calls the default constructor of AccountAuthParamsHelper to set authorization parameters.
- The Account SDK returns the AccountAuthParams object containing authorization parameters to your app.
- Your app calls the AccountAuthManager.getService method to initialize the AccountAuthService object.
- The Account SDK returns the AccountAuthService object to your app.
- Your app calls the AccountAuthService.silentSignIn method to send a silent sign-in request to the Account SDK.
- The Account SDK checks whether the user meets the authorization condition for silent sign-in and returns the authorization result to your app.
- Your app determines subsequent processing based on the authorization result.
Sample Code
- Call the default constructor of AccountAuthParamsHelper to set authorization parameters.
JavaAccountAuthParams authParams = new AccountAuthParamsHelper(AccountAuthParams.DEFAULT_AUTH_REQUEST_PARAM).createParams();Kotlin
val authParams : AccountAuthParams = AccountAuthParamsHelper(AccountAuthParams.DEFAULT_AUTH_REQUEST_PARAM).createParams() - Call the getService method of AccountAuthManager to initialize the AccountAuthService object.
JavaAccountAuthService service = AccountAuthManager.getService(MainActivity.this, authParams);Kotlin
val service : AccountAuthService = AccountAuthManager.getService(this@MainActivity, authParams) - Call the AccountAuthService.silentSignIn method to send a silent sign-in request.
JavaTask<AuthAccount> task = service.silentSignIn();Kotlin
val task : Task<AuthAccount> = service.silentSignIn() - Process the authorization result. If the authorization is successful, your app obtains the user's ID information and allows for sign-in. After a successful sign-in, your app automatically identifies the signed-in ID type based on authAccount.getAccountFlag.
Javatask.addOnSuccessListener(new OnSuccessListener<AuthAccount>() { @Override public void onSuccess(AuthAccount authAccount) { // Obtain the user's ID information. Log.i(TAG, "displayName:" + authAccount.getDisplayName()); // Obtain the ID type (0: HUAWEI ID; 1: AppTouch ID). Log.i(TAG, "accountFlag:" + authAccount.getAccountFlag()); } });Kotlin
task.addOnSuccessListener { authAccount ->
    // Obtain the user's ID information.
    Log.i(TAG, "displayName:" + authAccount.displayName)
    // Obtain the **0**D type (0: HU**1**WEI ID; 1: AppTouch ID).
    Log.i(TAG, "accountFlag:" + authAccount.accountFlag);
}
If the authorization fails, the user may have not successfully signed in before. Your app may determine whether to call the getSignInIntent method of AccountAuthService to explicitly display the authorization screen.
Javatask.addOnFailureListener(new OnFailureListener() { @Override public void onFailure(Exception e) { // The sign-in failed. Your app can **getSignInIntent()**nIntent() method to explicitly display the authorization screen. if (e instanceof ApiException) { ApiException apiException = (ApiException) e; Log.i(TAG, "sign failed status:" + apiException.getStatusCode()); } } });Kotlin
task.addOnFailureListener { e ->
    // The sign-in failed. Your app can **getSignInIntent()**nIntent() method to explicitly display the authorization screen.
    if (e is ApiException) {
        Log.i(TAG, "sign failed status:" + e.statusCode)
    }
}
Signing Out from an ID
Service Process
- A user has signed in to an app and attempts to sign out.
- Your app calls the AccountAuthService.signOut method to request the Account SDK to sign the user out.
- The Account SDK deletes the sign-in information of the user and sends the sign-out result to your app.
Sample Code
- Call the signOut API using the AccountAuthService instance that is created during the sign-in authorization.
Java
Kotlin// service indicates the AccountAuthService instance generated using the getService method during the sign-in authorization. Task<Void> signOutTask = service.signOut();// service indicates the AccountAuthService instance generated using the getService method during the sign-in authorization. val signOutTask = service.signOut() - Perform processing after the sign-out is complete.
JavasignOutTask.addOnCompleteListener(new OnCompleteListener<Void>() { @Override public void onComplete(Task<Void> task) { // Processing after the sign-out. Log.i(TAG, "signOut complete"); } });Kotlin
signOutTask.addOnCompleteListener { it ->
    // Processing after the sign-out.
    Log.i(TAG, "signOut complete")
}
Revoking Authorization
Service Process
- A signed-in user revokes authorization from your app.
- Your app calls the AccountAuthService.cancelAuthorization method to request the Account SDK to revoke authorization.
- The Account SDK deletes the authorization information of the user and sends the revoking result to your app.
Sample Code
- Configure an entry to allow a user to revoke authorization on your app. (Develop such an entry by yourself.)
- Call the AccountAuthService.cancelAuthorization method and process the returned result.
Java// service indicates the AccountAuthService instance generated using the getService method during the sign-in authorization. service.cancelAuthorization().addOnCompleteListener(new OnCompleteListener() { @Override public void onComplete(Task task) { if (task.isSuccessful()) { // Processing after a successful authorization revoking. Log.i(TAG, "onSuccess: "); } else { // Handle the exception. Exception exception = task.getException(); if (exception instanceof ApiException){ int statusCode = ((ApiException) exception).getStatusCode(); Log.i(TAG, "onFailure: " + statusCode); } } } }); Kotlin
// service indicates the AccountAuthService instance generated using the getService method during the sign-in authorization.
service.cancelAuthorization().addOnCompleteListener { task ->
    if (task.isSuccessful) {
      // Processing after a successful authorization revoking.
        Log.i(TAG, "onSuccess: ")
    } else {
        // Handle the exception.
        val exception = task.exception
        if (exception is ApiException) {
            val statusCode = exception.statusCode
            Log.i(TAG, "onFailure: $statusCode")
        }
    }
}
9. Testing the Demo App
Click  to run your project to generate an APK and install it on the test phone. After launching the demo app, you'll see the following screen:
10. Congratulations
Well done. You have successfully completed this codelab and learned how to:
- Create an app in AppGallery Connect.
- Enable Account Kit.
- Integrate the Account SDK.
- Call the APIs of Account Kit.
11. Reference
For more information, please click the following link:
API Reference
To download the sample code, please click the button below: