


Intelligent Assistant
Chat with our virtual assistant to get answers promptly.
The MDM Engine SDK provides for in-depth device management for authorized apps installed on Huawei devices, by providing a wealth of device management APIs and app permission management APIs.
For details, please refer to Required Permissions.
The following figure shows the architecture of the MDM Engine SDK.
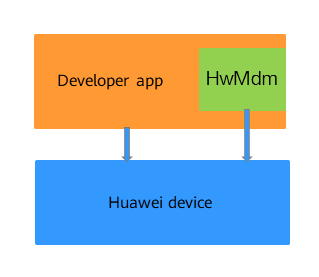
The architecture consists of the following:
App: Calls the MDM Engine SDK.
mdmkit-14.0.0.300.jar: .jar package of the MDM Engine SDK.
On a Huawei device, you can directly set functions by calling the APIs in mdmkit-14.0.0.300.jar. On non-Huawei devices, calling APIs in mdmkit-14.0.0.300.jar does not take effect.
Method 1: Use the HMS Toolkit plug-in to automatically import MDM Engine.


Modify the module-level build.gradle file and add dependencies in compileOnly mode, for example: compileOnly 'com.huawei.mdm:mdmkit:14.0.0.300'.
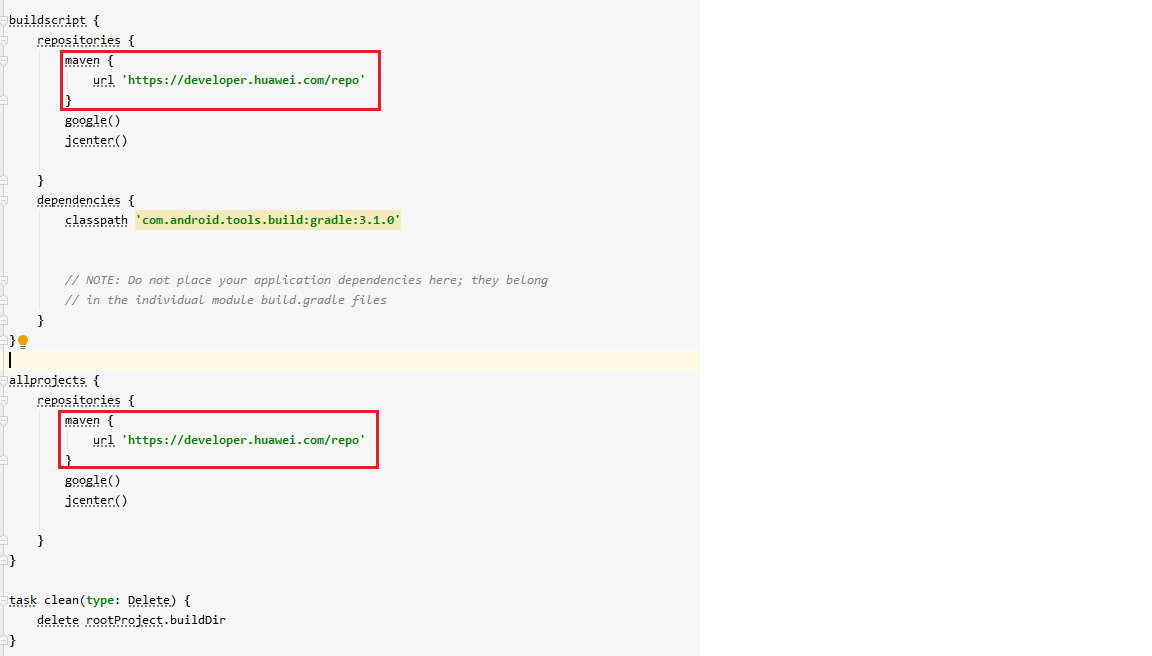
Use the dependencies in compileOnly mode in the gradle script.
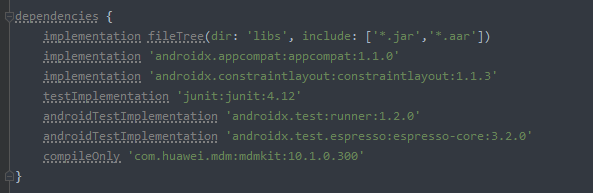
Write code to develop the app and perform unit tests.
In the AndroidManifest.xml file, add the permissions required by MDM APIs and the MDM root permission com.huawei.permission.sec.MDM.
Currently, the license and certificate are available for authorization. For more details about the application process, please refer to Overview.
Call the activation API activeLicense() of HEM Kit to authorize the APK. For details, see Activating or Deactivating an MDM License.
Use the HMS Toolkit plug-in to pack the certificate into the APK.

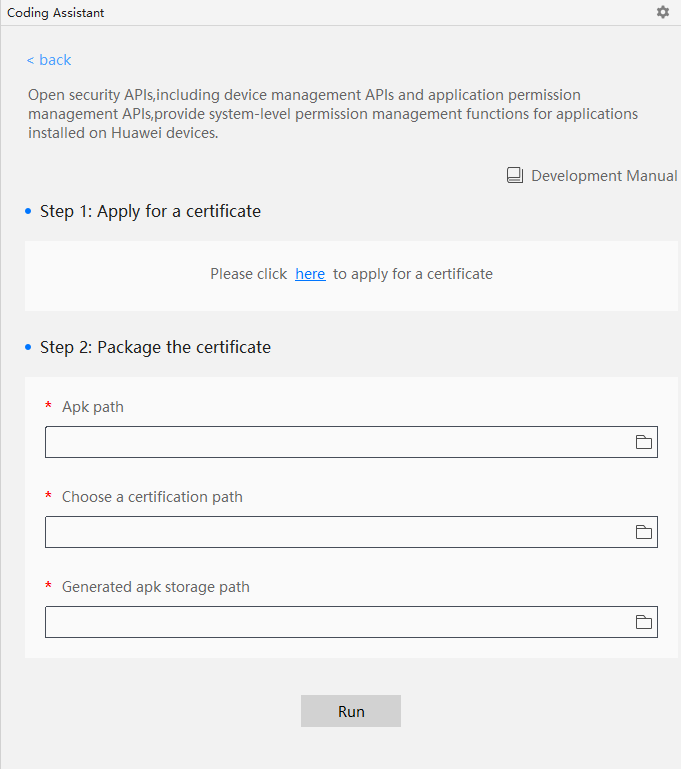
Your app must be authorized before calling MDM Engine APIs. For more details, please refer to Overview.
The APIs of mdmkit-14.0.0.300.jar integrated in your app are not supported on non-Huawei devices or Huawei devices running a system earlier than the minimum compatible system version. As a result, a NoExtAPIException will be thrown. You will need to capture this exception. Ensure that the file runs on a compatible Huawei device, in order for the APIs to be called successfully.
- import com.huawei.android.app.admin;
- // Use the native Android DevicePolicyManager.
- mDevicePolicyManager = (DevicePolicyManager) getSystemService(Context.DEVICE_POLICY_SERVICE);
- // Create the APK component name.
- mAdminName = new ComponentName(this, SampleDeviceReceiver.class);
- .........
- // If the APK is not activated by the device admin, activate it first (skip this step if you integrate with license-based authorization).
- if (mDevicePolicyManager !=null && !mDevicePolicyManager.isAdminActive(mAdminName)) {
- Intent intent = new Intent(DevicePolicyManager.ACTION_ADD_DEVICE_ADMIN);
- intent.putExtra(DevicePolicyManager.EXTRA_DEVICE_ADMIN, mAdminName);
- mActivity.startActivityForResult(intent, REQUEST_ENABLE);
- }
The following is an example.
- DeviceRestrictionManager restriction = new DeviceRestrictionManager();
- restriction.setWifiDisabled(adminName, true);
If the app is not activated before calling a device management API, a SecurityException will be thrown.
This specification describes common coding errors that may cause vulnerabilities or risks for component security and access control security of apps integrated with MDM Engine. It aims to prevent security issues caused by problems like inappropriate control of permissions to access components. You must comply with this specification when developing your app.
When components are exposed, internal APIs of MDM Engine may be exposed and exploited maliciously, which may make the component information vulnerable to leakage or attacks. Such leakage may cause severe impact on user devices. In addition, as MDM Engine features device management and control, attacks initiated exploiting security vulnerabilities of your app may affect the normal use of user devices.
If the exported attribute is not set for the Content Provider component, the component is public to other apps by default for Android 4.2 or earlier (SDK version 16 or earlier), and are not public by default for Android versions later than 4.2 (SDK versions later than 16).
If the exported attribute is not set for the Activity, Service, and Receiver components, the components are public to other apps by default when intent-filter is set, and are not public by default when intent-filter is not set.
Rule 1: Explicitly set the exported attribute of a private component to false.
Components that are used only inside your app must be set to non-public, in case of being called by other apps. That is, you must explicitly set exported to false for these components, instead of using the default value.
Recommended operation:
- <activity
- android:name="com.huawei.PrivateActivity"
- android:label="@string/app_name" >
- <intent-filter>
- <action android:name="com.huawei.action.EVENT_CHANGE" />
- </intent-filter>
- </activity>
In the example above, PrivateActivity is a private component, but the android:exported attribute is not set and the <intent-filter> tag is declared. That is, any external app that specifies the com.huawei.action.EVENT_CHANGE action can access the component.
- <activity
- android:name="com.huawei.PrivateActivity"
- android:label="@string/app_name"
- android:exported="false" >
- </activity>
In the example above, exported is set to false for the private component. That is, the component can be accessed only with an explicit intent.
Rule 2: Explicitly set the exported attribute of components that interact with external apps to true and set the access permission.
The components of an app are not used only within the app, but also interact with external apps in many cases. In these cases, you need to explicitly set android:exported to true in the AndroidManifest.xml file for the components, so that they can interact with external apps. Do not use the default values.
Once the components are made public, data will cross trust boundaries. In this case, component information may be leaked or the capabilities of MDM Engine may be exploited maliciously. Therefore, you need to place the components that interact with external apps under the component tag (for example, <activity>), and set the access permissions using the android:permission attribute.
Exception:
- <activity
- android:name=".MainActivity"
- android:exported="true">
- <intent-filter>
- <action android:name="android.intent.action.MAIN" />
- <category android:name="android.intent.category.LAUNCHER" />
- </intent-filter>
- </activity>
- <activity
- android:name="com.huawei.PublicActivity"
- android:label="@string/app_name" >
- <intent-filter>
- <action android:name="com.huawei.action.EVENT_CHANGE" />
- </intent-filter>
- </activity>
As any external apps that declare the com.huawei.action.EVENT_CHANGE action can access the PublicActivity component, malicious apps may exploit this component to obtain sensitive information or initiate denial-of-service (DoS) attacks.
- <permission
- android:name="com.huawei.permission.ACCESS"
- android:protectionLevel="signature" >
- </permission>
- <application
- android:allowBackup="false"
- android:icon="@drawable/ic_launcher"
- android:label="@string/app_name"
- android:theme="@style/AppTheme" >
- <activity
- android:name="com.huawei.PublicActivity"
- android:label="@string/app_name"
- android:permission="com.huawei.permission.ACCESS"
- android:exported="true" >
- <intent-filter>
- <action android:name="com.huawei.action.EVENT_CHANGE" />
- </intent-filter>
- </activity>
- </application>
Under the component tag, set android:exported to true and set android:permission, allowing your app to set access permissions based on specific security policies of components. In this way, the access permissions of components are controlled in a fine-grained manner and permissions between components are isolated from each other.
Set android:protectionLevel to signature in the <permission> tag for a component. The component will then be accessible only to apps with the specific developer signature.
The Broadcast component provides a message transfer mechanism for communication between components. These components may belong to the same app or different apps. Broadcasts between apps use the inter-process communication mechanism. If broadcast permission is not properly set, security risks may be brought to the program or system.
Rule 1: Restrict permissions to access broadcasts with sensitive personal information
Set permissions to control who can receive the broadcast, ensuring that broadcasts with sensitive personal information are not received by other apps.
Negative example:
- // Send a broadcast.
- Intent intent = new Intent("com.huawei.action.EXAMPLE");
- intent.putExtra(KEY, SENSITIVE_DATA);
- sendBroadcast(intent);
In the example above, receiver's permission is not specified for the broadcast that carries sensitive personal information (SENSITIVE_DATA). That is, any receiver that declares the com.huawei.action.EXAMPLE action can receive the broadcast.
Positive example:
Add parameters before broadcast sending to declare the permissions required by the receiver.
First, define the permission in the Androidmanifest.xml file of the broadcast sender app.
- <permission
- android:name="com.huawei.permission.TEST"
- android:protectionLevel="signature" >
- </permission>
Then, pass the defined permission when the broadcast is sent.
- // Send a broadcast.
- Intent intent = new Intent("com.huawei.action.EXAMPLE");
- intent.putExtra(KEY, SENSITIVE_DATA);
- sendBroadcast(intent,"com.huawei.permission.TEST");
The permission is specified for the receiver in the example above. That is, only the receiver with the com.huawei.permission.TEST permission can receive the broadcast. Specifying receiver's permissions when sending broadcasts can prevent broadcast hijacking attacks, while declaring permissions in broadcast sender apps can reduce the risk of broadcast spoofing attacks. This ensures the security of broadcast sending and is therefore most recommended.
At the same time, add the corresponding permission to the AndroidManifest.xml file of the receiver app.
- <uses-permission android:name="com.huawei.permission.TEST"/>
Rule 2: Restrict broadcast sources for the receiver to call MDM Engine's capabilities.
Set permissions to restrict the broadcast source, thus preventing the receiver from being interfered by malicious broadcasts with the same action, or MDM Engine's capabilities being used by malicious apps.
Negative example:
- // Receiver tag.
- <receiver
- android:name=".ExampleReceiver"
- <intent-filter>
- <action android:name="com.huawei.action.EXAMPLE" />
- </intent-filter>
- </receiver>
-
- public class ExampleReceiver extends BroadcastReceiver {
- private DevicePolicyManager mDpm;
- @Override
- public void onReceive(Context context, Intent intent) {
- // invoke mdm
- mDpm.setCameraDisabled(admin, true);
- }
- }
In the example above, the android:permission attribute is not declared in the <receiver> tag to restrict the broadcast source. That means, malicious apps can use MDM Engine's capabilities through com.huawei.action.EXAMPLE, affecting the normal use of the device.
Positive example:
Declare the android:permission attribute in the <receiver> tag of the receiver app and declare permissions required by the sender app.
First, define the permission in the AndroidManifest.xml file of the receiver app.
- <permission
- android:name="com.huawei.permission.TEST"
- android:protectionLevel="signature" >
- </permission>
Then, add the defined permission when registering the receiver.
- <receiver
- android:name=".ExampleReceiver"
- android:permission="com.huawei.permission.TEST"
- android:exported="true" >
- <intent-filter>
- <action android:name="com.huawei.action.EXAMPLE" />
- </intent-filter>
- </receiver>
- registerReceiver(receiver, filter, "com.huawei.permission.TEST", null);
After the permission is set, the receiver can receive broadcasts only from apps with the com.huawei.permission.TEST permission.
At the same time, declare the permission in the AndroidManifest.xml file of the broadcast sender app.
- <uses-permission android:name="com.huawei.permission.TEST"/>