


Intelligent Assistant
Chat with our virtual assistant to get answers promptly.
1. Build a model and add the graph object to the model.
2. (Optional) Generate a built model and call the SaveToFile API.
3. Build a network and call APIs of the Model Building Class to build a model generation file. If you need the format that is the same as the input and output of the original model, you can use the BuildIRModel API with the useOriginFormat capability.
- auto activation = hiai::op::Activation("Test")
- .set_input_x(data)
- .set_attr_mode(13);
Use squeezenet as an example: See the detailed code in Demo_Source_Code\hiaiv1_irmodelbuild\src\main\jni\CreateModel.cpp, the C++ file in the jni folder.
This model contains the following operators:
Call the Graph class API (ddk\ai_ddk_lib\include\graph\ in the DDK package) to build single operators on the network and cascade them based on their relationship in the native model.
Users can construct the data operator as the input of the entire network, as shown below.
- TensorDesc desc(Shape({in_channels, out_channels, h, w}), format, datatype);
- string data_name = op_name;
- data = hiai::op::Data(data_name);
- data.update_input_desc_x(desc);
The second parameter format of TensorDesc is reserved. The setting does not take effect. Use the default value.
For information like the weight, the Const operator can be used as the input of the operator, as shown below.
- hiai::op::Const conv10_const_1= hiai::op::Const("conv10_filter").set_attr_value(weightList0[0]);
This is a feature available since CANN DDK V320.
AIPP operators include AIPP input operators and AIPP functional operators.
AIPP input operators: ImageData and DynamicImageData.
AIPP functional operators: ImageCrop, ImageChannelSwap, ImageColorSpaceConversion, ImageResize, ImageDataTypeConversion, ImageRotation, and ImagePadding.
| Operator | Scenario | Support Cascade |
|---|---|---|
| ImageData | Used for static AIPP. The image type, length, and width are defined by input_format, src_image_size_w, and src_image_size_h. | Yes |
| DynamicImageData | Used for dynamic AIPP. The image type, length, and width are not specified. | No |
The Intermediate Representation (IR) model of AIPP supports the multiple inputs. Multiple ImageData operators can be defined on the network, and multiple groups of AIPP functional operators can be connected after one ImageData operator.
For all AIPP functions, the hardware supports only a fixed processing sequence. During IR building, the AIPP operators must be cascaded based on the cascading sequence diagram.
Unnecessary operators can be omitted from a group of AIPP functional operators. However, operators of other types cannot be inserted, and the same AIPP functional operators cannot be added repeatedly.
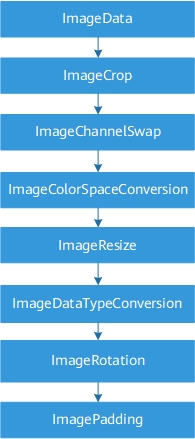
Assume that the model input needs to be cropped. The IR code implementation is as follows:
- TensorDesc desc(Shape({n, channels, h, w}), format, datatype);
- ge::op::ImageData data = op::ImageData(data_name).set_attr_input_format("XRGB8888_U8")
- .set_attr_src_image_size_w(32)
- .set_attr_src_image_size_h(32);
- data.update_input_desc_x(desc);
- auto cropOp = op::ImageCrop("crop").set_input_x(data)
- .set_attr_load_start_pos_w(0)
- .set_attr_load_start_pos_h(0)
- .set_attr_crop_size_w(16)
- .set_attr_crop_size_h(16);
- auto resizeOp = op::ImageResize("resize").set_input_x(cropOp)
- .set_attr_resize_output_h(32)
- .set_attr_resize_output_w(32);
- auto poolOp = op::PoolingD("pool").set_input_x(resizeOp)
- .set_attr_data_mode(0)
- .set_attr_pad_mode(4)
- .set_attr_ceil_mode(1)
- .set_attr_mode(0)
- .set_attr_pad(AttrValue::LIST_INT({0, 0, 0, 0}))
- .set_attr_window(AttrValue::LIST_INT({3, 3}))
- .set_attr_stride(AttrValue::LIST_INT({2, 2}))
- .set_attr_global_pooling(0);
For details about the complete AIPP code example, see Sample.
According to the operator definition, the Convolution operator has the following input and attributes:
- REG_OP(Convolution)
- .INPUT(x, TensorType({ DT_FLOAT }))
- .INPUT(filter, TensorType({ DT_FLOAT }))
- .OPTIONAL_INPUT(bias, TensorType({ DT_FLOAT }))
- .OPTIONAL_INPUT(offset_w, TensorType({ DT_INT8}))
- .OUTPUT(y, TensorType({ DT_FLOAT }))
- .REQUIRED_ATTR(strides, AttrValue::LIST_INT)
- .ATTR(dilations, AttrValue::LIST_INT ({ 1, 1 }))
- .ATTR(pads, AttrValue::LIST_INT ({ 0, 0, 0, 0 }))
- .ATTR(pad_mode, AttrValue::STR { "SPECIFIC" })
- .ATTR(groups, AttrValue::INT { 1 })
- .ATTR(data_format, AttrValue::STR { "NCHW" })
- .ATTR(offset_x, AttrValue::INT { 0 })
- .OP_END()
For a specific node, call the Graph class API to set the input and attribute values based on the detailed information about the node in the network model.
The input of the first Convolution node on the network includes one tensor input and two const inputs, which are configured through the set_input_x, set_input_filter, and set_input_bias APIs. Input bias is optional.
The values of attributes such as strides and dilations are specified in the model. For other attributes whose values are not specified, assign the default values by calling set_attr_{attribute name}.
- auto conv1 = hiai::op::Convolution("conv1")
- .set_input_x(data)
- .set_input_filter(conv1_const_0)
- .set_input_bias(conv1_const_1)
- .set_attr_strides(AttrValue::LIST_INT({ 2, 2 }))
- .set_attr_dilations(AttrValue::LIST_INT({ 1, 1 }))
- .set_attr_groups(1)
- .set_attr_pads(AttrValue::LIST_INT({ 0, 0, 0, 0 }))
- .set_attr_pad_mode("SPECIFIC");
According to the operator definition, the Activation operator has the following input and attributes:
- REG_OP(Activation)
- .INPUT(x, TensorType({ DT_FLOAT }))
- .OUTPUT(y, TensorType({ DT_FLOAT }))
- .ATTR(mode, AttrValue::INT { 1 })
- .ATTR(coef, AttrValue::FLOAT { 0.0 })
- .ATTR(negative_slope, AttrValue::FLOAT { 0.0 })
- .OP_END()
For a specific node, call the Graph class API to set the input and attribute values based on the detailed information about the node in the network model.
The first Activation node of the network has one input, which is configured through set_input_x.
If no attribute value is specified in the model, the attribute is optional. You can also call the set_attr_{attribute name} API to assign the default value.
- auto relu_conv1 = hiai::op::Activation("relu_conv1")
- .set_input_x(conv1)
- .set_attr_coef(0.000000)
- .set_attr_mode(1);
According to the operator definition, the PoolingD operator has the following input and attributes:
- REG_OP(PoolingD)
- .INPUT(x, TensorType({ DT_FLOAT, DT_UINT8 }))
- .OUTPUT(y, TensorType({ DT_FLOAT, DT_UINT8 }))
- .ATTR(mode, AttrValue::INT { 0 })
- .ATTR(pad_mode, AttrValue::INT { 0 })
- .ATTR(global_pooling, AttrValue::BOOL { false })
- .ATTR(window, AttrValue::LIST_INT({ 1, 1 }))
- .ATTR(pad, AttrValue::LIST_INT({ 0, 0, 0,0 }))
- .ATTR(stride, AttrValue::LIST_INT({ 1, 1 }))
- .ATTR(ceil_mode, AttrValue::INT { 0 })
- .ATTR(data_mode, AttrValue::INT { 1 })
- .OP_END()
For a specific node, call the Graph class API to set the input and attribute values based on the detailed information about the node in the network model.
The first PoolingD node of the network has one input, which is configured through set_input_x.
The value of the attribute stride is specified in the model. For other attributes whose values are not specified, call set_attr_{attribute name} to assign the default values.
- auto pool1 = hiai::op::PoolingD("pool1")
- .set_input_x(relu_conv1)
- .set_attr_data_mode(0)
- .set_attr_pad_mode(4)
- .set_attr_ceil_mode(1)
- .set_attr_mode(0)
- .set_attr_pad(AttrValue::LIST_INT({ 0, 0, 0, 0 }))
- .set_attr_window(AttrValue::LIST_INT({ 3, 3 }))
- .set_attr_stride(AttrValue::LIST_INT({ 2, 2 }))
- .set_attr_global_pooling(0);
According to the operator definition, the ConcatD operator has the following changeable input and attributes:
- REG_OP(ConcatD)
- .DYNAMIC_INPUT(x, TensorType({ DT_FLOAT, DT_INT32, DT_UINT8, DT_INT8, DT_BOOL }))
- .OUTPUT(y, TensorType({ DT_FLOAT, DT_INT32, DT_UINT8, DT_INT8, DT_BOOL }))
- .REQUIRED_ATTR(concat_dim, AttrValue::INT)
- .ATTR(N, AttrValue::INT { 1 })
- .OP_END()
For input nodes of the Concat D operator, call the Graph class API to set the input and attribute values based on the detailed information about the nodes in the network model.
The first ConcatD node on the network is configured with two inputs. The number of inputs is limited by create_dynamic_input_x.
If no attribute value is specified in the model, call set_attr_{attribute name} to assign the default value.
- auto fire2_concat = hiai::op::ConcatD("fire2/concat")
- .create_dynamic_input_x(2)
- .set_dynamic_input_x(1,fire2_relu_expand1x1)
- .set_dynamic_input_x(2,fire2_relu_expand3x3)
- .set_attr_concat_dim(1);
According to the operator definition, the Softmax operator has the following input and attributes:
- REG_OP(Softmax)
- .INPUT(x, TensorType({ DT_FLOAT }))
- .OUTPUT(y, TensorType({ DT_FLOAT }))
- .ATTR(axis, AttrValue::INT { 0 })
- .OP_END()
For a specific node, call the Graph class API to set the input and attribute values based on the detailed information about the node in the network model.
The first Softmax node of the network has one input, which is configured through set_input_x.
If no attribute value is specified in the model, call set_attr_{attribute name} to assign the default value.
- auto prob = op::Softmax("prob")
- .set_input_x(pool10)
- .set_attr_axis(1)
According to the operator definition, the If operator has the following input and attributes:
- REG_OP(If)
- .INPUT(cond, TensorType({DT_BOOL}))
- .DYNAMIC_INPUT(x, TensorType({DT_FLOAT, DT_INT8, DT_INT32, DT_BOOL}))
- .DYNAMIC_OUTPUT(y, TensorType({DT_FLOAT, DT_INT8, DT_INT32, DT_BOOL}))
- .REQUIRED_GRAPH(then_branch)
- .REQUIRED_GRAPH(else_branch)
- .ATTR(output_shapes, AttrValue::LIST_TENSOR_DESC{})
- .OP_END()
For a specific node, call the Graph class API to set the input and attribute values based on the detailed information about the node in the network model.
For the If node on the network, the inputs are cond and x, which is dynamically input. Configure cond through set_input_cond by building a single operator, as shown in the following code.
- auto less = hiai::op::Less("less").
- set_input_x1(leftData).
- set_input_x2(rightData);
- auto y = hiai::op::If("if").set_input_cond(less)
The attributes include REQUIRED_GRAPH, which is set by .set_graph_builder_, as shown in the following code.
- .set_graph_builder_else_branch(GenerateThenGraph)
GenerateThenGraph is a function (function type: std::function<void(ge::Graph&) that can be called to construct the subgraph of the control flow operator. This function can be used to generate a submodel. The following is an example:
- void GenerateThenGraph(ge::Graph& graph)
- {
- auto data = hiai::op::Data("then_input").set_attr_index(0);
- ge::TensorDesc desc(ge::Shape({1, 1, 2, 2}), ge::Format::FORMAT_NCHW, ge::DataType::DT_FLOAT);
- data.set_attr_index(0);
- data.update_input_desc_x(desc);
- auto thenActivate = hiai::op::Activation("then_activation").set_input_x(data);
- std::vector<ge::Operator> inputs{data};
- std::vector<ge::Operator> outputs{thenActivate};
- graph.SetInputs(inputs).SetOutputs(outputs);
- }
According to the operator definition, the While operator has the following input and attributes:
- REG_OP(While)
- .DYNAMIC_INPUT(x, TensorType({DT_FLOAT, DT_INT8, DT_INT32, DT_BOOL}))
- .DYNAMIC_OUTPUT(y, TensorType({DT_FLOAT, DT_INT8, DT_INT32, DT_BOOL}))
- .REQUIRED_GRAPH(cond)
- .REQUIRED_GRAPH(body)
- .ATTR(output_shapes, AttrValue::LIST_TENSOR_DESC{})
- .OP_END()
For a specific node, call the Graph class API to set the input and attribute values based on the detailed information about the node in the network model.
The input of the While node on the network is a dynamic input x, which is configured through set_dynamic_input_x.
The attributes include REQUIRED_GRAPH, which is set by .set_graph_builder_, as shown in the following code.
- .set_graph_builder_cond(GenerateCondGraph)
GenerateCondGraph is a function (function type: std::function<void(ge::Graph&) that can be called to construct the subgraph of the control flow operator. This function can be used to generate a submodel. The following is an example:
- void GenerateCondGraph(ge::Graph&graph)
- {
- auto data = hiai::op::Data("data_input").set_attr_index(0);
- auto leftData = hiai::op::Data("left_input").set_attr_index(1);
- auto rightData = hiai::op::Data("right_input").set_attr_index(2);
-
- auto less = hiai::op::Less("less").
- set_input_x1(leftData).
- set_input_x2(rightData);
- std::vector<ge::Operator> inputs{data, leftData, rightData};
- std::vector<ge::Operator> outputs{less};
-
- graph.SetInputs(inputs).SetOutputs(outputs);
- }
In the demo, Java calls the Native code through the JNI. The native code calls the functions of libhiai_ir.so and libhiai_ir_build.so libraries to build the IR model. The network building procedure is as follows:
If a success message is returned, go to the next step. If a failure message is returned, go to Step 9.
The code is implemented in Demo_Source_Code\hiaiv1_irmodelbuild\src\main\jni\CreateModel.cpp and Demo_Source_Code\hiaiv1_irmodelbuild\src\main\jni\ClassifyJni.cpp of the Demo_Source_Code project in the DDK.