Image为图片组件,常用于在应用中显示图片。Image支持加载PixelMap、ResourceStr和DrawableDescriptor类型的数据源,支持svg格式,其他需要解码的图片格式请参考ImageSource的supportedFormats属性说明。

-
该组件从API version 7开始支持。后续版本如有新增内容,则采用上角标单独标记该内容的起始版本。
-
该组件从API版本26.0.0开始支持WithTheme。
-
使用快捷组合键对Image组件复制时,Image组件必须处于获焦状态,如何获焦请参考设置组件是否可获焦。Image组件默认不获焦,需将focusable属性设置为true,即可使用Tab键将焦点切换到组件上,再将focusOnTouch属性设置为true,即可实现点击获焦。
-
图片格式支持SVG图源,SVG标签文档请参考SVG标签说明。
-
动图的播放依赖于Image节点的可见性变化,其默认行为是不播放的。当节点可见时,通过回调启动动画,当节点不可见时,停止动画。可见性状态的判断是通过onVisibleAreaChange事件触发的,当可见阈值ratios大于0时,表明Image处于可见状态。
-
Image组件播放GIF动图时,帧时长取自GIF文件中各帧的delay time字段。当某帧的时长值小于等于0时,系统会将其修正为100ms;当某帧的时长值大于0时,系统直接使用该原始值,不做最小帧时长限制。
-
如果图片加载过程中出现白色块,请参考Image白块问题解决方案。如果图片加载时间过长,请参考预置图片资源加载优化。
[h2]Image
Image(src: PixelMap | ResourceStr | DrawableDescriptor)
通过图片数据源获取图片,用于后续渲染展示。
Image组件加载图片失败或图片尺寸为0时,图片组件大小自动为0,不跟随父组件的布局约束。
Image组件默认按照居中裁剪,例如组件宽高设置相同,原图长宽不等,此时按照中间区域进行裁剪。
Image加载成功且组件不设置宽高时,其显示大小自适应父组件。

-
Image直接传入URL可能会带来的潜在性能问题,例如:(1) 大图加载时无法提前下载,白块显示的时间较长;(2) 小图设置同步加载,在弱网环境下,可能会阻塞UI线程造成冻屏问题;(3) 在快速滑动的瀑布流中,无法提前对即将要显示的图片进行下载,导致滑动白块较多。不同场景下,性能问题会有不同的表现,建议将网络下载部分与Image的显示剥离,可提前下载或者异步下载。如果图片加载过程中出现白色块,请参考Image白块解决方案。如果图片加载时间过长,请参考预置图片资源加载优化。
-
src由有效值(可正常解析并加载的图片资源)切换为无效值(无法解析或加载的图片路径)时,组件保持显示此前成功加载的图片内容,不进行清除或重置操作。
-
当Image组件入参为PixelMap类型时,只有当PixelMap对象发生变化(即指向一个新的PixelMap实例),Image组件才能感知到数据的变化。仅修改PixelMap对象的内容(如像素值)而不更换对象引用,无法触发数据变化的感知。
-
Image组件入参为Base64字符串时,Base64字符串通用格式为data:image/subtype;base64,Base64EncodedData,其中subtype为类型声明,Base64EncodedData为数据对应的base64编码,其他为固定字符串。例如:png图像对应的入参为data:image/png;base64,iVBORw0KGgo...。
-
image/subType用于声明数据内容的类型。从API版本26.0.0开始,Image组件接受任意data:image/xxx;base64,Base64EncodedData格式的Base64字符串,具体图片类型由系统多媒体能力根据实际数据内容识别,无需枚举所有支持的MIME类型。对于API版本26.0.0之前版本,Image组件不会强制校验声明的类型与Base64解码后的实际图片格式是否完全一致。在部分场景下,即使声明的类型与真实格式不一致,图片仍可能正常显示。为避免未来行为变化或未知问题,建议始终保持类型与实际图片格式一致。
-
Image组件从API版本26.0.0开始支持通过data:image/*;base64,Base64EncodedData的通配写法,对于API版本26.0.0之前版本,Image组件不支持data:image/*;base64,Base64EncodedData的通配写法,subType必须显式声明具体的图片类型。
-
Image组件从API版本26.0.0开始支持通过Base64加载SVG图片,对于API版本26.0.0之前版本,Image组件不支持通过Base64字符串形式加载SVG图片。
-
卡片能力: 从API version 9开始,该接口支持在ArkTS卡片中使用。
元服务API: 从API version 11开始,该接口支持在元服务中使用。
系统能力: SystemCapability.ArkUI.ArkUI.Full
参数:
| 参数名 | 类型 | 必填 | 说明 |
|---|---|---|---|
| src | PixelMap | ResourceStr| DrawableDescriptor | 是 | 图片的数据源,支持本地图片和网络图片,引用方式请参考加载图片资源。 1. PixelMap格式为像素图,常用于图片编辑的场景。 2. ResourceStr包含Resource和string格式。 string格式可用于加载网络图片和本地图片。当使用相对路径显示图片时,不支持跨包/跨模块调用该Image组件,建议使用Resource格式来管理需全局使用的图片资源。 从DevEco Studio 6.0.0 Beta2版本开始,新建工程或模块时,默认创建的模块不会对非resource目录下的资源进行打包,需使能相关开关:模块的build-profile.json5中buildOption > resOptions > copyCodeResource > enable 设置为true,详见resOptions中相关介绍。 - 支持Base64字符串。 - 传入的字符串为https网络图片地址时,建议参考示例2(下载与显示静态网络图片)。 - 支持file://路径前缀的字符串,应用沙箱URI:file://<bundleName>/<sandboxPath>。应用沙箱路径URI构造可参考constructor。沙箱路径需要使用fileUri.getUriFromPath(path)方法将路径转换为应用沙箱URI,然后传入显示。同时需要保证目录包路径下的文件有可读权限。 Resource格式可以跨包/跨模块访问资源文件,是访问本地图片的推荐方式,具体示例参考访问跨HAP/HSP包资源。 3. 当传入资源id或name为普通图片时,生成DrawableDescriptor对象。传入AnimatedDrawableDescriptor类型可播放PixelMap数组动画。 说明: - ArkTS卡片上支持gif图片格式动效,但仅在显示时播放一次。 - ArkTS卡片上不支持http://等网络相关路径前缀和file://路径前缀的字符串。 |
[h2]Image12+
Image(src: PixelMap | ResourceStr | DrawableDescriptor | ImageContent)
src新增ImageContent类型,可指定对应的图形内容。
卡片能力: 从API version 12开始,该接口支持在ArkTS卡片中使用。
元服务API: 从API version 12开始,该接口支持在元服务中使用。
模型约束: 此接口仅可在Stage模型下使用。
系统能力: SystemCapability.ArkUI.ArkUI.Full
参数:
| 参数名 | 类型 | 必填 | 说明 |
|---|---|---|---|
| src | PixelMap | ResourceStr| DrawableDescriptor| ImageContent | 是 | 图片的数据源,支持本地图片和网络图片,引用方式请参考加载图片资源。 PixelMap、ResourceStr和DrawableDescriptor的使用请参考Image的src参数说明。 传入ImageContent类型,指定图像内容。 说明: - ArkTS卡片上支持gif图片格式动效,但仅在显示时播放一次。 - ArkTS卡片上不支持http://等网络相关路径前缀和file://路径前缀的字符串。 |
[h2]Image12+
Image(src: PixelMap | ResourceStr | DrawableDescriptor, imageAIOptions: ImageAIOptions)
Image新增ImageAIOptions参数,为组件设置AI分析选项。
元服务API: 从API version 12开始,该接口支持在元服务中使用。
模型约束: 此接口仅可在Stage模型下使用。
系统能力: SystemCapability.ArkUI.ArkUI.Full
参数:
| 参数名 | 类型 | 必填 | 说明 |
|---|---|---|---|
| src | PixelMap | ResourceStr| DrawableDescriptor | 是 | 图片的数据源,支持本地图片和网络图片,引用方式请参考加载图片资源。 PixelMap、ResourceStr和DrawableDescriptor的使用请参考Image的src参数说明。 说明: - ArkTS卡片上支持gif图片格式动效,但仅在显示时播放一次。 - ArkTS卡片上不支持http://等网络相关路径前缀和file://路径前缀的字符串。 |
| imageAIOptions | ImageAIOptions | 是 | 给组件设置一个AI分析选项,通过此项可配置分析类型或绑定一个分析控制器。 |
[h2]Image
Image(src: PixelMap | ResourceStr | DrawableDescriptor | ImageContent, reloadKey?: string)
获取图片,支持通过reloadKey参数触发图片重新加载。当reloadKey的值发生变化时,将不使用缓存重新加载图片。
起始版本: 26.0.0
卡片能力: 从API版本26.0.0开始,该接口支持在ArkTS卡片中使用。
元服务API: 从API版本26.0.0开始,该接口支持在元服务中使用。
模型约束: 此接口仅可在Stage模型下使用。
系统能力: SystemCapability.ArkUI.ArkUI.Full
参数:
| 参数名 | 类型 | 必填 | 说明 |
|---|---|---|---|
| src | PixelMap | ResourceStr| DrawableDescriptor| ImageContent | 是 | 图片的数据源,支持本地图片和网络图片,引用方式请参考加载图片资源。 PixelMap、ResourceStr和DrawableDescriptor的使用请参考Image的src参数说明。 传入ImageContent类型,指定图像内容。 说明: - ArkTS卡片上支持gif图片格式动效,但仅在显示时播放一次。 - ArkTS卡片上不支持http://等网络相关路径前缀和file://路径前缀的字符串。 |
| reloadKey | string | 否 | 图片重新加载的标识。当reloadKey的值发生变化时,将不使用缓存重新加载图片。适用于图片源地址不变但图片内容已更新的场景(例如本地图片内容被重写)。 默认值:空字符串。 |
[h2]Image
Image(src: PixelMap | ResourceStr | DrawableDescriptor, imageAIOptions?: ImageAIOptions, reloadKey?: string)
获取图片,支持通过ImageAIOptions参数设置AI分析选项。当reloadKey的值发生变化时,将不使用缓存重新加载图片。
起始版本: 26.0.0
元服务API: 从API版本26.0.0开始,该接口支持在元服务中使用。
模型约束: 此接口仅可在Stage模型下使用。
系统能力: SystemCapability.ArkUI.ArkUI.Full
参数:
| 参数名 | 类型 | 必填 | 说明 |
|---|---|---|---|
| src | PixelMap | ResourceStr| DrawableDescriptor | 是 | 图片的数据源,支持本地图片和网络图片,引用方式请参考加载图片资源。 PixelMap、ResourceStr和DrawableDescriptor的使用请参考Image的src参数说明。 说明: - ArkTS卡片上支持gif图片格式动效,但仅在显示时播放一次。 - ArkTS卡片上不支持http://等网络相关路径前缀和file://路径前缀的字符串。 |
| imageAIOptions | ImageAIOptions | 否 | 给组件设置一个AI分析选项,通过此项可配置分析类型或绑定一个分析控制器。 |
| reloadKey | string | 否 | 图片重新加载的标识。当reloadKey的值发生变化时,将不使用缓存重新加载图片。适用于图片源地址不变但图片内容已更新的场景(例如本地图片内容被重写)。 默认值:空字符串。 |

[h2]alt
alt(value: string | Resource | PixelMap)
设置图片加载过程中显示的占位图。
占位图支持使用objectFit设置填充效果,与图片的填充效果一致。
当组件的参数类型为AnimatedDrawableDescriptor时设置该属性不生效。
卡片能力: 从API version 9开始,该接口支持在ArkTS卡片中使用。
元服务API: 从API version 11开始,该接口支持在元服务中使用。
系统能力: SystemCapability.ArkUI.ArkUI.Full
参数:
| 参数名 | 类型 | 必填 | 说明 |
|---|---|---|---|
| value | string | Resource | PixelMap12+ | 是 | 设置图片加载过程中显示的占位图,支持svg格式,其他需要解码的图片格式请参考ImageSource的supportedFormats属性说明,支持PixelMap类型图片,不支持网络图片。 - 支持Base64字符串。 - 支持file://路径前缀的字符串,应用沙箱URI:file://<bundleName>/<sandboxPath>。应用沙箱路径URI构造可参考constructor。沙箱路径需要使用fileUri.getUriFromPath(path)方法将路径转换为应用沙箱URI,然后传入显示。同时需要保证目录包路径下的文件有可读权限。 默认值:null 由有效值(可正常解析并加载的图片资源)切换为无效值(无法解析或加载的图片路径)时,组件保持显示此前成功加载的图片内容,不进行清除或重置操作。 |
[h2]alt22+
alt(src: ResourceStr | PixelMap | ImageAlt)
设置图片加载过程中和加载失败时的占位图。

占位图支持使用objectFit设置填充效果,与图片的填充效果一致。
当组件的参数类型为AnimatedDrawableDescriptor时设置该属性不生效。
卡片能力: 从API version 22开始,该接口支持在ArkTS卡片中使用。
元服务API: 从API version 22开始,该接口支持在元服务中使用。
模型约束: 此接口仅可在Stage模型下使用。
系统能力: SystemCapability.ArkUI.ArkUI.Full
参数:
| 参数名 | 类型 | 必填 | 说明 |
|---|---|---|---|
| src | ResourceStr | PixelMap| ImageAlt | 是 | 设置图片加载过程中和加载失败时的占位图,支持svg格式,其他需要解码的图片格式请参考ImageSource的supportedFormats属性说明,支持PixelMap类型图片,不支持网络图片。 - 支持Base64字符串。 - 支持file://路径前缀的字符串,应用沙箱URI:file://<bundleName>/<sandboxPath>。应用沙箱路径URI构造可参考constructor。沙箱路径需要使用fileUri.getUriFromPath(path)方法将路径转换为应用沙箱URI,然后传入显示。同时需要保证目录包路径下的文件有可读权限。 |
[h2]objectFit
objectFit(value: ImageFit)
设置图片的填充效果。未通过该接口设置时,默认为ImageFit.Cover,保持宽高比进行缩小或者放大。
卡片能力: 从API version 9开始,该接口支持在ArkTS卡片中使用。
元服务API: 从API version 11开始,该接口支持在元服务中使用。
系统能力: SystemCapability.ArkUI.ArkUI.Full
参数:
| 参数名 | 类型 | 必填 | 说明 |
|---|---|---|---|
| value | ImageFit | 是 | 图片的填充效果。 |
[h2]imageMatrix15+
imageMatrix(matrix: ImageMatrix)
设置图片的变换矩阵。通过ImageMatrix对象使用平移、旋转、缩放等函数,实现宫格缩略图的最佳呈现。SVG类型图源不支持该属性。
设置resizable、objectRepeat属性时,该属性设置不生效。该属性只针对图源做处理,不会触发Image组件的回调事件。
该属性与objectFit属性强关联,仅在objectFit属性设置为ImageFit.MATRIX时生效。
元服务API: 从API version 15开始,该接口支持在元服务中使用。
模型约束: 此接口仅可在Stage模型下使用。
系统能力: SystemCapability.ArkUI.ArkUI.Full
参数:
| 参数名 | 类型 | 必填 | 说明 |
|---|---|---|---|
| matrix | ImageMatrix | 是 | 图片的变换矩阵。 |
[h2]objectRepeat
objectRepeat(value: ImageRepeat)
设置图片的重复样式,从中心点向两边重复,剩余空间不足放下一张图片时会截断。SVG类型图源不支持该属性。
当组件的参数类型为AnimatedDrawableDescriptor时设置该属性不生效。
卡片能力: 从API version 9开始,该接口支持在ArkTS卡片中使用。
元服务API: 从API version 11开始,该接口支持在元服务中使用。
系统能力: SystemCapability.ArkUI.ArkUI.Full
参数:
| 参数名 | 类型 | 必填 | 说明 |
|---|---|---|---|
| value | ImageRepeat | 是 | 图片的重复样式。 默认值:ImageRepeat.NoRepeat |
[h2]interpolation
interpolation(value: ImageInterpolation)
定义图片插值效果。用于优化图片缩放时的锯齿问题。SVG类型图源不支持该属性。
当组件的参数类型为AnimatedDrawableDescriptor时设置该属性不生效。
卡片能力: 从API version 9开始,该接口支持在ArkTS卡片中使用。
元服务API: 从API version 11开始,该接口支持在元服务中使用。
系统能力: SystemCapability.ArkUI.ArkUI.Full
参数:
| 参数名 | 类型 | 必填 | 说明 |
|---|---|---|---|
| value | ImageInterpolation | 是 | 图片的插值效果。 默认值:ImageInterpolation.Low 设置undefined时,取值为ImageInterpolation.None。 |
[h2]renderMode
renderMode(value: ImageRenderMode)
设置图片的渲染模式。SVG类型图源不支持该属性。
设置ColorFilter时,该属性设置不生效。
当组件的参数类型为AnimatedDrawableDescriptor时设置该属性不生效。
卡片能力: 从API version 9开始,该接口支持在ArkTS卡片中使用。
元服务API: 从API version 11开始,该接口支持在元服务中使用。
系统能力: SystemCapability.ArkUI.ArkUI.Full
参数:
| 参数名 | 类型 | 必填 | 说明 |
|---|---|---|---|
| value | ImageRenderMode | 是 | 图片的渲染模式为原色或黑白。 默认值:ImageRenderMode.Original |
[h2]sourceSize
sourceSize(value: ImageSourceSize)
设置图片解码尺寸。仅在目标尺寸小于图源尺寸时生效。SVG类型图源和PixelMap资源不支持该属性。
当组件的参数类型为AnimatedDrawableDescriptor时设置该属性不生效。
卡片能力: 从API version 9开始,该接口支持在ArkTS卡片中使用。
元服务API: 从API version 11开始,该接口支持在元服务中使用。
系统能力: SystemCapability.ArkUI.ArkUI.Full
参数:
| 参数名 | 类型 | 必填 | 说明 |
|---|---|---|---|
| value | ImageSourceSize | 是 | 图片解码尺寸参数,降低图片的分辨率,常用于需要让图片显示尺寸比组件尺寸更小的场景。和objectFit接口的ImageFit.None配合使用时可在组件内显示小图。 |
[h2]matchTextDirection
matchTextDirection(value: boolean)
设置图片是否跟随系统语言方向,在RTL语言环境下显示镜像翻转显示效果。
当组件的参数类型为AnimatedDrawableDescriptor时设置该属性不生效。
卡片能力: 从API version 9开始,该接口支持在ArkTS卡片中使用。
元服务API: 从API version 11开始,该接口支持在元服务中使用。
系统能力: SystemCapability.ArkUI.ArkUI.Full
参数:
| 参数名 | 类型 | 必填 | 说明 |
|---|---|---|---|
| value | boolean | 是 | 图片是否跟随系统语言方向。 默认值:false,false表示图片不跟随系统语言方向,true表示图片跟随系统语言方向,在RTL语言环境下显示镜像翻转显示效果。 |
[h2]fitOriginalSize
fitOriginalSize(value: boolean)
设置图片的显示尺寸是否跟随图源尺寸。
图片组件已设置width、height属性时,fitOriginalSize属性不生效。
当组件的参数类型为AnimatedDrawableDescriptor时设置该属性不生效。
卡片能力: 从API version 9开始,该接口支持在ArkTS卡片中使用。
元服务API: 从API version 11开始,该接口支持在元服务中使用。
系统能力: SystemCapability.ArkUI.ArkUI.Full
参数:
| 参数名 | 类型 | 必填 | 说明 |
|---|---|---|---|
| value | boolean | 是 | 图片的显示尺寸是否跟随图源尺寸。 默认值:false 说明: 当不设置fitOriginalSize或者设置fitOriginalSize为false时,组件显示大小不跟随图源大小。 当设置fitOriginalSize为true时,组件显示大小跟随图源大小。 |
[h2]fillColor
fillColor(value: ResourceColor)
设置填充颜色。仅对SVG图源生效,设置后会替换SVG图片中所有可绘制元素的填充颜色。如需对png图片进行修改颜色,可以使用colorFilter。
当组件的参数类型为AnimatedDrawableDescriptor时设置该属性不生效。
卡片能力: 从API version 9开始,该接口支持在ArkTS卡片中使用。
元服务API: 从API version 11开始,该接口支持在元服务中使用。
系统能力: SystemCapability.ArkUI.ArkUI.Full
参数:
| 参数名 | 类型 | 必填 | 说明 |
|---|---|---|---|
| value | ResourceColor | 是 | 设置填充颜色。 说明: 默认不对组件进行填充。当传入异常值时,系统将使用默认的主题色:浅色模式下为黑色,深色模式下为白色。 从API version 21开始,当supportSvg2设置为true时,fillColor依赖SVG图源中fill属性的参数配置。当SVG图源中fill属性为'none'时,fillColor不生效。当supportSvg2设置为false时,fillColor生效,替换SVG图片中所有可绘制元素的填充颜色。 |
[h2]fillColor15+
fillColor(color: ResourceColor|ColorContent)
设置填充颜色。仅对SVG图源生效,设置后会替换SVG图片中所有可绘制元素的填充颜色。如需对png图片进行修改颜色,可以使用colorFilter。如果想重置填充颜色可以传入ColorContent类型。
当组件的参数类型为AnimatedDrawableDescriptor时设置该属性不生效。
元服务API: 从API version 15开始,该接口支持在元服务中使用。
模型约束: 此接口仅可在Stage模型下使用。
系统能力: SystemCapability.ArkUI.ArkUI.Full
参数:
| 参数名 | 类型 | 必填 | 说明 |
|---|---|---|---|
| color | ResourceColor|ColorContent | 是 | 设置填充颜色。 说明: 默认不对组件进行填充。当传入异常值时,系统将使用默认的主题色:浅色模式下为黑色,深色模式下为白色。 从API version 21开始,当supportSvg2设置为true时,fillColor依赖SVG图源中fill属性的参数配置。当SVG图源中fill属性为'none'时,fillColor不生效。 |
[h2]fillColor20+
fillColor(color: ResourceColor|ColorContent|ColorMetrics)
设置填充颜色。仅对SVG图源生效,设置后会替换SVG图片中所有可绘制元素的填充颜色。如需对png图片进行修改颜色,可以使用colorFilter。如果想重置填充颜色可以传入ColorContent类型。支持通过传入ColorMetrics类型设置P3色域颜色值,可在支持高色域的设备上获得更丰富的色彩表现。
当组件的参数类型为AnimatedDrawableDescriptor时设置该属性不生效。
元服务API: 从API version 20开始,该接口支持在元服务中使用。
模型约束: 此接口仅可在Stage模型下使用。
系统能力: SystemCapability.ArkUI.ArkUI.Full
参数:
| 参数名 | 类型 | 必填 | 说明 |
|---|---|---|---|
| color | ResourceColor|ColorContent|ColorMetrics | 是 | 设置填充颜色。 说明: 默认不对组件进行填充。当传入异常值时,系统将使用默认的主题色:浅色模式下为黑色,深色模式下为白色。 从API version 21开始,当supportSvg2设置为true时,fillColor依赖SVG图源中fill属性的参数配置。当SVG图源中fill属性为'none'时,fillColor不生效。 |
[h2]autoResize
autoResize(value: boolean)
设置图片解码过程中是否对图源自动缩放。降采样解码时图片的部分信息丢失,因此可能会导致图片质量的下降(如:出现锯齿),这时可以选择把autoResize设为false,按原图尺寸解码,提升显示效果,但会增加内存占用。
原图尺寸和显示尺寸不匹配时,图片都会出现些许的失真、模糊。最佳清晰度配置建议:
图片缩小显示时:.autoResize(false) + .interpolation(.Medium)
图片放大显示时:.interpolation(.High)
当组件的参数类型为AnimatedDrawableDescriptor和SVG时设置该属性不生效。
卡片能力: 从API version 9开始,该接口支持在ArkTS卡片中使用。
元服务API: 从API version 11开始,该接口支持在元服务中使用。
系统能力: SystemCapability.ArkUI.ArkUI.Full
参数:
| 参数名 | 类型 | 必填 | 说明 |
|---|---|---|---|
| value | boolean | 是 | 图片解码过程中是否对图源自动缩放。设置为true时,组件会根据显示区域的尺寸决定用于绘制的图源尺寸,有利于减少内存占用。如原图大小为800x1200,而显示区域大小为200x200,则图片会降采样解码到200x300的尺寸(实际计算过程中会依赖缩放和填充类型的配置,从而得到的计算结果会有差异),从而大幅度节省图片占用的内存。 默认值:false。 从API版本26.0.0开始,当图片解码后的宽×高像素乘积超过5000万时,默认值为true,即图片解码过程中开启降采样解码。该判断仅与图片像素尺寸相关,与图片文件大小及图片格式无关。 false表示关闭图源自动缩放,true表示开启图源自动缩放。 |
[h2]syncLoad8+
syncLoad(value: boolean)
设置是否同步加载图片。建议加载尺寸较小的本地图片时将syncLoad设为true,因为耗时较短,在主线程上执行即可。
当组件的参数类型为AnimatedDrawableDescriptor时设置该属性不生效。
alt占位图始终为异步加载,syncLoad对其不生效。
如果加载图片时出现闪烁,设置syncLoad为true。详情请参见并发优化。
卡片能力: 从API version 9开始,该接口支持在ArkTS卡片中使用。
元服务API: 从API version 11开始,该接口支持在元服务中使用。
系统能力: SystemCapability.ArkUI.ArkUI.Full
参数:
| 参数名 | 类型 | 必填 | 说明 |
|---|---|---|---|
| value | boolean | 是 | 是否同步加载图片,默认是异步加载。同步加载时阻塞UI线程,不会显示占位图。 默认值:false,false表示异步加载图片,true表示同步加载图片。 阻塞主线程超过6s将导致AppFreeze,具体参考AppFreeze(应用冻屏)检测。 |
[h2]copyOption9+
copyOption(value: CopyOptions)
设置图片是否可复制。当copyOption设置为非CopyOptions.None时,支持使用长按、鼠标右击、快捷组合键'CTRL+C'等方式进行复制。SVG图片不支持复制。
当组件的参数类型为AnimatedDrawableDescriptor时设置该属性不生效。
卡片能力: 从API version 9开始,该接口支持在ArkTS卡片中使用。
元服务API: 从API version 11开始,该接口支持在元服务中使用。
系统能力: SystemCapability.ArkUI.ArkUI.Full
参数:
| 参数名 | 类型 | 必填 | 说明 |
|---|---|---|---|
| value | CopyOptions | 是 | 图片是否可复制。 默认值:CopyOptions.None |
[h2]colorFilter9+
colorFilter(value: ColorFilter | DrawingColorFilter)
为图像设置颜色滤镜效果。
设置该属性时,renderMode属性设置不生效。
卡片能力: 从API version 9开始,该接口支持在ArkTS卡片中使用。
元服务API: 从API version 11开始,该接口支持在元服务中使用。
系统能力: SystemCapability.ArkUI.ArkUI.Full
参数:
| 参数名 | 类型 | 必填 | 说明 |
|---|---|---|---|
| value | ColorFilter | DrawingColorFilter12+ | 是 | 1. 给图像设置颜色滤镜效果,入参为一个4x5的RGBA转换矩阵。 2. 从API version12开始支持@ohos.graphics.drawing的ColorFilter类型作为入参。 说明: API version 11及之前,SVG类型图源不支持该属性。 从API version 12开始,该接口中的DrawingColorFilter类型支持在元服务中使用。其中,SVG类型的图源只有设置了stroke属性(无论是否有值)才会生效。 从API version 21开始,当supportSvg2属性设置为true时,colorFilter属性对整个SVG图源起作用。 |
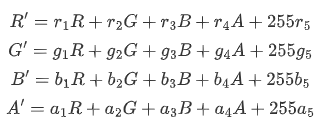
颜色滤镜通过一个4x5的矩阵来设置图像的颜色滤镜,矩阵第一行表示R(红色)的向量值,第二行表示G(绿色)的向量值,第三行表示B(蓝色)的向量值,第四行表示A(透明度)的向量值,4行分别代表不同的RGBA的向量值。
当矩阵对角线值为1,其余值为0时,保持图片原有色彩。
计算规则:
如果输入的滤镜矩阵如下:

像素点为[R, G, B, A],色值的范围[0, 255]
则过滤后的颜色为 [R’, G’, B’, A’]
该属性的具体使用可以参考示例9。
[h2]colorFilter
colorFilter(value: ColorFilter | DrawingColorFilter | ResourceColor)
为图像设置颜色滤镜效果。
设置该属性时,renderMode属性设置不生效。
当值为ResourceColor类型时,它将被转换为带有混合模式的DrawingColorFilter。
起始版本: 26.0.0
卡片能力: 从API版本26.0.0开始,该接口支持在ArkTS卡片中使用。
元服务API: 从API版本26.0.0开始,该接口支持在元服务中使用。
模型约束: 此接口仅可在Stage模型下使用。
系统能力: SystemCapability.ArkUI.ArkUI.Full
参数:
| 参数名 | 类型 | 必填 | 说明 |
|---|---|---|---|
| value | ColorFilter | DrawingColorFilter | ResourceColor | 是 | 图像颜色的滤镜值。 ColorFilter、DrawingColorFilter类型及SVG图源的相关说明,请参考colorFilter的接口说明。ResourceColor类型的输入颜色值,默认按照DrawingColorFilter.createBlendModeColorFilter的SRC_ATOP模式进行绘制(该模式表示滤镜颜色与目标图像叠加,滤镜覆盖在目标上方)。 |
[h2]draggable9+
draggable(value: boolean)
设置组件默认拖拽效果。
元服务API: 从API version 11开始,该接口支持在元服务中使用。
系统能力: SystemCapability.ArkUI.ArkUI.Full
参数:
| 参数名 | 类型 | 必填 | 说明 |
|---|---|---|---|
| value | boolean | 是 | 组件默认拖拽效果,设置为true时,组件可拖拽,绑定的长按手势不生效。 API version 9及之前,默认值为false。API version 10及之后,默认值为true。 若用户需要设置自定义手势,则需要将draggable设置为false。设置为false之后,拖拽类事件不再触发。 |
[h2]enableAnalyzer11+
enableAnalyzer(enable: boolean)
设置组件支持AI分析,当前支持主体识别、文字识别和对象查找等功能。具体使用指导请参考AI识图。
不能和overlay属性同时使用,两者同时设置时overlay中CustomBuilder属性将失效。该特性依赖设备能力。
分析图像要求是静态非矢量图,即svg、gif等图像类型不支持分析,支持传入PixelMap进行分析,目前仅支持RGBA_8888类型,使用方式见示例5(开启图像AI分析)。
alt占位图不支持分析,objectRepeat属性仅在取值为ImageRepeat.NoRepeat时支持分析,隐私遮罩属性obscured打开时不支持分析。
基于完整原始图像进行分析,设置clip、margin、borderRadius、position和objectFit属性导致图像显示不完整,或使用renderMode设置蒙层,仍基于完整原始图像进行分析。 copyOption属性不影响AI分析功能。
当组件的参数类型为AnimatedDrawableDescriptor时设置该属性不生效。

元服务API: 从API version 12开始,该接口支持在元服务中使用。
模型约束: 此接口仅可在Stage模型下使用。
系统能力: SystemCapability.ArkUI.ArkUI.Full
参数:
| 参数名 | 类型 | 必填 | 说明 |
|---|---|---|---|
| enable | boolean | 是 | Image组件是否支持AI分析。 设置为true时,Image组件支持AI分析。设置为false时,Image组件不支持AI分析。 默认值:false |
[h2]resizable11+
resizable(value: ResizableOptions)
设置图像拉伸时可调整大小的图像选项。拉伸对拖拽缩略图以及占位图有效。
设置合法的 ResizableOptions 时,objectRepeat属性、antialiased属性和orientation属性设置不生效。
当设置 top +bottom 大于原图的高或者 left + right 大于原图的宽时 ResizableOptions 属性设置不生效。
当组件的参数类型为动图、AnimatedDrawableDescriptor和SVG时设置该属性不生效。

元服务API: 从API version 12开始,该接口支持在元服务中使用。
模型约束: 此接口仅可在Stage模型下使用。
系统能力: SystemCapability.ArkUI.ArkUI.Full
参数:
| 参数名 | 类型 | 必填 | 说明 |
|---|---|---|---|
| value | ResizableOptions | 是 | 图像拉伸时可调整大小的图像选项。 |
[h2]privacySensitive12+
privacySensitive(supported: boolean)
设置是否支持卡片敏感隐私信息。
卡片能力: 从API version 12开始,该接口支持在ArkTS卡片中使用。
元服务API: 从API version 12开始,该接口支持在元服务中使用。
模型约束: 此接口仅可在Stage模型下使用。
系统能力: SystemCapability.ArkUI.ArkUI.Full
参数:
| 参数名 | 类型 | 必填 | 说明 |
|---|---|---|---|
| supported | boolean | 是 | 是否支持卡片敏感隐私信息。 默认值为false,表示不支持卡片敏感隐私信息,当设置为true时,隐私模式下图片将显示为半透明底板样式。 说明: 设置null则不敏感。 进入隐私模式需要卡片框架支持。 |
[h2]dynamicRangeMode12+
dynamicRangeMode(value: DynamicRangeMode)
设置期望展示的图像动态范围。SVG类型图源不支持该属性。
设备行为差异: 该接口在Phone、PC/2in1和Tablet设备中可正常生效,在其他设备类型中无效果。
元服务API: 从API version 12开始,该接口支持在元服务中使用。
模型约束: 此接口仅可在Stage模型下使用。
系统能力: SystemCapability.ArkUI.ArkUI.Full
参数:
| 参数名 | 类型 | 必填 | 说明 |
|---|---|---|---|
| value | DynamicRangeMode | 是 | 图像显示的动态范围。 默认值:DynamicRangeMode.STANDARD |
[h2]orientation14+
orientation(orientation: ImageRotateOrientation)
设置图像内容的显示方向。
该属性对alt占位图不生效。
卡片能力: 从API version 23开始,该接口支持在ArkTS卡片中使用。
元服务API: 从API version 14开始,该接口支持在元服务中使用。
模型约束: 此接口仅可在Stage模型下使用。
系统能力: SystemCapability.ArkUI.ArkUI.Full
参数:
| 参数名 | 类型 | 必填 | 说明 |
|---|---|---|---|
| orientation | ImageRotateOrientation | 是 | 图像内容的显示方向。 仅支持静态位图的显示。 如果需要显示携带旋转角度信息或翻转信息的图片,建议使用ImageRotateOrientation.AUTO进行设置。 默认值:ImageRotateOrientation.UP 设置为undefined或null时,取值为ImageRotateOrientation.AUTO。 |
[h2]hdrBrightness19+
hdrBrightness(brightness: number)
设置组件在显示HDR图片时的亮度。
SVG类型图源不支持该属性。
该属性与dynamicRangeMode属性同时设置时,dynamicRangeMode属性不生效。
元服务API: 从API version 19开始,该接口支持在元服务中使用。
模型约束: 此接口仅可在Stage模型下使用。
系统能力: SystemCapability.ArkUI.ArkUI.Full
参数:
| 参数名 | 类型 | 必填 | 说明 |
|---|---|---|---|
| brightness | number | 是 | 用于调整组件展示HDR图片的亮度,该接口仅对HDR图源生效。 默认值:1.0 取值范围:[0.0,1.0],小于0和大于1.0时取1.0。0表示图片按照SDR亮度显示,1.0表示图片按照当前允许的最高HDR亮度显示。 |
[h2]supportSvg221+
supportSvg2(enable: boolean)
开启或关闭SVG标签解析能力增强功能,开启后相关SVG图片显示效果会有变化。
Image组件创建后,不支持动态修改该属性的值。
卡片能力: 从API version 21开始,该接口支持在ArkTS卡片中使用。
元服务API: 从API version 21开始,该接口支持在元服务中使用。
模型约束: 此接口仅可在Stage模型下使用。
系统能力: SystemCapability.ArkUI.ArkUI.Full
参数:
| 参数名 | 类型 | 必填 | 说明 |
|---|---|---|---|
| enable | boolean | 是 | 控制是否开启SVG标签解析能力增强功能。 默认值:false true:支持SVG解析新能力;false:保持原有SVG解析能力。 |
[h2]contentTransition21+
contentTransition(transition: ContentTransitionEffect)
图片内容发生变化时,触发过渡动效。
元服务API: 从API version 21开始,该接口支持在元服务中使用。
模型约束: 此接口仅可在Stage模型下使用。
系统能力: SystemCapability.ArkUI.ArkUI.Full
参数:
| 参数名 | 类型 | 必填 | 说明 |
|---|---|---|---|
| transition | ContentTransitionEffect | 是 | 过渡动效的类型。 其中取值为ContentTransitionEffect.OPACITY表示淡入淡出效果,取值为ContentTransitionEffect.IDENTITY表示无动画效果。 默认值:ContentTransitionEffect.IDENTITY 设置为undefined或null时,取默认值ContentTransitionEffect.IDENTITY。 说明:对动态图片资源不生效。 |
[h2]antialiased23+
antialiased(isAntialiased: Optional<boolean>)
设置位图图片边缘是否开启抗锯齿。未通过该接口设置时,默认不开启抗锯齿。SVG类型图片不支持该属性。

元服务API: 从API version 23开始,该接口支持在元服务中使用。
模型约束: 此接口仅可在Stage模型下使用。
系统能力: SystemCapability.ArkUI.ArkUI.Full
参数:
| 参数名 | 类型 | 必填 | 说明 |
|---|---|---|---|
| isAntialiased | Optional<boolean> | 是 | 设置位图图片边缘是否开启抗锯齿。 true表示开启边缘抗锯齿;false表示不开启边缘抗锯齿。 设置为undefined时,不开启边缘抗锯齿。 |
ImageContent12+
指定图像内容。
卡片能力: 从API version 12开始,该接口支持在ArkTS卡片中使用。
元服务API: 从API version 12开始,该接口支持在元服务中使用。
模型约束: 此接口仅可在Stage模型下使用。
系统能力: SystemCapability.ArkUI.ArkUI.Full
| 名称 | 值 | 说明 |
|---|---|---|
| EMPTY | 0 | 空图像。 |
ImageInterpolation
图片的插值效果。
卡片能力: 从API version 9开始,该接口支持在ArkTS卡片中使用。
元服务API: 从API version 11开始,该接口支持在元服务中使用。
系统能力: SystemCapability.ArkUI.ArkUI.Full
| 名称 | 值 | 说明 |
|---|---|---|
| None | 0 | 最近邻插值。 |
| Low | 1 | 双线性插值。 |
| Medium | 2 | MipMap插值。 |
| High | 3 | Cubic插值,插值质量最高,可能会影响图片渲染的速度。 |
ImageRenderMode
图片的渲染模式。
卡片能力: 从API version 9开始,该接口支持在ArkTS卡片中使用。
元服务API: 从API version 11开始,该接口支持在元服务中使用。
系统能力: SystemCapability.ArkUI.ArkUI.Full
| 名称 | 值 | 说明 |
|---|---|---|
| Original | 0 | 原色渲染模式。 |
| Template | 1 | 黑白渲染模式。 |
ResizableOptions11+
图像拉伸时可调整大小的图像选项。
元服务API: 从API version 12开始,该接口支持在元服务中使用。
模型约束: 此接口仅可在Stage模型下使用。
系统能力: SystemCapability.ArkUI.ArkUI.Full
| 名称 | 类型 | 只读 | 可选 | 说明 |
|---|---|---|---|---|
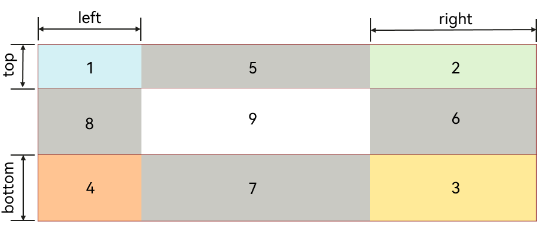
| slice | EdgeWidths | 否 | 是 | 边框宽度类型,用于描述组件边框不同方向的宽度。 说明: 只有当bottom和right同时大于0时,该属性生效。 当设置了top时,图片顶部拉伸,图片的像素值保持不变。 当设置了right时,图片右部拉伸,图片的像素值保持不变。 当设置了bottom时,图片底部拉伸,图片的像素值保持不变。 当设置了left时,图片左部拉伸,图片的像素值保持不变。 每个方向的宽度默认值为0,传入数字时默认单位为vp。 设置了EdgeWidths后的效果如图1(设置EdgeWidths效果图)所示。 |
| lattice12+ | DrawingLattice | 否 | 是 | 矩形网格对象。 说明: 通过@ohos.graphics.drawing的createImageLattice接口创建Lattice类型作为入参。将图像划分为矩形网格,同时处于偶数列和偶数行上的网格图像是固定的,不会被拉伸。其他位置的网格图像会根据slice进行拉伸。 该参数对backgroundImageResizable接口不生效。 传入数字时默认单位为px。 |
图1 设置EdgeWidths效果图
ImageAlt22+
设置图片占位图。
卡片能力: 从API version 22开始,该接口支持在ArkTS卡片中使用。
元服务API: 从API version 22开始,该接口支持在元服务中使用。
模型约束: 此接口仅可在Stage模型下使用。
系统能力: SystemCapability.ArkUI.ArkUI.Full
| 名称 | 类型 | 只读 | 可选 | 说明 |
|---|---|---|---|---|
| placeholder | ResourceStr | PixelMap | 否 | 是 | 加载过程中的占位图。 |
| error | ResourceStr | PixelMap | 否 | 是 | 加载失败的占位图。 |
DynamicRangeMode12+枚举说明
期望展示的图像动态范围。
元服务API: 从API version 12开始,该接口支持在元服务中使用。
模型约束: 此接口仅可在Stage模型下使用。
系统能力: SystemCapability.ArkUI.ArkUI.Full
| 名称 | 值 | 说明 |
|---|---|---|
| HIGH | 0 | 不受限动态范围,最大限度进行图片提亮。 |
| CONSTRAINT | 1 | 受限动态范围,受限进行图片提亮。 |
| STANDARD | 2 | 标准动态范围,不进行图片提亮。 |
ImageRotateOrientation14+
期望的图像内容显示方向。
卡片能力: 从API version 23开始,该接口支持在ArkTS卡片中使用。
模型约束: 此接口仅可在Stage模型下使用。
系统能力: SystemCapability.ArkUI.ArkUI.Full
| 名称 | 值 | 说明 |
|---|---|---|
| AUTO | 0 | 读取图片携带的EXIF元数据作为显示方向,支持旋转和镜像。 PixelMap和DrawableDescriptor类型的图片不包含头信息,调用该接口时图片显示效果不变化。 元服务API: 从API version 14开始,该接口支持在元服务中使用。
|
| UP | 1 | 默认按照当前图片的像素数据进行显示,不做任何处理。 元服务API: 从API version 14开始,该接口支持在元服务中使用。 |
| RIGHT | 2 | 将当前图片顺时针旋转90度后显示。 元服务API: 从API version 14开始,该接口支持在元服务中使用。
|
| DOWN | 3 | 将当前图片顺时针旋转180度后显示。 元服务API: 从API version 14开始,该接口支持在元服务中使用。
|
| LEFT | 4 | 将当前图片顺时针旋转270度后显示。 元服务API: 从API version 14开始,该接口支持在元服务中使用。
|
| UP_MIRRORED20+ | 5 | 将当前图片水平翻转后显示。 元服务API: 从API version 20开始,该接口支持在元服务中使用。
|
| RIGHT_MIRRORED20+ | 6 | 将当前图片水平翻转再顺时针旋转90度后显示。 元服务API: 从API version 20开始,该接口支持在元服务中使用。
|
| DOWN_MIRRORED20+ | 7 | 将当前图片垂直翻转后显示。 元服务API: 从API version 20开始,该接口支持在元服务中使用。
|
| LEFT_MIRRORED20+ | 8 | 将当前图片水平翻转再顺时针旋转270度后显示。 元服务API: 从API version 20开始,该接口支持在元服务中使用。
|


ImageSourceSize18+对象说明
图片解码尺寸。

为规范匿名对象的定义,API 18版本修改了此处的元素定义。其中,保留了历史匿名对象的起始版本信息,会出现外层元素@since版本号高于内层元素版本号的情况,但这不影响接口的使用。
卡片能力: 从API version 18开始,该接口支持在ArkTS卡片中使用。
元服务API: 从API version 18开始,该接口支持在元服务中使用。
模型约束: 此接口仅可在Stage模型下使用。
系统能力: SystemCapability.ArkUI.ArkUI.Full
| 名称 | 类型 | 只读 | 可选 | 说明 |
|---|---|---|---|---|
| width7+ | number | 否 | 否 | 图片解码尺寸宽度。 单位:vp 取值范围: (0, +∞);当取值小于等于0时,该参数不生效,按图片原始尺寸解码。 卡片能力: 从API version 9开始,该接口支持在ArkTS卡片中使用。 元服务API: 从API version 11开始,该接口支持在元服务中使用。 |
| height7+ | number | 否 | 否 | 图片解码尺寸高度。 单位:vp 取值范围: (0, +∞);当取值小于等于0时,该参数不生效,按图片原始尺寸解码。 卡片能力: 从API version 9开始,该接口支持在ArkTS卡片中使用。 元服务API: 从API version 11开始,该接口支持在元服务中使用。 |
DrawableDescriptor10+
type DrawableDescriptor = import ('../api/@ohos.arkui.drawableDescriptor').DrawableDescriptor
作为Image组件的入参对象。
元服务API: 从API version 11开始,该接口支持在元服务中使用。
模型约束: 此接口仅可在Stage模型下使用。
系统能力: SystemCapability.ArkUI.ArkUI.Full
| 类型 | 说明 |
|---|---|
| import ('../api/@ohos.arkui.drawableDescriptor').DrawableDescriptor | 返回一个DrawableDescriptor对象。 |
DrawingColorFilter12+
type DrawingColorFilter = import('../api/@ohos.graphics.drawing').default.ColorFilter
颜色滤波器对象。
元服务API: 从API version 12开始,该接口支持在元服务中使用。
模型约束: 此接口仅可在Stage模型下使用。
系统能力: SystemCapability.ArkUI.ArkUI.Full
| 类型 | 说明 |
|---|---|
| import('../api/@ohos.graphics.drawing').default.ColorFilter | 返回一个颜色滤波器。 |
DrawingLattice12+
type DrawingLattice = import('../api/@ohos.graphics.drawing').default.Lattice
将图片按照矩形网格进行划分。
元服务API: 从API version 12开始,该接口支持在元服务中使用。
模型约束: 此接口仅可在Stage模型下使用。
系统能力: SystemCapability.ArkUI.ArkUI.Full
| 类型 | 说明 |
|---|---|
| import('../api/@ohos.graphics.drawing').default.Lattice | 返回一个矩阵网格对象。 |
ImageMatrix15+对象说明
type ImageMatrix = Matrix4Transit
当前的矩阵对象。
元服务API: 从API version 15开始,该接口支持在元服务中使用。
模型约束: 此接口仅可在Stage模型下使用。
系统能力: SystemCapability.ArkUI.ArkUI.Full
| 类型 | 说明 |
|---|---|
| Matrix4Transit | 返回当前的矩阵对象。 |
ColorContent15+
指定颜色填充内容。
元服务API: 从API version 15开始,该接口支持在元服务中使用。
模型约束: 此接口仅可在Stage模型下使用。
系统能力: SystemCapability.ArkUI.ArkUI.Full
[h2]onComplete
onComplete(callback: (event?: { width: number, height: number, componentWidth: number, componentHeight: number, loadingStatus: number,contentWidth: number, contentHeight: number, contentOffsetX: number, contentOffsetY: number }) => void)
图片数据加载成功和解码成功时均触发该回调,返回成功加载的图片尺寸。
当组件的参数类型为AnimatedDrawableDescriptor时该事件不触发。
卡片能力: 从API version 9开始,该接口支持在ArkTS卡片中使用。
元服务API: 从API version 11开始,该接口支持在元服务中使用。
系统能力: SystemCapability.ArkUI.ArkUI.Full
参数:
| 参数名 | 类型 | 必填 | 说明 |
|---|---|---|---|
| width | number | 是 | 图片的宽。 单位:px 卡片能力: 从API version 9开始,该接口支持在ArkTS卡片中使用。 |
| height | number | 是 | 图片的高。 单位:px 卡片能力: 从API version 9开始,该接口支持在ArkTS卡片中使用。 |
| componentWidth | number | 是 | 组件的宽。 单位:px 卡片能力: 从API version 9开始,该接口支持在ArkTS卡片中使用。 |
| componentHeight | number | 是 | 组件的高。 单位:px 卡片能力: 从API version 9开始,该接口支持在ArkTS卡片中使用。 |
| loadingStatus | number | 是 | 图片加载成功的状态值。 说明: 返回的状态值为0时,表示图片数据加载成功。返回的状态值为1时,表示图片解码成功。 卡片能力: 从API version 9开始,该接口支持在ArkTS卡片中使用。 |
| contentWidth10+ | number | 是 | 图片实际绘制的宽度。 单位:px 说明: 仅在loadingStatus返回1时有效。 卡片能力: 从API version 10开始,该接口支持在ArkTS卡片中使用。 模型约束: 此接口仅可在Stage模型下使用。 |
| contentHeight10+ | number | 是 | 图片实际绘制的高度。 单位:px 说明: 仅在loadingStatus返回1时有效。 卡片能力: 从API version 10开始,该接口支持在ArkTS卡片中使用。 模型约束: 此接口仅可在Stage模型下使用。 |
| contentOffsetX10+ | number | 是 | 实际绘制内容相对于组件自身的x轴偏移。 单位:px 说明: 仅在loadingStatus返回1时有效。 卡片能力: 从API version 10开始,该接口支持在ArkTS卡片中使用。 模型约束: 此接口仅可在Stage模型下使用。 |
| contentOffsetY10+ | number | 是 | 实际绘制内容相对于组件自身的y轴偏移。 单位:px 说明: 仅在loadingStatus返回1时有效。 卡片能力: 从API version 10开始,该接口支持在ArkTS卡片中使用。 模型约束: 此接口仅可在Stage模型下使用。 |
[h2]onError9+
onError(callback: ImageErrorCallback)
图片加载异常时触发该回调。
当组件的参数类型为AnimatedDrawableDescriptor时该事件不触发。
卡片能力: 从API version 9开始,该接口支持在ArkTS卡片中使用。
元服务API: 从API version 11开始,该接口支持在元服务中使用。
系统能力: SystemCapability.ArkUI.ArkUI.Full
参数:
| 参数名 | 类型 | 必填 | 说明 |
|---|---|---|---|
| callback | ImageErrorCallback | 是 | 图片加载异常时触发的回调。 说明: 建议开发者使用此回调,可快速确认图片加载失败时的具体原因,参见ImageError的错误信息详细介绍;网络相关的超时上报,重试次数等规格细节,参见CacheDownloadOptions。 |
[h2]onFinish
onFinish(event: () => void)
当加载的源文件为带动效的SVG格式图片时,SVG动效播放完成时会触发这个回调。如果动效为无限循环动效,则不会触发这个回调。
仅支持SVG格式的图片。当组件的参数类型为AnimatedDrawableDescriptor时该事件不触发。
卡片能力: 从API version 9开始,该接口支持在ArkTS卡片中使用。
元服务API: 从API version 11开始,该接口支持在元服务中使用。
系统能力: SystemCapability.ArkUI.ArkUI.Full
参数:
| 参数名 | 类型 | 必填 | 说明 |
|---|---|---|---|
| event | () => void | 是 | 当加载的源文件为带动效的SVG格式图片时,SVG动效播放完成时会触发这个回调。如果动效为无限循环动效,则不会触发这个回调。 |
ImageErrorCallback9+
type ImageErrorCallback = (error: ImageError) => void
图片加载异常时触发此回调。
当组件的参数类型为AnimatedDrawableDescriptor时该事件不触发。
卡片能力: 从API version 9开始,该接口支持在ArkTS卡片中使用。
元服务API: 从API version 11开始,该接口支持在元服务中使用。
系统能力: SystemCapability.ArkUI.ArkUI.Full
参数:
| 参数名 | 类型 | 必填 | 说明 |
|---|---|---|---|
| error | ImageError | 是 | 图片加载异常时触发回调的返回对象。 |
ImageError9+
图片加载异常时触发回调的返回对象。
当组件的参数类型为AnimatedDrawableDescriptor时该事件不触发。
系统能力: SystemCapability.ArkUI.ArkUI.Full
| 名称 | 类型 | 只读 | 可选 | 说明 |
|---|---|---|---|---|
| componentWidth | number | 否 | 否 | 组件的宽。 单位:px 卡片能力: 从API version 9开始,该接口支持在ArkTS卡片中使用。 元服务API: 从API version 11开始,该接口支持在元服务中使用。 |
| componentHeight | number | 否 | 否 | 组件的高。 单位:px 卡片能力: 从API version 9开始,该接口支持在ArkTS卡片中使用。 元服务API: 从API version 11开始,该接口支持在元服务中使用。 |
| message10+ | string | 否 | 否 | 报错信息。 卡片能力: 从API version 10开始,该接口支持在ArkTS卡片中使用。 元服务API: 从API version 11开始,该接口支持在元服务中使用。 模型约束: 此接口仅可在Stage模型下使用。 |
| error20+ | BusinessError<void> | 否 | 是 | 图片加载异常返回的报错信息,其中code为错误码,message为错误信息。报错信息请参考以下错误信息的详细介绍。 默认值:{ code : -1, message : "" } 卡片能力: 从API version 20开始,该接口支持在ArkTS卡片中使用。 元服务API: 从API version 20开始,该接口支持在元服务中使用。 模型约束: 此接口仅可在Stage模型下使用。 |
| downloadInfo23+ | RequestDownloadInfo | 否 | 是 | 网络图片下载的详细信息,包含下载资源、网络、性能等信息。当图片来源为网络图片且下载失败时将携带此字段。 默认值:null 卡片能力: 从API version 23开始,该接口支持在ArkTS卡片中使用。 元服务API: 从API version 23开始,该接口支持在元服务中使用。 模型约束: 此接口仅可在Stage模型下使用。 |
BusinessError20+
type BusinessError<T = void> = import('../api/@ohos.base').BusinessError<T>
图片加载异常返回的错误信息。
卡片能力: 从API version 20开始,该接口支持在ArkTS卡片中使用。
元服务API: 从API version 20开始,该接口支持在元服务中使用。
模型约束: 此接口仅可在Stage模型下使用。
系统能力: SystemCapability.ArkUI.ArkUI.Full
| 类型 | 说明 |
|---|---|
| import('../api/@ohos.base').BusinessError<T> | 图片加载异常返回的错误信息。 |
以下是错误信息的详细介绍:ImageError的error属性为错误信息对象,其中code为错误码,message为错误信息。
| 错误码ID | 错误信息 | 错误信息发生阶段 | 图片加载类型 |
|---|---|---|---|
| 101000 | unknown source type. | 数据加载 | 未知类型 |
| 102010 | sync http task of uri cancelled. | 数据加载 | 网络文件 |
| 102011 | sync http task of uri failed. | 数据加载 | 网络文件 |
| 102012 | async http task of uri cancelled. | 数据加载 | 网络文件 |
| 102013 | async http task of uri failed. | 数据加载 | 网络文件 |
| 102030 | wrong code format. | 数据加载 | base64字符串文件 |
| 102031 | decode base64 image failed. | 数据加载 | base64字符串文件 |
| 102050 | path is too long. | 数据加载 | 沙箱文件 |
| 102051 | read data failed. | 数据加载 | 沙箱文件 |
| 102070 | get image data by name failed. | 数据加载 | 资源文件 |
| 102071 | get image data by id failed. | 数据加载 | 资源文件 |
| 102072 | uri is invalid. | 数据加载 | 资源文件 |
| 102090 | uri is invalid. | 数据加载 | 包内文件 |
| 102091 | get asset failed. | 数据加载 | 包内文件 |
| 102110 | open file failed. | 数据加载 | 媒体库文件 |
| 102111 | get file stat failed. | 数据加载 | 媒体库文件 |
| 102112 | read file failed. | 数据加载 | 媒体库文件 |
| 102130 | decoded data is empty. | 数据加载 | 媒体库缩略图文件 |
| 102131 | load shared memory image data timeout. | 数据加载 | 共享内存文件 |
| 103100 | make svg dom failed. | 数据加载 | 矢量图文件 |
| 103200 | image data size is invalid. | 数据加载 | 位图文件 |
| 111000 | image source create failed. | 数据解码 | 位图文件 |
| 111001 | pixelmap create failed. | 数据解码 | 位图文件 |
RequestDownloadInfo23+
type RequestDownloadInfo = import('../api/@ohos.request.cacheDownload').default.DownloadInfo
用于描述网络图片加载失败或异常时的下载信息。该对象包含本次下载任务的资源信息、网络信息以及性能统计信息,可用于定位加载异常的具体原因。
卡片能力: 从API version 23开始,该接口支持在ArkTS卡片中使用。
元服务API: 从API version 23开始,该接口支持在元服务中使用。
模型约束: 此接口仅可在Stage模型下使用。
系统能力: SystemCapability.ArkUI.ArkUI.Full
| 类型 | 说明 |
|---|---|
| import('../api/@ohos.request.cacheDownload').default.DownloadInfo | 网络资源加载异常时返回的下载信息,包含资源信息、网络请求信息与性能统计信息。 |
[h2]示例1(加载基本类型图片)
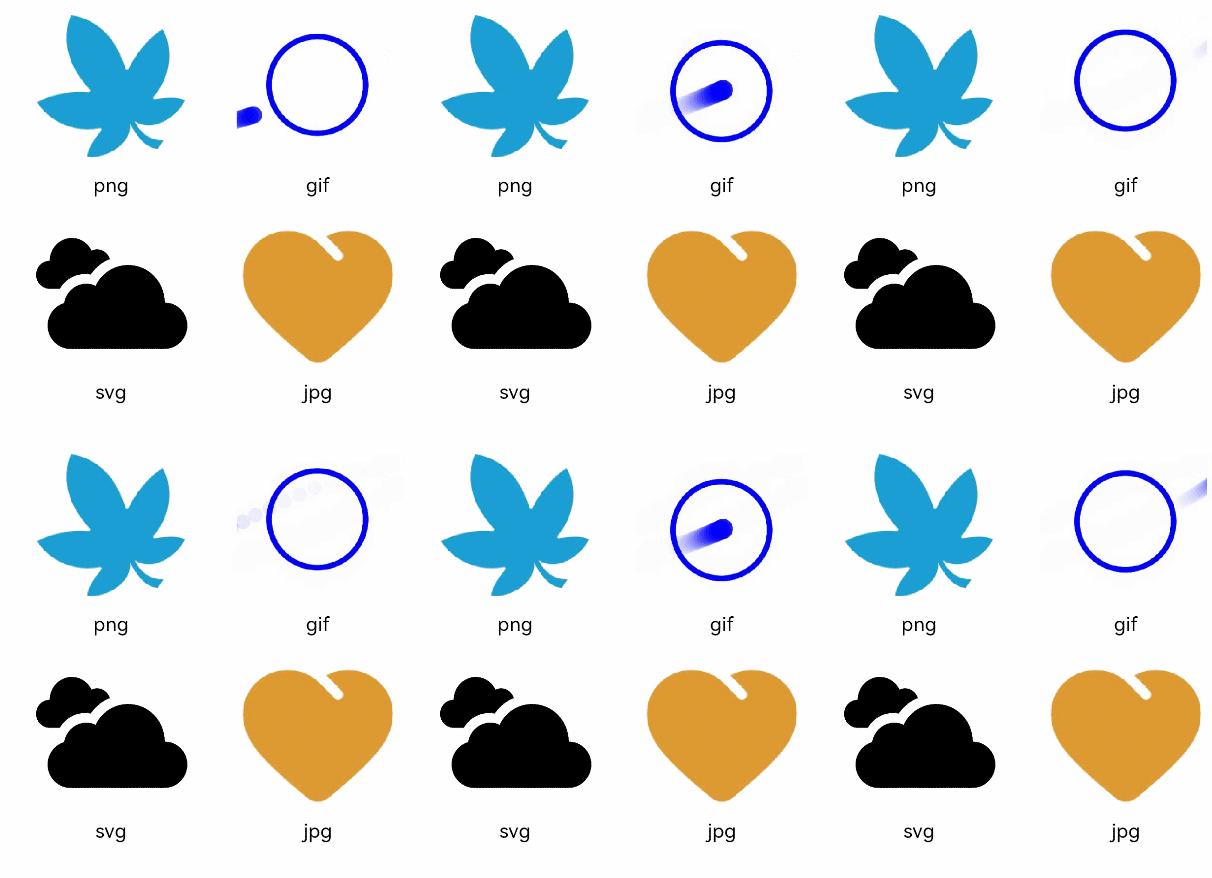
该示例通过传入Resource资源,加载png、gif、svg和jpg等基本类型的图片。
@Entry
@Component
struct ImageExample1 {
  build() {
    Column() {
      Flex({ direction: FlexDirection.Column, alignItems: ItemAlign.Start }) {
        Row() {
          // 加载png格式图片
          // $r('app.media.ic_camera_master_ai_leaf')需要替换为开发者所需的图像资源文件。
          Image($r('app.media.ic_camera_master_ai_leaf'))
            .width(110).height(110).margin(15)
            .overlay('png', { align: Alignment.Bottom, offset: { x: 0, y: 20 } })
          // 加载gif格式图片
          // $r('app.media.loading')需要替换为开发者所需的图像资源文件。
          Image($r('app.media.loading'))
            .width(110).height(110).margin(15)
            .overlay('gif', { align: Alignment.Bottom, offset: { x: 0, y: 20 } })
        }
        Row() {
          // 加载svg格式图片
          // $r('app.media.ic_camera_master_ai_clouded')需要替换为开发者所需的图像资源文件。
          Image($r('app.media.ic_camera_master_ai_clouded'))
            .width(110).height(110).margin(15)
            .overlay('svg', { align: Alignment.Bottom, offset: { x: 0, y: 20 } })
          // 加载jpg格式图片
          // $r('app.media.ic_public_favor_filled')需要替换为开发者所需的图像资源文件。
          Image($r('app.media.ic_public_favor_filled'))
            .width(110).height(110).margin(15)
            .overlay('jpg', { align: Alignment.Bottom, offset: { x: 0, y: 20 } })
        }
      }
    }.height(320).width(360).padding({ right: 10, top: 10 })
  }
} 
[h2]示例2(下载与显示静态网络图片)
加载网络图片时,默认网络超时是5分钟,建议使用alt配置加载时的占位图。使用HTTP工具包发送网络请求,接着将返回的数据解码为Image组件中的PixelMap,加载gif到PixelMap时,gif显示为静态图。图片开发可参考Image Kit简介。
使用网络图片时,需要申请权限ohos.permission.INTERNET。具体申请方式请参考声明权限。
import { http } from '@kit.NetworkKit';
import { BusinessError } from '@kit.BasicServicesKit';
import { image } from '@kit.ImageKit';

@Entry
@Component
struct ImageExample2 {
  @State pixelMapImg: PixelMap | undefined = undefined;

  aboutToAppear() {
    this.requestImageUrl('https://www.example.com/xxx.png'); // 请填写一个具体的网络图片地址
  }

  requestImageUrl(url: string) {
    http.createHttp().request(url, (error: BusinessError, data: http.HttpResponse) => {
      if (error) {
        console.error(`request image failed: url: ${url}, code: ${error.code}, message: ${error.message}`);
      } else {
        let imgData: ArrayBuffer = data.result as ArrayBuffer;
        console.info(`request image success, size: ${imgData.byteLength}`);
        let imgSource: image.ImageSource = image.createImageSource(imgData);
        class sizeTmp {
          height: number = 100;
          width: number = 100;
        }
        let options: Record<string, number | boolean | sizeTmp> = {
          'alphaType': 0,
          'editable': false,
          'pixelFormat': 3,
          'scaleMode': 1,
          'size': { height: 100, width: 100 }
        }
        imgSource.createPixelMap(options).then((pixelMap: PixelMap) => {
          console.info('image createPixelMap success');
          this.pixelMapImg = pixelMap;
          imgSource.release();
        }).catch(() => {
          imgSource.release();
        })
      }
    })
  }

  build() {
    Column() {
      Image(this.pixelMapImg)
        // $r('app.media.img')需要替换为开发者所需的图像资源文件。
        .alt($r('app.media.img'))
        .objectFit(ImageFit.None)
        .width('100%')
        .height('100%')
    }
  }
} 
[h2]示例3(下载与显示网络gif图片)
该示例使用cacheDownload.download接口下载网络gif图片。
使用网络图片时,需要申请权限ohos.permission.INTERNET。具体申请方式请参考声明权限。
import { cacheDownload } from '@kit.BasicServicesKit';

@Entry
@Component
struct Index {
  @State src: string = 'https://www.example.com/xxx.gif'; // 请填写一个具体的网络图片地址。

  async aboutToAppear(): Promise<void> {
    // 提供缓存下载任务的配置选项。
    let options: cacheDownload.CacheDownloadOptions = {};
    try {
      // 进行缓存下载,资源若下载成功会被缓存到应用内存或应用沙箱目录的特定文件中。
      cacheDownload.download(this.src, options);
      console.info(`success to download the resource. `);
    } catch (err) {
      console.error(`Failed to download the resource: code: ${err.code}, message: ${err.message}`);
    }
  }

  build() {
    Column() {
      // 若src指定的是网络图片且已成功下载并缓存,则本次显示无需重复下载。
      Image(this.src)
        .width(100)
        .height(100)
        .objectFit(ImageFit.Cover)
        .borderWidth(1)
    }
    .height('100%')
    .width('100%')
  }
}
[h2]示例4(为图片添加事件)
@Entry
@Component
struct ImageExample3 {
  // $r('app.media.earth')需要替换为开发者所需的图像资源文件。
  private imageOne: Resource = $r('app.media.earth');
  // $r('app.media.star')需要替换为开发者所需的图像资源文件。
  private imageTwo: Resource = $r('app.media.star');
  // $r('app.media.moveStar')需要替换为开发者所需的图像资源文件。
  private imageThree: Resource = $r('app.media.moveStar');
  @State src: Resource = this.imageOne;
  @State src2: Resource = this.imageThree;
  build(){
    Column(){
      // 为图片添加点击事件,点击完成后加载特定图片
      Image(this.src)
        .width(100)
        .height(100)
        .onClick(() => {
          this.src = this.imageTwo;
        })

      // 当加载图片为SVG格式时
      Image(this.src2)
        .width(100)
        .height(100)
        .onFinish(() => {
          // SVG动效播放完成时加载另一张图片
          this.src2 = this.imageOne;
        })
    }.width('100%').height('100%')
  }
} 
[h2]示例5(开启图像AI分析)
该示例使用enableAnalyzer接口开启图像AI分析。
import { image } from '@kit.ImageKit'

@Entry
@Component
struct ImageExample4 {
  @State imagePixelMap: image.PixelMap | undefined = undefined
  private aiController: ImageAnalyzerController = new ImageAnalyzerController()
  private options: ImageAIOptions = {
    types: [ImageAnalyzerType.SUBJECT, ImageAnalyzerType.TEXT],
    aiController: this.aiController
  }

  async aboutToAppear() {
    this.imagePixelMap = await this.getPixmapFromMedia($r('app.media.img'))
  }

  build() {
    Column() {
      Image(this.imagePixelMap, this.options)
        .enableAnalyzer(true)
        .objectFit(ImageFit.Contain)
        .width(200)
        .height(300)
        .margin({left: 10})
      Button('getTypes')
        .onClick(() => {
          this.aiController.getImageAnalyzerSupportTypes()
        })
    }
  }
  private async getPixmapFromMedia(resource: Resource) {
    let unit8Array = await this.getUIContext().getHostContext()?.resourceManager?.getMediaContent({
      bundleName: resource.bundleName,
      moduleName: resource.moduleName,
      id: resource.id
    })
    let imageSource = image.createImageSource(unit8Array?.buffer.slice(0, unit8Array.buffer.byteLength))
    let createPixelMap: image.PixelMap = await imageSource.createPixelMap({
      desiredPixelFormat: image.PixelMapFormat.RGBA_8888
    })
    await imageSource.release()
    return createPixelMap
  }
} 
[h2]示例6(通过slice拉伸图片)
该示例通过resizable属性的slice选项,调整不同方向对图片进行拉伸。
@Entry
@Component
struct Index {
  @State top: number = 10;
  @State bottom: number = 10;
  @State left: number = 10;
  @State right: number = 10;

  build() {
    Column({ space: 5 }) {
      // 原图效果
      // $r('app.media.landscape')需要替换为开发者所需的图像资源文件。
      Image($r('app.media.landscape'))
        .width(200).height(200)
        .border({ width: 2, color: Color.Pink })
        .objectFit(ImageFit.Contain)

      // 图像拉伸效果,设置resizable属性,对图片不同方向进行拉伸
      // $r('app.media.landscape')需要替换为开发者所需的图像资源文件。
      Image($r('app.media.landscape'))
        .resizable({
          slice: {
            // 传入数字时默认为vp单位,但在不同设备上vp单位会被解析成不同大小的px单位,可以根据需要选择传入的单位
            left: `${this.left}px`,
            right: `${this.right}px`,
            top: `${this.top}px`,
            bottom: `${this.bottom}px`
          }
        })
        .width(200)
        .height(200)
        .border({ width: 2, color: Color.Pink })
        .objectFit(ImageFit.Contain)

      Row() {
        Button('add top to ' + this.top).fontSize(10)
          .onClick(() => {
            this.top += 10;
          })
        Button('add bottom to ' + this.bottom).fontSize(10)
          .onClick(() => {
            this.bottom += 10;
          })
      }

      Row() {
        Button('add left to ' + this.left).fontSize(10)
          .onClick(() => {
            this.left += 10;
          })
        Button('add right to ' + this.right).fontSize(10)
          .onClick(() => {
            this.right += 10;
          })
      }

    }
    .justifyContent(FlexAlign.Start).width('100%').height('100%')
  }
} 
[h2]示例7(通过lattice拉伸图片)
该示例使用resizable属性的lattice选项,使用矩形网格对象对图片进行拉伸。
import { drawing } from '@kit.ArkGraphics2D';

@Entry
@Component
struct drawingLatticeTest {
  private xDivs: Array<number> = [1, 2, 200];
  private yDivs: Array<number> = [1, 2, 200];
  private fXCount: number = 3;
  private fYCount: number = 3;
  private drawingLatticeFirst: DrawingLattice =
    drawing.Lattice.createImageLattice(this.xDivs, this.yDivs, this.fXCount, this.fYCount);

  build() {
    Scroll() {
      Column({ space: 10 }) {
        Text('Original Image').fontSize(20).fontWeight(700)
        Column({ space: 10 }) {
          // $r('app.media.mountain')需要替换为开发者所需的图像资源文件。
          Image($r('app.media.mountain'))
            .width(260).height(260)
        }.width('100%')

        Text('Resize by lattice').fontSize(20).fontWeight(700)
        Column({ space: 10 }) {
          // $r('app.media.mountain')需要替换为开发者所需的图像资源文件。
          Image($r('app.media.mountain'))
            .objectRepeat(ImageRepeat.X)
            .width(260)
            .height(260)
            .resizable({
              lattice: this.drawingLatticeFirst
            })
        }.width('100%')
      }.width('100%')
    }
  }
} 
[h2]示例8(播放PixelMap数组动画)
该示例通过AnimatedDrawableDescriptor对象播放PixelMap数组动画。
import { AnimationOptions, AnimatedDrawableDescriptor } from '@kit.ArkUI';
import { image } from '@kit.ImageKit';

@Entry
@Component
struct ImageExample {
  pixelMaps: PixelMap[] = [];
  @State options: AnimationOptions = { iterations: 1 };
  @State animated: AnimatedDrawableDescriptor | undefined = undefined;

  async aboutToAppear() {
    this.pixelMaps = await this.getPixelMaps();
    this.animated = new AnimatedDrawableDescriptor(this.pixelMaps, this.options);
  }

  build() {
    Column() {
      Row() {
        Image(this.animated)
          .width('500px').height('500px')
          .onFinish(() => {
            // 当Image组件的图片源为AnimatedDrawableDescriptor对象时,onFinish回调不会执行。
            console.info('finish');
          })
      }.height('50%')

      Row() {
        Button('once').width(100).padding(5).onClick(() => {
          this.options = { iterations: 1 };
          this.animated = new AnimatedDrawableDescriptor(this.pixelMaps, this.options);
        }).margin(5)
        Button('infinite').width(100).padding(5).onClick(() => {
          this.options = { iterations: -1 };
          this.animated = new AnimatedDrawableDescriptor(this.pixelMaps, this.options);
        }).margin(5)
      }
    }.width('50%')
  }

  private async getPixmapListFromMedia(resource: Resource) {
    let unit8Array = await this.getUIContext().getHostContext()?.resourceManager?.getMediaContent(resource.id);
    let imageSource = image.createImageSource(unit8Array?.buffer.slice(0, unit8Array.buffer.byteLength));
    let createPixelMap: image.PixelMap[] = await imageSource.createPixelMapList({
      desiredPixelFormat: image.PixelMapFormat.RGBA_8888
    });
    await imageSource.release();
    return createPixelMap;
  }

  private async getPixmapFromMedia(resource: Resource) {
    let unit8Array = await this.getUIContext().getHostContext()?.resourceManager?.getMediaContent(resource.id);
    let imageSource = image.createImageSource(unit8Array?.buffer.slice(0, unit8Array.buffer.byteLength));
    let pixelMap: image.PixelMap = await imageSource.createPixelMap({
      desiredPixelFormat: image.PixelMapFormat.RGBA_8888
    });
    await imageSource.release();
    return pixelMap;
  }

  private async getPixelMaps() {
    // $r('app.media.mountain')需要替换为开发者所需的图像资源文件。
    let myPixelMaps: PixelMap[] = await this.getPixmapListFromMedia($r('app.media.mountain')); // 添加图片
    // $r('app.media.sky')需要替换为开发者所需的图像资源文件。
    myPixelMaps.push(await this.getPixmapFromMedia($r('app.media.sky')));
    // $r('app.media.clouds')需要替换为开发者所需的图像资源文件。
    myPixelMaps.push(await this.getPixmapFromMedia($r('app.media.clouds')));
    // $r('app.media.landscape')需要替换为开发者所需的图像资源文件。
    myPixelMaps.push(await this.getPixmapFromMedia($r('app.media.landscape')));
    return myPixelMaps;
  }
} 
[h2]示例9(为图像设置颜色滤镜效果)
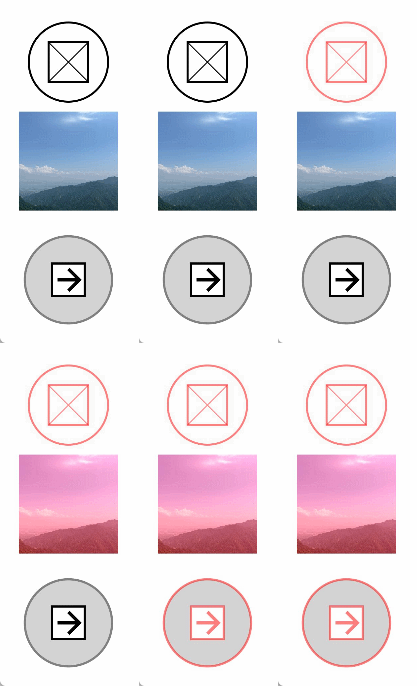
该示例通过colorFilter属性实现了给图像设置颜色滤镜效果。
import { drawing, common2D } from '@kit.ArkGraphics2D';

@Entry
@Component
struct ImageExample3 {
  // 当加载图片为svg格式时
  // $r('app.media.svg1')需要替换为开发者所需的图像资源文件。
  private imageOne: Resource = $r('app.media.svg1');
  // $r('app.media.1')需要替换为开发者所需的图像资源文件。
  private imageTwo: Resource = $r('app.media.1');
  @State src: Resource = this.imageOne;
  @State src2: Resource = this.imageTwo;
  private colorFilterMatrix: number[] = [1, 0, 0, 0, 0.5,
                                         0, 1, 0, 0, 0,
                                         0, 0, 1, 0, 0,
                                         0, 0, 0, 1, 0];
  private color: common2D.Color = {
    alpha: 255,
    red: 255,
    green: 0,
    blue: 0
  };
  @State drawingColorFilterFirst: ColorFilter | undefined = undefined;
  @State drawingColorFilterSecond: ColorFilter | undefined = undefined;
  @State drawingColorFilterThird: ColorFilter | undefined = undefined;

  build() {
    Column() {
      Image(this.src)
        .width(100)
        .height(100)
        .colorFilter(this.drawingColorFilterFirst)
        .onClick(()=>{
          this.drawingColorFilterFirst =
            drawing.ColorFilter.createBlendModeColorFilter(this.color, drawing.BlendMode.SRC_IN);
        })

      Image(this.src2)
        .width(100)
        .height(100)
        .colorFilter(this.drawingColorFilterSecond)
        .onClick(()=>{
          this.drawingColorFilterSecond = new ColorFilter(this.colorFilterMatrix);
        })

      // 当加载图片为svg格式时
      // $r('app.media.svg2')需要替换为开发者所需的图像资源文件。
      Image($r('app.media.svg2'))
        .width(110)
        .height(110)
        .margin(15)
        .colorFilter(this.drawingColorFilterThird)
        .onClick(()=>{
          this.drawingColorFilterThird =
            drawing.ColorFilter.createBlendModeColorFilter(this.color, drawing.BlendMode.SRC_IN);
        })
    }
  }
} 
[h2]示例10(为图像设置填充效果)
该示例通过objectFit属性为图像设置填充效果。
@Entry
@Component
struct ImageExample{
  build() {
    Column() {
      Flex({ direction: FlexDirection.Column, alignItems: ItemAlign.Start }) {
        Row() {
          // 加载png格式图片
          // $r('app.media.sky')需要替换为开发者所需的图像资源文件。
          Image($r('app.media.sky'))
            .width(110).height(110).margin(15)
            .overlay('png', { align: Alignment.Bottom, offset: { x: 0, y: 20 } })
            .border({ width: 2, color: Color.Pink })
            .objectFit(ImageFit.TOP_START)
          // 加载gif格式图片
          // $r('app.media.loading')需要替换为开发者所需的图像资源文件。
          Image($r('app.media.loading'))
            .width(110).height(110).margin(15)
            .overlay('gif', { align: Alignment.Bottom, offset: { x: 0, y: 20 } })
            .border({ width: 2, color: Color.Pink })
            .objectFit(ImageFit.BOTTOM_START)
        }
        Row() {
          // 加载svg格式图片
          // $r('app.media.svg')需要替换为开发者所需的图像资源文件。
          Image($r('app.media.svg'))
            .width(110).height(110).margin(15)
            .overlay('svg', { align: Alignment.Bottom, offset: { x: 0, y: 20 } })
            .border({ width: 2, color: Color.Pink })
            .objectFit(ImageFit.TOP_END)
          // 加载jpg格式图片
          // $r('app.media.jpg')需要替换为开发者所需的图像资源文件。
          Image($r('app.media.jpg'))
            .width(110).height(110).margin(15)
            .overlay('jpg', { align: Alignment.Bottom, offset: { x: 0, y: 20 } })
            .border({ width: 2, color: Color.Pink })
            .objectFit(ImageFit.CENTER)
        }
      }
    }.height(320).width(360).padding({ right: 10, top: 10 })
  }
} 
[h2]示例11(切换显示不同类型图片)
该示例展示了ResourceStr类型与ImageContent类型作为数据源的显示图片效果。
@Entry
@Component
struct ImageContentExample {
  @State imageSrcIndex: number = 0;
  // $r('app.media.app_icon')需要替换为开发者所需的图像资源文件。
  @State imageSrcList: (ResourceStr | ImageContent)[] = [$r('app.media.app_icon'), ImageContent.EMPTY];

  build() {
    Column({ space: 10 }) {
      Image(this.imageSrcList[this.imageSrcIndex])
        .width(100)
        .height(100)
      Button('点击切换Image的src', { type: ButtonType.Capsule, stateEffect: false })
        .height(50)
        .onClick(() => {
          this.imageSrcIndex = (this.imageSrcIndex + 1) % this.imageSrcList.length;
        })
    }.width('100%')
    .padding(20)
  }
} 
[h2]示例12(配置隐私隐藏)
该示例通过privacySensitive属性展示了如何配置隐私隐藏,效果展示需要卡片框架支持。
@Entry
@Component
struct ImageExample {
  build() {
    Column({ space: 10 }) {
      // $r('app.media.startIcon')需要替换为开发者所需的图像资源文件。
      Image($r('app.media.startIcon'))
        .width(50)
        .height(50)
        .margin({top :30})
        .privacySensitive(true)
    }
    .alignItems(HorizontalAlign.Center)
    .width('100%')
  }
} 
[h2]示例13(为图片设置扫光效果)
该示例通过linearGradient接口和animateTo()接口实现了给图片设置扫光效果。
import { curves } from '@kit.ArkUI';

@Entry
@Component
struct ImageExample11 {
  private curve = curves.cubicBezierCurve(0.33, 0, 0.67, 1);
  @State moveImg: string[] = ['imageScanEffect'];
  @State moveImgVisible: Visibility = Visibility.Visible;
  @State durationTime: number = 1500;
  @State iterationsTimes: number = -1;
  @State private opacityValue: number = 0.5;
  @State imageWidth: number = 450;
  @State visible: Visibility = Visibility.Hidden;
  @State stackBackgroundColor: string = '#E1E4E9';
  @State linePositionX: number = 0 - this.imageWidth;
  @State linePositionY: number = 0;
  @State imgResource: Resource | undefined = undefined;

  startupAnimate() {
    this.moveImg.pop();
    this.moveImg.push('imageScanEffect');
    setTimeout(() => {
      // $r('app.media.img')需要替换为开发者所需的图像资源文件。
      this.imgResource = $r('app.media.img');
    }, 3000);
    this.getUIContext()?.animateTo({
      duration: this.durationTime,
      curve: this.curve,
      tempo: 1,
      iterations: this.iterationsTimes,
      delay: 0
    }, () => {
      this.linePositionX = this.imageWidth;
    })
  }

  build() {
    Column() {
      Row() {
        Stack() {
          Image(this.imgResource)
            .width(this.imageWidth)
            .height(200)
            .objectFit(ImageFit.Contain)
            .visibility(this.visible)
            .onComplete(() => {
              this.visible = Visibility.Visible;
              this.moveImg.pop();
            })
            .onError(() =>{
              setTimeout(() => {
                this.visible = Visibility.Visible;
                this.moveImg.pop();
              }, 2600)
            })
          ForEach(this.moveImg, (item: string) => {
            Row()
              .width(this.imageWidth)
              .height(200)
              .visibility(this.moveImgVisible)
              .position({ x: this.linePositionX, y: this.linePositionY })
              .linearGradient({
                direction: GradientDirection.Right,
                repeating: false,
                colors: [[0xE1E4E9, 0], [0xFFFFFF, 0.75], [0xE1E4E9, 1]]
              })
              .opacity(this.opacityValue)
          })
        }
        .backgroundColor(this.visible ? this.stackBackgroundColor : undefined)
        .margin({top: 20, left: 20, right: 20})
        .borderRadius(20)
        .clip(true)
        .onAppear(() => {
          this.startupAnimate();
        })
      }
    }
  }
} 
[h2]示例14(为图片添加变换效果)
该示例通过imageMatrix和objectFit属性,为图片添加旋转和平移的效果。
从API version 15开始,新增imageMatrix属性。
import { matrix4 } from '@kit.ArkUI';

@Entry
@Component
struct Test {
  private matrix1 = matrix4.identity()
    .translate({ x: -400, y: -750 })
    .scale({ x: 0.5, y: 0.5 })
    .rotate({
      x: 2,
      y: 0.5,
      z: 3,
      centerX: 10,
      centerY: 10,
      angle: -10
    })

  build() {
    Row() {
      Column({ space: 50 }) {
        Column({ space: 5 }) {
          // $r('app.media.example')需要替换为开发者所需的图像资源文件。
          Image($r('app.media.example'))
            .border({ width:2, color: Color.Black })
            .objectFit(ImageFit.Contain)
            .width(150)
            .height(150)
          Text('图片无变换')
            .fontSize('25px')
        }
        Column({ space: 5 }) {
          // $r('app.media.example')需要替换为开发者所需的图像资源文件。
          Image($r('app.media.example'))
            .border({ width:2, color: Color.Black })
            .objectFit(ImageFit.None)
            .translate({ x: 10, y: 10 })
            .scale({ x: 0.5, y: 0.5 })
            .width(100)
            .height(100)
          Text('Image直接变换,默认显示图源左上角。')
            .fontSize('25px')
        }
        Column({ space: 5 }) {
          // $r('app.media.example')需要替换为开发者所需的图像资源文件。
          Image($r('app.media.example'))
            .objectFit(ImageFit.MATRIX)
            .imageMatrix(this.matrix1)
            .border({ width:2, color: Color.Black })
            .width(150)
            .height(150)
          Text('通过imageMatrix变换,调整图源位置,实现最佳呈现。')
            .fontSize('25px')
        }
      }
      .width('100%')
    }
  }
} 
[h2]示例15(通过sourceSize设置图片解码尺寸)
该示例通过sourceSize接口自定义图片的解码尺寸。
@Entry
@Component
struct Index {
  build() {
    Column() {
      // $r('app.media.sky')需要替换为开发者所需的图像资源文件。
      Image($r('app.media.sky'))
        .sourceSize({width:1393, height:1080})
        .height(300)
        .width(300)
        .objectFit(ImageFit.Contain)
        .borderWidth(1)
      // $r('app.media.sky')需要替换为开发者所需的图像资源文件。
      Image($r('app.media.sky'))
        .sourceSize({width:13, height:10})
        .height(300)
        .width(300)
        .objectFit(ImageFit.Contain)
        .borderWidth(1)
    }
    .height('100%')
    .width('100%')
  }
} 
[h2]示例16(通过renderMode设置图片的渲染模式)
该示例通过renderMode接口设置图片渲染模式为黑白模式。
@Entry
@Component
struct Index {
  build() {
    Column() {
      // $r('app.media.sky')需要替换为开发者所需的图像资源文件。
      Image($r('app.media.sky'))
        .renderMode(ImageRenderMode.Template)
        .height(300)
        .width(300)
        .objectFit(ImageFit.Contain)
        .borderWidth(1)
    }
    .height('100%')
    .width('100%')
  }
} 
[h2]示例17(通过objectRepeat设置图片的重复样式)
该示例通过objectRepeat接口在竖直轴上重复绘制图片。
@Entry
@Component
struct Index {
  build() {
    Column() {
      // $r('app.media.sky')需要替换为开发者所需的图像资源文件。
      Image($r('app.media.sky'))
        .objectRepeat(ImageRepeat.Y)
        .height('90%')
        .width('90%')
        .objectFit(ImageFit.Contain)
        .borderWidth(1)
    }
    .height('100%')
    .width('100%')
  }
} 
[h2]示例18(设置SVG图片的填充颜色)
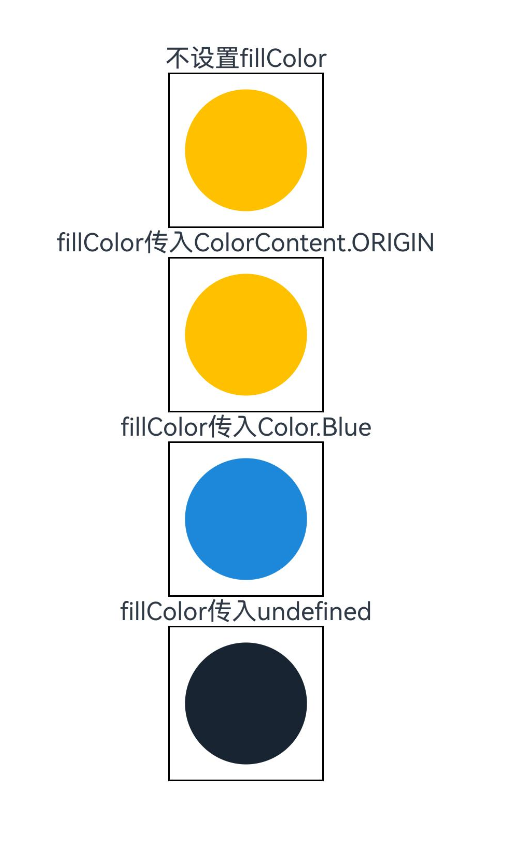
该示例通过fillColor属性为SVG图片设置不同颜色的填充效果。
@Entry
@Component
struct Index {
  build() {
    Column() {
      Text('不设置fillColor')
      // $r('app.media.svgExample')需要替换为开发者所需的图像资源文件。
      Image($r('app.media.svgExample'))
        .height(100)
        .width(100)
        .objectFit(ImageFit.Contain)
        .borderWidth(1)
      Text('fillColor传入ColorContent.ORIGIN')
      // $r('app.media.svgExample')需要替换为开发者所需的图像资源文件。
      Image($r('app.media.svgExample'))
        .height(100)
        .width(100)
        .objectFit(ImageFit.Contain)
        .borderWidth(1)
        .fillColor(ColorContent.ORIGIN)
      Text('fillColor传入Color.Blue')
      // $r('app.media.svgExample')需要替换为开发者所需的图像资源文件。
      Image($r('app.media.svgExample'))
        .height(100)
        .width(100)
        .objectFit(ImageFit.Contain)
        .borderWidth(1)
        .fillColor(Color.Blue)
      Text('fillColor传入undefined')
      // $r('app.media.svgExample')需要替换为开发者所需的图像资源文件。
      Image($r('app.media.svgExample'))
        .height(100)
        .width(100)
        .objectFit(ImageFit.Contain)
        .borderWidth(1)
        .fillColor(undefined)
    }
    .height('100%')
    .width('100%')
  }
} 
[h2]示例19(设置HDR图源动态提亮)
该示例通过hdrBrightness属性调整HDR图源的亮度,将hdrBrightness从0调整到1。
从API version 19开始,新增hdrBrightness属性。
import { image } from '@kit.ImageKit';

const TAG = 'AceImage';

@Entry
@Component
struct Index {
  // 'img_1'需要替换为开发者所需的图像资源文件。
  @State imgUrl: string = 'img_1';
  @State bright: number = 0; // 默认亮度为0
  aboutToAppear(): void {
    // 获取资源管理器中的媒体资源
    let img = this.getUIContext().getHostContext()?.resourceManager.getMediaByNameSync(this.imgUrl);
    // 创建图片源并获取图片信息
    if (img && img.buffer) {
      let imageSource = image.createImageSource(img?.buffer.slice(0));
      let imageInfo = imageSource.getImageInfoSync();
      // 检查图片信息是否获取成功
      if (imageInfo == undefined) {
        console.error(TAG, 'Failed to obtain the image information.');
      } else {
        // 成功获取到图片信息,打印HDR状态
        console.info(TAG, 'imageInfo.isHdr:' + imageInfo.isHdr);
      }
      imageSource.release();
    } else {
      console.error(TAG, 'Failed to obtain the image buffer.');
    }
  }

  build() {
    Column() {
      // $r('app.media.img_1')需要替换为开发者所需的图像资源文件。
      Image($r('app.media.img_1')).width('50%')
        .height('auto')
        .margin({ top: 160 })
        .hdrBrightness(this.bright) // 设置图片的HDR亮度,值由bright状态控制
      Button('图片动态提亮 0->1')
        .onClick(() => {
          // 动画过渡,切换亮度值
          this.getUIContext()?.animateTo({}, () => {
            this.bright = 1.0 - this.bright;
          });
        })
    }
    .height('100%')
    .width('100%')
  }
}
[h2]示例20(设置图片是否跟随系统语言方向)
该示例通过matchTextDirection接口,设置手机语言为维语时图片是否显示镜像翻转显示效果。
@Entry
@Component
struct Index {
  build() {
    Column() {
      Flex({ direction: FlexDirection.Column, alignItems: ItemAlign.Start }) {
        Row() {
          // 图片不跟随系统语言方向
          // $r('app.media.ocean')需要替换为开发者所需的图像资源文件。
          Image($r('app.media.ocean'))
            .width(110).height(110).margin(15)
            .matchTextDirection(false)
        }
        Row() {
          // 图片跟随系统语言方向
          // $r('app.media.ocean')需要替换为开发者所需的图像资源文件。
          Image($r('app.media.ocean'))
            .width(110).height(110).margin(15)
            .matchTextDirection(true)
        }
      }
    }.height(320).width(360).padding({ right: 10, top: 10 })
  }
} 
[h2]示例21(设置图像内容的显示方向)
该示例通过orientation属性,设置图像内容的显示方向。
@Entry
@Component
struct OrientationExample {
  build() {
    Column() {
      Row({ space: 25 }) {
        Column() {
          Text('AUTO')
          // $r('app.media.hello')需要替换为开发者所需的图像资源文件。
          Image($r('app.media.hello'))
            .width(125).height(125)
            .orientation(ImageRotateOrientation.AUTO)
        }

        Column() {
          Text('UP')
          // $r('app.media.hello')需要替换为开发者所需的图像资源文件。
          Image($r('app.media.hello'))
            .width(125).height(125)
            .orientation(ImageRotateOrientation.UP)
        }

        Column() {
          Text('RIGHT')
          // $r('app.media.hello')需要替换为开发者所需的图像资源文件。
          Image($r('app.media.hello'))
            .width(125).height(125)
            .orientation(ImageRotateOrientation.RIGHT)
        }
      }

      Row({ space: 25 }) {
        Column() {
          Text('DOWN')
          // $r('app.media.hello')需要替换为开发者所需的图像资源文件。
          Image($r('app.media.hello'))
            .width(125).height(125)
            .orientation(ImageRotateOrientation.DOWN)
        }

        Column() {
          Text('LEFT')
          // $r('app.media.hello')需要替换为开发者所需的图像资源文件。
          Image($r('app.media.hello'))
            .width(125).height(125)
            .orientation(ImageRotateOrientation.LEFT)
        }

        Column() {
          Text('UP_MIRRORED')
          // $r('app.media.hello')需要替换为开发者所需的图像资源文件。
          Image($r('app.media.hello'))
            .width(125).height(125)
            .orientation(ImageRotateOrientation.UP_MIRRORED)
        }
      }

      Row({ space: 15 }) {
        Column() {
          Text('RIGHT_MIRRORED')
          // $r('app.media.hello')需要替换为开发者所需的图像资源文件。
          Image($r('app.media.hello'))
            .width(125).height(125)
            .orientation(ImageRotateOrientation.RIGHT_MIRRORED)
        }

        Column() {
          Text('DOWN_MIRRORED')
          // $r('app.media.hello')需要替换为开发者所需的图像资源文件。
          Image($r('app.media.hello'))
            .width(125).height(125)
            .orientation(ImageRotateOrientation.DOWN_MIRRORED)
        }

        Column() {
          Text('LEFT_MIRRORED')
          // $r('app.media.hello')需要替换为开发者所需的图像资源文件。
          Image($r('app.media.hello'))
            .width(125).height(125)
            .orientation(ImageRotateOrientation.LEFT_MIRRORED)
        }
      }
    }
  }
} 
[h2]示例22(获取图片的exif信息并设置图像内容的显示方向)
该示例通过getImageProperty接口,获取图片的exif信息,再根据获取到的exif信息,通过orientation属性设置图像内容显示为正确方向。
import { image } from '@kit.ImageKit';
import { resourceManager } from '@kit.LocalizationKit';

@Entry
@Component
struct Example {
  @State rotateOrientation: ImageRotateOrientation = ImageRotateOrientation.UP;
  @State pixelMap: image.PixelMap | undefined = undefined;
  @State text1: string = 'The exif orientation is ';
  @State text2: string = 'Set orientation to ';

  // 根据获取到的EXIF方向信息,转换ImageRotateOrientation,使图片显示为正确的方向。
  getOrientation(orientation: string): ImageRotateOrientation {
    if (orientation == 'Top-right') {
      this.text2 = this.text2 + 'UP_MIRRORED';
      return ImageRotateOrientation.UP_MIRRORED;
    } else if (orientation == 'Bottom-right') {
      this.text2 = this.text2 + 'DOWN';
      return ImageRotateOrientation.DOWN;
    } else if (orientation == 'Bottom-left') {
      this.text2 = this.text2 + 'DOWN_MIRRORED';
      return ImageRotateOrientation.DOWN_MIRRORED;
    } else if (orientation == 'Left-top') {
      this.text2 = this.text2 + 'LEFT_MIRRORED';
      return ImageRotateOrientation.LEFT_MIRRORED;
    } else if (orientation == 'Right-top') {
      this.text2 = this.text2 + 'RIGHT';
      return ImageRotateOrientation.RIGHT;
    } else if (orientation == 'Right-bottom') {
      this.text2 = this.text2 + 'RIGHT_MIRRORED';
      return ImageRotateOrientation.RIGHT_MIRRORED;
    } else if (orientation == 'Left-bottom') {
      this.text2 = this.text2 + 'LEFT';
      return ImageRotateOrientation.LEFT;
    } else if (orientation == 'Top-left') {
      this.text2 = this.text2 + 'UP';
      return ImageRotateOrientation.UP;
    } else {
      this.text2 = this.text2 + 'UP';
      return ImageRotateOrientation.UP;
    }
  }

  async getFileBuffer(context: Context): Promise<ArrayBuffer | undefined> {
    try {
      const resourceMgr: resourceManager.ResourceManager = context.resourceManager;
      // 传入带有EXIF信息的资源文件,获取资源文件内容,返回Uint8Array。
      // 'hello.jpg'需要替换为开发者所需的图像资源文件。
      const fileData: Uint8Array = await resourceMgr.getRawFileContent('hello.jpg');
      console.info('Successfully get RawFileContent');
      // 转为ArrayBuffer并返回。
      const buffer: ArrayBuffer = fileData.buffer.slice(0);
      return buffer;
    } catch (error) {
      console.error('Failed to get RawFileContent');
      return undefined;
    }
  }

  aboutToAppear() {
    let context = this.getUIContext().getHostContext();
    if (!context) {
      return;
    }
    this.getFileBuffer(context).then((buf: ArrayBuffer | undefined) => {
      let imageSource = image.createImageSource(buf);
      if (!imageSource) {
        return;
      }
      // 从图像源中读取图片的EXIF方向信息。
      imageSource.getImageProperty(image.PropertyKey.ORIENTATION).then((orientation) => {
        this.rotateOrientation = this.getOrientation(orientation);
        this.text1 = this.text1 + orientation;
        let options: image.DecodingOptions = {
          'editable': true,
          'desiredPixelFormat': image.PixelMapFormat.RGBA_8888,
        }
        imageSource.createPixelMap(options).then((pixelMap: image.PixelMap) => {
          this.pixelMap = pixelMap;
          imageSource.release();
        });
      }).catch(() => {
        imageSource.release();
      });
    })
  }

  build() {
    Column({ space: 40 }) {
      Column({ space: 10 }) {
        Text('before').fontSize(20).fontWeight(700)
        // 'hello.jpg'需要替换为开发者所需的图像资源文件。
        Image($rawfile('hello.jpg'))
          .width(100)
          .height(100)
        Text(this.text1)
      }

      Column({ space: 10 }) {
        Text('after').fontSize(20).fontWeight(700)
        Image(this.pixelMap)
          .width(100)
          .height(100)
          .orientation(this.rotateOrientation)
        Text(this.text2)
      }
    }
    .height('80%')
    .width('100%')
  }
} 
[h2]示例23(动态切换SVG图片的填充颜色)
通过按钮切换不同色域下的颜色值,动态改变SVG图片的填充颜色效果,以展示ColorMetrics类型的使用方式和显示差异。
import { ColorMetrics } from '@kit.ArkUI';
@Entry
@Component
struct fillColorMetricsDemo {
  @State p3Red: ColorMetrics = ColorMetrics.colorWithSpace(ColorSpace.DISPLAY_P3, 0.631, 0.0392, 0.1294);
  @State sRGBRed: ColorMetrics = ColorMetrics.colorWithSpace(ColorSpace.SRGB, 0.631, 0.0392, 0.1294);
  @State p3Green: ColorMetrics = ColorMetrics.colorWithSpace(ColorSpace.DISPLAY_P3, 0.09, 0.662 ,0.552);
  @State sRGBGreen: ColorMetrics = ColorMetrics.colorWithSpace(ColorSpace.SRGB, 0.09, 0.662 ,0.552);
  @State p3Blue: ColorMetrics = ColorMetrics.colorWithSpace(ColorSpace.DISPLAY_P3, 0, 0.290 ,0.686);
  @State sRGBBlue: ColorMetrics = ColorMetrics.colorWithSpace(ColorSpace.SRGB, 0, 0.290 ,0.686);
  @State colorArray: (Color|undefined|ColorMetrics|ColorContent)[] = [
    this.p3Red, this.sRGBRed, this.p3Green, this.sRGBGreen, this.p3Blue,
    this.sRGBBlue, ColorContent.ORIGIN, Color.Gray, undefined
  ]
  @State colorArrayStr: string[] = [
    'P3 Red', 'SRGB Red', 'P3 Green', 'SRGB Green',
    'P3 Blue', 'SRGB Blue', 'ORIGIN', 'Gray', 'undefined'
  ]
  @State arrayIdx: number = 0
  build() {
    Column() {
      Text('FillColor is ' + this.colorArrayStr[this.arrayIdx])
      // $r('app.media.svgExample')需要替换为开发者所需的图像资源文件。
      Image($r('app.media.svgExample'))
        .width(110).height(110).margin(15)
        .fillColor(this.colorArray[this.arrayIdx])
      Button('ChangeFillColor')
        .onClick(()=>{
          this.arrayIdx = (this.arrayIdx + 1) % this.colorArray.length
        })
      Blank().height(30).width('100%')
      Text('FillColor is SRGB Red')
      // $r('app.media.svgExample')需要替换为开发者所需的图像资源文件。
      Image($r('app.media.svgExample'))
        .width(110).height(110).margin(15)
        .fillColor(this.sRGBRed)
      Blank().height(30).width('100%')
      Text('FillColor is SRGB Green')
      // $r('app.media.svgExample')需要替换为开发者所需的图像资源文件。
      Image($r('app.media.svgExample'))
        .width(110).height(110).margin(15)
        .fillColor(this.sRGBGreen)
      Blank().height(30).width('100%')
      Text('FillColor is SRGB Blue')
      // $r('app.media.svgExample')需要替换为开发者所需的图像资源文件。
      Image($r('app.media.svgExample'))
        .width(110).height(110).margin(15)
        .fillColor(this.sRGBBlue)
    }
  }
} 
[h2]示例24(使用应用沙箱路径显示图片)
在当前应用的haps/entry/files目录下预置一张名为cloud.png的图片,随后使用应用沙箱路径显示该图片。
import { fileUri } from '@kit.CoreFileKit';

@Entry
@Component
struct Index {
  private getSandBoxUri(): string {
    let context = this.getUIContext().getHostContext();
    if (!context) {
      return '';
    }
    // /data/storage/el2/base/haps/entry/files/cloud.png
    // 从应用沙箱中的文件路径获取URI
    // '/cloud.png'需要替换为开发者所需的图像资源文件。
    return fileUri.getUriFromPath(context.filesDir + '/cloud.png');
  }

  build() {
    Column() {
      Image(this.getSandBoxUri())
        .width(150)
        .height(150)
    }
    .height('100%')
    .width('100%')
  }
} 
[h2]示例25(使用相对路径显示图片)
在工程pages目录同级位置创建common目录,在common目录下预置一张名为cloud1.png的图片,随后使用相对路径显示该图片。
@Entry
@Component
struct Index {
  build() {
    Column({ space: 10 }) {
      Image('common/cloud1.png')
        .width(100)
        .height(100)
    }
    .height('100%')
    .width('100%')
  }
} 
[h2]示例26(使用supportSvg2属性时,SVG图片的显示效果)
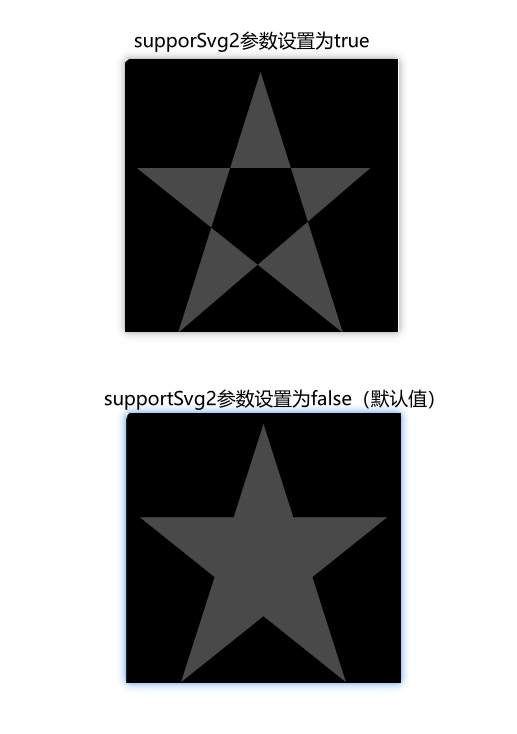
该示例通过设置supportSvg2属性,使SVG标签解析能力增强功能生效。
从API version 21开始,新增supportSvg2属性。
@Entry
@Component
struct Index {
  build() {
    Row() {
      Column() {
        Text('supportSvg2参数设置为true')
        // $rawfile('image.svg')需要替换为开发者所需的图像资源文件。
        Image($rawfile('image.svg'))
          .width(200)
          .height(200)
          .border({ width: 2, color: 'red' })
          .supportSvg2(true)
          .margin({ bottom: 30 })
        Text('supportSvg2参数设置为false(默认值)')
        // $rawfile('image.svg')需要替换为开发者所需的图像资源文件。
        Image($rawfile('image.svg'))
          .width(200)
          .height(200)
          .border({ width: 2, color: 'red' })
      }
      .width('100%')
    }
    .height('100%')
  }
} 
[h2]示例27(使用ContentTransition属性实现图片淡入淡出切换效果)
从API version 21开始,该示例演示了在点击图片切换图源时,通过contentTransition属性实现淡入淡出效果,完成图片的平滑过渡。
@Entry
@Component
struct ImageExample {
  // $r('app.media.icon')需要替换为开发者所需的图像资源文件。
  @State imageResource: Resource = $r('app.media.icon');

  build() {
    Row() {
      Column() {
        Image(this.imageResource)
          .width(200)
          .height(200)
          // 启用淡入淡出过渡效果。
          .contentTransition(ContentTransitionEffect.OPACITY)
          .onClick(() => {
            // $r('app.media.cloud1')需要替换为开发者所需的图像资源文件。
            this.imageResource = $r('app.media.cloud1')
          })
      }
      .width('100%')
    }
    .height('100%')
  }
} 
[h2]示例28(使用alt属性设置加载过程中和加载失败时的占位图)
该示例演示了在图片加载过程中和加载失败时,通过设置alt属性实现图片加载过程中和图片加载失败时显示指定图片
@Entry
@Component
struct ImageExample {
  build() {
      Column() {
      Text('同时设置placeholder属性和error属性')
      // 设置一个错误网址来触发alt的placeholder属性和error属性。
      Image("https://www.example.com/xxx.png")
      // $r('app.media.startIcon')和$r('app.media.example')需要替换为开发者所需的图像资源文件。
        .alt({ placeholder: $r('app.media.startIcon'), error: $r('app.media.example') })
        .width(100)
        .height(100)
        .margin(20)
      Text('只设置placeholder属性')
      Image("https://www.example.com/xxx.png")
        .alt({ placeholder: $r('app.media.startIcon')})
        .width(100)
        .height(100)
        .margin(20)
      Text('只设置error属性')
      Image("https://www.example.com/xxx.png")
        .alt({error: $r('app.media.example')})
        .width(100)
        .height(100)
        .margin(20)
      }
    .width('100%')
    .height('100%')
  }
} 
[h2]示例29(使用onError回调监听网络图片加载异常信息)
该示例演示如何通过onError回调获取网络图片加载异常时的详细下载信息ImageError。当图片加载失败时,可通过ImageError中的downloadInfo属性获取网络图片下载的详细信息,包括下载的资源信息、网络请求信息以及性能统计信息,有助于快速定位网络异常或资源错误原因。
从API version 23开始,ImageError新增downloadInfo属性。
@Entry
@Component
struct Index {
  build() {
    RelativeContainer() {
      Image('https://www.example.com/xxx.png') // 请填写一个具体的网络图片地址
        .height(100)
        .width(100)
        .onError((e)=>{
          console.error(`DownloadErrorInfo: ${JSON.stringify(e?.downloadInfo)}`)
        })
    }
    .height('100%')
    .width('100%')
  }
}
[h2]示例30(设置位图图片边缘抗锯齿)
该示例演示了如何通过设置antialiased接口开启位图图片边缘的抗锯齿功能。
从API version 23开始,新增antialiased接口。
@Entry
@Component
struct ImageExample {
  // $r('app.media.icon')需要替换为开发者所需的图像资源文件。
  @State imageResource: Resource = $r('app.media.icon');

  build() {
    Row() {
      Blank()
        .width(50)

      Column() {
        Blank()
          .height(20)
        Text('没有设置抗锯齿的有旋转角度的图片')
        Blank()
          .height(20)
        Image(this.imageResource)
          .width(50)
          .height(50)
          .rotate({angle: 1})

        Blank()
          .height(20)
        Text('设置了抗锯齿的有旋转角度的图片')
        Blank()
          .height(20)
        Image(this.imageResource)
          .width(50)
          .height(50)
          .rotate({angle: 1})
          .antialiased(true)
      }
    }
  }
} 