


Intelligent Assistant
Chat with our virtual assistant to get answers promptly.
Before generating an Eclipse project package, ensure that the JDK and Android SDK have been installed on your PC.
- allprojects {
- repositories {
- maven { url 'https://developer.huawei.com/repo' }
- google()
- jcenter()
- }
- }
- dependencies {
- transform "com.huawei.agconnect:agconnect-function:1.9.6.300"
- }
- dependencies {
- transform "com.huawei.agconnect:agconnect-function-ktx:1.9.1.300"
- }

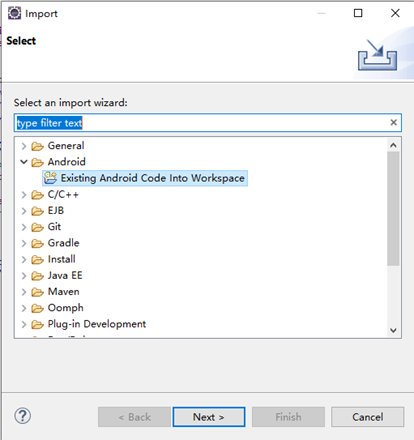
The project to be imported must be located in the same drive as the workspace, for example, D:\. If they are not in the same drive, select Copy projects into workspace to copy the project files to the workspace. Do not place the project to be imported in the directory whose level is the same as that of your Eclipse project. Otherwise, the import may fail.

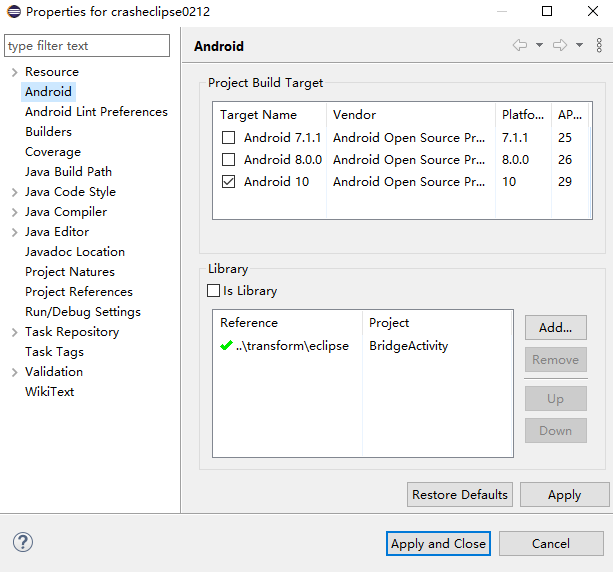
This step is required because Eclipse cannot automatically merge these assets directories. The following figure shows the resource files to be copied.
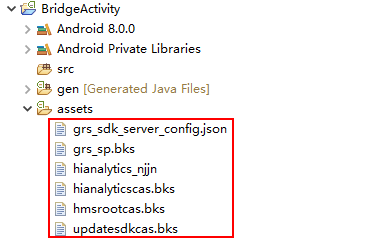
By default, Eclipse does not support AndroidManifest.xml file merging. You need to find the project.properties file in your project directory, open it, and add the following configuration to merge the Manifest files in subprojects:
- manifestmerger.enabled=true
Replace all ${applicationId} variables in the AndroidManifest.xml file of the BridgeActivity project with your app package name. Example:
Before:
- <application>
- <provider
- android:name="com.huawei.agconnect.core.provider.AGConnectInitializeProvider"
- android:authorities="${applicationId}.AGCInitializeProvider"
- android:exported="false" />
After:
- <application>
- <provider
- android:name="com.huawei.agconnect.core.provider.AGConnectInitializeProvider"
- android:authorities="com.huawei.functioneclipse.AGCInitializeProvider"
- android:exported="false" />
- public class MyApplication extends Application{
- // TODO: Add the following code:
- @Override
- public void onCreate() {
- super.onCreate();
- try {
- AGConnectOptionsBuilder builder = new AGConnectOptionsBuilder();
- builder.setInputStream(getAssets().open("agconnect-services.json"));
- AGConnectInstance.initialize(this, builder);
- } catch (IOException e) {
- e.printStackTrace();
- }
- }
- // Code adding ends.
- }
- <application
- <!-- Declaration starts. -->
- android:name=".MyApplication">
- <!-- Declaration ends. -->
- </application>
The AppGallery Connect SDK provides the AGConnectOptionsBuilder class to set parameters in the agconnect-services.json file. If you have selected Do not include key when downloading the file, the file does not include the client_id, client_secret, and api_key parameters. You must set these parameters in the AppGallery Connect SDK through the AGConnectOptionsBuilder class during app launch.
- // Add the following code:
- try {
- AGConnectOptionsBuilder builder = new AGConnectOptionsBuilder();
- InputStream in = getAssets().open("agconnect-services.json"); // If you are using the AppGallery Connect plugin, delete this line.
- builder.setInputStream(in); // If you are using the AppGallery Connect plugin, delete this line.
- builder.setClientId("client_id");
- builder.setClientSecret("client_secret");
- builder.setApiKey("api_key");
- builder.setCPId("cp_id");
- builder.setProductId("product_id");
- builder.setAppId("app_id");
- AGConnectInstance.initialize(this, builder);
- } catch (IOException e) {
- e.printStackTrace();
- }
- // TODO: Code adding ends.
You can go to Project settings > General information and check the value of each parameter, or click  next to a parameter to copy the parameter value.
Replace the parameters in the code with the settings on the General information tab page as follows:

If you think it is insecure to store client_id and client_secret in the JSON file, you are advised to store them on your own server. You can call the API https://connect-drcn.dbankcloud.cn/agc/apigw/oauth2/v1/token to obtain a token, after which you can call setCustomCredentialsProvider to pass the token to AppGallery Connect during the AppGallery Connect SDK initialization.
Sample code for calling the API to obtain a token:
- POST /agc/apigw/oauth2/v1/token
- Host: connect-drcn.dbankcloud.cn
- Content-Type: application/json
- {
- "grant_type":"client_credentials",
- "client_id":client ID displayed in the App information area on the Project settings page of AppGallery Connect,
- "client_secret":client secret displayed in the App information area on the Project settings page of AppGallery Connect,
- "useJwt":1
- }
Response example of the API for obtaining a token:
- HTTP/1.1 200 OK
- Content-Type: application/json; charset=utf-8
- {
- "access_token": "eyJhbGciOiJIUzU****************",
- "expires_in": 0
- }
- String tokenStr = "access_token";
- long expiration = expires_in;
-
- CustomCredentialsProvider developerClientToken = new CustomCredentialsProvider() {
- @Override
- public Task<Token> getTokens(boolean forceRefresh) {
- TaskCompletionSource<Token> source = new TaskCompletionSource<>();
- Token token;
- token = new Token() {
- @Override
- public long getExpiration() {
- return expiration;
- }
-
- @Override
- public long getIssuedAt() {
- return 0;
- }
-
- @Override
- public long getNotBefore() {
- return 0;
- }
-
- @Override
- public String getTokenString() {
- return tokenStr;
- }
- };
- source.setResult(token);
- return source.getTask();
- }
- };
-
- AGConnectOptionsBuilder builder = new AGConnectOptionsBuilder();
- builder.setCustomCredentialsProvider(developerClientToken);
- AGConnectInstance.initialize(getApplicationContext(),builder);
- val tokenStr = "access_token"
- val expiration: Long = expires_in
-
- val developerClientToken = CustomCredentialsProvider {
- val source = TaskCompletionSource<Token>()
- val token: Token
- token = object : Token {
- override fun getExpiration(): Long {
- return expiration
- }
-
- override fun getIssuedAt(): Long {
- return 0
- }
-
- override fun getNotBefore(): Long {
- return 0
- }
-
- override fun getTokenString(): String {
- return tokenStr
- }
- }
- source.setResult(token)
- source.task
- }
- val builder = AGConnectOptionsBuilder()
- builder.setCustomCredentialsProvider(developerClientToken)
- AGConnectInstance.initialize(getApplicationContext(), builder)
Before building the APK, configure obfuscation scripts to prevent the AppGallery Connect SDK from being obfuscated. If obfuscation arises, the AppGallery Connect SDK may not function properly.
Add configurations to the proguard-project.txt file to exclude the AppGallery Connect SDK from obfuscation.
- -keep class com.huawei.agconnect.remoteconfig.*{*;}
- -keepclassmembers class **{
- public <init>(android.content.Context,com.huawei.agconnect.AGConnectInstance);
- }
- -keepclassmembers class com.huawei.agconnect.remoteconfig.internal.server.**{*;}
- -keep class * implements android.os.Parcelable {
- public static final android.os.Parcelable$Creator *;
- }
If multiple processes are running concurrently, you need to call an initialization method in each subprocess to initialize the AppGallery Connect SDK after it is integrated into your app.
Add the initialization code to the onCreate method of Application:
- if (AGConnectInstance.getInstance() == null) {
- AGConnectInstance.initialize(getApplicationContext());
- }