


Intelligent Assistant
Chat with our virtual assistant to get answers promptly.
To standardize notification messages for a better experience, Push Kit will be fully updated from May 19, 2023 for quick apps.
During the update, the push capability will be unavailable. That is, push messages and notification messages cannot reach users in quick apps. We apologize for any inconvenience caused to you.
The service update is expected to be completed in the fourth quarter of 2023. We will notify you by email after that. If you have any questions, please send an email to developer@huawei.com. Thank you for your support.
Push Kit enables you to send latest messages from the cloud to devices, improving user perception and engagement and building good user relationships.
Push messages can be sent to mobile phones running EMUI 8.0 or later.
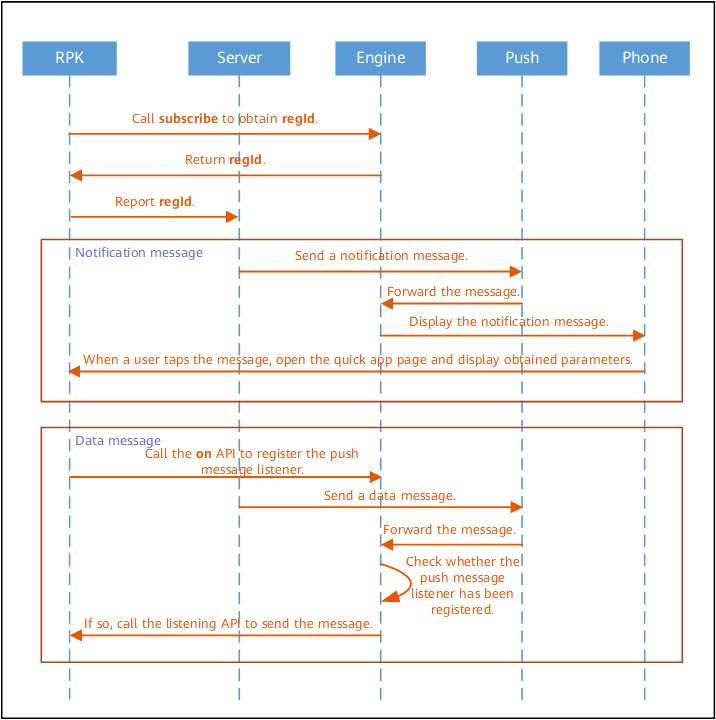
The following figure shows the process of sending a push message.
Before integrating Push Kit into your app, you'll need to complete the following preparations:
Only the return value huawei indicates yes. You can develop relevant functions and call Push Kit APIs only when the current device supports Push Kit.
regId is also called token or push token, which is used to send push messages. The value length is not fixed. The following examples show the two formats in which the value can be:
regId obtained from Huawei Quick App Loader can only be used in the quick apps running on the loader to push messages. It cannot be used in the quick apps released on AppGallery.
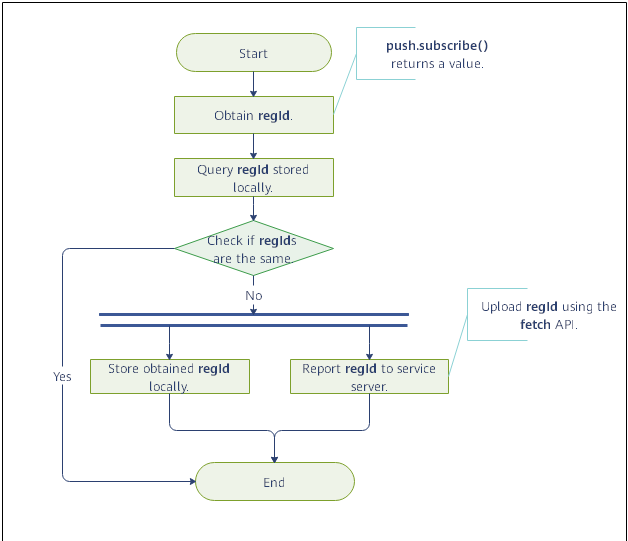
Generally, the value of regId does not change and does not need to be reported to the server each time after it is obtained.
You are advised to store regId using the Data Storage API locally and compare obtained regId each time with the local one. If they are the same, regId does not need to be reported to the server, and vice versa.
The following figure shows the overall process.
Sample code for obtaining regId and comparing it with locally stored content:
checkToken() {
    var subscribeToken=this.$app.$def.dataApp.pushtoken;
    console.log("checkToken subscribeToken= "+subscribeToken);
    var storage = require("@system.storage");
    var that=this;
    storage.get({
        key: 'token',
        success: function (data) {
            console.log("checkToken handling success data= "+data);
            if (subscribeToken != data) {
               // Report to your server.
                 that.uploadToken(subscribeToken);
                that.saveToken(subscribeToken);
            }
        },
        fail: function (data, code) {
            console.log("handling fail, code = " + code);
        }
    })
},
Sample code for storing regId locally:
saveToken(subscribeToken){
  console.log("saveToken");
  var storage = require("@system.storage");
  storage.set({
    key: 'token',
    value: subscribeToken,
       success: function (data) {
        console.log("saveToken handling success");
    },
    fail: function (data, code) {
        console.log("saveToken handling fail, code = " + code);
    }
  })
}, Push messages are displayed in the notification panel. When a user taps the message, a quick app page is displayed and the parameter values carried are assigned to the corresponding parameters on the page.
You can use either of the following methods to send messages:
A quick app can receive push messages when the following conditions are met.
Message Type | Prerequisites |
|---|---|
Notification message | [The version of Quick App Center is earlier than 3.2.1.] A quick app has been used before, and either of the following conditions is met:
[The version of Quick App Center is 3.2.1 or later.] A quick app has been used before, and either of the following conditions is met:
|
APIs for obtaining the access token and sending push messages are included in this mode.
API for obtaining the access token
For details about the API, please refer to OAuth 2.0-based Authentication.
API for sending push messages
Sends push messages.
Protocol: HTTPS POST
API access URL: https://push-api.cloud.huawei.com/v1/[clientid]/messages:send
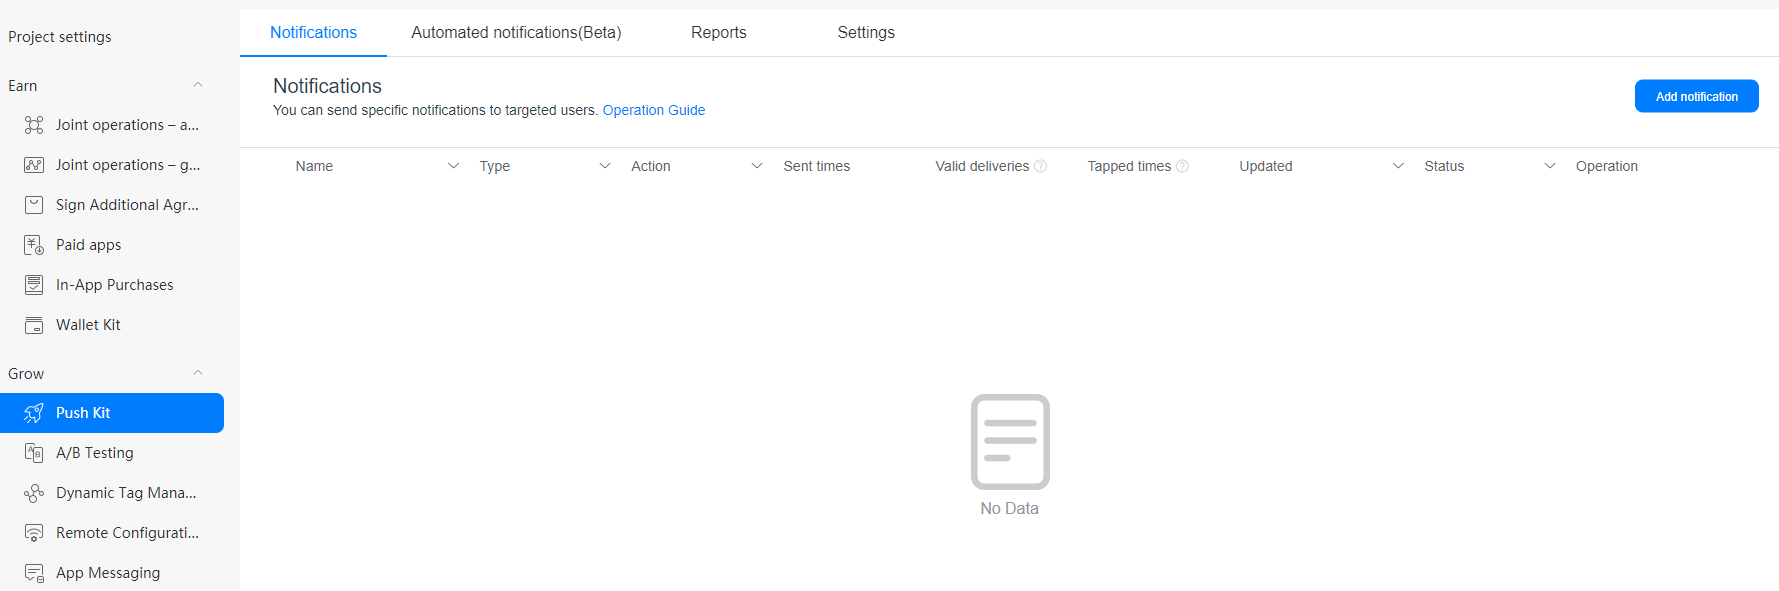
In the URL, [clientid] indicates the OAuth 2.0 client ID (credential). To obtain the client ID, sign in to AppGallery Connect, click My projects, click the desired project, and go to the Project settings page.
Request parameters (HTTP header)
Parameter | Example | Description |
|---|---|---|
Content-Type | application/json | -- |
Authorization | Bearer CF3Xl2XV6jMKZgqYSZFws9IPlgDvxqOfFSmrlmtkTRupbU2VklvhX9kC9JCnKVSDX2VrDgAPuzvNm3WccUIaDg== | A space character must be added between Bearer and the value of access_token. The value cannot contain backslashes (\). |
Request parameters (HTTP body):
{
    "validate_only": false,
    "message": {
        "data": JSON_FORMAT_STRING,
        "android": {
            "fast_app_target": 1
        },
        "token": ["AJRqlvj_atpAUr6qa2hZY-dRBSqzs-OJpF37fXShdXa7hXRHgX5v0M_-aF3KSXqLqhUreGMXmiiyzGVWYVToAa4ohlAUy_RsC75wxv7lnG2-rxf6RV_ivNbLjOCbYQ-tdw"]
    }
}
Request parameters
Parameter | Type | Mandatory/Optional | Description |
|---|---|---|---|
validate_only | boolean | Optional | Indicates whether a message is a test message. The test message is only used to verify format validity and is not pushed to user devices.
The default value is false. |
message | Object | Mandatory | Message structure, which must contain the valid message payload and target user. For details about the parameters, please refer to the definition in message structure. |
message structure
Parameter | Type | Mandatory/Optional | Description |
|---|---|---|---|
data | string | Mandatory | JSON format of the push message, including the message type, content, triggered action, reports, and other information. For details, please refer to sample code and data structure. |
android | object | Mandatory | Control information about a message sent to an Android app. For details about the parameters, please refer to AndroidConfig structure. |
token | array | Mandatory | Push token of the target user of a message. Each push token is regId obtained through the subscribe API, for example, ["pushtoken1","pushtoken2"] |
Sample code in data:
{
    "pushtype": 0,
    "pushbody": {
        "title": "Push message title",
        "description": "Push message content",
        "page": "/",
        "params": {
            "key1": "test1",
            "key2": "test2"
        }
    }
}
data structure
Parameter | Type | Parent Node | Mandatory/Optional | Description |
|---|---|---|---|---|
pushtype | Integer | data | Mandatory |
|
pushbody | JSON Object | data | Mandatory | - |
title | String | pushbody | Optional | Title of a notification message. This parameter is valid only when pushtype is set to 0. |
description | String | pushbody | Optional | Content of a notification message. This parameter is valid only when pushtype is set to 0. |
page | String | pushbody | Optional | Path of the quick app page that is displayed when a user taps a notification message. This parameter is valid only when pushtype is set to 0. Only the pages to be routed that are defined in the manifest file can be configured. The URL of the HTML5 page cannot be configured. |
params | JSON Object | pushbody | Optional | Parameters contained in the message body when a user taps a notification message. This parameter is valid only when pushtype is set to 0. NOTICE When pushtype is set to 0, the params parameter must be passed in the message body even if the message does not need to carry any parameter. Sample code: "params":{ } |
messageId | String | pushbody | Optional | ID of a data message. This parameter is valid only when pushtype is set to 1. |
data | String | pushbody | Optional | Content of a data message. This parameter is valid only when pushtype is set to 1. |
AndroidConfig structure
Parameter | Type | Mandatory/Optional | Description |
|---|---|---|---|
fast_app_target | integer | Mandatory | Indicates where the quick app is loaded.
If you need to push a message to Huawei Quick App Loader during development and debugging, set this parameter to 1. Set the parameter to 2 before submitting the app for release. |
Sample code of the push message body:
var mData = {
    "pushtype": 0, // The value 0 indicates that the message is a notification message.
    "pushbody": {
        "title": "Push message title",
        "description": "Push message content",
        "page": "/", // Path of the quick app page that is displayed when a user taps a notification message. This parameter is valid only when pushtype is set to 0. The value / indicates that the target page is the quick app home page.
        "params": {
            "key1": "test1",
            "key2": "test2"
        },
    }
};
var formatJsonString = JSON.stringify(mData);
var messbody = {
    "validate_only": false,
    "message": {
        "data": formatJsonString, // Note that the type of data is a JSON string, not a JSON object.
        "android": {
            "fast_app_target": 1, // The value 1 indicates that the message is sent to a quick app running on Quick App Loader. To send message to a quick app to be released on AppGallery, set the value to 2.
            "collapse_key": -1,
            "delivery_priority": "HIGH",
            "ttl": "1448s",
            "bi_tag": "Trump",
         },
         "token": ['pushtoken1','pushtoken2'], // Target user of the message.
    }
};
Response parameters
Parameter | Description |
|---|---|
code | |
msg | Result code description. |
requestId | Request ID, assigned by the push server. |
ext | Extension information (not in use currently). |
The responses are as follows.
Response Type | Example |
|---|---|
Success | HTTP/1.1 200 OK NSP_STATUS: 0 Content-Type: application/json;charset=UTF8 Content-Length: 122 { "code": "80000000", "msg":"success", "requestId":"124198421401" } |
System-level failure (traffic control) | HTTP/1.1 503 OK Content-Type: application/json;charset=UTF8 Content-Length: 0 |
System-level failure (invalid session) | HTTP/1.1 200 OK NSP_STATUS: 102 Content-Type: application/json;charset=UTF8 Content-Length: 0 |
Service-level failure | HTTP/1.1 200 OK NSP_STATUS: 0 Content-Type: application/json;charset=UTF8 Content-Length: 64 { "code": "80100004", "msg":"expire time is expired" } |
Result Code | Description | Solution |
|---|---|---|
200 | Success. | N/A |
400 | Invalid parameter. | Rectify the fault based on the result code description. |
401 | Authentication failure. | Verify the access token in the Authorization parameter in the request HTTP header. |
404 | Service not found. | Verify that the request URL is correct. |
500 | A system error occurred on the server. | Contact Huawei technical support. |
Result Code | Description |
|---|---|
6 | Expired session. |
102 | Invalid SESSION_KEY. |
105 | Invalid parameter. |
111 | The system or service is busy. |
112 | Service not found. |
113 | Failed to request the service. |
114 | Service unreachable or no route. |
199 | Unknown error. |
403 | No permission. |
Result Code | Description | Solution |
|---|---|---|
80000000 | Success. | N/A |
80100000 | Some tokens are successfully sent. Tokens returned are those failed to be sent because they are invalid. | Verify these tokens in the return value. |
80100001 | Some token parameters are incorrect. | Check the token parameters as prompted in the response. |
80100002 | The number of tokens must be 1 when a message is sent in synchronous mode. | Verify the token field in the request. |
80100003 | Incorrect message structure. | Verify the parameters in the message structure as prompted in the response. |
80100004 | The message expiration time is earlier than the current time. | Verify the message field ttl. |
80100013 | The collapse_key field in the message is invalid. | Verify the message field collapse_key. |
80100016 | The message contains sensitive information. | Verify that the message does not contain sensitive words. |
80200001 | OAuth authentication error. | The access token in the Authorization parameter in the request HTTP header failed to be authenticated. Ensure that the access token is correct. |
80200003 | OAuth token expires. | The access token in the Authorization parameter in the HTTP request header expires. Obtain a new access token. |
80300002 | The current app does not have the permission to send messages. | Check the message sending permission of the current app. |
80300007 | All tokens are invalid. | Verify the token parameter. |
80300008 | The message body size exceeds the default value. | Reduce the message body size and try again. |
80300010 | The number of tokens in the message body exceeds the default value. | Reduce the number of tokens and send them in batches. |
81000001 | Internal system error. | Contact Huawei technical support. |
This document is hereby developed to ensure that quick app developers properly use the push capabilities provided by quick apps, ensure that the push content complies with relevant rules, and improve user satisfaction.
(1) Definition of Violation Levels
Violation Level | Definition |
|---|---|
Level 1 |
|
Level 2 |
|
(2) Penalty Rules for Violations
Violation Level | Violations | Penalty Method |
|---|---|---|
Level 1 | Once or more times | The push service is permanently banned for the quick app. |
Level 2 | Once | The push service is banned for 30 days for the quick app. |
Twice | The push service is banned for 90 days for the quick app. | |
Three or more times | The push service is permanently banned for the quick app. |
This document takes effect from July 30, 2020. HUAWEI Quick App reserves the right of final interpretation on this document. If any rules are adjusted, they will be updated on the HUAWEI Developers official website.
app.ux file: Obtain the value of regId.
<script>
    import push from '@service.push';
    import fetch from '@system.fetch';
    import prompt from '@system.prompt';

    module.exports = {
        dataApp: {
            pushtoken: ''
        },
        onCreate() {
            console.info('Application onCreate');
            setTimeout(() => {
                this.checkPushIsSupported();
            }, 1000);

        },

        checkPushIsSupported() {
            let provider = push.getProvider();
            console.log("checkPush provider= " + provider);
            if (provider === 'huawei') {
                this.pushsubscribe();
            }
        },

        pushsubscribe() {
            console.log("pushsubscribe start");
            var that = this;
            push.subscribe({
                success: function (data) {
                    console.log("push.subscribe succeeded, result data=" + JSON.stringify(data));
                    that.dataApp.pushtoken = data.regId;
                    console.log("app oncreate this.dataApp.pushtoken=" + that.dataApp.pushtoken);
                    that.checkToken();

                },
                fail: function (data, code) {
                    console.log("push.subscribe failed, result data=" + JSON.stringify(data) + ", code=" + code);
                },
                complete: function () {
                    console.log("push.subscribe completed");
                }
            })
        },

        checkToken() {
            var subscribeToken = this.dataApp.pushtoken;
            console.log("checkToken subscribeToken= " + subscribeToken);
            var storage = require("@system.storage");
            var that = this;
            storage.get({
                key: 'token',
                success: function (data) {
                    console.log("checkToken storage data= " + data);
                    if (subscribeToken !== data) {
                        //upload it to your own service server
                        that.uploadToken(subscribeToken);
                        that.saveToken(subscribeToken);
                    } else {
                        console.log("checkToken regid is  the same as local storage");
                    }
                },
                fail: function (data, code) {
                    console.log("checkToken handling fail, code = " + code);
                }
            })
        },

        saveToken(subscribeToken) {
            console.log("saveToken");
            var storage = require("@system.storage");
            storage.set({
                key: 'token',
                value: subscribeToken,
                success: function (data) {
                    console.log("saveToken handling success");
                },
                fail: function (data, code) {
                    console.log("saveToken handling fail, code = " + code);
                }
            })
        },

        uploadToken(subscribeToken) {
            console.log("uploadToken");
            var that = this;
            var body = {
                xx: subscribeToken
            };

            fetch.fetch({
                url: 'https://xxx',
                method: 'POST',
                data: body,
                success: function (data) {
                    console.log("uploadToken code: " + data.code);
                    console.log("uploadToken data: " + data.data);
                },
                fail: function (data, code) {
                    console.log("handling fail, code = " + code);
                }
            })
        },

        pushunsubscribe() {
            push.unsubscribe({
                success: function (data) {
                    console.log('push.unsubscribe succeeded, result data = ' + JSON.stringify(data));
                    prompt.showToast({
                        message: 'push.unsubscribe succeeded',
                        duration: 2000,
                        gravity: 'center'
                    })
                },
                fail: function (data, code) {
                    console.log('push.unsubscribe failed, result data = ' + JSON.stringify(data) + ', code = ' + code);
                },
                complete: function () {
                    console.log('push.unsubscribe completed');
                }
            })
        }

    }
</script>
sendnotify.ux file: This sample code uses the fetch API to simulate a server to send messages. In actual development, use your own server.
<template>
  <div class="doc-page">
    <input type="button" class="btn" value="send notify msg" onclick="sendNotifyMsg" />
    <input type="button" class="btn" value="Do not receive Push messages" onclick="unregister" />
  </div>
</template>

<style>
    .doc-page {
      flex-direction: column;
      flex-direction: column;
      justify-content: center;
      align-content: center;
      align-items: center;
    }

    .btn {
      border-radius: 8px;
      margin-top: 16px;
      width: 80%;
      background-color: #4169e1;
      color: white;
    }
    .btn:active {
      background-color: #20b2aa;
    }
</style>
<script>
    import router from "@system.router"
    import prompt from '@system.prompt'
    import push from '@service.push';
    import fetch from '@system.fetch';
    import account from '@service.account';
    export default {
        props: ['websrc'],
        data: {
            attoken: '',
        },

        onInit: function () {
            //this.$page.setTitleBar({text: 'Simulating Notify Message Sending'});
            this.$page.setTitleBar({ text: 'Simulating Notify Message Sending', textColor: '#FFFFFF', backgroundOpacity: 0.9 });
        },

        sendNotifyMsg: async function () {
            try {
                var body = {
                    grant_type: 'client_credentials',
                    client_id: '101266687',
                    client_secret: 'd873aa90c3e8792517317e09f24b97df366ee10433b2f1bb3282d6ca6ce3f425'
                }
                const response = await fetch.fetch({
                    url: 'https://oauth-login.cloud.huawei.com/oauth2/v3/token',
                    method: 'POST',
                    data: body
                })
                var result = response.data.data;
                console.info('getAccessTokenV3 success data : ', result)
                this.attoken = JSON.parse(result).access_token;

                console.info('getAccessTokenV3 success attoken: ', this.attoken)
                this.beginSendNotifyMsg();
            } catch (err) {
                console.info('getAccessTokenV3 fail code: ', err.code)
                console.info('getAccessTokenV3 fail data: ', err.data)
            }
        },
        beginSendNotifyMsg: async function () {
            console.log("start sending push msg V3");
            var token = this.$app.$def.dataApp.pushtoken;
            console.log("send push msg app token=" + token);
            let tokenlist = Array.of(token);
            console.log("send push msg token list=" + tokenlist);
            var mData = {
                "pushtype": 0,
                "pushbody": {
                    "title": "How can young people make a living?",
                    "description": "Why did he choose to be a security guard after college graduation?",
                    "page": "/",
                    "params": {
                        "key1": "test1",
                        "key2": "test2"
                    }
                }
            };
            var formatJsonString = JSON.stringify(mData);
            var messbody = {
                "validate_only": false,
                "message": {
                    "data": formatJsonString,
                    "android": {
                        "fast_app_target": 1
                    },
                    "token": tokenlist,
                }
            };
            var access = 'Bearer ' + this.attoken;
            try {
                const response = await fetch.fetch({
                    url: 'https://push-api.cloud.huawei.com/v1/101266687/messages:send',
                    header: { 'Authorization': access, 'Content-Type': 'application/json;charset=utf-8;' },
                    method: 'POST',
                    data: messbody
                });
                console.info('sendPushMsg3 success code: ', response.data.code)
                console.info('sendPushMsg3 success data: ', response.data.data)
                console.info('sendPushMsg3 success headers: ', JSON.stringify(response.data.headers))
            } catch (error) {
                console.info("beginSendNotifyMsg catch error: " + error);
            }

        },

        unregister: function () {
            this.$app.pushunsubscribe();
        },

        getTimeStap: function () {
            const between = Date.now();
            console.log(" getTimeStap between=" + between);
        },

        onShow: function () {
            console.info(" onshow");
        },
        onHide: function () {
            console.info(" onHide");
        },

        onDestroy: function () {
            console.info("ondestroy");
        },
    }
</script>