As a lightweight IDE tool plugin, HMS Toolkit implements app creation, coding, conversion, debugging, test, and release. It helps you integrate HMS Core APIs with lower costs and higher efficiency.
Configuration Wizard of HMS Toolkit enables you to automatically complete necessary configuration for development preparations.
Installing HMS Toolkit
Windows: Start Android Studio, go to , enter HMS Toolkit in the search box, and click Install. After the installation is complete, restart Android Studio.
macOS: Start Android Studio, go to , enter HMS Toolkit in the search box, and click Install. After the installation is complete, restart Android Studio.
[h2]Configuring App Information in AppGallery Connect
To develop an app, create it in AppGallery Connect and set required information.
- Use your HUAWEI ID to sign in to AppGallery Connect. If you do not have any HUAWEI ID, register one by referring to Registration and Verification.
- Create a project and create an app. Note that set Package type to APK (Android app).
You only need to perform the preceding two steps in AppGallery Connect. Then go to Configuration Wizard of HMS Toolkit and perform configurations according to Configuring the HMS Toolkit Environment.
[h2]Configuring the HMS Toolkit Environment
Before calling the Map Kit capabilities, perform the following steps to configure the environment:
- In Android Studio, go to HMS > Configuration Wizard.

If you have not signed in to AppGallery Connect, Toolkit automatically opens the browser and prompts you to sign in and perform authorization.
- After sign-in authorization, select the team name, project module, integrated kit (Map Kit), and certificate type, click Generate to generate an SHA-256 certificate fingerprint, and click Next.

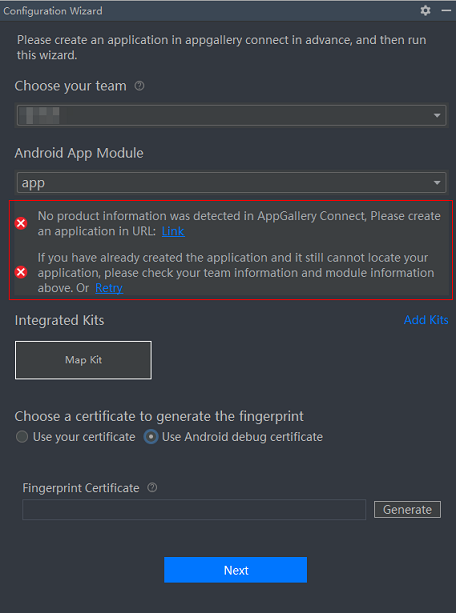
After you select the team name and project module, HMS Toolkit automatically checks whether the corresponding app is available in AppGallery Connect. If the error messages in red in the following figure are displayed, click Link to check whether the app has been created in AppGallery Connect.
- If not, create the app and click Retry.
- If so, verify that the team name and project module are correct and click Retry.

Two certificate type options:
- Use your certificate: Use the certificate that you created to generate an SHA-256 certificate fingerprint. This method is used in app release scenarios.
- Use Android debug certificate: Select the debugging certificate provided by Android to generate an SHA-256 certificate fingerprint. This method is used only in app debugging scenarios. After selecting this mode, you can select an existing certificate file or create a certificate. To learn more about the certificate, please refer to Sign your app.
Click Generate to generate a certificate fingerprint. If the generation fails, check whether the certificate information matches the fingerprint. Alternatively, manually generate a fingerprint by referring to Generating a Signing Certificate Fingerprint and enter it in the text box.
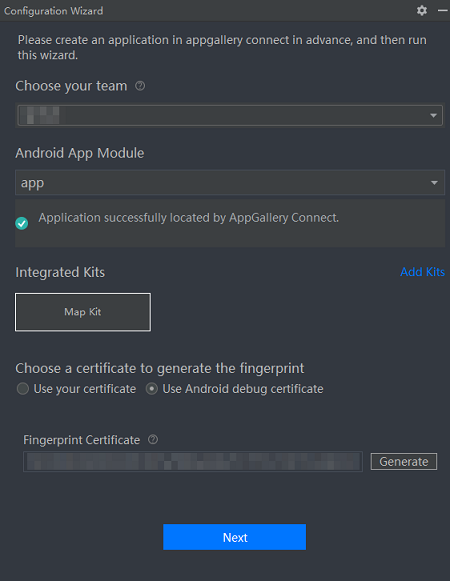
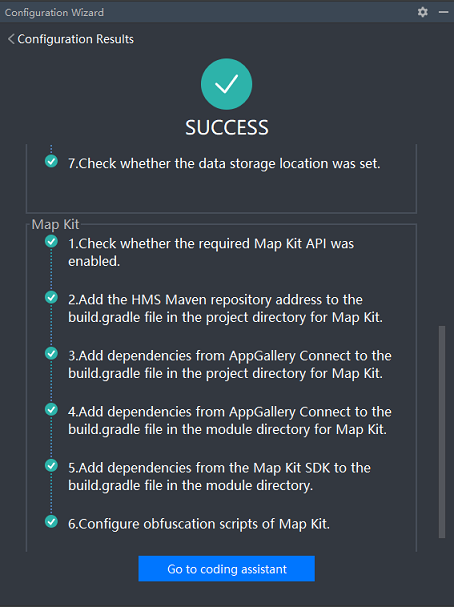
HMS Toolkit automatically checks the integration environment of Map Kit, including the general environment and the environment dedicated for the kit.
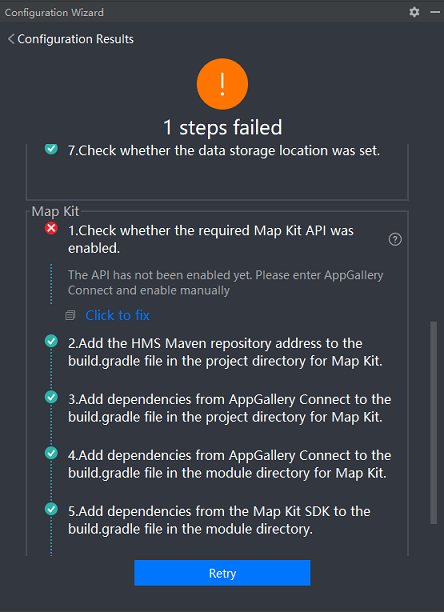
HMS Toolkit checks whether each configuration item is correct.
- If an item fails to pass the check, as shown in the preceding figure, click Link to manually modify the item as prompted. You can also click
 or refer to the following table to rectify the item. After the setting, click Retry to perform the check again.
No.
Check Item
Suggestions
1
Obtain the package name of your application
Create an app in AppGallery Connect in advance, and make sure that its package name is the same as that specified in HMS Toolkit for the app that you are developing.
NOTE:HMS Toolkit only queries the app in AppGallery Connect based on the package name and does not proactively create an app. The package name is specified by android.defaultConfig.applicationId in build.gradle.
2
Check whether there is any app corresponding to your application's package name in AppGallery Connect
3
Verify the package name
Make sure that the package name ends with .HUAWEI or .huawei. This restriction is applied only to joint operations games.
4
Generate a signing certificate
If you select Use Your Certificate, make sure that the certificate file is created successfully, and keyPassword and storePassword are set correctly.
5
Configure signing certificate information
6
Generate a certificate fingerprint
7
Configure the certificate fingerprint in AppGallery Connect
Manually copy the SHA-256 certificate fingerprint and paste it in the text box under Generate a certificate fingerprint, click the link that appears in the HMS Toolkit window, and enter the SHA-256 certificate fingerprint for the app.
8
Check whether the data storage location was set
Click the link that appears in the HMS Toolkit window, and set a data storage location.
9
Check whether the required xxx Kit service was enabled
Click the link that appears in the HMS Toolkit window, and enable required services.
After a service is enabled in HMS Toolkit, go to Project settings > Manage APIs in AppGallery Connect and enable the service.
10
Check whether the required xxx Kit API was enabled
11
Download the agconnect-services.json file
Ensure that the package name that you have specified for the app when you create it in AppGallery Connect is the same as that of the selected project template.
12
Copy the agconnect-services.json file to the module directory
13
Add the HMS Maven repository address to the build.gradle file in the project directory for xxx Kit
No manual intervention is required.
14
Add dependencies from AppGallery Connect to the build.gradle file in the project directory for xxx Kit
15
Add dependencies from AppGallery Connect to the build.gradle file in the module directory for xxx Kit
16
Add dependencies from the xxx Kit SDK to the build.gradle file in the module directory
17
Configure obfuscation scripts of xxx Kit
- If all the items are passed, click Go to coding assistant to call APIs. For details, please refer to Kit Integration Wizard.
Integrating Map Kit Through Coding Assistant
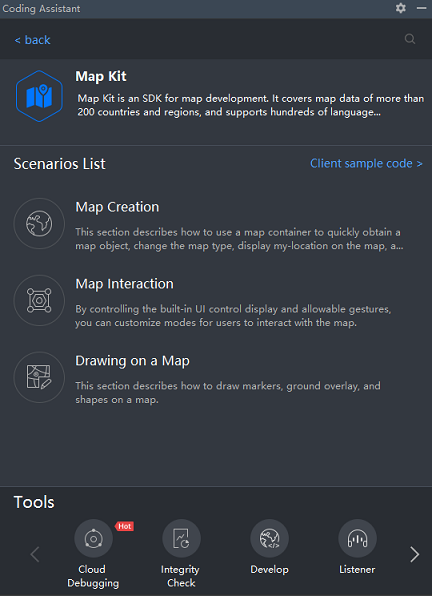
Go to HMS > Coding Assistant, and select Map Kit in the kit list. The following figure shows all the scenarios of Map Kit.
[h2]Completing the Code by Dragging and Dropping Scenario Cards
Select a scenario card, for example, Map Creation, and drag and drop it to the code editing area to create a map.
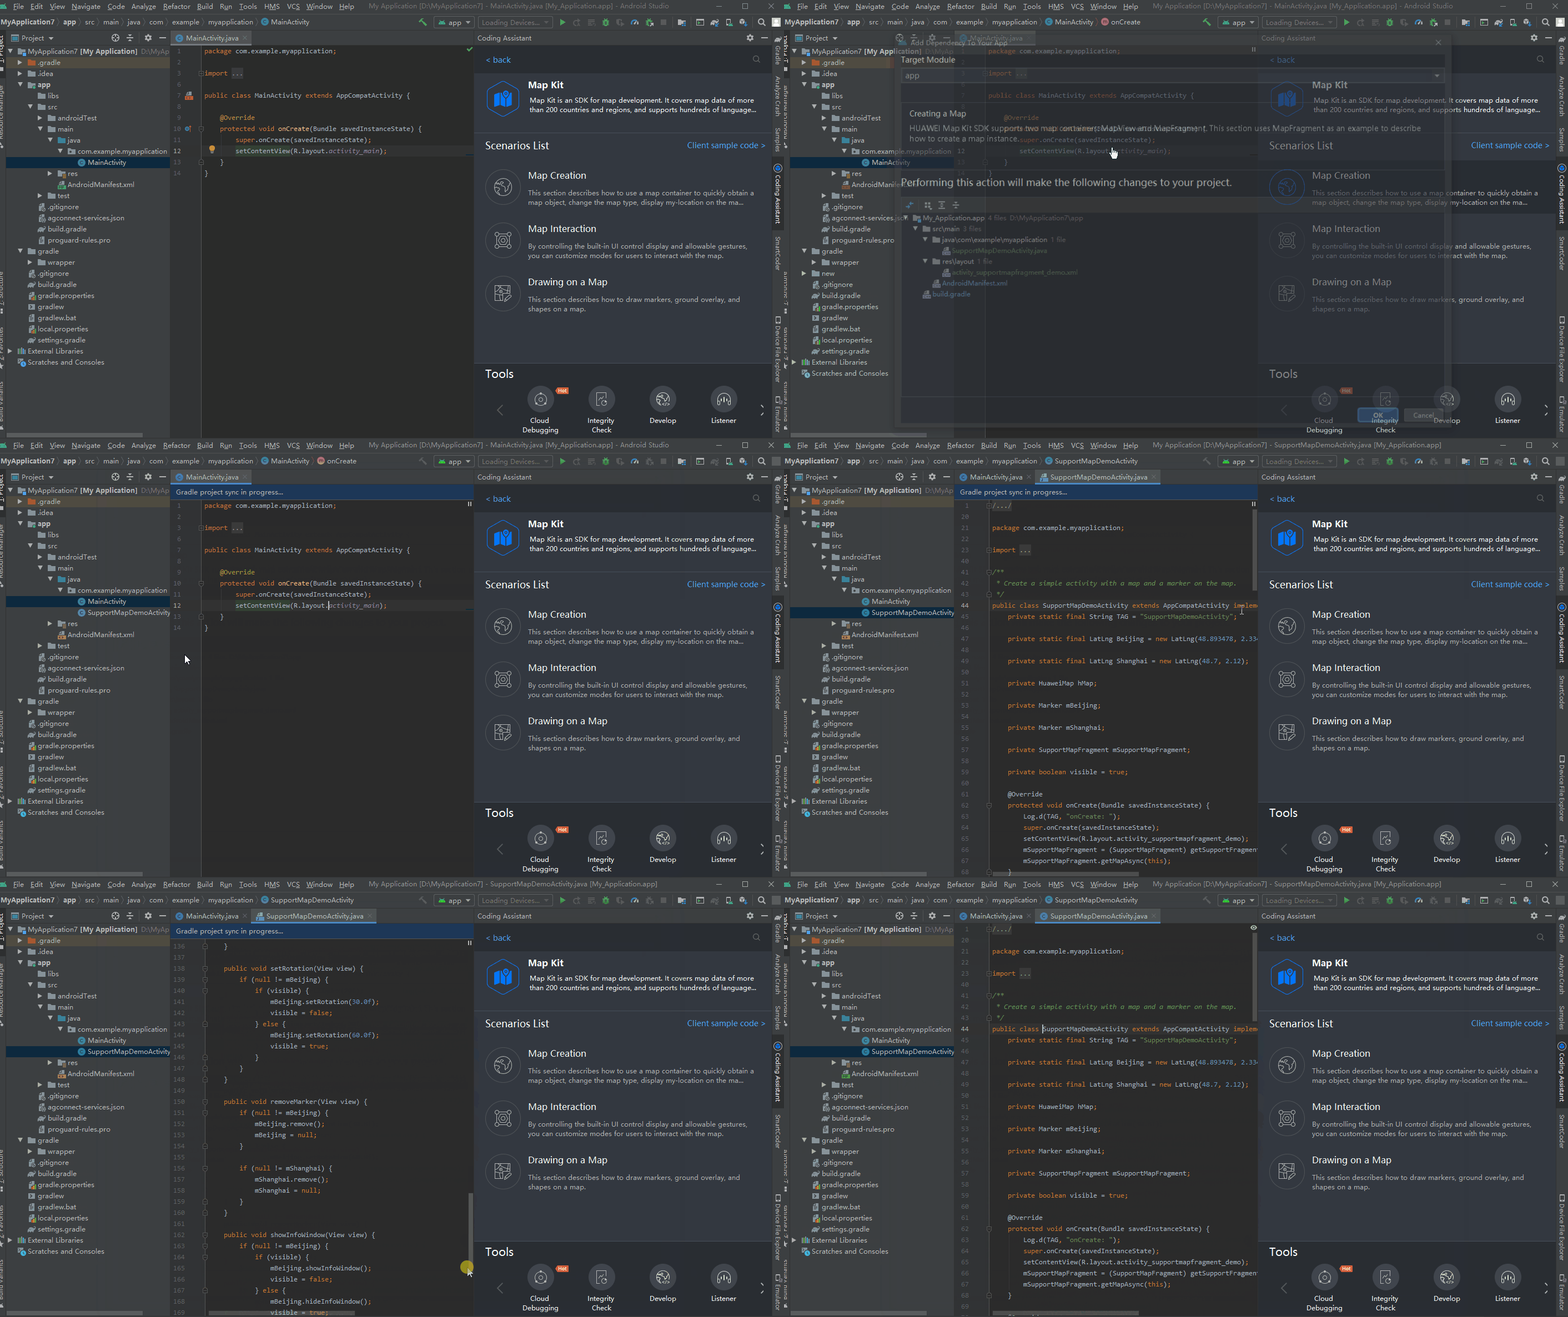
When you drag and drop the scenario card, Toolkit automatically generates an Activity file and XML layout file, and writes the configurations and dependencies required for the project running to the AndroidManifest.xml file, project-level build.gradle file, and app-level build.gradle file. To open the Activity, you need to call the Activity in the code. After the Activity is called, you can run the app on the device.
[h2]Scenario Simulation Tool
Develop provides the device-cloud location data comparison service, distance calculation service, and route planning service.
- Device-cloud location data comparison service: Compare the location data obtained on the device with that obtained on the cloud to analyze the location accuracy on the device.
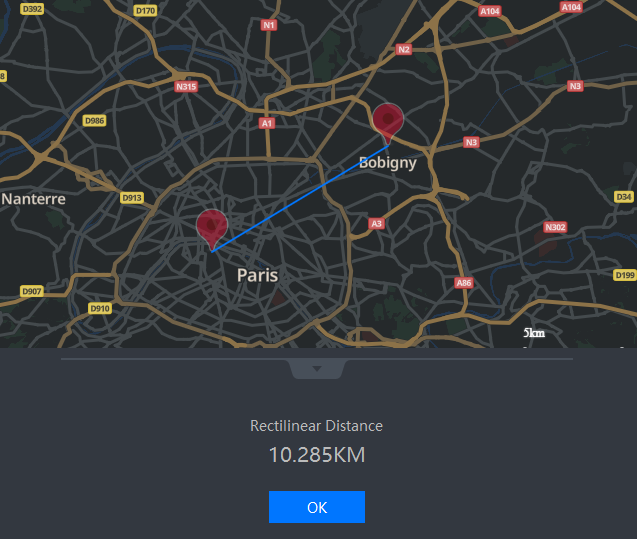
- Distance calculation service: Select the start and end locations to calculate the straight-line distance between them.
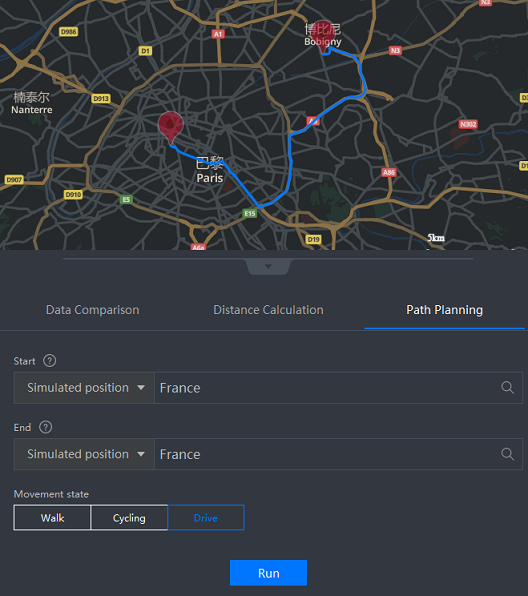
- Route planning service: Select the start and end locations for the tool to automatically plan the route based on the set motion mode.
To use Develop, perform the following steps:
- On the toolbar of the Map Kit card, click Develop. The page is displayed.
- Select Data Comparison, Distance Calculation, or Path Planning.
- Data Comparison:
- Determine a location for simulation. The Develop tool provides two methods for entering location information:
Simulated position: Enter a location name.
Latitude and Longitude: Enter the longitude and latitude of a location.
After the location is determined, the tool automatically queries the location data stored in the cloud.
- Obtain the location data on the device side.
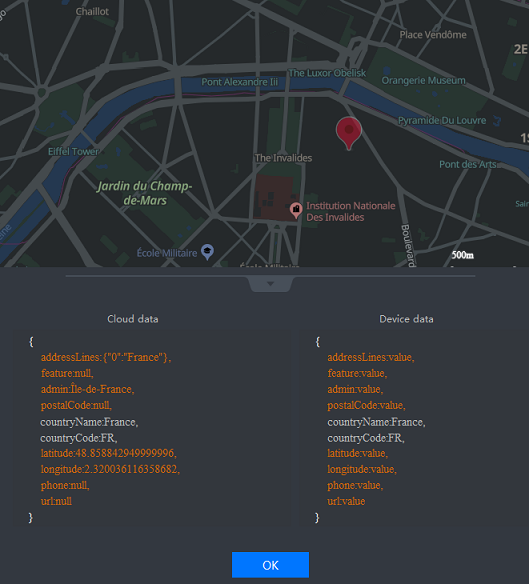
Method of Obtaining Device-Side Data: Obtain the location data on the device side. You can choose Log scraping or Manual input. If you choose Log scraping, you need to run the project and click Start. A window is displayed, showing the location data list parsed from the logs. Select the required data and click Capture to capture the location data and inject the data to the comparison page, as shown in the following figure.
The cloud data is displayed in the left pane, and the device data is displayed in the right pane. Click Run to start device-cloud location data comparison. Orange indicates that the data on the left and right is different.
- Determine a location for simulation. The Develop tool provides two methods for entering location information:
- Distance Calculation: Enter information about the start and end locations (a location or longitude and latitude), and click Run to calculate the straight-line distance between the two locations.
- Path Planning: Enter information about the start and end locations (a location or longitude and latitude), set Movement state, and click Run to plan the specific route.
- Data Comparison:
[h2]Other Functions
To implement other functions such as map interaction and drawing, drag and drop or copy code snippets. You can also manually implement them by referring to the development guide.
Building, Loading, and Debugging the App
After the preceding operations are complete, you can use Cloud Debugging in HMS Toolkit to debug the app on a real device. For details, please refer to Cloud Debugging.
[h2]Running or Debugging an App on a Remote Real Device
- Go to HMS > Cloud Debugging or click the icon shown in the following figure.

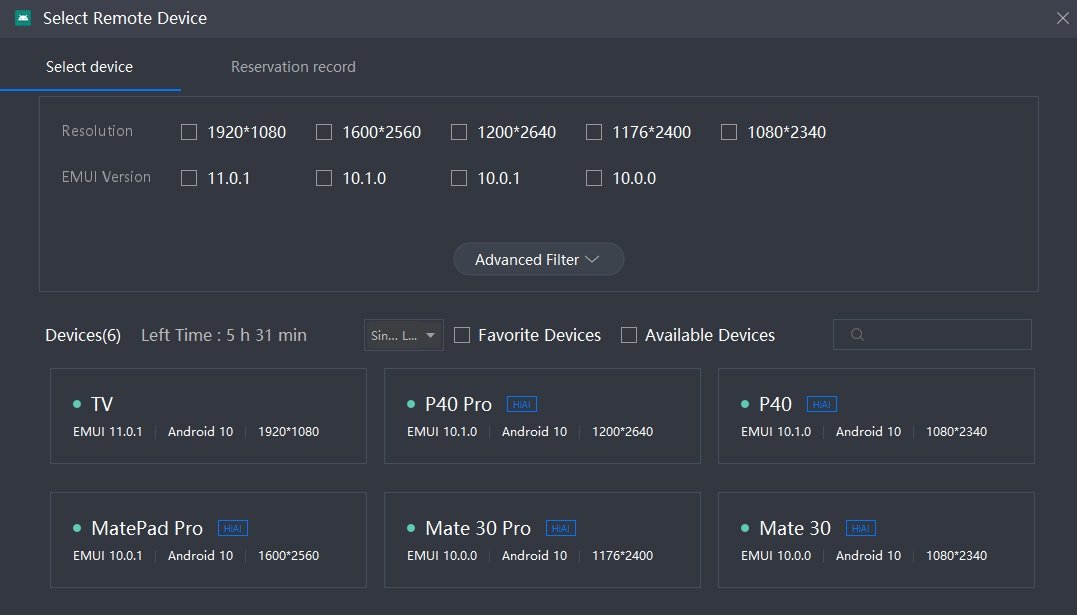
- On the Select Remote Device page, you can select a required device by Resolution, Android Version, EMUI Version, Series, and Others. Alternatively, you can use Available Devices.
- Click
 or
 to run or debug the app, respectively, on the remote device. You can also run ADB commands to perform operations. For details, please refer to ADB commands.

[h2]Running or Debugging an App on a Local Real Device
Click  or
 to run or debug the app, respectively, on the local device.

Using Cloud Testing to Test the APK
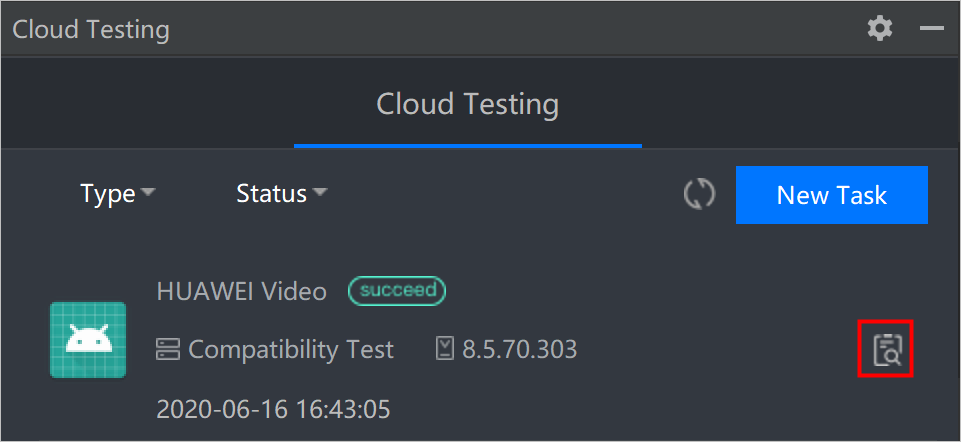
- Go to HMS > Cloud Testing or click the icon shown in the following figure.

- In Cloud Testing, click New Task.

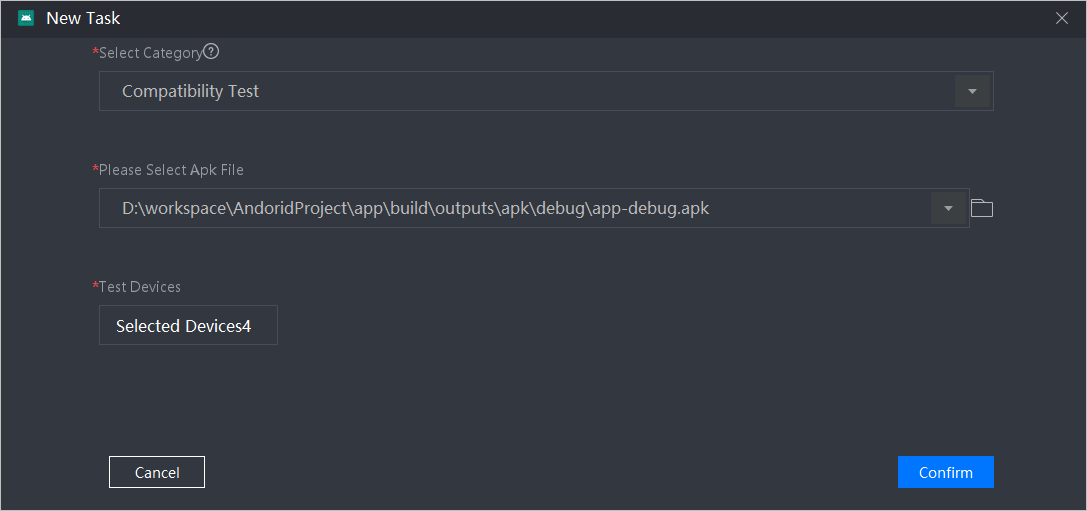
- Set the following task parameters and click Confirm to start the test task:
- Select Category: Test category. You can select Compatibility Test, Stability Test, Performance Test, and Consumption Test.
- Please Select Apk File: APK file to be tested.
- Test Devices: Device for app testing. Only one device can be selected for the stability test (Stability Test). For other tests, you can select multiple devices.
Test Duration: This parameter is valid only when Select Category is set to Stability Test. This parameter is optional. The value ranges from 10 to 60 minutes.
- Application Classification: This parameter is valid only when Select Category is set to Performance Test or Consumption Test. This parameter is optional.
- After the task is complete, click
 to view the test report.
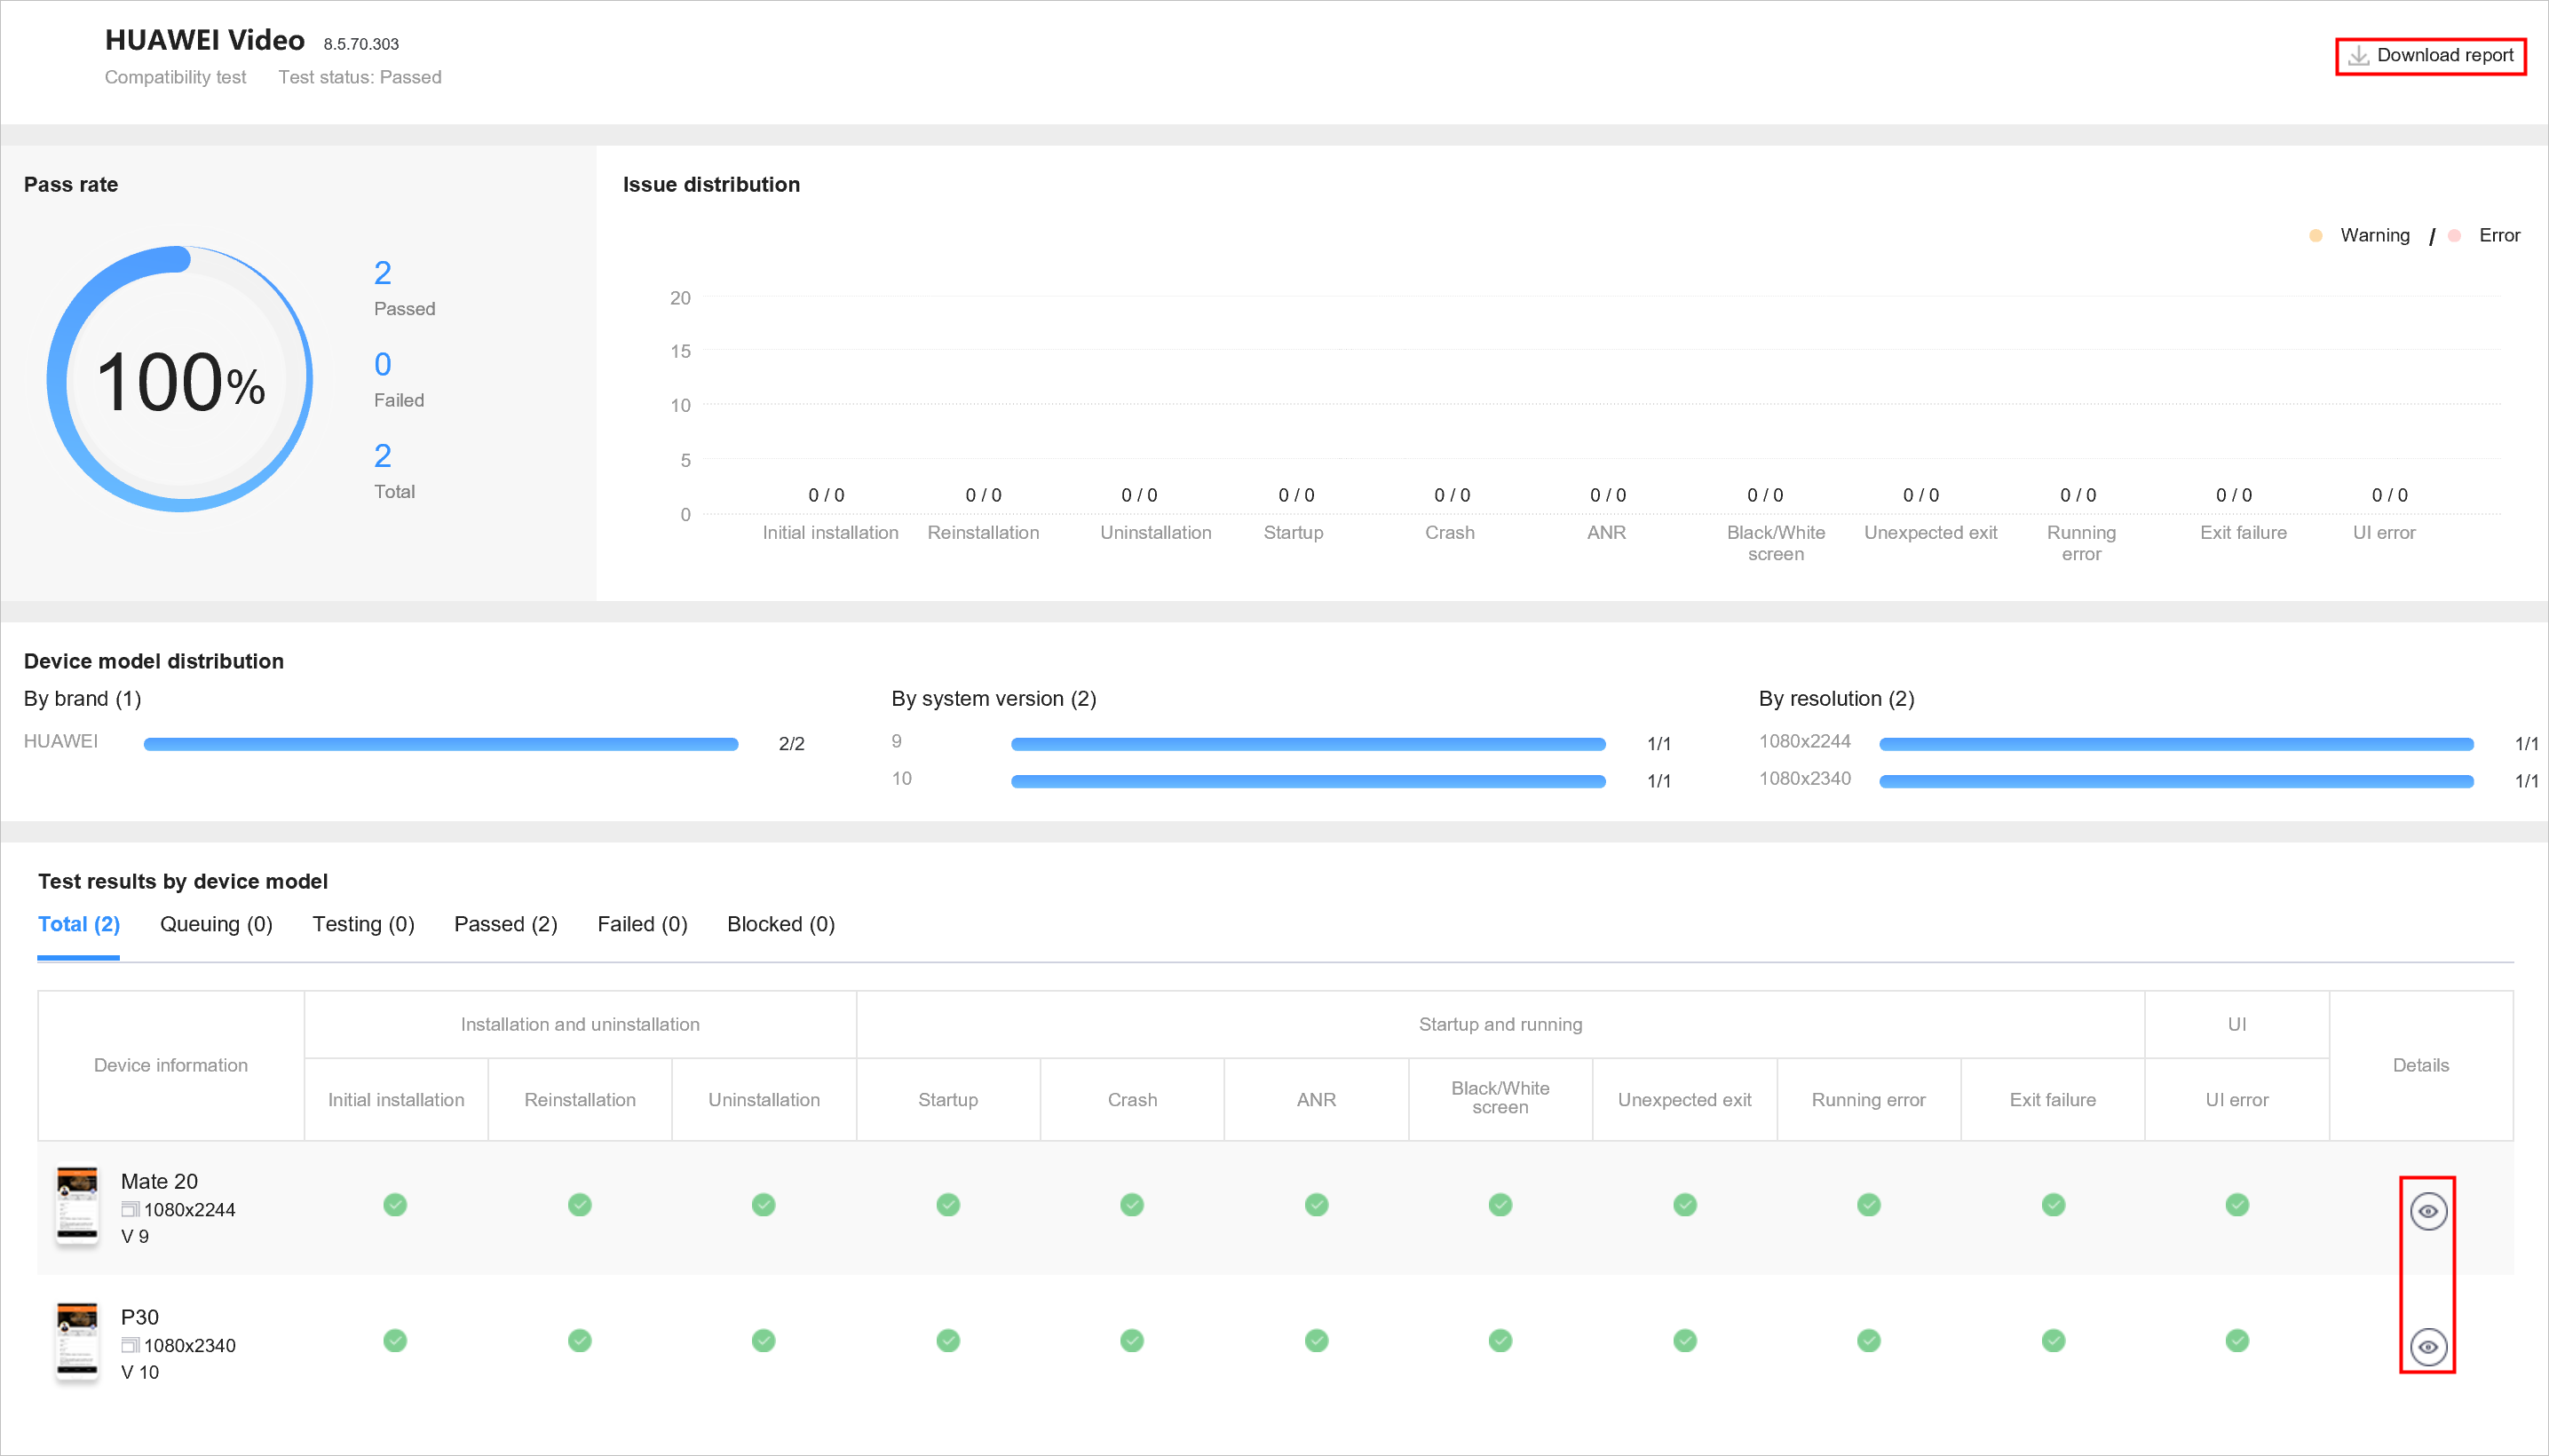
Click Download report to download the report locally. Click
 to view the test details. For details about the report description of each test, please refer to Operation Guide.
Publish to AppGallery Connect
After developing and debugging an app, Publish to AppGallery Connect helps you to release the APK package to AppGallery Connect.
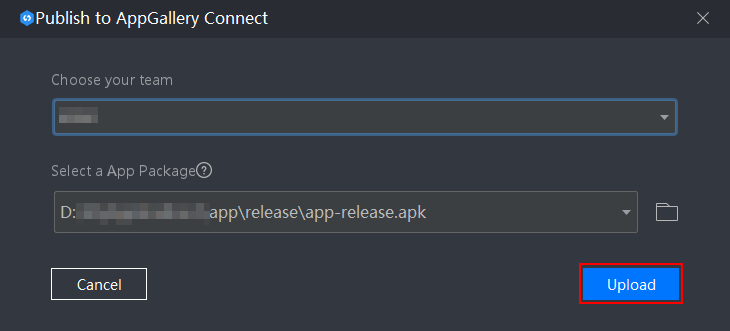
- In HMS, click Publish to AppGallery Connect.
- Select the team name and the APK file (with 1 GB at most) to be released, and click Upload.

When the APK file is uploaded, the following two checks are performed. If an error is reported, modify the file and upload it again.
- The file must be in release format. For details about how to generate such an APK file, please refer to How do I generate a release.apk file in a project?.
- The SHA-256 certificate fingerprint has been obtained and configured in the app information in AppGallery Connect. Procedure: Run the following command in the cmd window to read the information value of the APK file, obtain the SHA-256 certificate fingerprint from the information value, and fill in the SHA-256 certificate fingerprint to the app:
>keytool -printcert -jarfile app-release.apk directory in the project directorySet app-release.apk directory in the project directory as required.
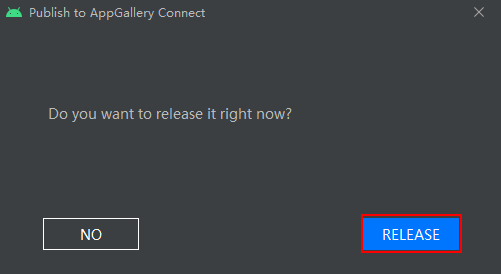
- After the upload is complete, click RELEASE. On the page that is displayed, go to Release app > Draft.
- Enter the information about the app release and submit for review.