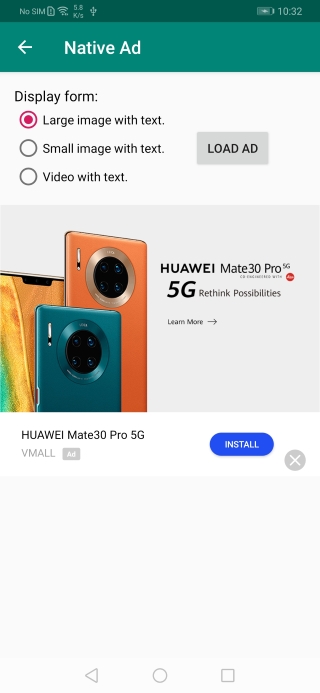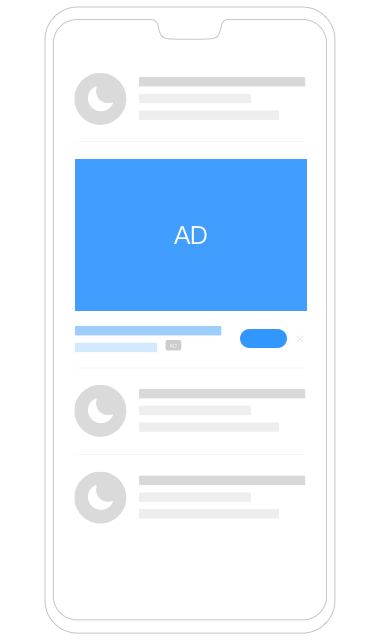
Native ads fit seamlessly into the surrounding content to match your app design. Such ads can be customized as needed.
Load native ads through the Native Ad Loader class.
The Native Ad Loader class provides the Native Ad Loader Builder class for setting the ad slot ID, customizing attributes, and building the Native Ad Loader object. The sample code is as follows:
- // "testy63txaom86" is a dedicated test ad slot ID.
- NativeAdLoader.Builder builder = new NativeAdLoader.Builder(this, "testy63txaom86");
- builder.setNativeAdLoadedListener(new NativeAd.NativeAdLoadedListener() {
- @Override
- public void onNativeAdLoaded(NativeAd nativeAd) {
- // Call this method when an ad is successfully loaded.
- ...
- }
- }).setAdListener(new AdListener() {
- @Override
- public void onAdFailed(int errorCode) {
- // Called when an ad fails to be loaded.
- ...
- }
- });
- NativeAdLoader nativeAdLoader = builder.build();
If an ad is loaded successfully, the SDK calls the onNativeAdLoaded() method of Native Ad Native Ad Load ed Listener to return the Native Ad object.
If an ad fails to be loaded, the SDK calls the onAdFailed() method of Ad Listener.
Native Ad Loader provides the loadAd() and loadAds() methods for ad loading.
Ad Param is the only parameter. The sample code is as follows:
- nativeAdLoader.loadAd(new AdParam.Builder().build());
After loadAd() is called, the SDK calls back the added listener method.
loadAds() contains two parameters: Ad Param and the number of ads to be loaded. The maximum number is 5. The number of ads returned by the SDK will be less than or equal to the requested number, and the returned ads are different.
The sample code is as follows:
- nativeAdLoader.loadAds(new AdParam.Builder().build(), 5);
After loadAds() is called, the listener makes multiple callbacks based on the number of returned ads. An app requesting multiple ads can use the NativeAdLoader.isLoading() method in the callback code to determine whether ad loading is complete. The sample code is as follows:
- // "testy63txaom86" is a dedicated test ad slot ID.
- NativeAdLoader.Builder builder = new NativeAdLoader.Builder(this, "testy63txaom86");
- NativeAdLoader nativeAdLoader = builder.setNativeAdLoadedListener(new NativeAd.NativeAdLoadedListener() {
- @Override
- public void onNativeAdLoaded(NativeAd nativeAd) {
- if (nativeAdLoader.isLoading()) {
- // nativeAdLoader is still loading ads.
- ...
- } else {
- // nativeAdLoader has finished loading ads.
- ...
- }
- }
- }).build();
- nativeAdLoader.loadAds(new AdParam.Builder().build(), 5);
The "Why this ad" icon and an ad identifier must be displayed in the corner of each ad view.
The procedure for displaying a native ad is as follows:
Customize a layout to display the assets in Native Ad.
NativeView must be used as the root layout of native ads. Otherwise, the ad revenue will be affected.
The following is a sample view hierarchy for a native ad that uses Relative Layout to display its asset view:
- <com.huawei.hms.ads.nativead.NativeView xmlns:android="http://schemas.android.com/apk/res/android"
- android:orientation="vertical"
- android:layout_width="match_parent"
- android:layout_height="wrap_content"
- ... >
- <RelativeLayout
- ... >
- <com.huawei.hms.ads.nativead.MediaView
- android:id="@+id/ad_media"
- ... />
- <RelativeLayout
- ... >
- <TextView
- android:id="@+id/ad_title"
- ... />
- // Other assets.
- ...
- </RelativeLayout>
- // Other assets.
- ...
- </RelativeLayout>
- </com.huawei.hms.ads.nativead.NativeView>
After obtaining the Native View object, register and populate the asset view.
The following shows the sample code for registering and populating the view with the title and multimedia:
- // ad_native: name of the XML layout file for the native ad.
- NativeView nativeView = (NativeView) getLayoutInflater().inflate(R.layout.ad_native, null);
- nativeView.setTitleView(nativeView.findViewById(R.id.ad_title));
- ((TextView) nativeView.getTitleView()).setText(nativeAd.getTitle());
- nativeView.setMediaView((MediaView) nativeView.findViewById(R.id.ad_media));
- nativeView.getMediaView().setMediaContent(nativeAd.getMediaContent());
Set other ad assets to be displayed.
Media View is used to display multimedia assets. If the loaded ad contains a video element, the video will be rendered in Media View. Otherwise, an image will be rendered in Media View.
The sample code is as follows:
- nativeView.setNativeAd(nativeAd);
Add Native View to the UI to display the native ad. The sample code is as follows:
- private void loadAd() {
- NativeAdLoader.Builder builder = new NativeAdLoader.Builder(this, "testy63txaom86");
- builder.setNativeAdLoadedListener(new NativeAd.NativeAdLoadedListener() {
- @Override
- public void onNativeAdLoaded(NativeAd nativeAd) {
- // TODO
- ...
- // Obtain NativeView.
- NativeView nativeView = (NativeView) getLayoutInflater().inflate(R.layout.ad_native, null);
- // Register and populate the native ad asset views.
- initNativeAdView(nativeAd, nativeView);
- // Add NativeView to the UI.
- FrameLayout adFrameLayout = findViewById(R.id.frame_layout_ad);
- adFrameLayout.removeAllViews();
- adFrameLayout.addView(nativeView);
- // TODO
- ...
- }
- });
- ...
- }
- private void initNativeView(NativeAd nativeAd, NativeView nativeView) {
- // Register and populate the title view.
- nativeView.setTitleView(nativeView.findViewById(R.id.ad_title));
- ((TextView) nativeView.getTitleView()).setText(nativeAd.getTitle());
- // Register and populate the multimedia view.
- nativeView.setMediaView((MediaView) nativeView.findViewById(R.id.ad_media));
- nativeView.getMediaView().setMediaContent(nativeAd.getMediaContent());
- // Register and populate other asset views.
- ...
- // Register the native ad object.
- nativeView.setNativeAd(nativeAd);
- }
Add an event listener for native ads. The sample code is as follows:
- NativeAdLoader nativeAdLoader = builder.setAdListener(new AdListener() {
- @Override
- public void onAdClicked() {
- // TODO
- ...
- }
- ...
- }).build();
When you have finished showing a native ad, you should destroy it.
- nativeAd.destroy();
A native ad may contain video assets in addition to images and text. The HUAWEI Ads SDK also provides the following two classes for video configuration and control:
The Video Configuration class is used to configure native videos. The sample code is as follows:
- // "testy63txaom86" is a dedicated test ad slot ID.
- NativeAdLoader.Builder builder = new NativeAdLoader.Builder(this, "testy63txaom86");
- VideoConfiguration videoConfiguration = new VideoConfiguration.Builder()
- // Set whether to play video assets in mute mode. The default value is true.
- .setStartMuted(true)
- .build();
- NativeAdConfiguration adConfiguration = new NativeAdConfiguration.Builder()
- .setVideoConfiguration(videoConfiguration)
- .build();
- builder.setNativeAdOptions(adConfiguration);
The Video Operator class is used to obtain video information and control videos. The controller instance needs to be obtained by calling the Native Ad.getVideoOperator() method. This method always returns the Video Operator object, regardless of whether the ad contains a video asset.
- VideoOperator videoOperator = nativeAd.getVideoOperator();
Video Operator provides the hasVideo() method to determine whether the ad contains a video asset.
The VideoOperator.Video LifecycleListener class can be used to listen for events during video playback.
- videoOperator.setVideoLifecycleListener(new VideoOperator.VideoLifecycleListener() {
- @Override
- public void onVideoEnd() {
- // TODO
- ...
- super.onVideoEnd();
- }
- });
Huawei provides a set of native ad templates for you to quickly integrate into your app to display native ads.
Native ad templates are available in two sizes: small and medium. Both will scale to fill the width of their parent views. You can change the layout or style of the templates as you like.
The following figure shows a small template:

The content of the XML layout file is as follows:
- <com.huawei.hms.ads.nativead.NativeView xmlns:android="http://schemas.android.com/apk/res/android"
- android:id="@+id/native_small_view"
- android:layout_width="match_parent"
- android:layout_height="wrap_content"
- android:layout_centerInParent="true"
- android:layout_marginTop="10dp"
- android:background="#FFFFFF"
- android:orientation="vertical">
- <RelativeLayout
- android:id="@+id/background"
- android:layout_width="match_parent"
- android:layout_height="wrap_content"
- android:layout_alignParentTop="true"
- android:orientation="vertical">
- <com.huawei.hms.ads.nativead.MediaView
- android:id="@+id/ad_media"
- android:layout_width="75dp"
- android:layout_height="50dp"
- android:layout_marginStart="24dp"
- android:layout_marginTop="8dp"
- android:layout_marginBottom="8dp"
- android:background="#8BC34A" />
- <RelativeLayout
- android:id="@+id/center_view"
- android:layout_width="wrap_content"
- android:layout_height="wrap_content"
- android:layout_marginStart="107dp"
- android:layout_marginTop="8dp"
- android:layout_marginEnd="48dp"
- android:layout_marginBottom="8dp"
- android:background="#FFFFFF">
- <TextView
- android:id="@+id/ad_title"
- android:layout_width="match_parent"
- android:layout_height="34dp"
- android:layout_marginBottom="16dp"
- android:alpha="1"
- android:textColor="#000000"
- android:textSize="@dimen/hiad_text_13_sp" />
- <TextView
- android:id="@+id/ad_source"
- android:layout_width="wrap_content"
- android:layout_height="14dp"
- android:layout_marginTop="36dp"
- android:alpha="0.6"
- android:maxWidth="132dp"
- android:textColor="#666666"
- android:textSize="@dimen/hiad_text_9_sp" />
- <TextView
- android:id="@+id/ad_flag"
- android:layout_width="16dp"
- android:layout_height="14dp"
- android:layout_marginStart="8dp"
- android:layout_marginTop="36dp"
- android:layout_toEndOf="@+id/ad_source"
- android:background="@drawable/native_flag_rounded_corners_shape"
- android:gravity="center"
- android:text="@string/ad_flag"
- android:textColor="#FFFFFF"
- android:textSize="8sp"
- android:textStyle="bold" />
- <Button
- android:id="@+id/ad_call_to_action"
- android:layout_width="44dp"
- android:layout_height="@dimen/hiad_16_dp"
- android:layout_alignParentEnd="true"
- android:layout_marginTop="34dp"
- android:background="@drawable/native_button_rounded_corners_shape"
- android:textColor="#FFFFFF"
- android:textSize="6sp" />
- </RelativeLayout>
- </RelativeLayout>
- </com.huawei.hms.ads.nativead.NativeView>
The following figure shows a medium template:
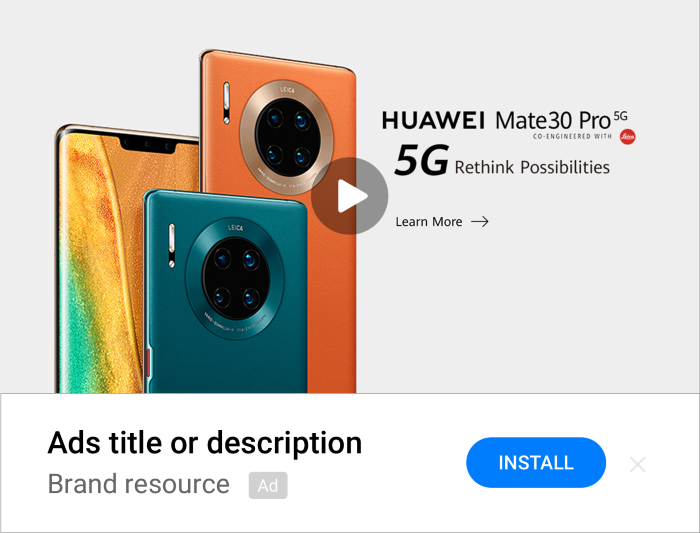
The content of the XML layout file is as follows:
- <com.huawei.hms.ads.nativead.NativeView xmlns:android="http://schemas.android.com/apk/res/android"
- android:id="@+id/native_video_view"
- android:layout_width="match_parent"
- android:layout_height="wrap_content"
- android:layout_centerInParent="true"
- android:background="#FFFFFF"
- android:orientation="vertical">
- <RelativeLayout
- android:id="@+id/background"
- android:layout_width="match_parent"
- android:layout_height="wrap_content">
- <com.huawei.hms.ads.nativead.MediaView
- android:id="@+id/ad_media"
- android:layout_width="match_parent"
- android:layout_height="wrap_content" />
- <RelativeLayout
- android:id="@+id/left_bottom_view"
- android:layout_width="wrap_content"
- android:layout_height="wrap_content"
- android:layout_below="@id/ad_media">
- <TextView
- android:id="@+id/ad_title"
- android:layout_width="180dp"
- android:layout_height="19dp"
- android:layout_marginStart="24dp"
- android:layout_marginTop="16dp"
- android:alpha="1"
- android:textColor="#000000"
- android:textSize="@dimen/hiad_text_13_sp" />
- <TextView
- android:id="@+id/ad_source"
- android:layout_width="wrap_content"
- android:layout_height="19dp"
- android:layout_below="@id/ad_title"
- android:layout_marginStart="24dp"
- android:layout_marginTop="2dp"
- android:layout_marginBottom="16dp"
- android:alpha="0.6"
- android:maxWidth="158dp"
- android:textColor="#666666"
- android:textSize="@dimen/hiad_text_12_sp" />
- <TextView
- android:id="@+id/ad_flag"
- android:layout_width="20dp"
- android:layout_height="14dp"
- android:layout_marginStart="8dp"
- android:layout_marginTop="40dp"
- android:layout_toEndOf="@+id/ad_source"
- android:background="@drawable/native_flag_rounded_corners_shape"
- android:gravity="center"
- android:text="@string/ad_flag"
- android:textColor="#FFFFFF"
- android:textSize="8sp"
- android:textStyle="bold" />
- </RelativeLayout>
- <RelativeLayout
- android:id="@+id/right_bottom_view"
- android:layout_width="wrap_content"
- android:layout_height="wrap_content"
- android:layout_below="@id/ad_media"
- android:layout_alignParentEnd="true">
- <Button
- android:id="@+id/ad_call_to_action"
- android:layout_width="72dp"
- android:layout_height="26dp"
- android:layout_alignParentEnd="true"
- android:layout_marginTop="23dp"
- android:layout_marginEnd="52dp"
- android:layout_marginBottom="23dp"
- android:background="@drawable/native_button_rounded_corners_shape"
- android:textColor="#FFFFFF"
- android:textSize="10sp" />
- </RelativeLayout>
- </RelativeLayout>
- </com.huawei.hms.ads.nativead.NativeView>
The content of the drawable/native_flag_rounded_corners_shape.xml file is as follows:
- <shape xmlns:android="http://schemas.android.com/apk/res/android">
- <solid android:color="#CCCCCC" />
- <padding
- android:bottom="1dp"
- android:left="1dp"
- android:right="1dp"
- android:top="1dp" />
- <corners
- android:bottomLeftRadius="2dp"
- android:bottomRightRadius="2dp"
- android:topLeftRadius="2dp"
- android:topRightRadius="2dp" />
- </shape>
The content of the drawable/native_button_rounded_corners_shape.xml file is as follows:
- <shape xmlns:android="http://schemas.android.com/apk/res/android">
- <solid android:color="#214EF3" />
- <padding
- android:bottom="1dp"
- android:left="1dp"
- android:right="1dp"
- android:top="1dp" />
- <corners
- android:bottomLeftRadius="20dp"
- android:bottomRightRadius="20dp"
- android:topLeftRadius="20dp"
- android:topRightRadius="20dp" />
- </shape>
The NativeAdConfiguration object allows you to customize native ads.
The sample code is as follows:
- // "testy63txaom86" is a dedicated test ad slot ID.
- NativeAdLoader.Builder builder = new NativeAdLoader.Builder(this, "testy63txaom86");
- NativeAdConfiguration adConfiguration = new NativeAdConfiguration.Builder()
- .setVideoConfiguration(videoConfiguration) // Set video attributes.
- .setRequestCustomDislikeThisAd(true) // Set whether to customize "Dislike This Ad".
- .build();
- builder.setNativeAdOptions(adConfiguration);
For details about the methods, please refer to NativeAdConfiguration.Builder in the API Reference.
The "Dislike This Ad" feature allows users to block the ads that they are not interested in.
An example is as follows.

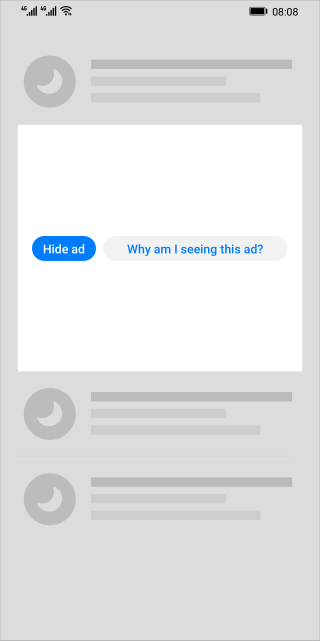
Figure 1 Native ad Figure 2 Ad options

Figure 3 Reasons for disliking this ad Figure 4 Native ad disliked
If you do not want to display the view showing that an ad is disliked, you can call the setDislikeAdListener() method in the NativeAd class to set the ad disliking event listener for the NativeAd object and add custom implementation to the onAdDisliked() method in the listener. When an ad is disliked, the SDK calls back the onAdDisliked() method in the listener.
The sample code is as follows:
- NativeAdLoader.Builder builder = new NativeAdLoader.Builder(this, "testy63txaom86");
- builder.setNativeAdLoadedListener(new NativeAd.NativeAdLoadedListener() {
- @Override
- public void onNativeAdLoaded(NativeAd nativeAd) {
- ...
- nativeAd.setDislikeAdListener(new DislikeAdListener() {
- @Override
- public void onAdDisliked() {
- // TODO Call this method when an ad is disliked.
- }
- });
- }
- });
You can use the setRequestCustomDislikeThisAd() method in the NativeAdConfiguration.Builder class to set whether to customize "Dislike This Ad". If "Dislike This Ad" is customized, the "Why this ad" icon will be displayed for native ads. To hide this icon, call the setChoicesPosition() method in the NativeAdConfiguration.Builder class.
The sample code is as follows:
- NativeAdConfiguration adConfiguration = new NativeAdConfiguration.Builder()
- .setRequestCustomDislikeThisAd(true) // Customize "Dislike This Ad".
- .setChoicesPosition(NativeAdConfiguration.ChoicesPosition.INVISIBLE) // Hide the "Why this ad" icon.
- .build();
- NativeAdLoader nativeAdLoader = builder.setNativeAdOptions(adConfiguration).build();
When a native ad is loaded, the NativeAd.isCustomDislikeThisAdEnabled() method can be called to determine whether "Dislike This Ad" is customized. In addition, a list of reasons for disliking this ad can be obtained by using the NativeAd.getDislikeAdReasons() method. You can customize how to display the list on the UI.
The sample code is as follows:
- if (nativeAd.isCustomDislikeThisAdEnabled()) {
- List<DislikeAdReason> dislikeAdReasons = nativeAd.getDislikeAdReasons();
- }
You can use the NativeAd.dislikeAd() method to send the selected reason to the HUAWEI Ads SDK.
The sample code is as follows:
- nativeAd.dislikeAd(dislikeAdReason);
When testing native ads, use the dedicated test ad slot ID to obtain test ads. This avoids invalid ad clicks during the test. The test ad slot ID is used only for function commissioning. Before releasing your app, apply for a formal ad slot ID and replace the test ad slot ID with the formal one.
The following table lists the dedicated ad slot IDs for native ad testing.
Ad Format | Display Form | Size | Aspect Ratio | Test Ad Slot ID |
Native | Large image with text | 1080 x 607 | 16:9 | testu7m3hc4gvm |
Native | Small image with text | 225 x 150 | 3:2 | testb65czjivt9 |
Native | Video with text | 640 x 360 | 16:9 | testy63txaom86 |
You can download the sample code for native ads and execute the code. The following screen will be displayed.