Pausing barcode scanning will reset the camera's focal length. For example, if the focal length is adjusted to zoom in, it will be restored to the initial state after the barcode scanning is paused and then resumed.
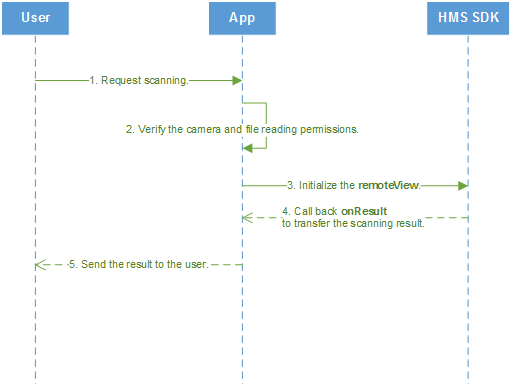
In Customized View mode, you do not need to worry about developing the scanning process or camera control. Scan Kit will do all these tasks for you. However, you will need to design the scanning UI. This can also be easily complete based on sample code.
The process of using Scan Kit in Customized View mode is as follows:
1. A user starts an app and sends a request of scanning a barcode.
2. Check whether the app has the camera access and file reading permissions.
3. Initialize the customized view of the app to build the scanning UI and start scanning.
4. If the scanning is successful, the HMS SDK calls the onResult API of the app to pass the scanning result.
5. The app encapsulates the scanning result and sends it to the user.
For details, please refer to Custom Elements for the Scanning UI in Customized View Mode.
1. Create a RemoteView and load it to the activity layout.
a. Bind the camera preview screen to the RemoteView and set the scanning area. In the preview stream, Scan Kit identifies only the image in the scanning area. To better magnify the captured image, it is recommended that the scanning box be placed in the middle of the screen and be slightly smaller than the scanning area.
b. Set the barcode formats you want Scan Kit to support, initialize the remote view, and set UI elements.
Scan Kit that supports only certain barcode formats will scan faster. For example, if only QR Code and Data Matrix need to be detected, use the setFormat(HmsScan.QRCODE_SCAN_TYPE, HmsScan.DATAMATRIX_SCAN_TYPE) method to set Scan Kit to support only the two types of barcodes. If scanning barcodes in all Barcode Formats Supported by HUAWEI Scan Kit supported by Scan Kit is acceptable for you, you do not need to call the setFormat method to specify the barcode format.
c. Load the RemoteView to the activity. The sample code is as follows:
- @Override
- protected void onCreate(Bundle savedInstanceState) {
- super.onCreate(savedInstanceState);
- setContentView(R.layout.activity_defined);
- // Bind the camera preview layout.
- frameLayout = findViewById(R.id.rim);
- // Set the scanning area. Set the parameters as required.
- DisplayMetrics dm = getResources().getDisplayMetrics();
- float density = dm.density;
- mScreenWidth = getResources().getDisplayMetrics().widthPixels;
- mScreenHeight = getResources().getDisplayMetrics().heightPixels;
- // Set the width and height of the barcode scanning box to 300 dp.
- final int SCAN_FRAME_SIZE = 300;
- int scanFrameSize = (int) (SCAN_FRAME_SIZE * density);
- Rect rect = new Rect();
- rect.left = mScreenWidth / 2 - scanFrameSize / 2;
- rect.right = mScreenWidth / 2 + scanFrameSize / 2;
- rect.top = mScreenHeight / 2 - scanFrameSize / 2;
- rect.bottom = mScreenHeight / 2 + scanFrameSize / 2;
- // Initialize the remote view. Use setContext() to pass the context (mandatory), use setBoundingBox() to set the scanning area, and use setFormat() to set the barcode format. Then call the build() method to create the remote view.
- remoteView = new RemoteView.Builder().setContext(this).setBoundingBox(rect).setFormat(HmsScan.QRCODE_SCAN_TYPE, HmsScan.DATAMATRIX_SCAN_TYPE).build();
- // Load the customized view to the activity.
- remoteView.onCreate(savedInstanceState);
- FrameLayout.LayoutParams params = new FrameLayout.LayoutParams(LinearLayout.LayoutParams.MATCH_PARENT, LinearLayout.LayoutParams.MATCH_PARENT);
- frameLayout.addView(remoteView, params);
- }
2. Set a result callback listener for the RemoteView to obtain the HmsScan object. For the information contained in this object, please refer to Parsing Barcodes.
- @Override
- protected void onCreate(Bundle savedInstanceState) {
- ...
- // Subscribe to the identification result callback event.
- remoteView.setOnResultCallback(new OnResultCallback() {
- @Override
- public void onResult(HmsScan[] result) {
- // Obtain the scanning result object HmsScan.
- showResult(result);
- }
- });
- }
3. Set a lifecycle listener for the remote view.
- @Override
- protected void onStart() {
- super.onStart();
- remoteView.onStart();
- }
- @Override
- protected void onResume() {
- super.onResume();
- remoteView.onResume();
- }
- @Override
- protected void onPause() {
- super.onPause();
- remoteView.onPause();
- }
- @Override
- protected void onStop() {
- super.onStop();
- remoteView.onStop();
- }
- @Override
- protected void onDestroy() {
- super.onDestroy();
- remoteView.onDestroy();
- }
4. Set other optional listeners for the RemoteView.
- protected void onCreate(Bundle savedInstanceState) {
- ...
- // Call back this API under dim lighting. The sample code is used to control the flashlight button.
- flushBtn = findViewById(R.id.flush_btn);
- remoteView.setOnLightVisibleCallback(new OnLightVisibleCallBack() {
- @Override
- public void onVisibleChanged(boolean visible) {
- if(visible){
- flushBtn.setVisibility(View.VISIBLE);
- }
- }
- });
- ...
- }
5. (Optional) Pause or resume barcode scanning.
a. After successfully scanning a barcode, if you want to perform other operations without ending the current activity, call the API for pausing barcode scanning.
- remoteView.pauseContinuouslyScan();
b. If you want to scan again, call the API for resuming barcode scanning. The activity will start receiving the scanning result again.
- remoteView.resumeContinuouslyScan();
Pausing barcode scanning will reset the camera's focal length. For example, if the focal length is adjusted to zoom in, it will be restored to the initial state after the barcode scanning is paused and then resumed.
6. If you want to add the function of scanning barcodes from images, use the Bitmap.
a. Set the button for going to the album.
b. Develop the process of scanning barcodes from images in Bitmap mode. For details, please refer to Scanning QR Codes from Images.