Overview
ArkWeb is a platform designed to provide Web components for apps to display Web page content. It also supports various capabilities such as page loading, page interaction, and page debugging. In the digital era, the page display speed directly reflects the smoothness of apps, affecting user experience. Rapid page loading and seamless display can significantly enhance user retention within the app, minimize wait times, and boost overall user satisfaction.
The web page display process involves DNS resolution, connection establishment, and more. Its loading speed is affected by factors such as network latency and resource size. To speed up the web page loading, you can optimize capabilities such as web page loading, resource downloading, and page rendering to improve performance and user experience.
This topic describes the following common optimization methods:
- Web page loading optimization: Speeding up web page loading to ensure a smooth user experience.
- JSBridge: Using JSBridge communication to avoid redundant switchover to the ArkTS environment and UI congestion.
- Same-layer rendering: Rendering page elements by layer to reduce page redrawing and rearrangement times and improve page rendering efficiency.
ArkWeb provides methods to speed up the page display. You can use these optimization methods to improve app performance, user experience, user satisfaction, and retention rate.
[h2]Web Page Loading Process
The web page loading process includes network connection, resource download (including waiting for network resource download), DOM parsing, JavaScript code compilation and execution, and rendering. During page loading, key procedures include network connection, resource download, and complete page rendering. This topic describes how to shorten the duration of the following key procedures:
- Pre-starting the web rendering process: loads a blank Web component before the web page required by the service is started. In this way, when at least one Web component is alive, the web rendering process always exists, thereby saving a time for starting the rendering process when the Web component is started subsequently, and speeding up page loading.
- Pre-resolution: implements DNS resolution in advance to reduce the resolution time and the web loading duration.
- Pre-connection: completes DNS resolution and socket connection establishment before a user requests a page. This step covers pre-resolution. In this way, when a user requests a page, a connection has been established between the server and the browser, and data can be directly transmitted, thereby reducing the network latency and improving the page loading speed.
- Pre-downloading: downloads required resources before loading pages to avoid congestion and latency. In this way, the browser can obtain required resources such as images, CSS files, and JavaScript files in advance when loading pages. Proper use of the pre-download technique can speed up page loading and improve user experience.
- Pre-rendering: renders the page to be loaded in the background in advance to complete the entire page loading process. In this way, when a user accesses the page, the page can be directly switched to the foreground and immediately displayed. To use pre-rendering, all required resources must be downloaded before DOM parsing, JavaScript execution, and page rendering. Otherwise, the page content may be incomplete or rendering errors may occur. Pre-rendering can significantly reduce the page loading time, especially for resource-intensive pages or pages with complex interactions.
- Prefetching POST: obtains the data of the POST request in advance if the POST request exists on the web page to be loaded and takes a long time. In this way, when a user initiates a POST request, the system intercepts it and replaces it with prefetched data to accelerate page loading and enhance user experience.
- Precompiling JavaScript files to generate code caches: compiles JavaScript files into bytecode and caches the bytecode locally to reduce the compilation time when the page is loaded for the first time.
- Compiling JavaScript files to generate code caches during resource interception and replacement: compiles JavaScript files into bytecode and caches the bytecode locally to save the compilation time for non-initial page loading.
- Injecting offline resources without interception: injects required images, style sheets, and script resources into the memory cache before page loading to reduce the network request time during the first loading.
- Accelerated resource interception and replacement: supports input parameters in ArrayBuffer format. You can directly use data in ArrayBuffer format for interception and replacement without format conversion on the app side.

All optimization methods are based on preprocessing. If users do not open pre-processed web pages, extra resources will be consumed. The following table lists the effects, costs, and application scenarios of each optimization method.
| Optimization Method | Effect (Optimization Data Is for Reference Only) | Adaptation Difficulty | Impact | Application Scenario |
|---|---|---|---|---|
| Pre-starting the web rendering process | The time required for starting the web rendering process is reduced by about 140 ms. | Low | Extra memory and computing power. | Web pages to be used with a high probability. |
| Pre-resolution | The time required for resolving the domain name of the web page that is actually started by the user is reduced by about 66 ms. | Low | The domain name of the web page that is not started by the user may be parsed in advance. | Web pages to be used with a medium- or high- probability. |
| Preconnection | The time required for web page domain name resolution and network connection is reduced by about 80 ms. | Low | The resources of the web page that is not started by the user may be connected in advance. | Web pages to be used with a medium- or high- probability. |
| Predownloading | The time spent on network GET request downloading, DOM parsing blocking, and JavaScript execution is reduced by about 641 ms. | Low | Extra resources for network connections, downloads, and storage. | Web pages to be used with a high probability. |
| Prerendering | Displays a page in seconds, minimizing the page loading latency to about 486 ms. | Moderate | Extra consumption for network connections, downloads, storage, and rendering. | Web pages to be used with an ultra-high probability. |
| Prefetching POST requests | The time spent on network POST request downloading, DOM parsing blocking, and JavaScript execution is reduced by about 313 ms. | Moderate | Extra resources for network connections, downloads, and storage. | Web pages to be used with a high probability. |
| Precompiling JavaScript files to generate bytecode cache | The time required for JavaScript compilation is reduced. The optimization data depends on the size of JavaScript resources. The time required for precompiling 5.76 MB resources is shortened by 2,915 ms. | Moderate | Extra storage resources. | JavaScript Web pages using the HTTP/HTTPS protocols that are loaded for the first and second time. |
| Generating the bytecode cache by JavaScript for resource interception and replacement | The time required for JavaScript compilation is reduced. The optimization data depends on the size of JavaScript resources. The time required for intercepting and replacing 2.4 MB resources is shortened by 67 ms. | High | Extra storage resources. | JavaScript web pages using custom protocols that are loaded for the third or subsequent times. |
| Injecting offline resources without interception | The time required for loading resources to the memory is reduced. The optimization data depends on the resource size. When 25 MB resources are injected, the time required for loading resources to the memory is shortened by 1,240 ms. | Moderate | Extra storage resources. | Resources to be used with a high probability. |
| Fast resource interception and replacement | The conversion time is reduced, and the data transmission mode in ArrayBuffer format is optimized. The optimization data depends on the resource size. The time required for 10 KB resource interception and replacement is shortened by 20 ms. | Low | - | Data to be transferred in ArrayBuffer format. |
[h2]Pre-Starting the Web Rendering Process
Principles
Before a web page required by a service is started, a blank Web component can be loaded, so that the web rendering process always exists when at least one Web component is alive. This reduces time for starting the rendering process when the Web component is started subsequently, and accelerates page loading.
You are advised to pre-start the web rendering process before starting the web page, for example, during cold start or ad display. If the web rendering process cannot be pre-started during cold start, you are advised to pre-start the process during idle time.


- Creating a blank Web component consumes memory (about 200 MB) and computing power. Therefore, you are advised to reuse the pre-created Web component for subsequent page loading.
- The app shares a web rendering process globally, which is terminated only when all Web components are destroyed. Therefore, you are advised to ensure that at least one Web component is active.
Case Study
[Not recommended]
Tap to go to the next page and directly load the web page.

In this example, the network permission needs to be configured because network access is involved.
// Index.ets
@Entry
@Component
struct Index {
  pageInfos: NavPathStack = new NavPathStack()

  build() {
    Navigation(this.pageInfos) {
      Column() {
        Button('Load Test Page', { stateEffect: true, type: ButtonType.Capsule })
          .width('80%')
          .height(40)
          .margin(20)
          .onClick(() => {
            // Put the NavDestination page information specified by name on the stack.
            this.pageInfos.pushPath({ name: 'pageOne' })
          })
      }
    }.title('NavIndex')
  }
}
// Second.ets
import { webview } from '@kit.ArkWeb'
import { hilog } from '@kit.PerformanceAnalysisKit';
const DOMAIN = 0x0000;
const TAG = 'Sample';
@Builder
export function PageOneBuilder() {
Second()
}
@Component
export struct Second {
webviewController: webview.WebviewController = new webview.WebviewController();
aboutToAppear(): void {
// Output Web page start loading time
hilog.info(DOMAIN, TAG, `load page start time: ${Date.now()}`);
}
build() {
NavDestination() {
Row() {
Column() {
// Please replace the URL with the real address.
Web({ src: 'https://www.example.com', controller: this.webviewController })
.height('100%')
.width('100%')
.onPageEnd((event) => {
// Output Web page loading completion time
hilog.info(DOMAIN, TAG, `load page end time: ${Date.now()}`);
})
}
.width('100%')
}
.height('100%')
}
}
} Click Load Test Page. The following figure shows the time required for loading the page is 82 ms.

[Recommended]
Create a Web component in the background to pre-start the web rendering process for rendering.
- Create a node and corresponding NodeController, and create a Web component in the background.
// Create NodeController // common.ets import { UIContext } from '@kit.ArkUI'; import { webview } from '@kit.ArkWeb'; import { NodeController, BuilderNode, Size, FrameNode } from '@kit.ArkUI'; import { hilog } from '@kit.PerformanceAnalysisKit'; const DOMAIN = 0x0000; const TAG = 'Sample'; // Specific component contents of dynamic components in @Builder // Data is a parameter encapsulation class. class Data{ url: string = 'https://www.example.com'; controller: WebviewController = new webview.WebviewController(); } let shouldInactive: boolean = true; @Builder function WebBuilder(data:Data) { Column() { Web({ src: data.url, controller: data.controller }) .domStorageAccess(true) .zoomAccess(true) .fileAccess(true) .mixedMode(MixedMode.All) .width('100%') .height('100%') .onPageBegin(() => { data.controller.onActive(); }) .onPageEnd(() => { hilog.info(DOMAIN, TAG, `load page end time: ${Date.now()}`); }) .onFirstMeaningfulPaint(() =>{ if (!shouldInactive) { return; } // stop render data.controller.onInactive(); shouldInactive = false; }) } } // Used to control and feedback the behavior of nodes on the corresponding NodeContainer, which needs to be used together with NodeContainer export class MyNodeController extends NodeController { private rootNode: BuilderNode<Data[]> | null = null; private root: FrameNode | null = null; // The method that must be overridden is used to build the number of nodes and return the nodes to be mounted in the corresponding NodeContainer. // //Called when the corresponding NodeContainer is created, or refreshed by calling the rebuild method. makeNode(uiContext: UIContext): FrameNode | null { hilog.info(DOMAIN, TAG, ' uicontext is undefined : '+ (uiContext === undefined)); if (this.rootNode != null) { const parent: FrameNode = this.rootNode.getFrameNode()?.getParent() as FrameNode; if (parent) { let inspectorInfo: string = JSON.stringify(parent.getInspectorInfo()); hilog.info(DOMAIN, TAG, inspectorInfo); parent.removeChild(this.rootNode.getFrameNode()); this.root = null; } this.root = new FrameNode(uiContext); this.root.appendChild(this.rootNode.getFrameNode()); // Returns the FrameNode node return this.root; } // Returns a null node that controls the dynamic component to be unbound. return null; } // Callback when layout size changes. aboutToResize(size: Size): void { hilog.info(DOMAIN, TAG, 'aboutToResize width : ' + size.width + ' height : ' + size.height); } // Call back when the NodeContainer corresponding to the controller is in Appear. aboutToAppear(): void { hilog.info(DOMAIN, TAG, 'aboutToAppear'); } // Call back when the NodeContainer corresponding to the controller is Disappear. aboutToDisappear(): void { hilog.info(DOMAIN, TAG, 'aboutToDisappear'); } // This function is a user-defined function and can be used as an initialization function. // Initialize builderNode through UIContext, and then initialize the contents in @Builder through the Build interface in BuilderNode. initWeb(url:string, uiContext:UIContext, control:WebviewController): void { if(this.rootNode != null) { return; } // Creating a node requires uiContext. this.rootNode = new BuilderNode(uiContext) // Create dynamic Web components this.rootNode.build(wrapBuilder<Data[]>(WebBuilder), { url:url, controller:control }) } } // Create the NodeController needed for Map saving. let NodeMap:Map<string, MyNodeController | undefined> = new Map(); // Create WebViewController needed for Map saving. let controllerMap:Map<string, WebviewController | undefined> = new Map(); // Initialization requires UIContext to be obtained in Ability. export const createNWeb = (url: string, uiContext: UIContext) => { // Create NodeController let baseNode: MyNodeController = new MyNodeController(); let controller: WebviewController = new webview.WebviewController() ; // Initialize a custom web component baseNode.initWeb(url, uiContext, controller); controllerMap.set(url, controller) NodeMap.set(url, baseNode); } // Customize to get the NodeController interface. export const getNWeb = (url : string) : MyNodeController | undefined => { return NodeMap.get(url); } - Create a carrier, create a Web component, and load a blank page.
// Carrier Ability import { UIAbility } from '@kit.AbilityKit'; import { window } from '@kit.ArkUI'; import { createNWeb } from '../pages/common'; export default class EntryAbility extends UIAbility { onWindowStageCreate(windowStage: window.WindowStage): void { windowStage.loadContent('pages/Index', (err) => { // Create an empty ArkWeb dynamic component in advance (need to pass in UIContext) and start the rendering process. createNWeb('about://blank', windowStage.getMainWindowSync().getUIContext()); }); } } - Create the Web component to be loaded.
Home page
// Index.ets
@Entry
@Component
struct Index {
  pageInfos: NavPathStack = new NavPathStack()

  build() {
    Navigation(this.pageInfos) {
      Column() {
        Button('Load Test Page', { stateEffect: true, type: ButtonType.Capsule })
          .width('80%')
          .height(40)
          .margin(20)
          .onClick(() => {
            // Put the NavDestination page information specified by name on the stack.
            this.pageInfos.pushPath({ name: 'pageOne' })
          })
      }
    }.title('NavIndex')
  }
}
Redirect to the test page:// Second.ets import { webview } from '@kit.ArkWeb'; import { getNWeb } from './common'; import { hilog } from '@kit.PerformanceAnalysisKit'; const DOMAIN = 0x0000; const TAG = 'Sample'; @Builder export function PageOneBuilder() { Second() } @Component export struct Second { webviewController: webview.WebviewController = new webview.WebviewController(); aboutToAppear(): void { // Output Web page start loading time hilog.info(DOMAIN, TAG, `load page start time: ${Date.now()}`); } build() { NavDestination() { Row() { Column() { // Please replace the URL with the real address. NodeContainer(getNWeb('https://www.example.com')) .height('100%') .width('100%') } .width('100%') } .height('100%') } } }
Click Load Test Page. The following figure shows the time required for loading the page is 44 ms.


You can determine whether to reuse the Web component in subsequent page operations.
Summary
| Next Page Loading Mode | Duration (for Reference Only) | Description |
|---|---|---|
| Directly loading a web page | 82 ms | The rendering process is started only when the page is loaded, increasing the loading time. |
| Pre-starting the web rendering process | 44 ms | The rendering process is started in advance during idle time, shortening the startup time. |
[h2]Pre-resolution and Preconnection
Principles
The Web component can be initialized and run only after the app is started and the onCreate lifecycle of UIAbility is complete. The running phase of the Web component encompasses the onAppear, load, onPageBegin, and onPageEnd steps. Pre-resolution and pre-connection optimization apply to web page startup and redirection scenarios, for example, loading the web home page during app startup. After creating a Web component instance, you can set the URL and perform pre-resolution and pre-connection at different time points.
- To load the app home page, you are advised to set the home page URL and perform pre-resolution and pre-connection after the Web component is initialized, as shown by a in the following figure.
- To load a page in an app, you are advised to set the URL of the current page in the onAppear phase of the Web component for pre-resolution and pre-connection, as shown by b in the following figure.
- To load a page that may be tapped by a user in the next step, you are advised to set the URL of the page during onPageEnd and subsequent operations for pre-resolution and pre-connection, as shown by c in the following figure.


When using pre-resolution and pre-connection for optimization, pay attention to the following:
- Pre-connection has a validity period. You are advised to reuse an established connection within 5 minutes. Otherwise, the connection will be closed.
- Pre-connection takes time. You are advised to preload the page 150 ms earlier than the actual page loading time.
- After the current page is loaded, that is, after onPageEnd is called, the current Web component can be reused to preconnect to a new page or predownload resources.
Case Study
Case 1: To perform operations on the home page of an app in advance, call initializeWebEngine() to initialize the kernel of the Web component, and then call prepareForPageLoad() to preconnect to the page to be loaded. In prepareForPageLoad, set the second parameter to true to perform preconnection. If the second parameter is set to false, only DNS pre-resolution is performed. The code is as follows:
import { AbilityConstant, UIAbility, Want } from '@kit.AbilityKit';
import { webview } from '@kit.ArkWeb';
import { hilog } from '@kit.PerformanceAnalysisKit';

const DOMAIN = 0x0000;
const TAG = 'Sample';

export default class EntryAbility extends UIAbility {
  onCreate(want: Want, launchParam: AbilityConstant.LaunchParam) {
    hilog.info(DOMAIN, TAG, 'EntryAbility onCreate');
    webview.WebviewController.initializeWebEngine();
    // When pre-connecting, you need to replace' https://www.example.com' with the actual website address to visit
    // Specify that the second parameter is true, which means to pre-connect. If it is false, the interface will only pre-resolve the URL.
    // The third parameter, numSockets, has a value range of 1-6. If it exceeds 6, the parameter will be treated as 6.
    webview.WebviewController.prepareForPageLoad('https://www.example.com/', true, 2);
    AppStorage.setOrCreate('abilityWant', want);
    hilog.info(DOMAIN, TAG, 'EntryAbility onCreate done');
  }
} 
The prepareForPageLoad preconnection and pre-resolution are related only to the host. If the URL contains parameters, the preconnection and pre-resolution can also be performed.
Case 2: To connect to the current web page in advance, you can use the onAppear method of the Web component. The code is as follows:
import { webview } from '@kit.ArkWeb';

@Entry
@Component
struct WebComponent {
  webviewController: webview.WebviewController = new webview.WebviewController();
  build() {
    Column() {
      Button('loadData')
        .onClick(() => {
          if (this.webviewController.accessBackward()) {
            this.webviewController.backward();
          }
        })
      Web({ src: 'https://www.example.com/cn/', controller: this.webviewController})
        .onAppear(() => {
          // Specify that the second parameter is true, which means to pre-connect. If it is false, the interface will only pre-resolve the URL.
          // The third parameter is the number of socket to be pre-connected. A maximum of six are allowed.
          webview.WebviewController.prepareForPageLoad('https://www.example.com/cn/', true, 2);
        })
    }
  }
}
Case 3: After the current page is displayed, you can preconnect to the next page in onPageEnd().
import { webview } from '@kit.ArkWeb';

@Entry
@Component
struct WebComponent {
  webviewController: webview.WebviewController = new webview.WebviewController();
  build() {
    Column() {
      Web({ src: 'https://www.example.com/', controller: this.webviewController})
        .onPageEnd(() => {
          // Pre-connected https://www.example1.com/
          // The third parameter, numSockets, has a value range of 1-6. If it exceeds 6, the parameter will be treated as 6.
          webview.WebviewController.prepareForPageLoad('https://www.example.com/', true, 2);
        })
    }
  }
}
[h2]Predownloading
Principles
As shown in the following figure, the running of the Web component encompasses onAppear, load, onPageBegin, and onPageEnd. You can set the URL to be accessed next in onPageEnd to download required resources in advance. This mode applies to web page startup and redirection scenarios. For example, after the guidance process is complete, predownload the page to be redirected. After creating a Web component instance, you can set the URL for pre-download after the current page is loaded. This solution can significantly reduce the resource download time and the time consumed by page DOM parsing and JS code compilation and execution caused by resource download. The estimated benefit is hundreds of milliseconds (the specific time depends on the current network environment).


- Pre-download involves connection and resource download, which may take more than 700 ms (depending on the current network environment). You are advised to reserve sufficient time for pre-download.
- Pre-downloading resources consume extra bandwidth and memory. Therefore, you are advised to use this solution for frequently accessed pages.
- After the pre-download is complete, the connection of the current Web component is closed. If you want to preconnect to the next page, you need to explicitly call the preconnection API.
Case Study
As shown in the following example, in the onPageEnd phase, the prefetchPage() method is called to download the resources required by the page in advance, including the main resource and sub-resources. However, the JavaScript code of the web page is not executed or the web page is not rendered, which speeds up the loading operation.
import { webview } from '@kit.ArkWeb';

@Entry
@Component
struct WebComponent {
  webviewController: webview.WebviewController = new webview.WebviewController();
  build() {
    Column() {
      Web({ src: 'https://www.example.com/', controller: this.webviewController})
        .onPageEnd(() => {
          // Pre-connected https://www.iana.org/help/example-domains
          this.webviewController.prefetchPage('https://www.iana.org/help/example-domains');
        })
    }
  }
} 
prefetchPage caches the downloaded resources for 5 minutes.
[h2]Prerendering
Principles
Prerendering is particularly effective for web page startup and redirection, for example, redirection from the home page to a child page. Unlike pre-connection and predownloading, prerendering requires a new Web component to be created and prerendered in the background. In this case, the component is not mounted to the component tree (the status is Hidden or InActive). You can dynamically mount the component as required later.
The following figure shows the principles. First, define a custom component to encapsulate the Web component. The component should be created offline, contained in a stateless NodeContainer, and bound to the corresponding NodeController. After the Web component is prerendered in the background, the NodeController mounts the Web component to the NodeContainer in the ViewTree when the Web component needs to be displayed. The general prerendering steps are as follows:
- Create a custom Web component offline and encapsulate it based on the specific scenario.
- Create and bind the custom Web component to a NodeController. The NodeController API is implemented to manage operations such as creating, displaying, and updating nodes. Put the NodeController object into the container for calling.
- Bind the NodeController to a NodeContainer component to implement dynamic page display.


Prerendering consumes more memory and computing power than predownloading and pre-connection. Therefore, you are advised to use prerendering only for frequently accessed pages. The number of Web components created in the background of an app should be less than 200.
In addition, to facilitate the pre-rendering of the Web component, you can reference nodepool. This third-party library provides the capability of reusing global custom components to pre-render the Web components more efficiently and easily.
Case Study
import { UIAbility } from '@kit.AbilityKit';
import { window } from '@kit.ArkUI';
// Carrier Ability
// EntryAbility.ets
import {createNWeb} from './common';
export default class EntryAbility extends UIAbility {
  onWindowStageCreate(windowStage: window.WindowStage): void {
    windowStage.loadContent('pages/Index', (err, data) => {
      // Create ArkWeb dynamic components (need to pass in UIContext), which can be created at any time after loadContent.
      createNWeb('https://www.example.com', windowStage.getMainWindowSync().getUIContext());
      if (err.code) {
        return;
      }
    });
  }
} // Create NodeController
// common.ets
import { UIContext } from '@kit.ArkUI';
import { webview } from '@kit.ArkWeb';
import { NodeController, BuilderNode, Size, FrameNode } from '@kit.ArkUI';
import { hilog } from '@kit.PerformanceAnalysisKit';
const DOMAIN = 0x0000;
const TAG = 'Sample';
// Specific component contents of dynamic components in @Builder
// Data is a parameter encapsulation class.
class Data{
url: string = 'https://www.example.com';
controller: WebviewController = new webview.WebviewController();
}
let shouldInactive: boolean = true;
@Builder
function WebBuilder(data:Data) {
Column() {
Web({ src: data.url, controller: data.controller })
.domStorageAccess(true)
.zoomAccess(true)
.fileAccess(true)
.mixedMode(MixedMode.All)
.width('100%')
.height('100%')
.onPageBegin(() => {
data.controller.onActive();
})
.onPageEnd(() => {
hilog.info(DOMAIN, TAG, `load page end time: ${Date.now()}`);
})
.onFirstMeaningfulPaint(() =>{
if (!shouldInactive) {
return;
}
// stop render
data.controller.onInactive();
shouldInactive = false;
})
}
}
// Used to control and feedback the behavior of nodes on the corresponding NodeContainer, which needs to be used together with NodeContainer
export class MyNodeController extends NodeController {
private rootNode: BuilderNode<Data[]> | null = null;
private root: FrameNode | null = null;
// The method that must be overridden is used to build the number of nodes and return the nodes to be mounted in the corresponding NodeContainer.
// //Called when the corresponding NodeContainer is created, or refreshed by calling the rebuild method.
makeNode(uiContext: UIContext): FrameNode | null {
hilog.info(DOMAIN, TAG, ' uicontext is undefined : '+ (uiContext === undefined));
if (this.rootNode != null) {
const parent: FrameNode = this.rootNode.getFrameNode()?.getParent() as FrameNode;
if (parent) {
let inspectorInfo: string = JSON.stringify(parent.getInspectorInfo());
hilog.info(DOMAIN, TAG, inspectorInfo);
parent.removeChild(this.rootNode.getFrameNode());
this.root = null;
}
this.root = new FrameNode(uiContext);
this.root.appendChild(this.rootNode.getFrameNode());
// Returns the FrameNode node
return this.root;
}
// Returns a null node that controls the dynamic component to be unbound.
return null;
}
// Callback when layout size changes.
aboutToResize(size: Size): void {
hilog.info(DOMAIN, TAG, 'aboutToResize width : ' + size.width + ' height : ' + size.height);
}
// Call back when the NodeContainer corresponding to the controller is in Appear.
aboutToAppear(): void {
hilog.info(DOMAIN, TAG, 'aboutToAppear');
}
// Call back when the NodeContainer corresponding to the controller is Disappear.
aboutToDisappear(): void {
hilog.info(DOMAIN, TAG, 'aboutToDisappear');
}
// This function is a user-defined function and can be used as an initialization function.
// Initialize builderNode through UIContext, and then initialize the contents in @Builder through the Build interface in BuilderNode.
initWeb(url:string, uiContext:UIContext, control:WebviewController): void {
if(this.rootNode != null)
{
return;
}
// Creating a node requires uiContext.
this.rootNode = new BuilderNode(uiContext)
// Create dynamic Web components
this.rootNode.build(wrapBuilder<Data[]>(WebBuilder), { url:url, controller:control })
}
}
// Create the NodeController needed for Map saving.
let NodeMap:Map<string, MyNodeController | undefined> = new Map();
// Create WebViewController needed for Map saving.
let controllerMap:Map<string, WebviewController | undefined> = new Map();
// Initialization requires UIContext to be obtained in Ability.
export const createNWeb = (url: string, uiContext: UIContext) => {
// Create NodeController
let baseNode: MyNodeController = new MyNodeController();
let controller: WebviewController = new webview.WebviewController() ;
// Initialize a custom web component
baseNode.initWeb(url, uiContext, controller);
controllerMap.set(url, controller)
NodeMap.set(url, baseNode);
}
// Customize to get the NodeController interface.
export const getNWeb = (url : string) : MyNodeController | undefined => {
return NodeMap.get(url);
} // Use the Page page of NodeController.
// Index.ets
import {getNWeb} from './common';
@Entry
@Component
struct Index {
build() {
Row() {
Column() {
// NodeContainer is used to bind with NodeController node, and rebuild will trigger makeNode.
// Page page is bound to NodeController through NodeContainer interface to realize dynamic component page display.
NodeContainer(getNWeb('https://www.example.com'))
.height('90%')
.width('100%')
}
.width('100%')
}
.height('100%')
}
} Prefetching POST requests is applicable to web page startup and redirection scenarios. If a web page to be loaded contains a time-consuming POST request, you can prefetch the POST request at different time points to reduce the time consumed for waiting for the POST request data to be downloaded. The following scenarios are for your reference:
- For the app home page, you are advised to prefetch the POST request of the home page after the Web component is created or the web kernel is initialized in advance. For example, you are advised to prefetch the POST request in XComponent.onCreate() or the lifecycle function aboutToAppear() of the custom component.
- After the current page is loaded, you can prefetch the POST request of the next page that may be tapped by the user. It is recommended that you prefetch the POST request in onPageEnd() of the Web component or later.

- This solution can significantly reduce the time required for downloading POST requests. The estimated benefit may be 100 milliseconds (depending on the data content of POST requests and the current network environment).
- Prefetching POST requests encompasses connection and resource download, which can take hundreds of milliseconds, depending on the data content of the POST requests and the current network environment. You are advised to reserve sufficient time for prefetching.
- Prefetching POST requests consumes extra bandwidth and memory. Therefore, you are advised to prefetch POST requests only for frequently accessed pages.
- POST requests are instantaneous. You need to specify the validity period of prefetching POST requests.
- Currently, only POST requests whose Content-Type is application/x-www-form-urlencoded can be prefetched. A maximum of six POST requests can be prefetched. When the seventh POST request is prefetched, the earliest prefetched POST request is automatically cleared. You can also call the clearPrefetchedResource() API to clear the prefetched resources that are no longer used.
- To use the prefetched resources, you need to add ArkWebPostCacheKey to the header of the POST request. The value of ArkWebPostCacheKey is the cacheKey of the corresponding resource.
Case Study
Case 1: Loading a home page containing a POST request

Prefetching POST requests does not affect the loading time of the home page.
[Not recommended]
If the home page contains a POST request and the POST request takes a long time, you are not advised to directly load the web page.
import { webview } from '@kit.ArkWeb';

@Entry
@Component
struct WebComponent {
  webviewController: webview.WebviewController = new webview.WebviewController();

  build() {
    Column() {
      Web({ src: 'https://www.example.com/', controller: this.webviewController })
    }
  }
}
[Recommended]
Prefetch POST requests to load the home page. The steps are as follows:
- Use initializeWebEngine() to initialize the kernel of the Web component in advance, and then call prefetchResource() to prefetch the POST requests of the page to be loaded.
import { AbilityConstant, UIAbility, Want } from '@kit.AbilityKit'; import { webview } from '@kit.ArkWeb'; import { hilog } from '@kit.PerformanceAnalysisKit'; const DOMAIN = 0x0000; const TAG = 'Sample'; export default class EntryAbility extends UIAbility { // EntryAbility.ets onCreate(want: Want, launchParam: AbilityConstant.LaunchParam): void { hilog.info(DOMAIN, TAG, 'EntryAbility onCreate.'); webview.WebviewController.initializeWebEngine(); // When pre-acquiring, 'https://www.example1.com/POST? E=f&g=h' is replaced by the actual website address to be visited. webview.WebviewController.prefetchResource( { url: 'https://www.example.com/POST?e=f&g=h', method: 'POST', formData: 'a=x&b=y' }, [{ headerKey: 'c', headerValue: 'z' }], 'KeyX', 500 ); AppStorage.setOrCreate('abilityWant', want); hilog.info(DOMAIN, TAG, 'EntryAbility onCreate done.'); } // ... } - Use the Web component to load the web page containing POST requests.
import { webview } from '@kit.ArkWeb'; @Entry @Component struct WebComponent { webviewController: webview.WebviewController = new webview.WebviewController(); build() { Column() { Web({ src: 'https://www.example.com/', controller: this.webviewController }) .onPageEnd(() => { // Clear the cache of pre-acquired resources that are no longer used in the future. webview.WebviewController.clearPrefetchedResource(['KeyX']); }) } } } - In the JavaScript file of the page to be loaded, initiate a POST request and set ArkWebPostCacheKey of the response header to KeyX set during prefetch.
const xhr = new XMLHttpRequest();
xhr.open('POST', 'https://www.example.com/POST?e=f&g=h', true);
xhr.setRequestHeader('Content-Type', 'application/x-www-form-urlencoded');
xhr.setRequestHeader('ArkWebPostCacheKey', 'KeyX');
xhr.onload = function () {
  if (xhr.status >= 200 && xhr.status < 300) {
    console.log('Success', xhr.responseText);
  } else {
    console.error('Request failed.');
  }
}
const formData = new FormData();
formData.append('a', 'x');
formData.append('b', 'y');
xhr.send(formData);
Case 2: Loading the next page containing a POST request
[Not recommended]
If the web page to be loaded contains POST requests and the POST requests take a long time, you are not advised to directly load the web page.
import { webview } from '@kit.ArkWeb';

@Entry
@Component
struct WebComponent {
  webviewController: webview.WebviewController = new webview.WebviewController();

  build() {
    Column() {
      Button('Load Page')
        .onClick(() => {
          this.webviewController.loadUrl('https://www.example1.com/');
        })
      Web({ src: 'https://www.example.com/', controller: this.webviewController })
    }
  }
}
[Recommended]
To load the next page by prefetching the POST request, perform the following steps:
- After the current page is displayed, use onPageEnd() to pre-obtain the POST request of the page to be loaded.
import { hiTraceMeter } from '@kit.PerformanceAnalysisKit'; import { webview } from '@kit.ArkWeb'; @Entry @Component struct WebComponent { controller: webview.WebviewController = new webview.WebviewController(); webviewController: webview.WebviewController = new webview.WebviewController(); build() { Column() { // Load the business Web component at an appropriate time. This example takes the Button click trigger as an example. Button('Load Page') .onClick(() => { // Performance dot hiTraceMeter.startTrace('getMessageData', 1); // Please replace the URL with the real address. this.controller.loadUrl('https://www.example1.com/'); }) Web({ src: 'https://www.example.com/', controller: this.webviewController }) .onPageEnd(() => { // When pre-acquiring, 'https://www.example1.com/POST? E=f&g=h' is replaced by the actual website address to be visited. webview.WebviewController.prefetchResource( { url: 'https://www.example1.com/POST?e=f&g=h', method: 'POST', formData: 'a=x&b=y' }, [{ headerKey: 'c', headerValue: 'z' }], 'KeyX', 500 ); }) } } } - On the page to be loaded, execute the JavaScript file to initiate a POST request and set ArkWebPostCacheKey of the response header to KeyX of cachekey set during prefetch.
const xhr = new XMLHttpRequest();
xhr.open('POST', 'https://www.example.com/POST?e=f&g=h', true);
xhr.setRequestHeader('Content-Type', 'application/x-www-form-urlencoded');
xhr.setRequestHeader('ArkWebPostCacheKey', 'KeyX');
xhr.onload = function () {
  if (xhr.status >= 200 && xhr.status < 300) {
    console.log('Success', xhr.responseText);
  } else {
    console.error('Request failed');
  }
}
const formData = new FormData();
formData.append('a', 'x');
formData.append('b', 'y');
xhr.send(formData);
[h2]Precompiling JavaScript Files to Generate Bytecode Cache (Code Cache)
Principles
The JavaScript files to be used can be compiled into bytecode and cached locally before the page is loaded. This reduces the compilation time when the page is loaded for the first time.
In this case, you need to create an offline Web component that does not need to be rendered for precompilation. After the precompilation is complete, use other Web components to load service web pages.

You are advised to use Code Linter for code inspection, focusing specifically on the @performance/js-code-cache-by-precompile-check rule. If issues related to this rule are identified in the scan results, adjust your code by following the optimization suggestions provided in this section.
- Only JavaScript files requested using HTTP or HTTPS can be precompiled.
- JavaScript files using the ES6 Module syntax cannot be precompiled to generate code cache.
- The E-Tag and Last-Modified values of the response header can be configured to mark the JavaScript cache version. When the values change, the bytecode cache is updated.
- Local JavaScript files cannot be precompiled to generate code cache.
Case Study
Case 1: Loading a web page without precompiling JavaScript
import { webview } from '@kit.ArkWeb';
import { hilog, hiTraceMeter } from '@kit.PerformanceAnalysisKit';

const DOMAIN = 0x0000;
const TAG = 'Sample';

@Entry
@Component
struct Index {
  controller: webview.WebviewController = new webview.WebviewController();

  build() {
    Column() {
      // Load the business Web component at an appropriate time. This example takes the Button click trigger as an example.
      Button('Load Page')
        .onClick(() => {
          // Performance dot
          hiTraceMeter.startTrace('unPrecompileJavaScript', 1);
          // Please replace the URL with the real address.
          this.controller?.loadUrl('https://www.example.com/b.html');
        })
      Web({ src: 'https://www.example.com/a.html', controller: this.controller })
        .fileAccess(true)
        .onPageBegin((event) => {
          hilog.info(DOMAIN, TAG, `load page begin: ${event?.url}`);
        })
        .onPageEnd((event) => {
          // Performance dot
          hiTraceMeter.finishTrace('unPrecompileJavaScript', 1);
          hilog.info(DOMAIN, TAG, `load page end: ${event?.url}`);
        })
    }
  }
}
Click the Load Page button, and the performance-tracing data is as follows. Duration in the getMessageData process indicates the duration from the start to the end of loading the page.
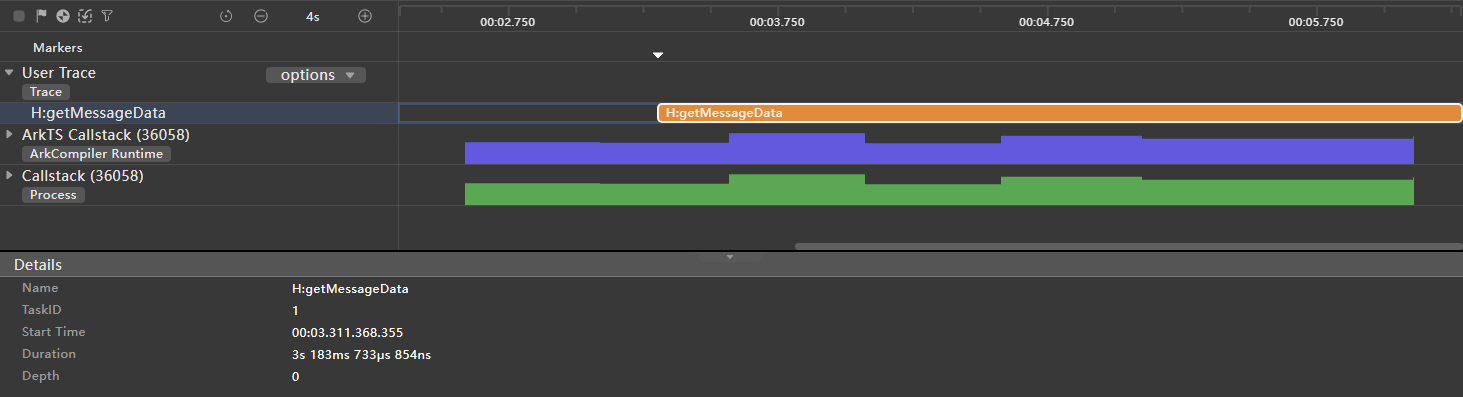

The compilation time of the JavaScript file depends on the file size and logic complexity.
Case 2: Loading a web page by precompiling JavaScript to generate code cache subject to the following steps:
- Configure the JavaScript file to be precompiled.
import { webview } from '@kit.ArkWeb'; import { hilog } from '@kit.PerformanceAnalysisKit'; const DOMAIN = 0x0000; const TAG = 'Sample'; interface Config { url: string, localPath: string, // local resource path options: webview.CacheOptions } @Entry @Component struct Index { controller: webview.WebviewController = new webview.WebviewController(); // Configure precompiled JavaScript file information configs: Array<Config> = [ { url: 'https://www.example.com/example.js', localPath: 'example.js', options: { responseHeaders: [ { headerKey: 'E-Tag', headerValue: 'xxx' }, { headerKey: 'Last-Modified', headerValue: 'Web, 21 Mar 2024 10:38:41 GMT' } ] } } ] // ... } - Read the configuration and perform precompilation.
Web({ src: 'https://www.example.com/a.html', controller: this.controller })
  .onControllerAttached(async () => {
    // Read the configuration and precompile.
    for (const config of this.configs) {
      this.getUIContext()
        .getHostContext()?.resourceManager.getRawFileContent(config.localPath)
        .then((content: Uint8Array) => {
          this.controller.precompileJavaScript(config.url, content, config.options)
            .then(() => {
              hilog.info(DOMAIN, TAG, 'precompile successfully!');
            }).catch((errCode: number) => {
            hilog.error(DOMAIN, TAG, 'precompile failed.' + errCode);
          })
        }).catch(() => {
        hilog.error(DOMAIN, TAG, 'precompile failed!.');
      })
    }
  })
Click the Load Page button, and the performance trace data is as follows. Duration in the getMessageData process indicates the duration from the start to the end of loading the page.
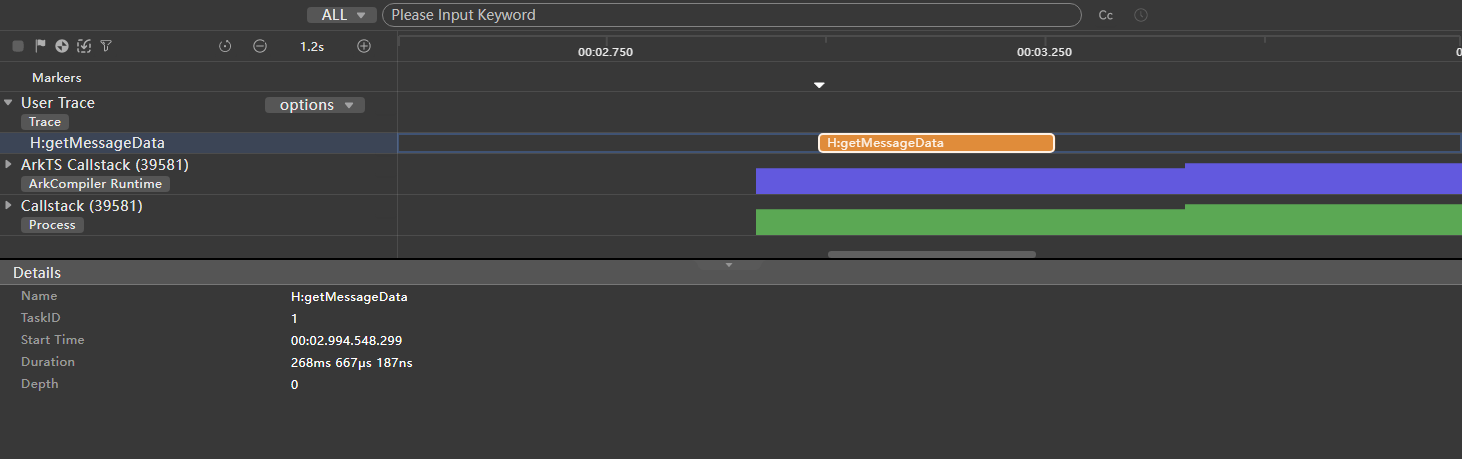

To update the locally generated compilation bytecode, change the value of E-Tag or Last-Modified in responseHeaders of the cacheOptions parameter and call the API again.
Summary
| Page Loading Mode | Duration (for Reference Only) | Description |
|---|---|---|
| Directly loading a web page | 3183 ms | JavaScript files can be compiled only when page loading is triggered, which increases the loading time. |
| Precompiling JavaScript files to generate bytecode cache | 268 ms | JavaScript files are precompiled before a page is loaded, which shortens the compilation duration for loading the page at the first time. |
[h2]Generating Code Caches of JavaScript Files for Resource Interception and Replacement
Principles
This solution is applicable to the scenario where network JavaScript files need to be loaded and intercepted and replaced during page loading. This solution allows bytecode to be cached locally, reducing compilation time when the page is not loaded for the first time.

You are advised to use Code Linter for code inspection, focusing specifically on the @performance/js-code-cache-by-interception-check rule. If issues related to this rule are identified in the scan results, adjust your code by following the optimization suggestions provided in this section.
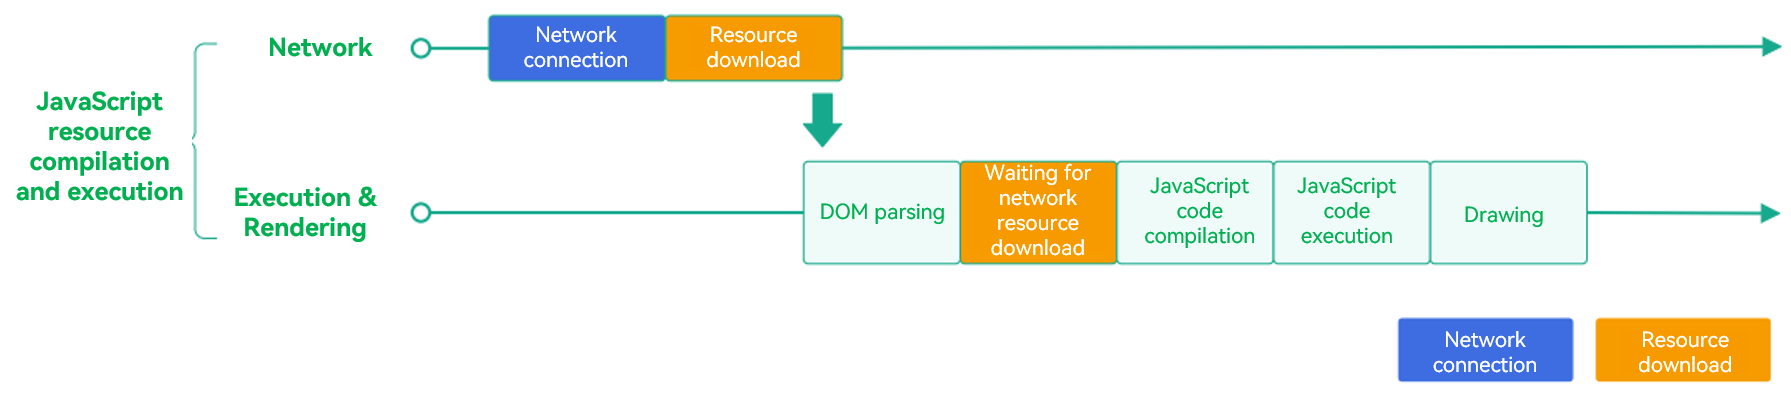
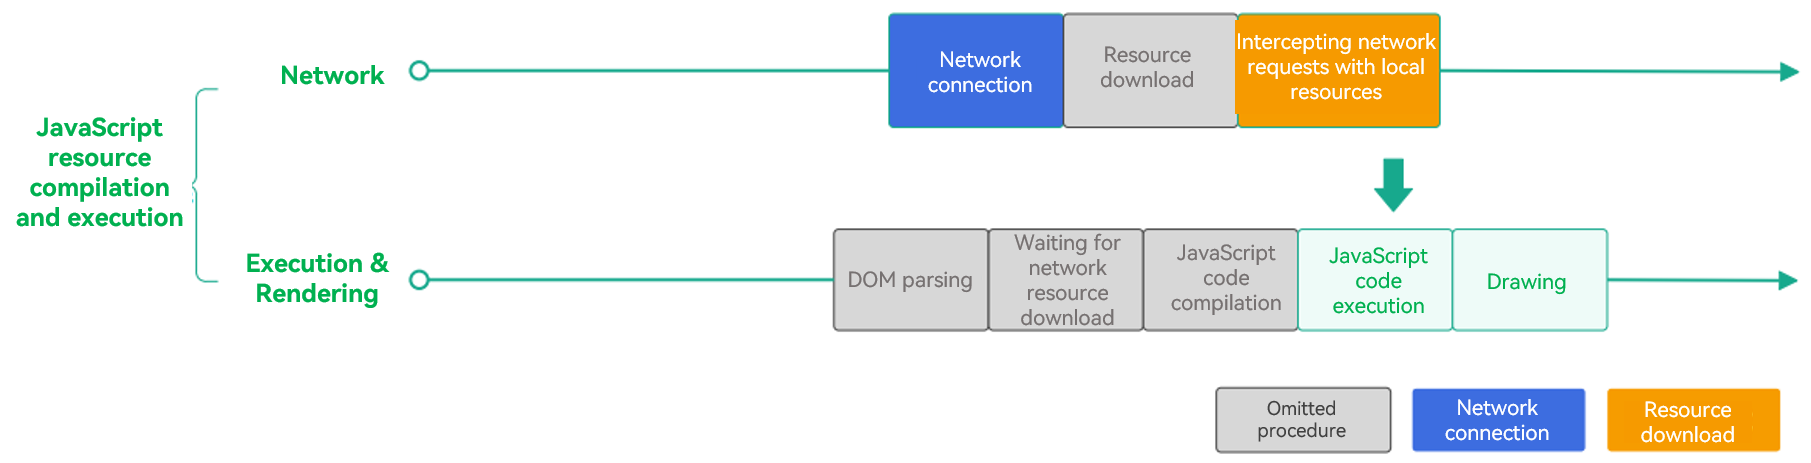
By default, the Web component supports code cache generation for JavaScript files using HTTP and custom protocols. The procedure is as follows:
- Register a custom protocol before running the Web component.
- Intercept the JavaScript file of the custom protocol and set ResponseData and ResponseDataID.

ResponseData indicates the JavaScript content, and ResponseDataID is used to determine whether the JavaScript content is changed. When the content is changed, the value of ResponseDataID must be changed accordingly.
Case Study
Case 1: Intercept the JavaScript file using HTTP and generate code cache.
[Not recommended]
Load the web page without setting ResponseDataID.
- Construct a frontend HTML5 page.
<!DOCTYPE html> <html lang="en"> <head> <meta charset="UTF-8"> <meta name="viewport" content="width=device-width, user-scalable=no, initial-scale=1.0, maximum-scale=1.0, minimum-scale=1.0"> <meta http-equiv="X-UA-Compatible" content="ie=edge"> <title>Document</title> </head> <body> <div id="div-1">this is a test div</div> <div id="div-2">this is a test div</div> <div id="div-3">this is a test div</div> <div id="div-4">this is a test div</div> <div id="div-5">this is a test div</div> <div id="div-6">this is a test div</div> <div id="div-7">this is a test div</div> <div id="div-8">this is a test div</div> <div id="div-9">this is a test div</div> <div id="div-10">this is a test div</div> <div id="div-11">this is a test div</div> </body> <script src="https://www.example.com/test.js"></script> </html> - Intercept and replace the page request without setting ResponseDataID.
import { webview } from '@kit.ArkWeb';
import { hiTraceMeter } from '@kit.PerformanceAnalysisKit';

@Entry
@Component
struct Index {
  webViewController: webview.WebviewController = new webview.WebviewController();
  responseResource: WebResourceResponse = new WebResourceResponse();
  // The developer defines the response data, and the length of the response data must be greater than or equal to 1024 to generate CodeCache.
  @State jsData: string = 'JavaScript Data';

  build() {
    Column() {
      Web({ src: $rawfile('index.html'), controller: this.webViewController })
        .onInterceptRequest(event => {
          // Intercept page requests
          if (event?.request.getRequestUrl() === 'https://www.example.com/test.js') {
            // Construct response data
            this.responseResource.setResponseData(this.jsData);
            this.responseResource.setResponseEncoding('utf-8');
            this.responseResource.setResponseMimeType('application/javascript');
            this.responseResource.setResponseCode(200);
            this.responseResource.setReasonMessage('OK');
            return this.responseResource;
          }
          return null;
        })
        .onPageBegin(() => {
          hiTraceMeter.startTrace('getMessageData', 0);
        })
        .onPageEnd(() => {
          hiTraceMeter.finishTrace('getMessageData', 0);
        })
    }
    .width('100%')
  }
}
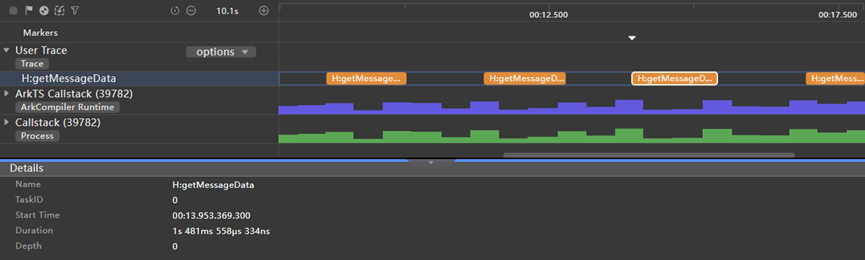
Start and close the app, repeat this sequence twice, and check the page loading time for the third startup. The following figure shows the performance data. Duration in the getMessageData process indicates the duration from the start to the end of page loading.
[Recommended]
Set ResponseData and ResponseDataID in the request header during resource interception and replacement.
import { webview } from '@kit.ArkWeb';
import { hiTraceMeter } from '@kit.PerformanceAnalysisKit';

@Entry
@Component
struct Index {
  controller: webview.WebviewController = new webview.WebviewController();
  responseResource: WebResourceResponse = new WebResourceResponse();
  // Construct response data
  @State jsData: string = 'JavaScript Data';

  build() {
    Column() {
      Web({ src: $rawfile('index.html'), controller: this.controller })
        .onInterceptRequest((event) => {
          // Intercept page requests
          if (event?.request.getRequestUrl() === 'https://www.example.com/test.js') {
            // Construct response data
            this.responseResource.setResponseHeader([
              {
                // Format: No more than 13 digits. Js ID, this field must be updated when Js is updated.
                headerKey: 'ResponseDataID',
                headerValue: '0000000000001'
              }]);
            this.responseResource.setResponseData(this.jsData);
            this.responseResource.setResponseEncoding('utf-8');
            this.responseResource.setResponseMimeType('application/javascript');
            this.responseResource.setResponseCode(200);
            this.responseResource.setReasonMessage('OK');
            return this.responseResource;
          }
          return null;
        })
        .onPageBegin(() => {
          hiTraceMeter.startTrace('getMessageData', 0);
        })
        .onPageEnd(() => {
          hiTraceMeter.finishTrace('getMessageData', 0);
        })
    }
  }
}
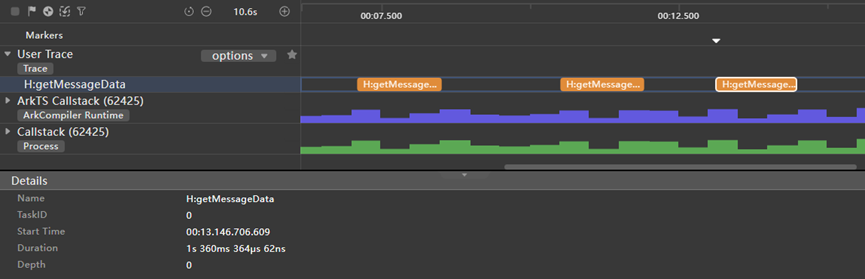
Start and close the app, repeat this sequence twice, and check the page loading time for the third startup. The following figure shows the performance data. Duration in the getMessageData process indicates the duration from the start to the end of page loading.
Case 2: Call the ArkTS API customizeSchemes() to generate code cache for JavaScript files using custom protocols. The procedure is as follows:
- Set isCodeCacheSupported of the scheme object to true, so that code cache can be generated for the JavaScript file using custom protocols.
scheme1: webview.WebCustomScheme = { schemeName: "scheme1", isSupportCORS: true, isSupportFetch: true, isCodeCacheSupported: true } - Register the custom protocol with the Web component before running it.

Ensure that the custom protocol is different from the built-in protocols of the web kernel.
aboutToAppear(): void { try { webview.WebviewController.customizeSchemes([this.scheme1]) } catch (error) { let e: business_error.BusinessError = error as business_error.BusinessError; hilog.error(DOMAIN, TAG, `ErrorCode: ${e.code}, Message: ${e.message}`); } } - Intercept the JavaScript file supporting the custom protocol and set ResponseData and ResponseDataID. ResponseData indicates the JavaScript content, and ResponseDataID is used to determine whether the JavaScript content is changed.

If the JavaScript content is changed, change the value of ResponseDataID accordingly.
Web({
  src: $rawfile('index.html'),
  controller: this.webController
})
  .fileAccess(true)
  .javaScriptAccess(true)
  .width('100%')
  .height('100%')
  .onConsole((event) => {
    hilog.info(DOMAIN, TAG, 'ets onConsole:' + event?.message.getMessage());
    return false
  })
  .onInterceptRequest((event) => {
    let responseResource = new WebResourceResponse()
    // Intercept page requests
    if (event?.request.getRequestUrl() == 'https://www.intercept.com/test-cc.js') {
      // Construct response data
      responseResource.setResponseHeader([
        {
          headerKey: 'ResponseDataID',
          headerValue: '0000000000002'
          // Format: No more than 13 digits. Js ID, this field must be updated when Js is updated.
        }]);
      responseResource.setResponseData(this.jsData);
      responseResource.setResponseEncoding('utf-8');
      responseResource.setResponseMimeType('application/javascript');
      responseResource.setResponseCode(200);
      responseResource.setReasonMessage('OK');
      return responseResource;


    }
    if (event?.request.getRequestUrl() == 'scheme1://www.intercept.com/test-cc2.js') {
      // Construct response data
      responseResource.setResponseHeader([
        {
          headerKey: 'ResponseDataID',
          headerValue: '0000000000001'
          // Format: No more than 13 digits. Js ID, this field must be updated when Js is updated.
        }]);
      responseResource.setResponseData(this.jsData2);
      responseResource.setResponseEncoding('utf-8');
      responseResource.setResponseMimeType('application/javascript');
      responseResource.setResponseCode(200);
      responseResource.setReasonMessage('OK');
      return responseResource;
    }
    return null;
  })
Case 3: Call the native API int32_t OH_ArkWeb_RegisterCustomSchemes(const char *scheme, int32_t option) to generate code cache for the JavaScript file using the custom protocol. Intercept the requests sent by the Web component through the network interception API. For details about the sample code, see Intercepting Network Requests Initiated by the Web component. The procedure is as follows:
- Pass the ARKWEB_SCHEME_OPTION_CODE_CACHE_ENABLED parameter when registering the third-party protocol configuration.
// register Custom Schemes before web initialized static napi_value RegisterCustomSchemes(napi_env env, napi_callback_info info) { OH_LOG_INFO(LOG_APP, "register custom schemes"); OH_ArkWeb_RegisterCustomSchemes("custom", ARKWEB_SCHEME_OPTION_STANDARD | ARKWEB_SCHEME_OPTION_CORS_ENABLED | ARKWEB_SCHEME_OPTION_CODE_CACHE_ENABLED); return nullptr; } - Set ResponseDataID.
// Read Rawfile Data On Worker Thread void RawfileRequest::ReadRawfileDataOnWorkerThread() { OH_LOG_INFO(LOG_APP, "read rawfile in worker thread."); const struct UrlInfo { std::string resource; std::string mimeType; } urlInfos[] = {{"local.html", "text/html"}, {"local_script.js", "text/javascript"}, {"test-cc.js", "text/javascript"} }; if (!resourceManager()) { OH_LOG_ERROR(LOG_APP, "read rawfile error, resource manager is nullptr."); return; } RawFile *rawfile = OH_ResourceManager_OpenRawFile(resourceManager(), rawfilePath().c_str()); if (!rawfile) { OH_ArkWebResponse_SetStatus(response(), 404); } else { OH_ArkWebResponse_SetStatus(response(), 200); } for (auto &urlInfo : urlInfos) { if (urlInfo.resource == rawfilePath()) { OH_ArkWebResponse_SetMimeType(response(), urlInfo.mimeType.c_str()); break; } } if ("test-cc.js" == rawfilePath()) { OH_LOG_ERROR(LOG_APP, "OH_ArkWebResponse_SetHeaderByName ResponseDataID"); OH_ArkWebResponse_SetHeaderByName(response(), "ResponseDataID", "0000000000001", true); } OH_ArkWebResponse_SetCharset(response(), "UTF-8"); } - Register the third-party protocol and set SchemeHandler.
// EntryAbility.ets
onCreate(want: Want, launchParam: AbilityConstant.LaunchParam): void {
  // register CustomSchemes
  testNapi.registerCustomSchemes();
  // initializeWebEngine
  webview.WebviewController.initializeWebEngine();
  // Set SchemeHandler.
  testNapi.setSchemeHandler();
}
The performance tracing data is as follows. Avg Wall Duration in the getMessageData process indicates the average duration from the start to the end of two page loading operations.

Summary (Example: Performance data of intercepting and replacing HTTP-based JavaScript files to generate bytecode cache)
Construct a 2.4 MB JavaScript file to intercept and replace resources, and perform multiple tests to obtain the average duration. The detailed data is as follows:
| Resource Interception and Replacement Method | Data (for Reference Only) | Description |
|---|---|---|
| Intercepting and replacing resources without setting ResponseDataID | 1469.7 ms | JavaScript resources are compiled and cached each time a page is loaded, increasing the loading time. |
| Intercepting and replacing resources after setting ResponseDataID | 1402.9 ms | When a page is loaded, the bytecode is cached locally and ResponseDataID is set to avoid repeated caching, reducing the subsequent loading time. |
[h2]Injecting Offline Resources Without Interception
Principles
Before a page is loaded, images, style sheets, and script resources are injected to the memory cache to reduce the network request time for the first loading.

- You need to create an offline Web component to inject resources to the memory cache, so that other Web components can load corresponding service web pages.
- Only resources requested using HTTP or HTTPS can be injected to the memory.
- Resources in the memory cache are automatically managed by the kernel. When the number of injected resources is too large, the kernel automatically releases unused resources. Do not inject too many resources into the memory cache.
- In normal cases, the validity period of a resource is controlled by the Cache-Control or Expires response header. The default validity period is 86400 seconds, that is, one day.
- The MIMEType item of the resources is configured through the provided Content-Type response header. The Content-Type header must comply with standards; otherwise, the resources cannot be used correctly. For resources of the MODULE_JS type, a valid MIMEType item must be provided. For other types, MIMEType is optional.
- Only HTML tags can be used for loading.
- If a script tag on a web page uses the crossorigin property, set the value of Cross-Origin to anonymous or use-credentials in the responseHeaders parameter of the API.
- After the webview.WebviewController.SetRenderProcessMode(web_webview.RenderProcessMode.MULTIPLE) API is called, the app starts the multi-rendering process mode. In this case, the solution does not take effect.
- A maximum of 30 resources can be injected in a single call, with a maximum size of 10 MB per individual resource.
Case Study
Case 1: Directly loading a web page
import { webview } from '@kit.ArkWeb';
import { hiTraceMeter } from '@kit.PerformanceAnalysisKit';

@Entry
@Component
struct Index {
  controller: webview.WebviewController = new webview.WebviewController();


  build() {
    Column() {
      // Load business web components at the right time. This example is the example of Button click trigger.
      Button('Load Page')
        .onClick(() => {
          // Performance hit point
          hiTraceMeter.startTrace('getMessageData', 1);
          this.controller.loadUrl('https://www.example.com/b.html');
        })
      Web({ src: 'https://www.example.com/a.html', controller: this.controller })
        .fileAccess(true)
        .onPageEnd(() => {
          // Performance hit point
          hiTraceMeter.finishTrace('getMessageData', 1);
        })
    }
  }
}
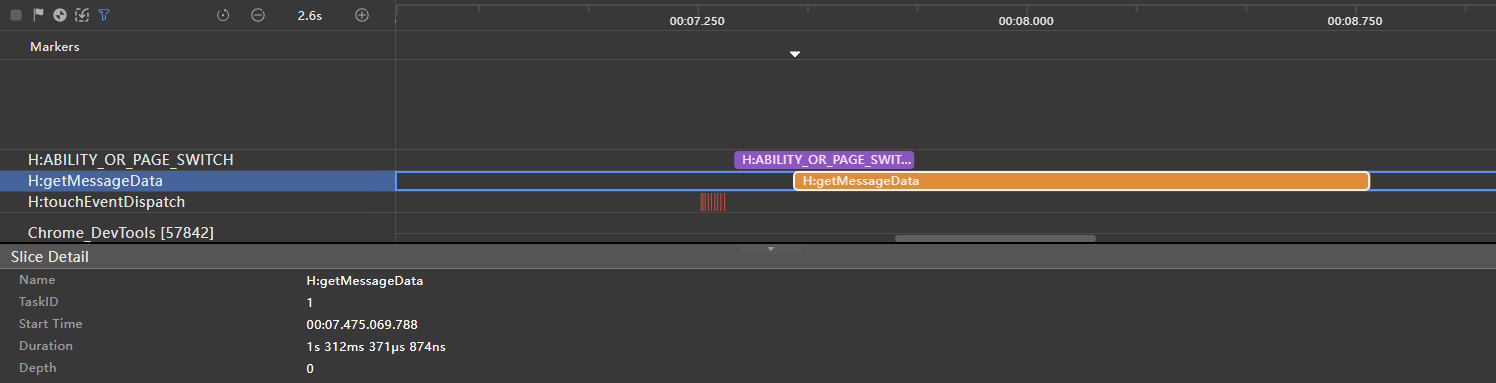
The performance tracing data is as follows. Duration in the getMessageData process indicates the duration from the start to the end of loading the page.
Case 2: To load a web page without interception, perform the following steps:
- Create the resource configuration.
import { webview } from '@kit.ArkWeb'; import { hilog } from '@kit.PerformanceAnalysisKit'; const DOMAIN = 0x0000; const TAG = 'Sample'; export interface ResourceConfig { urlList: Array<string>, type: webview.OfflineResourceType, responseHeaders: Array<Header>, localPath: string, } export interface ExceptionResource { console: string, urlList: Array<string> | undefined | null; type: webview.OfflineResourceType | undefined | null, responseHeaders: Array<Header> | undefined | null, resource?: Uint8Array | undefined | null localPath?: string, } export const baseURL: string = 'http://localhost:8083/resource/'; export const baseURL1: string = 'http://localhost:8083/resource/'; export const basicResources: Array<ResourceConfig> = [ { localPath: "in_cache_middle.png", urlList: [ baseURL, baseURL + "request.png", baseURL1 + "request.png", ], type: webview.OfflineResourceType.IMAGE, responseHeaders: [] }, { localPath: "in_cache.js", urlList: [ baseURL, baseURL + "request.js", baseURL1 + "request.js" ], type: webview.OfflineResourceType.CLASSIC_JS, responseHeaders: [ {headerKey: "Content-Type", headerValue: "text/javascript" }, {headerKey: "Cache-Control", headerValue: "max-age=100000" }, ] }, { localPath: "in_cache_module1.js", urlList: [ baseURL + "request_module1.js", ], type: webview.OfflineResourceType.MODULE_JS, responseHeaders: [ {headerKey: "Content-Type", headerValue: "application/javascript" }, {headerKey: "Access-Control-Allow-Origin" , headerValue: "*"}, {headerKey: "Cache-Control", headerValue: "max-age=100000" }, ] }, { localPath: "in_cache_module2.js", urlList: [ baseURL + "request_module2.js", ], type: webview.OfflineResourceType.MODULE_JS, responseHeaders: [ {headerKey: "Content-Type", headerValue: "application/javascript" }, {headerKey: "Access-Control-Allow-Origin" , headerValue: "*"}, {headerKey: "Cache-Control", headerValue: "max-age=100000" }, ] }, { localPath: "in_cache.css", urlList: [ baseURL, baseURL + "request.css", baseURL1 + "request.css", ], type: webview.OfflineResourceType.CSS, responseHeaders: [ {headerKey: "resource-Type", headerValue: "text/css" }, {headerKey: "Cache-Control", headerValue: "max-age=100000" }, ] }, ]; - Read the configuration and inject resources.
// Call the offline resource injection cache interface
export async function injectOfflineResource(controller: WebviewController, resourceMapArr: Array<webview.OfflineResourceMap>): Promise<void> {
  try {
    controller.injectOfflineResources(resourceMapArr);
  } catch (err) {
    hilog.error(DOMAIN, TAG, 'qqq injectOfflineResource error: ' + err.code + ' ' + err.message);
  }
}
The following figure shows the performance data. Duration in the getMessageData process indicates the total duration for loading a page.

Summary
| Page Loading Mode | Duration (for Reference Only) | Description |
|---|---|---|
| Directly loading a web page | 1312 ms | A resource request is initiated only when page loading is triggered, which increases the page loading time. |
| Loading a web page by injecting offline resources without interception | 74 ms | Resources are preset in the memory, which shortens the time for network requests. |
[h2]Fast Resource Interception and Replacement
Principles
The fast resource interception and replacement APIs support input parameters in ArrayBuffer format, reducing the time required for converting the ArrayBuffer format to the String format.

The usage of this solution is the same as that of the original API. You only need to transfer data in ArrayBuffer format when calling the WebResourceResponse.setResponseData() API.
Case Study
Case 1: Using data in string format for interception and replacement
import { webview } from '@kit.ArkWeb';
import { hilog } from '@kit.PerformanceAnalysisKit';

const DOMAIN = 0x0000;
const TAG = 'Sample';

@Entry
@Component
struct Index {
  controller: webview.WebviewController = new webview.WebviewController();
  responseResource: WebResourceResponse = new WebResourceResponse();
  // Here is the string format data.
  resourceStr: string = 'xxxxxxxxxxxxxxx';

  build() {
    Column() {
      Button('1 MB')
        .fontSize(12)
        .margin(5)
        .onClick(() => {
          const chunk = 'x'.repeat(1024);
          let result = '';
          for (let i = 0; i < 1000; i++) {
            result += chunk;
          }
          this.resourceStr = JSON.stringify({
            status: 200,
            result: result,
          });
          hilog.info(DOMAIN, TAG, `Generated string data, size: ${this.resourceStr.length} bytes (${1000} KB)`);
        })
      Web({ src: $rawfile("intercept.html"), controller: this.controller })
        .onConsole((event) => {
          hilog.error(DOMAIN, TAG, `getMessageData ${event?.message?.getMessage()}`);
          return true;
        })
        .onInterceptRequest(event => {
          if (event) {
            if (!event.request.getRequestUrl().startsWith('http://bridge')) {
              return null;
            }
          }
          // Use string format data for interception and replacement
          this.responseResource.setResponseData(this.resourceStr);
          this.responseResource.setResponseEncoding('utf-8');
          this.responseResource.setResponseMimeType('text/json');
          this.responseResource.setResponseCode(200);
          this.responseResource.setReasonMessage('OK');
          this.responseResource.setResponseHeader([{ headerKey: 'Access-Control-Allow-Origin', headerValue: '*' }]);
          hilog.info(DOMAIN, TAG, 'getMessageData return reponse');
          return this.responseResource;
        })
    }
  }
}
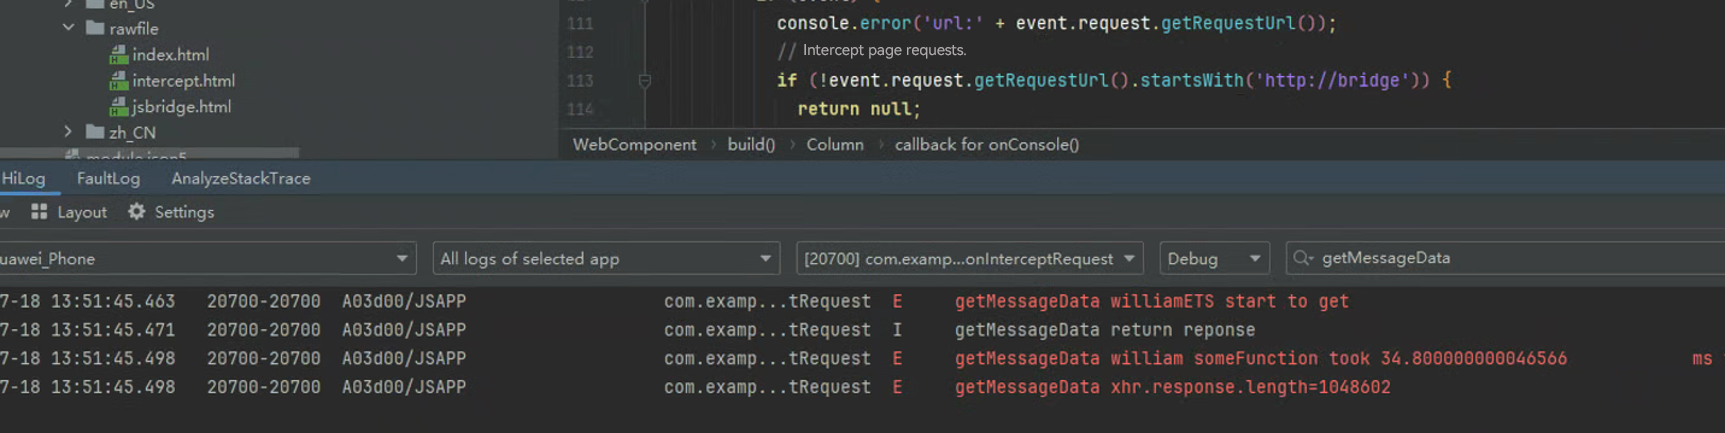
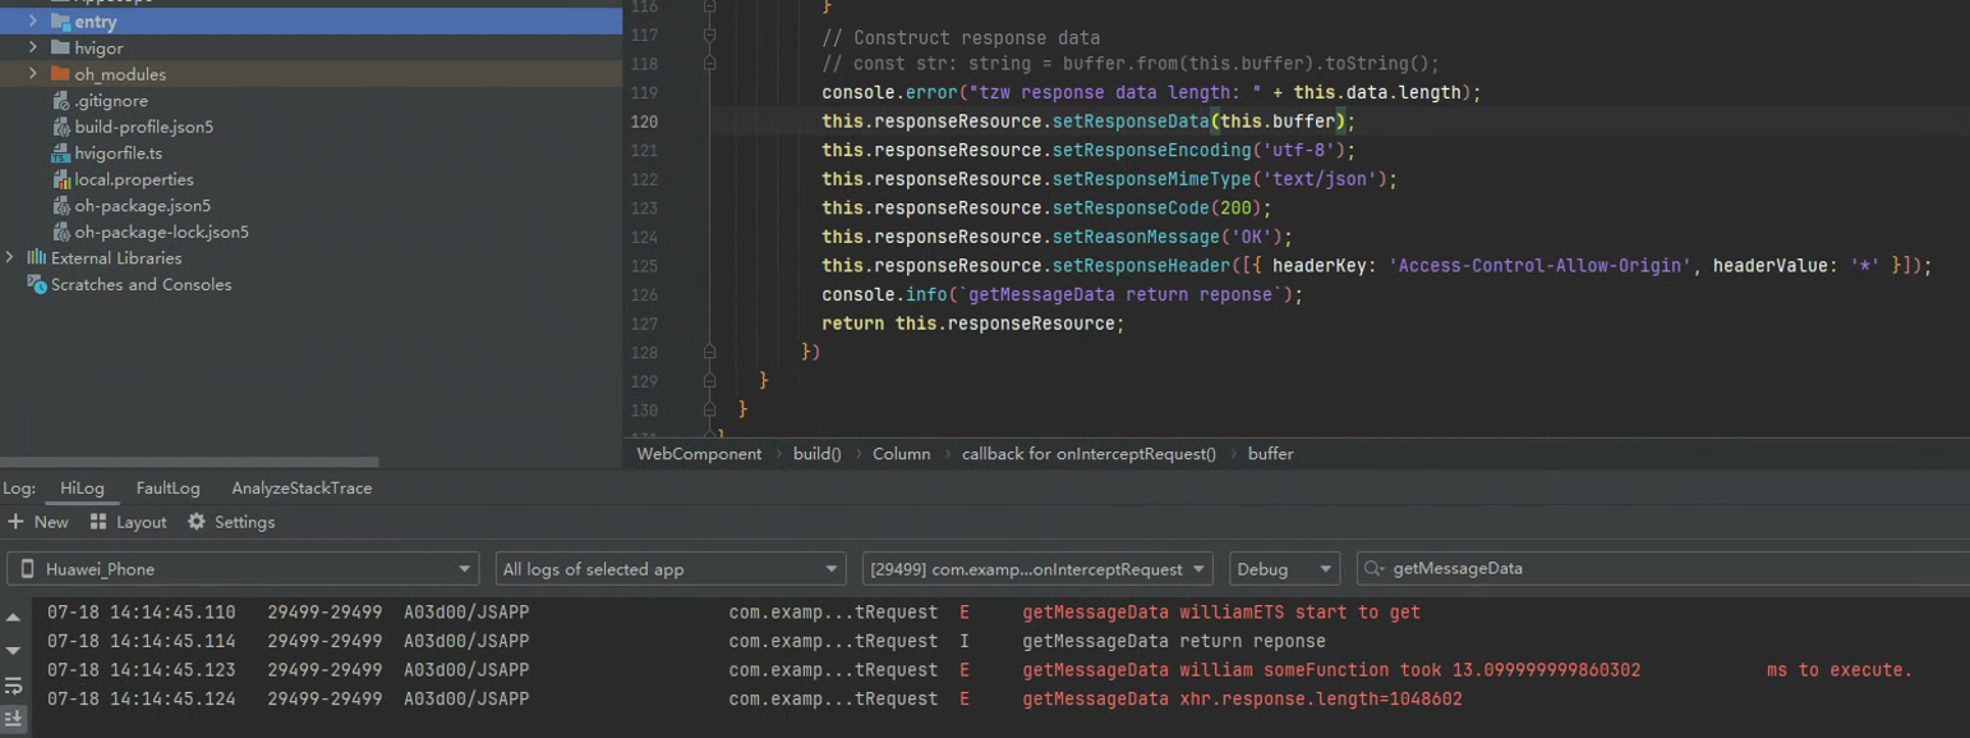
The following figure shows the time for resource replacement. The durations of getMessageData and someFunction indicate the time for loading resources.
Case 2: Using data in ArrayBuffer format for interception and replacement
import { webview } from '@kit.ArkWeb';
import { hilog } from '@kit.PerformanceAnalysisKit';

const DOMAIN = 0x0000;
const TAG = 'Sample';

@Entry
@Component
struct WebComponent {
  controller: webview.WebviewController = new webview.WebviewController()
  scheme1: webview.WebCustomScheme = { schemeName: "imeituan", isSupportCORS: true, isSupportFetch: true }
  responseResource: WebResourceResponse = new WebResourceResponse()
  // Developer Custom Response Data
  data: string = "";
  buffer: ArrayBuffer = new ArrayBuffer(this.data.length);
  usingLen: number = 1;

  aboutToAppear(): void {
    // Configure the Web to open the debugging mode
    webview.WebviewController.setWebDebuggingAccess(true);

    try {
      webview.WebviewController.customizeSchemes([this.scheme1])
      hilog.info(DOMAIN, TAG, `customizeSchemes`)
    } catch (error) {
      hilog.error(DOMAIN, TAG, error);
    }

    this.initArrayBufferData(1);
  }

  onPageShow(): void {

  }

  initStringData(size: Number): void {
    switch (size){
      case 1:
        this.usingLen = 10; //10k
        break;
      case 2:
        this.usingLen = 1024; //1M
        break;
      case 3:
        this.usingLen = 1024 * 10; //10M
        break;
      default:
        this.usingLen = 1;
    }

    let str: string = "";
    let str_1k: string = "";
    for (let i = 0 ; i < 1024; i++) {
      str_1k = str_1k.concat("x");
    }
    for (let j = 0; j < this.usingLen; j++) {
      str = str.concat(str_1k);
    }

    this.data = JSON.stringify({
      status: 200,
      result: str,
    });
    hilog.info(DOMAIN, TAG, 'init data length: ' + this.data.length);
  }

  // size - 1:10k, 2:1M, 3:10M
  initArrayBufferData(size:Number): void {
    this.initStringData(size);
    hilog.error(DOMAIN, TAG, 'target string: ' + this.data);
    this.buffer = new ArrayBuffer(this.data.length);
    const uint8Array: Uint8Array = new Uint8Array(this.buffer);
    for (let i = 0; i < this.data.length; i++) {
      uint8Array[i] = this.data.charCodeAt(i);
    }
  }

  build() {
    Column() {
      Button('set to 10K')
        .onClick(() => {
          this.initArrayBufferData(1);
          hilog.info(DOMAIN, TAG, 'datalen set to length '+ this.buffer.byteLength);
        })
      Button('set to 1M')
        .onClick(() => {
          this.initArrayBufferData(2);
          hilog.info(DOMAIN, TAG, 'datalen set to length '+ this.buffer.byteLength);
        })
      Button('set to 10M')
        .onClick(() => {
          this.initArrayBufferData(3);
          hilog.info(DOMAIN, TAG, 'datalen set to length '+ this.buffer.byteLength);
        })
      Web({ src: $rawfile("intercept.html"), controller: this.controller })
        .onConsole((event) => {
          hilog.error(DOMAIN, TAG, `getMessageData ${event?.message?.getMessage()}`);
          return true;
        })
        .onInterceptRequest((event) => {
          if (event) {
            hilog.error(DOMAIN, TAG, 'url:' + event.request.getRequestUrl());
            // Block Page Request
            if (!event.request.getRequestUrl().startsWith('http://bridge')) {
              return null;
            }
          }
          // Construct response data
          // const str: string = buffer.from(this.buffer).toString();
          hilog.error(DOMAIN, TAG, 'response data length: ' + this.data.length);
          this.responseResource.setResponseData(this.buffer);
          this.responseResource.setResponseEncoding('utf-8');
          this.responseResource.setResponseMimeType('text/json');
          this.responseResource.setResponseCode(200);
          this.responseResource.setReasonMessage('OK');
          this.responseResource.setResponseHeader([{ headerKey: 'Access-Control-Allow-Origin', headerValue: '*' }]);
          hilog.info(DOMAIN, TAG, 'getMessageData return reponse');
          return this.responseResource;
        })
    }
  }
}
The following figure shows the time required for resource replacement. The execution durations of getMessageData and william someFunction indicate the resource loading duration.
Summary
| Page Loading Mode | Duration (for Reference Only) | Description |
|---|---|---|
| Using data in string format for interception and replacement | 15 ms | The internal data of the Web component needs to be converted into ArrayBuffer before transmission, which increases the data processing steps and startup time. |
| Using data in ArrayBuffer format for interception and replacement | 6 ms | The API supports the ArrayBuffer format, optimizing the data transmission mode and reducing the conversion and transmission time. |
[h2]JSBridge Optimization Solution
Application Scenario
If an app leverages both ArkTS and C++, or if its architecture is similar to that of a mini program, with a built-in C++ environment, you are advised to use the ArkWeb_ControllerAPI and ArkWeb_ComponentAPI APIs provided by ArkWeb on the native side to implement the JSBridge feature.
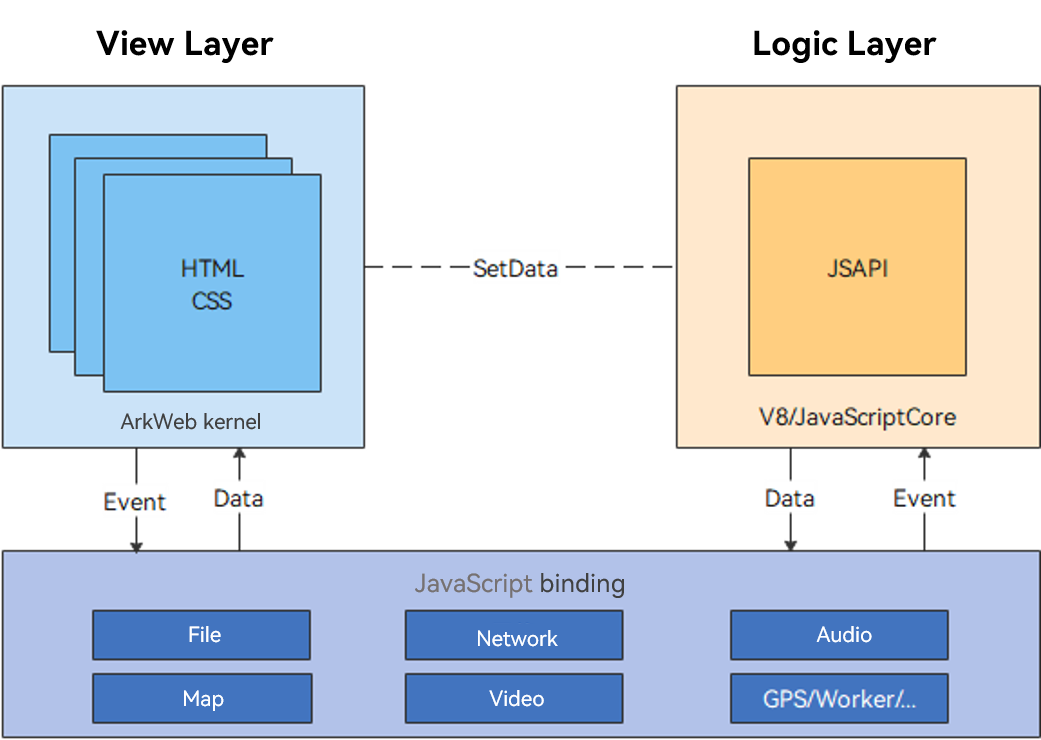
The preceding figure shows the general architecture of a mini program. The logic layer uses the built-in JavaScript runtime. The existing C++ environment communicates with the view layer (ArkWeb renderer) through the native API, without returning to the ArkTS environment to call the JSBridge API.
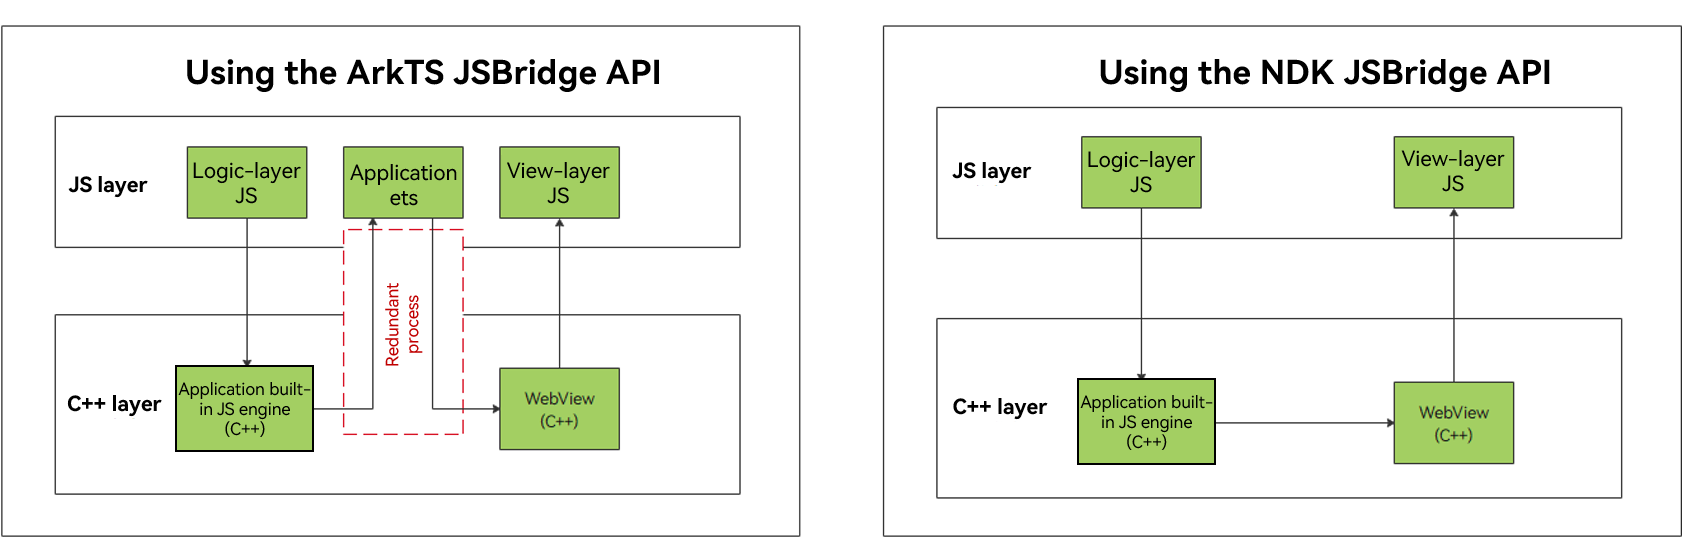
The native JSBridge APIs are provided to avoid unnecessary switching to the ArkTS environment and allow callback to be reported in non-UI threads to avoid UI blocking.
Case Study
Case 1: Using ArkTS APIs to implement JSBridge communication
App code:
import { webview } from '@kit.ArkWeb';
import { hilog } from '@kit.PerformanceAnalysisKit';

const DOMAIN = 0x0000;
const TAG = 'Sample';

@Entry
@Component
struct WebComponent {
  webviewController: webview.WebviewController = new webview.WebviewController();

  aboutToAppear(): void {
    // Configure the Web to open the debugging mode
    webview.WebviewController.setWebDebuggingAccess(true);
  }

  build() {
    Column() {
      Button('runJavaScript')
        .onClick(() => {
          hilog.info(DOMAIN, TAG, 'Current time:' + new Date().getTime());
          // When the front-end page function has no parameters, delete the param.
          this.webviewController.runJavaScript('htmlTest(param)');
        })
      Button('runJavaScriptCodePassed')
        .onClick(() => {
          // Pass runJavaScript side code method
          this.webviewController.runJavaScript(`function changeColor(){document.getElementById('text').style.color = 'red'}`);
        })
      Web({ src: $rawfile('index.html'), controller: this.webviewController })
    }
  }
}
Frontend page code:
<!DOCTYPE html>
<html>
<body>
<button type="button" onclick="callArkTS()">Click Me!</button>
<h1 id="text">This is a piece of test information. The font color is black by default. It turns green after runJavaScript() is called and red after runJavaScriptCodePassed() is called.</h1>
<script>
    var param = "param: JavaScript Hello World!";
    function htmlTest(param) {
      document.getElementById('text').style.color = 'green';
      document.getElementById('text').innerHTML ='Current time:'+new Date().getTime()
      console.log(param);
    }
    function htmlTest() {
      document.getElementById('text').style.color = 'green';
      document.getElementById('text').innerHTML ='Current time:'+new Date().getTime();
    }
    function callArkTS() {
      changeColor();
    }
</script>
</body>
</html>
After the runJavaScript button is clicked, the htmlTest method of the H5 page is triggered, and the page content is changed to the current timestamp, as shown in the following figure.
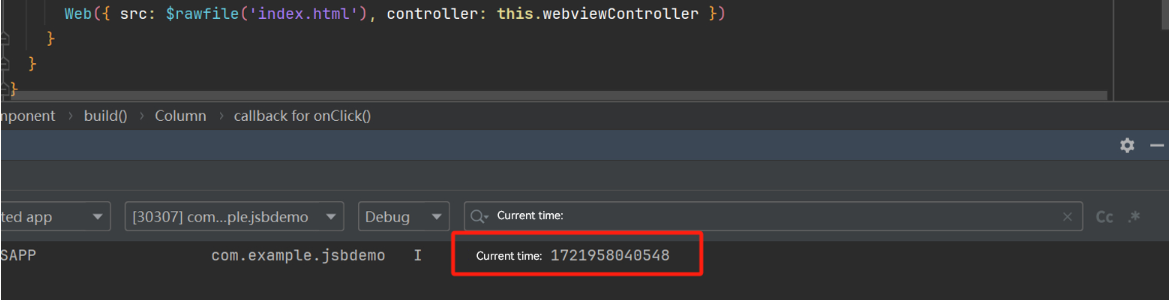
The measured latency between clicking the button on the ArkTS side and triggering the H5-side htmlTest method is 7 to 9 ms.
Case 2: Using NDK APIs to implement JSBridge communication
App code:
import testNapi from 'libentry.so';
import { webview } from '@kit.ArkWeb';
import { hilog } from '@kit.PerformanceAnalysisKit';

const DOMAIN = 0x0000;
const TAG = 'Sample';

class testObj {
  constructor() {
  }

  test(): string {
    hilog.info(DOMAIN, TAG, 'ArkUI Web Component');
    return "ArkUI Web Component";
  }

  toString(): void {
    hilog.info(DOMAIN, TAG, 'Web Component toString');
  }
}

@Entry
@Component
struct Index {
  webTag: string = 'ArkWeb1';
  controller: webview.WebviewController = new webview.WebviewController(this.webTag);
  @State testObjtest: testObj = new testObj();

  aboutToAppear(): void {
    hilog.info(DOMAIN, TAG, 'aboutToAppear');
    // init web ndk
    testNapi.nativeWebInit(this.webTag);
  }

  build() {
    Column() {
      Row() {
        Button('runJS hello')
          .fontSize(12)
          .onClick(() => {
            hilog.info(DOMAIN, TAG, 'start:---->'+new Date().getTime());
            testNapi.runJavaScript(this.webTag, "runJSRetStr(\"" + "hello" + "\")");
          })
      }.height('20%')

      Row() {
        Web({ src: $rawfile('runJS.html'), controller: this.controller })
          .javaScriptAccess(true)
          .fileAccess(true)
          .onControllerAttached(() => {
            hilog.error(DOMAIN, TAG, 'ndk onControllerAttached webId: ' + this.controller.getWebId());
          })
      }.height('80%')
    }
  }
}
Use hello.cpp as the service logic code on the C++ side of the app:
// Registration objects and methods, sending scripts to callbacks after H5 execution, parsing instances passed from the side of the storage application and other code logics are not displayed here, and developers realize them by themselves according to their own business scenarios.
// Send the JS script to the H5 side for execution
#include "napi/native_api.h"
#include <bits/alltypes.h>
#include <memory>
#include <string>
#include <sys/types.h>
#include <thread>

#include "hilog/log.h"
#include "web/arkweb_interface.h"
#include "jsbridge_object.h"

constexpr unsigned int LOG_PRINT_DOMAIN = 0xFF00;
std::shared_ptr<JSBridgeObject> jsbridge_object_ptr = nullptr;
static ArkWeb_ControllerAPI *controller = nullptr;
static ArkWeb_ComponentAPI *component = nullptr;

static void RunJavaScriptCallback(const char *webTag, const char *result, void *userData) {
    OH_LOG_Print(LOG_APP, LOG_INFO, LOG_PRINT_DOMAIN, "ArkWeb", "ndk RunJavaScriptCallback webTag:%{public}s", webTag);
    if (!userData) {
        OH_LOG_Print(LOG_APP, LOG_INFO, LOG_PRINT_DOMAIN, "ArkWeb", "ndk RunJavaScriptCallback userData is nullptr");
        return;
    }
    std::weak_ptr<JSBridgeObject> jsb_weak_ptr = *static_cast<std::weak_ptr<JSBridgeObject> *>(userData);
    if (auto jsb_ptr = jsb_weak_ptr.lock()) {
        jsb_ptr->RunJavaScriptCallback(result);
    } else {
        OH_LOG_Print(LOG_APP, LOG_INFO, LOG_PRINT_DOMAIN, "ArkWeb",
                     "ndk RunJavaScriptCallback jsb_weak_ptr lock failed");
    }
}

static void ProxyMethod1(const char *webTag, const ArkWeb_JavaScriptBridgeData *dataArray, size_t arraySize, void *userData) {
    OH_LOG_Print(LOG_APP, LOG_INFO, LOG_PRINT_DOMAIN, "ArkWeb", "ndk ProxyMethod1 webTag:%{public}s", webTag);
    if (!userData) {
        OH_LOG_Print(LOG_APP, LOG_INFO, LOG_PRINT_DOMAIN, "ArkWeb", "ndk ProxyMethod1 userData is nullptr");
        return;
    }
    std::weak_ptr<JSBridgeObject> jsb_weak_ptr = *static_cast<std::weak_ptr<JSBridgeObject> *>(userData);
    if (auto jsb_ptr = jsb_weak_ptr.lock()) {
        jsb_ptr->ProxyMethod1(dataArray, arraySize);
    } else {
        OH_LOG_Print(LOG_APP, LOG_INFO, LOG_PRINT_DOMAIN, "ArkWeb", "ndk ProxyMethod1 jsb_weak_ptr lock failed");
    }
}

static void ProxyMethod2(const char *webTag, const ArkWeb_JavaScriptBridgeData *dataArray, size_t arraySize, void *userData) {
    OH_LOG_Print(LOG_APP, LOG_INFO, LOG_PRINT_DOMAIN, "ArkWeb", "ndk ProxyMethod2 webTag:%{public}s", webTag);
    if (!userData) {
        OH_LOG_Print(LOG_APP, LOG_INFO, LOG_PRINT_DOMAIN, "ArkWeb", "ndk ProxyMethod2 userData is nullptr");
        return;
    }
    std::weak_ptr<JSBridgeObject> jsb_weak_ptr = *static_cast<std::weak_ptr<JSBridgeObject> *>(userData);

    std::string jsCode = "runJSRetStr()";
    ArkWeb_JavaScriptObject object = {(uint8_t *)jsCode.c_str(), jsCode.size(),
                                     &JSBridgeObject::StaticRunJavaScriptCallback,
                                     static_cast<void *>(jsbridge_object_ptr->GetWeakPtr())};
    controller->runJavaScript(webTag, &object);

    if (auto jsb_ptr = jsb_weak_ptr.lock()) {
        jsb_ptr->ProxyMethod2(dataArray, arraySize);
    } else {
        OH_LOG_Print(LOG_APP, LOG_INFO, LOG_PRINT_DOMAIN, "ArkWeb", "ndk ProxyMethod2 jsb_weak_ptr lock failed");
    }
}

void ValidCallback(const char *webTag, void *userData) {
    OH_LOG_Print(LOG_APP, LOG_INFO, LOG_PRINT_DOMAIN, "ArkWeb", "ndk ValidCallback webTag: %{public}s", webTag);
    if (!userData) {
        OH_LOG_Print(LOG_APP, LOG_INFO, LOG_PRINT_DOMAIN, "ArkWeb", "ndk ValidCallback userData is nullptr");
        return;
    }
    std::weak_ptr<JSBridgeObject> jsb_weak_ptr = *static_cast<std::weak_ptr<JSBridgeObject> *>(userData);
    if (auto jsb_ptr = jsb_weak_ptr.lock()) {
        jsb_ptr->SaySomething("ValidCallback");
    } else {
        OH_LOG_Print(LOG_APP, LOG_INFO, LOG_PRINT_DOMAIN, "ArkWeb", "ndk ValidCallback jsb_weak_ptr lock failed");
    }

    OH_LOG_Print(LOG_APP, LOG_INFO, LOG_PRINT_DOMAIN, "ArkWeb", "ndk RegisterJavaScriptProxy begin");
    ArkWeb_ProxyMethod method1 = {"method1", ProxyMethod1, static_cast<void *>(jsbridge_object_ptr->GetWeakPtr())};
    ArkWeb_ProxyMethod method2 = {"method2", ProxyMethod2, static_cast<void *>(jsbridge_object_ptr->GetWeakPtr())};
    ArkWeb_ProxyMethod methodList[2] = {method1, method2};
    ArkWeb_ProxyObject proxyObject = {"ndkProxy", methodList, 2};
    controller->registerJavaScriptProxy(webTag, &proxyObject);

    OH_LOG_Print(LOG_APP, LOG_INFO, LOG_PRINT_DOMAIN, "ArkWeb", "ndk RegisterJavaScriptProxy end");
}

void LoadStartCallback(const char *webTag, void *userData) {
    OH_LOG_Print(LOG_APP, LOG_INFO, LOG_PRINT_DOMAIN, "ArkWeb", "ndk LoadStartCallback webTag: %{public}s", webTag);
    if (!userData) {
        OH_LOG_Print(LOG_APP, LOG_INFO, LOG_PRINT_DOMAIN, "ArkWeb", "ndk LoadStartCallback userData is nullptr");
        return;
    }
    std::weak_ptr<JSBridgeObject> jsb_weak_ptr = *static_cast<std::weak_ptr<JSBridgeObject> *>(userData);
    if (auto jsb_ptr = jsb_weak_ptr.lock()) {
        jsb_ptr->SaySomething("LoadStartCallback");
    } else {
        OH_LOG_Print(LOG_APP, LOG_INFO, LOG_PRINT_DOMAIN, "ArkWeb", "ndk LoadStartCallback jsb_weak_ptr lock failed");
    }
}

void LoadEndCallback(const char *webTag, void *userData) {
    OH_LOG_Print(LOG_APP, LOG_INFO, LOG_PRINT_DOMAIN, "ArkWeb", "ndk LoadEndCallback webTag: %{public}s", webTag);
    if (!userData) {
        OH_LOG_Print(LOG_APP, LOG_INFO, LOG_PRINT_DOMAIN, "ArkWeb", "ndk LoadEndCallback userData is nullptr");
        return;
    }
    std::weak_ptr<JSBridgeObject> jsb_weak_ptr = *static_cast<std::weak_ptr<JSBridgeObject> *>(userData);
    if (auto jsb_ptr = jsb_weak_ptr.lock()) {
        jsb_ptr->SaySomething("LoadEndCallback");
    } else {
        OH_LOG_Print(LOG_APP, LOG_INFO, LOG_PRINT_DOMAIN, "ArkWeb", "ndk LoadEndCallback jsb_weak_ptr lock failed");
    }
}

void DestroyCallback(const char *webTag, void *userData) {
    OH_LOG_Print(LOG_APP, LOG_INFO, LOG_PRINT_DOMAIN, "ArkWeb", "ndk DestroyCallback webTag: %{public}s", webTag);
    if (!userData) {
        OH_LOG_Print(LOG_APP, LOG_INFO, LOG_PRINT_DOMAIN, "ArkWeb", "ndk DestroyCallback userData is nullptr");
        return;
    }
    std::weak_ptr<JSBridgeObject> jsb_weak_ptr = *static_cast<std::weak_ptr<JSBridgeObject> *>(userData);
    if (auto jsb_ptr = jsb_weak_ptr.lock()) {
        jsb_ptr->SaySomething("DestroyCallback");
    } else {
        OH_LOG_Print(LOG_APP, LOG_INFO, LOG_PRINT_DOMAIN, "ArkWeb", "ndk DestroyCallback jsb_weak_ptr lock failed");
    }
}

void SetComponentCallback(ArkWeb_ComponentAPI * component, const char* webTagValue) {
    if (!ARKWEB_MEMBER_MISSING(component, onControllerAttached)) {
        component->onControllerAttached(webTagValue, ValidCallback,
                                        static_cast<void *>(jsbridge_object_ptr->GetWeakPtr()));
    } else {
        OH_LOG_Print(LOG_APP, LOG_ERROR, LOG_PRINT_DOMAIN, "ArkWeb", "component onControllerAttached func not exist");
    }

    if (!ARKWEB_MEMBER_MISSING(component, onPageBegin)) {
        component->onPageBegin(webTagValue, LoadStartCallback,
                                        static_cast<void *>(jsbridge_object_ptr->GetWeakPtr()));
    } else {
        OH_LOG_Print(LOG_APP, LOG_ERROR, LOG_PRINT_DOMAIN, "ArkWeb", "component onPageBegin func not exist");
    }

    if (!ARKWEB_MEMBER_MISSING(component, onPageEnd)) {
        component->onPageEnd(webTagValue, LoadEndCallback,
                                        static_cast<void *>(jsbridge_object_ptr->GetWeakPtr()));
    } else {
        OH_LOG_Print(LOG_APP, LOG_ERROR, LOG_PRINT_DOMAIN, "ArkWeb", "component onPageEnd func not exist");
    }

    if (!ARKWEB_MEMBER_MISSING(component, onDestroy)) {
        component->onDestroy(webTagValue, DestroyCallback,
                                        static_cast<void *>(jsbridge_object_ptr->GetWeakPtr()));
    } else {
        OH_LOG_Print(LOG_APP, LOG_ERROR, LOG_PRINT_DOMAIN, "ArkWeb", "component onDestroy func not exist");
    }
}

static napi_value NativeWebInit(napi_env env, napi_callback_info info) {
    OH_LOG_Print(LOG_APP, LOG_INFO, LOG_PRINT_DOMAIN, "ArkWeb", "ndk NativeWebInit start");
    size_t argc = 1;
    napi_value args[1] = {nullptr};
    napi_get_cb_info(env, info, &argc, args, nullptr, nullptr);
    size_t webTagSize = 0;
    napi_get_value_string_utf8(env, args[0], nullptr, 0, &webTagSize);
    char *webTagValue = new (std::nothrow) char[webTagSize + 1];
    size_t webTagLength = 0;
    napi_get_value_string_utf8(env, args[0], webTagValue, webTagSize + 1, &webTagLength);
    OH_LOG_Print(LOG_APP, LOG_ERROR, LOG_PRINT_DOMAIN, "ArkWeb", "ndk NativeWebInit webTag:%{public}s", webTagValue);

    jsbridge_object_ptr = std::make_shared<JSBridgeObject>(webTagValue);
    if (jsbridge_object_ptr)
        jsbridge_object_ptr->Init();

    controller = reinterpret_cast<ArkWeb_ControllerAPI *>(OH_ArkWeb_GetNativeAPI(ARKWEB_NATIVE_CONTROLLER));
    component = reinterpret_cast<ArkWeb_ComponentAPI *>(OH_ArkWeb_GetNativeAPI(ARKWEB_NATIVE_COMPONENT));
    SetComponentCallback(component, webTagValue);

    OH_LOG_Print(LOG_APP, LOG_INFO, LOG_PRINT_DOMAIN, "ArkWeb", "ndk NativeWebInit end");
    delete[] webTagValue;
    return nullptr;
}

static napi_value RunJavaScript(napi_env env, napi_callback_info info) {
    size_t argc = 2;
    napi_value args[2] = {nullptr};
    napi_get_cb_info(env, info, &argc, args, nullptr, nullptr);

    size_t webTagSize = 0;
    napi_get_value_string_utf8(env, args[0], nullptr, 0, &webTagSize);
    char *webTagValue = new (std::nothrow) char[webTagSize + 1];
    size_t webTagLength = 0;
    napi_get_value_string_utf8(env, args[0], webTagValue, webTagSize + 1, &webTagLength);
    OH_LOG_Print(LOG_APP, LOG_INFO, LOG_PRINT_DOMAIN, "ArkWeb", "ndk OH_NativeArkWeb_RunJavaScript webTag:%{public}s",
                 webTagValue);

    size_t bufferSize = 0;
    napi_get_value_string_utf8(env, args[1], nullptr, 0, &bufferSize);
    char *jsCode = new (std::nothrow) char[bufferSize + 1];
    size_t byteLength = 0;
    napi_get_value_string_utf8(env, args[1], jsCode, bufferSize + 1, &byteLength);

    OH_LOG_Print(LOG_APP, LOG_INFO, LOG_PRINT_DOMAIN, "ArkWeb",
                 "ndk OH_NativeArkWeb_RunJavaScript jsCode len:%{public}zu", strlen(jsCode));

    ArkWeb_JavaScriptObject object = {(uint8_t *)jsCode, bufferSize, &JSBridgeObject::StaticRunJavaScriptCallback,
                                     static_cast<void *>(jsbridge_object_ptr->GetWeakPtr())};
    controller->runJavaScript(webTagValue, &object);
    delete[] webTagValue;
    delete[] jsCode;
    return nullptr;
}

EXTERN_C_START
static napi_value Init(napi_env env, napi_value exports) {
    napi_property_descriptor desc[] = {
        {"nativeWebInit", nullptr, NativeWebInit, nullptr, nullptr, nullptr, napi_default, nullptr},
        {"runJavaScript", nullptr, RunJavaScript, nullptr, nullptr, nullptr, napi_default, nullptr},
    };
    napi_define_properties(env, exports, sizeof(desc) / sizeof(desc[0]), desc);
    return exports;
}
EXTERN_C_END

static napi_module demoModule = {
    .nm_version = 1,
    .nm_flags = 0,
    .nm_filename = nullptr,
    .nm_register_func = Init,
    .nm_modname = "entry",
    .nm_priv = ((void *)0),
    .reserved = {0},
};

extern "C" __attribute__((constructor)) void RegisterEntryModule(void) { napi_module_register(&demoModule); }
For details about the native service code entry/src/main/cpp/jsbridge_object.h and entry/src/main/cpp/jsbridge_object.cpp, see Mutual Invoking Between the Application Side and Frontend Page (C/C++).
Using runJS.html as the frontend page of an app:
<!DOCTYPE html>
<html lang="en-gb">
<head>
    <meta name="viewport" content="width=device-width, initial-scale=1.0">
    <title>run javascript demo</title>
</head>
<body>
<h1>run JavaScript Ext demo</h1>
<p id="webDemo"></p>
<br>
<button type="button" style="height:30px;width:200px" onclick="testNdkProxyObjMethod1()">test ndk method1 ! </button>
<br>
<br>
<button type="button" style="height:30px;width:200px" onclick="testNdkProxyObjMethod2()">test ndk method2 ! </button>
<br>
</body>
<script type="text/javascript">
    function testNdkProxyObjMethod1() {
      // Verify whether the ndk method has been registered in window
      if (window.ndkProxy == undefined) {
        document.getElementById("webDemo").innerHTML = "ndkProxy undefined";
        return "objName undefined";
      }
      if (window.ndkProxy.method1 == undefined) {
        document.getElementById("webDemo").innerHTML = "ndkProxy method1 undefined";
        return "objName  test undefined";
      }
      if (window.ndkProxy.method2 == undefined) {
        document.getElementById("webDemo").innerHTML = "ndkProxy method2 undefined";
        return "objName  test undefined";
      }
      // Call the method1 method of ndk registered to window and display the results back to the p tag.
      var retStr = window.ndkProxy.method1("hello", "world", [1.2, -3.4, 123.456], ["Saab", "Volvo", "BMW", undefined], 1.23456, 123789, true, false, 0,  undefined);
      document.getElementById("webDemo").innerHTML  = "ndkProxy and method1 is ok, " + retStr;
    }
    function testNdkProxyObjMethod2() {
      // Verify whether the ndk method has been registered in window
      if (window.ndkProxy == undefined) {
        document.getElementById("webDemo").innerHTML = "ndkProxy undefined";
        return "objName undefined";
      }
      if (window.ndkProxy.method1 == undefined) {
        document.getElementById("webDemo").innerHTML = "ndkProxy method1 undefined";
        return "objName  test undefined";
      }
      if (window.ndkProxy.method2 == undefined) {
        document.getElementById("webDemo").innerHTML = "ndkProxy method2 undefined";
        return "objName  test undefined";
      }
      var student = {
        name:"zhang",
        sex:"man",
        age:25
      };
      var cars = [student, 456, false, 4.567];
      let params = "[\"{\\\"scope\\\"]";
      // Call the method2 method of ndk registration to the windows and display the results back to the p tag
      var retStr = window.ndkProxy.method2("hello", "world", false, cars, params);
      document.getElementById("webDemo").innerHTML  = "ndkProxy and method2 is ok, " + retStr;
    }
    function runJSRetStr(data) {
      const d = new Date();
      let time = d.getTime();
      document.getElementById("webDemo").innerHTML = new Date().getTime();
      return JSON.stringify(time);
    }
</script>
</html>
After the runJS hello button is tapped, the runJSRetStr method of the HTML5 page is triggered, and the page content is updated to the current timestamp.
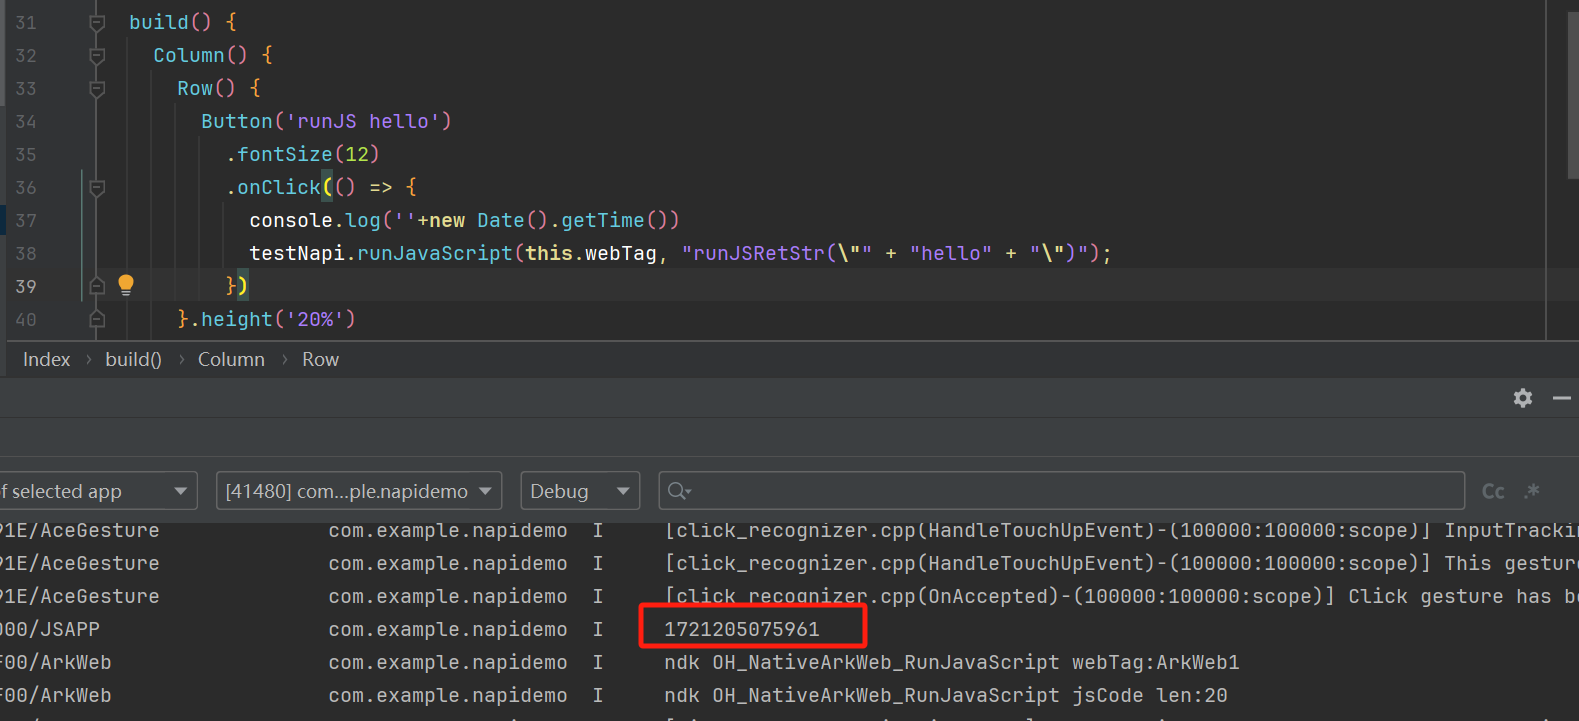
According to multiple tests, it takes 2 to 6 ms from when the button on the ArkTS side is clicked to when the runJSRetStr method on the H5 side is triggered.
Summary
| Communication Mode | Duration (for Reference Only) | Description |
|---|---|---|
| Using ArkWeb for communication with frontend pages | 7 ms to 9 ms | Frequent ArkTS environment switchover takes a long time. |
| Using ArkWeb and C++ for communication with frontend pages | 2 ms to 6 ms | No redundant ArkTS environment switchover occurs, and the communication takes a short time. |
The JSBridge optimization solution facilitates communication between ArkWeb and web pages. You can select a proper communication mechanism based on the app architecture.
- If an app is developed in ArkTS, you are advised to use the runJavaScriptExt API provided by ArkWeb to implement communication from the app to the frontend, and use registerJavaScriptProxy to implement communication from the frontend to the app.
- If an app leverages both ArkTS and C++, or if its architecture is similar to that of a mini-program, with a built-in C++ environment, you are advised to use the OH_NativeArkWeb_RunJavaScript and OH_NativeArkWeb_RegisterJavaScriptProxy APIs provided by ArkWeb on the NDK side to implement the JSBridge feature.

You need to determine whether the C++ environment exists based on the current service. (A major indication is whether the app is built on the Node-API technology. If yes, the app has the C++ environment.) For app development in a C++ environment, use the JSBridge APIs provided by ArkWeb on the NDK side. If no C++ environment is available, you can use the JSBridge API provided by ArkWeb.
[h2]Asynchronously Calling the JSBridge Function
Principles
The asynchronous JSBridge call is applicable to the scenario where the HTML5 side calls the JSBridge function registered on the ArkTS or C++ side. After the call, the execution result is not waited for, avoiding the web thread waiting for IPC for a long time due to the JSBridge synchronous call when the ArkUI main thread is heavily loaded.
Case Study
Case 1: Use the ArkTS API to implement JSBridge communication. The procedure is as follows:
- Register only the synchronization function.
import { webview } from '@kit.ArkWeb'; import { BusinessError } from '@kit.BasicServicesKit'; import { hilog } from '@kit.PerformanceAnalysisKit'; const DOMAIN = 0x0000; const TAG = 'Sample'; // Define ETS side objects and functions class TestObj { constructor() {} test(testStr:string): string { let start: number = Date.now(); // Simulate time-consuming operations for(let i = 0; i < 500000; i++) {} let end: number = Date.now(); hilog.info(DOMAIN, TAG, 'objName.test start: ' + start); return 'objName.test Sync function took ' + (end - start) + 'ms'; } asyncTestBool(testBol:boolean): Promise<string> { return new Promise((resolve, reject) => { let start: number = Date.now(); // Simulate time-consuming operation (asynchronous) setTimeout(() => { for(let i = 0; i < 500000; i++) {} let end: number = Date.now(); hilog.info(DOMAIN, TAG, 'objAsyncName.asyncTestBool start: ' + start); resolve('objName.asyncTestBool Async function took ' + (end - start) + 'ms'); }, 0); // Use 0 ms delay to simulate an asynchronous operation that starts immediately }); } } class WebObj { constructor() {} webTest(): string { let start: number = Date.now(); // Simulate time-consuming operations for(let i = 0; i < 500000; i++) {} let end: number = Date.now(); hilog.info(DOMAIN, TAG, 'objTestName.webTest start: ' + start); return 'objTestName.webTest Sync function took ' + (end - start) + 'ms'; } webString(): string { let start: number = Date.now(); // Simulate time-consuming operations for(let i = 0; i < 500000; i++) {} let end: number = Date.now(); hilog.info(DOMAIN, TAG, 'objTestName.webString start: ' + start); return 'objTestName.webString Sync function took ' + (end - start) + 'ms'; } } class AsyncObj { constructor() { } asyncTest(): Promise<string> { return new Promise((resolve, reject) => { let start: number = Date.now(); // Simulate time-consuming operation (asynchronous) setTimeout(() => { for (let i = 0; i < 500000; i++) { } let end: number = Date.now(); hilog.info(DOMAIN, TAG, 'objAsyncName.asyncTest start: ' + start); resolve('objAsyncName.asyncTest Async function took ' + (end - start) + 'ms'); }, 0); // Use 0 ms delay to simulate an asynchronous operation that starts immediately }); } asyncString(testStr:string): Promise<string> { return new Promise((resolve, reject) => { let start: number = Date.now(); // Simulate time-consuming operation (asynchronous) setTimeout(() => { for (let i = 0; i < 500000; i++) { } let end: number = Date.now(); hilog.info(DOMAIN, TAG, 'objAsyncName.asyncString start: ' + start); resolve('objAsyncName.asyncString Async function took ' + (end - start) + 'ms'); }, 0); // Use 0 millisecond delay to simulate immediate asynchronous operation }); } } @Entry @Component struct Index { controller: webview.WebviewController = new webview.WebviewController(); @State testObjtest: TestObj = new TestObj(); @State webTestObj: WebObj = new WebObj(); @State asyncTestObj: AsyncObj = new AsyncObj(); build() { Column() { Button('refresh') .onClick(()=>{ try{ this.controller.refresh(); } catch (error) { hilog.error(DOMAIN, TAG, `ErrorCode:${(error as BusinessError).code},Message:${(error as BusinessError).message}`); } }) Button('Register JavaScript To Window') .onClick(()=>{ try { // Only register synchronization functions this.controller.registerJavaScriptProxy(this.webTestObj,"objTestName",["webTest","webString"]); } catch (error) { hilog.error(DOMAIN, TAG, `ErrorCode:${(error as BusinessError).code},Message:${(error as BusinessError).message}`); } }) Web({src: $rawfile('index.html'),controller: this.controller}).javaScriptAccess(true) } } } - Call the JSBridge function on the HTML5 page.
<!DOCTYPE html>
<html lang="en">
<head>
    <meta charset="UTF-8">
    <meta name="viewport" content="width=device-width, initial-scale=1.0">
    <title>Document</title>
</head>
<body>
<button type="button" onclick="htmlTest()"> Click Me!</button>
<p id="demo"></p>
<p id="webDemo"></p>
<p id="asyncDemo"></p>
</body>
<script type="text/javascript">
    async function htmlTest() {
    document.getElementById("demo").innerHTML = 'Test start:' + new Date().getTime() + '\n'
      const time1 = new Date().getTime();
      objTestName.webString();
      const time2 = new Date().getTime();
      objAsyncName.asyncString();
      const time3 = new Date().getTime();
      objName.asyncTestBool();
      const time4 = new Date().getTime();
      objName.test();
      const time5 = new Date().getTime();
      objTestName.webTest();
      const time6 = new Date().getTime();
      objAsyncName.asyncTest();
      const time7 = new Date().getTime();
      const result = [
      'objTestName.webString()Duration:'+ (time2 - time1),
      'objAsyncName.asyncString()Duration:'+ (time3 - time2),
      'objName.asyncTestBool()Duration:'+ (time4 - time3),
      'objName.test()Duration:'+ (time5 - time4),
      'objTestName.webTest()Duration:'+ (time6 - time5),
      'objAsyncName.asyncTest()Duration:'+ (time7 - time6)
      ]
      document.getElementById("demo").innerHTML = document.getElementById("demo").innerHTML + '\n' + result.join('\n');
    }
</script>
</html>
Case 2: Use registerJavaScriptProxy or javaScriptProxy to register an asynchronous function or both asynchronous and synchronous functions. When the HTML5 page calls the JSBridge function, you are advised not to use the unrecommended method.
Button('refresh')
  .onClick(()=>{
    try{
      this.controller.refresh();
    } catch (error) {
      hilog.error(DOMAIN, TAG, `ErrorCode:${(error as BusinessError).code},Message:${(error as BusinessError).message}`);
    }
  })
Button('Register JavaScript To Window')
  .onClick(()=>{
    try {
      // Only register synchronization functions
      this.controller.registerJavaScriptProxy(this.webTestObj,"objTestName",["webTest","webString"]);
    } catch (error) {
      hilog.error(DOMAIN, TAG, `ErrorCode:${(error as BusinessError).code},Message:${(error as BusinessError).message}`);
    }
  })
Web({src: $rawfile('index.html'),controller: this.controller}).javaScriptAccess(true)

// Registration by javaScriptProxy
// javaScriptProxy only supports the registration of one object. If you need to register multiple objects, please use registerJavaScriptProxy.
Web({src: $rawfile('index.html'),controller: this.controller})
 .javaScriptAccess(true)
 .javaScriptProxy({
   object: this.testObjtest,
   name:"objName",
   methodList: ["test","toString"],
   // Specify the list of asynchronous functions
   asyncMethodList: ["test","toString"],
   controller: this.controller
 })
Summary
The data running result is as follows:
| Registration Method | Duration (for Reference Only) | Description |
|---|---|---|
| Synchronization Method | 1398 ms, 2707 ms, 2705 ms | The JavaScript thread will be blocked when the synchronous function is called. |
| Asynchronous Method | 2 ms, 2 ms, 4 ms | The JavaScript thread will not be blocked when the asynchronous function is called. |
The running data shows that the async method does not occupy the JavaScript single-thread task queue for a long time because it does not need to wait for the result. However, the synchronous method needs to wait until the main thread on the ArkTS side is executed synchronously before returning the result.

When a JSBridge API is registered, the calling mode (synchronous or asynchronous) is determined based on the API called during registration. You need to determine whether to register an asynchronous function based on the current service.
- Calling a synchronous function will block the JavaScript execution because it waits until the execution of the JSBridge function is complete. This method is applicable to scenarios where return values are required or where there are strict timing dependencies.
- Calling an asynchronous function does not require waiting until the execution of the JSBridge function is complete. The subsequent JavaScript can be executed after a specified time. However, the JSBridge function cannot directly return values.
- The JSBridge function registered on the ETS side needs to be executed in the main thread. The function registered on the NDK side will be executed in other threads.
- The mode of calling the asynchronous JSBridge API is the same as that of calling the synchronous API on the JavaScript side, except for the registration method. The calling mode in this section is for reference only.
JSBridge communication using the NDK APIs (asynchronous function registered on the C++ side):
// Define the JSBridge function
static void ProxyMethod1(const char* webTag, void* userData) {
    OH_LOG_Print(LOG_APP, LOG_INFO, LOG_PRINT_DOMAIN, "ArkWeb", "Method1 webTag :%{public}s",webTag);
}

static void ProxyMethod2(const char* webTag, void* userData) {
    OH_LOG_Print(LOG_APP, LOG_INFO, LOG_PRINT_DOMAIN, "ArkWeb", "Method2 webTag :%{public}s",webTag);
}

static void ProxyMethod3(const char* webTag, void* userData) {
    OH_LOG_Print(LOG_APP, LOG_INFO, LOG_PRINT_DOMAIN, "ArkWeb", "Method3 webTag :%{public}s",webTag);
}

void RegisterCallback(const char *webTag) {
    int myUserData = 100;
    //Create function method structure
    ArkWeb_ProxyMethod m1 = {
        .methodName = "method1",
        .callback = ProxyMethod1,
        .userData = (void *)&myUserData
    };
    ArkWeb_ProxyMethod m2 = {
        .methodName = "method2",
        .callback = ProxyMethod2,
        .userData = (void *)&myUserData
    };
    ArkWeb_ProxyMethod m3 = {
        .methodName = "method3",
        .callback = ProxyMethod3,
        .userData = (void *)&myUserData
    };
    ArkWeb_ProxyMethod methodList[2] = {m1,m2};

    //Create a JSBridge object structure
    ArkWeb_ProxyObject obj = {
        .objName = "ndkProxy",
        .methodList = methodList,
        .size = 2
    };
    // Get the ArkWeb_Controller API structure
    ArkWeb_AnyNativeAPI* apis = OH_ArkWeb_GetNativeAPI(ArkWeb_NativeAPIVariantKind::ARKWEB_NATIVE_CONTROLLER);
    ArkWeb_ControllerAPI* ctrlApi = reinterpret_cast<ArkWeb_ControllerAPI*>(apis);

        // Call the registration interface, registration function
        ctrlApi->registerJavaScriptProxy(webTag, &obj);

    ArkWeb_ProxyMethod asyncMethodList[1] = {m3};
    ArkWeb_ProxyObject obj2 = {
        .objName = "ndkProxy",
    .methodList = asyncMethodList,
    .size = 1
    };
    ctrlApi->registerAsyncJavaScriptProxy(webTag, &obj2);
} Same-layer rendering is an optimization technology used to improve the rendering performance of web pages. Elements at the same layer are rendered together to reduce the number of redrawing and rearrangement times and improve the UI rendering efficiency. For details about same-layer rendering, see Rendering Native Components on the Web Using Same-Layer Rendering.
Summary
This topic describes the principles and optimization methods of loading web pages, providing important guidance for you. In the Internet era, users have increasingly stringent requirements on the web page loading speed and experience. Therefore, page loading optimization has become a major concern for developers. Understanding the principles of web page loading helps you optimize loading issues and improve app quality.
This topic introduces multiple optimization methods for web page loading, such as preconnection, predownloading, prerendering, prefetching POST requests, and precompilation. These methods can significantly improve the smoothness and user experience of apps. However, they all depend on preprocessing, and therefore bring some costs.
In practice, you need to determine a proper solution and policy based on the specific situation. In addition, the fast resource interception and replacement and JSBridge solutions are provided to improve web loading performance. In addition to the preceding methods, you can compress resources and reduce HTTP requests to further optimize the page loading speed. For example, compressing resources can reduce the file size and loading time, and reducing HTTP requests can shorten network latency, speed up page loading, and improve user experience.
Web page loading optimization is crucial to improving user experience, website performance, page views, and conversion rate. Therefore, you need to pay attention to and continuously explore optimization methods to achieve business objectives. Optimization methods described in this topic can effectively enhance the page loading speed, user experience, page views, app engagement, and user loyalty. By continuously increasing the page loading speed, you can better meet user requirements and improve app value.