The process from app startup to UI display includes framework initialization, page loading, and layout rendering. The following figure shows the main process for page loading and layout rendering.

- When a page file is executed, the frontend UI description is used to create the corresponding FrameNode node tree at the backend. This tree is used for updating UI component properties, calculating the layout, and handling events. Each tree node corresponds to a frontend UI component.
- After the FrameNode tree is generated, the root node starts to create a layout task. This task traverses all subnodes and creates a layout packaging task for the subnodes. The layout packaging task includes performing related calculation and layout tasks.
- After the layout packaging task is complete, each FrameNode tree creates a rendering packaging task and draws the content.
After the app is started, the page loading and rendering performance are related to the number of nodes in the FrameNode tree and the properties of each node. Therefore, to shorten the page loading and layout rendering duration, you can consider the following optimization solutions when using UI components at the frontend:
- Do not perform time-consuming operations within the lifecycle of a custom widget. After a custom widget is created, its lifecycle callback function is called before rendering. If the function contains time-consuming operations, the UI rendering will be blocked, increasing the load of the main thread.
- Register component properties on demand. When the backend creates the FrameNode node tree, each property registered on the component is also saved on the FrameNode node, including the rendering property set (such as color) and layout property set (such as length, width, and alignment mode). When the FrameNode node executes the layout and rendering packaging tasks, the property set is used as the input. Therefore, component properties must be registered as required during app development to avoid setting redundant properties.
- Use @Builder functions instead of custom components: Each custom component defined in the frontend results in a corresponding CustomNode being created in the backend FrameNode tree. As a child class of FrameNode, the CustomNode class is used to process service logic related to custom components. When a large number of custom components are used on a page, the number of CustomNode nodes in the FrameNode node tree increases exponentially, increasing the page creation and rendering duration. For this reason, you can preferentially use the @Builder functions instead of custom components if service requirements are met.
- Use layout container components properly. ArkUI provides a series of components to quickly build pages. For details, see Building Layouts. Select a proper layout container component for different service scenarios and properly use the features and functions of the component to effectively shorten the page layout duration.
Avoiding Time-Consuming Operations During the Lifecycle of Custom Components
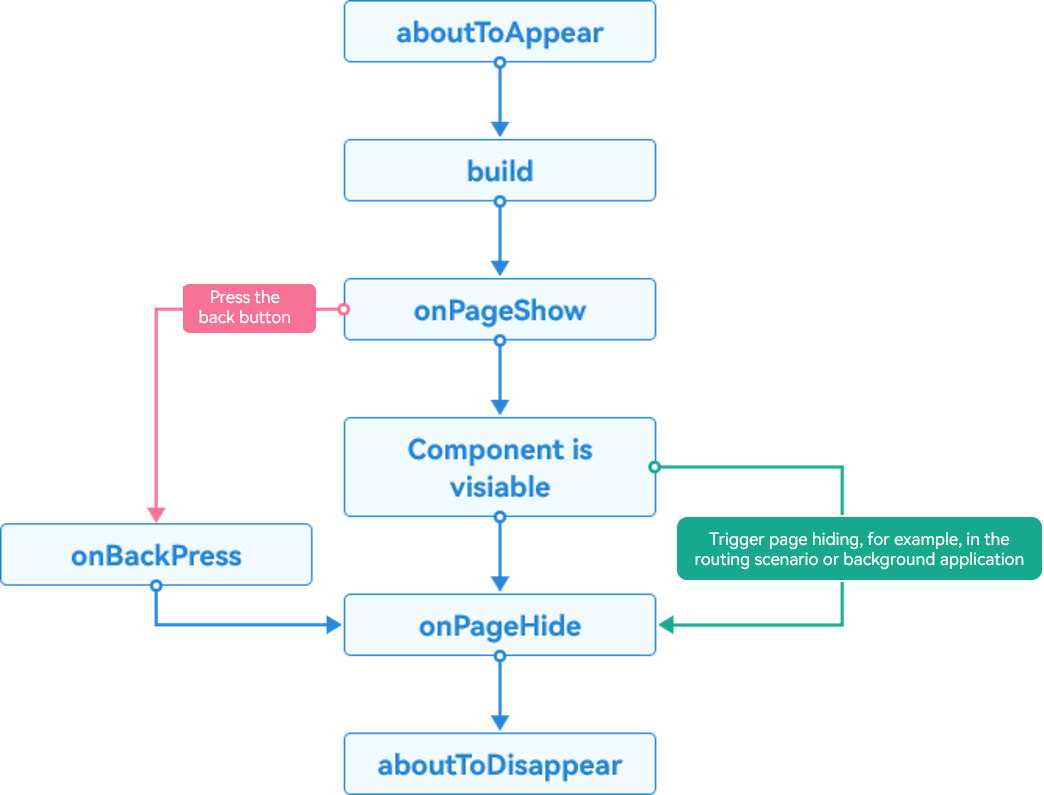
As shown in the preceding figure, execute the lifecycle callback function aboutToAppear() after the custom component is created and before executing the build function. Otherwise, time-consuming operations will block the UI rendering, increasing the load of the UI main thread. Therefore, do not perform time-consuming operations during the lifecycle of a custom component. In time-consuming complex computing scenarios, the computing result can be cached. For time-consuming tasks that do not need to wait for results, you can use multiple threads to process the tasks and prevent the main thread from being blocked. It is recommended that only the initialization logic of the current component be performed in the aboutToAppear() lifecycle function. Other service logic can be processed in advance or delayed as required. Assume that a complex player object needs to be created in the child component of the video list on the home page. The creation of the object is time-consuming. If the object is created in the aboutToAppear() function of the component, when the home page is loaded and rendered, the rendering of each child component in the list waits until the corresponding player object is initialized and created. In this case, the page loading is time-consuming and even a white screen may occur. The pseudocode is as follows:
Negative example:
@Component
export struct VideoCard {
  // ...
  aboutToAppear(): void {
    // Create a complex object task. If the task takes 1s to execute, the component will be rendered again after 1s.
    this.createComplexVideoPlayer();
  }
  // ...
}

@Component
export struct CardList {
  @State videoList: VideoItem[] = getVideoList();

  build() {
    List() {
      ForEach(this.videoList, (item: VideoItem) => {
        ListItem() {
          VideoCard({ item })
        }
      }, (item: VideoItem) => item.id)
    }
  }
}
In this scenario, you can delay the time for creating a player object task. For example, you can calculate the position of the current component on the page. When the child component slides to one third of the page, a player object is created and the video is played. In this case, the main thread will not be blocked when the page is rendered for the first time. The sample code is as follows:
Positive example:
@Component
export struct VideoCard {
  @State isVideoInit: boolean = false;
  // ...
  build() {
    Column() {
      // Video Playback Component
    }
    .onAreaChange((old, newValue) => {
      if (!this.isVideoInit) {
        let positionY: number = newValue.position.y as number
        if (positionY < screenHeight / 3) {
          this.createComplexVideoPlayer();
          this.isVideoInit = true;
        }
      }
    })
  }
  // ...
}

@Component
export struct CardList {
  @State videoList: VideoItem[] = getVideoList();

  build() {
    List() {
      ForEach(this.videoList, (item: VideoItem) => {
        ListItem() {
          VideoCard({ item })
        }
      }, (item: VideoItem) => item.id)
    }
  }
}
For example, in the lifecycle aboutToAppear, do not use resource data as the argument of the getXXXSync API of @ohos.resourceManager (Resource Management). You are advised to use the resource ID as the argument. The recommended method is resourceManager.getStringSync($r('app.string.test').id). The following uses getStringSync as an example to test whether the two types of parameters differ in time consumption during usage.
Negative example:
import { hilog, hiTraceMeter } from '@kit.PerformanceAnalysisKit';
import { common } from '@kit.AbilityKit';
import { BusinessError } from '@kit.BasicServicesKit';

@Entry
@Component
struct Index {
  @State message: string = 'getStringSync';
  private context = this.getUIContext().getHostContext() as common.UIAbilityContext;

  aboutToAppear(): void {
    hiTraceMeter.startTrace('getStringSync', 1);
    // The input parameter of the getStringSync interface uses the resource directly, without using the resource ID.
    try {
      this.context.resourceManager.getStringSync($r('app.string.app_name'));
    } catch (error) {
      let err = error as BusinessError;
      hilog.warn(0x000, 'testTag', `getStringSync failed, code=${err.code}, message=${err.message}`);
    }
    hiTraceMeter.finishTrace('getStringSync', 1);
  }

  build() {
    RelativeContainer() {
      Text(this.message)
        .fontSize(50)
        .fontWeight(FontWeight.Bold)
    }
    .height('100%')
    .width('100%')
  }
}
You can use Cold Start Analysis: Launch to capture performance trace points and check the time consumed for the analysis based on hiTraceMeter. The time consumed is 1.956 ms in the following case.

Positive example:
import { hilog, hiTraceMeter } from '@kit.PerformanceAnalysisKit';
import { common } from '@kit.AbilityKit';
import { BusinessError } from '@kit.BasicServicesKit';

@Entry
@Component
struct Index {
  private context = this.getUIContext().getHostContext() as common.UIAbilityContext;
  @State message: string = 'getStringSyncAfter';

  aboutToAppear(): void {
    hiTraceMeter.startTrace('getStringSyncAfter', 2);
    // The input parameter of the getStringSync interface uses the resource ID.
    try {
      this.context.resourceManager.getStringSync($r('app.string.app_name').id);
    } catch (error) {
      let err = error as BusinessError;
      hilog.warn(0x000, 'testTag', `getStringSync failed, code=${err.code}, message=${err.message}`);
    }
    hiTraceMeter.finishTrace('getStringSyncAfter', 2);
  }

  build() {
    RelativeContainer() {
      Text(this.message)
        .fontSize(50)
        .fontWeight(FontWeight.Bold)
    }
    .height('100%')
    .width('100%')
  }
}
You can use Cold Start Analysis: Launch to capture performance trace points and check the time consumed for the analysis based on hiTraceMeter. The time consumed is 0.071 ms.

Syntax | Duration |
|---|---|
Resource information: getStringSync($r('app.string.app_name')) | 1.956 ms |
Resource ID: getStringSync($r('app.string.app_name').id) | 0.071 ms |
It can be concluded that it takes more time when resource information than resource ID is used as the parameter. Therefore, when a similar method is required, it is better to use the resource ID as a parameter to effectively reduce the time consumed for customizing the component lifecycle.
Registering Component Properties on Demand
When using components to develop app UIs, you need to set properties for each component and perform logic processing such as UI style and behavior processing. When a large number of properties are set for a single component and the component is widely used in the app, the settings greatly affect the app performance. For example, in the React Native (RN) framework development, 21 properties need to be set for a single component, and the component is used in the ForEach loop. In this scenario, the properties required by the app are unknown. Therefore, all properties are set on the component through property methods. However, in actual use, most apps use only a few of the properties, and other properties retain default values, which results in redundant settings of a large quantity of properties. The sample code snippet is as follows:
build() {
  Stack() {
    this.renderChildren()
  }
  .width(this.descriptor.layoutMetrics.frame.size.width)
  .height(this.descriptor.layoutMetrics.frame.size.height)
  .backgroundColor(convertColorSegmentsToString(this.descriptor.props.backgroundColor))
  .position({ y: this.descriptor.layoutMetrics.frame.origin.y, x: this.descriptor.layoutMetrics.frame.origin.x })
  .borderWidth(this.descriptor.props.borderWidth)
  .borderColor({
    left: convertColorSegmentsToString(this.descriptor.props.borderColor.left),
    top: convertColorSegmentsToString(this.descriptor.props.borderColor.top),
    right: convertColorSegmentsToString(this.descriptor.props.borderColor.right),
    bottom: convertColorSegmentsToString(this.descriptor.props.borderColor.bottom)
  })
  .borderRadius(this.descriptor.props.borderRadius)
  .borderStyle(this.getBorderStyle())
  .opacity(this.getOpacity())
  .transform(this.descriptor.props.transform != undefined ? convertMatrixArrayToMatrix4(this.descriptor.props.transform) : undefined)
  .clip(this.getClip())
  .hitTestBehavior(this.getHitTestMode())
  .shadow(this.getShadow())
}
In this scenario, during app development, the performance will be severely deteriorated when components with a large number of redundant properties need to be displayed in batches in the view. In this case, you can use Attribute Modifier to dynamically register component properties instead of using property methods to statically register component properties.
In comparison with using property methods to statically register component properties, using AttributeModifier to dynamically register component properties differs in the following aspects:
- Registering properties dynamically: The system provides the AttributeModifier API, which enables you to customize the implementation class of the AttributeModifier API. When the app is running, the system calls a method related to the component style in the implementation class of the AttributeModifier API. In the method, the component properties are dynamically set based on the custom service logic.
- Updating properties by Diff: When a component is to be created or updated, the API for updating the style property object of the component is executed again. The logic of the property Diff is implemented based on Map. The value of key is the property type, and the value of value is the property modifier object. In the update scenario, the corresponding property modifier object is found based on the value of key for Diff comparison. If a property has been updated, the Native side is notified to update the property.
A simple public avatar component is used as an example to demonstrate the performance benefits of the AttributeModifier solution. The public avatar component requires that the user avatar be displayed on the UI if the user avatar data is available. For data without user avatars, the gray background and the first character of the user name are displayed. Currently, 1000 avatar components are displayed in the list, as shown in the following figure.

Set properties for the avatar component by referring to the following code:
import { util } from '@kit.ArkTS';

@Observed
class User {
  id: string;
  name: string;
  avatarImage: ResourceStr;

  constructor(id: string, name: string, avatarImage: ResourceStr) {
    this.id = id;
    this.name = name;
    this.avatarImage = avatarImage;
  }
}

//create data
const DEFAULT_BACKGROUND_COLOR = Color.Grey;
const getUsers = () => {
  return Array.from(Array(1000), (item: User, i: number) => {
    return new User(
      util.generateRandomUUID(),
      i % 2 === 0 ? 'Zhang San' : 'Li Si',
      i % 2 === 0 ? '' : $r('app.media.startIcon')
    );
  });
}

@Component
export struct AvatarGrid {
  @State users: User[] = getUsers();

  build() {
    Grid() {
      ForEach(this.users, (u: User) => {
        GridItem() {
          Avatar({ user: u })
        }
      }, (user: User) => user.id)
    }
    .columnsTemplate('1fr 1fr 1fr 1fr 1fr 1fr')
    .columnsGap(4)
    .rowsGap(4)
  }
}

// Avatar component
@Component
struct Avatar {
  @ObjectLink user: User;

  build() {
    Row() {
      if (!this.user.avatarImage) {
        Text(this.user.name.charAt(0))
          .fontSize(28)
          .fontColor(Color.White)
          .fontWeight(FontWeight.Bold)
      }
    }
    .backgroundImage(this.user.avatarImage)
    .backgroundImageSize(ImageSize.Cover)
    .backgroundColor(DEFAULT_BACKGROUND_COLOR)
    .justifyContent(FlexAlign.Center)
    .size({ width: 50, height: 50 })
    .borderRadius(25)

    // .padding(2)
    // .margin(2)
    // .opacity(1)
    // .clip(false)
    // .layoutWeight(1)
    // .backgroundBlurStyle(BlurStyle.NONE)
    // .alignItems(VerticalAlign.Center)
    // .borderWidth(1)
    // .borderColor(Color.Pink)
    // .borderStyle(BorderStyle.Solid)
    // .expandSafeArea([SafeAreaType.SYSTEM])
    // .rotate({angle: 5})
    // .responseRegion({x: 0})
    // .mouseResponseRegion({x: 0})
    // .constraintSize({minWidth: 25})
    // .hitTestBehavior(HitTestMode.Default)
    // .backgroundImagePosition(Alignment.Center)
    // .foregroundBlurStyle(BlurStyle.NONE)
  }
}
To use AttributeModifier to dynamically register properties, add a custom class to implement the AttributeModifier API, and modify the property registration logic of the Avatar component. The modified code is as follows:
// 1.Custom Attribute Modifier, this class implements the AttributeModifier interface
class RowModifier implements AttributeModifier<RowAttribute> {
  private customImage: ResourceStr = '';
  private static instance: RowModifier;

  constructor() {
  }

  setCustomImage(customImage: ResourceStr) {
    this.customImage = customImage;
    return this;
  }

  // Adopting a singleton pattern avoids creating a new modifier for each component, increasing the performance overhead incurred by creating the
  public static getInstance(): RowModifier {
    if (!RowModifier.instance) {
      RowModifier.instance = new RowModifier();
    }
    return RowModifier.instance;
  }

  // 2.Implement the applyNormalAttribute method of the AttributeModifier interface to customize the logic of attribute setting.
  applyNormalAttribute(instance: RowAttribute) {
    if (this.customImage) {
      instance.backgroundImage(this.customImage);
      instance.backgroundImageSize(ImageSize.Cover);
    } else {
      instance.backgroundColor(Color.Blue);
      instance.justifyContent(FlexAlign.Center);
      // instance.padding(2)
      // instance.margin(2)
      // instance.opacity(1)
      // instance.clip(false)
      // instance.layoutWeight(1)
      // instance.backgroundBlurStyle(BlurStyle.NONE)
      // instance.alignItems(VerticalAlign.Center)
      // instance.borderWidth(1)
      // instance.borderColor(Color.Pink)
      // instance.borderStyle(BorderStyle.Solid)
      // instance.expandSafeArea([SafeAreaType.SYSTEM])
      // instance.rotate({ angle: 5 })
      // instance.responseRegion({x: 0})
      //instance.mouseResponseRegion({x: 0})
      // instance.constraintSize({minWidth: 25})
      // instance.hitTestBehavior(HitTestMode.Default)
      //instance.backgroundImagePosition(Alignment.Center)
      //instance.foregroundBlurStyle(BlurStyle.NONE)
    }
    instance.size({ width: 50, height: 50 });
    instance.borderRadius(25);
  }
}


@Component
struct Avatar {
  @ObjectLink user: User;

  build() {
    Row() {
      if (!this.user.avatarImage) {
        Text(this.user.name.charAt(0))
          .fontSize(28)
          .fontColor(Color.White)
          .fontWeight(FontWeight.Bold)
      }
    }
    // 3.Pass a custom RowModifier class as a parameter to enable on-demand property registration
    .attributeModifier(RowModifier.getInstance().setCustomImage(this.user.avatarImage))
  }
}
For the preceding two solutions, gradually increase the number of registered properties and use the launch analysis provided by DevEco Studio to obtain the page loading duration (value of PageRouterManager::LoadPage) and first frame duration (value of First Frame - App Phase) on the app side in the two solutions. The comparison is as follows:
Static Property Registration | Dynamic Property Registration | |||||||
|---|---|---|---|---|---|---|---|---|
Number of registered properties | 6 | 12 | 18 | 24 | 6 | 12 | 18 | 24 |
PageRouterManager::LoadPage | 639 ms 900 μs | 668 ms 624 μs | 719 ms 139 μs | 764 ms 437 μs | 640 ms 989 μs | 662 ms 112 μs | 705 ms 407 μs | 717 ms 294 μs |
First Frame - App Phase | 45 ms 554 μs | 45 ms 638 μs | 52 ms 918 μs | 52 ms 643 μs | 44 ms 603 μs | 43 ms 923 μs | 46 ms 709 μs | 46 ms 355 μs |

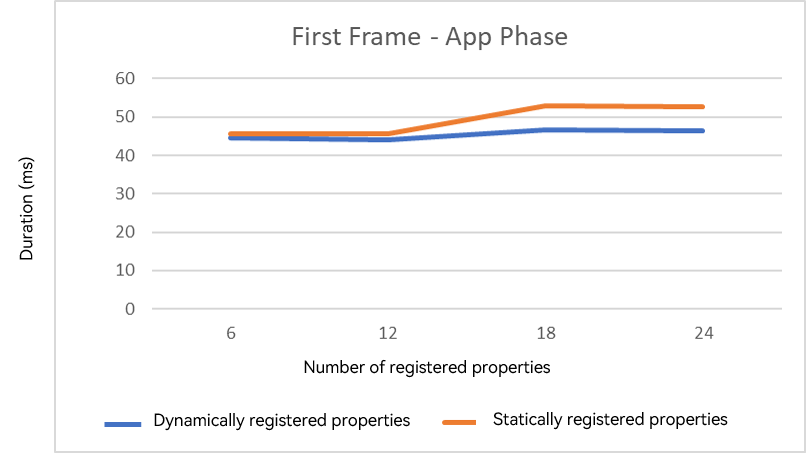
According to the preceding data, benefits of dynamic registration are not significant if a small number of properties are to be registered. When the number of registered properties increases, the benefits of dynamic registration increase linearly.
Preferentially Using the @Builder Method Instead of Custom Components
When a custom component is used in ArkUI, a CustomNode node will be created in the backend FrameNode tree in the build phase, and a RenderNode node will be created in the rendering phase, as shown in the following figure.
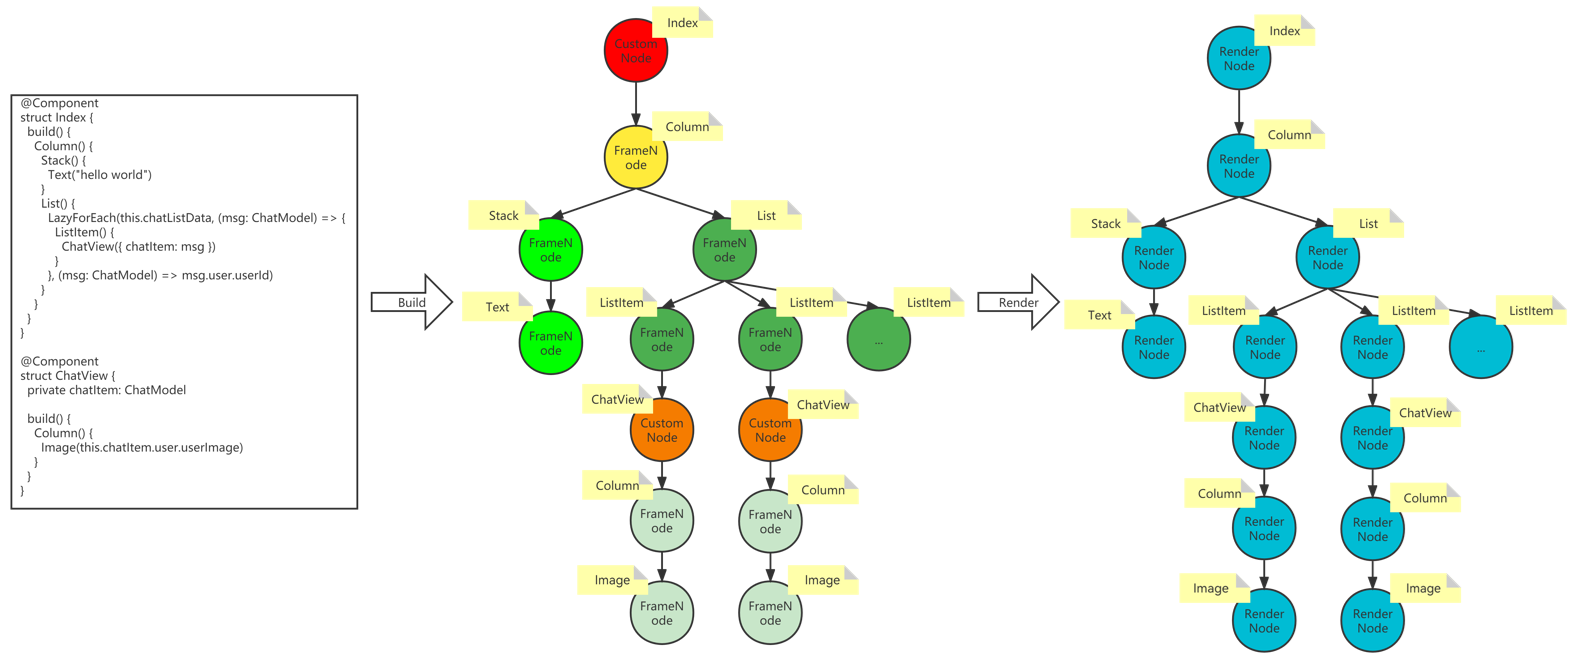
- The frontend UI description structure will create the corresponding FrameNode node tree at the backend.
- The FrameNode node tree is used to process service logic such as updating UI component properties, calculating the layout, and handling events.
- As a child class of FrameNode, CustomNode is used to process service logic related to custom components, for example, executing the build function.
- The FrameNode node tree generates a backend render tree for UI rendering in the rendering phase.
Therefore, a smaller number of custom components used during app development, especially in loops, will reduce the number of CustomNode nodes in the FrameNode tree by multiple times, which effectively shortens the page loading and rendering duration. You can preferentially replace the custom component in an app with the @Builder function, which does not create a new tree node in the backend FrameNode tree.

The @Builder decorator strictly prohibits defining state variables or using lifecycle functions within it. Data interaction must be performed by passing parameters or accessing the state variables of the component to which the decorator belongs.
When a component is used only for display and does not require the internal state variables or lifecycle functions of the custom @Component, you can create an @Builder function instead of creating an @Component.
For example, when the ForEach loop is used to display the card list information, the page is displayed as follows:
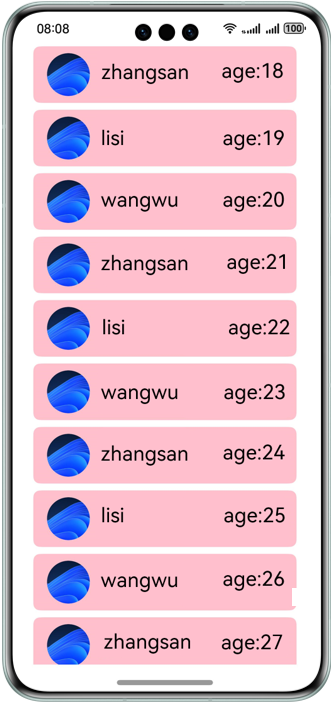
Use the custom component solution. The sample code is as follows:
import { util } from '@kit.ArkTS';

interface User {
  id: string;
  name: string;
  age?: number;
  avatarImage?: ResourceStr;
  //introduction: string;
  // ...
}

// create data
const DEFAULT_BACKGROUND_COLOR = Color.Pink;
const getUsers = () => {
  const USERS: User[] = [{
    id: '1',
    name: 'Zhang San',
  }, {
    id: '2',
    name: 'Li Si',
  }, {
    id: '3',
    name: 'Wang Wu',
  }];
  return Array.from(Array(30), (item: User, i: number) => {
    return {
      id: util.generateRandomUUID(),
      name: USERS[i%3].name,
      avatarImage: $r('app.media.startIcon'),
      age: 18 + i
    } as User;
  });
}

// User Card List Component
@Component
export struct UserCardList {
  @State users: User[] = getUsers();

  build() {
    List({ space: 8 }) {
      ForEach(this.users, (item: User) => {
        ListItem() {
          UserCard({ name: item.name, age: item.age, avatarImage: item.avatarImage })
        }
      }, (item: User) => item.id)
    }
    .alignListItem(ListItemAlign.Center)
  }
}

// User Card Customization Component
@Component
struct UserCard {
  @Prop avatarImage: ResourceStr;
  @Prop name: string;
  @Prop age: number;

  build() {
    Row() {
      Row() {
        Image(this.avatarImage)
          .size({ width: 50, height: 50 })
          .borderRadius(25)
          .margin(8)
        Text(this.name)
          .fontSize(30)
      }
      Text(`age:${this.age.toString()}`)
        .fontSize(20)
    }
    .backgroundColor(DEFAULT_BACKGROUND_COLOR)
    .justifyContent(FlexAlign.SpaceBetween)
    .borderRadius(8)
    .padding(8)
    .height(66)
    .width('80%')
  }
}
Replace the custom component UserCard with the @Builder function. The modified code is as follows:
// 1. Customizing @Builder Function Components
@Builder
function UserCardBuilder(name: string, age?: number, avatarImage?: ResourceStr) {
  Row() {
    Row() {
      Image(avatarImage)
        .size({ width: 50, height: 50 })
        .borderRadius(25)
        .margin(8)
      Text(name)
        .fontSize(30)
    }
    Text(`age:${age?.toString()}`)
      .fontSize(20)
  }
  .backgroundColor(Color.Blue)
  .justifyContent(FlexAlign.SpaceBetween)
  .borderRadius(8)
  .padding(8)
  .height(66)
  .width('80%')
}

@Component
export struct UserCardList {
  @State users: User[] = getUsers();

  build() {
    List({ space: 8 }) {
      ForEach(this.users, (item: User) => {
        ListItem() {
          // 2. Using the @Builder function in a build function
          UserCardBuilder(item.name, item.age, item.avatarImage)
        }
      }, (item: User) => item.id)
    }
    .alignListItem(ListItemAlign.Center)
  }
}
Increase the number of components from 30 to 3000. Use the profiler to obtain the time consumed by the page loading tag PageRouterManager::LoadPage and the page UI refresh task tag UITaskScheduler::FlushTask. The time consumed by the two solutions is compared as follows:
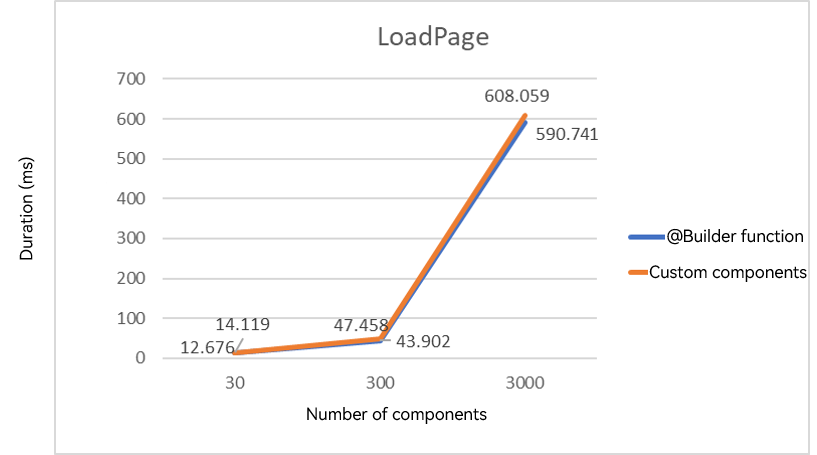

As shown in the preceding figure, the @Builder solution outperforms the custom component solution in terms of page loading and UI page refreshing (including layout, rendering, and animation). As the number of components increases, the benefits increase linearly.
Using Layout Container Components Properly
If a large number of components need to be displayed, a layout container component is usually used to quickly implement the page layout. When the layout container component is used, multiple components need to be displayed at a time. As a result, the first frame may take a long time or even frame loss may occur. In this case, you can perform on-demand loading or lazy loading on child components in the container component. You can also use the capability for reusing components of the same structure. For details about how to optimize the performance of each layout container component, see Layout Optimization.