Overview
Aspect-Oriented Programming (AOP) is a programming paradigm that implements unified management of program functions through precompilation and runtime dynamic proxies. AOP separates program concerns by injecting code to implement cross-cutting concerns. This effectively isolates different parts of the service logic, reducing coupling between components and thereby improving maintainability and reusability for higher development efficiency.
In AOP, cross-cutting concerns—such as logging, parameter validation, or performance monitoring—are encapsulated as aspects, allowing you to add functionality without modifying the core service logic. This approach separates service code from non-service code, reducing code coupling.
HarmonyOS implements AOP using an instrumentation mechanism. It offers the Aspect class with APIs, such as addBefore(), addAfter(), and replace(), for AOP. These APIs allow you to insert custom logic before or after method execution, or entirely replace a method's implementation, providing flexible runtime enhancements. The following are some common use cases of these APIs:
- Validating method parameters: You can validate parameters before method execution and check return values after execution.
- Collecting method execution frequency and time: You can combine addBefore and addAfter to measure method execution time and frequency. This facilitates performance monitoring and data-driven optimization.
- Validating method return values: You can validate the return values of methods. In the callback parameters of addAfter(), the second parameter represents the return value of the original method, which can be validated.
- Validating member variables in methods: During method execution, validate member variables to ensure data integrity and accuracy, which allows potential issues to be detected and handled in a timely manner.
- Replacing method implementation: The replace() API allows you to replace a method's implementation at runtime. This is especially useful for extending functionality without changing existing method calls.
- Replacing the method implemented by a child class: By using the replace() API with the child class as the targetClass parameter, you can replace the method implementation in the child class.
- Obtaining the target bundle name during application startup: You can call the addBefore() API to monitor and record the application startup process, including obtaining the bundle name. This helps debugging and performance profiling.
- Adding Instrumentation to system SDK APIs: You can use the addBefore() API to implement instrumentation or replacement on system SDK APIs.
This section explores the basic principles behind the AOP APIs and demonstrates how they are applied in the use cases described above.
Instrumentation Principles
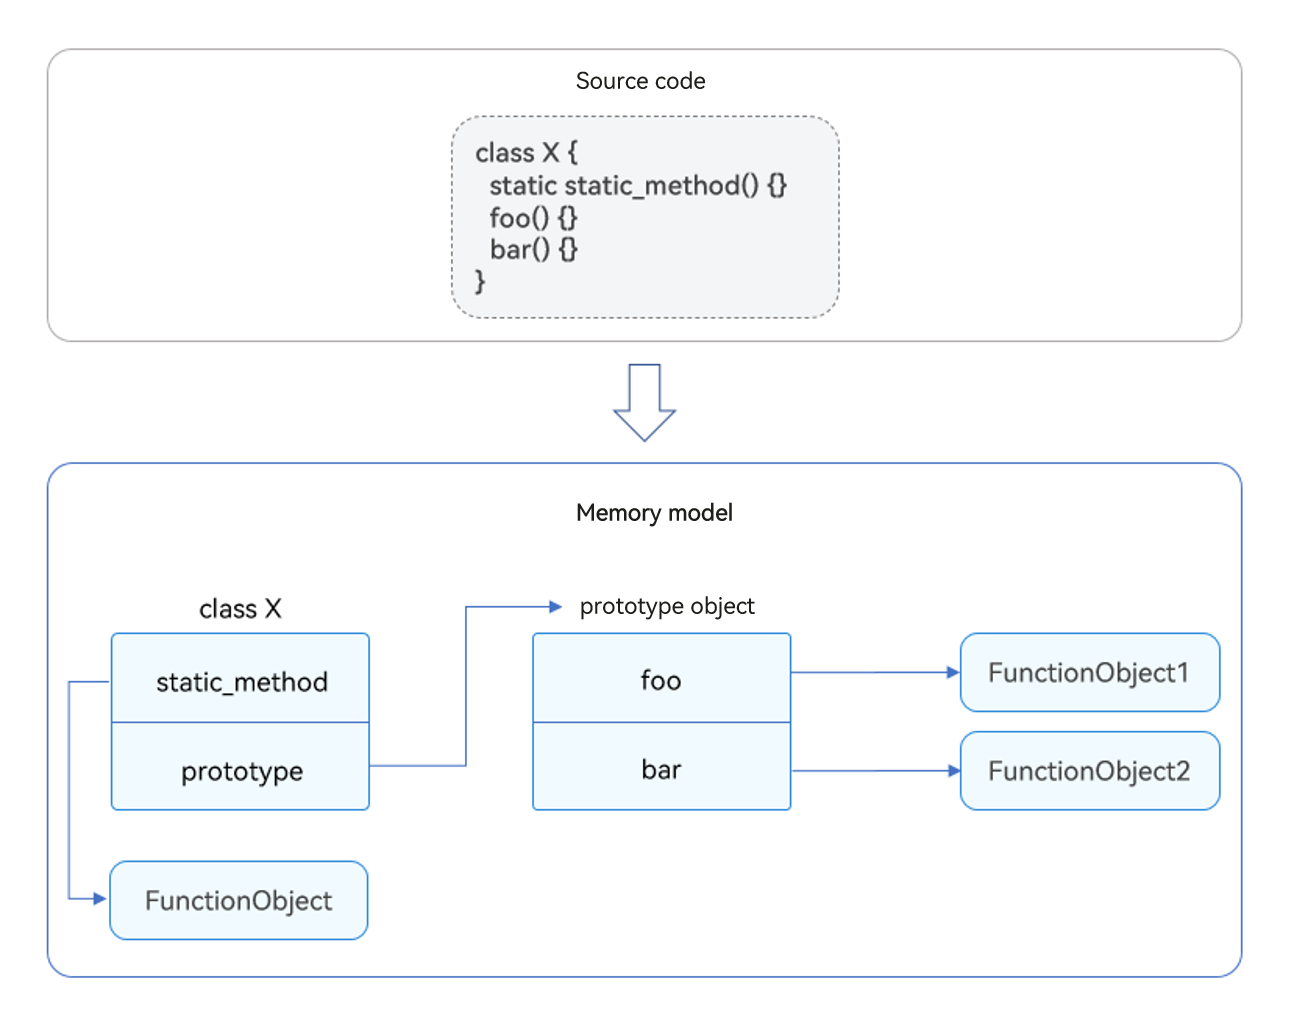
The principles of addBefore(), addAfter(), and replace() are based on the ECMAScript semantics of a class. In other words, the class static method is the class attribute, and the class instance method is the attribute of the prototype object of the class.
[h2]Principle Analysis
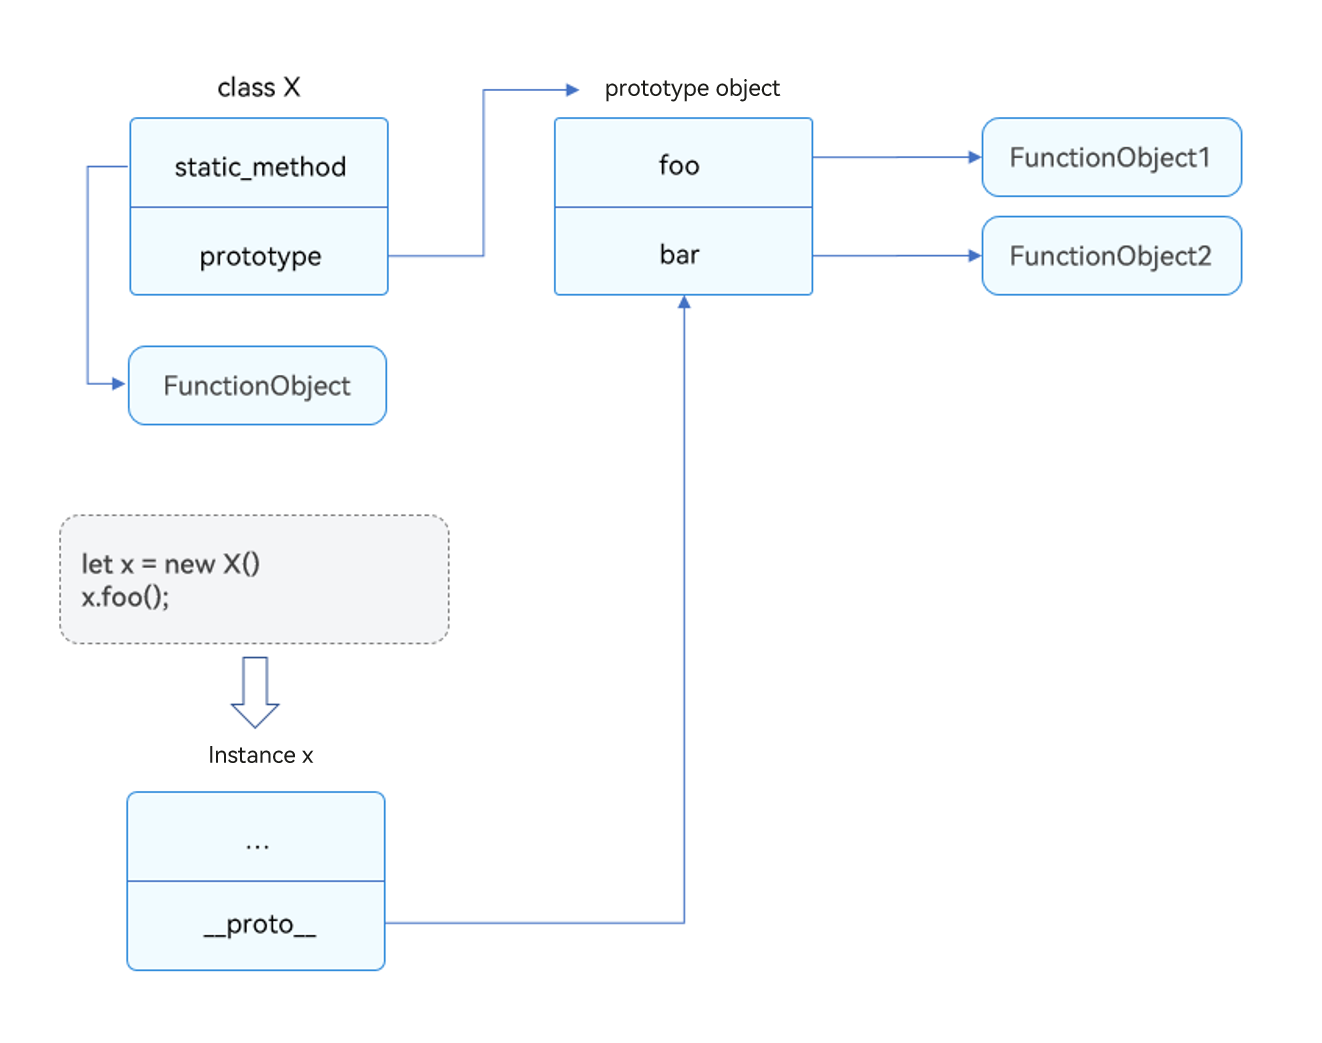
Each instance of a class has a __proto__ property, known as its prototype, which is a reference to the prototype object of the class, as shown in Figure 2. When an instance invokes a method, the system checks __proto__ to locate the class's prototype object, and then obtains and executes the method from the prototype object. As all instances of a class share the same prototype object, any change to the methods in the object affects all instances.
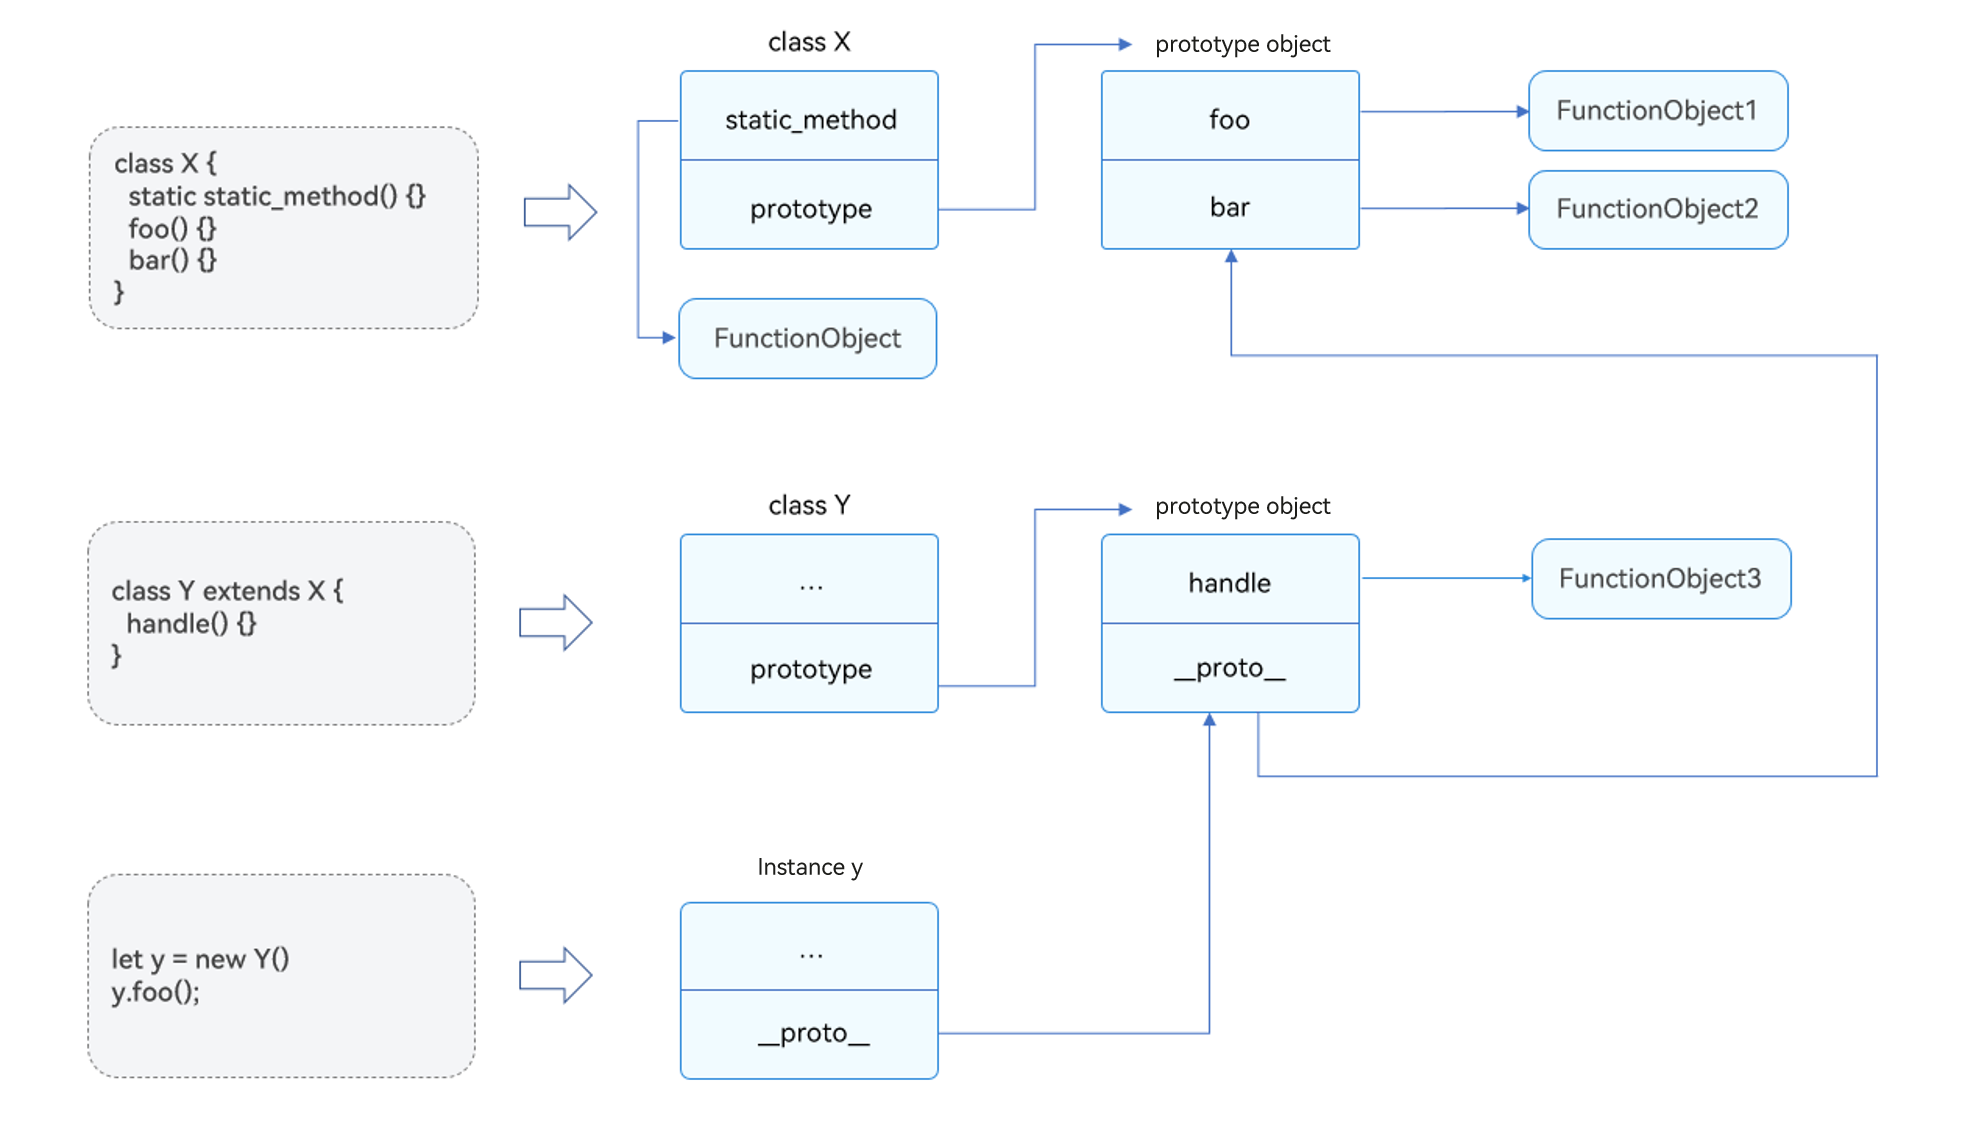
The prototype object itself also has a __proto__ property. Class inheritance is implemented through prototypes. When an instance method is called, the system looks for the method in the prototype chain and executes the method once it is found. Figure 3 illustrates this process.
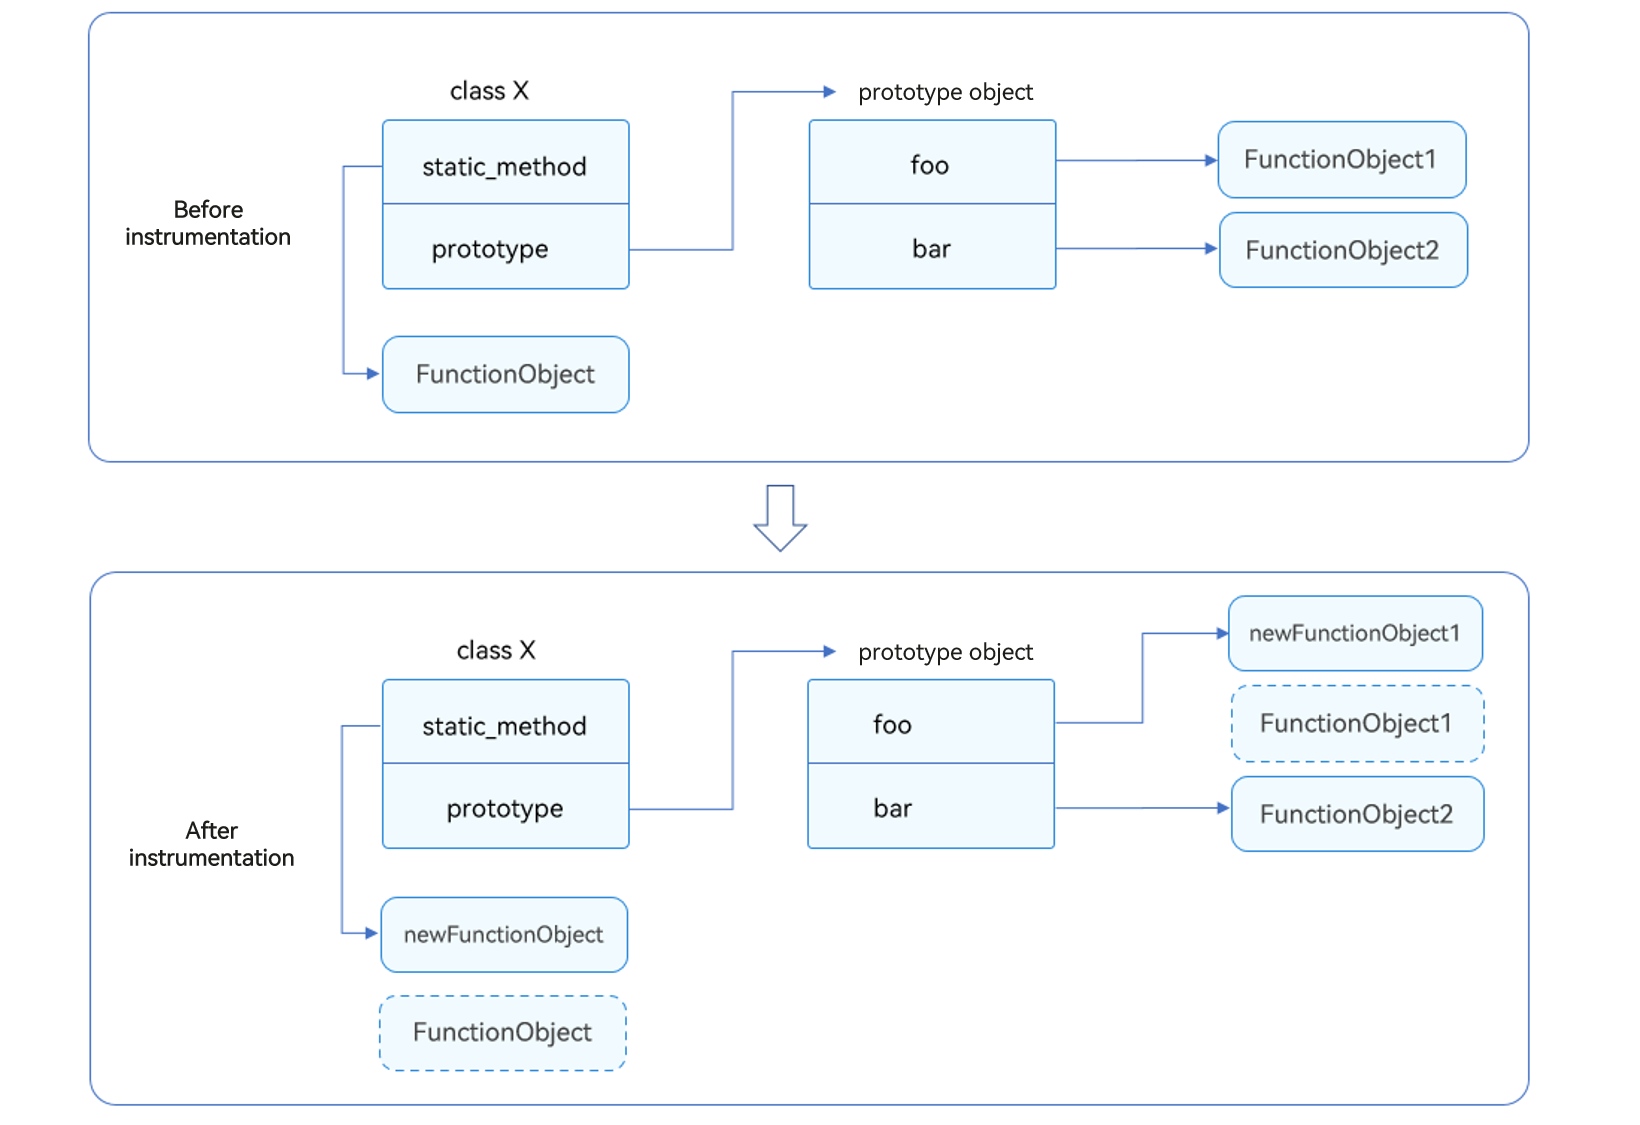
The operations of instrumentation and replacement involve combining the callback parameters with the original method to create a function, and then replacing the original method with the new function. This process is illustrated in Figure 4.
[h2]API Pseudocode
addBefore: Instrumentation before class method execution
// Instrument before class method execution
static addBefore(targetClass, methodName, isStatic, before): void {
  let target =  isStatic ? targetClass : targetClass.prototype;
  let origin = target[methodName];
  // Define a new function that first executes "before" and then executes the old method.
  let newFunc = function (...args) {
    before(this, ...args);
    return origin.bind(this)(...args);
  }
  // Replace the method with a new function
  target[methodName] = newFunc;
}
addAfter: Instrumentation after class method execution
// Instrument after class method execution
static addAfter(targetClass, methodName, isStatic, after) : void {
  let target =  isStatic ? targetClass : targetClass.prototype;
  let origin = target[methodName];
  // Define a new function that first executes the old method, then executes after.
  let newFunc = function (...args) {
    let ret = origin.bind(this)(...args);
    return after(this, ret, ...args);
  }
  // Replace the method with a new function
  target[methodName] = newFunc;
}
replace: Replacement of the class method
static replace(targetClass, methodName, isStatic, instead) : void {
  let target =  isStatic ? targetClass : targetClass.prototype;
  // Define a new function that only executes "instead" inside.
  let newFunc = function (...args) {
    return instead(this, ...args);
  }
  // Replace the method with a new function
  target[methodName] = newFunc;
}
Scenario 1: Validating Method Parameters
In some cases, the service development team may overlook parameter validation, leading to potential risks. When this issue is identified by the O&M team, immediate remediation is required. However, modifying the service code directly can be complex and time-consuming. To address the issue quickly, the O&M team chooses to use instrumentation to temporarily inject parameter validation logic into the relevant methods.
Consider this example: A team develops a basic capability module and encapsulates the capabilities in class A. During module integration, it is found that methods in class A method do not provide parameter validation, raising the risk of processing invalid input. To avoid this risk, the O&M team uses instrumentation to insert parameter validation logic into the methods of class A, ensuring system stability and security without modifying the source code.
[h2]When to Use
The addBefore() API allows access to the original method's parameters through its callback parameters. This enables you to insert parameter validation logic before the method is executed. Validation takes effect dynamically at runtime after addBefore() is applied. Typically, the addBefore() API is typically called at the application entry point.
[h2]How to Develop
- Encapsulate basic capabilities in class A. The code for obtaining an element with the specified index in the array is as follows.
// baseAbility.ts export class A { getElementByIndex<T>(arr: Array<T>, idx: number): T { return arr[idx]; } } - Integrate basic capabilities on the home page, verify the parameter type, and check whether the index is out of range.
// index.ets
import { util } from '@kit.ArkTS';
import { A } from '../components/baseAbility';

@Entry
@Component
struct Index {
  build() {
    // UI code
  }
}

util.Aspect.addBefore(A, 'getElementByIndex', false,
  // Check the parameters
  (instance: A, arr: Object, idx: number) => {
    if (!(arr instanceof Array)) {
      throw Error('arg arr is expected to be an array');
    }
    if (!(Number.isInteger(idx) && idx >= 0)) {
      throw Error('arg idx is expected to be a non-negative integer');
    }
    if (idx >= arr.length) {
      throw Error('arg idx is expected to be smaller than arr.length');
    }
  });
// The original method is executed
let buffer: Array<number> = [1, 2, 3, 5];
let that = new A();
that.getElementByIndex(buffer, -1);
that.getElementByIndex(buffer, 5);
that.getElementByIndex(123 as Object as Array<number>, 5)
Scenario 2: Collecting Method Execution Frequency and Time
In performance profiling or debugging scenarios, the performance management team often needs to gather data on how many times a method is called and measure its execution time. Traditionally, this would require the development team to modify the source code, repackage, and redeploy the application—a process that is inefficient and often impractical due to resource constraints. To address this challenge, AOP provides a non-intrusive solution.
[h2]When to Use
To track method call frequency, you can insert logic before the method using the addBefore() API. This logic automatically increments a counter each time the method is called. To measure execution time, use the addBefore() API for recording the start time and the addAfter() API for recording the end time after the method execution.
To store the collected data, you can use closure variables or overwrite existing variables on each method execution.
[h2]How to Develop
- Collect the execution frequency.
// somePackage.ets
export class Test {
  foo(){}
}
// index.ets import { util } from '@kit.ArkTS'; import { Test } from '../components/somePackage'; @Entry @Component struct Index { build() { // UI code } } util.TextDecoder.toString(); // increment call count let countFoo = 0; util.Aspect.addBefore(Test, 'foo', false, () => { countFoo++; }); // Invoke and print logs new Test().foo(); console.log('countFoo = ', countFoo); // [LOG]: "countFoo = ", 1 let a = new Test(); a.foo() console.log('countFoo = ', countFoo); // [LOG]: "countFoo = ", 2 function bar(a: Test) { a.foo(); console.log('countFoo = ', countFoo); new Test().foo(); console.log('countFoo = ', countFoo); } bar(a); // [LOG]: "countFoo = ", 3 // [LOG]: "countFoo = ", 4 console.log('countFoo = ', countFoo); // [LOG]: "countFoo = ", 4 - Collect the execution time.
// somePackage1.ets
export class Test1 {
  doSomething() { // instance method
    // ...
  }
  static test() { // static method
    // ...
  }
}
// index2.ets import {util} from '@kit.ArkTS'; import { Test1 } from '../components/somePackage1'; @Entry @Component struct Index { build() { // UI code } } // Print the time before and after the insertion, and encapsulate the insertion action into an interface function addTimePrinter(targetClass: Object, methodName: string, isStatic: boolean) { let t1 = 0; let t2 = 0; util.Aspect.addBefore(targetClass, methodName, isStatic, () => { t1 = new Date().getTime(); }); util.Aspect.addAfter(targetClass, methodName, isStatic, () => { t2 = new Date().getTime(); console.log("t2---t1 = " + (t2 - t1).toString()); }); } // Add the logic for printing the execution time to the doSomething instance method of Test addTimePrinter(Test1, 'doSomething', false); new Test1().doSomething() // Add the logic for printing the execution time to the test static method of the test addTimePrinter(Test1, 'test', true); Test1.test()

Avoid using the instrumentation approach in collecting execution statistics on functions executed in multiple threads. This is because concurrent access to the method count variable or execution time variable may lead to write conflicts.
Scenario 3: Validating Method Return Values
When using methods provided by third-party libraries in your application, you are advised to validate their return values.
[h2]When to Use
In the callback parameters of addAfter, the second parameter represents the return value of the original method, which can be validated.

The return value from the addAfter callback replaces the return value of the original method.
[h2]How to Develop
- Verify the URL returned by the third-party library method. If the verification fails, an exception is thrown.
// someThirdParty.ets
export class WebHandler {
  getWebAddrHttps(): string {
    let ret = 'http';
    // ...
    return ret;
  }
}
// index.ets import {util} from '@kit.ArkTS'; import { WebHandler } from '../components/someThirdParty'; @Entry @Component struct Index { build() { // UI code } } util.Aspect.addAfter(WebHandler, 'getWebAddrHttps', false, (instance: WebHandler, ret: string) => { if (!ret.startsWith('https')) { throw Error('Handler\'s method \'getWebAddrHttps\': return value does not start with \'https\''); } // Verification is correct, remember to return the original method's return value. return ret; }); new WebHandler().getWebAddrHttps();
Scenario 4: Validating Member Variables in Methods
During method execution, validate member variables to ensure data integrity and accuracy, which allows potential issues to be detected and handled in a timely manner.
[h2]When to Use
In the callback parameters of the addBefore() API, the first parameter represents the this object of the original method. This parameter allows access to member variables or the invocation of member methods, enabling real-time monitoring and validation of member variables.
[h2]How to Develop
- In the getInfo() method, check whether the name and age attributes of the Person class are normal.
// somePackage.ets
export class Person {
  name: string;
  age: number;
  constructor(n: string, a: number) {
    this.name = n;
    this.age = a;
  }
  getInfo(): string {
    return 'name: ' + this.name + ', ' + 'age: ' + this.age.toString();
  }
}
// index.ets import {util} from '@kit.ArkTS'; import { Person } from '../components/somePackage'; @Entry @Component struct Index { build() { // UI code } } // Verify the name and age members util.Aspect.addBefore(Person, 'getInfo', false, (instance: Person) => { if (instance.name.length == 0) { throw Error('empty name'); } if (instance.age < 0) { throw Error('invalid age'); } }); new Person('c', -1).getInfo();
Scenario 5: Replacing Method Implementation
In some cases, replacing the original method is necessary to ensure the proper working and performance optimization of the application. For example, the original method implementation may call a deprecated API, or its performance may need improvement.
[h2]When to Use
In the parameters of the replace() API, the fourth one is the callback function, which replaces the original method. The first parameter of the callback function is the this object, and subsequent parameters are the parameters of the original method. Through the callback parameters of the replace() API, you can access all the execution context of the original method, allowing for complete control and customization of the original method's execution process.
[h2]How to Develop
- Modify the log printing in the foo() method.
export class Test2 {
  foo(arg: string) {
    console.log(arg);
  }
}
// index.ets import {util} from '@kit.ArkTS'; import { Test2 } from '../components/somePackage'; @Entry @Component struct Index { build() { // UI code } } new Test2().foo('123'); // [LOG]: "123" // replace the original method util.Aspect.replace(Test2, 'foo', false, (instance: Test2, arg: string) => { console.log(arg + ' __replaced implementation'); }); new Test2().foo('123'); // [LOG]: "123 __replaced implementation"
Scenario 6: Replacing the Method Implemented by a Child Class
When a child class calls a parent class method, and there is a need to modify the implementation of the child class method, it should be done in a way that does not affect the parent class. This ensures that other child classes inheriting from the same parent class remain unaffected.
[h2]When to Use
By using the replace() API with the child class as the targetClass parameter, you can replace the method implementation in the child class.
The underlying principle of this operation is based on the JavaScript prototype chain mechanism. Through the replace() API, the new function is placed on the prototype of the child class. As a result, when the child class method is executed, the prototype chain first searches the child class prototype for the new function to execute, instead of executing the parent class method. This ensures that other child classes inheriting from the same parent class remain unaffected.
[h2]Case 1: Replacing the Method Implementation of a Specific Child Class
- A Base class has two child classes, Child1 and Child2, both of which inherit the foo() method. This example demonstrates how to modify the foo() method implementation of Child1 without affecting the foo() method of Base and Child2.
// base.ets
export class Base {
  foo() {
    console.log('hello');
  }
}
// child1 import {Base} from './base'; export class Child1 extends Base {}// child.ets import {Base} from './base'; export class Child extends Base { // Inherit the getCurrentLocation method of the parent class }
[h2]Case 2: Optimizing Real-Time Location Acquisition
- The Child class inherits the getCurrentLocation() API from the Base class. However, during testing, it was found that this API is called too frequently in the Child class, which could lead to performance issues or excessive resource usage. To reduce system API calls, the implementation of the API in the Child class was replaced by introducing a caching mechanism. The specific implementation is as follows: If the time since the last call is less than 60 seconds, the cached location data is returned. If more than 60 seconds have passed, the system API is called to obtain new location data, which is then stored in the cache for future use.
import { geoLocationManager } from "@kit.LocationKit";
export class Base1 {
  getCurrentLocation() {
    return geoLocationManager.getCurrentLocation();
  }
}
// child.ets import {Base1} from "./base"; export class Child extends Base1 { // inherit the getCurrentLocation method from the parent class }// index.ets import { util } from '@kit.ArkTS'; import { geoLocationManager } from "@kit.LocationKit"; import { Child } from '../components/child'; @Entry @Component struct Index { build() { // UIcode } } let cached_location: Object | undefined; let time: number | undefined; util.Aspect.replace(Child, 'getCurrentLocation', false, () => { let newTime = new Date().getTime(); // Real-time location can be called at most once per minute. if (!cached_location || !time || newTime - time > 60000) { time = newTime; cached_location = geoLocationManager.getCurrentLocation(); } // Return cached location information return cached_location; }); new Child().getCurrentLocation()

If your application needs to access the device location information, it must first apply for required permissions.
- ohos.permission.LOCATION
- ohos.permission.APPROXIMATELY_LOCATION
For details, see Requesting User Authorization.
Scenario 7: Obtaining the Target Bundle Name During Application Startup
During navigation between applications, obtaining the target application's bundle name is necessary to identify and monitor the target application, ensuring the security and accuracy of the navigation process.
[h2]When to Use
In the onCreate() method of EntryAbility, you can instrument the startAbility() method of the UIAbilityContext class to access the bundleName property from the Want parameter. Since UIAbilityContext is a system-provided class and is not exported, it cannot be imported directly. However, it can be accessed through the context member of EntryAbility (inherited from UIAbility). Instrumentation can then be performed within the onCreate() method using this context object. In this way, the target method can be monitored and customized to meet specific requirements.
[h2]How to Develop
- Obtain the class object through the constructor attribute of the class instance.
// EntryAbility.ets
import { AbilityConstant, UIAbility, Want } from '@kit.AbilityKit';
import { hilog } from '@kit.PerformanceAnalysisKit';
import { util } from '@kit.ArkTS';
// Obtain the target package name
export default class EntryAbility extends UIAbility {
  onCreate(want: Want, launchParam: AbilityConstant.LaunchParam): void {
    hilog.info(0x0000, 'testTag', '%{public}s', ' onCreate');
    util.Aspect.addBefore(this.context.constructor, 'startAbility', false,
      (instance: Object, wantParam: Want) => {
        console.info('UIAbilityContext startAbility: want.bundleName is ' + wantParam.bundleName);
      });
    this.context.startAbility(want, () => {})
  }
  // Other related configurations
  // ...
}
Scenario 8: Adding Instrumentation to System SDK APIs
For service requirements, you may need to implement instrumentation or replacement on system SDK APIs. Since util.Aspect requires the instrumentation be performed on classes and class methods, ensure that the parameter is a class that exists at runtime.
[h2]When to Use
The system SDK APIs are exposed in either of the following ways:
- Scenario 1: Directly expose classes and class methods for external calls via class instantiation or instances, such as AppStorage and UIAbilityContext.
- Scenario 2: Declare a namespace and expose methods in it, such as window and router.
In scenario 1, you can pass the class name and class method name to util.Aspect. If the class is not exported and only the class instance is available, you can return the parameter by using the constructor of the instance. For details, please refer to scenario 7.
In scenario 2, you can wrap the API into a class and then use util.Aspect to add instrumentation.
[h2]How to Develop
- In scenario 2, you can encapsulate the relevant window methods requiring instrumentation into a wrapper class, and perform instrumentation on this wrapper class. The following uses window.createWindow() as an example.
// WindowWrap.ets

import { window } from '@kit.ArkUI';
import { util } from '@kit.ArkTS';

export class WindowWrap {
  private static instance: WindowWrap = new WindowWrap();

  private constructor() {
  }

  public static getInstance() {
    return WindowWrap.instance;
  }

  public createWindow() {
    let config: window.Configuration = {
      name: 'test',
      windowType: window.WindowType.TYPE_DIALOG
    }
    window.createWindow(config, () => {
      // do something
    })
  }
}

util.Aspect.addBefore(WindowWrap, 'createWindow', false, (instance: WindowWrap): void => {
  console.info('addBefore createWindow');
})
Appendix: Precautions for Using APIs
- The class to be instrumented usually needs to be imported. For non-exported classes, if an instance of the class is available, the target class can be accessed through the instance's constructor property.
- To ensure proper functioning of the instrumentation APIs, the target method name must not be obfuscated.
- Instrumenting a parent class affects all its child classes. Instrumenting a child class does not affect the parent class (regardless of whether the method is inherited), but it affects all child classes of the child class.
- The fourth parameter of the APIs is the callback function. The first parameter passed to this function is the this object representing the context of the method invocation. If the original method is called using this this object without an exit mechanism, it may lead to infinite recursion. To safely call the original method, store it before the instrumentation. The following example illustrates an undesirable practice:
class Test {
  foo() {}
}
util.Aspect.addBefore(Test, 'foo', false, (instance: Test) => {
  instance.foo();
});
// Infinite recursion
new Test().foo();
The following example illustrates how to safely call the original method:
class Test {
  foo() {}
}
// Save the original method implementation first
let originalFoo = new Test().foo;
util.Aspect.addBefore(Test, 'foo', false, (instance: Test) => {
  // If the original method does not use this, you can directly call the originalFoo () method.
  // If this is used in the original method, bind should be used to bind the instance, but there will be a compilation warning originalFoo.bind (instance);
});
- Method instrumentation and replacement are not recommended for ArkUI structs, which, by design, are unique constructs that lie between functions and classes. Since they undergo intermediate code conversion during compilation, objects and methods present in the development phase may not exist at runtime, resulting in failed instrumentation and replacement. Although underlying implementation of a struct is a class (so using the APIs may not trigger compilation errors), this implementation detail may change in future versions of ArkUI, which could cause unexpected issues. The following is a negative example.
// Counterexample
@Component
struct Index {
  foo() {}
  build() {};
}

util.Aspect.replace(Index, 'foo', false, () => {
  // ...
});
util.Aspect.replace(Index, 'build', false, () => {
  // ...
});
- The return value of the addAfter() callback will override that of the original method. Therefore, ensure that the return value matches the original method's return type. To preserve the original return value, explicitly return the original value (that is, the second parameter of the callback function).
// Example of unrecommended usage:
class Test {
  foo(): string {
    return 'hello';
  }
}

util.Aspect.addAfter(Test, 'foo', false, () => {
  console.log('execute foo');
});

// The correct usage example is as follows:
class Test1 {
  foo(): string {
    return 'hello';
  }
}

util.Aspect.addAfter(Test1, 'foo', false, (instance: Test, ret: string) => {
  console.log('execute foo');
  return ret; // Return the return value of the original method
})
- The APIs are not confined to methods of system-provided classes. As long as the class and its methods exist as actual objects at runtime, and the method's property descriptor has the writable field set to true, the corresponding APIs can be used for instrumentation or replacement.

If the method's property descriptor has writable set to false—such as in scenarios where the method is frozen—then the API cannot operate on that method.
By default, a method's writable property is true.
- Using the Aspect class APIs for instrumentation does not have a significant impact on performance after AOT or JIT compilation.