Overview
Using the smart watch map navigation as a typical example, this topic presents a systematic analysis on the technical solution for map navigation between smartphones and wearables through communications. It details the experience design, solution design, UI development, and functionality development for the collaboration with wearables in map navigation.
- Experience design: key points of experience design for the wearable map navigation from the perspectives of design and interaction.
- Solution design: overall implementation solution of the wearable map navigation from the perspective of the interaction process.
- UI development: key points of UI development for collaborative navigation between smartphones and wearables.
- Functionality development: principles and procedures for developing the core functionalities of the wearable map navigation.
Experience Design
This section describes the experience design for the wearable map navigation from the perspectives of UX design and UI interaction.
[h2]UX Design
UX design involves both smartphones and wearables, the two endpoints for implementing collaborative navigation. The UX design of the smartphones focuses on the map display page, whereas while that for wearables centers on both the map display and navigation pages. The following table describes their details.
Page on the Smartphone | Effect (Smartphone) | Effect (Wearable) |
|---|---|---|
Home screen (map display page) |
|
|
Navigation page | N/A |
|


[h2]UI Interaction
The UI interaction design of the wearable map navigation includes the following key features:
- Navigation reminder: The smart watch vibrates to remind the user.
- Synchronization on both ends: The destination selection is synchronized in real time between both the smartphone and smart watch.
- Always-on display: The smart watch screen is always on during navigation and is turned off after navigation ends.
- Interaction control: The map view can be zoomed in or out by rotating the crown.
Solution Design
This section describes the interaction logic of the wearable map navigation, illustrating its complete implementation process.

UI Development
This section describes the core UI development specifications for collaborative navigation between smartphones and wearables and delves into the key technical points.
[h2]Key Points of UI Development on Smartphones
The key points of UI development on smartphones are as follows:
- Immersive map display: full-screen adaptation and optimized visuals
- Interaction design: operation buttons initiated using sheet transition

For details about how to display an immersive map, see Immersive Window.
For details about how to initiate operation buttons, see Sheet Transition.
[h2]Key Points of UI Development on Wearables
Given the limited screen size of smart wearables and their circular dial design, you have to pay special attention to UI development:
- Content adaptation: Ensure that the displayed content is complete and centered, preventing squeezing or truncation.
- Layout optimization: UX adaptation is required based on the round screen features.

Functionality Development
This section describes how to develop the core functionalities of the wearable map navigation, focusing on the implementations of map operations, interconnection and communication, notifications, and vibration.
[h2]Map Operations
Map operations involve map display and map drawing. For details about map display, refer to Displaying a Map.
Map drawing is implemented through MapComponentController, involving the following core operations:
Map click (marking the destination):
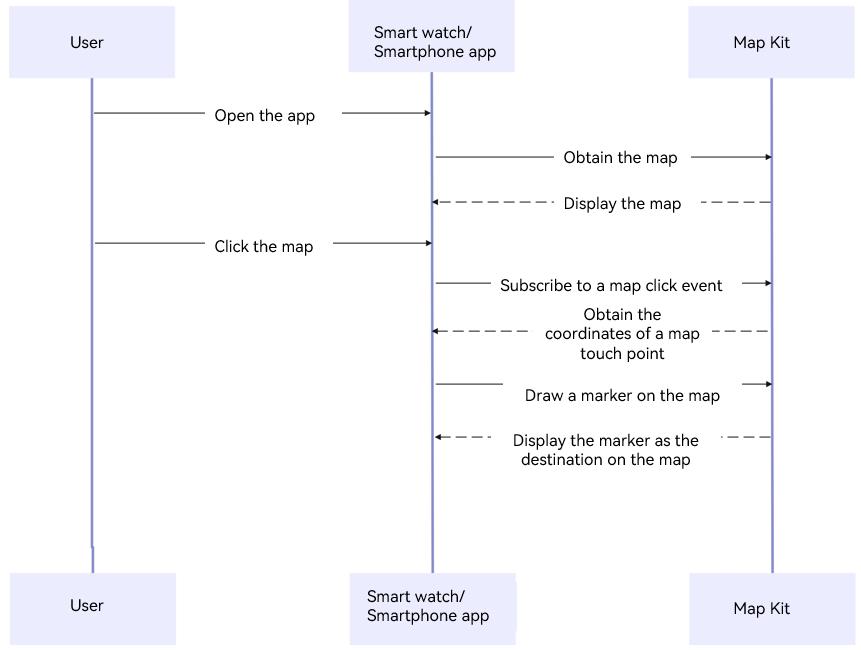
Perform the following steps:
- Register a map click event listener. In the callback, the geographical coordinates of the touch point are persistently stored to the destination_Position status variable.
// Destination location information obtained based on the map click event. @StorageLink('destination_Position') @Watch('changeDestinationPositionMark') destination_Position: mapCommon.LatLng = { longitude: 0, latitude: 0 }; // ... aboutToAppear(): void { // ... // Map initialization callback this.callback = async (err, mapController) => { if (!err) { // ... let mapOnclickCallBack = async (position: mapCommon.LatLng) => { if (this.isStartNavigation) { // If the navigation has started, you are not allowed to click on the mobile phone. this.isBarShow = false; } else { // Send destination information to the watch for synchronization this.connectUtils.sendMessage(JSON.stringify(new CommunicationInformation(1, undefined, position))); // Modify destination_Position to trigger changeDestinationPositionMark // To refresh the destination mark on the map. this.destination_Position = position; this.isBarShow = true; } }; this.mapEventManager.on('mapLoad', mapLoadCallback); this.mapEventManager.on('mapClick', mapOnclickCallBack); } }; // Obtains the connected watch device and subscribes to the watch's message sending event. this.connectUtils.getConnectedDevices(); try { this.connectUtils.notifyClient = wearEngine.getNotifyClient(this.getUIContext().getHostContext()); } catch (err) { hilog.error(0x0000, TAG, `Failed to get notify client. Cause code: ${err.code}, message: ${err.message}`); } } - Listen for the change of destination_Position and call addMarker() to dynamically update the destination map marker.
// Destination location information obtained based on the map click event.
@StorageLink('destination_Position') @Watch('changeDestinationPositionMark') destination_Position: mapCommon.LatLng =
  {
    longitude: 0,
    latitude: 0
  };
// ...
/*
 * Triggered when destination_Position changes.
 * Used to refresh the destination marker on the map when the destination changes.
 */
async changeDestinationPositionMark() {
  if (this.mapController) {
    this.mapController.clear();
    let markerOptions: mapCommon.MarkerOptions = {
      position: this.destination_Position,
      rotation: 0,
      visible: true,
      zIndex: 0,
      alpha: 1,
      anchorU: 0.5,
      anchorV: 1,
      clickable: true,
      draggable: true,
      flat: false,
    };
    try {
      await this.mapController.addMarker(markerOptions);
    } catch (err) {
      hilog.error(0x0000, TAG,
        `Failed to add marker. Cause code: ${err.code}, message: ${err.message}`);
    }
  }
}
Path navigation:
- Generate navigation route information based on the current location and destination.
Button($r('app.string.DrawRoute')) .width(158) .height(40) .onClick(async () => { let params: navi.RouteParams = { origins: [ { latitude: this.myLocation.latitude, longitude: this.myLocation.longitude } ], destination: this.destination_Position, language: 'zh_CN' }; const result = await navi.getWalkingRoutes(params); let drawRouteUtil: DrawRouteUtils = new DrawRouteUtils(); // Draw a route on a map using navigation route information. drawRouteUtil.drawRoute(this.mapController, result.routes[0].steps[0].roads) }) - Draw a visualized route based on the navigation route information by calling addPolyline().
/*
 * Draw a navigation route on a map
 * The first parameter needs to be transferred to MapComponentController to operate the map.
 * The second parameter needs to pass in the navigation information to draw the navigation route.
 * @param mapController : map controller for drawing markers or routes on a map.
 * @param steps : Navigation route information obtained through the Map Kit
 */
async drawRoute(mapController: map.MapComponentController | undefined, steps: Array<navi.RouteRoad>) {
  if (mapController === undefined) {
    hilog.info(0X0000, TAG, 'Drawing failed');
    return;
  }
  let roads: Array<mapCommon.LatLng> = [];
  let des_arr: RouteInfomation[] = [];
  for (let index = 0; index < steps.length; index++) {
    for (let i = 0; i < steps[index].polyline.length; i++) {
      roads.push(steps[index].polyline[i]);
      des_arr.push(new RouteInfomation(steps[index].action as string, steps[index].distance, steps[index].duration))
    }
  }

  // The route segment information is stored in the AppStorage and then sent to the watch through the WearEngine.
  AppStorage.setOrCreate('routeInfomation', des_arr);

  let polylineOption: mapCommon.MapPolylineOptions = {
    points: roads,
    color: 0xFF089C57,
    jointType: mapCommon.JointType.ROUND,
    width: 24
  };

  // Use MapComponentController to draw a route on a map
  mapController.addPolyline(polylineOption).catch((error: Error) => {
    let err = error as BusinessError;
    if (err.code) {
      hilog.error(0x0000, TAG,
        `Failed to add poly line. Cause code: ${err.code}, message: ${err.message}`);
    }
  }).then(() => {
    hilog.info(0X0000, TAG, 'Drawing success');
  });
}

The map implementation depends on the capability of Map Kit. Before using the map, you need to apply for the Map Kit service. For details, refer to Preparations.
[h2]Interconnection and Communication
The wearable map navigation system synchronizes data between two endpoints through the device communication protocol, with messages distinguished by the tag flag in the header. The message types are detailed in the table below.
Message Type | Tag Flag | Functionality |
|---|---|---|
Route information | 0 | Synchronizes navigation route information. |
Destination location | 1 | Synchronizes destination location information. |
Signal information | 2 or more | Sends signal information, such as notifying the smart watch that navigation has started and notifying the smartphone that navigation has ended. |
In the callback function that listens for messages from the peer device (whether a smartphone or smart wearable), the sent messages are transcoded, and data is stored according to the tag flag to support different logics.
/**
 * Callback Method for Listening to Peer Communication.
 */
private onMsgCallback: Callback<wearEngine.P2pMessage> = (data: wearEngine.P2pMessage): void => {
  let str: string = '';
  // Decodes the intercepted content into a character string.
  if (canIUse('SystemCapability.Utils.Lang')) {
    let decoder: util.TextDecoder = util.TextDecoder.create();
    str = decoder.decodeToString(data.content);
  }
  // Convert the JSON character string to the CommunicationInformation type.
  let communicationInformation: CommunicationInformation = JSON.parse(str);
  // Determine the information type based on the tag.
  if (communicationInformation.tag === 0) {
    // When tag is set to 0,Indicates that the transferred information is path description information,
    // which is stored in AppStorage to refresh the watch navigation page.
    AppStorage.setOrCreate('route_information', communicationInformation.routeInfomation);
  } else if (communicationInformation.tag === 1) {
    // When tag is set to 1, Indicates that the transferred information is destination location information
    // and is saved to the AppStorage for synchronizing the destination logo of the mobile phone and watch.
    AppStorage.setOrCreate('destination_Position', communicationInformation.location);
  } else if (communicationInformation.tag === 2) {
    // Signal sent from your phone to your watch when navigation starts, indicating that navigation starts.
    AppStorage.setOrCreate('isStartNavigation', true);
  } else {
    // Signal sent from your watch to your phone when navigation ends, indicating that navigation ends.
    AppStorage.setOrCreate('isStartNavigation', false);
  }
} 
For details about how to connect a smartphone to a smart wearable, see Wearable Application Development and App-to-App Message Communications.
[h2]Notifications
When navigation is initiated, the smartphone is required to send a notification to the smart wearable via the notify() API provided by Wear Engine, informing the smartwatch that navigation has started.
/*
 * Method of notifying a message to watch.
 */
notifyMessage() {
  // Configure the notification content.
  // Including the package name of the notification source, notification title, and notification content.
  let type1Notification: wearEngine.Notification = {
    type: wearEngine.NotificationType.NOTIFICATION_WITHOUT_BUTTONS,
    bundleName: 'com.example.smartwatchmapnavigation',
    title: 'smartwatchmapnavigation',
    text: 'walk navigation start',
  }
  let options: wearEngine.NotificationOptions = {
    notification: type1Notification,
    onAction: (feedback: wearEngine.NotificationFeedback) => {
      hilog.info(0x000, TAG,
        `one button notify get feedback is ${feedback.action ? feedback.action : feedback.errorCode}`);
    }
  }

  // Sends a notification to the watch based on notifyClient.
  // This method can be invoked only by apps on mobile phones.
  this.notifyClient!.notify(this.deviceRandomId, options).then(result => {
    hilog.info(0x000, TAG, `Succeeded in sending notification.`);
  }).catch((error: BusinessError) => {
    hilog.error(0x000, TAG, `Failed to send notification. Code is ${error.code}, message is ${error.message}`);
  })
} 
Notifications depend on the Wear Engine service. For details, refer to Wearable Application Development and Template-based Notifications on Wearable Devices.
[h2]Vibration
During navigation, the smart wearable provides vibration notifications for developers.
// Vibration Tools Class
export class VibratorUtil {
  /*
   * The method of  Vibration.
   */
  Vibrator() {
    try {
      // Use the startVibration method to enable vibration and set the duration.
      vibrator.startVibration({
        type: 'time',
        duration: 1000,
      }, {
        id: 0,
        usage: 'alarm'
      }, (error: BusinessError) => {
        if (error) {
          hilog.error(0x0000, TAG, `Failed to start vibration. Code: ${error.code}, message: ${error.message}`);
          return;
        }
        hilog.info(0x0000, TAG, 'Succeed in starting vibration');
      });
    } catch (err) {
      let e: BusinessError = err as BusinessError;
      hilog.error(0x00000, TAG, `An unexpected error occurred. Code: ${e.code}, message: ${e.message}`);
    }
  }
} 
For details about how to request the permission for using vibration, refer to Vibrator Development (ArkTS).