Overview
The app of multi-target products in HarmonyOS lies in software development and distribution, especially customized development for different user groups and service scenarios. Multi-target products provide a more flexible and efficient development mode, so that apps can better adapt to market requirements and changes. Such custom development can better meet users' personalized requirements and improve user experience.
[h2]Basic Concepts
- target: corresponds to the multi-target product of an HAP/HSP/HAR package. Multiple targets can be defined for each module in a project. Each target corresponds to a custom HAP/HAR package. Through configuration, a different HAP/HAR package can be built for a module.
- product: corresponds to the multi-target product of an app. A HarmonyOS project is built into an app package. Multiple products can be defined for a project, and each product corresponds to a custom app package. Through configuration, multiple app packages can be built for a project.
During the build, the HarmonyOS build system generates build products based on product and target defined in the configuration file. For each target, the build system generates a corresponding HAP/HSP/HAR package. The HAP/HSP/HAR package contains all the code and resources required by the target. For each product, the build system generates an app package that contains all dependent targets. The app package can be released to AppGallery.
[h2]Use Cases
Typical use cases:
- Different user groups: The system allows you to build different app versions for different user groups (such as Chinese and international users). These versions may vary in terms of functions, UIs, and languages to meet the requirements of different user groups.
- Different service scenarios: In different service scenarios, an app may need to provide different functions or resources. For example, an online education app may need to provide learning materials for students and teaching materials for teachers. HarmonyOS allows you to configure different targets to implement differentiated customization.
In the preceding scenarios, you need to modify configuration files such as build-profile.json5 and module.json5 to define different products and targets. These configuration files allow you to specify different device types, source code sets, and resources for each target, and allocate different targets to different products based on service requirements. During the build process, the build tool generates different targets based on the configurations, and then builds different products based on different targets.
The following uses a specific case to describe how to configure different resources and how to build multi-target products.
How to Implement
HarmonyOS multi-target products support multiple types of packages, including HAP (basic unit for app installation, each HAP corresponds to an app module), HAR (static shared package), HSP (dynamic shared package), and App (complete app that can be released by multiple HAPs), to meet app development and customization requirements in different service scenarios.
[h2]Customization Items for Multi-Target Products
The following table lists the customization items supported by multi-target products as well as the corresponding functions. For details about how to configure each customization item, see Configuring Multiple Targets and Products.
Multi-Target Module | Customization Item | Function |
|---|---|---|
HAP | HAP package name (artifactName) | Name of the app package generated by the product. The name can contain digits, letters, hyphens (-), underscores (_), and periods (.). The version number can be entered. |
Device type (deviceType) | Supported device types, such as phones and tablets. | |
Source code set (source) | Source code of the target.
| |
Resource (resource) | Path of the required resource file. Multiple resource file paths can be configured. | |
Distribution rules (distributionFilter) | Distribution rules distributionFilter for targets of the same device type. | |
Subpackages for targets (preloads) | For an atomic service, preloads can be specified for each target. | |
Abilities (icon, label, and launchType) | Icon, name, and launch type of the customized product. | |
SO library dependencies (nativeLib-filter) | Filtering rules for customizing and packaging .so libraries. | |
HAR/HSP | Device type (deviceType) | Supported device types, such as phones and tablets. |
SO library dependencies (nativeLib-filter) | Filtering rules for customizing and packaging .so libraries. | |
Source code set (source) | Source code of the target.
| |
Resource (resource) | Path of the required resource file. Multiple resource file paths can be configured. | |
App | App bundle name and vendor name (artifactName and vendor) | Product name and vendor name. |
bundleName | Bundle name of the project. You can select the corresponding bundle name for signing. If not defined, the default bundle name of the project is used. | |
bundleType | Product type.
| |
Signing configuration (signingConfig) | Signature file customized for a product. | |
App icon and name (icon and label) | Icon and name customized for a product. | |
Dependent modules (modules) | Targets contained in a product. One or more targets can be specified for each product. |
To sum up, the app, HAP, HAR, and HSP packages do not support differentiated customization of all configuration options. Multi-target customization is required based on the supported configuration options during development.
[h2]Build Schematic

As shown in the figure, during HarmonyOS app development, an app usually contains multiple HAR/HAP/HSP modules. Multiple targets can be defined for each HAR/HAP/HSP module by configuring the module-level build-profile.json file. Different resources can be customized for each target (see the preceding description of customization items). Therefore, differentiated targets are formed. For example, through customization, module A generates TargetA-1 and TargetA-2; module B generates TargetB-1, TargetB-2, and TargetB-3; module C generates TargetC-1 and TargetC-2. Configure the project-level build-profile.json file to define multiple products. Each product can depend on different targets and be configured with different app product customization items. Therefore, differentiated products are formed. For example, App-product1 is built based on TargetA-1, TargetB-1, and TargetC-1, and App-product2 is built based on TargetB-3 and TargetC-2. The corresponding customization effect is displayed after you select a product during project build.
[h2]Development Process
- First, break down the requirement and determine the product and target information based on the specific service scenario. That is, determine the products to be built, the targets that each product depends on, and the customization items of each target.
- Customize the content of each target customization item.
- Customize the product customization items and set the targets that the product depends on.
- Customize service logic to implement different target products.
- Select different products to build different target products.
This section describes the process and method of building multi-target products based on a case. In this case, two product projects can be built based on the same set of source code: official version and test version. The implementation effects of the two projects are as follows:
Official version: The resources of the official version and a page redirection button are displayed on the home page of the project. The page is a HAP module page. You can tap the button to go to the customized page of the official version. This page is a HAR module page, which contains a calculator. This calculator supports addition and subtraction.
Test version: The resources of the test version and a page redirection button are displayed on the home page of the project. The page is a HAP module page. You can tap the button to go to the customization page of the test version. This page is an HAR module page, which contains a common calculator. This calculator supports only subtraction.
This case includes the customization items related to the HAP, HAR, and app. The differences are as follows:
Customized Module | Customization items of the Official Version | Customization Items of the Test Version |
|---|---|---|
HAP Module (target) |
|
|
HAR module (target) |
|
|
App project (product) |
|
|
- Break down the requirement and determine the product and target information based on the specific service scenario.
According to the preceding case design and customization item table, two product versions need to be customized, that is, the official version and test version. Each product depends on two modules: a HAP module and a HAR module.
- Customize the target content.
HAP module: Configure the target in the module-level build-profile.json5 file.
"targets": [
  {
    "name": "official",
    "source": {
      "pages": [
        "pages/Index"
      ],
      "sourceRoots": [
        "./src/official_pages"
      ]
    },
    "resource": {
      "directories": [
        "./src/main/official/resources",
        "./src/main/resources"
      ]
    }
  },
  {
    "name": "test",
    "source": {
      "pages": [
        "pages/Index"
      ],
      "sourceRoots": [
        "./src/test_pages"
      ]
    },
    "resource": {
      "directories": [
        "./src/main/test/resources",
        "./src/main/resources"
      ]
    }
  },
]
In the preceding configuration file code, the target name, source code set pages, source code set sourceRoots, and resource file directory of the official and test versions are configured. Therefore, you need to create the configured files and directories in the corresponding directory structure. Based on the preceding configuration, you need to create the Index.ets file in the pages directory, the test_pages and official_pages directories in the src directory, and the test/resources and official/resources directories in the src/main directory.
You can configure multiple resource file directories for different targets. You are advised to place the shared resource files in the default resource file directory and place the differentiated resource files in the customized resource file directory. When configuring the resource directories, add the default resource directory and customized resource directory. In this example, two resource directories are configured for different versions. One is used to store common resources, and the other is used to store differentiated resources of different targets.
If resources with the same name exist in the specified directories, the resources are used based on the sequence in which the directories are configured. For example, if the official/resources and resources directories referenced by the official target contain resource files with the same name, the resources in the official/resources directory will be packaged into the HAP.
* In the configuration file, default is the target generated by default during project creation. Generally, no special processing is required.
HAR module: Configure the target in the module-level build-profile.json5 file.
"targets": [
  {
    "name": "official",
    "config": {
      "buildOption": {
        "arkOptions": {
          "buildProfileFields": {
            "productName": "official"
          }
        },
        "nativeLib": {
          "filter": {
            "excludes": [
              "../libs/arm64-v8a/libentry.so"
            ]
          }
        }
      }
    },
    "runtimeOS": "HarmonyOS",
    "output": {
      "artifactName": "official"
    },
    "source": {
      "sourceRoots": [
        "./src/official_pages"
      ]
    },
    "resource": {
      "directories": [
        "./src/main/official/resources",
        "./src/main/resources"
      ]
    }
  },
  {
    "name": "test",
    "config": {
      "buildOption": {
        "arkOptions": {
          "buildProfileFields": {
            "productName": "test"
          }
        }
      }
    },
    "runtimeOS": "HarmonyOS",
    "output": {
      "artifactName": "test"
    },
    "source": {
      "sourceRoots": [
        "./src/test_pages"
      ]
    },
    "resource": {
      "directories": [
        "./src/main/test/resources",
        "./src/main/resources"
      ]
    }
  }
]
In the preceding configuration file code, the target name, buildProFields custom parameter, product name, source code set sourceRoots, and resource file directory of the official and test versions are configured, and the .so files that do not need to be packaged are deleted from the official version. Similarly, the required file directories need to be created, such as test/resources and official/resources folders in the src/main/ directory of the HAR module, as well as the official_pages and test_pages folders in the src/ directory.
- Customize the product content.
App project: Configure the target in the project-level build-profile.json5 file.
{
  "app": {
    "signingConfigs": [],
    "products": [
      {
        "name": "official",
        "compatibleSdkVersion": "5.0.5(17)",
        "targetSdkVersion": "5.0.5(17)",
        "runtimeOS": "HarmonyOS",
        "buildOption": {
          "strictMode": {
            "caseSensitiveCheck": true,
            "useNormalizedOHMUrl": true
          }
        },
        "bundleName": "com.official.com",
        "bundleType": "app",
        "icon": "$media:startIcon",
        "label": "$string:official_app_name"
      },
      {
        "name": "test",
        "compatibleSdkVersion": "5.0.5(17)",
        "targetSdkVersion": "5.0.5(17)",
        "runtimeOS": "HarmonyOS",
        "buildOption": {
          "strictMode": {
            "caseSensitiveCheck": true,
            "useNormalizedOHMUrl": true
          }
        },
        "bundleName": "com.test.com",
        "bundleType": "app",
        "icon": "$media:app_icon",
        "label": "$string:test_app_name"
      },
      {
        "name": "default",
        "compatibleSdkVersion": "5.0.5(17)",
        "targetSdkVersion": "5.0.5(17)",
        "runtimeOS": "HarmonyOS",
      }
    ],
    "buildModeSet": [
      {
        "name": "debug",
      },
      {
        "name": "release"
      }
    ]
  },
  "modules": [
    {
      "name": "entry",
      "srcPath": "./entry",
      "targets": [
        {
          "name": "official",
          "applyToProducts": [
            "official"
          ]
        },
        {
          "name": "test",
          "applyToProducts": [
            "test"
          ]
        }
      ]
    },
    {
      "name": "myhar",
      "srcPath": "./myhar"
    }
  ]
}
In this configuration file, the product name, product bundle name (bundleName), signing configuration, app icon, and dependent target are configured. Note that the dependencies must be configured for the module that references the HAR module. In this example, the HAR package is called in the entry module. Therefore, you need to configure dependencies in the corresponding oh-package.json5 file.
- Customize service logic to implement different target products.
- Use the differentiated code spaces configured in sourceRoots to implement the multi-target title (code file).


In the preceding configuration file, the source code set sourceRoots of the HAP module is configured, and their official version and test version correspond to src/official_pages and src/test_pages respectively.
Create an .ets file with the same name and a method of the same type in the corresponding sourceRoots directory. For example, the VersionInfo.ets file is created in the example. Add the following code:
src/official_pages/VersionInfo.ets
export const getName = () => "This is official version."
export const getTitleName = () => $r('app.string.title')
src/test_pages/VersionInfo.ets
export const getName = () => "This is test version."
export const getTitleName = () => $r('app.string.title')
In the Index.ets file, you can use import packageName without sourceRoot to implement differentiated build under different targets (import xxx from '<packageName>/sourceFileName'). For details about this capability, see sourceRoots.
import { MainPage } from 'myhar' import { getName, getTitleName } from 'entry/VersionInfo' @Entry @Component struct Index { @State message: string = getName(); @State titleMessage: Resource = getTitleName(); build() { Column() { Column() { Text(this.titleMessage) .height(40) .fontSize(30) .fontWeight(FontWeight.Medium) Text(this.message) .fontSize(14) .fontWeight(FontWeight.Normal) .fontColor(Color.Black) .opacity(0.6) .height(19) .margin({ top: 2 }) } .height(78) .width('100%') .alignItems(HorizontalAlign.Start) .padding({ left: 12, right: 12, top: 8, bottom: 12 }) Row() { MainPage() .backgroundColor('#F1F3F5') } .layoutWeight(1) } .width('100%') .height('100%') .backgroundColor('#F1F3F5') .expandSafeArea([SafeAreaType.SYSTEM], [SafeAreaEdge.TOP, SafeAreaEdge.BOTTOM]) } } - Reference differentiated resources in the HAR module to implement the multi-target effect of resources on the page.

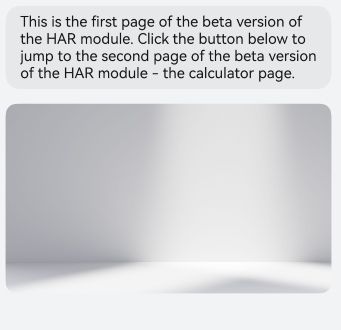
In the preceding configuration file, the resource file paths for the HAR module are configured, with the official version mapping to src/main/official/resources and the test version to src/main/test/resources.
Add the image resource with the same name and JSON string to the corresponding resource file directory. For example, add the HarImage.jpg image with the same name (but different image content) to the media file in the resource file directory, and add the title_description parameter with the same name (but a different value) to the string.json file in the element file.
Directly reference the resource with the same name on the page. The code is as follows:
TextArea({ text: $r('app.string.title_description') }) .fontSize(16) .width('100%') .fontColor('#e6000000') .fontWeight(FontWeight.Normal) .borderRadius(16) .focusable(false) Image($r('app.media.HarImage')) .width('100%') .borderRadius(12) .padding({ top: 16 }) - In the HAR module, a user can be redirected to different pages based on different custom parameters to implement the multi-target effect of route.The effect comparison is as follows:Figure 1 Official version
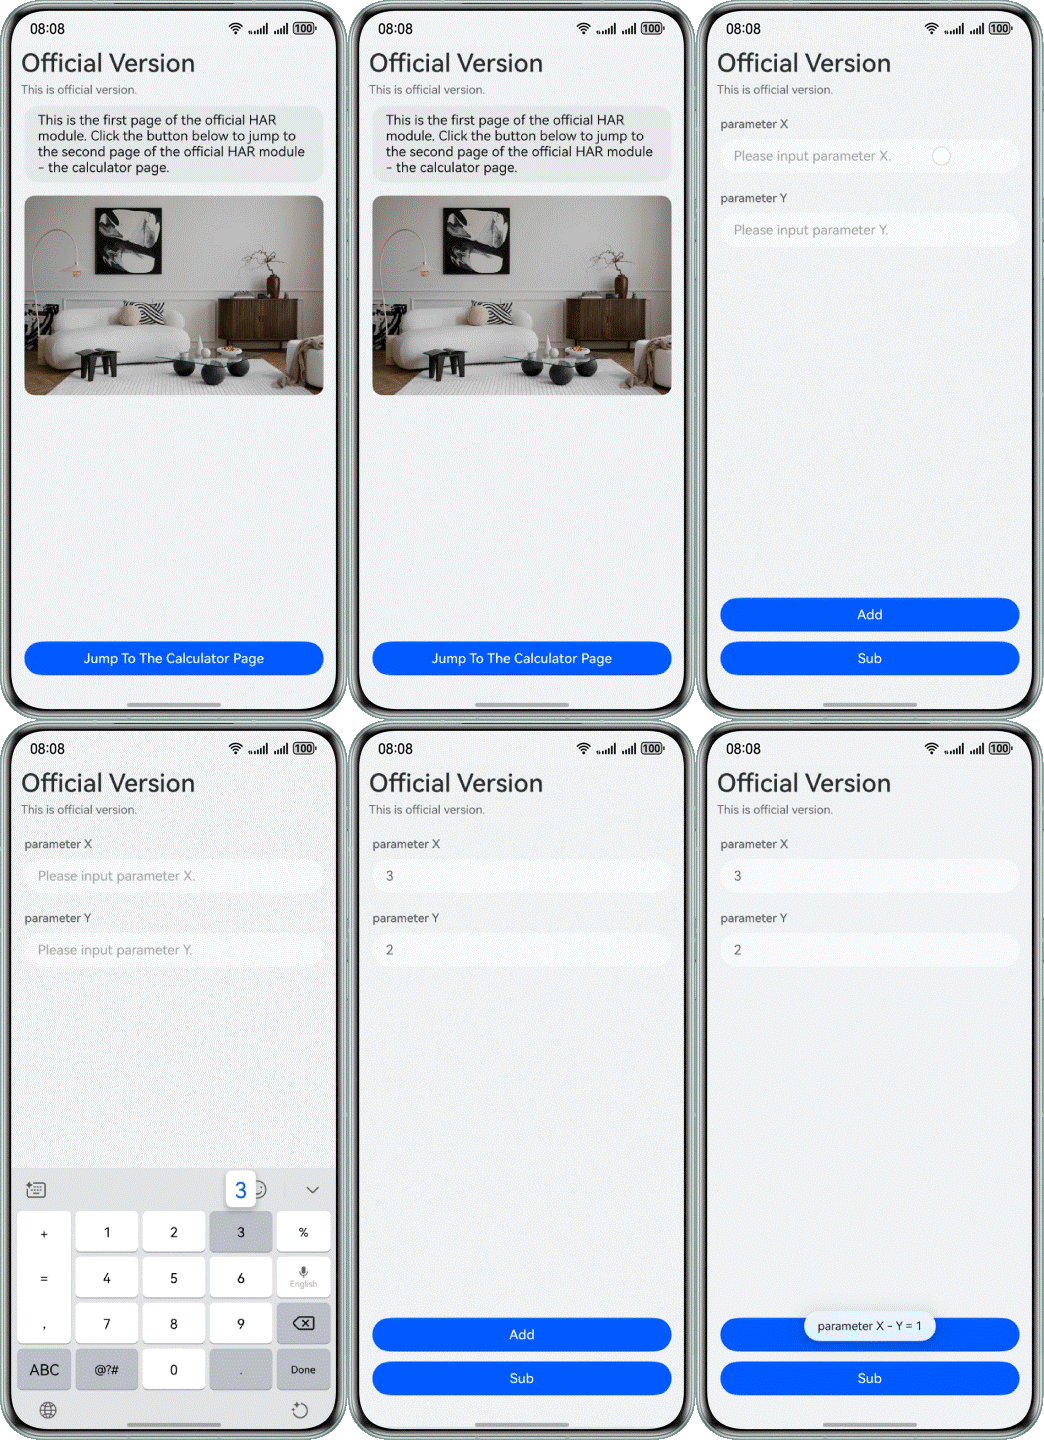 Figure 2 Test version
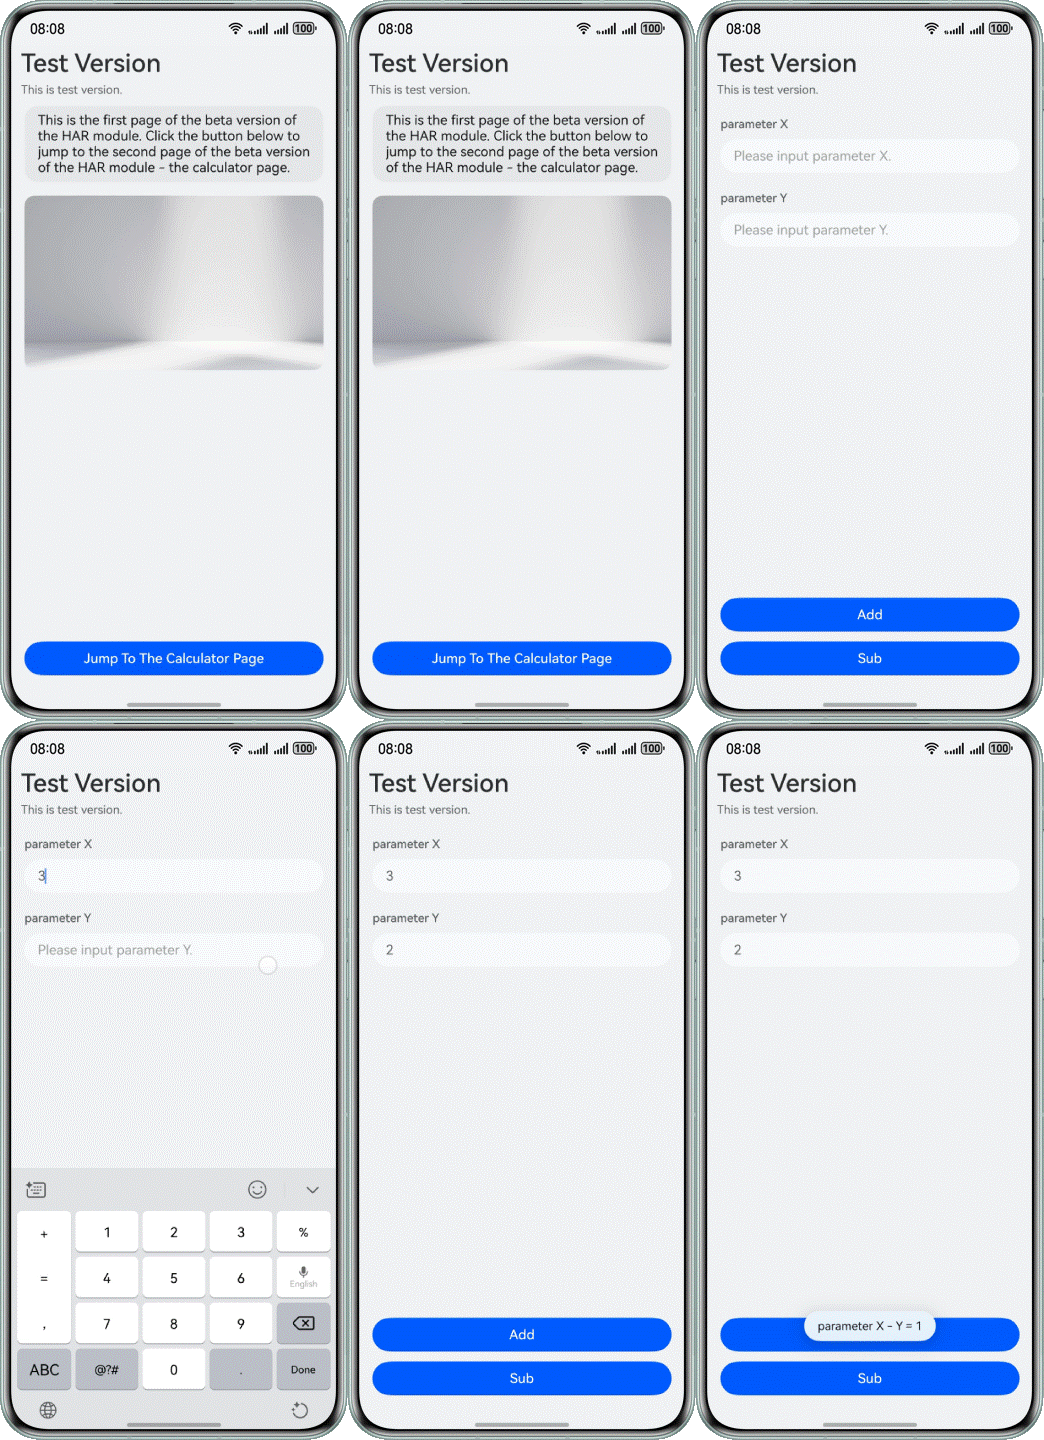
The previous case describes how to call the same-name method of the same-name file in the differential code spaces configured in the sourceRoots directory. The following describes how to call different methods of different files in different targets.
First, generate a BuildProfile.ets file based on the custom parameters configured in the configuration file. In the configuration file of the HAR module, the buildProfileFields custom parameter productName is configured, and it is set to official and test respectively in the official and test versions. In this way, different productName values are generated for different product versions, which are used to distinguish different product versions in the code project.
Then, create different .ets files in the sourceRoots directories of official and test versions and export the corresponding components. In the example, OfficialSecondPages.ets is created in the src/official_pages directory of the HAR module and an OfficialSecond component is exported, create TestSecondPages.ets in the src/test_pages directory and export a TestSecond component. The two components contain different page information.
Import the corresponding method on the home page to implement the redirection logic. The code is shown below:
Import method and component:
import BuildProfile from '../../../../BuildProfile';
import { OfficialSecond } from '../../../official_pages/OfficialSecondPage';
import { TestSecond } from '../../../test_pages/TestSecondPage';
Define the page redirection logic: Different pages are displayed when different parameter values are received.
@Builder
PagesMap(name: string) {
  if (name == 'official') {
    OfficialSecond();
  } else {
    TestSecond();
  }
}
Add the click attribute for the button and pass custom parameters to implement navigation route.
Button($r('app.string.button_describe'))
  .fontSize(16)
  .height(40)
  .width('100%')
  .onClick(() => {
    this.pageInfos.pushPath({ name: BuildProfile.productName });
  })
- Use the differentiated code spaces configured in sourceRoots to implement the multi-target title (code file).
- Select different products to build different target products.Figure 3 Build operations

Click Product (marked as ① in the figure) in the upper right corner of DevEco Studio. Select the corresponding product project in the area marked as ② in the figure. After the project is selected, the dependent target in the file is automatically mapped. Then, click Apply. After the preceding operations are complete, you can click the run button to view the multi-target product effect. The following figure shows the running effect of this case.
Figure 4 Official version Figure 5 Test version

[h2]How Do I Configure Signing Information for Different Products?
Configure the project-level build-profile.json5 file.
Add configuration option signingConfig to each product.

On the Signing Configs tab, click the plus sign (+) to add signing information.
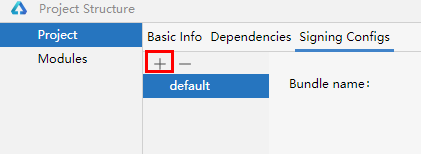
Select the corresponding bundle name and enter the configured signingConfig information (for each product).

Click OK.
