


Intelligent Assistant
Chat with our virtual assistant to get answers promptly.
HarmonyOS Device Connector (hdc) is a command line tool used to interact with devices for debugging, data transfer, log viewing, and application installation. It can run on Windows, Linux, and MacOS to provide efficient and convenient device debugging capabilities.
hdc consists of three parts:
client: A process running on the PC. It starts when you run the hdc command and exits after the command is complete.
server: A background service process running on the PC. It manages data interaction and device discovery between the client process and the daemon process on the device.
daemon: A process running on the device for debugging. It is used to respond to requests sent by server.
The following figure shows the relationship.
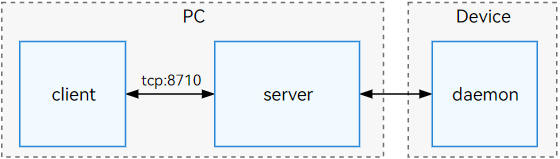
When the client starts, it checks whether the server is running by default. If not, a new hdc process is started as a server process and runs in the background.
When the server is running, it listens for port 8710 on the computer by default. You can set the system environment variable OHOS_HDC_SERVER_PORT to listen for a port number ranging from 1 to 65535.
You can obtain hdc in any of the following ways:
Obtain the hdc tool through HarmonyOS SDK. HarmonyOS SDK is embedded in DevEco Studio. No additional configuration is required. hdc is installed in DevEco Studio/sdk/default/HarmonyOS/toolchains by default. On macOS, the SDK is installed in DevEco Studio/Contents.
Obtain related tools through the SDK directory of Command Line Tools. hdc is installed in Command Line Tools/sdk/default/HarmonyOS/toolchains by default.
hdc supports both USB and wireless connections. You can enable or disable debugging in Settings > System > Developer options on the device. The setting takes effect immediately without restarting the device. If Developer options is not enabled, enable it by referring to Developer Options. For details about the connection mode and procedure, see USB Connection and TCP Connection.
Perform debugging in the installation directory
You can run hdc commands in the toolchains subdirectory of the HarmonyOS SDK to debug devices.
hdc can run independently. You can save the hdc executable file and libusb_shared dependency file in the toolchains subdirectory to a custom directory and run the hdc command in the custom directory to implement independent debugging.
Add hdc to the system environment variables
On Windows:
Press the Windows key, enter Settings in the search box, and click to enter the Settings screen.
Search for Advanced system settings. Choose Environment Variables > System Variables > Path, and click Edit to add the directory of hdc.exe to Path. After the environment variables are configured, restart the computer and run the hdc command in the CLI.
On Linux/macOS:
Start the terminal tool and run the following command:
- echo $SHELL
If the command output is bin/bash, open the .bashrc file.
- vi ~/.bashrc
If the command output is /bin/zsh, open the .zshrc file.
- vi ~/.zshrc
Switch to the English input method and press i to enter the Insert mode.
Add the PATH information to the end of the file.
- export PATH={DevEco Studio}/sdk/default/HarmonyOS/toolchains:$PATH
Replace {DevEco Studio} with the absolute path of the DevEco Studio installation directory, for example, /home/DevEco-Studio.
After the editing is complete, press Esc to exit the Insert mode, input :wq, and press Enter to save the file.
Run the following command for the environment variable to take effect.
If the .bashrc file is opened in 1, run the following command:
- source ~/.bashrc
If the .zshrc file is opened in 1, run the following command:
- source ~/.zshrc
After the environment variables are configured, restart the system.
You can configure system environment variables to modify the listening port of the server process, logging level, or feature switch. For details, see Options.
After the environment variables are configured, restart the CLI or other software that uses HarmonyOS SDK for the new environment variable to take effect.
Global parameters can be added between hdc and the command to be executed. For example, you can use the -t parameter to specify a device to run the command.
- hdc -t connect-key shell echo "Hello world"
| Parameter | Description |
|---|---|
| -t | Connects to a specified target device based on the device ID. This parameter is optional when one device is connected and mandatory when multiple devices are connected. |
| -l | (Optional) Specifies the log level when the device is running. The value ranges from 0 to 6. The default value is 3 (LOG_INFO). |
| -s | (Optional) Specifies the IP and port in IP:port format for listening when the client connects to the server. |
| -p | (Optional) Executes a client command without querying the server process. |
| -m | (Optional) Starts the server process in the foreground. |
| -e | (Optional) Specifies the IP address for listening on the local host when TCP port forwarding is performed. The default value is 127.0.0.1. This parameter must be used together with -m. If the -e parameter is used to specify the listening address, and the address is not the local loopback address (for example, 127.0.0.1), pay attention to the access security. Note: This API is supported since API version 20. |
| Command | Description |
|---|---|
| list targets | Displays all connected target devices. |
| wait | Waits until the device is properly connected. |
| tmode usb | Deprecated since API version 15. It does not operate the device connection channel. Set it through the USB debugging switch in the device settings screen. |
| tmode port | Enables the network connection channel of the device. |
| tmode port close | Disables the network connection channel of the device. |
| tconn | Specifies the device to connect based on IP:port. |
| shell | Runs a command on the device, for example, hdc shell ls. If no command parameter is specified, you can run commands on the device terminal. For details about common debugging tools, see Common debugging tools for shell commands. |
| install | Installs an application. |
| uninstall | Uninstalls a specified application. |
| file send | Sends a local file to a remote device. |
| file recv | Receives a file from a remote device. |
| fport ls | Lists all port forwarding tasks. |
| fport | Sets up a local port forwarding, which forwards data from a local port to a remote port. |
| rport | Sets up a remote port forwarding, which forwards data from a remote port to a local port. |
| fport rm | Deletes a port forwarding task. |
| start | Starts the hdc server process. |
| kill | Terminates the hdc server process. |
| reconnect | Resets the session of the connected USB device and triggers USB re-enumeration. NOTE: This command is supported since API version 26.0.0. |
| hilog | Obtains device log information. |
| jpid | Displays the PIDs of started applications on the device. |
| track-jpid | Displays the PIDs and names of started applications on the device in real time. |
| target boot | Restarts the target device. |
| keygen | Generates a new key pair. |
| version | Displays the hdc version information. You can also run the hdc -v command to display the version information. |
| checkserver | Obtains the version information about the client process and server process. |
| bugreport | Exports system information. |
| spawn-sub | Starts a subserver. NOTE: This command is supported since API version 26.0.0. |
| killall-sub | Terminates a subserver. NOTE: This command is supported since API version 26.0.0. |
To use the USB debugging mode, enable the USB debugging functionality on the device and connect the device to the computer using a USB cable before running the command.
- hdc list targets
- hdc shell echo "Hello world"
hdc can be used with other debugging tools. The following table lists the tools.
| Command | Description |
|---|---|
| aa | Application debugging tool |
| anm | Notification manager |
| atm | Access token manager |
| bm | Bundle manager |
| cem | Common event manager |
| devicedebug | Tool for sending debug signals to applications |
| edm | Enterprise device manager |
| hidumper | System information export tool |
| hilog | Log manager |
| hiperf | Performance analysis tool |
| hitrace | System tracing and collection tool |
| mediatool | Media resource library tool |
| param | Operating system parameter manager |
| power-shell | Device power status conversion tool |
| rawheap-translator | .rawheap file parsing tool |
| uinput | Input simulation tool |
| arkdata | ArkData database debugging tool |
| sqlite | SQLite debugging tool |
| wukong | Wukong stability tool |
| UItest | UI test framework |
| HiSmartPerf Device daemon | HiSmartPerf Device-daemon tool commands |
Display the hdc help information.
- hdc -h [verbose]
- hdc help
| Name | Description |
|---|---|
| -h verbose | Displays the help information about the hdc command. The optional parameter verbose can be used to display detailed help information. |
| help | Displays the help information about the hdc command. |
Return value
| Value | Description |
|---|---|
| OpenHarmony device connector(hdc) ... ---------------------------------global commands:---------------------------------- -h/help [verbose] - Print hdc help, 'verbose' for more other cmds ... (Detailed information is omitted here.) | Help information for hdc commands. |
If an exception occurs, run the hdc kill -r command to terminate the process and restart the hdc service.
If the hdc list targets command cannot obtain the device information, see What should I do if the device cannot be identified.
- hdc list targets [-v]
Parameters
| Name | Description |
|---|---|
| -v | Displays more details about the device. |
Return value
| Value | Description |
|---|---|
| Device ID list | List of IDs of connected devices. You can add the -v parameter to the command to view the following information: device ID, connection mode (TCP/USB), connection status (Unknown/Ready/Connected/Offline/Unauthorized), device name, and hdc identifier. |
| Device ID Unauthorized | The device is unauthorized. |
| [Empty] | No device is found. |
Usage
- $ hdc list targets
- connect-key1
- ...
- $ hdc list targets -v
- connect-key1 USB Connected localhost hdc
- 127.0.0.1:5555 TCP Offline localhost hdc
- connect-key2 USB Offline localhost hdc
- ...
- hdc -t [connect-key] [command]
Parameters
| Name | Description |
|---|---|
| -t | Connects to a specified target device based on the device ID. This parameter is optional when one device is connected and mandatory when multiple devices are connected. |
| command | Command to be executed. |
The connect-key uniquely identifies a device. If the device is connected through USB, the connect-key is the USB SN. If the device is connected over the network, the connect-key is IP:port.
Return value
| Value | Description |
|---|---|
| Normal command output. For details, see Commands. | - |
| [Fail]Not match target founded, check connect-key please. | The -t parameter is used to match the connect-key that does not exist. Check whether the connect-key is correct. |
| [Fail]Device not founded or connected. | The device is not found or connected. |
| [Fail]ExecuteCommand need connect-key? please confirm a device by help info. | Ensure that the device is connected and the debugging functionality is enabled. |
| Unknown operation command... | The command is not supported. |
The error information is for reference only and may be optimized. Do not use the error information for logic judgment of automated scripts or programs. In practice, you are advised to use standard error codes provided by the system. For details, see hdc Error Codes.
Usage
This option must be used with a command. The following uses the shell command as an example.
- $ hdc list targets
- connect-key1
- ...
- $ hdc -t connect-key1 shell echo "hello world!"
- hello world!
- hdc wait # Wait for the device to connect.
- hdc -t [connect-key] wait # Wait for the specified device to connect. Replace connect-key with the specified device ID.
Parameters
| Name | Description |
|---|---|
| -t connect-key | Parameter added in API version 12: Optional when connecting to a single device. Required when connecting to multiple devices. |
Return value
| Value | Description |
|---|---|
| None | The hdc wait command ends when a properly connected device is identified. |
Usage
- # If the device is connected properly, the command executes with no printed output.
- $ hdc wait # Connect to a single device.
- $ hdc -t connect-key1 wait # Use -t to specify the device to be connected when there are multiple devices.
Check the environment
| Item | Normal | Exception Handling |
|---|---|---|
| USB debugging | USB debugging is enabled. | If the USB debugging mode is not automatically enabled, restart the device. |
| USB data cable connection | The PC used for debugging is connected to the device USB port using a USB cable. | If you use a USB cable with low bandwidth and no data communication function, the device may fail to be identified. You are advised to use an original charging cable. |
| USB port | A USB port on the mainboard (USB port on the rear panel of a desktop computer or USB port on a laptop computer) is used. | If you use a conversion adapter, docking station, or USB port on the front panel of a desktop computer, issues such as low bandwidth and USB sync problems may occur, which results in frequent disconnections. Therefore, direct connection between the PC and the device is recommended. |
| hdc environment variable | The help information is displayed after the hdc -h command is executed. | For details, see Environment Setup. |
| Driver | After the device is connected via hdc, HDC Device or HDC Interface is displayed in Device Manager. | For details, see What should I do if the device cannot be identified. |
Procedure
Connect to the device through a USB port.
Run the following command to check the connected device:
- hdc list targets
If the returned information contains the device ID, the USB connection is successful.
After the device is found, run commands to interact with the device. If you want to perform hdc commands without the device ID, ensure that the device is not in TCP connection mode (the device information displayed by running the hdc list targets command does not contain IP:port) and directly connect to the device. For example:
- hdc shell
The TCP debugging mode is not stable. You are advised to use it only in the test environment.
Check the environment
| Item | Normal | Exception Handling |
|---|---|---|
| Network connection | The PC and the device are on the same network. | Connect the PC and device to the same Wi-Fi network. |
| Network Status | Use telnet IP:port to check that the network connection between the PC and the device is normal. | Use a stable network. |
| hdc environment variable | The help information is displayed after the hdc -h command is executed. | For details, see Environment Setup. |
Procedure
Go to Settings > System > Developer options and enable Wireless debugging.
Record the IP address and port number displayed on the device in format IP:port.
Connect to the device over TCP.
- hdc tconn IP:port
If Connect OK is displayed, the connection is successful.
A maximum of 16 connections are supported. If the number of connections exceeds 16, connection blocking occurs. Wait until an existing connection is released before connecting to a new device.
Check the connection.
- hdc list targets
The returned information is in format IP:port.
To disable the TCP connection mode, disable Wireless debugging on the device or disconnect the network.
In a remote connection, the client (typically a local PC) connects over the network to the server (typically a server or development machine connected to the target device) to debug, control, and manage the target device remotely.
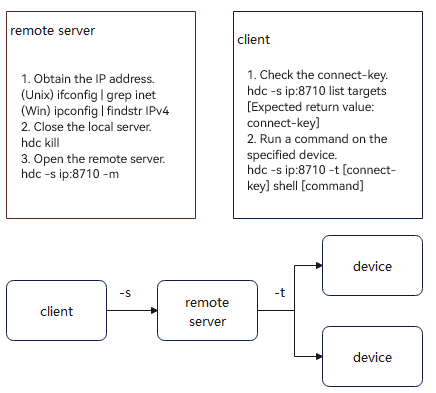
Use the -s parameter to specify the IP address and port number of the server. The setting is valid only when the current command is executed.
- hdc -s [IP:]port [command]
| Command | Description |
|---|---|
| -s | Specifies the IP address and port number of the current server process to listen for. |
Parameters
| Parameter | Description |
|---|---|
| IP | IP address to listen for. Both IPv4 and IPv6 addresses are supported. This parameter is optional. If no IP address is specified, the default IP address 127.0.0.1 is listened for. |
| port | Port to listen for. The value ranges from 1 to 65535. |
| command | Commands supported hdc. For details, see hdc Commands. |
Return value
| Value | Description |
|---|---|
| Connect server failed. | Failed to connect to the server. |
| -s content port incorrect. | The port number is out of range (1 to 65535). |
Usage
- # Run the command to obtain the device information in the server process of 127.0.0.1:8710:
- $ hdc -s 127.0.0.1:8710 list targets
Procedure
Configure the server
After the server is connected to the corresponding hdc device through USB, run the following commands:
- $ hdc kill # Terminate the local hdc service.
- $ hdc -s IP:8710 -m # Enable the hdc service for network forwarding.
- # IP indicates the IP address of the server. To query the IP address, you can run the ipconfig command on Windows and run the ifconfig command on Unix.
- # 8710 is the default port number. You can also set it to another port number, for example, 18710.
- # After startup, the server prints logs.
Connect to the client
Ensure that the client can connect to the server IP address, and then run the following command:
- $ hdc -s IP:8710 [command] # IP indicates the IP address of the server, and 8710 indicates the port number set in step 1.
- # If the port number changes, change the port number in this command accordingly.
- # command can be any available hdc command, for example, list targets.
If the -s parameter is used to specify a server port, the system ignores the port set in the OHOS_HDC_SERVER_PORT environment variable. If the -s parameter is used to specify the server address, and the listening address is not the local loopback address (for example, 127.0.0.1), pay attention to the access security.
The following table lists the commands for switching the connection mode.
| Command | Description |
|---|---|
| tmode usb | This command is invalid and cannot be used to enable the USB connection channel. You need to enable it on the device setting page. |
| tmode port [port-number] | Enables the network connection channel of the device. Then the daemon process on the device restarts, and the established connection is interrupted. You need to reconnect the device. |
| tmode port close | Disables the network connection channel of the device. Then the daemon process on the device restarts, and the established connection is interrupted. You need to reconnect the device. |
| tconn IP:port [-remove] | Connects to a specified device using IP:port and disconnects the device using the -remove parameter. |
You are advised to enable or disable the USB debugging and wireless debugging on the device.
Run the following commands:
- hdc tmode port [port-number]
Parameters
| Parameter | Description |
|---|---|
| port-number | Port number of the connection. The value ranges from 1 to 65535. |
Return value
| Value | Description |
|---|---|
| Set device run mode successful. | The operation is successful. |
| [Fail]ExecuteCommand need connect-key. | Failed to enable the network connection channel because no device exists in the list. |
| [Fail]Incorrect port range. | The port number is out of range (1 to 65535). |
Usage
- $ hdc tmode port 65512
- Set device run mode successful.
Before switching, ensure that the remote device and the local computer are on the same network. You can run the ping command to check the network connection.
On the local PC, run the ping command.
If the remote device returns response packets, the remote device and the local PC are on the same network.
Otherwise, do not run this command.
After the command is executed, the remote daemon exits and restarts. You need to reconnect to it.
Run the following commands:
- hdc tmode port close
Return value
| Value | Description |
|---|---|
| [Fail]ExecuteCommand need connect-key. | The command cannot be executed because the device list is empty. |
Usage
- hdc tmode port close
After the command is executed, the remote daemon exits and restarts. You need to reconnect to it.
Connect to the specified device over TCP.
- hdc tconn IP:port [-remove]
Parameters
| Parameter | Description |
|---|---|
| IP:port | IP address and port number of the device. |
| -remove | An optional parameter used to disconnect a specified device. |
Return value
| Value | Description |
|---|---|
| Connect OK. | Device connected. |
| [Info]Target is connected, repeat operation. | The device is already connected. |
| [Fail]Connect failed. | Failed to connect the specified device. |
Usage
- $ hdc tconn 192.168.0.1:8888
- Connect OK
- # Disconnect from the specified device.
- $ hdc tconn 192.168.0.1:8888 -remove
- hdc shell [-b bundlename] [command]
Parameters
| Parameter | Description |
|---|---|
| -b bundlename | This parameter is added in API version 15. The bundle name of a debug application. - When the command parameter is specified: the command is executed in non-interactive mode in the data directory of the debug application. For details, see Accessing the App Sandbox in CLI Mode. Since API version 26.0.0, this parameter supports the following features: - When the command parameter is omitted, you can enter an interactive shell session in the data directory of the debug application, and the default working directory is the root path of the debug application data directory. - When the [-b bundlename] parameter is omitted, the default execution path is the system root directory. |
| command | A single command to execute on the device. The command varies depending on the system type or version. You can run the hdc shell ls /system/bin command to obtain the supported command list. Currently, most commands are provided by toybox. You can run the hdc shell toybox --help command to obtain the help information. If this parameter is not specified, hdc starts an interactive shell session, in which you can enter commands such as ls, cd, and pwd at the command prompt. |
If the [-b bundlename] parameter is specified, the installed application corresponding to the bundle name must be signed using the debug certificate and started on the device. For details about how to request and use the debug certificate, see Requesting a Debug Certificate.
If both the device system version and the hdc version are earlier than API version 26.0.0, the default working directory of the interactive shell session entered without the command parameter is still the system root directory. You are advised to upgrade the device system version and check version compatibility by referring to hdc Version Mappings. You can run the hdc shell hdcd -v command to query the device system version.
Return value
| Value | Description |
|---|---|
| Command execution result. | Execution result of the command. For details, see the corresponding command output. |
| /bin/sh: XXX : inaccessible or not found. | The specified command is not supported. |
| [Fail]Error information. | The execution fails. For details, see hdc Error Codes. |
Usage
- # Enter the interactive mode to run a command.
- $ hdc shell
- $
- # Run the command in non-interactive mode.
- $ hdc shell "ps -ef | grep hdcd"
- shell 39491 1 1 14:40:58 ? 00:00:00 hdcd
- # Query all available commands.
- $ hdc shell help -a
- ---toybox---------------------------------------------------------------------
-
- usage: toybox [--long | --help | --version | [command] [arguments...]]
-
- With no arguments, shows available commands. First argument is
- name of a command to run, followed by any arguments to that command.
-
- --long Show path to each command
- ...
- # Specify the bundle name of an application to run the command in non-interactive mode in its data directory. The **touch**, **rm**, **ls**, **stat**, **cat** and **mkdir** commands are supported.
- $ hdc shell -b com.example.myapplication ls data/storage/el2/base/
- # Enters the interactive shell session of the app data directory of a specified package name.
- $ hdc shell -b com.example.myapplication
- $ pwd
- ... (The actual output on the device prevails.)
| Command | Description |
|---|---|
| install src | Installs an application. |
| uninstall bundlename | Uninstalls an application. |
The install command of the bm module is integrated into the device, which simplifies the application installation process. You can run the command on the PC to install applications. Run the following commands:
- hdc install [-cwd path|-r|-s|-w waitingTime|-u userId|-p|-g|-h] src
Parameters
| Parameter | Description |
|---|---|
| src | Path of the application installation package. You can install HAP and inter-application HSP. Since API version 22, APP can be installed. |
| -cwd | Modifies the working directory. Used to switch src to the specified path during application installation. For example, the initially installed application is test.hap, whose directory is C:\, and the actual installation package path is C:\test.hap. If -cwd "D:\" is used, the actual installation package path is D:\test.hap. |
| -r | Optional parameter. Overwrites and installs an HAP/HSP. By default, this parameter is omitted, which means overwrite installation. |
| -s | Mandatory when installing an inter-application HSP, and optional in other scenarios. Used to specify the path of the inter-application HSP to be installed. When a directory is specified, each path directory can contain only one HSP. |
| -w | Optional parameter. Specifies the waiting time of the bm tool when installing a HAP. The minimum waiting time is 180s, the maximum waiting time is 600s, and the default value is 180s. |
| -u | Optional parameter. Specifies the user. By default, the application is installed under the current active user. |
| -p | Optional parameter. Specifies the path of the HAP/HSP to be installed. For a multi-HAP/HSP application, you can specify the folder path where multiple HAPs/HSPs are located. Since API version 22, you can specify the path of the APP to be installed, or the path of a folder that contains only one APP. |
| -g | Optional parameter. When installing a debug package, supports user authorization and manual authorization. This parameter takes effect only for debug applications. When a debug application is updated to a release application, the granted user authorization and manual authorization are revoked. Note: This parameter is supported since API version 24. |
| -h | Optional parameter. Displays the help information of the bm module install command. |
Return value
| Value | Description |
|---|---|
| [Info]App install path:XXX msg:install bundle successfully. AppMod finish. | The installation is successful. |
| Error information. | The installation fails. |
Usage
When the install command is executed to use the command parameters of the bm module, if the -w and -u parameters require combined use with their values, you must enclose the parameter variables and their values in quotation marks (for example, "-w 180" and "-u 100"). This prevents command execution failures caused by abnormal parameter parsing.
- # Install the example.hap file.
- $ hdc install D:\example.hap
- [Info]App install path:D:\example.hap msg:install bundle successfully.
- AppMod finish
- # Install the example.app file.
- $ hdc install D:\example.app
- [Info]App install path:D:\example.app msg:install bundle successfully.
- AppMod finish
- # Install the example.hap file (-r is supported by the install command of the bm module, which is used for overwrite installation).
- $ hdc install -r D:\example.hap
- [Info]App install path:D:\example.hap msg:install bundle successfully.
- AppMod finish
- # Install the example.hsp file (-s is supported by the install command of the bm module, which is mandatory for installing the HSP file).
- $ hdc install -s D:\example.hsp
- [Info]App install path:D:\example.hsp msg:install bundle successfully.
- AppMod finish
- # Install the example.hap file (-w is supported by the install command of the bm module, which specifies the wait time of the bm tool).
- $ hdc install "-w 180" D:\example.hap
- [Info]App install path:D:\example.hap msg:install bundle successfully.
- AppMod finish
- # Install the example.hap file (-u is supported by the install command of the bm module, which specifies the user ID).
- $ hdc install "-u 100" D:\example.hap
- [Info]App install path:D:\example.hap msg:install bundle successfully.
- AppMod finish
- # Install the application in D:\hap_dir (-p is supported by the install command of the bm module, which specifies the installation path).
- $ hdc install -p D:\hap_dir
- [Info]App install path:D:\hap_dir msg:install bundle successfully.
- AppMod finish
- # The following is an example of installing the example.hap package. (When the signature certificate type of the install command is debug version application, the user is automatically granted with the permission and can manually set the permission.)
- $ hdc install -g D:\example.hap
- [Info]App install path:D:\example.hap msg:install bundle successfully.
- AppMod finish
The uninstall command is integrated into the bm module on the device, which simplifies the uninstallation process. You can run the command on the PC to uninstall applications. Run the following commands:
- hdc uninstall [-n|-k|-s|-h] bundlename
Parameters
| Name | Description |
|---|---|
| bundlename | Application bundle name. |
| -n | Used to uninstall an application with a specified bundle name. This parameter is optional. |
| -k | Used to uninstall an application with or without retaining the application data. This parameter is optional. By default, the application data is deleted along the uninstall. |
| -s | Used to uninstall an HSP. This parameter is mandatory only for the HSP uninstallation. |
| -h | Used to display the help information about the uninstall command of the bm module. This parameter is optional. |
Return value
| Value | Description |
|---|---|
| [Info]App uninstall path: msg:uninstall bundle successfully. AppMod finish. | The uninstallation is successful. |
| Reason why the uninstallation fails. | The uninstallation failed. |
Usage
- # Uninstall the com.ohos.example file.
- $ hdc uninstall com.ohos.example
- [Info]App uninstall path: msg:uninstall bundle successfully.
- AppMod finish
- # Uninstall the com.ohos.example file (-n is supported by the uninstall command of the bm module, which specifies the bundle name).
- $ hdc uninstall -n com.ohos.example
- [Info]App uninstall path: msg:uninstall bundle successfully.
- AppMod finish
- # Uninstall the com.ohos.example file (-k is supported by the uninstall command of the bm module, which is used to save application data during uninstallation).
- $ hdc uninstall -k com.ohos.example
- [Info]App uninstall path: msg:uninstall bundle successfully.
- AppMod finish
- # Uninstall the com.ohos.example file (-s is supported by the uninstall command of the bm module, which is mandatory during HSP uninstallation).
- $ hdc uninstall -s com.ohos.example
- [Info]App uninstall path: msg:uninstall bundle successfully.
- AppMod finish
| Command | Description |
|---|---|
| file send SOURCE DEST | Sends a local file to a remote device. |
| file recv DEST SOURCE | Receives a file from a remote device. |
Run the following commands:
- hdc file send [-a|-sync|-z|-m|-cwd path|-b bundlename] SOURCE DEST
Parameters
| Name | Description |
|---|---|
| SOURCE | Path of the file to send. |
| DEST | Path of the target file. Since API version 21, some operations on the media library file can be performed through hdc. (In earlier versions, "[Fail]Error opening file: ..." is displayed.) Path of the media library file: /mnt/data/<uid>/media_fuse/Photo/ directory and its subdirectories. <uid> is the ID of the current user. For details about how to operate the media library through hdc, see mediatool. |
| -a | Used to retain the file modification timestamp. |
| -sync | Used to transfer only the files whose mtime is updated. mtime (modified timestamp): timestamp after modification. |
| -z | Used to compress and transmit files in LZ4 format. This parameter is unavailable. |
| -m | Used to synchronize the DAC permission, UID, GID, and MAC permission during file transfer. DAC (Discretionary Access Control): discretionary access control; uid (User identifier): user identifier (or user ID); gid (Group identifier): group identifier (or group ID); MAC (Mandatory Access Control): mandatory access control (or non-discretionary access control). |
| -cwd | Modifies the working directory. This parameter is used to switch the SOURCE to a specified path during file transfer. For example, if the file is test and the directory is /data, the actual file path is /data/test. If -cwd "/user/" is used, the actual file path is /user/test. |
| -b | Used to specify the bundle name of the debug-type application. This parameter is added in API version 15 (If this parameter is used in an earlier version, the message "[Fail]Unknown file option: -b" is displayed). For details, see Accessing the App Sandbox in CLI Mode. |
| bundlename | Bundle name of the debug-type application. |
Return value
| Value | Description |
|---|---|
| FileTransfer finish, Size:1, File count = 1, time:10ms rate:0.00kB/s | A success message is displayed if the file is sent successfully. |
| Reason for the file sending failure | Error information is displayed if the file fails to be sent. |
Usage
- $ hdc file send test /test/
- FileTransfer finish, Size:xxx, File...
- $ hdc file send -b com.example.myapplication test /test/ # Import the test file to the com.example.myapplication sandbox.
- FileTransfer finish, Size:xxx, File...
- $ hdc file send D:\dest\Camera/mnt/data/100/media_fuse/Photo/ # Media library operation. Import all files in D:\dest\Camera to /mnt/data/100/media_fuse/Photo/Camera/.
- FileTransfer finish, Size:xxx, File...
- $ hdc file send D:\dest\New directory/mnt/data/100/media_fuse/Photo/Camera/ # Media library operation. Directories cannot be created in the media library.
- [Fail][E005005] Error create directory: ..., path:/mnt/data/100/media_fuse/Photo/Camera//New directory
Run the following commands:
- hdc file recv [-a|-sync|-z|-m|-cwd path|-b bundlename] DEST SOURCE
Parameters
| Name | Description |
|---|---|
| SOURCE | Destination path on the local device. |
| DEST | Path of the file to send. Since API version 21, some operations on the media library file can be performed through hdc. (In earlier versions, "[Fail]Error opening file: ..." is displayed.) Path of the media library file: /mnt/data/<uid>/media_fuse/Photo/ directory and its subdirectories. <uid> is the ID of the current user. For details about media library operations, see mediatool. |
| -a | Used to retain the file modification timestamp. |
| -sync | Used to transfer only the files whose mtime is updated. mtime (modified timestamp): timestamp after modification. |
| -z | Used to compress and transmit files in LZ4 format. This parameter is unavailable. |
| -m | Used to synchronize the DAC permission, UID, GID, and MAC permission during file transfer. DAC (Discretionary Access Control): discretionary access control; uid (User identifier): user identifier (or user ID); gid (Group identifier): group identifier (or group ID); MAC (Mandatory Access Control): mandatory access control (or non-discretionary access control). |
| -cwd | Modifies the working directory. This parameter is used to switch the SOURCE to a specified path during file transfer. For example, if the initial directory for receiving files is /data/ but -cwd "/user/" is used, the actual directory for receiving files is /user/. |
| -b | Used to send files in the data directory of a specified debug-type application process. This parameter is added in API version 15. For details, see Accessing the App Sandbox in CLI Mode. |
| bundlename | Bundle name of the debug application process. |
Return value
| Value | Description |
|---|---|
| FileTransfer finish, Size:1, File count = 1, time:10ms rate:0.00kB/s | A success message is displayed if the file is received successfully. |
| Reason for the file receiving failure | Error information is displayed if the file fails to be received. |
Usage
- $ hdc file recv /test/test ./
- FileTransfer finish, Size:xxx, File...
- $ hdc file recv -b com.example.myapplication /test/test # Export the sandbox file test/test of com.example.myapplication.
- FileTransfer finish, Size:xxx, File...
- $ hdc file recv /mnt/data/100/media_fuse/Photo/Camera/File A # Export file A.
- FileTransfer finish, Size:xxx, File...
- $ hdc file recv /mnt/data/100/media_fuse/Photo/Camera # Export the Camera directory and files in the directory.
- FileTransfer finish, Size:xxx, File...
To use the [-b bundlename] parameter, ensure that the installed application is signed by a debug certificate and started. For details about how to request and use the debug certificate, see Requesting a Debug Certificate.
Version updates: Since API version 12, Chinese characters can be used as file transfer command parameters, which facilitates the use in multi-language environments.
| Command | Description |
|---|---|
| fport ls | Displays all port forwarding tasks. |
| fport localnode remotenode | Sets a local port forwarding, which listens for requests from the local node and forwards the requests to the remote node. The task format is [/topic/body/section/table/tgroup/tbody/row/entry/b/forwarding {""}) :[/topic/body/section/table/tgroup/tbody/row/entry/b/forwarding/forwarding {""}) (forwarding] (forwarding], for example, tcp:1234. |
| rport remotenode localnode | Sets a remote port forwarding, which listens for requests from the remote node and forwards the requests to the local node. The task format is [/topic/body/section/table/tgroup/tbody/row/entry/b/forwarding {""}) :[/topic/body/section/table/tgroup/tbody/row/entry/b/forwarding/forwarding {""}) (forwarding] (forwarding], for example, tcp:1234. |
| fport rm taskstr | Deletes a port forwarding task. |
Port forwarding type supported by the computer: TCP.
Port forwarding types supported by the device: TCP, dev, localabstract, localreserved, localfilesystem, jdwp, ark.
Query all local and remote port forwarding tasks.
- hdc fport ls
Return value
| Value | Description |
|---|---|
| tcp:1234 tcp:1080 [Forward] | Local port forwarding. |
| tcp:2080 tcp:2345 [Reverse] | Remote port forwarding. |
| [Empty] | No port forwarding. |
Usage
- $ hdc fport ls
- connect-key tcp:2080 tcp:2345 [Reverse]
- connect-key tcp:1234 tcp:1080 [Forward]
Set a local port forwarding, which forwards data from the local node to the remote node.
- hdc fport localnode remotenode
Return value
| Value | Description |
|---|---|
| Forwardport result:OK. | The port forwarding is set up properly. |
| [Fail]Incorrect forward command. | Failed to set up the port forwarding due to parameter errors. |
| [Fail]TCP Port listen failed at XXXX. | Failed to set up the port forwarding because the local port is in use. |
| [Fail]Forward parament failed. | The port forwarding format is incorrect, or the forwarding port protocol or port range is incorrect. |
| [Fail]Not support forward-type. | The current platform does not support the forwarding port protocol used in the parameter. |
Usage
- $ hdc fport tcp:1234 tcp:1080
- Forwardport result:OK
When creating a local port forwarding task, the PC uses the TCP protocol and the specified port. By default, 127.0.0.1:port is listened for. If the -e parameter is used to specify the IP address of the host that to be listened when the service process starts, the PC listens for the IP:port specified by -e.
Set up a remote port forwarding, which forwards data from a remote port to a local port.
- hdc rport remotenode localnode
Return value
| Value | Description |
|---|---|
| Forwardport result:OK. | The port forwarding is set up properly. |
| [Fail]Incorrect forward command. | Failed to set up the port forwarding due to parameter errors. |
| [Fail]TCP Port listen failed at XXXX. | Failed to set up the port forwarding because the local port is in use. |
| [Fail]Forward parament failed. | The port forwarding format is incorrect, or the forwarding port protocol or port range is incorrect. |
| [Fail]Not support forward-type. | The current platform does not support the forwarding port protocol used in the parameter. |
Usage
- $ hdc rport tcp:1234 tcp:1080
- Forwardport result:OK
Delete a specified local port forwarding task or remote port forwarding task.
- hdc fport rm taskstr
taskstr specifies the local or remote port forwarding task to be deleted. You are advised to run the hdc fport ls command to query the task and then delete it.
Parameters
| Parameter | Description |
|---|---|
| taskstr | Port forwarding task, in the format of tcp:XXXX tcp:XXXX. |
Return value
| Value | Description |
|---|---|
| Remove forward ruler success, ruler:tcp:XXXX tcp:XXXX. | The port forwarding is removed successfully. |
| [Fail]Remove forward ruler failed, ruler is not exist tcp:XXXX tcp:XXXX. | Failed to remove the port forwarding task because it does not exist. |
Usage
- $ hdc fport rm tcp:1234 tcp:1080
- Remove forward ruler success, ruler:tcp:1234 tcp:1080
| Command | Description |
|---|---|
| start [-r] | Starts the hdc process. You can use the -r option to restart the process. |
| kill [-r] | Terminates the hdc process. You can use the -r option to restart the process. |
| reconnect connect-key | Resets the session of the target device that has been connected through USB and is managed by the local service process, and triggers USB re-enumeration. connect-key is the USB identifier of the device, which can be queried by running the hdc list targets command. |
| -p | Executes a client command without querying the server process. |
| -m | Starts a server process in the foreground. Foreground startup mode (with the -m parameter): Service logs are printed to the client window in real time. Background startup mode (without the -m parameter): The client does not print service logs. The log content is written to a local disk file. For details about the file storage path, see Server Process Logs. |
| -e | Specifies the local listening IP address in TCP port forwarding. The default value is 127.0.0.1. This parameter must be used together with -m. |
Start the hdc server.
- hdc start [-r]
Return value
| Value | Description |
|---|---|
| No returned information | The server is started successfully. |
Usage
- hdc start -r # Restart the server.
When the hdc server is started and the system does not detect any running server, the log level setting priority is as follows: If the -l parameter and the OHOS_HDC_LOG_LEVEL environment variable are specified in the same command, the environment variable takes effect. If only the -l parameter is specified, the log level specified by it is used. If neither parameter is specified, the server is started at the default log level LOG_INFO.
Run the following commands:
- hdc kill [-r]
Return value
| Value | Description |
|---|---|
| Kill server finish. | The server is terminated successfully. |
| [Fail]Error information. | Failed to terminate the server. |
Usage
- $ hdc kill -r # Terminate and restart the server. You can run the hdc -l 5 kill -r command to view the detailed restart log.
- Kill server finish
- $ hdc kill # Terminate the server.
- Kill server finish
Reset the session and trigger USB re-enumeration for a connected USB device that is managed by the local hdc service process.
Run the following commands:
- hdc reconnect connect-key
Parameters
| Parameter | Description |
|---|---|
| connect-key | USB connection identifier of the target device. You can run the hdc list targets command to query the identifier. |
Return value
| Value | Description |
|---|---|
| Reconnecting connect-key ... | The specified device is being reconnected. |
| Usage: reconnect <target-key> | The connect-key is not specified. |
| Target device connect-key not available | The target does not exist or is not connected. |
| Reconnect only supports USB devices | The current target is not a USB connection and cannot be reconnected. |
Usage
- $ hdc list targets
- connect-key
- $ hdc reconnect connect-key
- Reconnecting connect-key ...
Executes a client command without querying the server process. If the service is not started, running this command does not restart the service. Before using the parameter, ensure that the service has been started. Run the following commands:
- hdc -p [command]
Parameters
| Parameter | Description |
|---|---|
| command | Command to be executed. |
Return value
| Value | Description |
|---|---|
| Connect server failed. | Failed to connect to the server. |
Usage
- $ hdc start # Start the server.
- $ hdc -p list targets # Execute the command without checking.
- connect-key1
- connect-key2
- ...
When a command is executed without the -p parameter specified, the client first checks whether a server process is running locally. If the system does not detect a running server process, the client automatically starts a server process and sets up a connection to transfer commands. If the system detects a running server process, the client directly connects to the server process and transfers commands.
Start the server process in the foreground.
- hdc -m
Return value
| Value | Description |
|---|---|
| Initial failed. | The server process fails to be initialized. |
| [I][1970-01-01 00:00:00.000] Program running. Ver: X.X.Xx Pid:XXX. ... | Logs of the corresponding level are printed to display the activity status of the server. |
Usage
- $ hdc -s 127.0.0.1:8710 -m # Specify the network listening parameters of the current server process and start the server process.
- [I][1970-01-01 00:00:00.000][4f28][xxxx.xxx:123] Program running. Ver: 3.1.0e Pid:12345
- ...
- $ hdc -e 0.0.0.0 -m # Set the local listening IP address to 0.0.0.0 for port forwarding and start the server process.
- [I][1970-01-01 00:00:00.000][4f28][xxxx.xxx:123] Program running. Ver: 3.2.0b Pid:12345
- ...
In foreground startup mode, you can use the -s parameter to specify the network listening parameters of the server. If no IP address and port number are specified using the -s parameter and the environment variable OHOS_HDC_SERVER_PORT is not set, the system uses the default IP address and port number 127.0.0.1:8710. You can also use the -e parameter to specify the IP address for which the local host should listen during port forwarding. If -e is omitted, it defaults to 127.0.0.1.
If the server process is started in the foreground, the default log output level is LOG_DEBUG. To change the log level, use the -l parameter.
Only one server instance is allowed in the running environment. If a server is running, a new server instance cannot be started in the foreground.
| Command | Description |
|---|---|
| hilog [-h] | Displays the log information of the device. You can run the hdc hilog -h command to obtain the supported parameters. |
| jpid | Displays the PIDs of started applications on the device. |
| track-jpid [-a|-p] | Displays the PIDs and bundle names of started applications on the device in real time. Only applications with the debug tag can be debugged. If no parameter is specified, only the PIDs and bundle names of started debug-type applications are displayed. If the**-a** parameter is used, the process tags of debug- and release-type applications are displayed. If the**-p** parameter is used, the process tags of debug- and release-type applications are not displayed. |
| target boot [-bootloader|-recovery] | Restarts the target device. You can use the -bootloader option to enter the fastboot mode and the -recovery option to enter the recovery mode. |
| target boot [MODE] | Restarts the target device. After the device is restarted with the specified parameter, it enters the corresponding mode. MODE is a parameter supported by the reboot command in the /bin/begetctl command. You can run the hdc shell "/bin/begetctl -h | grep reboot" command to view the supported parameters. |
Run the following commands:
- hdc hilog [-h]
Parameters
| Parameter | Description |
|---|---|
| -h | Parameters supported by HiLog. You can run the hdc hilog -h command to obtain the parameter list. |
Return value
| Value | Description |
|---|---|
| Return value | Log information obtained. |
Usage
- $ hdc hilog -h
- Usage:
- -h --help
- Show all help information.
- Show single help information with option:
- ...
Run the following commands:
- hdc jpid
Return value
| Value | Description |
|---|---|
| PID list | PIDs of started applications on the device. |
| [Empty] | No process is started on the device. |
Usage
- $ hdc jpid
- 1234
- 1080
- ...
Display the PIDs and names of the started applications on the device in real time.
- hdc track-jpid [-a|-p]
Parameters
| Parameter | Description |
|---|---|
| Not specified | Displays the PIDs and bundle names of started debug-type applications only. |
| -a | Displays the PIDs, bundle names, and process names of the debug-type and release-type applications, as well as the debug and release tags. |
| -p | Displays the PIDs, bundle names, and process names of the debug and release applications, but does not display the debug and release tags. |
Return value
| Value | Description |
|---|---|
| PID and bundle/process name list | If no parameter is specified, only the PIDs of the started applications are displayed. If the -p parameter is specified, the bundle names of the applications are displayed. If the -a parameter is specified, both debug and release tags are displayed. |
| [Empty] | No application process is opened. |
Usage
- $ hdc track-jpid -a
- 1234 com.example.hello release
- ...
- $ hdc track-jpid -p
- 1234 com.example.hello
- ...
Run the following commands:
- hdc target boot [-bootloader|-recovery]
- hdc target boot [MODE]
Parameters
| Name | Description |
|---|---|
| Not specified | Used to restart a device. |
| -bootloader | Used to restart a device to enter the fastboot mode. |
| -recovery | Used to restart a device to enter the recovery mode. |
| MODE | Used to restart a device to enter the MODE mode. MODE is a parameter supported by reboot in the /bin/begetctl command. |
Usage
- hdc target boot -bootloader # Restart the device to enter the fastboot mode.
- hdc target boot -recovery # Restart the device to enter the recovery mode.
- hdc target boot shutdown # Shut down the device.
| Command | Description |
|---|---|
| keygen FILE | Generates a new key pair and saves the private key and public key to FILE and FILE.pub, respectively. FILE indicates the custom file name. You can specify the directory. The default directory is the current working directory. |
Run the following commands:
- hdc keygen FILE
Parameters
| Parameter | Description |
|---|---|
| FILE | Custom file name. |
Usage
- # Generate the key and key.pub files in the current directory.
- $ hdc keygen key
| Command | Description |
|---|---|
| -v | Prints the client version information. |
| version | Prints the server version information. |
| checkserver | Obtains the client and server process versions. |
Queries the version information of the hdc client process. For details, see hdc Version Mappings. The command format is as follows:
- hdc -v
Return value
| Value | Description |
|---|---|
| Ver: X.X.Xx. | hdc (SDK) client version information. |
Usage
- $ hdc -v
- Ver: 3.1.0e
Queries the version information of the hdc server process. For details, see hdc Version Mappings. The command format is as follows:
- hdc version
Return value
| Value | Description |
|---|---|
| Ver: X.X.Xx. | hdc (SDK) server version information. |
Usage
- $ hdc version
- Ver: 3.1.0e
Run the following commands:
- hdc checkserver
Return value
| Value | Description |
|---|---|
| Client version: Ver: X.X.Xx, Server version: Ver: X.X.Xx. | The client and server versions. |
Usage
- $ hdc checkserver
- Client version: Ver: 3.1.0e, Server version: Ver: 3.1.0e
Run the following commands:
- hdc bugreport [FILE]
Parameters
| Parameter | Description |
|---|---|
| FILE | Specifies the name of the system information file. This parameter is optional. You can specify the storage directory. The default directory is the current working directory. |
Return value
| Value | Description |
|---|---|
| -------------------------------[base]------------------------------- BuildId: xxx ReleaseType: xxx OsVersion: default/default/default/default/xxx DeviceType: default Manufacture: default ----- | Defines a struct for basic device information. |
Usage
- $ hdc bugreport
- -------------------------------[base]-------------------------------
-
- BuildId: xxx
- ReleaseType: xxx
- OsVersion: default/default/default/default/xxx
- DeviceType: default
- Manufacture: default
- -----
Specify the log level at runtime
Specify the hdc log level. The default value is LOG_INFO.
- hdc -l [level] [command]
Parameters
| Parameter | Description |
|---|---|
| [level] | Used to specify the log level at runtime. The level increases with the number. When a log level is set, the current level and lower levels are enabled. For example, if the log level is set to 3, logs of levels 1 to 3 can be printed. 0: LOG_OFF 1: LOG_FATAL 2: LOG_WARN 3: LOG_INFO 4: LOG_DEBUG 5: LOG_ALL 6: LOG_LIBUSB |
| command | Command to be executed. |
When the log level is set to 6 (LOG_LIBUSB), incremental logs related to libusb are generated. The incremental logs are detailed and contain a large amount of data, which helps accurately diagnose USB-related exceptions in server processes. You are advised to set the log level as required. USB-related operations are mainly performed by server processes. Therefore, incremental logs are available only for server processes. Accordingly, the client logs almost do not contain incremental log information.
You can change only the log levels of the current client and server.
Return value
| Value | Description |
|---|---|
| Log information. | Logs of the specified level. |
Usage
- # Run the shell ls command to print logs of the LOG_DEBUG level and lower levels on the client.
- $ hdc -l 5 shell ls
- [D][1970-01-01 00:00:00.000][12dc][xxxx.xxx:123] Mallocchannel:1234567
- ...
- # Start the server in the foreground and specify the log level to LOG_LIBUSB.
- $ hdc kill && hdc -l 6 -m
- Kill server finish
- [I][1970-01-01 00:00:00.000][4f28][xxxx.xxx:123] Program running. Ver: 3.1.0e Pid:12345
- ...
- # Start the server in the background and specify the log level to LOG_LIBUSB.
- $ hdc kill && hdc -l 6 start
- Kill server finish
- [D][1970-01-01 00:00:00.000][12dc][xxxx.xxx:123] Mallocchannel:1234567
- ...
You can use the -m parameter to start the server in the foreground and view its log output directly. To exit the process, press Ctrl+C.
If the server is started in the background, you can view the log output in hdc.log.
Obtain logs
Run the following command to enable the functionality of obtaining logs:
- hdc kill
- hdc -l 5 start
The collected logs are stored in the following path.
| OS | Path | Remarks |
|---|---|---|
| Windows | %temp%\ | Example: C:\Users\Username\AppData\Local\Temp. Replace Username with the actual one. |
| Linux | /tmp/ | - |
| macOS | $TMPDIR/ | You can run the echo $TMPDIR command to view the actual path, and cd $TMPDIR to go to the corresponding directory. |
The log file types are as follows.
| Type | Name Format | Functionality | Remarks |
|---|---|---|---|
| Real-time log | hdc.log | Records server logs in real time. | Each time the hdc server is restarted, the original log is renamed and a new hdc.log is recorded. |
| Temporary historical log | hdc-%Y%m%d-%H%M%S.log | Dumps intermediate files generated during historical log archiving. | For example, if the time is 16:18:57.921 on September 19, 2024, the time format is 20240919-161857921, and the name of the generated temporary log file is hdc-20240919-161857921.log. |
| Archived historical logs | hdc-%Y%m%d-%H%M%S.log.tgz | Compresses and stores historical logs. | The archive file is a compressed file of the .tgz type. You can use a decompression tool to obtain the file. For example, if the temporary name of a historical log file is hdc-20240919-161857921.log, the name of the corresponding archived historical log file is hdc-20240919-161857921.log.tgz. After the archived historical log file is generated, the corresponding temporary historical log file is automatically deleted. |
| Temporary real-time log | .hdc.cache.log | Records temporary caches generated by real-time logs. | - |
Use HiLog to obtain the corresponding logs.
- hdc shell hilog -w start # Enable HiLog log flushing. Executing this command again when the HiLog tool is already enabled will result in an error.
- hdc shell hilog -w stop # Disable HiLog log flushing. Executing this command again when the HiLog tool is already disabled will result in an error.
- hdc shell ls /data/log/hilog # View the flushed HiLog logs.
- hdc file recv /data/log/hilog {local_path} # Obtain the flushed HiLog logs (including kernel logs). {local_path} varies according to the system. Replace it with the actual path.
| Command | Description |
|---|---|
| spawn-sub | Starts a subserver. |
| killall-sub | Stops a subserver. |
This function is supported since API version 26.0.0.
Disconnects the specified USB device from the server on the computer, starts a new subserver process, and connects the USB device to the subserver process. Run the following commands:
- hdc spawn-sub -i connect-key -o [IP:]port
After a subserver process is created, you can use the -s parameter to access the subserver process. For details, see Remote Connection.
Parameters
| Parameter | Description |
|---|---|
| connect-key | ID of the USB device connected to the subserver. |
| IP | IP address to listen for. Both IPv4 and IPv6 addresses are supported. This parameter is optional. If no IP address is specified, the default IP address 127.0.0.1 is listened for. |
| port | Port to listen for. The value ranges from 1 to 65535. |
Return value
| Value | Description |
|---|---|
| Subserver connected successfully | The subserver process has been connected to the USB device. |
| Port binding failed | The subserver process exits due to a port listening failure. |
| USB connection timeout | The subserver process exits due to a timeout in connecting to the USB device. |
| Device not found | The main server process cannot find the device. |
| Invalid parameters | The input parameter of the command is incorrect. |
| USB device disconnected | The USB connection of the subserver process has been disconnected. |
| Only main server can spawn subserver | A new subserver process cannot be created through a subserver process. |
| Subprocess launch failed | Failed to start the child process. |
| Subserver process exited | The subserver process has exited. |
Usage
- $ hdc spawn-sub -i connect-key -o [IP:]port
- Subserver connected successfully
To terminate all started subserver processes, run the following command:
- hdc killall-sub
Return value
| Value | Description |
|---|---|
| Kill subservers finish | All subserver processes have been terminated. |
Usage
- $ hdc killall-sub
- Kill subservers finish
Default value: 8710
Used to set the listening port number when the server is running. This port is used for data communication between the client and the server.
When the server starts, it listens to port 8710 of the PC by default. The client uses TCP to connect to the server through this port. If port 8710 of the PC has been used or you want to use another port, you can add the environment variable OHOS_HDC_SERVER_PORT to the system environment variable to listen for any unoccupied port when the server starts. You can set the port number to a value ranging from 1 to 65535.
For example, set OHOS_HDC_SERVER_PORT to 18710.
Default value: 3
Used to set the log level for the server. For details, see Server Logs.
Default: enabled
Used to set whether to enable the heartbeat functionality for the server and daemon. This functionality is enabled by default.
After the server and daemon are started, they send heartbeat packets to each other and record the heartbeat packets in hdc logs for checking the device connection status.
When the environment variable OHOS_HDC_HEARTBEAT is set to 1 for the server, its heartbeat functionality is disabled. When the device is connected to the PC, the server notifies the daemon that the heartbeat functionality is disabled and does not send heartbeat packets to each other.
When OHOS_HDC_HEARTBEAT is set to other values, the heartbeat functionality is enabled.
Default: disabled
Sets whether to enable the hdc command recording functionality. This functionality is enabled by default. This functionality records only the executed hdc commands but not the command execution results.
When this parameter is set to 1, the command recording functionality is enabled. When it is not set or set to any other number, the command recording functionality is disabled.
This parameter is supported since API version 20.
The recording log files are stored in the following paths:
| OS | Path | Remarks |
|---|---|---|
| Windows | %temp%\hdc_cmd\ | Example: C:\Users\Username\AppData\Local\Temp\hdc_cmd<br/> (Replace the user name with the actual one.) |
| Linux | /tmp/hdc_cmd/ | - |
| macOS | $TMPDIR/hdc_cmd/ | - |
Default: disabled
Used to set the encryption functionality of the TCP connection channel between the server and the daemon. By default, the encryption functionality is disabled.
When this parameter is set to 1, the channel encryption functionality is enabled. When it is not set or set to any other number, this functionality is disabled.
This parameter is supported since API version 20.
When the server is running, it listens for port 8710 of the PC by default. You can customize the listening port by setting the system environment variable OHOS_HDC_SERVER_PORT.
Default: The log flushing function is disabled for the computer-side subserver process.
Sets the maximum number of log files that can be flushed to disks for the computer-side subserver process. The value is an integer ranging from 1 to 20. If the value is greater than 20, the value is automatically truncated to 20. If the value is 0 or a negative number, log flushing is not allowed.
The logs of the subserver process are flushed to the .hdc_subserver directory in the TEMP directory. The location of the TEMP directory varies depending on the platform. For details, see the table in "Obtain logs" under Server Logs.
This parameter is supported starting from API version 26.0.0.
The number of actual log files may be one more than the configured number due to the time sequence relationship between log file creation and aging.
The following example describes how to set environment variables by setting OHOS_HDC_LOG_LEVEL to 5. For details, see Environment Setup.
| OS | Configuration Method |
|---|---|
| Windows | In Settings, search for View advanced system settings. In Environment Variables > System Variables > Path, click Edit to add the environment variable OHOS_HDC_LOG_LEVEL whose value is 5. After the configuration is complete, click OK. Restart the CLI or other software that uses HarmonyOS SDK for the new environment variable to take effect. |
| Linux | Add export OHOS_HDC_LOG_LEVEL=5 to the end of the ~/.bash_profile file, save the file, and run the source ~/.bash_profile command for the current environment variable to take effect. |
| macOS | Add export OHOS_HDC_LOG_LEVEL=5 to the end of the ~/.zshrc file, save the file, and run the source ~/.zshrc command for the current environment variable to take effect. Restart the CLI or other software that uses HarmonyOS SDK for the new environment variable to take effect. |
| hdc Version | API Version | New Features |
|---|---|---|
| 3.1.0a | 12 | The wait command supports the -t parameter. For details, see Waiting for Device Connection. |
| 3.1.0e | 15 or later | - The file send command supports the -b parameter. For details, see Transferring Files. - The file recv command supports the -b parameter. For details, see Transferring Files. - The shell command supports the -b parameter. For details, see Running Interactive Commands. |
| 3.2.0b | 20 | - The port forwarding task can listen for the IP address of the remote host. For details, see Creating a Local Port Forwarding. |
| 3.2.0e | 26.0.0 or later | - The shell command supports the -b parameter. If the command parameter is not specified, the interactive shell session is entered by default. For details, see Running Interactive Commands. |
If the current hdc version is too early, the compatibility of some functionalities may be affected. You can download the latest version based on the API version description.
Symptom
After the hdc list targets command is executed, the command output is [Empty].
Possible Causes and Solution
Scenario 1
Check whether the target device is displayed in Device Manager.
Windows:
Check whether HDC Device (for a single-port device) or HDC Interface (for a composite-port device) exists under Universal Serial Bus Controllers in Device Manager.
Linux:
Run the lsusb command. Check whether HDC Device or HDC Interface is displayed in the command output.
macOS:
Check the system information or system overview of the USB device as follows:
Press and hold the Option key, and click the menu (usually in the upper left corner of the screen).
Choose System Information or System Overview.
Select USB on the left.
Check whether HDC Device or HDC Interface exists in the device tree.
Solution
If the hdc device is not displayed in the preceding environments, it is not correctly identified. You can try the following methods to solve the problem:
Use another physical USB port.
Change the USB cable.
Use another PC.
Enable USB debugging on the device.
When the authorization and trust dialog box is displayed, tap Trust or Always trust.
Restore the device to its factory settings.
Scenario 2
A USB device exists, but the driver is damaged. HDC Device with a warning icon in yellow is displayed.
Symptom: This problem usually occurs in Windows. In Device Manager/Universal Serial Bus Device, HDC Device is displayed with a yellow warning icon, indicating that the device cannot work properly. To resolve the problem, reinstall the driver. If the problem persists, use another USB cable, docking station, or USB port.
To reinstall the driver, perform the following steps:
Open Device Manager, and right-click the HDC Device with a warning icon.
In the displayed menu, choose Update driver.
In the first prompt window, click Browse my computer for drivers.
In the second prompt window, click Let me pick from a list of available drivers on my computer.
In the third prompt window, deselect Show compatible hardware, select WinUsb Device for Manufacture and WinUsb Device for Model, and click Next.
Scenario 3
If "[Fail]Failed to communicate with daemon" is displayed when the device is connected, the possible causes are:
Symptom: After the hdc command is executed on the CLI, "[Fail]Failed to communicate with daemon" is returned.
Possible causes are as follows:
The hdc or SDK does not match the device. If the device is the latest version, update the hdc or SDK tool to the latest version.
The port is occupied.
When hdc and hdc_std use the same port simultaneously, the port set by OHOS_HDC_SERVER_PORT will cause a conflict. (If the variable is not set, the default port 8710 is used, resulting in the same conflict.) This problem also occurs when other software occupies the default hdc port.
Scenario 4
"Connect server failed" is displayed when the device is connected.
The possible causes are as follows:
Port preemption
Solution:
Check the software processes that have the built-in hdc functionality.
If the software (DevEco Studio or DevEco Testing) that has the built-in hdc functionality is running, stop these software processes and run hdc commands.
Check hdc port status.
For example, if OHOS_HDC_SERVER_PORT is set to 8710, run the following commands to check the port status.
Unix:
- netstat -an |grep 8710
Windows:
- netstat -an |findstr 8710
If the port is used by another software, stop the software process or change the OHOS_HDC_SERVER_PORT environment variable to another port number.
Make sure the server of any other version is stopped.
Windows:
Choose Task Manager > Details, right-click the hdc.exe process and choose Open file location. Check whether the location is the same as that configured in the environment variable. If not, stop the hdc.exe process by running the hdc kill command or terminating the process in Task Manager. Then, run the hdc command again. (After the server is stopped, running the hdc command will restart it.)
Unix:
Run the ps -ef |grep hdc command to query the hdc server and check whether the process startup location is the hdc file location set by the environment variable Path. If not, stop the hdc process by running the hdc kill or kill -9 hdc PID command, and run the hdc command again. (After the server is stopped, running the hdc command will restart it.)
Registry exception
Solution: Clear the registry. The procedure is as follows:
Press Win+R to open the Run dialog box, and enter regedit to open the registry.
Enter the following address in the address bar, and press Enter to access the registry of the USB device driver.
- Computer\HKEY_LOCAL_MACHINE\SYSTEM\CurrentControlSet\Control\Class\{88bae032-5a81-49f0-bc3d-a4ff138216d6}
Right-click UpperFilters and choose Modify from the shortcut menu. Back up and clear the value data in the file. If the fault persists, restore the data.
Refresh the Device Manager, remove and reconnect the USB cable to the USB port, or restart the PC.
Symptom
After a non-root user connects the device to the PC through USB on Linux or macOS, the device cannot be found by running the hdc list targets command.
Possible Causes and Solution
By default, a non-root user does not have the permission to operate USB devices. To enable the permission, perform the following steps:
On macOS, stop the hdc service and run the sudo command to restart it.
- sudo hdc kill
- sudo hdc start
On Linux:
To temporarily grant the full operation permission on a USB device, run the following command:
- sudo chmod -R 777 /dev/bus/usb/
To permanently change the operation permission on a USB device, do as follows:
Run the lsusb command to obtain the vendorID and productID of the USB device.
Create an udev rule.
Edit the udev loading rule and replace the default idVendor and idProduct values of the device with the values obtained in the previous step.
MODE="0666" indicates the permissions of GROUP (the user group) for the USB device. Ensure that the login user is in the user group.
- $ sudo vim /etc/udev/rules.d/90-myusb.rules
- SUBSYSTEMS=="usb", ATTRS{idVendor}=="067b", ATTRS{idProduct}=="2303", GROUP="users", MODE="0666"
Restart the computer or reload the udev rule.
- sudo udevadm control --reload
Enabling the USB device operation permission for non-root users can solve the problem that the device cannot be found due to insufficient permission when hdc is used in Linux. However, granting the permission may cause potential security issues. You are advised to evaluate whether to enable the permission based on the application scenario.
Symptom
The hdc commands cannot be executed on the CLI.
Possible Causes and Solution
The operating environment is abnormal.
Linux: 64-bit Ubuntu 18.04 or later is recommended. If a libc++.so reference error occurs, run the ldd or readelf command to check the library reference.
macOS: macOS 11 or later is recommended.
Windows: Windows 10 or Windows 11 64-bit is recommended. If the WinUSB library or driver is missing in an earlier version, use Zadig to update it. For devices that require driver installation, use Zadig to install the libusb-win32 driver. For details, see Zadig.
Improper running mode: Use the correct command to run the hdc tool instead of double-clicking the file.
Symptom
Garbled characters are displayed when the hdc file send/recv command is executed. For example, when the file recv command is used to send a file with a Chinese name from the device to the local host, the error message "[Fail]Error opening file: no such file or directory, path:XXXXX" is displayed, and the path contains garbled characters.

Possible Causes and Solution
Since API version 12, the file transfer command supports Chinese characters in the parameter path. Update the version to the latest version.
Run the hdc checkserver command to check the current version. If the version is earlier than 3.1.0a, upgrade the SDK to API version 12 or later.
Symptom
When the hdc list targets command is executed to query the connected devices, "Unauthorized" is displayed next to the device ID.

Possible Causes and Solution
Unauthorized first connection: After the device is connected and unlocked, the trust confirmation prompt appears. Select Always trust or Trust to complete authorization.
Authorization prompt closed or authorization denied: The authorization prompt on the device will close after timeout, or you may have selected Distrust to reject authorization. To enable the authorization again, go to Settings > System > Developer options > USB debugging/Wireless debugging on the device, disable the debugging function, and then enable it again. Alternatively, run the hdc kill -r command to restart the service process. (If the spawn-sub command has been executed, run the hdc killall-sub command.) Then the trust confirmation prompt appears again. Select Always trust or Trust to complete authorization.
Symptom
When a hdc command is executed, the error message "CryptAcquireContext second failed XXX" is displayed?
Possible Causes and Solution
Modify the registry information in the PC as follows:
Press Win+R to open the Run dialog box, and enter regedit to open the registry.
Enter the following address in the address bar, and press Enter.
Computer\HKEY_LOCAL_MACHINE\SOFTWARE\Microsoft\Cryptography\Protect\Providers\df9d8cd0-1501-11d1-8c7a-00c04fc297eb;
Right-click to create a DWORD (32-bit) value (D), set its name to ProtectionPolicy and value to 1 (hexadecimal), and click OK.
Restart the computer. The problem is solved.
Symptom
When a device is connected using USB, "Unknown USB Device (Device Descriptor Request Failed)" is displayed in Universal Serial Bus controllers of Device Manager on the PC.
Possible Causes and Solution
Go to the Windows Service Management page (by inputting services.msc) and restart the Plug and Play service.
Uninstall the faulty USB device in Device Manager and remove the USB cable.
Restart the computer.
If this problem persists after these steps or after you connect the device to another computer, the driver of the USB device may be faulty. In this case, replace the USB cable.
Symptom
If the hdc command output is not as expected, the possible causes are as follows:
Scenario 1: When the hdc command is executed, the message "Connect server failed" is displayed.
Scenario 2: When the hdc command is executed, the message "connect failed status:-4078" is displayed.
Scenario 3: No output is displayed after the hdc command is executed.
Possible Causes and Solution
To solve the port exception problem, perform the following steps:
Check the software processes that come with hdc, including software with built-in hdc, such as DevEco Studio and DevEco Testing. If such software exists, close it and then run the hdc commands.
Check hdc port status. For example, if OHOS_HDC_SERVER_PORT is set to 8710, run the following command to check the port status.
Unix:
- netstat -an |grep 8710
Windows:
- netstat -an |findstr 8710
If the port is used by another software, terminate the software process or change the OHOS_HDC_SERVER_PORT environment variable to another port number.
Make sure the server of any other version is stopped.
Windows: Choose Task Manager > Details, right-click the hdc.exe process and choose Open file location. Check whether the location is the same as that configured in the environment variable. If not, stop the hdc.exe process by running the hdc kill command or terminating the process in Task Manager. Then, run the hdc command again. (After the server is stopped, running the hdc command will restart it.)
Unix: Run the ps -ef | grep hdc command to query the hdc server process running in the background and check whether the process startup location is the hdc file location set by the environment variable Path. If not, stop the hdc process by running the hdc kill or kill -9 hdc PID command, and run the hdc command again. (After the server is stopped, running the hdc command will restart it.)
Run the hdc list targets command.
Check whether HDC Device exists in device management.
Run the hdc kill command to stop the server and run the hdc -l5 start command to collect logs. (The hdc.log file is stored in the TEMP directory on the execution end. The directory varies depending on the operating system. For details, see Server Logs.)
Locate the problem based on the hdc.log file.
For more FAQs, see FAQs.
Error Message
The sdk hdc.exe version is too low, please upgrade to the latest version.
Symptom
The hdc version is too early. You need to update it to the latest version.
Possible Causes
If the hdc version is earlier than 3.0.0b, authorization is not supported and the client cannot access the system.
Solution
Update the hdc to the latest version by referring to hdc Version Mappings.
Error Message
The device unauthorized.
This server's public key is not set.
Please check for a confirmation dialog on your device.
Otherwise try 'hdc kill' if that seems wrong.
Symptom
The device is not authorized. Check whether the device has been authorized on the trust confirmation prompt. If the device has been authorized, run the hdc kill command and then run the debugging command again.
Possible Causes
Scenario 1: When the device is connected for the first time, the debugging computer is not authorized on the device.
Scenario 2: If the authorization dialog box is displayed and you click Trust instead of Always trust, you need to authorize the device again after reconnecting to the device.
Solution
Scenario 1: In the authorization dialog box displayed on the device, click Trust.
Scenario 2: Go to Settings > System > Developer options on the device, disable and then enable the debugging function, and reconnect the device for authorization. Alternatively, run the hdc kill -r command (or run the hdc killall-sub command if the spawn-sub command has been executed), restart the HDC, and then trigger the authorization dialog box again. In the dialog box, tap Always trust.
Error Message
The device unauthorized.
The user denied the access for the device.
Please execute 'hdc kill' and redo your command,
then check for a confirmation dialog on your device.
Symptom
The device is not authorized. If the device rejects the debugging authorization, run the hdc kill command and run the debugging command again. Then check the trust confirmation prompt on the device.
Possible Causes
The authorization dialog box on the device is automatically closed due to timeout, and the authorization is not confirmed.
You have clicked Don't trust to reject the authorization.
Solution
Go to Settings > System > Developer options, disable and then enable the debugging function, and reconnect the device for authorization. Alternatively, run the hdc kill -r command (if the spawn-sub command has been executed, run the hdc killall-sub command) to restart the HDC, trigger the authorization dialog box again, and click Always trust.
Error Message
The communication channel is being established.
Please wait for several seconds and try again.
Symptom
It indicates that the communication channel is not established and asks you to try again after several seconds.
Possible Causes
The network or USB connection is not established or unstable.
Solution
After the device is connected, wait for about 10 seconds. After the connection is established, debug the device.
Error Message
The current computer has not obtained the permission to debug the control device.
Symptom
The current computer does not obtain the permission to debug the device, and the device rejects the debugging authorization.
Possible Causes
The device cannot be debugged by an unauthorized computer.
Solution
Use a computer that has obtained the debugging authorization.
Error Message
Auth failed, cannt login the device.
Symptom
The public key verification on the device fails, and the current computer is rejected to debug the device.
Possible Causes
Solution
Obtain the public key file for debugging authentication on the device again.
Error Message
For USB debugging, please set it on the device's Settings UI.
Symptom
The hdc tmode command cannot be used to set USB debugging.
Possible Causes
The hdc tmode usb command is deprecated. For details, see Switching Between USB Debugging and Wireless Debugging.
Solution
For details about the tmode usb command, see Switching Between USB Debugging and Wireless Debugging.
Error Message
Unknown command.
Symptom
The hdc tmode command is incorrect.
Possible Causes
Parameters are missing or incorrect in the hdc tmode command.
Solution
Complete the command by referring to Switching Between USB Debugging and Wireless Debugging.
Error Message
USB communication abnormal, please check the USB communication link.
Symptom
The USB communication is abnormal. Check the USB communication link.
Possible Causes
The USB cable is loose or disconnected.
After the hdc shell reboot command is executed, the device restarts and is disconnected. In this case, no action is required.
After the hdc tmode port XXX command is executed, the USB debugging mode is switched to the wireless debugging mode, and the device is disconnected. In this case, no action is required.
Solution
Ensure that the USB cable is securely connected to the device and computer. If the connection is normal but the issue persists, change the USB cable or USB port.
Update the hdc to the latest version by referring to hdc Version Mappings.
Error Message
IP address incorrect.
Symptom
The IP address format is incorrect.
Possible Causes
When the tconn command is used for wireless debugging connection, the input IP address is not in IPv4 format.
Solution
Check whether the input IP address is valid by referring to the correct format 127.0.0.1:8888. If invalid characters exist, correct the IP address and re-establish the connection.
Error Message
Device not found or connected.
Symptom
No connected device is found or the device is not connected.
Possible Causes
The device is disconnected.
Solution
For details, see What should I do if the device cannot be identified.
Error Message
Not support tmode for Emulator.
Symptom
The Emulator does not support the hdc tmode command.
Possible Causes
The Emulator in DevEco Studio does not support the hdc tmode command.
Solution
To use tmode-related commands, connect to a physical device.
Error Message
Terminal hdc process failed, please terminal the hdc process in the task manager first.
Symptom
The server cannot be terminated.
Possible Causes
After the .hdcserver.pid file is deleted, the server cannot be terminated by the hdc kill command because the server PID cannot be obtained.
Solution
Terminate the hdc server in Task Manager.
Error Message
Unsupport command.
Symptom
The command is not supported.
Possible Causes
The device version is too early to support debugging commands.
Solution
Upgrade the device version or check whether the command is correct by referring to hdc Commands.
Error Message
Failed to communicate with daemon.
Symptom
The communication between the server and the daemon on the device is abnormal.
Possible Causes
The USB is disconnected.
The network is unstable over TCP.
Solution
Check and ensure that the device is properly connected.
Check the network status. After the network becomes stable, try again.
Error Message
Invalid bundle name: bundlename.
Symptom
The bundlename specified in the hdc shell [-b bundlename] [command] command does not belong to an installed and started debug-type application, or the application directory does not exist.
Possible Causes
Scenario 1: The specified application is not installed on the device.
Scenario 2: The specified application is not a debug-type application.
Scenario 3: The specified application is not started.
Solution
Scenario 1: Ensure that the application specified in the command has been installed on the device.
Run the hdc shell "bm dump -a | grep bundlename" command to check whether the application corresponding to the bundle name has been installed on the device. The expected result is bundlename.
For example, if the bundle name is com.example.myapplication, run the following command:
- hdc shell "bm dump -a | grep com.example.myapplication"
If the bundle has been installed on the device, the following information is returned:
- com.example.myapplication
Scenario 2: Check whether the application specified by the command is a debug-type application.
Run the hdc shell "bm dump -n bundlename | grep appProvisionType" command. The expected result is "appProvisionType": "debug".
For example, run the following command to check the bundle name com.example.myapplication:
- hdc shell "bm dump -n com.example.myapplication | grep appProvisionType"
If the application is a debug-type application, the following information is displayed:
- "appProvisionType": "debug",
To build a debug-type application, you need to sign the application using a debug certificate. For details, see Requesting a Debug Certificate.
Scenario 3: Ensure that the bundle specified by the command has been started.
After the application starts, the system mounts the corresponding resource directory. You can run the hdc shell "mount |grep bundlename" command to query the resource directory mounting status after the application starts.
For example, to check the bundle name com.example.myapplication, run the following command:
- hdc shell "mount |grep com.example.myapplication"
If the corresponding resource directory has been mounted, mounting information is expected to be returned. (The returned information varies according to the actual mounting status and is not displayed here.)
If the corresponding resource directory is not mounted, no information is returned.
If the corresponding resource directory is not mounted, you can click the application or run the aa command to start the application.
For example, to start the application whose name is com.example.myapplication and module name is EntryAbility, run the following command:
- hdc shell aa start -b com.example.myapplication -a EntryAbility
For details, see aa Commands.
Error Message
Unsupport interactive shell command option.
Symptom
The hdc shell [-b bundlename] [command] command does not support the interactive option.
Possible Causes
The command parameter specified by hdc shell [-b bundlename] [command] cannot be empty.
Solution
Ensure that the command parameter is not empty. For details, see Running Interactive Commands.
Error Message
Unsupport shell option: XXX.
Symptom
The hdc shell [-b bundlename] [command] command contains unsupported parameters, for example, -f and -B.
Possible Causes
The parameters are case insensitive, or unsupported parameters are used.
Solution
Use the command parameters supported by the current version, for example, the -b parameter. For details, see Running Interactive Commands.
Error Message
Device does not support this shell option.
Symptom
The device does not support the hdc shell [-b bundlename] [command] command.
Possible Causes
The device version is too early to support new command parameters.
Solution
Upgrade the device OS to the latest version. For details, see hdc Version Mappings.
Error Message
The parameter is missing, correct your input by referring below: Usage...
Symptom
The** hdc shell xxx** command is not supported on the device.
Possible Causes
The system version of the device is too early to support the new command parameters.
Solution
Upgrade the device OS to the latest version. For details, see hdc Version Mappings.
Error Message
The parameter is missing, correct your input by referring below: Usage...
Symptom
Mandatory parameters are missing in the hdc file send [-b bundlename][SOURCE][DEST] command.
Mandatory parameters are missing in the hdc file recv [-b bundlename][DEST][SOURCE] command.
Possible Causes
When the -b parameter is specified, the bundlename, SOURCE, and DEST parameters are missing. For details about the command, see Transferring Files.
Solution
Ensure that the bundlename, SOURCE, and DEST parameters are not empty.
Error Message
SDK/Device ROM doesn't support -b option.
Symptom
The hdc file send/recv command contains the -b option, but the hdc in SDK or device system version does not support this option.
Possible Causes
Scenario 1: When the hdc file send [-b bundlename] [SOURCE] [DEST] command is executed, the device system does not support the -b option.
Scenario 2: When the hdc file recv [-b bundlename] [DEST] [SOURCE] command is executed, the hdc in SDK does not support the -b option.
Solution
Scenario 1: Upgrade the system to the latest version. For details, see hdc Version Mappings.
Scenario 2: Upgrade the SDK to the latest version. For details, see hdc Version Mappings.
Error Message
Error create directory: xxx, path: xxx.
Symptom
Failed to create a directory.
Possible Causes
When the hdc file send command is executed to send a file, the corresponding directory on the device is an unauthorized directory or a read-only system directory.
Solution
Change the target directory for sending files, and ensure that it has the write permission.
Same as the error code E003001 Invalid Bundle Name.
Error Message
Remote path: xxx is invalid, no such file/directory or it's out of the application directory.
Symptom
The path specified by DEST in the hdc file send [-b bundlename][SOURCE][DEST] command does not exist or exceeds the application data directory.
The path specified by DEST in the hdc file recv [-b bundlename][SOURCE][DEST] command does not exist or exceeds the application data directory.
Possible Causes
Scenario 1: The remote path does not exist.
Scenario 2: The DEST parameter contains the .. redirection symbol. After resolving the path traversal, the actual directory falls outside the application's data root directory.
Solution
Check whether the relative path of the application data directory specified by DEST exists.
Error Message
Not any installation package was found.
Symptom
No installation package is found.
Possible Causes
The installation package parameter is missing when the hdc install command is executed.
Solution
For details, see Managing Applications.
Error Message
Operate need running under debug mode.
Symptom
The command can be executed only in debug mode.
Possible Causes
The command is not supported.
Solution
No operation is required.
Error Message
Operation not allowed.
Symptom
The command operation is not allowed.
Possible Causes
Operations on sensitive files (such as system configuration files and log files) are not allowed.
Solution
No operation is required.
Error Message
-e content IP incorrect.
Symptom
-The IP address specified by -e is incorrect.
Possible Causes
The IP address format is invalid.
Solution
Ensure that the entered IP address is valid and the IP address belongs to the local host.
Error Message
Operation restricted by the organization.
Symptom
The operation is blocked by the organization.
Possible Causes
The hdc client/server debugging functionality in the PC/2-in-1 device is disabled by the organization.
Solution
Contact the organization device administrator to query the hdc debugging policy configuration of the PC/2-in-1 device.