As a tag management system, DTM helps you conveniently manage the tracking tags of your mobile apps. A DTM configuration is a tracking tag management unit mapping an app. A configuration consists of tags for tracking events, conditions for determining when to report events, and variables for simplifying tag and condition management. On the DTM portal, you can create a configuration for your app, add variables, conditions, and tags to the configuration, and create versions for the configurations. Once you have integrated DTM into your app, it will automatically obtain the latest released configuration from the DTM server, and update your tracking tags.
To sign in to the DTM portal, perform the following steps:
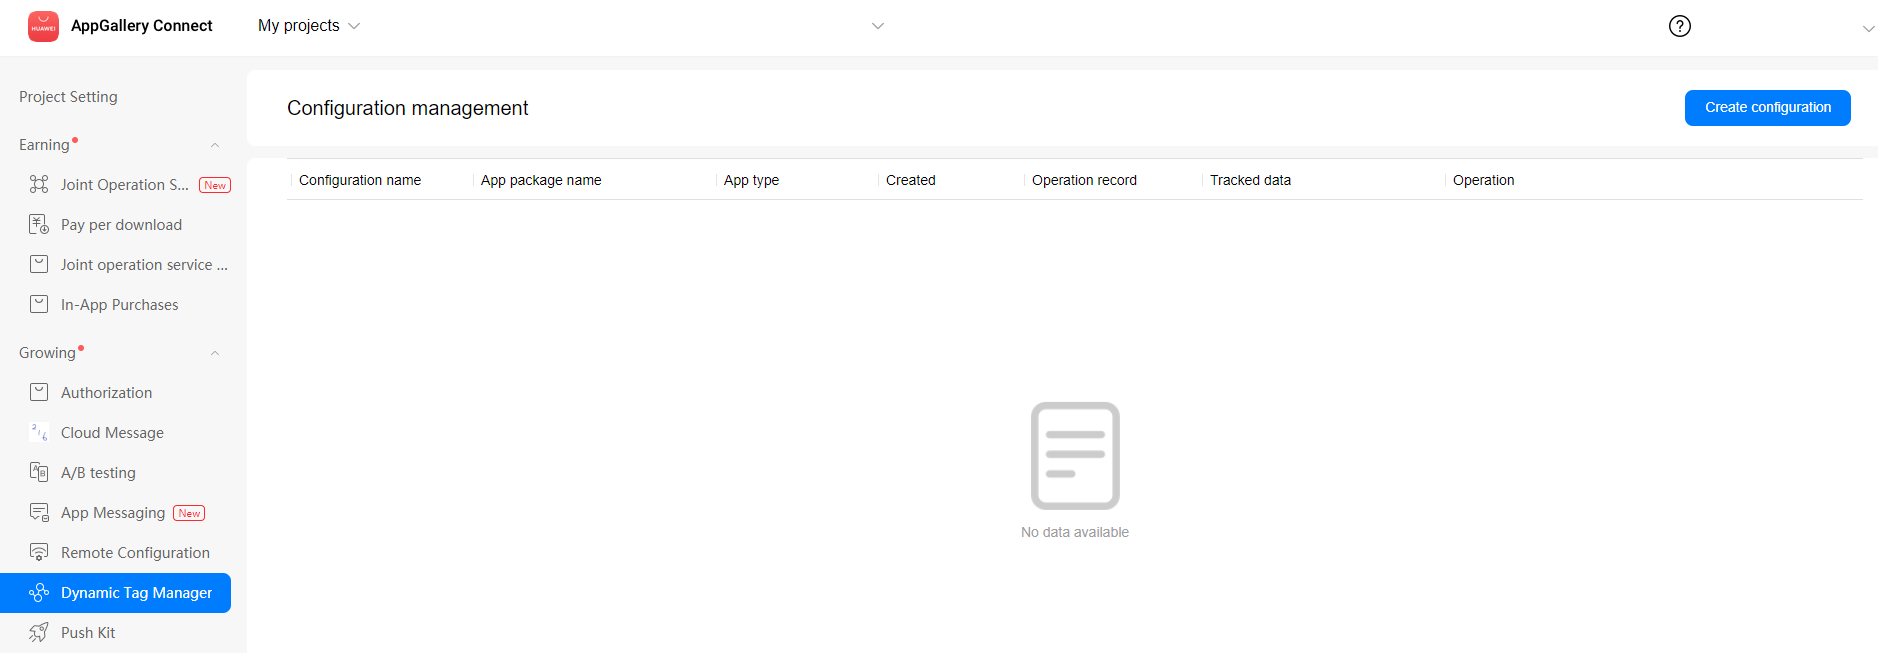
1. Sign in to AppGallery Connect and click My projects.
2. Find your app project and click it.
3. On the Project Setting page, go to Growing > Dynamic Tag Manager.
NOTE:
Only Chrome (recommended), Firefox, and Edge browsers are supported.
Before using DTM, you need to set data storage location for your app. If the data storage location is not set for your app, the system prompts you to set it when you go to the DTM portal.
1. Permission
Managing Permissions
Configuration access is controlled by permission. Only the team owner account and administrator can manage permissions. Other team members have operation permissions corresponding to their roles in the team. For details, please refer to Managing Teams and Roles.
Table1 PermissionsPermission | Description |
View DTM configuration | Allows the team member to view the configuration (including groups, tags, conditions, and variables) of an app. However, the team member cannot modify the configuration. |
Edit DTM configuration | Allows the team member to modify groups, tags, conditions, and variables in the configuration, and create a version. However, the team member cannot release a version. |
Release DTM configuration | Allows the team member to modify groups, tags, conditions, and variables in the configuration, and create and release a version. However, the team member cannot create and delete configurations. |
Manage DTM configuration | Allows the team member to perform all operations on the configuration. |
Table2 Team member permissionsPermission | Account Holder | Administrator | App Administrator | Operations | Development |
View DTM configuration | √ | √ | √ | √ | √ |
Edit DTM configuration | √ | √ | √ | √ | √ |
Release DTM configuration | √ | √ | √ |
|
|
Manage DTM configuration | √ | √ |
|
|
|
2. Configuration
The configuration refers to all DTM resources, including the overview, variables, conditions, tags, groups, versions. Everything you do is done in configuration, so creating configurations is your first step. Configuration management includes managing permissions and importing, exporting, editing, and deleting configurations.
1. Creation: Before using DTM, you need to create a configuration for managing resources.
2. Import: You can import local configuration data to DTM to quickly synchronize it.
3. Export: You can export configuration data of any version or workspace from DTM.
4. Edit: You can change the name and operation record storage duration of a configuration, and specify whether to report data to HUAWEI Analytics.
5. Deletion: You can delete a configuration version that you have not released.
Creating a Configuration
1. Click Create configuration on the DTM portal.
2. In the Create configuration dialog box that is displayed, set Configuration name, App type, Operation record, and Data report.
3. Click OK to create the configuration.
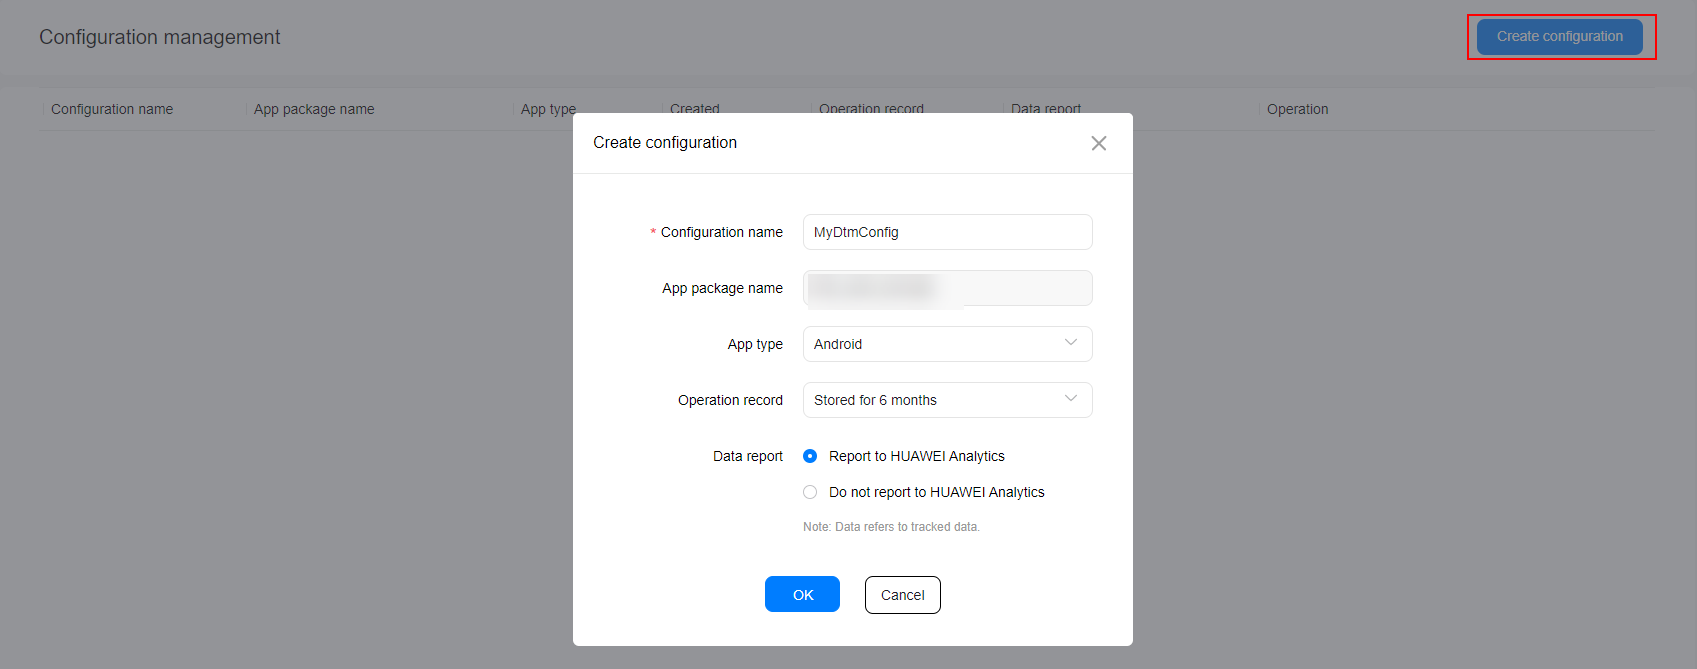
4. After the configuration is created, view it on the Configuration management page. You can click its name to access the configuration page.

NOTE:
Only the team owner account can create configurations.
DTM will automatically fill in the app package name with that entered during app creation. You cannot change the app package name when creating a configuration.
Currently, only Android apps are supported.
You can create only one configuration for an app.
Import a Configuration
You can import a configuration from a specified file to the current draft configuration. During import, the server will verify the format integrity of the imported file. To prevent verification failure, you are advised to import a configuration file exported in Exporting a Configuration.
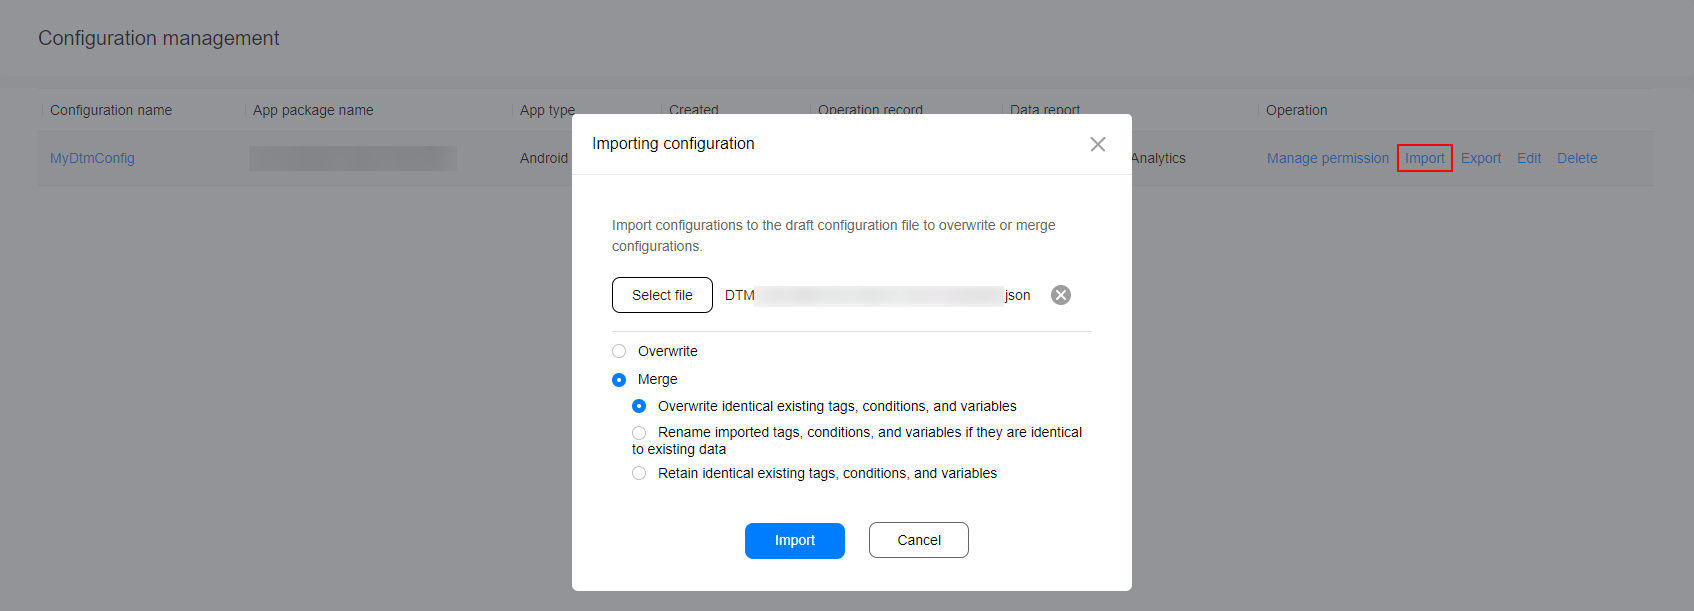
1. Click Import on the Configuration management page.
2. Select a local JSON file, specify an import policy, and click Import.
NOTE:
The imported configuration must contain at least one variable, condition, or tag.
The import policies include Overwrite and Merge. If you select Overwrite, variables, conditions, tags, and groups in the draft configuration will be overwritten with the imported ones.
If you select Merge, you need to further specify the rule for processing variables, conditions, tags, and groups with the same names as existing ones.
Overwriting old content with new one: Overwrites data in the draft with imported data.
Renaming new content: Automatically renames imported data with the same name as existing data and retain both imported data and existing data.
Retaining old content: Discards imported data with the same name as existing data.
Exporting a Configuration
You can export historical configuration or draft configuration to a JSON file. The file can be used to synchronize the configuration between apps or restore the configuration to a historical version. For details, please refer to Import a Configuration.
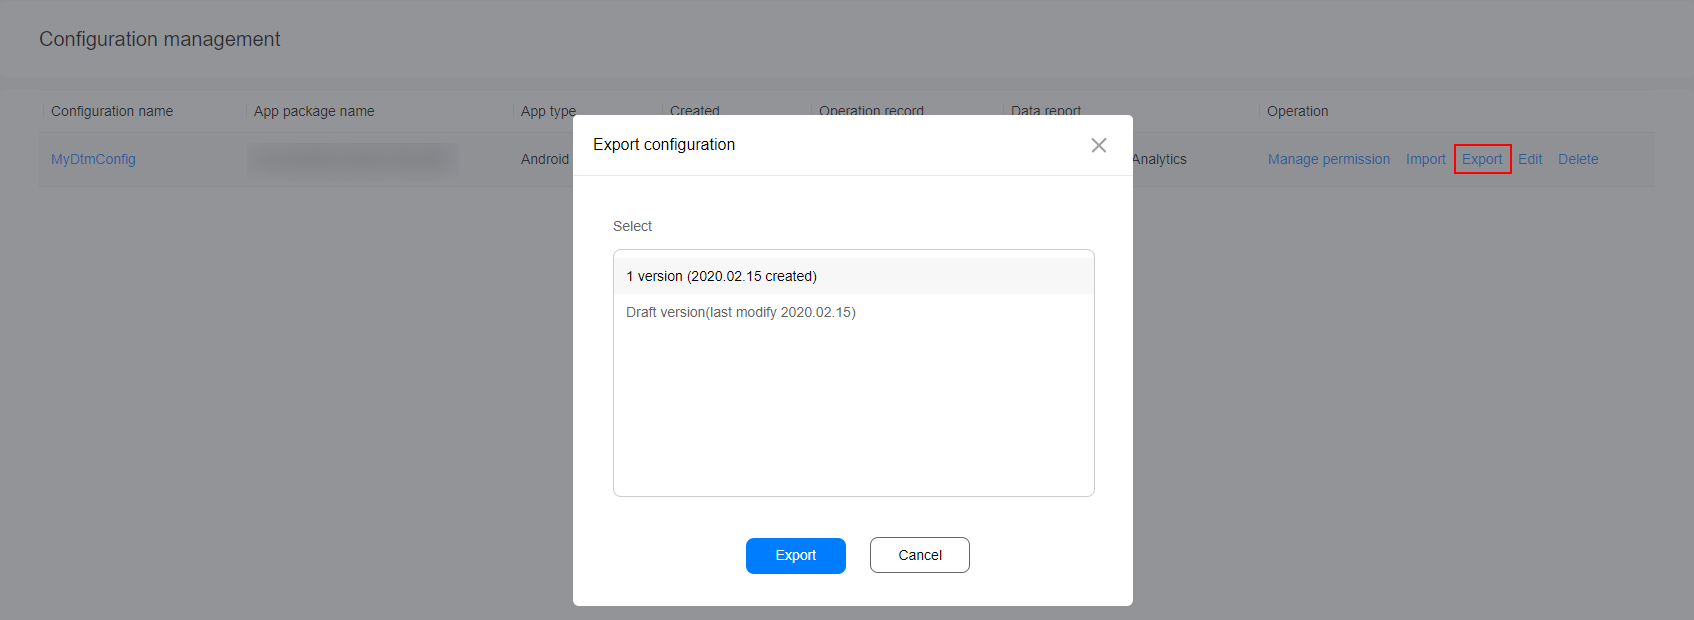
1. Click Export on the Configuration management page.
2. Select a configuration version and click Export to export it.
NOTE:
The Draft version indicates to export data in the current draft configuration, including content modified after new version creation.
Editing a Configuration
After a configuration is created, you can change its name and operation record storage duration.
1. Click Edit on the right of a configuration.
2. Modify the name and operation record storage duration, and click OK.
Deleting a Configuration
1. Click Delete on the right of a configuration on the Configuration management page.
2. Confirm the information in the dialog box and click OK.
NOTE:
If a configuration has a released version, the configuration cannot be deleted.
3. Overview
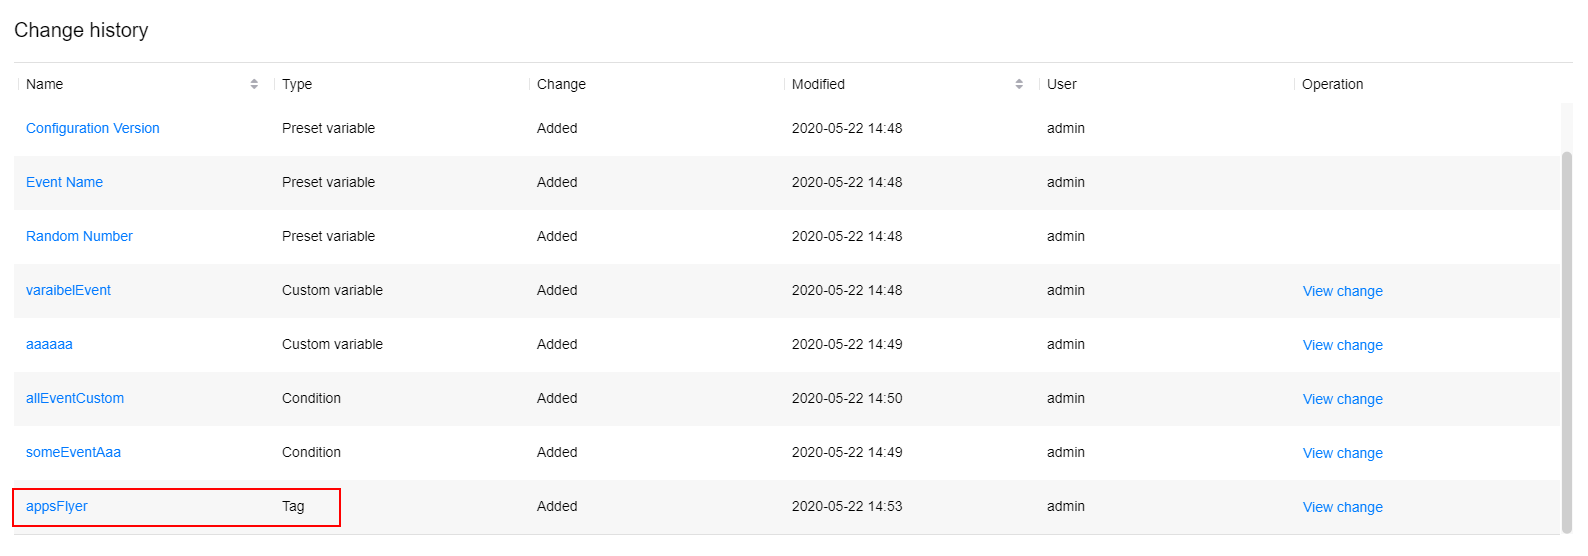
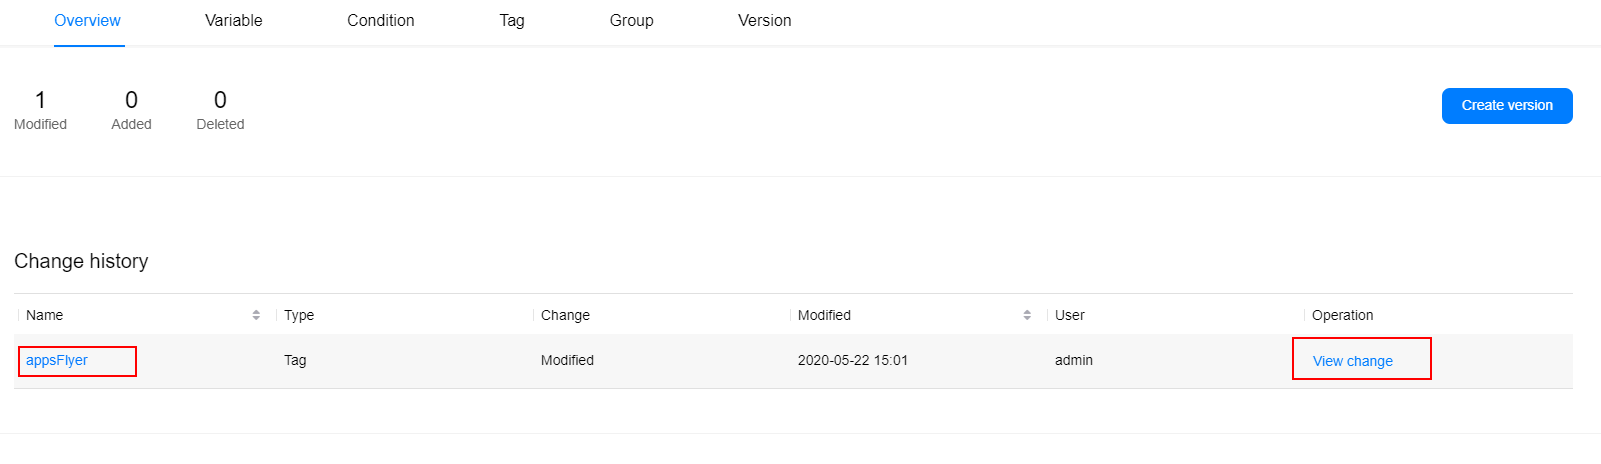
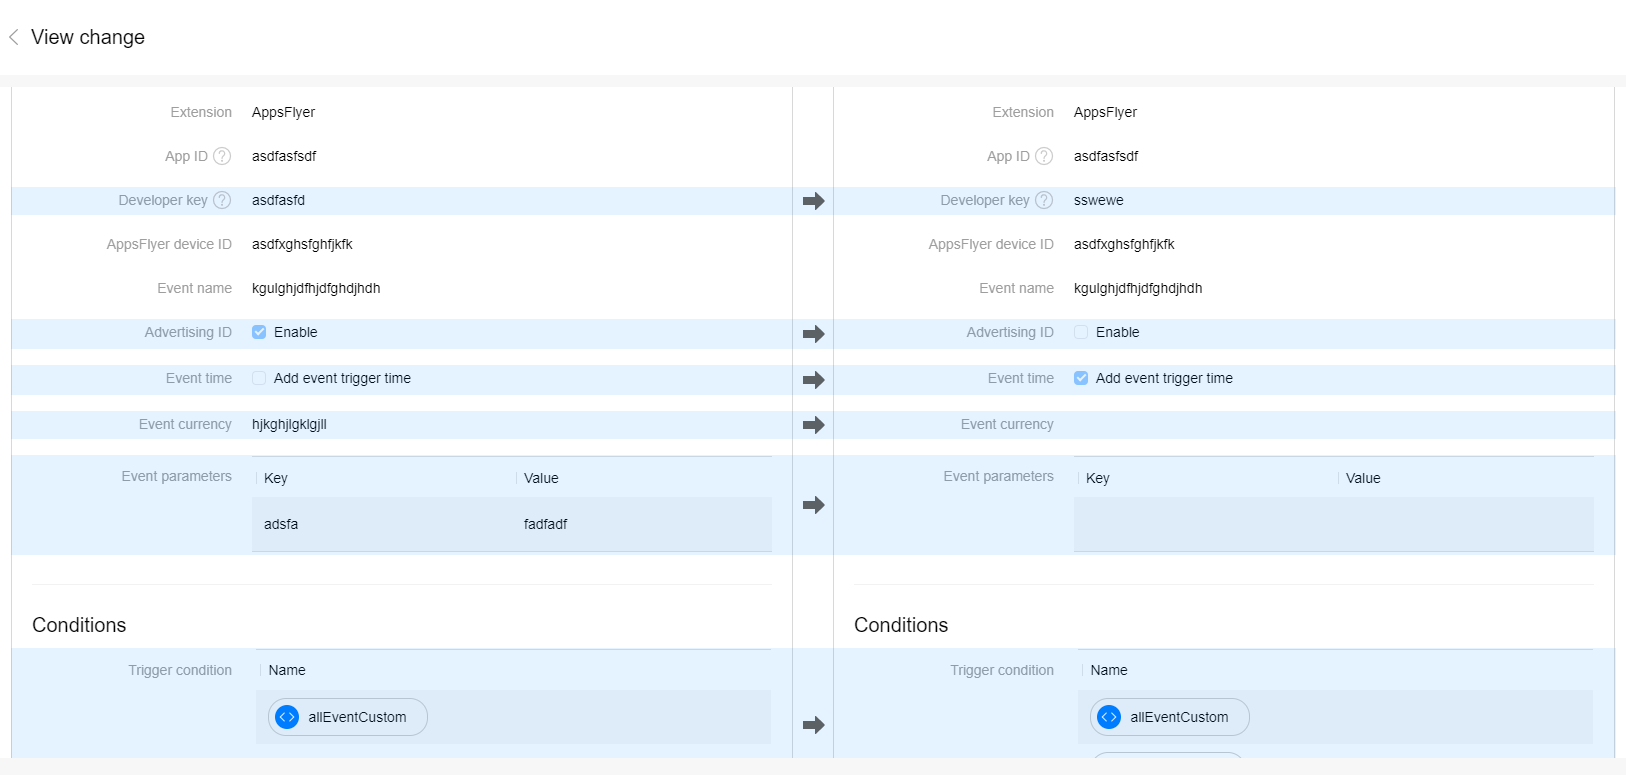
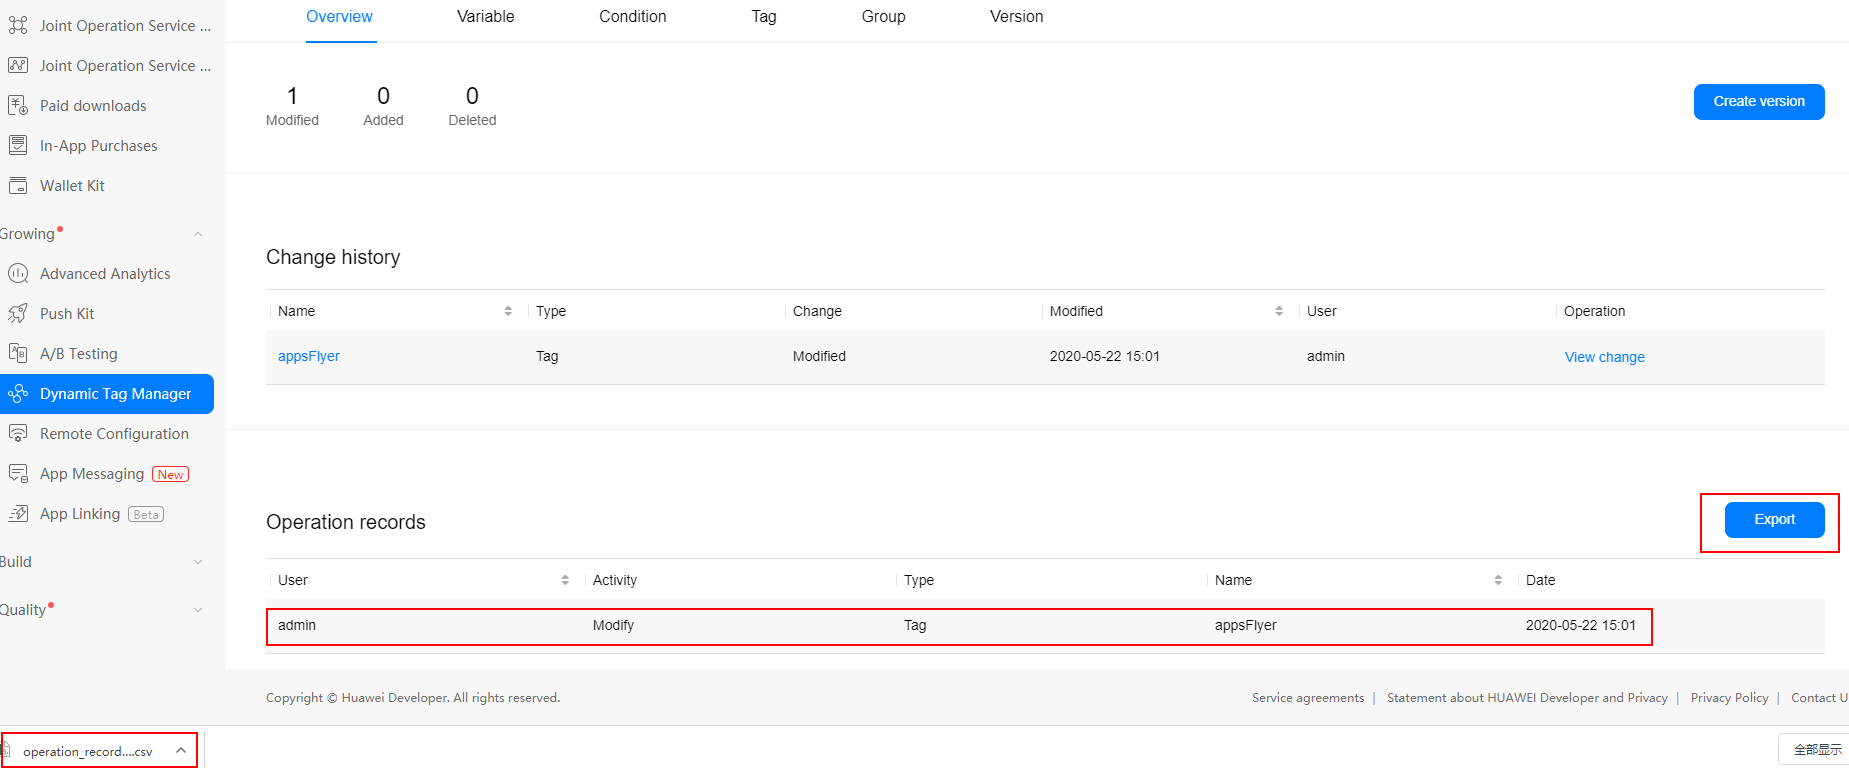
On the Overview tab page, you can view the change history and operation records of variables, conditions, and tags in the current configuration version. In the Operation records area, you can view operation records on a variable, condition, tag, or group, for example, when they are created, modified, or deleted. In the Change history area, you can view whether a variable, condition, or tag is added or deleted at the specific time point, or click their name to view the current status of the variable, condition, or tag. In addition, you can click View change to view comparison of the variable, condition, or tag between the current version and previous version. You can also create a version on the Overview tab page.
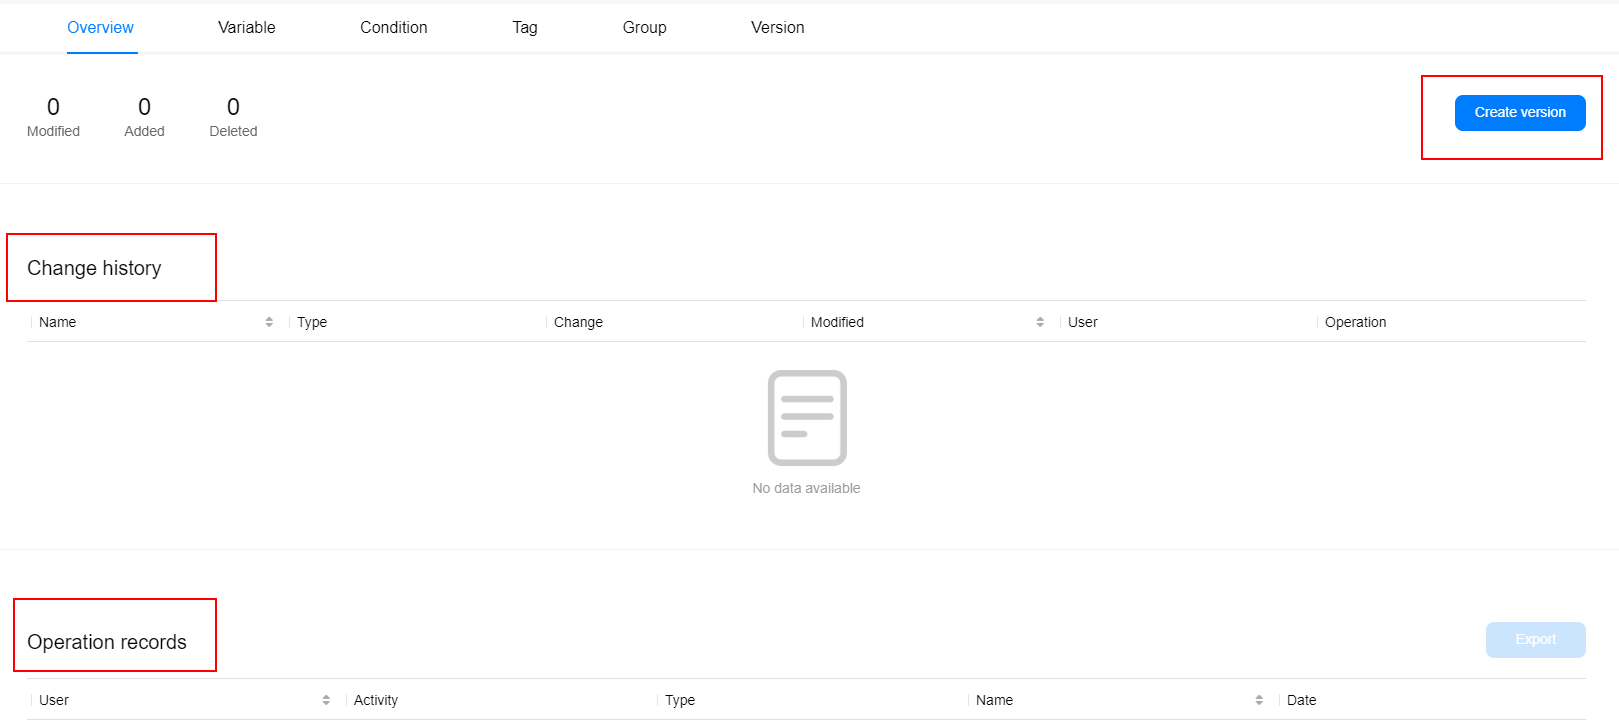
Viewing the Change History
1. Create, modify, or delete a variable, condition, or tag on the corresponding tab page, and click the Overview tab to view the change history. Here, a tag is used as an example.
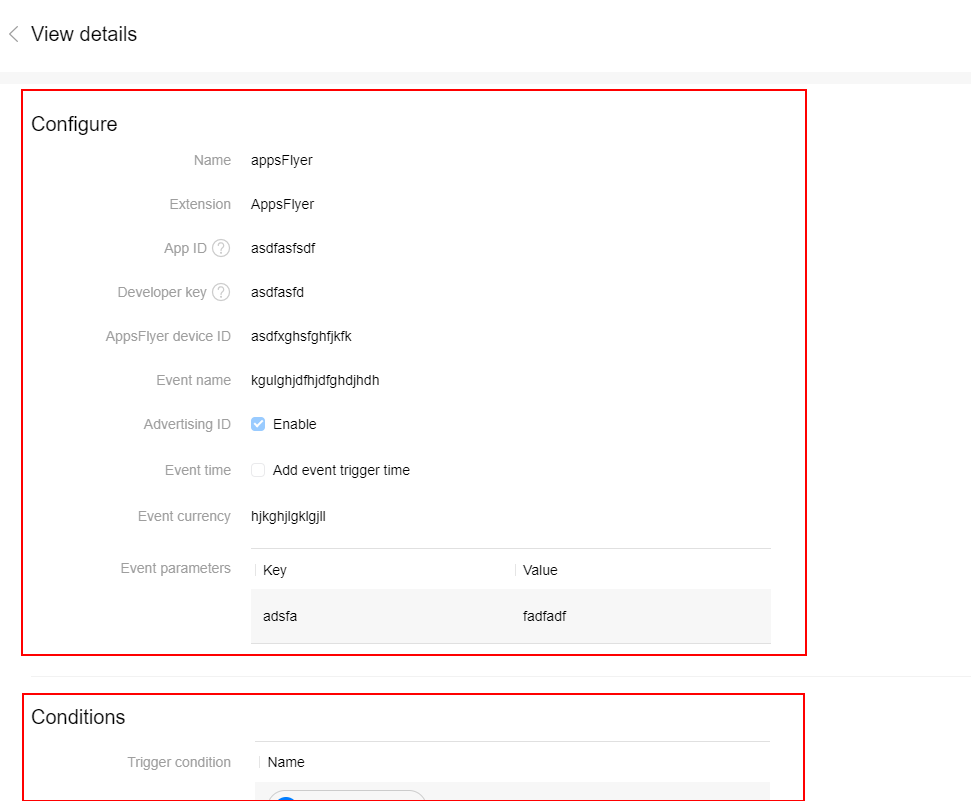
2. Click the name of a variable, condition, or tag in Change history, and view the change details. Here, a tag is used as an example.
3. View variable, condition, or tag changes in the current version compared with the previous version.
a. Click Create version, set related parameters, and click OK. Then, go to the Overview tab page and view the version creation record.
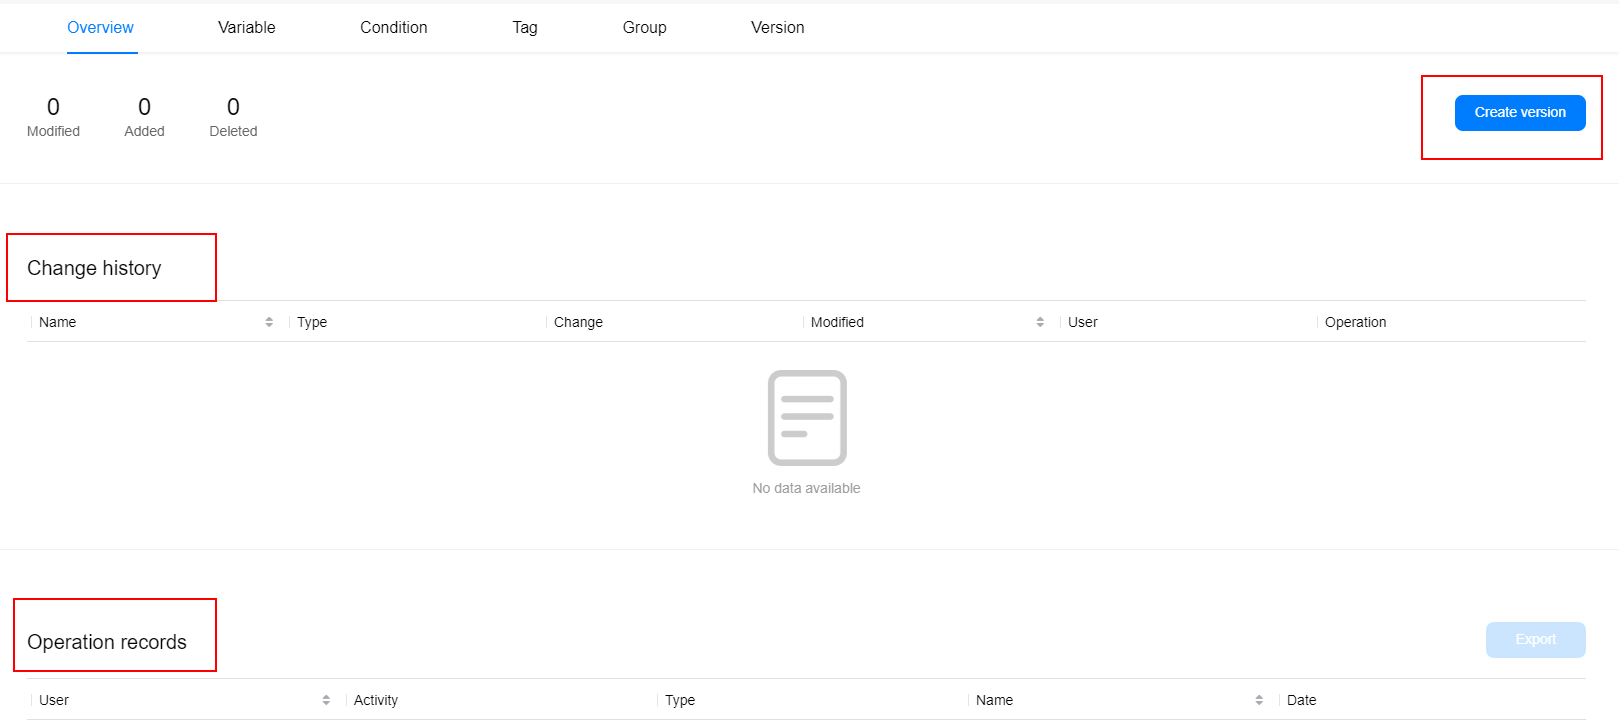
b. Modify a variable, condition, or tag in the previous version, and then click the Overview tab. In the Change history area, click View change in the Operation column of the modified variable, condition, or tag. Here, a tag is used as an example.
c. View specific changes on the View change page displayed.
Viewing an Operation Record
Create, modify, or delete a variable, condition, tag, or group on the corresponding tab page, click the Overview tab, and view the operation record in the Operation records area. In addition, you can also export operation records into an Excel file.
4. Variable
A variable is a placeholder used in a condition or tag. For example, the App Name variable indicates the name of an Android app. DTM provides predefined variables which can be used to configure most tags and conditions. You can also create your own custom variables. Currently, DTM provides 17 types of preset variables and 6 types of custom variables. Preset variable values can be obtained from the app without specifying any information. For a custom variable, you need to specify the mode to obtain its value.
Table3 Preset variablesVariable | Description |
Event Name | Name of a triggered event. |
Random Number | Random integer ranging from 0 to 2,147,483,647. |
Configuration ID | ID of a configuration. |
Configuration Version | Release version of a configuration. |
SDK Version | Version of the SDK. |
App ID | App ID (Android), which must be set to the app package name. |
App Name | Name of an app. |
App Version Name | Name of an app version. |
App Version Code | Code of an app version. |
Screen Resolution | Screen resolution of the device where the app is running. The value is in Width x Height format. |
Platform | Operating system (Android). |
OS Version | Version of the operating system where the app is running. The value is a string, for example, 8.1.0. |
Device ID | ID of a device. |
Device Name | Name of a device. |
Language | Language set by the user. |
OAID | HUAWEI advertising ID. |
Limit OAID tracking | Indicates whether to enable ad tracking. |
Table4 Custom variable typesVariable Type | Description |
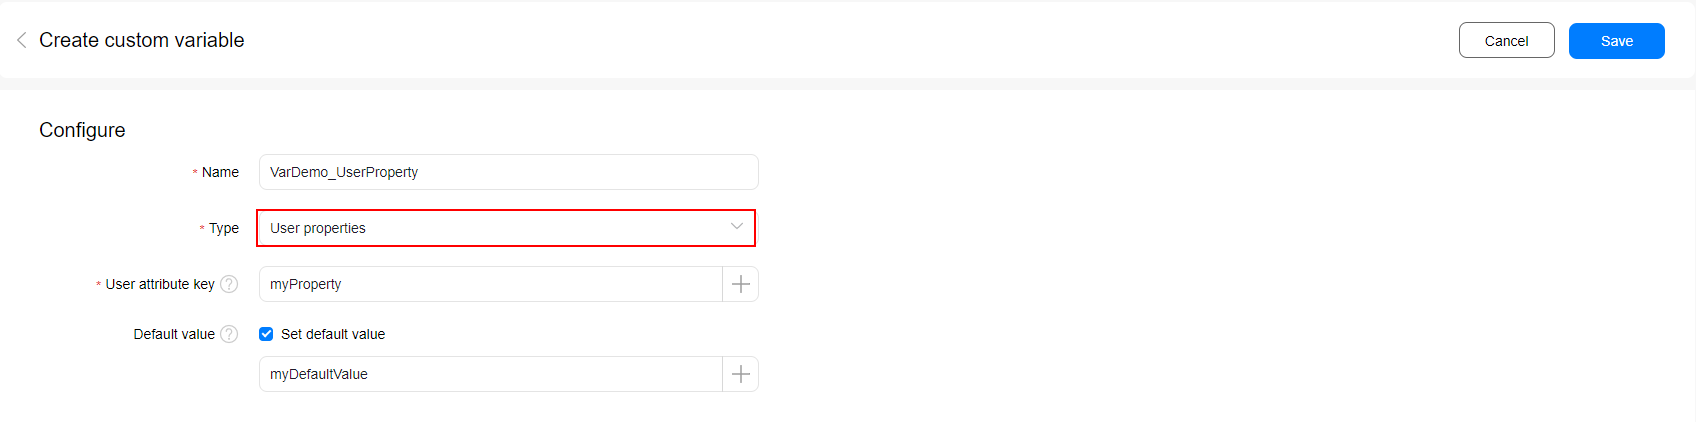
User Property | User property, which is used to obtain the user property value when the tracing tag is executed. The user property value is set by HUAWEI Analytics. You can also set a default value for a user property on the DTM UI. The default value will be used for the user property if no value is obtained during tag execution. If no default value is set, the user property will be left empty when no value is obtained. |
Event Parameter | Event parameter, which is generally used to obtain the parameter value of the reported event from the event context during tag execution. |
Mapping Table | A mapping table contains a group of key-value pairs. You can enter a value and obtain the corresponding parameter value from the table. With the mapping table, you can make the variable value automatically change according to the input value. Table 3 describes a mapping table example. In the example, multiple versions of an app have been released, and the version codes are 1.0, 2.0, and 3.0 respectively. If the defined variable Version ID needs to be set to different values for different app versions, you can define the value mapping for each version in a mapping table. During tag execution, the version code is matched to obtain the variable value. |
Constant | You can set a constant value for a variable of this type. |
Function Call | To obtain the value of a custom variable, you can set the variable type to Function Call and specify the full path of a class which has implemented the ICustomVariable API. During tag execution, the variable will be set to the value returned by the specified class. When configuring a Function Call variable, you can configure parameter values which can be used in the class of implemented APIs. |
Branch
| Branch variables support the following data types: integer, float, Boolean, character, array, and key-value pair. When using the Branch extension template, you can reference relevant Branch variables based on the value ranges of Branch extension template fields. |
Table5 Mapping table exampleIf {{App Version Code}} Is | Set {{Version ID}} To |
1.0 | value_version1.0 |
2.0 | value_version2.0 |
3.0 | value_version3.0 |
Creating a Preset Variable
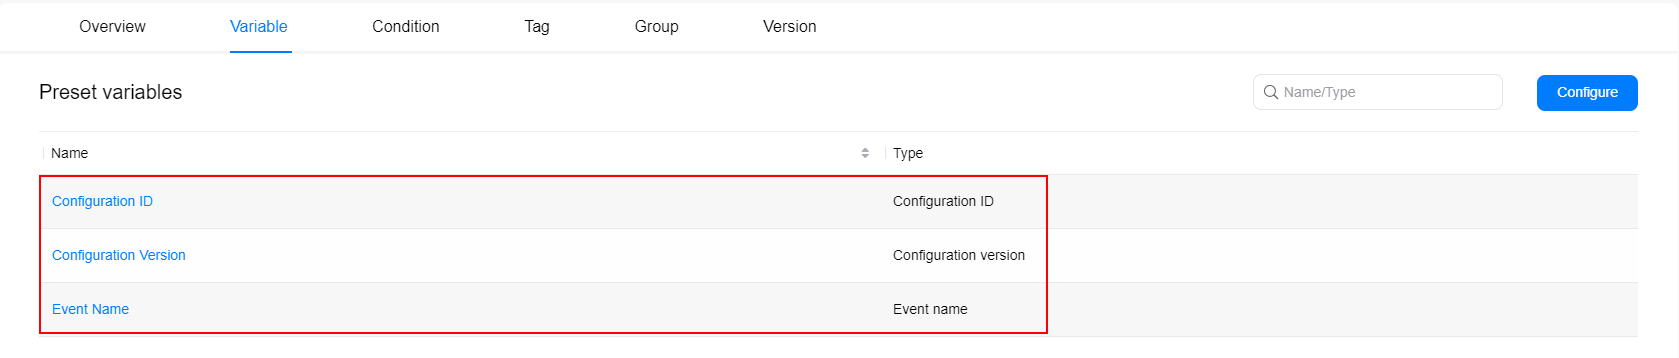
1. Click Configure next to Preset variables on the Variable page.
2. On the Configure preset variable page that is displayed, select the preset variable to be created and click OK.
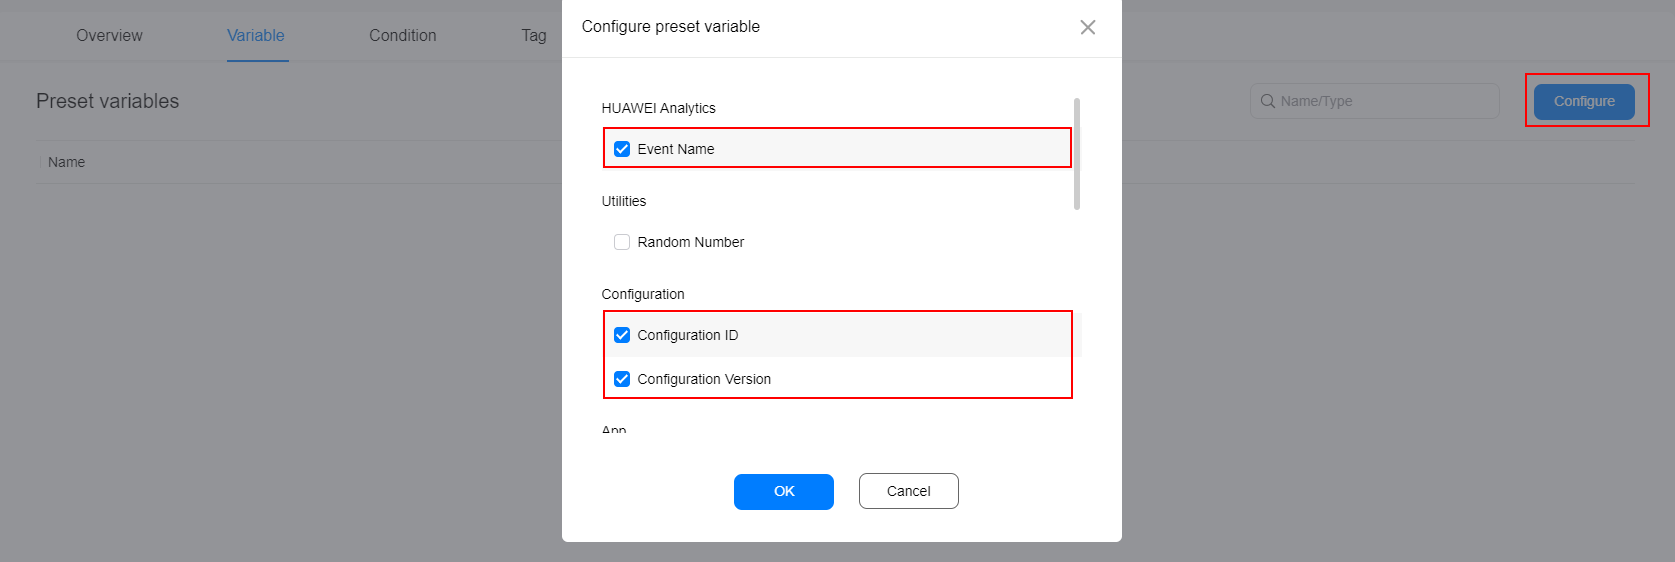
3. View the created preset variable on the Variable page.
NOTE:
You can click a preset variable to go to the preset variable page and view resources referencing the variable.
Deleting a Preset Variable
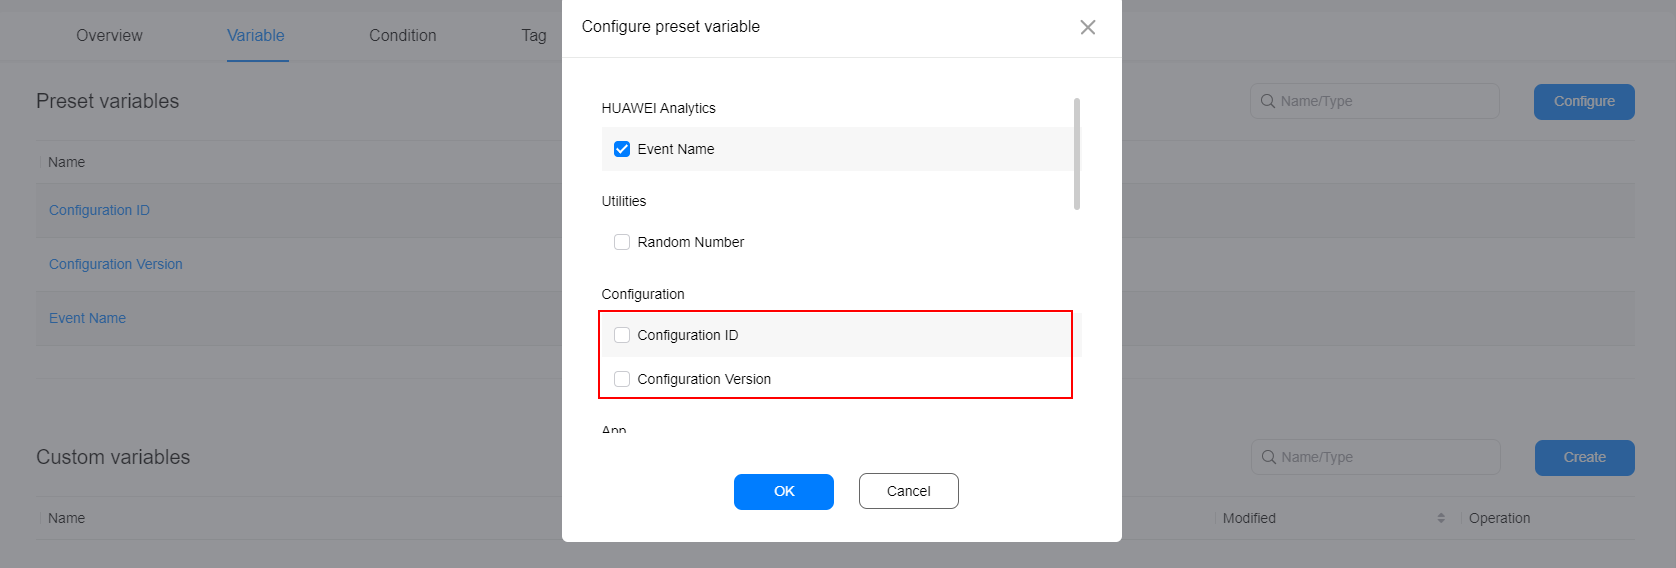
1. Click Configure next to Preset variables on the Variable page.
2. On the Configure preset variable page that is displayed, deselect the preset variable to be deleted and click OK.
Creating a Custom Variable
1. Click Create on the right of Custom variables on the Variable page.
2. On the Create custom variable page that is displayed, enter a variable name, select a variable type, set related parameters, and click Save.
3. View the created custom variable on the Variable page.

NOTE:
If the reference icon ( ) is displayed next to the text box of a variable parameter, you can click the icon to reference a created variable. A referenced variable is marked with {{}} on the page.
Variables cannot be referenced cyclically. In addition, a variable cannot reference itself. Otherwise, variable creation will fail.
Editing a Custom Variable
1. Click a custom variable on the Variable page.
2. On the Edit custom variable page, modify the variable name, type, and parameters and click Save.
NOTE:
On the editing page of a custom variable, you can view resources referencing the variable.
Deleting a Custom Variable
1. Click Delete on the right of a variable on the Variable page.
2. Confirm the information in the dialog box and click OK.
NOTE:
If a variable is referenced by other resources, the variable cannot be deleted. To delete it, you need to delete relevant reference relationships.
5. Condition
A condition is the prerequisite for triggering a tag and determines when the tag is executed. A tag must contain at least one trigger condition.
A condition consists of three elements: name, type, and trigger condition.
The name and type are mandatory.
If Trigger is set to All events, all types of events will trigger the condition. If Trigger is set to Some events, you need to further specify trigger conditions for the condition.
Each trigger condition consists of three parts: variable, operator, and attribute value. You can currently choose between 2 types of conditions and 16 types of operators.
Currently, condition management includes creating, copying, and deleting a condition.
Creating a condition: You can create a condition for triggering a tag.
Copying a condition: You can copy any condition you have created. You can then quickly modify it and add a new condition.
Deleting a condition: You can delete a condition that is not being referenced.
Table6 Condition typesCondition Type | Description |
Custom | Customizes a condition. |
Configuration loaded | Matches a condition when the configuration load is completed. |
Table7 OperatorsOperator |
Equals |
Contains |
Begins with |
Ends with |
Matches regular expression |
Matches regular expression (case insensitive) |
Does not equal |
Does not contain |
Does not begin with |
Does not end with |
Does not match regular expression |
Does not match regular expression (case insensitive) |
Less than |
Less than or equal to |
Greater than |
Greater than or equal to |
Creating a Condition
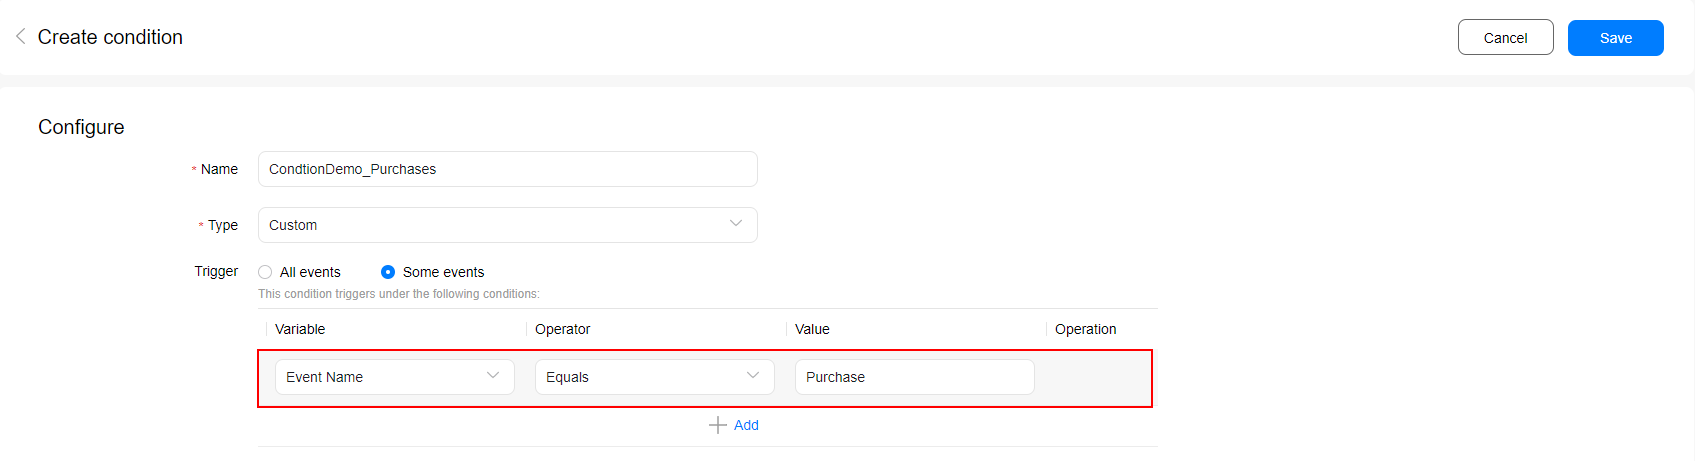
1. Click Create on the Condition page.
2. On the Create condition page that is displayed, enter a condition name, select a condition type, and set related parameters.
3. Set Variable, Operator, and Value for a trigger condition if you select a condition type and set Trigger to Some events. You can click Add to add multiple trigger conditions.
4. Click Save.
5. View the created condition on the Condition page.

NOTE:
If multiple trigger conditions are configured for a condition, the condition is triggered only when all trigger conditions are true.
Modifying a Condition
1. Click a condition on the Condition page.
2. On the Modify condition page that is displayed, modify the name, type, and trigger conditions for the condition.
3. Click Save.
NOTE:
On the Modify condition page, you can view resources referencing the condition.
Copying a Condition
1. Click Copy next to a condition on the Condition page.
2. On the Copy condition page that is displayed, modify the name, type, and trigger conditions for the condition.
3. Click Save.
Deleting a Condition
1. Click Delete next to a condition on the Condition page.
2. Confirm the information in the dialog box and click OK.
NOTE:
If a condition is referenced by other resources, the condition cannot be deleted. To delete it, you need to delete relevant reference relationships.
6. Tag
A tag is used in your app to track events. DTM supports the HUAWEI Analytics and custom function templates, as well as many third-party tag extension templates. With DTM, you do not need to add additional third-party tracking tags in your app. You can set parameters and trigger conditions for a tag in DTM, and release the configuration version to track events. You can also update and release tags for your app in DTM after you have released it, so you can adjust tag configurations in real time.
Creating a Tag
1. Click Create on the Tag page.
2. On the Create tag page that is displayed, enter a tag name, select a tag extension template, and set related parameters.
3. On the Create tag page, set Trigger condition and Exception condition for the tag. When the specified trigger condition is met, events will be reported to the analytics platform. When the specified exception condition is met, events will be blocked and not reported to the analytics platform.
4. Click Save.
NOTE:
If the reference icon ( ) is displayed next to the text box of a tag parameter, you can click the icon to reference a created variable. A referenced variable is marked with {{}} on the page.
A tag must contain at least one trigger condition. If both trigger and exception conditions are configured for a tag, the exception condition is triggered in priority.
Creating a Tag (HUAWEI Analytics)
A tag mainly consists of parameters and conditions. The parameters vary depending on extension template. Here, HUAWEI Analytics is used as an example to describe how to create a tag.
1. On the Create tag page, enter a tag name and set Extension to HUAWEI Analytics.
2. Use the default value Modify event for Operation. When Extension is set to HUAWEI Analytics, the Add event, Modify event, and Block event options are available for Operation.
Table9 Operation types of HUAWEI Analytics
Operation Type | Description |
Add event | When an event meeting the specific condition occurs, the app sends an additional event to HUAWEI Analytics. You can configure a name for the additional event. By default, parameters of the additional event are inherited from the source event. You can also add, modify, and delete event parameters. |
Modify event | When an event meeting the specific condition occurs, you can rename the event and send the renamed event to HUAWEI Analytics. You can also add, modify, and delete event parameters. |
Block event | You can block an event so that it is not reported to HUAWEI Analytics. |
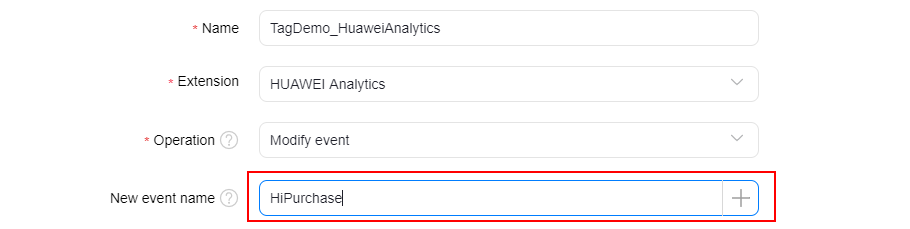
3. (Optional) Enter a new event name in the New event name text box.
NOTE:
The event name must start with a letter or reference and can contain only digits, letters, and underscores (_). If a variable is referenced in the event name, you need to ensure that the value of the referenced variable meets the event name constraints. Otherwise, the event may fail to be reported.
4. (Optional) Click Add below Parameters to be added or modified and set Key and Value for the parameter. If the reported original event parameter contains the specified key, the parameter value is changed to the specified value mapping the key. Otherwise, the specified key-value pair will be added to the event.
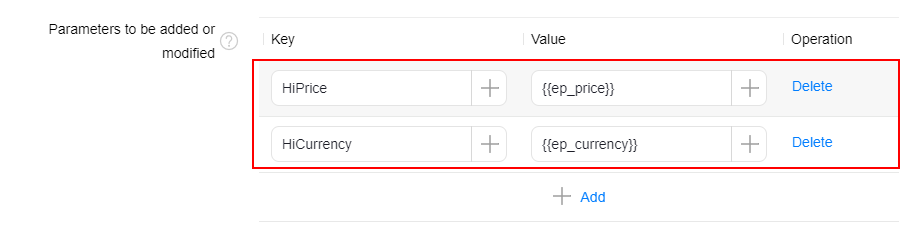
5. (Optional) Click Add below Parameters to be deleted and set Key for the parameter. If a reported original event parameter contains the specified key, the parameter will be deleted.

6. Click Add under Trigger condition and set a trigger condition for the tag.
7. (Optional) Click Added next to Exception condition and set an exception condition for the tag.
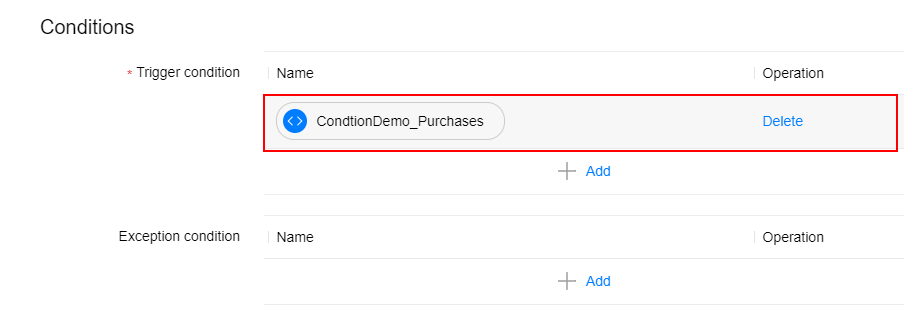
8. Click Save. You can view the created tag on the Tag page.

Modifying a Tag
1. Click a tag on the Tag page.
2. On the Edit tag page that is displayed, modify the tag configurations and conditions.
3. Click Save.
Copying a Tag
1. Click Copy next to a tag on the Tag page.
2. On the Copy tag page that is displayed, modify the tag configurations and conditions.
3. Click Save.
Pausing/Executing a Tag
1. Click Pause next to a tag on the Tag page. Confirm the information in the dialog box and click OK. The pause icon will be displayed ahead a paused tag. In addition, a paused tag will not be triggered to report events in configuration versions created later;

2. Click Execute next to the paused tag to resume it. After a paused tag is resumed, the pause icon ahead the tag name will disappear and the tag can be triggered to report events in configuration versions created later.
Deleting a Tag
1. Click Delete next to a tag on the Tag page.
2. Confirm the information in the dialog box and click OK.
WARNING
A deleted tag cannot be restored. Before deleting a tag, ensure that the tag is no longer used. If a tag is not needed for a while, you can pause the tag. For details, please refer to Pausing/Executing a Tag.
7. Group
Creating a Group
1. Click Create on the Group page.
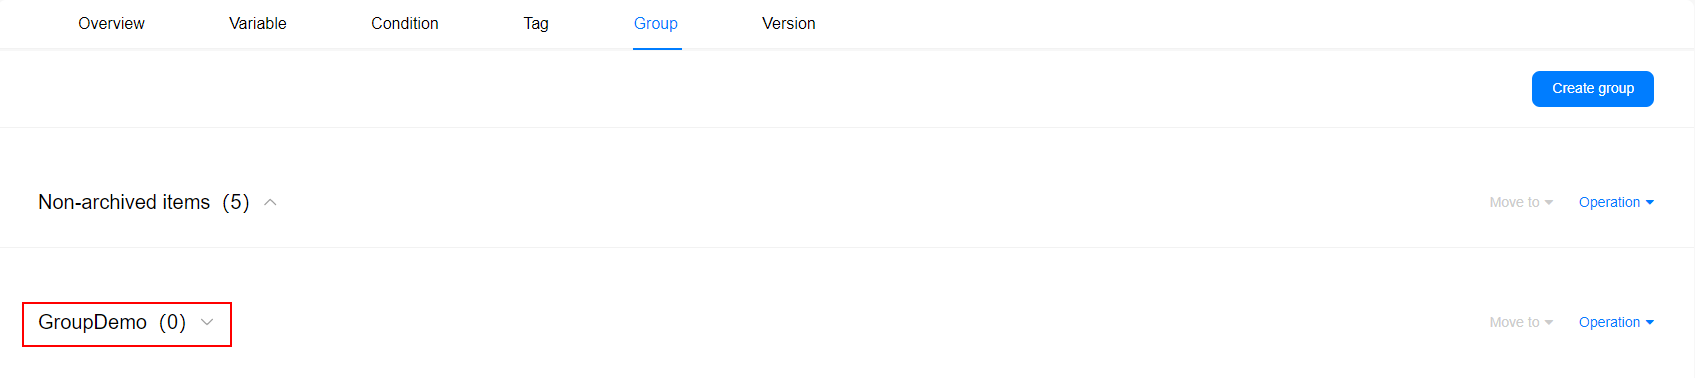
2. On the Create group page, enter a group name and click OK.

3. View the created group on the Group page.
Note:
By default, the Non-archived items group has been created in DTM. All uncategorized resources are archived in this group.
Moving Resources in a Group to Another Group
1. On the Group page, select a resource to be moved in a group.
2. Click Move to on the right of the group and select a target group to which the resource is moved.
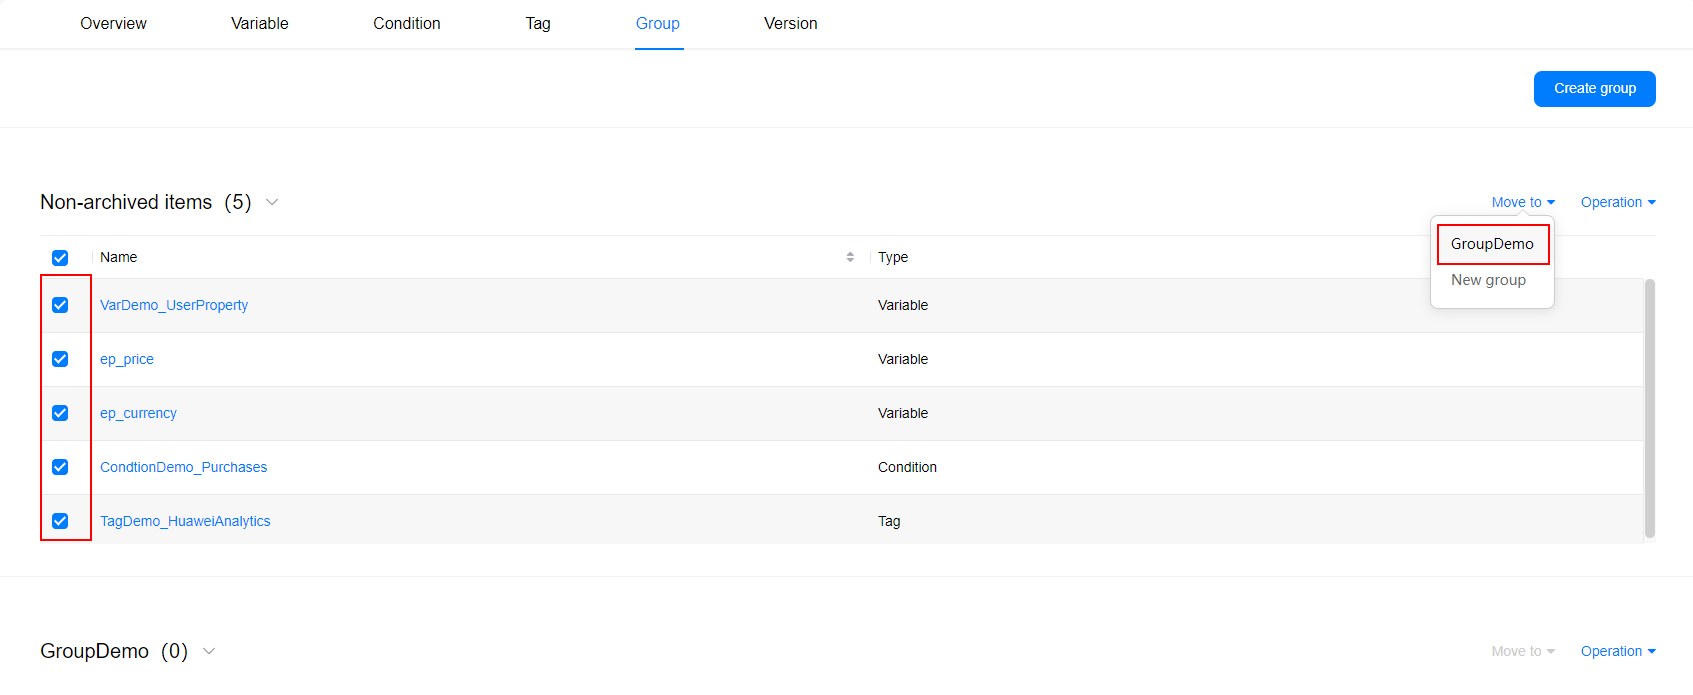
3. View the resource in the target group.
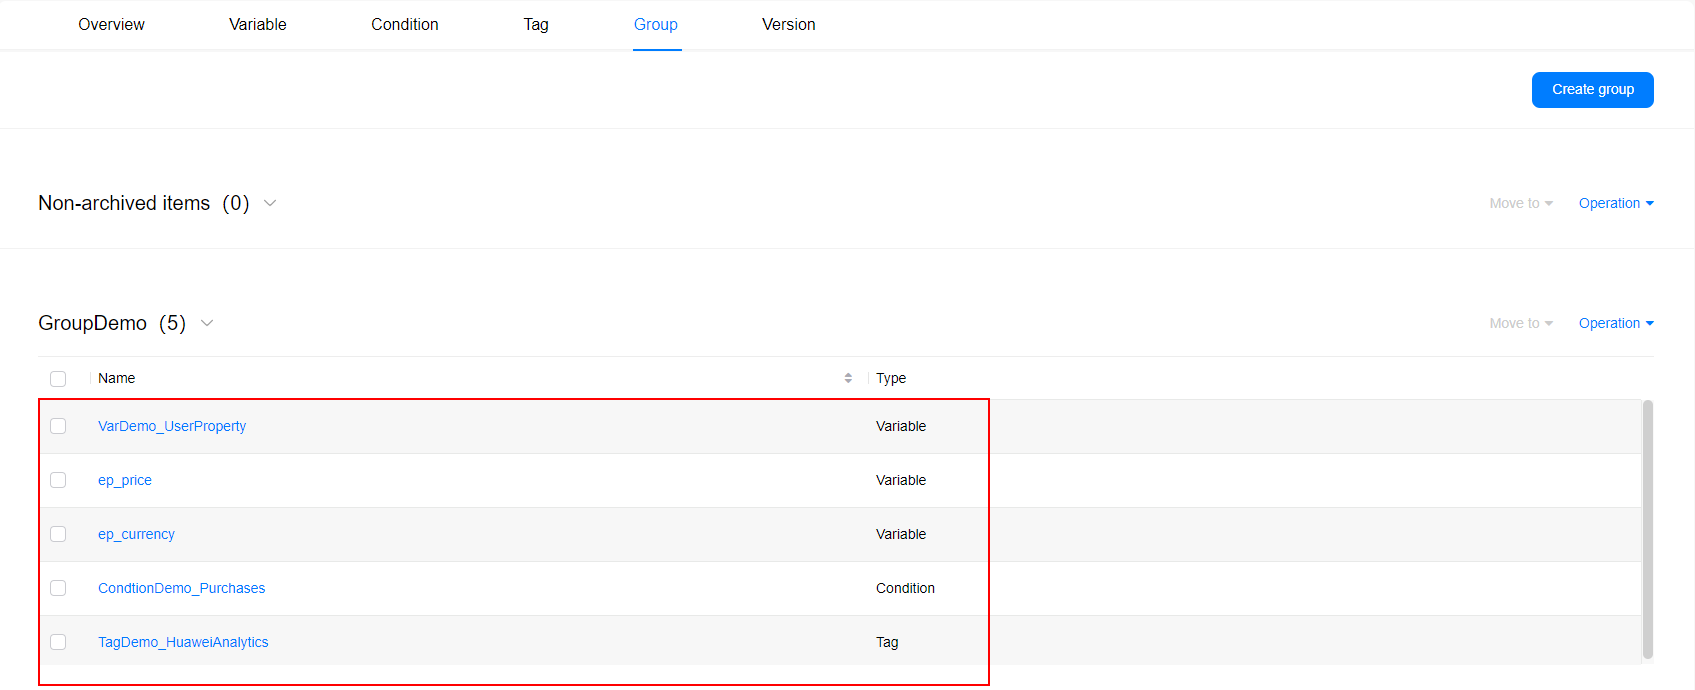
Modifying a Group
1. On the Group page, click Operation and select Rename group on the right of a group.
2. Modify the group name on the Rename group page.
3. Click OK.
Deleting a Group
1. On the Group page, click Operation and select Delete group on the right of a group.
2. Confirm the information in the dialog box and click OK.
Note:
If a group contains resources, you need to remove the resources from the group before deleting it
8. Version
A version is a snapshot of a configuration at a time point. It can be used to record different phases of a configuration. You can create a version for a configuration anytime to save the latest configuration. After creating a version, you can click the version name to view details about the version. On the Version details page of a version, you can download, preview, and release the version. Only a released version can be automatically loaded by apps on devices.
Creating a Version
1. Click Create version on the Overview page or click Create on the Version page.
2. On the Create version page that is displayed, enter the version name and description, and click OK.
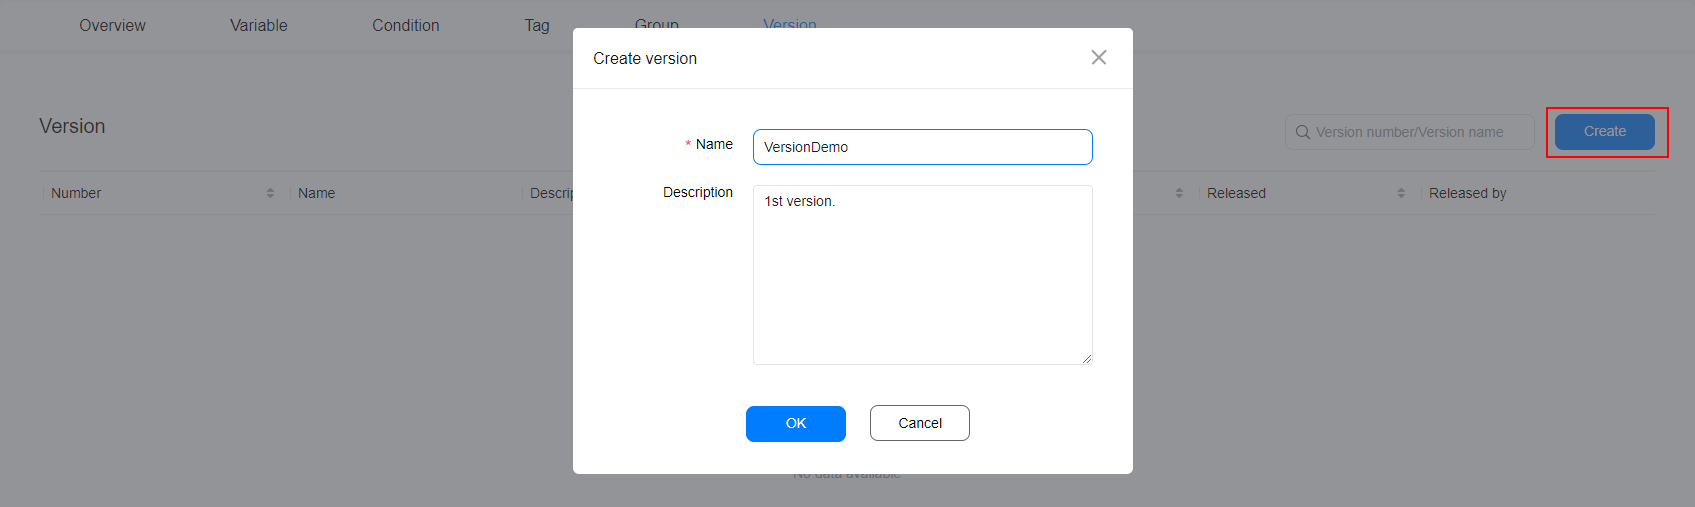
3. View the created version on the Version page.

Viewing Version Details
1. Click a version on the Version page.
2. On the Version details page that is displayed, view the overview, operation records, variables, conditions, and tags of the version. You can also download, preview, release, export, modify, or delete the version on this page.
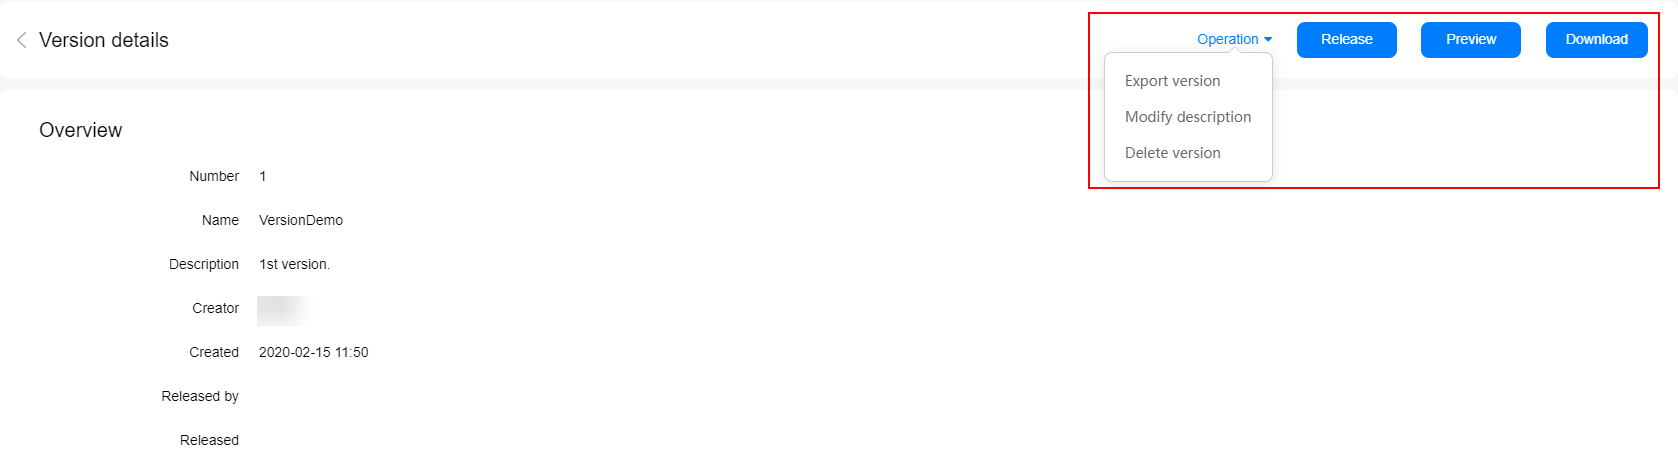
Downloading a Version
1. Click Download on the Version details page.
2. Select a local directory and click Save. The configuration version will be saved as a JSON file that can be loaded and executed by the DTM SDK.
Previewing a Version
You can preview a configuration version to check whether it can be executed as expected. You can start your app on the debugging device through methods provided on the Preview page. Your app will automatically load the latest configuration version, enabling you to verify the configuration version before releasing it.
1. Click Preview on the Version details page.
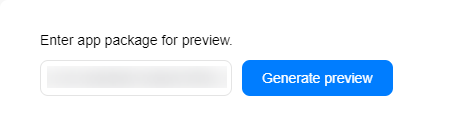
2. On the Preview page that is displayed, view preview links generated for the app bound to the configuration by default. To change the app package name, directly enter a new app package name in the text box previous Generate preview and click Generate preview.
3. Preview your app configuration version. Three methods for previewing an app configuration version are displayed under Start preview. You can preview your app configuration version using any of the methods.
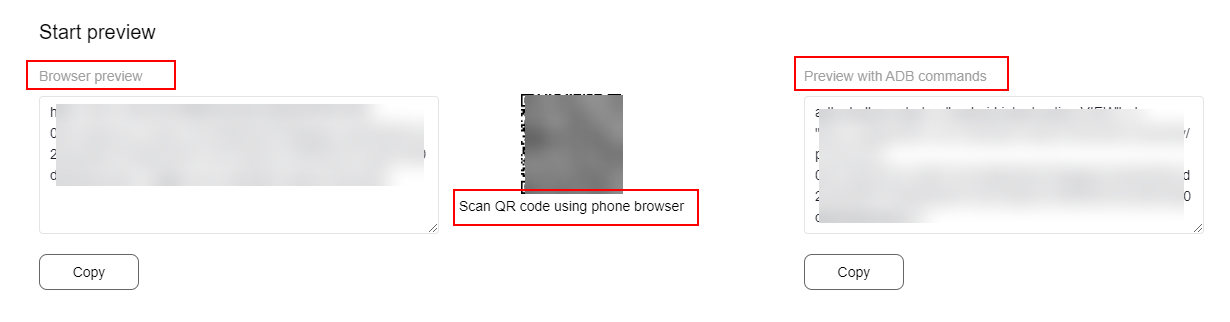
Table10 Preview methods
Preview Method | Description |
Browser preview | Click Copy under Browser preview to copy the address and access it in a browser to preview the app configuration version. |
Scan QR code using phone browser | Use the QR code scanning function of the browser to scan the QR code to preview the app configuration version. |
Preview with ADB commands | Connect the device to a PC, click Copy under Preview with ADB commands to copy the address, and run the address in the CLI of the PC to preview the app configuration version. |
NOTE:
Preview start addresses provided on the Preview page can only be used to start the app with the specified app package name on the debugging device.
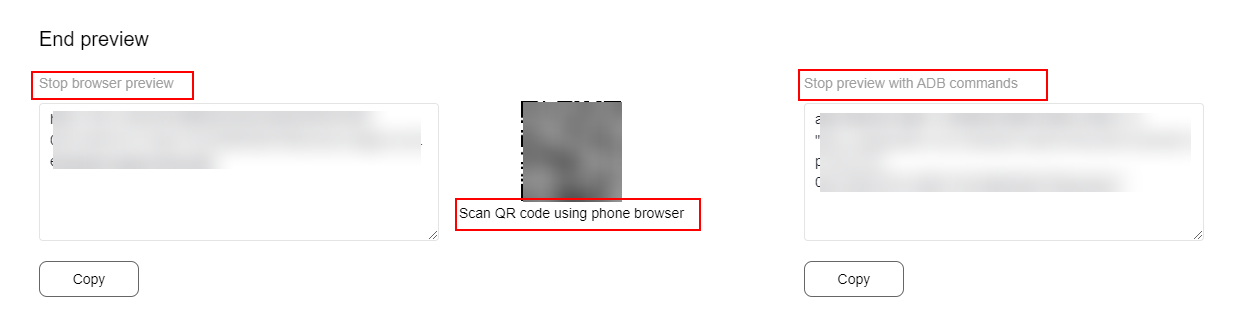
4. Stop previewing your app configuration version. Three methods for stopping previewing an app configuration version are displayed under End preview. You can stop previewing your app configuration version using any of the methods. The usage is similar to that for previewing an app configuration version.
Releasing a Version
After creating a configuration version, you need to release it so that the DTM SDK can automatically load the configuration version in the next update period. If a configuration has multiple released versions, the DTM SDK will load the latest released version. To ensure that a version can be executed as expected, you can debug the version through version preview before releasing it.
1. Click Release on the Version details page.
2. Confirm the information in the dialog box and click OK.
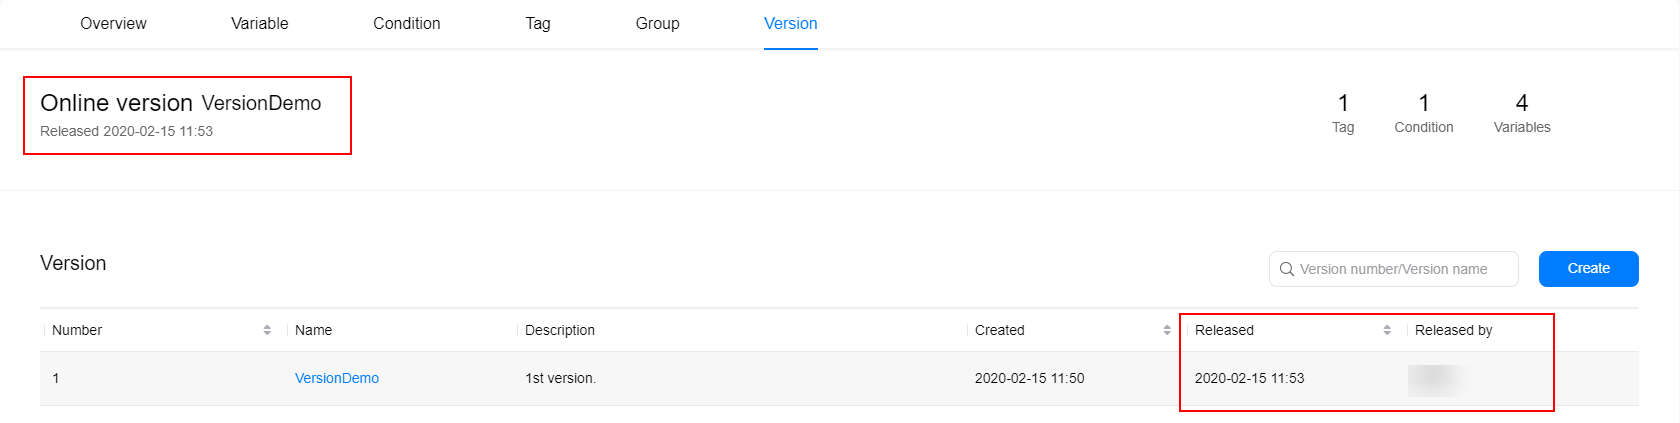
3. View the person releasing the version and release time in the version information after successful release.
NOTE:
The DTM SDK automatically loads configuration at an interval of 6 hours.
Modifying a Version
1. Go to Operation > Modify description on the Version details page.
2. On the Modify version page that is displayed, modify the version name and description.
3. Click OK.
Exporting a Version
Similar to version export in Exporting a Configuration, you can export the variables, conditions, and tags of the current configuration version to a JSON file. The exported file can be used in Import a Configuration.
1. Go to Operation > Export version on the Version details page.

2. Select a local directory and click Save.
Deleting a Version
1. Go to Operation > Delete version on the Version details page.
2. Confirm the information in the dialog box and click OK.
NOTE:
The latest version and current online version released of a configuration cannot be deleted.