1. Overview
This section describes the process of developing basic capabilities of HUAWEI Push Kit so that you can send messages to Huawei phones. The following figure shows the process.
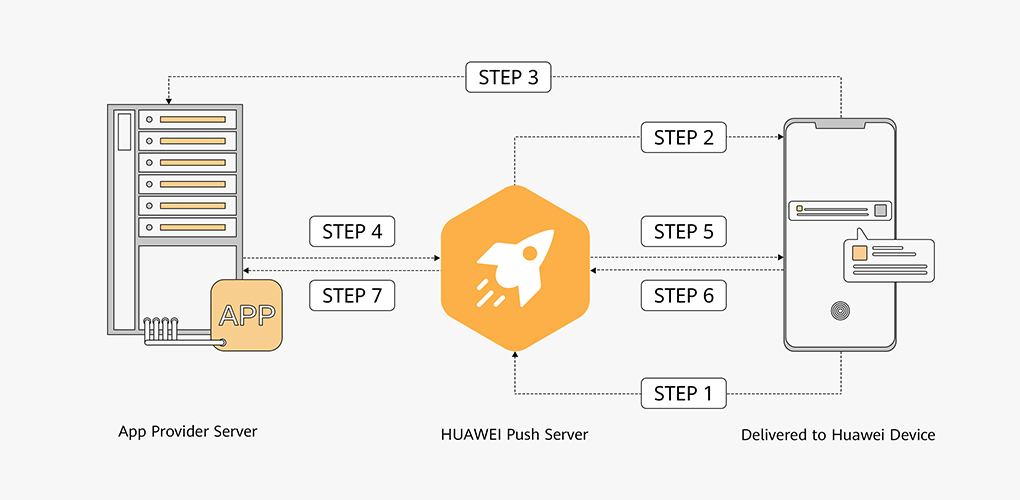
Steps 1 and 2: An app integrated with the HMS SDK calls the HmsInstanceId.getToken method to obtain a push token. For details, please refer to Applying for a Push Token.
Steps 3: The app reports the obtained push token to the app server.
Steps 4: The app server uses the push token to call APIs of the HUAWEI Push Kit server to send messages. For details, please refer to Server Development Guide.
Steps 5: The HUAWEI Push Kit server sends the messages to devices and the devices receive the messages. For details, please refer to Receiving Data Messages.
Steps 6 and 7: When the HUAWEI Push Kit server detects responses from the devices, it sends a message receipt to the app server. To achieve this, you need to implement the message receipt function. For details, please refer to Server Development Guide.
2. Client Development Guide
This section describes how to develop the client to implement basic HUAWEI Push Kit capabilities. Through this section, you can quickly understand the knowledge and skills required for the client development. You can also experience HUAWEI Push Kit after basic development. The client development covers the following activities:
1. After integrating the HMS Core Push SDK, apply for a push token. For details, please refer to Applying for a Push Token. If you integrate the HMS Core Push SDK 4.0, a token will be automatically obtained. For details, please refer to Automatic Initialization.
2. Use your app to receive the data messages sent through HUAWEI Push Kit. For details, please refer to Receiving Data Messages.
3. Enable or disable notification messages to be displayed in NC. For details, please refer to Configuring Whether to Display Notification Messages.
4. Customize the actions to be triggered upon notification message tapping and send data to the app. For details, please refer to Customizing Actions to Be Triggered upon Notification Message Tapping.
2.1 Applying for a Push Token
2.1.1 Scenario Description
An app has a unique push token on each device. The client calls the HmsInstanceId.getToken method to obtain the token from the HUAWEI Push Kit server. Then the app server sends messages to the app based on the token. You can upload tokens to your app server for maintenance. The app server can then call the push API of the HUAWEI Push Kit server to send messages to apps in batches based on the tokens. For details about how to develop the app server to send messages, please refer to Server Development Guide. In some cases, no token is returned through the getToken method. You can call the onNewToken method to obtain the token by referring to the description of this method.
If you want to use the automatic initialization capability of the HMS Core Push SDK to obtain a token, configure the capability by referring to Automatic Initialization.
Scenarios where a token may change include but are not limited to the following:
1. An app is uninstalled and installed again.
2. An app calls the API for deregistering the token.
3. A user restores the device to its factory settings.
4. App data is deleted.
Note:
l To improve security, HUAWEI Push Kit updated its token generation and modification rules on March 10, 2018 by introducing the token format 2.0.
The token length is variable. Currently, a token supports 130 bytes and contains digits, uppercase letters, lowercase letters, hyphens (-), and underscores (_).
l Recommended best practice
1. Configure your app to determine the push token length as variable.
2. Update the push token periodically. (It is recommended that the app obtain the token upon each startup and report the new one to the app server if it is different from the token obtained last time.)
3. Do not use tokens to trace and mark users.
2.1.2 Precautions
1. The getToken method returns a token as requested only after HUAWEI Push Kit is enabled in AppGallery Connect. For details, please refer to Enabling Services.
2. If the EMUI version is 10.0 or later on a Huawei device, a token will be returned through the getToken method. If the getToken method fails to be called, HUAWEI Push Kit automatically caches the token request and calls the method again. A token will then be returned through the onNewToken method.
3. If the EMUI version on a Huawei device is earlier than 10.0 and no token is returned using the getToken method, a token will be returned using the onNewToken method. However, the onNewToken method requires that HUAWEI Push Kit be enabled.
4. If the server determines that a token has expired, an updated token will be returned using the onNewToken method.
5. To integrate the HMS SDK of the latest version into an app, the version of HMS Core (APK) in the app must be 3.0.0 or later. If the version is earlier than 3.0.0, for an app that can run in the foreground, the HMS SDK displays a message to prompt the user to upgrade HMS Core (APK) to the latest version. In this case, an Activity class instance must be transferred using an input parameter of HmsInstanceId.getInstance. For an app that only runs in background, if you do not want to display the upgrade wizard window to the user, a Context class instance of a non-Activity type can be transferred.
6. For an app with the automatic initialization capability, the getToken method does not need to be called explicitly to apply for a token. The HMS Core Push SDK will automatically apply for a token and call the onNewToken method to return the token.
2.1.3 Development Procedure
It is recommended that the getToken method be called in the onCreate method of the first Activity class after app startup.
1. Use the getToken method to obtain a token.
- private void getToken() {
- new Thread() {
- @Override
- public void run() {
- try {
- // read from agconnect-services.json
- String appId = AGConnectServicesConfig.fromContext(this).getString("client/app_id");
- String token = HmsInstanceId.getInstance(this).getToken(appId, "HCM");
- Log.i(TAG, "get token:" + token);
- if(!TextUtils.isEmpty(token)) {
- sendRegTokenToServer(token);
- }
- } catch (ApiException e) {
- Log.e(TAG, "get token failed, " + e);
- }
- }
- }.start();
- }
- private void sendRegTokenToServer(String token) {
- Log.i(TAG, "sending token to server. token:" + token);
- }
Notice:
1. After a token is obtained by using the getToken method, null judgment must be performed.
2. In the outer code segment of the getToken method, you need to add exception capture processing.
2. When a token changes or the EMUI version is earlier than 10.0, call the onNewToken method to return an updated or a requested token.
- // This method callback must be completed in 10 seconds. Otherwise, you need to start a new Job for callback processing.
- @Override
- public void onNewToken(String token) {
- Log.i(TAG, "received refresh token:" + token);
- // send the token to your app server.
- if (!TextUtils.isEmpty(token)) {
- refreshedTokenToServer(token);
- }
- }
- private void refreshedTokenToServer(String token) {
- Log.i(TAG, "sending token to server. token:" + token);
- }
2.2 Deregistering a Push Token
2.2.1 Scenario Description
If you do not want an app to receive messages from HUAWEI Push Kit, you can call the HmsInstanceId.deleteToken method to deregister the push token of the app. After the deregistration, the app will no longer receive messages from HUAWEI Push Kit, including messages about subscribed topics.
You are advised not to use the deleteToken method. Instead, you can invalidate the token on your app server, and configure your app server to send no message if the token is invalid. This avoids frequent token requests.
Notice:
The version of HMS Core (APK) must be 3.0.0 or later.
2.2.2 Development Procedure
Call the API for deregistering tokens.
- private void deleteToken() {
- new Thread() {
- @Override
- public void run() {
- try {
- // read from agconnect-services.json
- String appId = AGConnectServicesConfig.fromContext(this).getString("client/app_id");
- HmsInstanceId.getInstance(this).deleteToken(appId, "HCM");
- Log.i(TAG, "deleteToken success.");
- } catch (ApiException e) {
- Log.e(TAG, "deleteToken failed." + e);
- }
- }
- }.start();
- }
2.3 Receiving Data Messages
2.3.1 Scenario Description
When the app server executes topic-based messaging or sends data messages (including notification messages that need to be processed by the app according to the function configuration in Notification Message Display on UI), the developer needs to implement the onMessageReceived method for message receiving. Then the app processes the messages by itself.
2.3.2 Development Procedure
Override the onMessageReceived method to obtain message data.
- @Override
- public void onMessageReceived(RemoteMessage message) {
- Log.i(TAG, "onMessageReceived is called");
- if (message == null) {
- Log.e(TAG, "Received message entity is null!");
- return;
- }
- Log.i(TAG, "getCollapseKey: " + message.getCollapseKey()
- + "\n getData: " + message.getData()
- + "\n getFrom: " + message.getFrom()
- + "\n getTo: " + message.getTo()
- + "\n getMessageId: " + message.getMessageId()
- + "\n getSendTime: " + message.getSentTime()
- + "\n getDataMap: " + message.getDataOfMap()
- + "\n getMessageType: " + message.getMessageType()
- + "\n getTtl: " + message.getTtl()
- + "\n getToken: " + message.getToken());
- RemoteMessage.Notification notification = message.getNotification();
- if (notification != null) {
- Log.i(TAG, "\n getImageUrl: " + notification.getImageUrl()
- + "\n getTitle: " + notification.getTitle()
- + "\n getTitleLocalizationKey: " + notification.getTitleLocalizationKey()
- + "\n getTitleLocalizationArgs: " + Arrays.toString(notification.getTitleLocalizationArgs())
- + "\n getBody: " + notification.getBody()
- + "\n getBodyLocalizationKey: " + notification.getBodyLocalizationKey()
- + "\n getBodyLocalizationArgs: " + Arrays.toString(notification.getBodyLocalizationArgs())
- + "\n getIcon: " + notification.getIcon()
- + "\n getSound: " + notification.getSound()
- + "\n getTag: " + notification.getTag()
- + "\n getColor: " + notification.getColor()
- + "\n getClickAction: " + notification.getClickAction()
- + "\n getChannelId: " + notification.getChannelId()
- + "\n getLink: " + notification.getLink()
- + "\n getNotifyId: " + notification.getNotifyId());
- }
- Boolean judgeWhetherIn10s = false;
- // If the messages are not processed in 10 seconds, the app needs to use WorkManager for processing.
- if (judgeWhetherIn10s) {
- startWorkManagerJob(message);
- } else {
- // Process message within 10s
- processWithin10s(message);
- }
- }
- private void startWorkManagerJob(RemoteMessage message) {
- Log.d(TAG, "Start new job processing.");
- }
- private void processWithin10s(RemoteMessage message) {
- Log.d(TAG, "Processing now.");
- }
2.4 Configuring Whether to Display Notification Messages
2.4.1 Scenario Description
Notification messages are instant messages (IMs) that are directly displayed in NC. You can call the turnOnPush method to enable notification messaging or call the turnOffPush method to disable notification messaging. Notification messaging is enabled by default.
Notice:
1. This function is supported only on Huawei devices whose EMUI version is 5.1 or later.
2. To integrate the HMS SDK of the latest version into an app, the version of HMS Core (APK) in the app must be 3.0.0 or later. If the version is earlier than 3.0.0, for an app that can run in the foreground, the HMS SDK displays a message to prompt the user to upgrade HMS Core (APK) to the latest version. In this case, an Activity class instance must be transferred using an input parameter of HmsMessaging.getInstance. For an app that only runs in background, if you do not want to display the upgrade wizard window to the user, a Context class instance of a non-Activity type can be transferred.
2.4.2 Development Procedure
This section provides sample code for enabling notification messaging.
- HmsMessaging.getInstance(context).turnOnPush().addOnCompleteListener(new OnCompleteListener<Void>() {
- @Override
- public void onComplete(Task<Void> task) {
- if (task.isSuccessful()) {
- Log.i(TAG, "turnOnPush Complete");
- } else {
- Log.e(TAG, "turnOnPush failed: ret=" + task.getException().getMessage());
- }
- }
- });
2.5 Customizing Actions to Be Triggered upon Notification Message Tapping
You can customize the actions to be triggered when users tap notification messages, such as opening the home page of an app, accessing a specific URL, opening customized rich media, or opening a specified page of an app. This section describes how to carry out device-cloud synergy development to customize the actions of opening the home page and a specified page of an app and receive data from the app server.
Notice:
1. Tapping a notification message to open the home page or a specified page of an app is implemented by starting the target Activity across apps. Therefore, you need to set the exported attribute of the target Activity to true. That is, ensure that the target Activity is open to the public and not restricted by permission. Otherwise, the Activity can not be started.
2. To pass data to your app through a message, the Push Service app version must be 10.0.0 or later.
2.5.1 Opening a Specified Page of an App
To enable a user to open a specified page of an app upon a tap, you can either set the intent parameter in the RESTful API of the HUAWEI Push Kit server or set the action parameter. If both parameters are set, the value of the intent parameter is preferred.
Setting the intent Parameter
To start an Activity across apps, use an explicit Intent, which can transfer extra data to the app. The development procedure is as follows:
1. Generate Intent parameters.
In your Android Studio project, create Intent by referring to the following code:
- Intent intent = new Intent(Intent.ACTION_VIEW);
- // Define a scheme protocol, for example, pushscheme://com.huawei.codelabpush/deeplink?.
- intent.setData(Uri.parse("pushscheme://com.huawei.codelabpush/deeplink?"));
- // Add parameters to Intent as required.
- intent.putExtra("name", "abc");
- intent.putExtra("age", 180);
- // The following flag is mandatory. If it is not added, duplicate messages may be displayed.
- intent.addFlags(Intent.FLAG_ACTIVITY_CLEAR_TOP);
- String intentUri = intent.toUri(Intent.URI_INTENT_SCHEME);
- // The value of intentUri will be assigned to the intent parameter in the message to be sent.
- Log.d("intentUri", intentUri);
You can add parameters in either of the following methods:
Method 1: Use ampersands (&) to separate key-value pairs. The following is an example:
- intent.setData(Uri.parse("pushscheme://com.huawei.codelabpush/deeplink?name=abc&age=180"));
In this example, name=abc and age=180 are two key-value pairs separated by an ampersand (&).
Method 2: Directly add parameters to the Intent.
- intent.setData(Uri.parse("pushscheme://com.huawei.codelabpush/deeplink?"));
- intent.putExtra("name", "abc");
- intent.putExtra("age", 180);
For details about how to enable your app server to send messages, please refer to Server Development Guide. Message body example:
- {
- "message": {
- "notification": {
- "title": "message title",
- "body": "message body"
- },
- "android": {
- "notification": {
- "click_action": {
- "type": 1,
- "intent": "intent://com.huawei.codelabpush/deeplink?#Intent;scheme=pushscheme;launchFlags=0x4000000;i.age=180;S.name=abc;end"
- }
- }
- },
- "token": [
- "pushtoken1"
- ]
- }
- }
3. Register the Activity class to be started in the AndroidManifest.xml file of the client.
Register the Activity class by referring to the following configuration, where the values of host, path, and scheme must be the same as those defined in step 1. Otherwise, the specified page will not be displayed.
- <activity android:name=".DeeplinkActivity">
- <intent-filter>
- <action android:name="android.intent.action.VIEW" />
- <category android:name="android.intent.category.DEFAULT" />
- <category android:name="android.intent.category.BROWSABLE" />
- <data
- android:host="com.huawei.codelabpush"
- android:path="/deeplink"
- android:scheme="pushscheme" />
- </intent-filter>
- </activity>
4. Receive data in the customized Activity class.
- public class DeeplinkActivity extends Activity {
- @Override
- public void onCreate(Bundle savedInstanceState) {
- super.onCreate(savedInstanceState);
- setContentView(R.layout.activity_deeplink);
- Intent intent = getIntent();
- if (null != intent) {
- // Obtain data set in Method 1.
- String name1 = intent.getData().getQueryParameter("name");
- int age1 = Integer.parseInt(intent.getData().getQueryParameter("age"));
- // Obtain data set in Method 2.
- String name2 = intent.getStringExtra("name");
- int age2 = intent.getIntExtra("age", -1);
- Toast.makeText(this, "name " + name1 + ",age " + age1, Toast.LENGTH_SHORT).show();
- }
- }
- }
Setting the action Parameter
The value of the action parameter must be the same as the action name set in the intent-filter section of the Activity class registered in the AndroidManifest.xml file of the client.
1. Register the Activity class to be started in the AndroidManifest.xml file of the client.
- <activity android:name=".YourActivity">
- <intent-filter>
- <action android:name="com.huawei.codelabpush.intent.action.test" />
- <category android:name="android.intent.category.DEFAULT" />
- </intent-filter>
- </activity>
2. Set action in the message body on the app server.
- {
- "message": {
- "data": "{'score': '7','time': '16:42'}",
- "notification": {
- "title": "message title",
- "body": "message body"
- },
- "android": {
- "data": "{'androidData': '7','time': '16:42'}",
- "notification": {
- "click_action": {
- "type": 1,
- "action": "com.huawei.codelabpush.intent.action.test"
- }
- }
- },
- "token": [
- "pushtoken1"
- ]
- }
- }
3. Receive data in the customized Activity class.
For details, please refer to the sample code in Opening the Home Page of an App.
2.5.2 Opening the Home Page of an App
To trigger the action of opening the home page of an app and transfer extra data to the app when a user taps a notification message, perform the following development steps:
1. Enable your app server to send notification messages.
Use data in the message structure of the RESTful API provided by the HUAWEI Push Kit server to transfer data, and use click_action to specify the tap action. If message.android.data exists, its value will overwrite that of message.data. For details about how to enable your app server to send messages, please refer to Server Development Guide.
Message body example:
- {
- "message": {
- "data": "{'score': '7','time': '16:42'}",
- "notification": {
- "title": "message title",
- "body": "message body"
- },
- "android": {
- "data": "{'androidData': '7', 'time': '16:42'}",
- "notification": {
- "click_action": {
- "type": 3
- }
- }
- },
- "token": [
- "pushtoken1"
- ]
- }
- }
2. Register MainActivity in the AndroidManifest.xml file of the client.
Declare MainActivity as follows, which ensures that the home page of an app will be opened when a user taps a notification message.
- <activity android:name=".MainActivity">
- <intent-filter>
- <action android:name="android.intent.action.MAIN" />
- <category android:name="android.intent.category.LAUNCHER" />
- </intent-filter>
- </activity>
3. Receive data through MainActivity.
Implement the onCreate method of the MainActivity class to receive data.
- public class MainActivity extends Activity {
- @Override
- public void onCreate(Bundle savedInstanceState) {
- super.onCreate(savedInstanceState);
- setContentView(R.layout.activity_main);
- getIntentData(getIntent());
- }
- private void getIntentData(Intent intent) {
- if (null != intent) {
- // Developers can use the following three lines of code to obtain the values for dotting statistics.
- String msgid = intent.getStringExtra("_push_msgid");
- String cmdType = intent.getStringExtra("_push_cmd_type");
- int notifyId = intent.getIntExtra("_push_notifyid", -1);
- Bundle bundle = intent.getExtras();
- if (bundle != null) {
- for (String key : bundle.keySet()) {
- String content = bundle.getString(key);
- Log.i(TAG, "receive data from push, key = " + key + ", content = " + content);
- }
- }
- Log.i(TAG, "receive data from push, msgId = " + msgid + ", cmd = " + cmdType + ", notifyId = " + notifyId);
- } else {
- Log.i(TAG, "intent is null");
- }
- }
- }
2.6 Automatic Initialization
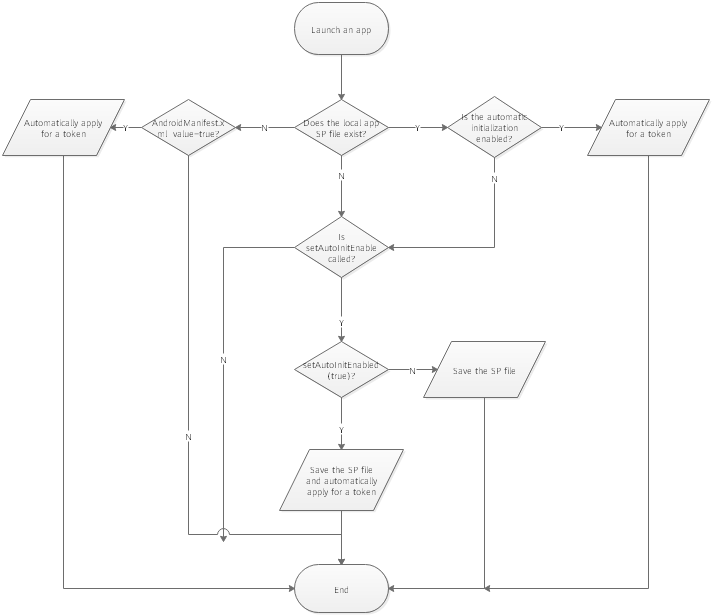
The HMS Core Push SDK 4.0 provides the capability of automatically generating AAIDs and automatically applying for tokens. After this capability is configured, the applied token is returned through the onNewToken() method. You can configure automatic initialization by adding the meta-data section to the AndroidManifest.xml file or calling the setAutoInitEnabled(boolean enable) method in the HmsMessaging class.
Method 1
Add the meta-data section under application in the AndroidManifest.xml file. The following is sample code, in which the value of name cannot be changed, and value indicates whether to enable automatic initialization. The options are true (yes) and false (no).
- <application
- <meta-data
- android:name="push_kit_auto_init_enabled"
- android:value="true" />
- </application>
Method 2
Explicitly call the setAutoInitEnabled(boolean enable) method in the HmsMessaging class. In the method, the enable parameter indicates whether to enable automatic initialization. The options are true (yes) and false (no). The value will be saved in a file in the shared_prefs directory on your app server.
Will the two methods conflict with each other?
To determine whether automatic initialization is enabled, the HMS Core Push SDK checks whether the file in the shared_prefs directory on the app server contains the setting of push_kit_auto_init_enabled. If so, the HMS Core Push SDK does not read the setting in the meta-data section. If not, the HMS Core Push SDK reads the setting in the meta-data section.
The following figure shows the SDK checking
2.7 Client Test
So far, you have completed the basic function development on the client side. You can package your Android project into an APK and install it on a mobile phone for testing. Ensure that you use a correct certificate fingerprint (for details, please refer to Generating a Signing Certificate Fingerprint).
You can test whether messages sent through HUAWEI Push Kit can be received by apps by referring to Sending Messages from the HUAWEI Push Kit Console. To enable the app server to send customized messages to apps, please refer to Server Development Guide.
3. Server Development Guide
The HUAWEI Push Kit server supports HTTPS for sending both uplink and downlink messages. The following sections provide guidance for HTTP-based downlink messaging. For details about sending uplink messages, please refer to Uplink Messages Sending.
Notice:
Before sending a message to the HUAWEI Push Kit server, your app server needs to obtain an app-level access token. For details about how to obtain the access token, please refer to
Open Platform Authentication -
Client Password Mode.
The following figure shows the HTTPS-based messaging process.
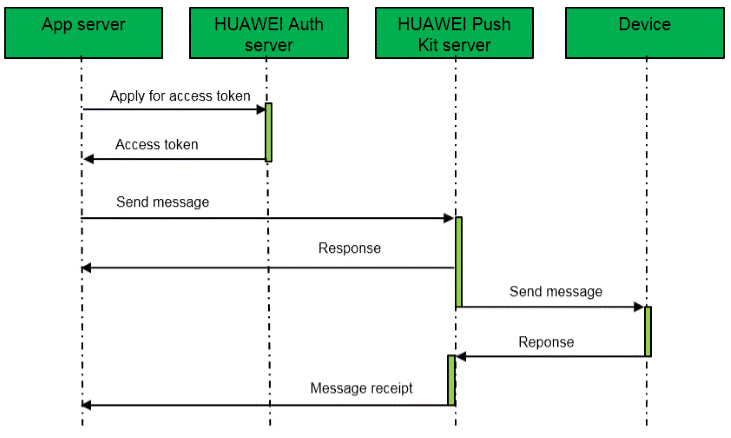
The process is as follows:
1. Your app server obtains an access token. For details, please refer to Open Platform Authentication - Client Password Mode.
2. Your app server calls an API to send a message to HUAWEI Push Kit server. For details, please refer to Sending Messages.
Sample code of a typical notification message:
- {
- "validate_only": false,
- "message": {
- "notification": {
- "title": "title",
- "body": "body"
- },
- "android": {
- "notification": {
- "title": "android title",
- "body": "android body",
- "click_action": {
- "type": 1,
- "intent": "#Intent;compo=com.rvr/.Activity;S.W=U;end"
- }
- }
- },
- "token": [
- "pushtoken1",
- "pushtoken2"
- ]
- }
- }
Notice:
If message.android.notification.title and message.android.notification.body are set for a notification message, their values will overwrite those of message.notification.title and message.notification.body respectively.
Sample code of a typical data message:
- {
- "validate_only": false,
- "message": {
- "data": "{'param1':'value1','param2':'value2'}",
- "token": [
- "pushtoken1",
- "pushtoken2"
- ]
- }
- }
3. Your app server receives a message receipt. For details, please refer to Message Receipt.