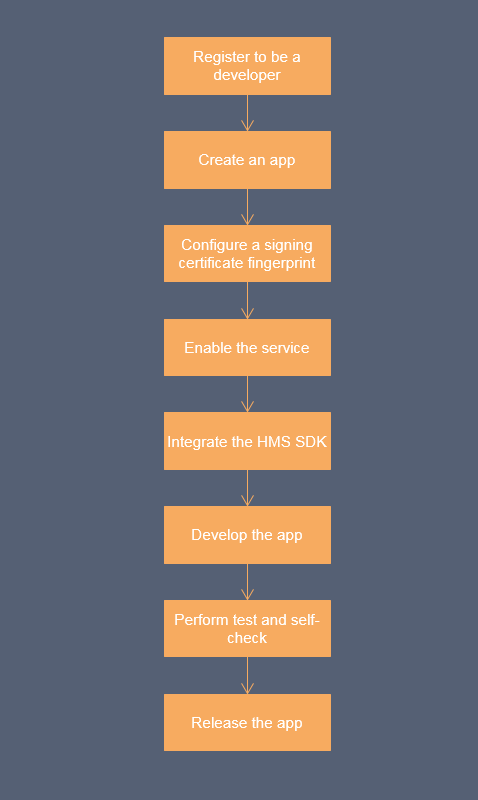
If you have an app with third-party mobile services integrated, you can use HMS Convertor to automatically convert APIs of the third-party mobile services into HMS-based APIs, achieving quick integration of HMS services. To learn more about HMS Convertor, click here.
Before you get started, you must register as a HUAWEI developer and complete identity verification on the HUAWEI Developer website. For details, please refer to Register a HUAWEI ID.
Create an app by referring to Creating a Project and Creating an App in the Project. Special configurations for a game app are as follows:
Platform: SelectAndroid.
Device: SelectMobile phone.
App category: SelectGame.
A signing certificate fingerprint is used to verify the authenticity of an app when it attempts to access Huawei Mobile Services (APK) through the HMS SDK. Before using the HMS Core service, you must locally generate a signing certificate fingerprint and configure it on HUAWEI Developer. Please ensure that the following conditions are met:
● You have created the app's signature file.
● The JDK has been installed on your PC.
Perform the following steps:
1. Open the command line tool (using the cmd command) and run the cd command to go to the directory where keytool.exe is located. In the following example, the Java program is installed in Program Files (x86) in the C drive.

2. Run keytool -genkey -alias android_test_key -keyalg RSA -keystore <keystore-file> and generate the app's signature file following the instructions.
-alias android_test_key, where "android_test_key" is an alias and can be any character, as long as no error is prompted.
-keyalg RSA, where "RSA" is the key algorithm.
-keystore <keystore-file>, where <keystore-file> is the complete path of the app's signature file.
Example:
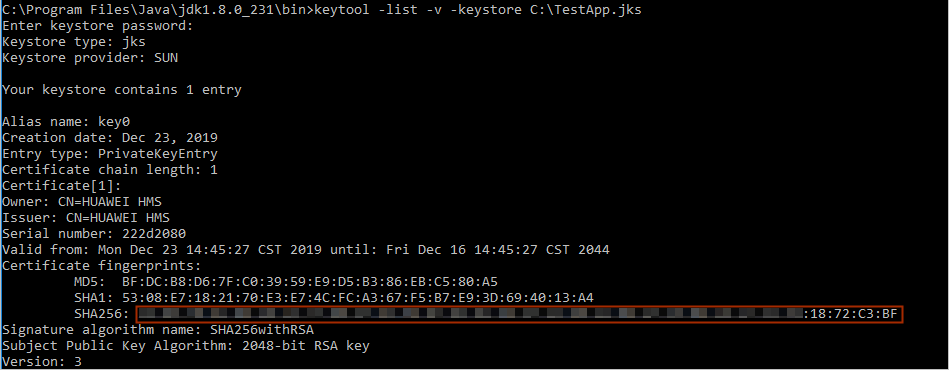
- keytool -list -v –keystore E:\Android.keystore
3. Obtain the SHA-256 fingerprint from the result.
1. Sign in toAppGallery Connectand select My projects.
2.Find your project from the project list and click the app on the project card.
3. On the Project Setting page, set SHA-256 certificate fingerprint to the SHA-256 fingerprint from Generating a Signing Certificate Fingerprint.
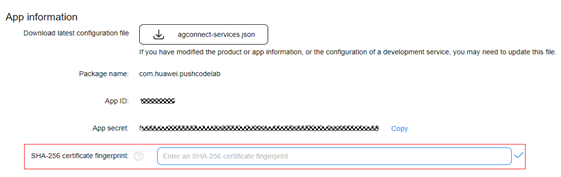
4. After completing configuration, click √.
To use the Safety Detect function, you must enable the Safety Detect service. For details, please refer to Enabling Services.
If you are using Android Studio, you can integrate your HMS SDK by using the Maven repository. Before you start developing an app, integrate the HMS SDK into your Android Studio first.
1. Add the AppGallery Connect configuration file of the current app to your AndroidStudio.
a. Sign in toAppGallery Connectand select My projects.
b. Find your project from the project list and click the app on the project card.
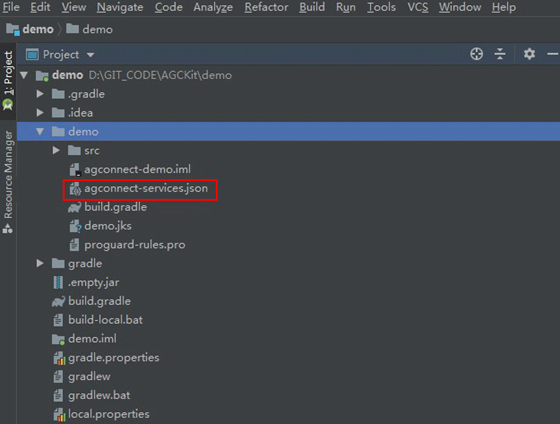
c. On the Project Setting page, click agconnect-services.json to download the configuration file.
d. Copy the agconnect-services.json file to the app root directory.
2. Configure the Maven repository address for the HMS SDK.
a. Open the build.gradle file in the root directory of your Android Studio project.
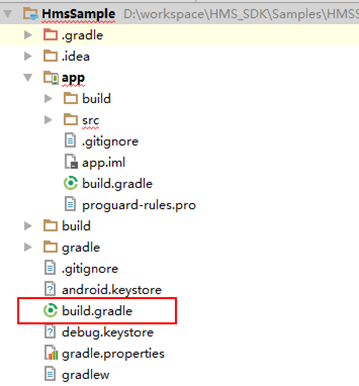
b. Go to allprojects > repositories and configure the Maven repository address for the HMS SDK.
- allprojects {
- repositories {
- google()
- jcenter()
- maven {url 'https://developer.huawei.com/repo/'}
- }
- }
c. Go to buildscript > repositories and configure the Maven repository address for the HMS SDK.
- buildscript {
- repositories {
- google()
- jcenter()
- maven {url 'https://developer.huawei.com/repo/'}
- }
- }
d. Go to buildscript > dependencies and configure the AppGallery Connect plug-in address.
- buildscript {
- dependencies {
- classpath 'com.android.tools.build:gradle:3.3.0'
- classpath 'com.huawei.agconnect:agcp:1.2.1.301'
- }
- }
3. Add build dependencies and address of the AppGallery Connect plug-in.
a. Open the build.gradle file in the app directory.
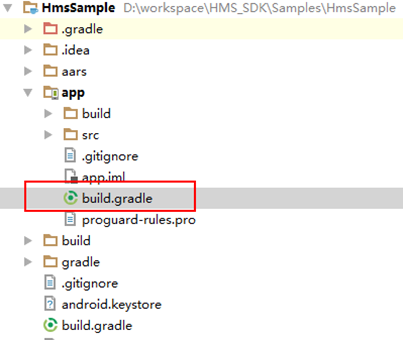
b. Add the AppGallery Connect plug-in dependency to the file header.
- apply plugin: 'com.huawei.agconnect'
c. Configure build dependencies.
- dependencies {
- implementation 'com.huawei.hms:safetydetect:4.0.3.300'
- }
4. Open the modified build.gradle file again. You will find a Sync Now link in the upper right corner of the page.
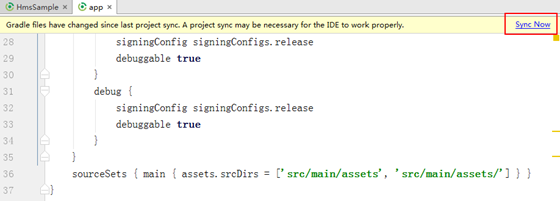
Click Sync Now and wait until synchronization is complete.
5. Define multi-language settings.
● Skip this step if your app does not require support for additional languages. By default, the app will support all languages supported by the HMS SDK.
● If your app only supports certain languages, you can configure the languages during this step.
Open the build.gradle file in the app directory of your project.

Go to android > defaultConfig and add the resConfigs configuration. en (English) and zh-rCN (Simplified Chinese) are mandatory. For example, if your app supports only English and Simplified Chinese, the configuration is as follows:
- android {
- defaultConfig {
- ...
- resConfigs "en","zh-rCN"
- }
- }
For details about the languages supported by the HMS SDK, please refer to Languages Supported by HMS SDK.
Before starting your development in the Eclipse Integrated Development Environment (IDE), download the HMS SDK and integrate it into your app project.
1. Download the .zip packages of the HMS Base SDK and HMS Core Safety Detect SDK at the following URLs, and decompress the packages.
Download and decompress the zip packages of the HMS Base SDK and HUAWEI Account SDK.
For details, please refer to Eclipse SDK Download.
2. Go to File > Import to import all SDK projects to your workspace.
a. Go to Android > Existing Android Code Into Workspace and click Next.
b. Click Browse and navigate to the directory where your projects are located. Select the projects to be imported under Projects and click Finish. By default, all projects are selected. You can change as needed.
1. Right-click your app project and choose Properties from the shortcut menu.
2. Choose Resource > Android from the navigation tree, click Add, select the imported projects, and click Apply and Close.
3. As the XML file in the Eclipse IDE does not support the dollar sign ($), replace ${applicationId} in the AndroidManifest.xml file of the HMSSdkBase and Agconnect-core projects with your app package name.
- <application>
- <provider
- android:name="com.huawei.agconnect.core.provider.AGConnectInitializeProvider"
- android:authorities="${applicationId}.AGCInitializeProvider"
- android:exported="false" />
- <service
- android:name="com.huawei.agconnect.core.ServiceDiscovery"
- android:exported="false" />
- </application>
Copy the properties files in the assets directory of the HMSSdkBase project to the assets directory of your app project.
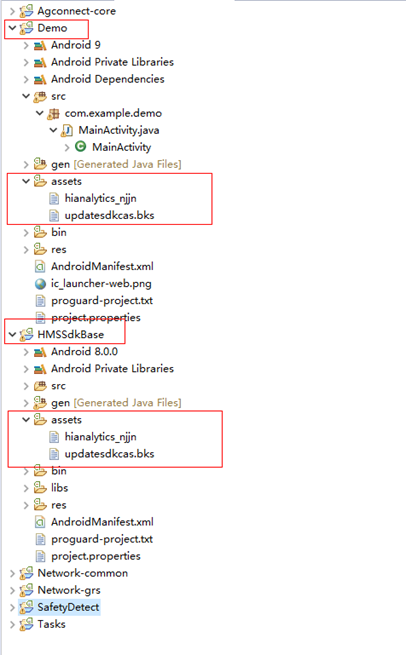
Find and open the file in your project directory and add the following code to merge the manifest files in the subprojects:
- manifestmerger.enabled=true
1. Sign in to AppGallery Connect and select My apps.
2. Find your app from the list and click the app name.
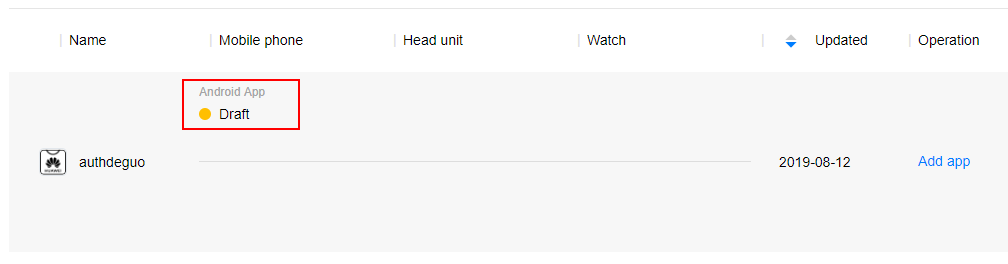
3. Go to Development > Overview > App information.
4. Click agconnect-services.json to download the configuration file.

5. The Eclipse IDE does not support the AppGallery Connect plug-in. Therefore, you need to place the agconnect-services.json file in the assets directory of your project and add the following code to the Application subclass of the project. If the project does not have an Application subclass, you need to create a subclass that is inherited from the Application subclass. For example, create a MyApplication class.
- public class MyApplication extends Application{
- @Override
- public void onCreate() {
- super.onCreate();
- }
- // TODO: Add the following code:
- @Override
- protected void attachBaseContext(Context context) {
- super.attachBaseContext(context);
- AGConnectServicesConfig config = AGConnectServicesConfig.fromContext(context);
- config.overlayWith(new LazyInputStream(context) {
- public InputStream get(Context context) {
- try {
- return context.getAssets().open("agconnect-services.json");
- } catch (IOException e) {
- return null;
- }
- }
- });
- }
- // TODO: End
- }
You still need to import the following classes:
- import java.io.IOException;
- import java.io.InputStream;
- import com.huawei.agconnect.config.AGConnectServicesConfig;
- import com.huawei.agconnect.config.LazyInputStream;
- import android.app.Application;
- import android.content.Context;
- import android.util.Log;
6. Open the AndroidManifest.xml file of your project and add the Application subclass name to the application section. If the subclass name has been added, skip this step. In the following example, add the MyApplication class name.
- <application
- android:name=".MyApplication"
- …
- >
- </application>
7. On the Eclipse IDE menu bar, click Project, then Clean
Before building the APK, configure obfuscation scripts to prevent the HMS SDK from being obfuscated. If obfuscation arises, the HMS SDK may not function properly.
The configuration file in Android Studio is proguard-rules.pro, and that in Eclipse is proguard-project.txt.
1. Open the obfuscation configuration file of your project and add configurations to exclude the HMS SDK from obfuscation.
- -ignorewarnings
- -keepattributes *Annotation*
- -keepattributes Exceptions
- -keepattributes InnerClasses
- -keepattributes Signature
- -keepattributes SourceFile,LineNumberTable
- -keep class com.hianalytics.android.**{*;}
- -keep class com.huawei.updatesdk.**{*;}
- -keep class com.huawei.hms.**{*;}
2. If you have used AndResGuard, add it to the whitelist in the obfuscation script file.
- "R.string.hms*",
- "R.string.agc*",
- "R.string.connect_server_fail_prompt_toast",
- "R.string.getting_message_fail_prompt_toast",
- "R.string.no_available_network_prompt_toast",
- "R.string.third_app_*",
- "R.string.upsdk_*",
- "R.layout.hms*",
- "R.layout.upsdk_*",
- "R.drawable.upsdk*",
- "R.color.upsdk*",
- "R.dimen.upsdk*",
- "R.style.upsdk*
For details, please refer to the following sections:
HUAWEI Developer provides a tool that fully automates checking of apps. You simply fill in the app information and upload the APK, and the tool will scan your APK and provide you with a report. You can then optimize your app based on the report for improved performance.
For details about the check procedure, please refer to Self-check Before Release.
Before submitting your app to us, you need to learn the following rules and FAQs:
After developing your app, you need to complete the app information and submit your app for release in AppGallery Connect. For details, please refer to Releasing an App.