概述
在应用开发中,动态模糊效果虽然能够增强视觉体验,但不当使用(如对图片组件使用动态模糊、模糊半径过大等)可能导致性能问题,如图像卡顿、丢帧或渲染耗时增加等。这些问题不仅影响用户体验,还可能增加应用的功耗。通过合理优化代码逻辑,可有效降低渲染开销,提升用户体验。本文通过AppAnalyzer工具检测应用中存在的图像模糊卡顿问题,结合工具提示的故障原因,给出相应的优化解决方案,帮助开发者解决图像模糊性能问题。
图像模糊卡顿问题检测和分析
开发者可以通过AppAnalyzer工具对应用的图像模糊性能进行检测,并根据检测报告中的建议进行优化,确保图像模糊性能达标。使用AppAnalyzer工具检测图像模糊性能的步骤如下:
在DevEco Studio中启动AppAnalyzer工具,详细请参见AppAnalyzer。
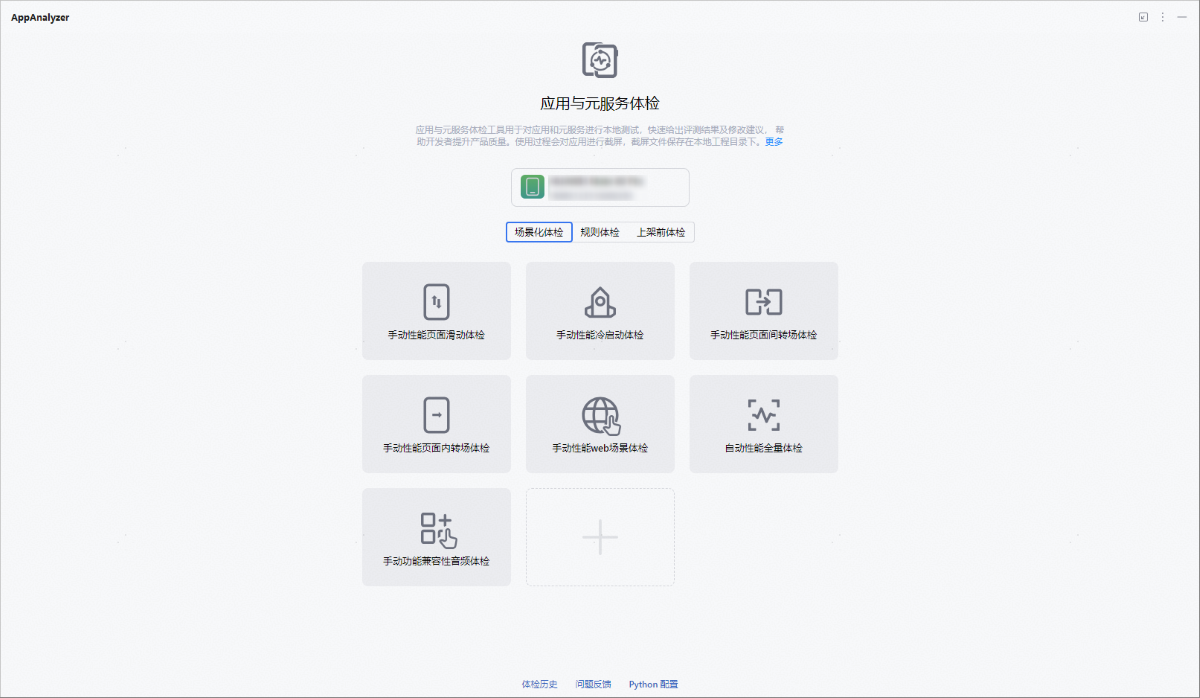
默认选择场景化体检,点击任一手动性能体检项(页面间转场、页面内转场、页面滑动)即可进入对应体检界面。本文以“手动性能页面间转场体检”为例进行说明。
完成体检后,打开体检报告并点击展开“转场卡顿率”部分。如果检测结果显示黄色或红色警告,且提示“可能故障原因”为“动态模糊绘制丢帧诊断”,则表明存在图像模糊性能问题。
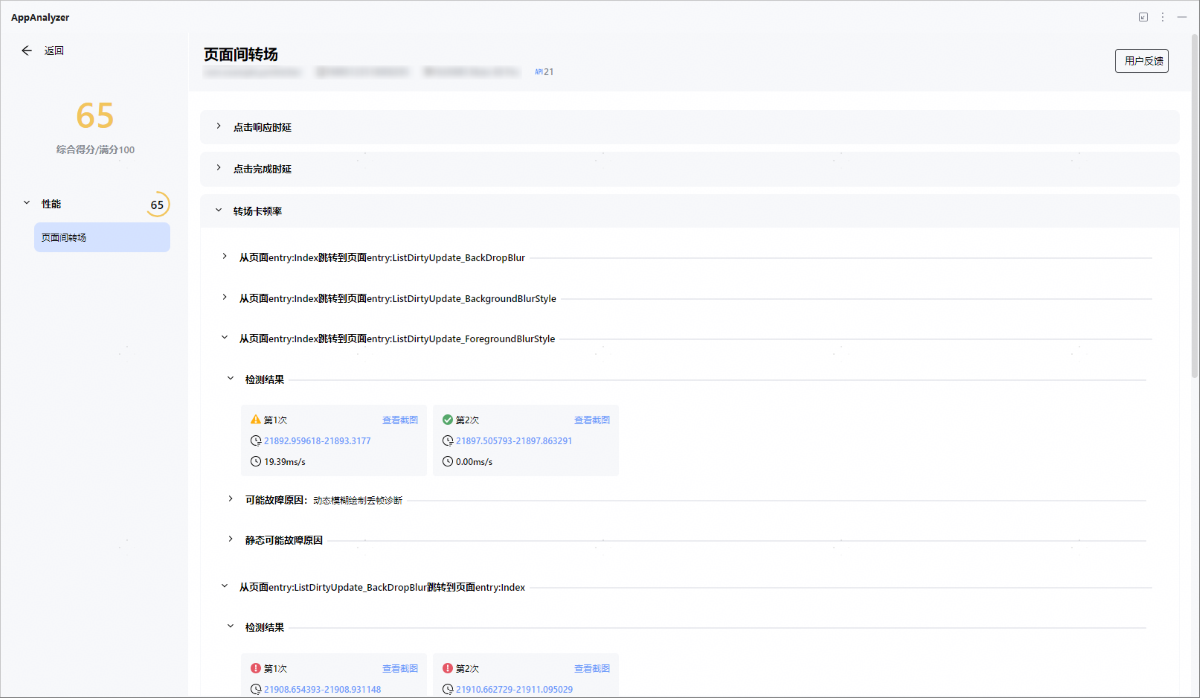
在检测出的图像模糊报告中,若“可能故障原因”为“动态模糊绘制丢帧诊断”,可参考以下两点建议进行优化:
- 建议对图片组件使用静态模糊
- 建议缩小模糊半径
[h2]对图片组件使用静态模糊
在使用动态模糊对图片组件进行处理时,若检测结果异常,动态模糊绘制过程中出现丢帧情况。建议改用静态模糊,以优化图片模糊性能。动态模糊与静态模糊的概念及使用场景,请参阅相关文档:使用场景。
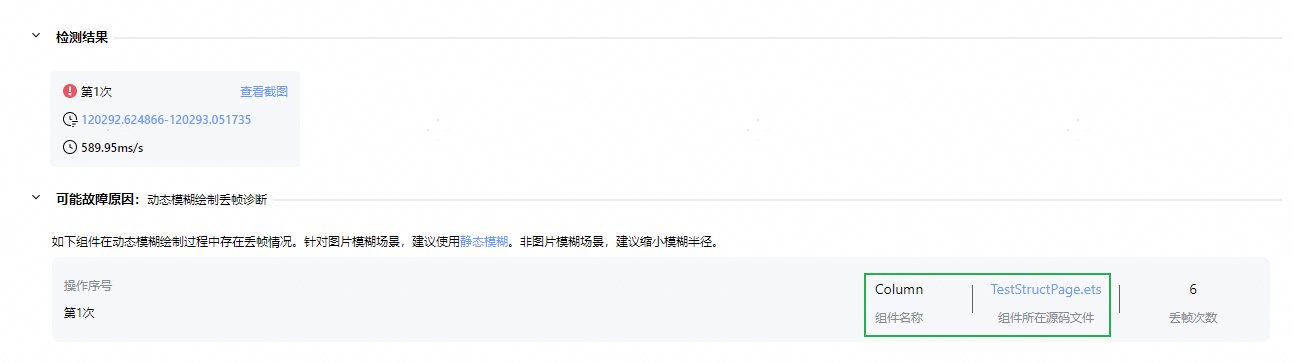
例如,从检测报告中的可能故障原因中,点击组件所在源码文件,可跳转定位至TestStructPage.ets页面中的Column组件处。在示例代码中,使用了blur动态模糊API对图片组件进行模糊处理,导致在检测中总耗时过长和丢帧。
反例
Column() {
  Image($r('app.media.test'))
    .width('100%')
    .height('30%')
    .objectFit(ImageFit.Auto)
    .blur(13)
  // ...
}
优化建议
针对图片模糊场景,建议使用静态模糊。通过静态模糊和动态模糊性能效果对比,可以发现在模糊效果类似的条件下,静态模糊的性能要优于动态模糊。建议开发者在组件背景和内容无需实时更新的场景中,优先使用静态模糊,可以减少应用卡顿与丢帧,提升用户体验。
正例
import { image } from '@kit.ImageKit';
import { effectKit } from '@kit.ArkGraphics2D';
import { window } from '@kit.ArkUI';
import { hilog } from '@kit.PerformanceAnalysisKit';
import { BusinessError } from '@kit.BasicServicesKit';

@Component
export struct StaticBlur {
  @Consume('navPathStack') navPathStack: NavPathStack;
  @State isShowStaticBlur: boolean = false;
  @State pixelMap: image.PixelMap | undefined = undefined;
  @State imgSource: image.ImageSource | undefined = undefined;
  @State bottomSafeHeight: number = 0; // 底部导航栏高度

  aboutToAppear(): void {
    window.getLastWindow(this.getUIContext().getHostContext()!, (err, windowBar) => {
      if (err.code) {
        return;
      }
      try {
        // 获取底部导航栏的高度
        this.bottomSafeHeight =
          this.getUIContext()
            .px2vp(windowBar.getWindowAvoidArea(window.AvoidAreaType.TYPE_NAVIGATION_INDICATOR).bottomRect.height);
      } catch (error) {
        let err: BusinessError = error as BusinessError;
        hilog.warn(0x0000, 'testTag', `getWindowAvoidArea failed, code=${err.code}, message=${err.message}`);
      }
      windowBar.setWindowLayoutFullScreen(true)
        .catch((err: BusinessError) => {
          hilog.error(0x0000, 'testTag', `setWindowLayoutFullScreen failed, code=${err.code}, message=${err.message}`);
        })
    });
  }

  aboutToDisappear(): void {
    // 在组件销毁时释放pixelMap和imgSource
    this.pixelMap?.release();
    this.pixelMap = undefined;
    this.imgSource?.release();
    this.imgSource = undefined;
  }

  async staticBlur(): Promise<void> {
    let context: Context = this.getUIContext().getHostContext()!;
    await context.resourceManager.getRawFileContent('test.png') // 从rawfile文件目录中检索图像
      .then((fileData: Uint8Array) => {
        let buffer: ArrayBuffer = fileData.buffer.slice(0); // 创建一个ArrayBuffer实例
        this.imgSource = image.createImageSource(buffer); // 创建ImageSource实例
      })
      .catch((err: BusinessError) => {
        hilog.error(0x0000, 'testTag', `getRawFileContent failed, code=${err.code}, message=${err.message}`);
      })
    // 为pixels创建属性
    let opts: image.InitializationOptions = {
      editable: true, // 是否可编辑
      pixelFormat: 3, // 像素格式,3代表RGBA_8888
      size: {
        // 创建图像尺寸
        height: 4,
        width: 6
      }
    };
    // 创建PixelMap
    await this.imgSource!.createPixelMap(opts).then((pixelMap: image.PixelMap) => {
      const blurRadius: number = 3;
      let headFilter: effectKit.Filter = effectKit.createEffect(pixelMap); // 创建Filter实例
      if (headFilter !== null) {
        headFilter.blur(blurRadius); // 设置静态模糊,将模糊效果添加到效果列表中
        // 使用添加了链表效果的PixelMap来检索源图像的图像
        headFilter.getEffectPixelMap().then((pixelMap: image.PixelMap) => {
          this.pixelMap = pixelMap;
          this.imgSource?.release(); // 释放ImageSource
        }).catch((error: BusinessError) => {
          hilog.error(0x0000, 'testTag', `getEffectPixelMap failed, code=${error.code}, message=${error.message}`);
        });
      }
    })
  }

  @Builder
  staticBlurBuilder() {
    Stack({ alignContent: Alignment.Bottom }) {
      Image(this.pixelMap)
        .width('100%')
        .height('100%')
        .objectFit(ImageFit.Fill)
      Button('close')
        .width('90%')
        .height(40)
        .margin({ bottom: this.bottomSafeHeight + 16 })
        .onClick(() => {
          this.isShowStaticBlur = false;
          this.pixelMap?.release(); // 释放PixelMap
        })
    }
    .width('100%')
    .height('100%')
  }

  build() {
    NavDestination() {
      Column() {
        Button('static blur')
          .width('90%')
          .height(40)
          .onClick(() => {
            this.isShowStaticBlur = true;
            // 设置静态模糊
            this.staticBlur();
          })
          .bindContentCover(this.isShowStaticBlur, this.staticBlurBuilder(), {
            modalTransition: ModalTransition.DEFAULT
          })
      }
      .padding({ bottom: this.bottomSafeHeight + 16 })
      .width('100%')
      .height('100%')
      .justifyContent(FlexAlign.End)
    }
    .hideTitleBar(true)
  }
}
[h2]缩小模糊半径
在对非图片组件(如Text组件)或不适用静态模糊的场景(如Gif动图)使用模糊时,若检测结果显示动态模糊绘制时出现丢帧异常,可以考虑缩小模糊半径,以优化图片模糊性能。
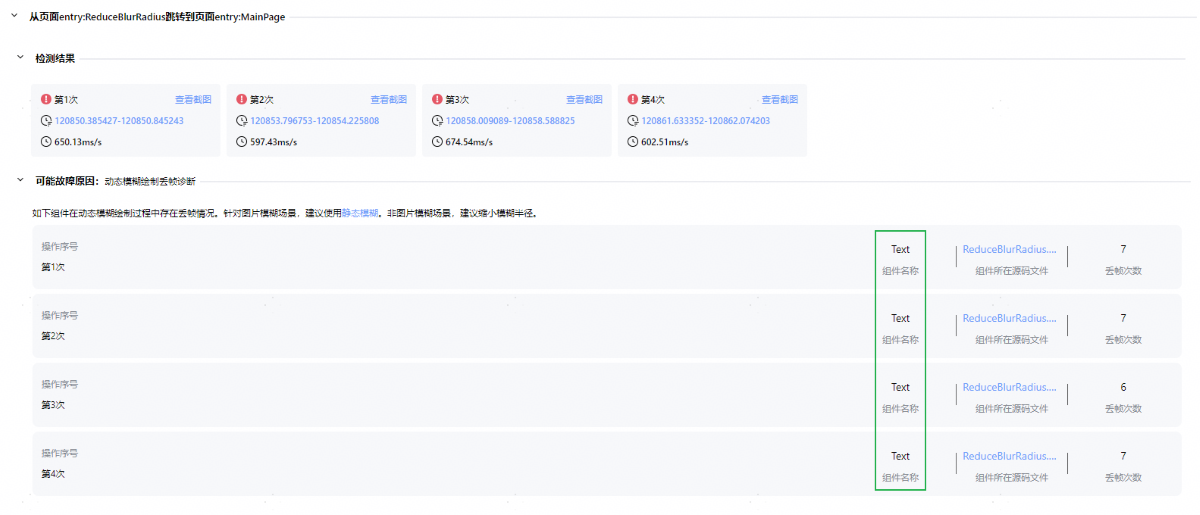
例如,从检测报告中可能故障原因中,点击组件所在源码文件,可跳转定位至ReduceBlurRadius.ets页面中的Text组件处。在示例代码中,使用了backdropBlur()对Text组件进行背景模糊,其模糊半径为2。
反例
Text('Backdrop Blur')
  .padding(5)
  .width('90%')
  .height('50%')
  .fontSize(20)
  .fontColor(Color.White)
  .textAlign(TextAlign.Center)
  .backdropBlur(2)
  .backgroundImage($r('app.media.test'))
  .backgroundImageSize({ width: '90%' })
  .backgroundImagePosition(Alignment.Center)
优化建议
非图片模糊场景,建议缩小模糊半径。动态模糊每帧需重新计算,通过缩小半径,可降低性能消耗。
正例
Text('Backdrop Blur')
  .padding(5)
  .width('90%')
  .height('50%')
  .fontSize(20)
  .fontColor(Color.White)
  .textAlign(TextAlign.Center)
  .backdropBlur(0.2) // 模糊半径减小至0.2,具体数值需根据实际需求而定
  .backgroundImage($r('app.media.test')) // 这里的 'app.media.test' 只是一个示例,开发者应将其替换为自己的内容
  .backgroundImageSize({ width: '90%' })
  .backgroundImagePosition(Alignment.Center)
表 1 常见的模糊API及其对应的优化建议
| 模糊API和模糊类型 | 优化建议 |
|---|---|
blur:内容模糊 backdropBlur:背景模糊 backgroundBlurStyle:背景模糊 foregroundBlurStyle:内容模糊 backgroundEffect:背景模糊 | 1、若是图片组件,建议使用静态模糊; 2、若是非图片组件或不适用静态模糊的场景,建议减小模糊半径; |