Navigation提供系统路由表和自定义路由表两种实现方式,通过路由表的配置可以完成本包和跨包的页面跳转。
支持自定义路由表和系统路由表混用。
系统路由表
系统路由表是动态路由的一种实现方式。从API version 12开始,Navigation支持使用系统路由表的方式进行动态路由。从API version 23开始,Navigation组件支持跳转到按需加载的HSP页面。
系统路由表支持模拟器但不支持预览器。
要实现系统路由表,各业务模块(HAP、HSP、HAR)中需要独立配置router_map.json文件,在触发路由跳转时,应用只需要通过NavPathStack提供的路由方法,传入需要路由的页面配置名称,此时系统会自动完成路由模块的动态加载、页面组件构建,并完成路由跳转,从而实现了开发层面的模块解耦。其主要步骤如下:
-
添加完路由配置文件地址后,在工程resources/base/profile路径下创建router_map.json文件。添加如下配置信息,各字段含义详见routerMap标签。
{ "routerMap": [ { "name": "PageOne", "pageSourceFile": "src/main/ets/pages/PageOne.ets", "buildFunction": "PageOneBuilder", "data": { "description" : "this is PageOne" } } ] } -
在跳转目标模块的配置文件module.json5添加路由表配置。
{ "module": { // ... "routerMap": "$profile:router_map", // ... } } -
在跳转目标页面,配置入口Builder函数,函数名称需要和router_map.json配置文件中的buildFunction保持一致,否则在编译时会报错。
// 跳转页面入口函数 @Builder export function PageOneBuilder() { PageOne(); } @Component struct PageOne { pathStack: NavPathStack = new NavPathStack(); build() { NavDestination() { } .title('PageOne') .onReady((context: NavDestinationContext) => { this.pathStack = context.pathStack; }) } } -
通过pushPathByName等路由接口进行页面跳转。
@Entry
@Component
struct SystemRoutingTable {
  pageStack : NavPathStack = new NavPathStack();

  build() {
    Navigation(this.pageStack){
    }.onAppear(() => {
      this.pageStack.pushPathByName('PageOne', undefined, false);
    })
    .hideNavBar(true)
  }
}
自定义路由表
自定义路由表通过给Navigation的navDestination属性设置Builder函数实现,其特点是需要import页面。有两种import页面的方式,静态import和动态import,二者的区别在于:
| import方式 | 模块间耦合度 | 实现复杂度 | 性能 |
|---|---|---|---|
| 动态import | 模块间解耦。 | 复杂度高。 | 性能好,按需加载,跳转前再加载对应页面。 |
| 静态import | 模块间耦合。 | 复杂度低。 | 性能一般,初始化时一次性加载所有依赖的页面。 |
[h2]动态import
动态import主要用于多个模块(HAR/HSP)复用相同业务逻辑的场景,实现各业务模块间的解耦,同时支持路由功能的扩展与整合,可以按需import。
动态import的优势:
- 路由定义除了跳转的URL以外,可以配置丰富的扩展信息,如横竖屏默认模式、是否需要鉴权等等,做路由跳转时统一处理。
- 给每个路由页面设置一个名字,按照名称进行跳转而不是文件路径。
- 页面的加载可以使用动态import(按需加载),防止首个页面加载大量代码导致卡顿。
实现步骤如下,具体请参考自动生成动态路由示例。
- 定义页面跳转配置项。
- 使用资源文件进行定义,通过资源管理@ohos.resourceManager在运行时对资源文件解析。
- 在ets文件中配置路由加载配置项,一般包括路由页面名称(即pushPath等接口中页面的别名),文件所在模块名称(HSP/HAR的模块名),加载页面在模块内的路径(相对src目录的路径)。
- 加载目标跳转页面,通过动态import将跳转目标页面所在的模块在运行时加载,在模块加载完成后,调用模块中的方法,通过import在模块的方法中加载模块中显示的目标页面,并返回页面加载完成后定义的Builder函数。
- 触发页面跳转,在Navigation的navDestination属性中执行步骤2加载的Builder函数,即可跳转到目标页面。
[h2]静态import
静态import实现方式简单,但通过静态import页面进行路由跳转会导致不同模块之间的依赖耦合,并存在首页加载时间长等问题。建议使用动态import或系统路由表。
静态import实现步骤如下:
- 使用@Builder装饰器创建自定义构造函数pageMap。
- 在自定义构造函数pageMap里实现路由表,根据传入的页面名称构造不同的页面。
- 将pageMap配置到Navigation的navDestination属性中,完成路由表注册。
import { hilog } from '@kit.PerformanceAnalysisKit';

const DOMAIN = 0x0000;

@Entry
@Component
struct NavigationExample {
  @Provide('navPathStack') navPathStack: NavPathStack = new NavPathStack();
  private arr: number[] = [1, 2];

  @Builder
  pageMap(name: string) {
    if (name === 'NavDestinationTitle1') {
      pageOneTmp();
    } else if (name === 'NavDestinationTitle2') {
      pageTwoTmp();
    }
  }

  build() {
    Column() {
      Navigation(this.navPathStack) {
        TextInput({ placeholder: 'search...' })
          .width('90%')
          .height(40)

        List({ space: 12 }) {
          ForEach(this.arr, (item: number) => {
            ListItem() {
              Text('Page' + item)
                .width('100%')
                .height(72)
                .borderRadius(24)
                .fontSize(16)
                .fontWeight(500)
                .textAlign(TextAlign.Center)
                .onClick(() => {
                  this.navPathStack.pushPath({ name: 'NavDestinationTitle' + item });
                })
            }
          }, (item: number) => item.toString())
        }
        .width('90%')
        .margin({ top: 12 })
      }
      // $r('app.string.mainTitle')需要替换为开发者所需的字符串资源文件,资源文件中的value值为“主标题”
      .title($r('app.string.mainTitle'))
      .navDestination(this.pageMap)
      .mode(NavigationMode.Split)
    }
    .height('100%')
    .width('100%')
  }
}

@Component
export struct pageTwoTmp {
  @Consume('navPathStack') navPathStack: NavPathStack;
  context = this.getUIContext().getHostContext();

  build() {
    NavDestination() {
      Column() {
        Text('NavDestinationContent2')
      }.width('100%').height('100%')
    }.title('NavDestinationTitle2')
    .onBackPressed(() => {
      const popDestinationInfo = this.navPathStack.pop(); // 弹出路由栈的栈顶元素
      // $r('app.string.returnValue')需要替换为开发者所需的字符串资源文件,资源文件中的value值为“返回值”
      hilog.info(DOMAIN, 'testTag', 'pop', this.context!.resourceManager.getStringSync($r('app.string.returnValue').id),
        JSON.stringify(popDestinationInfo));
      return true;
    })
  }
}

@Component
export struct pageOneTmp {
  @Consume('navPathStack') navPathStack: NavPathStack;
  context = this.getUIContext().getHostContext();

  build() {
    NavDestination() {
      Column() {
        Text('NavDestinationContent1')
      }.width('100%').height('100%')
    }.title('NavDestinationTitle1')
    .onBackPressed(() => {
      const popDestinationInfo = this.navPathStack.pop(); // 弹出路由栈的栈顶元素
      // $r('app.string.returnValue')需要替换为开发者所需的字符串资源文件,资源文件中的value值为“返回值”
      hilog.info(DOMAIN, 'testTag', 'pop', this.context!.resourceManager.getStringSync($r('app.string.returnValue').id),
        JSON.stringify(popDestinationInfo));
      return true;
    })
  }
}
开发步骤
如下示例展示了基于系统路由表的跨包跳转,实现六个页面之间的相互跳转,其中HAP包有两个页面HapPageA和HapPageB,HSP包中有两个页面HspPageA和HspPageB,HAR包中也有两个页面HarPageA、HarPageB。
-
配置路由表。
参考系统路由表在每个HAP、HAR、HSP模块中配置各自的系统路由表,每个模块的src/main/resources/base/profile/目录都需要创建一个router_map.json文件。
在router_map.json文件中填写具体的路由表信息(下面仅以HAP模块中的配置为例),示例如下:
{ "routerMap": [ { "name": "HapPageA", "pageSourceFile": "src/main/ets/pages/HapPageA.ets", "buildFunction": "HapPageABuilder", "data": { "description": "this is HapPageA" } }, { "name": "HapPageB", "pageSourceFile": "src/main/ets/pages/HapPageB.ets", "buildFunction": "HapPageBBuilder", "data": { "description": "this is HapPageB" } } ] }在每个模块的module.json5中配置各自的路由表。
{ "module": { // ... "routerMap": "$profile:router_map", // ... } } -
跳转功能开发。
以HAP包中的HapPageA为例:
// 仅作为示例写法,其余页面、模块需自行创建
import { ControlPanel } from './Common';

@Component
export struct HapPageA {
  build() {
    NavDestination() {
      Stack({alignContent: Alignment.Center}) {
        ControlPanel()
      }.width('100%').height('100%')
    }.title('HapPageA')
    .onReady((ctx: NavDestinationContext) => {
      let config = ctx.getConfigInRouteMap();
    })
  }
}

// 页面的buildFunction,用于构造页面
@Builder
export function HapPageABuilder(): void {
  HapPageA();
}
其中Common是为了方便演示页面间跳转抽出来的一个控制面板组件,示例如下:
@Component export struct ControlPanel { private stack: NavPathStack | undefined = undefined; aboutToAppear(): void { let info = this.queryNavigationInfo(); this.stack = info?.pathStack; } build() { Column({ space: 20 }) { Button('push HapPageA').onClick(() => { this.stack?.pushPath({ name: 'HapPageA' }); }) Button('push HapPageB').onClick(() => { this.stack?.pushPath({ name: 'HapPageB' }); }) Button('push HarPageA').onClick(() => { this.stack?.pushPath({ name: 'HarPageA' }); }) Button('push HarPageB').onClick(() => { this.stack?.pushPath({ name: 'HarPageB' }); }) Button('push HspPageA').onClick(() => { this.stack?.pushPath({ name: 'HspPageA' }); }) Button('push HspPageB').onClick(() => { this.stack?.pushPath({ name: 'HspPageB' }); }) } } } -
编译构建。
因为HAR和HSP被HAP模块依赖,所以需要先编译HAR和HSP,为了方便演示,这里将编译产物放到一个公共目录里面。
图1 HSP、HAR编译产物示意图
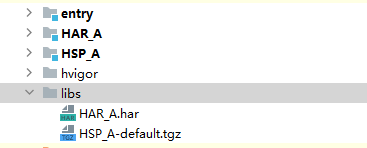
在HAP的oh-package.json5配置文件中配置对HAR与HSP的依赖。
{
  "name": "entry",
  "version": "1.0.0",
  "description": "Please describe the basic information.",
  "main": "",
  "author": "",
  "license": "",
  "dependencies": {
    "har_a": "file:../libs/HAR_A.har", // 因为演示中使用的是本地依赖包,所以通过file指示一个固定的文件。
    "hsp_a": "file:../libs/HSP_A-default.tgz", // 因为演示中使用的是本地依赖包,所以通过file指示一个固定的文件。
  }
}
然后在DevEco Studio中直接运行HAP模块,此时会将HAP与HSP一起安装到设备中,效果如下:
图2 Navigation跨包跳转示例