为了实现对@ComponentV2装饰的自定义组件中变量变化的观测,开发者可以使用@Local装饰器装饰变量。
在阅读本文档前,建议提前阅读:@ComponentV2。常见问题请参考组件内状态变量常见问题。

从API version 12开始,在@ComponentV2装饰的自定义组件中支持使用@Local装饰器。
从API version 12开始,该装饰器支持在元服务中使用。
从API version 23开始,该装饰器支持在ArkTS卡片中使用。
概述
@Local表示组件内部的状态,使得自定义组件内部的变量具有观察变化的能力:
-
被@Local装饰的变量无法从外部初始化,因此必须在组件内部进行初始化。
-
当被@Local装饰的变量变化时,会刷新使用该变量的组件。
-
@Local支持观测number、boolean、string、Object、class等基本类型以及Array、Set、Map、Date等内置类型。
-
@Local的观测能力仅限于被装饰的变量本身。当装饰简单类型时,能够观测到对变量的赋值;当装饰对象类型时,仅能观测到对对象整体的赋值;当装饰数组类型时,能观测到数组整体以及数组元素项的变化;当装饰Array、Set、Map、Date等内置类型时,可以观测到通过API调用带来的变化。详见观察变化。
-
@Local支持null、undefined以及联合类型。
状态管理V1版本@State装饰器的局限性
状态管理V1使用@State装饰器定义组件中的基础状态变量,该状态变量常用来作为组件内部状态,在组件内使用。但由于@State装饰器又能够从外部初始化,因此无法确保@State装饰变量的初始值一定为组件内部定义的值。
class ComponentInfo {
  public name: string;
  public count: number;
  public message: string;

  constructor(name: string, count: number, message: string) {
    this.name = name;
    this.count = count;
    this.message = message;
  }
}

@Component
struct Child {
  @State componentInfo: ComponentInfo = new ComponentInfo('Child', 1, 'Hello World'); // 父组件传递的componentInfo会覆盖初始值

  build() {
    Column() {
      Text(`componentInfo.message is ${this.componentInfo.message}`)
    }
  }
}

@Entry
@Component
struct Index {
  build() {
    Column() {
      Child({ componentInfo: new ComponentInfo('Unknown', 0, 'Error') })
    }
  }
}
上述代码中,可以通过在初始化Child自定义组件时传入新的值来覆盖作为内部状态变量使用的componentInfo。但Child自定义组件并不能感知到componentInfo从外部进行了初始化,这不利于自定义组件内部状态的管理。因此推出@Local装饰器表示组件的内部状态。
装饰器说明
| @Local变量装饰器 | 说明 |
|---|---|
| 装饰器参数 | 无。 |
| 可装饰的变量类型 | Object、class、string、number、boolean、enum等基本类型以及Array、Date、Map、Set等内置类型。支持null、undefined以及联合类型。 |
| 装饰变量的初始值 | 必须本地初始化,不允许外部传入初始化。 |
观察变化
使用@Local装饰的变量具有观察变化的能力。当装饰的变量发生变化时,会触发该变量绑定的UI组件刷新。
-
当装饰的变量类型为boolean、string、number时,可以观察到对变量赋值的变化。
@Entry @ComponentV2 struct Index { // 点击的次数 @Local count: number = 0; @Local message: string = 'Hello'; @Local flag: boolean = false; build() { Column() { Text(`${this.count}`) Text(`${this.message}`) Text(`${this.flag}`) Button('change Local') .onClick(() => { // 当@Local装饰简单类型时,能够观测到对变量的赋值 this.count++; this.message += ' World'; this.flag = !this.flag; }) } } } -
当装饰的变量类型为类对象时,仅可以观察到对类对象整体赋值的变化,无法直接观察到对类成员属性赋值的变化,对类成员属性的观察依赖@ObservedV2和@Trace装饰器,也可以使用makeObserved将该对象变为可观察对象。注意,API version 19之前,@Local无法和@Observed装饰的类实例对象混用。API version 19及以后,支持部分状态管理V1V2混用能力,允许@Local和@Observed同时使用,详情见状态管理V1和V2混用指导(API version 19及之后)。
class RawObject { public name: string; constructor(name: string) { this.name = name; } } @ObservedV2 class ObservedObject { @Trace public name: string; constructor(name: string) { this.name = name; } } @Entry @ComponentV2 struct Index { @Local rawObject: RawObject = new RawObject('rawObject'); @Local observedObject: ObservedObject = new ObservedObject('observedObject'); build() { Column() { Text(`${this.rawObject.name}`) Text(`${this.observedObject.name}`) Button('change object') .onClick(() => { // 对类对象整体的修改均能观察到 this.rawObject = new RawObject('new rawObject'); this.observedObject = new ObservedObject('new observedObject'); }) Button('change name') .onClick(() => { // @Local不具备观察类对象属性的能力,因此对rawObject.name的修改无法观察到 this.rawObject.name = 'new rawObject name'; // 由于ObservedObject的name属性被@Trace装饰,因此对observedObject.name的修改能被观察到 this.observedObject.name = 'new observedObject name'; }) } } } -
当装饰简单类型数组时,可以观察到数组整体或数组项的变化。
@Entry @ComponentV2 struct Index { @Local numArr: number[] = [1, 2, 3, 4, 5]; // 使用@Local装饰一维数组变量 @Local dimensionTwo: number[][] = [[1, 2, 3], [4, 5, 6]]; // 使用@Local装饰二维数组变量 build() { Column() { Text(`${this.numArr[0]}`) Text(`${this.numArr[1]}`) Text(`${this.numArr[2]}`) Text(`${this.dimensionTwo[0][0]}`) Text(`${this.dimensionTwo[1][1]}`) Button('change array item') // 按钮1:修改数组中的特定元素 .onClick(() => { this.numArr[0]++; this.numArr[1] += 2; this.dimensionTwo[0][0] = 0; this.dimensionTwo[1][1] = 0; }) Button('change whole array') // 按钮2:替换整个数组 .onClick(() => { this.numArr = [5, 4, 3, 2, 1]; this.dimensionTwo = [[7, 8, 9], [0, 1, 2]]; }) } } } -
当装饰的变量是嵌套类或对象数组时,@Local无法观察深层对象属性的变化。对深层对象属性的观测依赖@ObservedV2与@Trace装饰器。
@ObservedV2 class Region { @Trace public x: number; @Trace public y: number; constructor(x: number, y: number) { this.x = x; this.y = y; } } @ObservedV2 class Info { @Trace public region: Region; @Trace public name: string; constructor(name: string, x: number, y: number) { this.name = name; this.region = new Region(x, y); } } @Entry @ComponentV2 struct Index { @Local infoArr: Info[] = [new Info('Ocean', 28, 120), new Info('Mountain', 26, 20)]; @Local originInfo: Info = new Info('Origin', 0, 0); build() { Column() { ForEach(this.infoArr, (info: Info) => { Row() { Text(`name: ${info.name}`) Text(`region: ${info.region.x}-${info.region.y}`) } }) Row() { Text(`Origin name: ${this.originInfo.name}`) Text(`Origin region: ${this.originInfo.region.x}-${this.originInfo.region.y}`) } Button('change infoArr item') .onClick(() => { // 由于属性name被@Trace装饰,所以能够观察到 this.infoArr[0].name = 'Win'; }) Button('change originInfo') .onClick(() => { // 由于变量originInfo被@Local装饰,所以能够观察到 this.originInfo = new Info('Origin', 100, 100); }) Button('change originInfo region') .onClick(() => { // 由于属性x、y被@Trace装饰,所以能够观察到 this.originInfo.region.x = 25; this.originInfo.region.y = 25; }) } } } -
当装饰内置类型时,可以观察到变量整体赋值及API调用带来的变化。
类型 可观察变化的API Array push, pop, shift, unshift, splice, copyWithin, fill, reverse, sort Date setFullYear, setMonth, setDate, setHours, setMinutes, setSeconds, setMilliseconds, setTime, setUTCFullYear, setUTCMonth, setUTCDate, setUTCHours, setUTCMinutes, setUTCSeconds, setUTCMilliseconds Map set, clear, delete Set add, clear, delete
限制条件
@Local装饰器存在以下使用限制:
-
@Local装饰器只能在@ComponentV2装饰的自定义组件中使用。
@ComponentV2 struct MyComponent { @Local message: string = 'Hello World'; // 正确用法 build() { } } @Component struct TestComponent { @Local message: string = 'Hello World'; // 错误用法,编译时报错 build() { } } -
@Local装饰的变量表示组件内部状态,不允许从外部传入初始化。
@ComponentV2
struct ChildComponent {
  @Local message: string = 'Hello World';
  build() {
  }
}
@ComponentV2
struct MyComponent {
  build() {
    ChildComponent({ message: 'Hello' }) // 错误用法,编译时报错
  }
}
@Local与@State对比
@Local与@State的用法、功能对比如下:
| 用法 | @State | @Local |
|---|---|---|
| 参数 | 无。 | 无。 |
| 从父组件初始化 | 可选。 | 不允许外部初始化。 |
| 观察能力 | 能观测变量本身以及一层的成员属性,无法深度观测。 | 能观测变量本身,深度观测依赖@Trace装饰器。 |
| 数据传递 | 可以作为数据源和子组件中状态变量同步。 | 可以作为数据源和子组件中状态变量同步。 |
[h2]观测对象整体变化
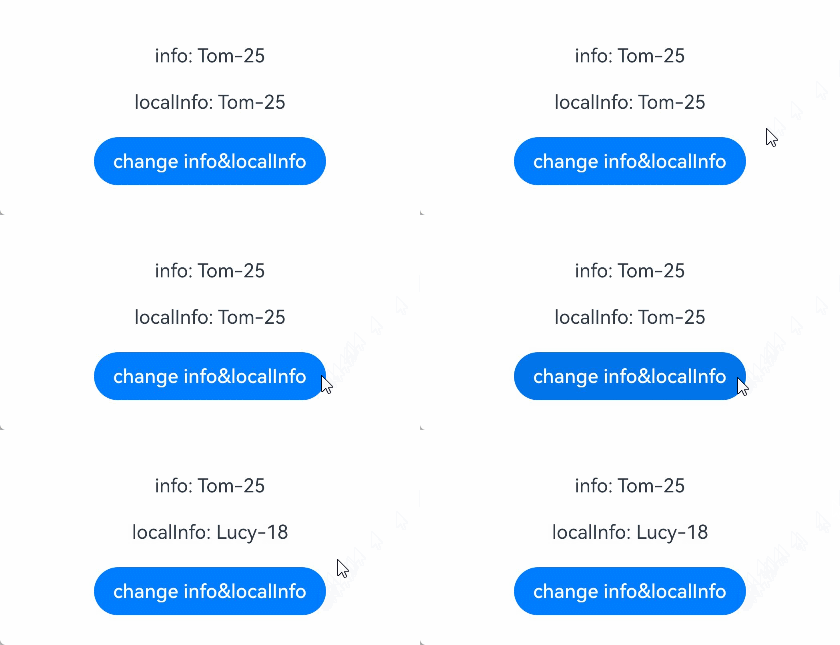
被@ObservedV2与@Trace装饰的类对象实例,具有深度观测对象属性的能力。但当对对象整体赋值时,UI却无法刷新。使用@Local装饰对象,可以达到观测对象本身变化的效果。
@ObservedV2
class Info {
  @Trace public name: string;
  @Trace public age: number;

  constructor(name: string, age: number) {
    this.name = name;
    this.age = age;
  }
}

@Entry
@ComponentV2
struct Index {
  info: Info = new Info('Tom', 25);
  @Local localInfo: Info = new Info('Tom', 25);

  build() {
    Row() {
      Column() {
        Text(`info: ${this.info.name}-${this.info.age}`) // Text1
          .margin(10)
        Text(`localInfo: ${this.localInfo.name}-${this.localInfo.age}`) // Text2
          .margin(10)
        Button('change info&localInfo')
          .onClick(() => {
            this.info = new Info('Lucy', 18); // Text1不会刷新
            this.localInfo = new Info('Lucy', 18); // Text2会刷新
          })
          .margin(10)
      }
      .width('100%')
    }
    .height('100%')
  }
} 
[h2]装饰Array类型变量
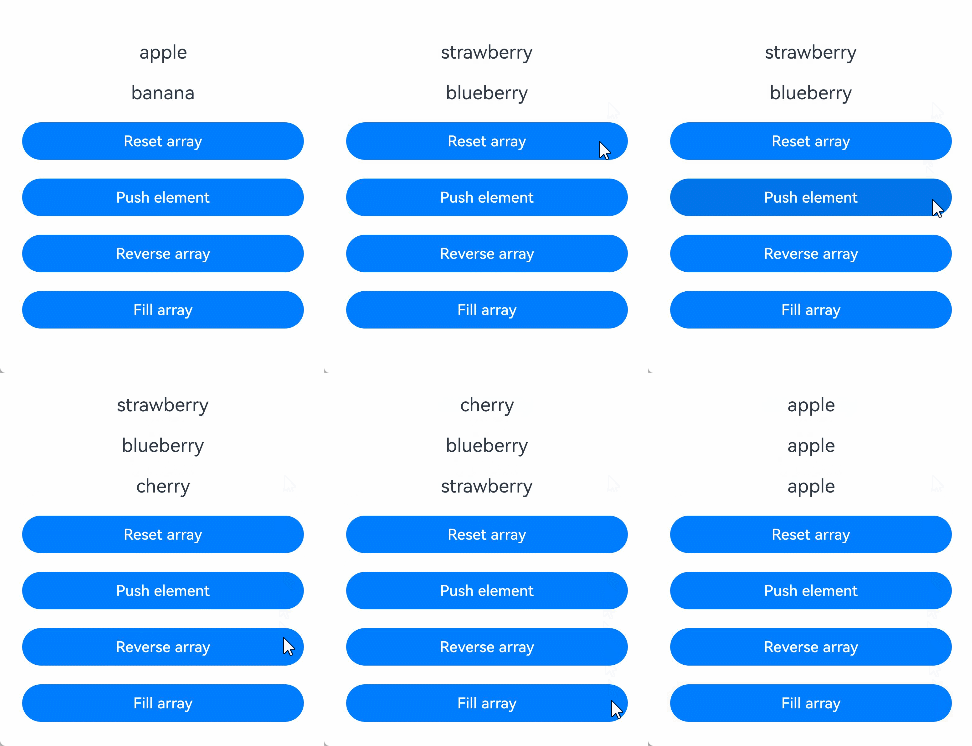
当装饰的对象是Array时,可以观察到Array整体的赋值,同时可以通过调用Array的接口push, pop, shift, unshift, splice, copyWithin, fill, reverse, sort更新Array中的数据。
class Fruit {
  public name: string;

  constructor(name: string) {
    this.name = name;
  }
}

@Entry
@ComponentV2
struct Index {
  @Local fruits: Fruit[] = [new Fruit('apple'), new Fruit('banana')]; // 使用@Local装饰Array类型变量

  build() {
    Row() {
      Column() {
        ForEach(this.fruits, (item: Fruit) => {
          Text(`${item.name}`)
            .fontSize(20)
            .margin(10)
        })
        // 对数组整体重新赋值,触发UI刷新
        Button('Reset array')
          .onClick(() => {
            this.fruits = [new Fruit('strawberry'), new Fruit('blueberry')];
          })
          .width(300)
          .margin(10)
        // 新增数组元素,触发UI刷新
        Button('Push element')
          .onClick(() => {
            this.fruits.push(new Fruit('cherry'));
          })
          .width(300)
          .margin(10)
        // 翻转数组元素,触发UI刷新
        Button('Reverse array')
          .onClick(() => {
            this.fruits.reverse();
          })
          .width(300)
          .margin(10)
        // 使用同一元素填充数组,触发UI刷新
        Button('Fill array')
          .onClick(() => {
            this.fruits.fill(new Fruit('apple'));
          })
          .width(300)
          .margin(10)
      }
      .width('100%')
    }
    .height('100%')
  }
} 
[h2]装饰Date类型变量
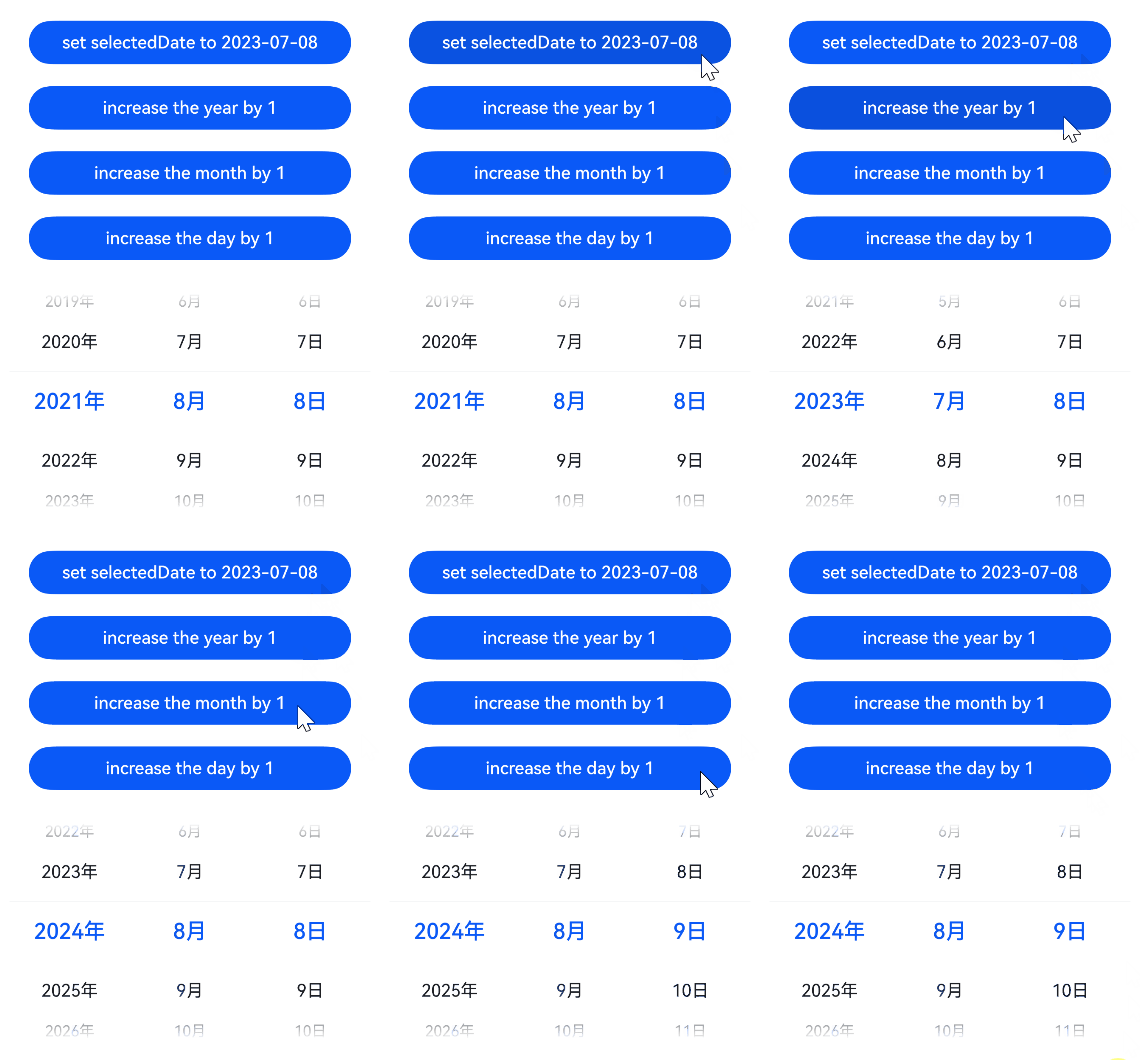
当装饰的对象是Date时,可以观察到Date整体的赋值,同时可通过调用Date的接口setFullYear, setMonth, setDate, setHours, setMinutes, setSeconds, setMilliseconds, setTime, setUTCFullYear, setUTCMonth, setUTCDate, setUTCHours, setUTCMinutes, setUTCSeconds, setUTCMilliseconds更新Date中的数据。
@Entry
@ComponentV2
struct DatePickerExample {
  @Local selectedDate: Date = new Date('2021-08-08'); // 使用@Local装饰Date类型变量

  build() {
    Row() {
      Column() {
        // 通过给selectedDate重新赋值新的Date实例,触发UI刷新
        Button('set selectedDate to 2023-07-08')
          .onClick(() => {
            this.selectedDate = new Date('2023-07-08');
          })
          .margin(10)
          .width(300)
        // 调用Date的setFullYear接口修改年份,触发UI刷新
        Button('increase the year by 1')
          .onClick(() => {
            this.selectedDate.setFullYear(this.selectedDate.getFullYear() + 1);
          })
          .margin(10)
          .width(300)
        // 调用Date的setMonth接口修改月份,触发UI刷新
        Button('increase the month by 1')
          .onClick(() => {
            this.selectedDate.setMonth(this.selectedDate.getMonth() + 1);
          })
          .margin(10)
          .width(300)
        // 调用Date的setDate接口修改日期,触发UI刷新
        Button('increase the day by 1')
          .onClick(() => {
            this.selectedDate.setDate(this.selectedDate.getDate() + 1);
          })
          .margin(10)
          .width(300)
        DatePicker({
          start: new Date('1970-1-1'),
          end: new Date('2100-1-1'),
          selected: this.selectedDate
        }).margin(20)
      }
      .width('100%')
    }
    .height('100%')
  }
} 
[h2]装饰Map类型变量
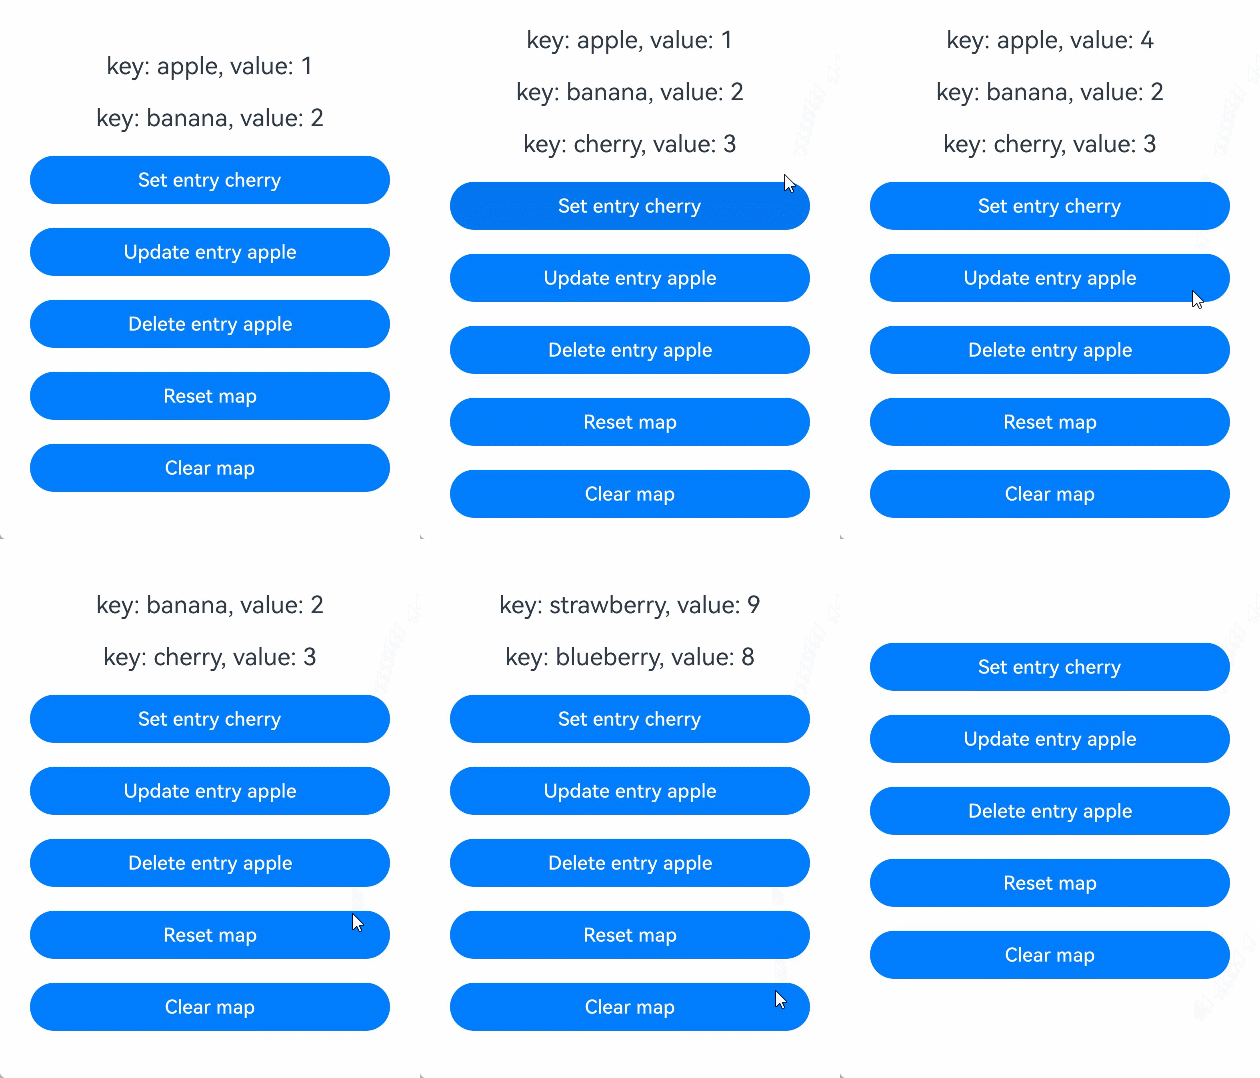
当装饰的对象是Map时,可以观察到对Map整体的赋值,同时可以通过调用Map的接口set, clear, delete更新Map中的数据。
@Entry
@ComponentV2
struct MapSample {
  @Local fruits: Map<string, number> = new Map([['apple', 1], ['banana', 2]]); // 使用@Local装饰Map类型变量

  build() {
    Row() {
      Column() {
        ForEach(Array.from(this.fruits.entries()), (item: [string, number]) => {
          Text(`key: ${item[0]}, value: ${item[1]}`)
            .fontSize(20)
            .margin(10)
        })
        // 新增键值对,触发UI刷新
        Button('Set entry cherry')
          .onClick(() => {
            this.fruits.set('cherry', 3);
          })
          .width(300)
          .margin(10)
        // 更新键值对,触发UI刷新
        Button('Update entry apple')
          .onClick(() => {
            this.fruits.set('apple', 4);
          })
          .width(300)
          .margin(10)
        // 删除键值对,触发UI刷新
        Button('Delete entry apple')
          .onClick(() => {
            this.fruits.delete('apple');
          })
          .width(300)
          .margin(10)
        // 对Map整体重新赋值,触发UI刷新
        Button('Reset map')
          .onClick(() => {
            this.fruits = new Map([['strawberry', 9], ['blueberry', 8]]);
          })
          .width(300)
          .margin(10)
        // 清空Map,触发UI刷新
        Button('Clear map')
          .onClick(() => {
            this.fruits.clear();
          })
          .width(300)
          .margin(10)
      }
      .width('100%')
    }
    .height('100%')
  }
} 
[h2]装饰Set类型变量
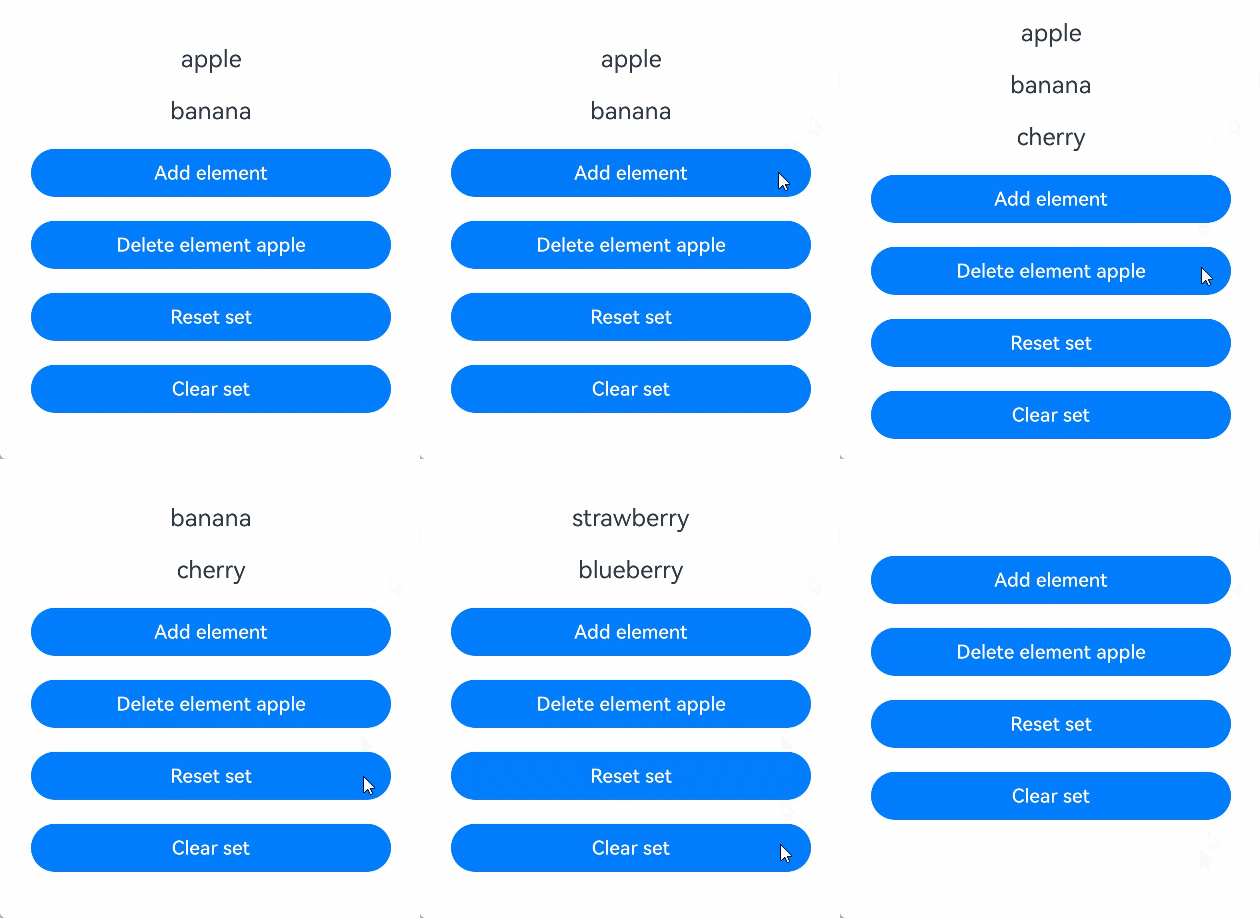
当装饰的对象是Set时,可以观察到对Set整体的赋值,同时可以通过调用Set的接口add, clear, delete更新Set中的数据。
@Entry
@ComponentV2
struct SetSample {
  @Local fruits: Set<string> = new Set(['apple', 'banana']); // 使用@Local装饰Set类型变量

  build() {
    Row() {
      Column() {
        ForEach(Array.from(this.fruits.entries()), (item: [string, string]) => {
          Text(`${item[0]}`)
            .fontSize(20)
            .margin(10)
        })
        // 新增元素,触发UI刷新
        Button('Add element')
          .onClick(() => {
            this.fruits.add('cherry');
          })
          .width(300)
          .margin(10)
        // 删除元素,触发UI刷新
        Button('Delete element apple')
          .onClick(() => {
            this.fruits.delete('apple');
          })
          .width(300)
          .margin(10)
        // 对Set整体重新赋值,触发UI刷新
        Button('Reset set')
          .onClick(() => {
            this.fruits = new Set(['strawberry', 'blueberry']);
          })
          .width(300)
          .margin(10)
        // 清空Set,触发UI刷新
        Button('Clear set')
          .onClick(() => {
            this.fruits.clear();
          })
          .width(300)
          .margin(10)
      }
      .width('100%')
    }
    .height('100%')
  }
} 
[h2]联合类型
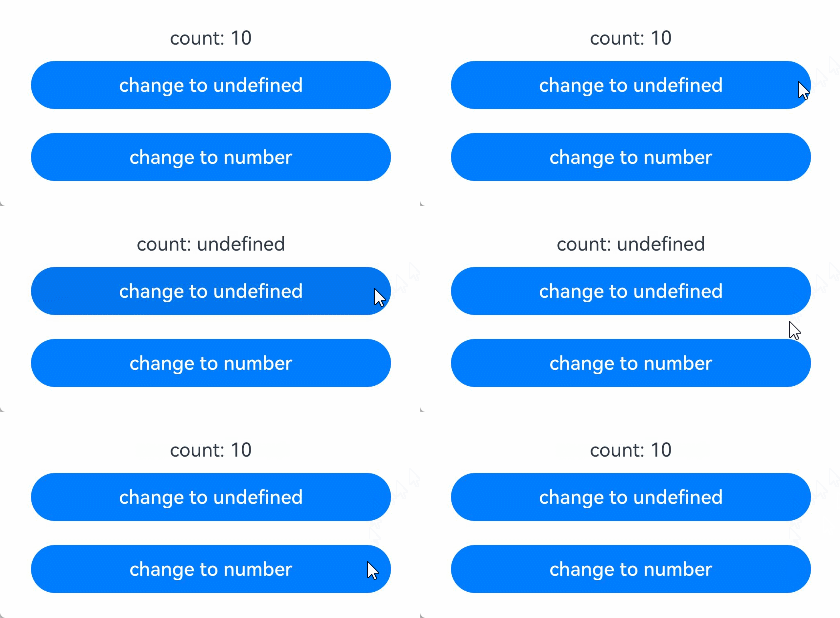
@Local支持null、undefined以及联合类型。在下面的示例中,count类型为number | undefined,点击改变count的类型,UI会随之刷新。
@Entry
@ComponentV2
struct Index {
  @Local count: number | undefined = 10; // 使用@Local装饰联合类型变量

  build() {
    Row() {
      Column() {
        Text(`count: ${this.count}`)
        // 将联合类型变量从number切换为undefined,触发UI刷新
        Button('change to undefined')
          .onClick(() => {
            this.count = undefined;
          })
          .width(300)
          .margin(10)
        // 将联合类型变量从undefined切换为number,触发UI刷新
        Button('change to number')
          .onClick(() => {
            this.count = 10;
          })
          .width(300)
          .margin(10)
      }
      .width('100%')
    }
    .height('100%')
  }
} 
[h2]在状态管理V2中使用animateTo动画效果异常
在下面的场景中,animateTo暂不支持直接在状态管理V2中使用。
@Entry
@ComponentV2
struct Index {
  @Local w: number = 50; // 宽度
  @Local h: number = 50; // 高度
  @Local message: string = 'Hello';

  build() {
    Column() {
      Button('change size')
        .margin(20)
        .onClick(() => {
          // 在执行动画前,存在额外的修改
          this.w = 100;
          this.h = 100;
          this.message = 'Hello World';
          this.getUIContext().animateTo({
            duration: 1000
          }, () => {
            this.w = 200;
            this.h = 200;
            this.message = 'Hello ArkUI';
          })
        })
      Column() {
        Text(`${this.message}`)
      }
      .backgroundColor('#ff17a98d')
      .width(this.w)
      .height(this.h)
    }
  }
}
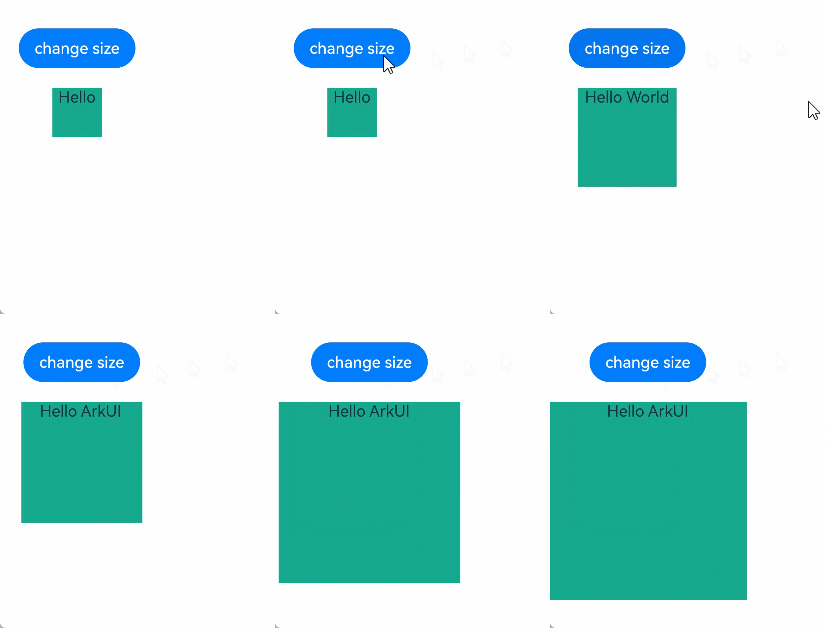
上述代码中,开发者预期的动画效果是:绿色矩形从长宽100变为200,字符串从Hello World变为Hello ArkUI。但由于当前animateTo与V2的刷新机制不兼容,执行动画前的额外修改未生效,实际显示的动画效果是:绿色矩形从长宽50变为200,字符串从Hello变为Hello ArkUI。
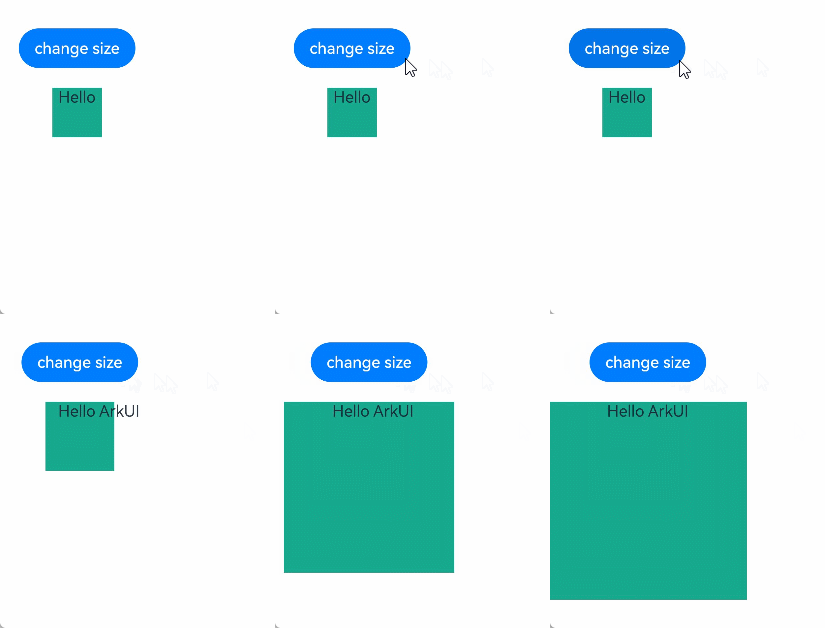
从API version 22开始,可以使用applySync接口实现预期的显示效果。
import { UIUtils } from '@kit.ArkUI';

@Entry
@ComponentV2
struct Index {
  @Local w: number = 50; // 宽度
  @Local h: number = 50; // 高度
  @Local message: string = 'Hello';

  build() {
    Column() {
      Button('change size')
        .margin(20)
        .onClick(() => {
          // 在执行动画前,存在额外的修改
          UIUtils.applySync(() => {
            this.w = 100;
            this.h = 100;
            this.message = 'Hello World';
          })
          this.getUIContext().animateTo({
            duration: 1000
          }, () => {
            this.w = 200;
            this.h = 200;
            this.message = 'Hello ArkUI';
          })
        })
      Column() {
        Text(`${this.message}`)
      }
      .backgroundColor('#ff17a98d')
      .width(this.w)
      .height(this.h)
    }
  }
}
原理为使用applySync接口同步刷新闭包函数内的状态变量变化,再执行原来的动画达成预期的效果。