Hvigor allows you to develop your own plugin, where you can define the build logic and share it with others.
With Hvigor, you can implement plugins with the hvigorfile.ts script or based on a TypeScript project.
For details about plugin development practices, see Customizing the Hvigor Plugin.

You are advised to use the Node.js bundled with DevEco Studio. If you need to install it separately, use the matching Node.js version. For the version compatibility details, see DevEco Studio Compatibility and Version Mappings.
Developing a Plugin with the hvigorfile Script
You can quickly develop a plugin by editing the hvigorfile.ts file in your project or module directory. However, note that the plugins created this way cannot be reused or shared across projects.
Since DevEco Studio 6.0.2 Beta1, code editing features such as code completion, code generation, and code refactoring are supported for build script writing. For details, see Editor Basics, Code Generation/Completion, and Code Refactoring.
To create build scripts, you are advised to place them under the scripts directory of the project or module to keep them separate from the app code, as shown in the example below.
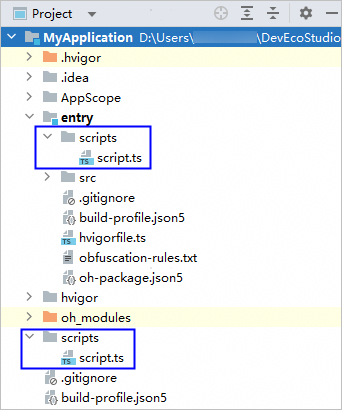
The following example demonstrates plugin development with a project-level hvigorfile.ts script.
- Import module dependencies. For details about more APIs, see Using APIs for Extending Your Build.
// Project-level hvigorfile.ts import { appTasks } from '@ohos/hvigor-ohos-plugin'; import { HvigorPlugin, HvigorNode } from '@ohos/hvigor'; - Write the plugin code to implement the HvigorPlugin API.
// Project-level hvigorfile.ts function customPlugin(): HvigorPlugin { return { pluginId: 'customPlugin', apply(node: HvigorNode) { // Plugin code. console.log('hello customPlugin!'); } } } - Add the custom plugin to the export declaration.
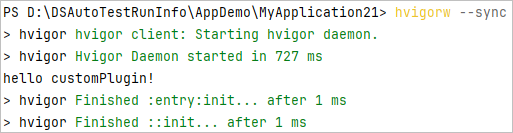
// Project-level hvigorfile.ts export default { system: appTasks, plugins:[ customPlugin() // Custom plugin ] } - Run Hvigor commands.
Execute the apply method of the plugin when the Hvigor lifecycle is configured.
Developing a Plugin Based on a TypeScript Project
The plugin code developed based on a TypeScript project can be reused and shared across projects. Therefore, this development mode is recommended.
[h2]Initializing the TypeScript Project
- Create an empty directory.
Run the cd command to go to the empty directory.
- Install TypeScript with the Node Package Manager (npm).
// Install TypeScript globally.
npm install typescript -g
- Initialize the nmp project.Run the following command and configure the project as instructed: After initialization, the package.json file is generated.
// Initialize the nmp project.
npm init
- Generate a TypeScript configuration file.Run the following command to generate a tsconfig.json file:
// Initialize the TypeScript configuration file.
tsc --init
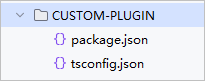
- Delete the verbatimModuleSyntax field.
Check the tsconfig.json file for the presence of the verbatimModuleSyntax field. If it exists and is set to true, it will prevent the use of ESM syntax and cause a compilation error. Therefore, you need to delete this field.
[h2]Developing a Plugin
- Configure the npm image repository address, which is used to install the @ohos/hvigor plugin.
Create an .npmrc file in your project directory and configure the following:
registry=https://repo.huaweicloud.com/repository/npm/
@ohos:registry=https://repo.harmonyos.com/npm/
- Declare the dependency on hvigor.
Add hvigor information to devDependencies in the package.json file.
"devDependencies": {
    "@ohos/hvigor": "6.26.2"  // Obtain the version number from Using APIs for Extending Your Build.
}
If the dependency is configured in dependencies, a compilation error occurs when the plugin is used.
- Install dependencies.Run the following command to install dependencies:
npm install
- Write the plugin code.
Create the custom-plugin.ts file in the src/plugin directory and write the plugin code. For details about more APIs, see Using APIs for Extending Your Build.
import type { HvigorNode, HvigorPlugin } from '@ohos/hvigor'; export function customPlugin(): HvigorPlugin { return { pluginId: 'customPlugin', apply(node: HvigorNode) { console.log('hello customPlugin!'); } } } - Export the plugin.
Create an index.ts file and declare the export of plugin methods in it. Since .ts files are ultimately compiled into .js files, the .js file needs to be exported.
export { customPlugin } from './src/plugin/custom-plugin.js';
[h2]Publishing the Plugin
The TypeScript project, as an npm project in essence, is published in the same way as an npm project. For details, see the npm official documentation.
The process for publishing an npm package is as follows:
- Configure the registry.
Open the .npmrc file in the project directory and configure the image repository where you want to publish.
registry=[npm image repository address]
- Generate an AccessToken.
Run the following command to register and log in to the npm repository. The token information is automatically generated in the .npmrc file in the project directory.
npm login
- Compile the npm package.
tsc
If the following error is reported during the compilation, check whether verbatimModuleSyntax is deleted during project initialization.

- Publish the npm package.
Run the following command to package the npm project and publish it to the image repository:
npm publish
[h2]Using the Plugin
- Add the dependency.
In the hvigor/hvigor-config.json5 file of the project, add the custom plugin to dependencies. The dependencies support offline plugin configuration.
"dependencies": { "custom-plugin": "1.0.0" // Add the custom plugin. } - Install dependencies.
- Method 1: Click Sync Now in the upper right corner of the editing area or choose File > Sync and Refresh Project. DecEvo Studio automatically installs the plugin based on the dependency configuration in hvigor-config.json5.
- Method 2: Run the following hvigorw command. The command line tool automatically installs the plugin.
hvigorw --sync
- Import the plugin.
Determine the target node for importing the plugin, locate its corresponding hvigorfile.ts, and import the plugin in that file.
import { customPlugin } from 'custom-plugin'; - Use the plugin.
Add the custom plugin to plugins in export default.
export default {
  system: appTasks,  // Take the project-level hvigorfile.ts as an example.
  plugins:[
    customPlugin()  // Add the custom plugin.
  ]
}