Use Cases
A notification message is directly sent by Push Kit and displayed in the notification panel, on the lock screen, as a banner, or in other forms. Users can tap the message to launch the corresponding app. You can configure the notification message layout to attract users.
Constraints
The function of sending notification messages supports phones, tablets, and PCs/2-in-1 devices. Support for wearables is available starting from 5.1.0(18), and for TVs starting from 5.1.1(19).
Applying for Required Permissions
Push Kit classifies notification messages into the following categories based on the message content: service and communication and news and marketing. For the two categories, self-classification needs to be enabled and configured separately.
The two types of notification messages are different in terms of the notification mode, display position, and frequency control rules. For more information about permission application, please refer to Message Self-Classification.

-
If you have not applied for the message self-classification permission, messages pushed by your app are categorized as news and marketing messages by default (category set to MARKETING). If you only need to send news and marketing messages, you do not need to apply for the message self-classification permission.
-
The maximum number of news and marketing messages that can be pushed by an app to each device on a daily basis is either 2 or 5, depending on your app category. For details, please refer to Notification Message Frequency Control Rules. If your upper limit is reached, send test messages or apply for the self-classification permission. For details, please refer to Message Frequency Control.
Frequency Control
During the debugging phase, the maximum number of test messages that can be pushed for each project every day is 1000. To send test messages, you need to set testMessage to true.
After formal release, the total number of messages that each app can push to a single device each day is subject to the device-based message frequency control policy. The message sending frequency is governed based on service scenarios and traffic. In cases where message sending is unnecessary or unreasonable, frequency limits will be applied.
Different frequency control policies are applied for service and communication messages, and news and marketing messages. For details, please refer to Notification Message Frequency Control Rules.
Development Procedure
-
To ensure that devices can receive messages properly, you need to call the requestEnableNotification() method to prompt users to allow notifications before sending messages. The sample code is as follows:
Import the notificationManager module and related common modules.
import { hilog } from '@kit.PerformanceAnalysisKit';
import { BusinessError } from '@kit.BasicServicesKit';
import { UIAbility } from '@kit.AbilityKit';
import { window } from '@kit.ArkUI';
import { notificationManager } from '@kit.NotificationKit';
Request notification authorization from a user:
const DOMAIN = 0x0000; export default class EntryAbility extends UIAbility { // ... onWindowStageCreate(windowStage: window.WindowStage) { hilog.info(DOMAIN, 'testTag', '%{public}s', 'Ability onWindowStageCreate'); windowStage.loadContent('pages/Index', (err, data) => { if (err.code) { hilog.error(DOMAIN, 'testTag', 'Failed to load the content. Cause: %{public}s', JSON.stringify(err) ?? ''); return; } hilog.info(DOMAIN, 'testTag', 'Succeeded in loading the content. Data: %{public}s', JSON.stringify(data) ?? ''); notificationManager.requestEnableNotification(this.context).then(() => { hilog.info(DOMAIN, 'testTag', 'RequestEnableNotification success'); }).catch((err: BusinessError) => { hilog.error(DOMAIN, 'testTag', `RequestEnableNotification failed, code is ${err.code}, message is ${err.message}`); }); }); } // ... } -
Configure skills to ensure proper redirection upon tapping the message. For details, please refer to Actions to Be Triggered upon Message Tapping.
-
Call the REST API of the Push Kit server on your app server to push notification messages. If you have not requested the required permission or the permission you have requested does not match the category field contained in the request body of your REST API call for pushing scenario-specific messages, notification messages are classified into news and marketing messages by default. In this case, you are subject to the restriction that each app can push up to 2 or 5 (depending on the app category) messages to each device on a daily basis.

-
This sample code demonstrates only some message fields in REST APIs. For details about server-side development, please refer to relevant instructions on device-cloud debugging.
-
Use the API request URL of the V3 version (https://push-api.cloud.huawei.com/v3/[projectId]/messages:send) to push messages.
If the API request URL version is V3 (https://push-api.cloud.huawei.com/v3/[projectId]/messages:send), the message can be pushed to HarmonyOS NEXT/5.x and later versions. If the request URL version is V2 (https://push-api.cloud.huawei.com/v2/[projectId]/messages:send), the message can be pushed only to HarmonyOS 3.x/4.x.
The following is an example request (change the value of category to the actual message type):
// Request URL POST "https://push-api.cloud.huawei.com/v3/[projectId]/messages:send" // Request header Content-Type: application/json Authorization: Bearer eyJr*****OiIx---****.eyJh*****iJodHR--***.QRod*****4Gp---**** push-type: 0 // Request body { "payload": { "notification": { "category": "xxxxxx", // Change it to the actual notification message type. "title": "Common notification title", "body": "Common notification content", "clickAction": { "actionType": 0 }, // Indicates whether to display the notification when the app is running in the foreground. This parameter is valid only for notifications whose push-type is 0. "foregroundShow": true, "notifyId": 12345 } }, "target": { "token": ["MAMzLg**********lPW"] }, "pushOptions": { "testMessage": true, "ttl": 86400 } }-
[projectId]: project ID. To obtain the value, sign in to AppGallery Connect, click Development and services, click the desired project, and go to Project settings.
-
Authorization: a character string in JWT format. Obtain the value by referring to Authorization.
-
push-type: The value 0 indicates an alert message. In this example, the message is a notification message.
-
category: category of a notification message. In this example, MARKETING indicates news and marketing messages. For more categories, please refer to category.
-
actionType: action triggered upon message tapping. The value 0 indicates that the user will be redirected to the app home screen after tapping the message. The value 1 indicates that the user will be redirected to an in-app screen after tapping the message.
-
token: push token. Obtain the value by referring to Obtaining a Push Token.
-
testMessage (optional): indicates whether a message is a test message. The value true indicates a test message. In each project, a maximum of 1000 test messages can be sent every day. Each push can carry up to 10 tokens. For details, please refer to testMessage.
-
ttl (optional): message cache duration. For details, please refer to ttl.
-
notifyId (optional): custom message ID. If a message does not contain the ID or the ID is -1, Push Kit will generate a unique ID for the message. Different notification messages can use the same message ID, so that new messages can overwrite old messages. The ID must be a number in the range [0, 2147483647]. If the ID will be used for message recall, it must be set. For details, please refer to notifyId.
-
foregroundShow (optional): indicates whether to display notification messages in the notification panel when an app is running in the foreground. The value true indicates that notification messages are displayed in the notification panel regardless of whether the app is running in the foreground or background. The value false indicates that notification messages are not displayed in the notification panel when an app is running in the foreground and are only pushed as background messages. The default value is true. If foregroundShow is set to true, receiveMessage is not triggered.
-
-
Send a push request. For details about the response, please refer to Response Parameters. Then check whether the device has received the notification message. If not, locate the problem by referring to FAQs.
[h2]Opening the App Home Screen upon Message Tapping
-
Check the skills configuration in src/main/module.json5 at the module level. Ensure that uris is not set for the skill that specifies the app home page (skill that contains the configurations entity.system.home and ohos.want.action.home); otherwise, devices will fail to receive messages.

In the module.json5 file, skills can contain multiple skill objects. Each object corresponds to one capability.
To configure push message redirection and other redirection capabilities (like NFC or browser redirection), you must create separate skill objects within skills to map the respective capabilities.
The following is an example of configuring skills for opening the app home screen upon message tapping:
{ "module": { // ... "abilities": [ { "name": "EntryAbility", "srcEntry": "./ets/entryability/EntryAbility.ets", "description": "$string:EntryAbility_desc", "icon": "$media:layered_image", "label": "$string:EntryAbility_label", "startWindowIcon": "$media:startIcon", "startWindowBackground": "$color:start_window_background", "exported": true, "skills": [ // This skill specifies the app home screen. Do not set uris for it. { "entities": [ "entity.system.home" ], "actions": [ // The configuration "action.system.home" is for versions earlier than API 19 and has been discarded. "ohos.want.action.home" ] }, // Configurations of other skills. {} ] }, // ... ] } } -
Set actionType to 0 when sending a message.
// Request URL POST "https://push-api.cloud.huawei.com/v3/[projectId]/messages:send" // Request header Content-Type: application/json Authorization: Bearer eyJr*****OiIx---****.eyJh*****iJodHR--***.QRod*****4Gp---**** push-type: 0 // Request body { "payload": { "notification": { "category": "MARKETING", "title": "Common notification title", "body": "Common notification content", "clickAction": { "actionType": 0, "data": {"testKey": "testValue"} } } }, "target": { "token": ["MAMzLg**********lPW"] }, "pushOptions": { "testMessage": true } }- actionType: action triggered by a message tap. The value 0 indicates that the home screen (where the entry ability, usually EntryAbility, is located) is opened.

In the request body of a scenario-specific message, if the API request URL version is V3 (https://push-api.cloud.huawei.com/v3/[projectId]/messages:send), the message can be pushed to HarmonyOS NEXT/5.x and later versions. If the API request URL version is V2 (https://push-api.cloud.huawei.com/v2/[projectId]/messages:send), the message can be pushed only to HarmonyOS 3.x/4.x.
- actionType: action triggered by a message tap. The value 0 indicates that the home screen (where the entry ability, usually EntryAbility, is located) is opened.
[h2]Opening an In-app Screen upon Message Tapping
-
Set actions or uris in skills of the target ability in src/main/module.json5 at the module level using either of the following methods:
Method 1: Add an independent skill object to skills. For the object, set the actions parameter to open an in-app screen upon message tapping. The following is an example:
{
  "name": "TestAbility",
  "srcEntry": "./ets/abilities/TestAbility.ets",
  "exported": false,
  "startWindowIcon": "$media:startIcon",
  "startWindowBackground": "$color:start_window_background",
  "skills": [
    // Keep the existing skill object unchanged.
    {
      "actions": [
        "com.app.action"
      ]
    },
    // Add an independent skill object and set the actions parameter.
    {
      "actions": [
        "com.test.action"
      ]
    }
  ]
  // ...
}
Method 2: Add an independent skill object to skills. For the object, set the uris parameter to open an in-app screen upon message tapping. (Note that, both the actions and uris parameters need to be set, with the actions parameter set to an empty string.) The following is an example:
{
  "name": "InnerUrisAbility",
  "srcEntry": "./ets/abilities/InnerUrisAbility.ets",
  "exported": false,
  "startWindowIcon": "$media:startIcon",
  "startWindowBackground": "$color:start_window_background",
  "skills": [
    // Keep the existing skill object unchanged.
    {
      "actions": [
        "com.app.action"
      ]
    },
    // Add an independent skill object, and set the uris and actions parameters for it. The actions parameter must be set to an empty string.
    {
      "actions": [
        ""
      ],
      "uris": [
        {
          "scheme": "https",
          "host": "www.xxx.com",
          "port": "8080",
          "path": "push/test"
        }
      ]
    }
  ]
  // ...
}
In the module.json5 file, skills can contain multiple skill objects. Each object corresponds to one capability.
To configure push message redirection and other redirection capabilities (like NFC or browser redirection), you must create separate skill objects within skills to map the respective capabilities.
-
Set actionType under clickAction to 1 when sending a message.
// Request URL POST "https://push-api.cloud.huawei.com/v3/[projectId]/messages:send" // Request header Content-Type: application/json Authorization: Bearer eyJr*****OiIx---****.eyJh*****iJodHR--***.QRod*****4Gp---**** push-type: 0 // Request body { "payload": { "notification": { "category": "MARKETING", "title": "Common notification title", "body": "Common notification content", "clickAction": { "actionType": 1, "action": "com.test.action", "uri": "https://www.xxx.com:8080/push/test", "data": {"testKey": "testValue"} } } }, "target": { "token": ["MAMzLg**********lPW"] }, "pushOptions": { "testMessage": true } }- actionType: action triggered upon message tapping. The value 1 indicates that a specified in-app screen will be opened after a user taps a message. When this field is set to 1, set at least one of uri and action. If both of them are set, the app screen specified by action is opened first. If no app screen is matched for both action and uri, the app home screen is opened upon message tapping.
- action: a set of values that can be used to receive Want. These values can be customized.
- uri: a set of values that match uris in Want. For details about the URI rules, please refer to skills.

-
In the request body of a scenario-specific message, if the API request URL version is V3 (https://push-api.cloud.huawei.com/v3/[projectId]/messages:send), the message can be pushed to HarmonyOS NEXT/5.x and later versions. If the API request URL version is V2 (https://push-api.cloud.huawei.com/v2/[projectId]/messages:send), the message can be pushed only to HarmonyOS 3.x/4.x.
-
If no app screen is matched for both action and uri, the app home screen is opened upon message tapping.
[h2]Transmitting Data
When calling the REST API of the Push Kit server to push a notification message, your app server can pass the data field in the API call request, so the passed data can be transmitted to your app client when a user taps the message.
-
Call the REST API to push a message and pass the data field under clickAction in the request body. The following is an example:
{ "payload": { "notification": { "category": "MARKETING", "title": "Common notification title", "body": "Common notification content", "clickAction": { "actionType": 0, "data": {"testKey": "testValue"} // The data field is passed. } } }, "target": { "token": ["MAMzLg**********lPW"] }, "pushOptions": { "testMessage": true } }data: data in JSON format, carried when a message is tapped.
-
Override the following code in the onCreate() method of the target screen (TestAbility used as an example) to enter this lifecycle callback from a cold start:
import { AbilityConstant, UIAbility, Want } from '@kit.AbilityKit';
import { hilog } from '@kit.PerformanceAnalysisKit';
// ...
const DOMAIN = 0x0000;

export default class InnerUrisAbility extends UIAbility {
  // ...
  onCreate(want: Want, launchParam: AbilityConstant.LaunchParam): void {
    hilog.info(DOMAIN, 'testTag', '%{public}s', 'InnerUrisAbility onCreate');
    // Obtain data transferred in the message.
    const value = want.parameters?.['testKey']; // value: "testValue"
    hilog.info(DOMAIN, 'testTag', 'Succeeded in getting message data, value is %{public}s', value ?? 'default value');
    // Process data based on the service scenario.
    // ...
  }
  // ...
}
Override the following code in the onNewWant() method to enter this lifecycle callback from a hot start:
import { AbilityConstant, UIAbility, Want } from '@kit.AbilityKit';
import { hilog } from '@kit.PerformanceAnalysisKit';
// ...
const DOMAIN = 0x0000;

export default class InnerUrisAbility extends UIAbility {
  // ...
  onNewWant(want: Want, launchParam: AbilityConstant.LaunchParam): void {
    hilog.info(DOMAIN, 'testTag', '%{public}s', 'InnerUrisAbility onNewWant');
    // Obtain data transferred in the message.
    const value = want.parameters?.['testKey']; // value: "testValue"
    hilog.info(DOMAIN, 'testTag', 'Succeeded in getting message data, value is %{public}s', value ?? 'default value');
    // Process data based on the service scenario.
    // ...
  }
  // ...
}

The onNewWant() method is available only in singleton mode.
Configuring the Notification Message Layout
Push Kit offers a variety of notification message layouts that you can customize to attract users and increase your app's daily active users.
[h2]Common Notification Format
When you send a notification, the notification parameter must contain the title and body fields to define the title and body displayed in the notification panel respectively. A maximum of three lines of content can be displayed. Any excess text will be truncated by an ellipsis (...).
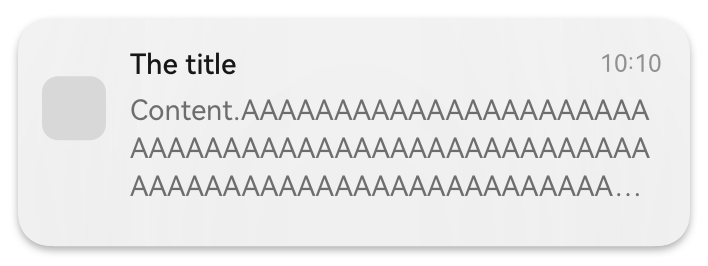
Message body example:
{
  "payload": {
    "notification": {
      "category": "MARKETING",
      "title": "Push Kit",
      "body": "Push Kit is a messaging service provided for you to establish a cloud-to-device messaging channel. By integrating Push Kit, you can send messages to your apps on user devices in real time. This helps you maintain closer ties with users and increase user awareness of and engagement with your apps.",
      "clickAction": {
        "actionType": 0
      }
    }
  },
  "target": {
    "token": ["MAMzLg**********lPW"]
  },
  "pushOptions": {
    "testMessage": true
  }
}
[h2]Notification Badge

Wearables and TVs do not support this notification format.
You can include the badge field when sending a notification to set the numerical badge to be displayed on your app icon, informing users of new messages.
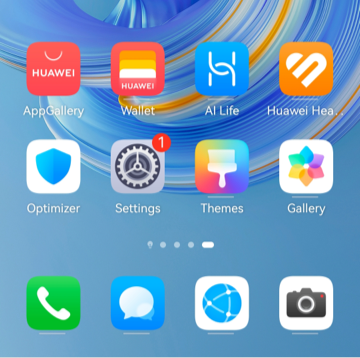
Message body example:
{
  "payload": {
    "notification": {
      "category": "MARKETING",
      "title": "Notification title",
      "body": "Notification body",
      "badge":{
        "addNum": 1,
        "setNum": 99
      },
      "clickAction": {
        "actionType": 0
      }
    }
  },
  "target": {
    "token": ["MAMzLg**********lPW"]
  },
  "pushOptions": {
    "testMessage": true
  }
} 
-
addNum: increment to the badge number, which is not the actual number to be displayed.
-
setNum: actual number to be displayed on the badge. The priority of setNum is higher than that of addNum.
-
Launching an app, tapping a message, or cleaning up notifications will not affect the badge number. You can call the setBadgeNumber() method to change the badge number. Before doing so, please import the required module.
-
When badgeNumber in the setBadgeNumber() method is set to 0, the badge number is cleared.
[h2]Large Notification Icon

Wearables do not support this notification format.
Do not push images that contain sensitive content.
You can include the image field when sending a notification to display a large icon to notify users.
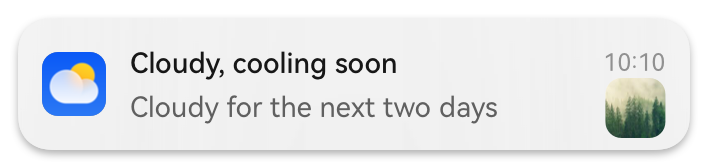
Message body example:
{
  "payload": {
    "notification": {
      "category": "MARKETING",
      "title": "Push Kit",
      "body": "Push Kit is a messaging service.",
      "image": "https://***.png", // The supported image formats are PNG, JPG, JPEG, BMP, and WEBP. The total number of the image's pixel bytes must not exceed 192 KB. If it exceeds this limit, the image will not be displayed.
      "clickAction": {
        "actionType": 0
      }
    }
  },
  "target": {
    "token": ["MAMzLg**********lPW"]
  },
  "pushOptions": {
    "testMessage": true
  }
}
[h2]Multi-line Text Format

Wearables do not support this notification format.
You can include the inboxContent and style fields in notification to set the multi-line text format when sending a message. A maximum of three separate lines of content can be displayed. For each line, overlong text will be truncated by an ellipsis (...).
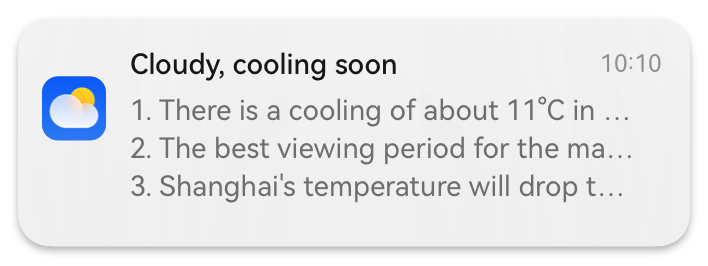
Message body example:
{
  "payload": {
    "notification": {
      "category": "MARKETING",
      "title": "Personalized message display",
      "body": "Notification body",
      "style": 3,
      "inboxContent": [
          "1. Message styles",
          "2. Message reminder and display modes",
          "3. Support for notification message localization"
          ],
      "clickAction": {
        "actionType": 0
      }
    }
  },
  "target": {
    "token": ["MAMzLg**********lPW"]
  },
  "pushOptions": {
    "testMessage": true
  }
} 
-
To use the multi-line text format, set the style field to 3.
-
If you send multiple notifications and they get collapsed, the title and body shown before the multi-line text expansion use the values of the title and body fields respectively.
-
When a user expands a multi-line text message or only one multi-line text message exists, the title and body displayed use the values of the title and inboxContent fields respectively.
Developing Account Authentication for Notification Messages
Push Kit enables targeted messaging by authenticating user accounts. This feature allows you to send notifications to specific accounts on a device based on their unique account attributes.
For example, on a Huawei phone, if a user switches from account A to account B within a specific app, notifications sent to account A will not be displayed on the device to prevent account B from seeing account A's notifications.

-
After the push token is changed, the corresponding account is automatically unbound from your app.
-
A maximum of 10 app accounts can be bound.
Push Kit supports two account types: HUAWEI ID and app account (account in the app's own account system).
-
HUAWEI ID
In this case, profileId is the unique anonymous identifier mapped to a HUAWEI ID in the app.
You can call the bindAppProfileId() API for account binding when:
- A user authorizes to sign in to your app using their HUAWEI ID.
- A user switches from another account to the current HUAWEI ID in your app.
You can call the unbindAppProfileId() API to unbind an account when:
- A user signs out of their HUAWEI ID in your app.
Example: After a user selects HUAWEI ID for sign-in and successfully signs in to account A, your app calls the bindAppProfileId() API of Push Kit to bind the profileId of account A to the push token on the current device. If a notification sent by the app server contains the profileId of account A, the notification is displayed only when account A signs in. If a notification does not contain any profileId, the notification is displayed regardless of which account has signed in.
-
App account
In this case, profileId is the unique anonymous identifier mapped to an account in the app's own account system.
You can call the bindAppProfileId() API for account binding when:
- A user signs in to their app account in your app.
- A user switches from another app account to the current app account in your app.
You can call the unbindAppProfileId() API to unbind an account when:
- A user signs out of their app account in your app.
Example: After a user successfully signs in to account A in the app's own account system, the app calls the bindAppProfileId() API of Push Kit to bind the profileId of the account to the push token on the current device. If a notification sent by the app server contains the profileId of account A, the notification is displayed only when account A signs in. If a notification does not contain any profileId, the notification is displayed regardless of which account has signed in.

If unbindAppProfileId() is not called when an account signs out, or bindAppProfileId() is not called when the user switches to another account, messages sent to the previous account will still be displayed.
-
To ensure that devices can receive notification messages properly, you are advised to call the requestEnableNotification() method to prompt users to allow notifications before sending messages. For details, please refer to Requesting Notification Authorization of Notification Kit.
-
Generate a non-null and unique profileId for the account to be bound. (You are not advised to use the actual account ID as profileId. Generate an anonymous identifier that can uniquely map to the account ID. There is no restriction on the generation algorithm.) Call the bindAppProfileId() method to bind the user to the app on the current device. The sample code is as follows:
Import the pushService module and related common modules:
import { pushCommon, pushService } from '@kit.PushKit';
import { BusinessError } from '@kit.BasicServicesKit';
import { hilog } from '@kit.PerformanceAnalysisKit';
Call the bindAppProfileId method:
const profileId: string = '111***222'; const DOMAIN = 0x0000; // ... function bindAppProfileId(): void { pushService.bindAppProfileId(pushCommon.AppProfileType.PROFILE_TYPE_APPLICATION_ACCOUNT, profileId).then(() => { hilog.info(DOMAIN, 'testTag', 'Succeeded in binding app profile id'); }).catch((err: BusinessError) => { hilog.error(DOMAIN, 'testTag', 'Failed to bind app profile id: %{public}d %{public}s', err.code, err.message); }); } -
Report the push token and generated profileId to your app server so that the server can push messages to the device.
-
Ensure that your app server calls the REST API to push a notification message. The notification message example is as follows:
// Request URL POST "https://push-api.cloud.huawei.com/v3/[projectId]/messages:send" // Request header Content-Type: application/json Authorization: Bearer eyJr*****OiIx---****.eyJh*****iJodHR--***.QRod*****4Gp---**** push-type: 0 // Request body { "payload": { "notification": { "category": "MARKETING", "title": "Common notification title", "body": "Common notification content", "profileId": "111***222", "clickAction": { "actionType": 0 } } }, "target": { "token": ["MAMzLg**********lPW"] }, "pushOptions": { "testMessage": true } }- [projectId]: project ID. To obtain the value, sign in to AppGallery Connect, click Development and services, click the desired project, and go to Project settings.
- Authorization: a character string in JWT format. Obtain the value by referring to Authorization.
- push-type: The value 0 indicates the notification message type.
- actionType: action triggered upon message tapping. The value 0 indicates that the home screen of the app will be opened after a user taps the message.
- token: push token. Obtain the value by referring to Obtaining a Push Token.
- profileId: anonymous identifier of an account in the app. For details, please refer to profileId.
After a message is sent successfully, Push Kit verifies the AppProfileType (HUAWEI ID or app account) used during account binding.
-
If a HUAWEI ID is bound, Push Kit checks whether the profileId carried in the message is the same as that bound to the app, and then checks whether the current signed-in HUAWEI ID is the same as the distributed account used during binding. The message is displayed only when both conditions are met.
-
If an app account is bound, Push Kit checks whether the profileId carried in the message is the same as the profileId bound to the app. If so, the message is displayed.

In the request body of a scenario-specific message, if the API request URL version is V3 (https://push-api.cloud.huawei.com/v3/[projectId]/messages:send), the message can be pushed to HarmonyOS NEXT/5.x and later versions. If the API request URL version is V2 (https://push-api.cloud.huawei.com/v2/[projectId]/messages:send), the message can be pushed only to HarmonyOS 3.x/4.x.
Processing Notification Messages When the App is Running in the Foreground
To display notification messages when the app is running in the background and only receive notification messages and complete service handling when the app is running in the foreground, you need to configure both the server and client as follows:
-
Pass the foregroundShow parameter in the REST API call request body and set it to false, so that notification messages are not displayed when the app is running in the foreground. (The default value of foregroundShow is true, indicating that notification messages are displayed no matter whether the app is running in the foreground or background.)
{ "payload": { "notification": { "category": "MARKETING", "title": "Common notification title", "body": "Common notification content", "clickAction": { "actionType": 0 }, "foregroundShow": false // If this parameter is set to false, notification messages are not displayed when the app is running in the foreground. } }, "target": { "token": ["MAMzLg**********lPW"] }, "pushOptions": { "testMessage": true } } -
Set actions to action.ohos.push.listener in skills of the ability configuration (PushMessageAbility used as an example here) in the src/main/module.json5 file at the module level of the client-side project. (This action can be defined for only one ability.)
{ "name": "PushMessageAbility", "srcEntry": "./ets/abilities/PushMessageAbility.ets", "description": "$string:PushMessageAbility_desc", "icon": "$media:layered_image", "label": "$string:PushMessageAbility_label", "startWindowIcon": "$media:startIcon", "startWindowBackground": "$color:start_window_background", "launchType": "singleton", "exported": false, "skills": [ // Keep the existing skill object unchanged. { "actions": [ "com.app.action" ] }, // Add an independent skill object and set the actions parameter. { "actions": [ "action.ohos.push.listener" ] } ] // ... } -
In the onCreate() method of the existing UIAbility class with the actions parameter set (for details, see step 2) in the client-side project, call the receiveMessage() method and set PushType to DEFAULT to obtain notification messages when the app is running in the foreground. The following sample code uses PushMessageAbility as an example:
Import the pushService module and related common modules:
import { AbilityConstant, UIAbility, Want } from '@kit.AbilityKit';
import { pushService } from '@kit.PushKit';
import { hilog } from '@kit.PerformanceAnalysisKit';
import { BusinessError } from '@kit.BasicServicesKit';
Call the receiveMessage API to receive scenario-specific messages from Push Kit.
const DOMAIN = 0x0000;

export default class PushMessageAbility extends UIAbility {
  onCreate(want: Want, launchParam: AbilityConstant.LaunchParam): void {
    // ...
    try {
      // The value of receiveMessage is always DEFAULT.
      pushService.receiveMessage('DEFAULT', this, (payload) => {
        hilog.info(DOMAIN, 'testTag', '%{public}s', 'Receive message for DEFAULT type.');

        try {
          // Obtain the data transmitted from the server.
          const data: string = payload?.data;
          // TODO: Complete the service processing by yourself.
          hilog.info(DOMAIN, 'testTag', 'Succeeded in getting notification,data=%{public}s',
            JSON.stringify(JSON.parse(data)?.notification));
        } catch (err) {
          const e: BusinessError = err as BusinessError;
          hilog.error(DOMAIN, 'testTag', 'Failed to process data: %{public}d %{public}s.', e.code, e.message);
        }
      });
      hilog.info(DOMAIN, 'testTag', '%{public}s', 'Succeeded in registering default message.');
    } catch (err) {
      const e: BusinessError = err as BusinessError;
      hilog.error(DOMAIN, 'testTag', 'Failed to register default message: %{public}d %{public}s', e.code, e.message);
    }
    // ...
  }
}
Implementing Custom Ringtones for Notification Messages
When a device receives a notification message, the default system notification ringtone is played. To implement custom ringtones, pass the sound field in the REST API call request. This function is not supported for messages with category set to MARKETING. This function requires configurations on both the server and client sides. The steps are as follows:
-
Place the custom ringtone file in the /resources/rawfile directory of the client-side project (for example, the value alert.mp3 corresponds to the /resources/rawfile/alert.mp3 file of the app on the device). Then recompile and reinstall the app package.
-
Call the REST API on the server side to push a message and pass the sound field in the request body. The following is an example:
// Request URL POST "https://push-api.cloud.huawei.com/v3/[projectId]/messages:send" // Request header Content-Type: application/json Authorization: Bearer eyJr*****OiIx---****.eyJh*****iJodHR--***.QRod*****4Gp---**** push-type: 0 // Request body { "payload": { "notification": { "category": "TRAVEL", // Change it to the actual notification message type. "title": "Common notification title", "body": "Common notification content", "clickAction": { "actionType": 0 }, "notifyId": 12345, "sound": "alert.mp3", // When category is set to MARKETING, this function is not supported. "soundDuration": 10 // This parameter must be used together with the sound parameter. } }, "target": { "token": ["MAMzLg**********lPW"] }, "pushOptions": { "testMessage": true, "ttl": 86400 } }- sound (optional): custom notification ringtone. The ringtone file specified here must be stored in the /resources/rawfile directory of the app. For example, the value alert.mp3 corresponds to the /resources/rawfile/alert.mp3 file of the app on the device. For details, please refer to sound. When category is set to MARKETING, this function is not supported.
- soundDuration (optional): duration of the custom ringtone, in seconds. The value must be a number within the range [1, 60]. The soundDuration parameter must be used together with the sound parameter. The custom ringtone specified by the sound parameter will be played until the duration reaches the value of soundDuration. If the duration of the custom ringtone is shorter than the value of soundDuration, it will loop until the specified time is reached. For details, please refer to soundDuration.