3D编辑器ArkGraphics Editor提供3D模型、动画、ShaderGraph等核心编辑能力,可供设计师、开发者快速接入使用。支持通过拖拽等操作,利用3D编辑器可视化能力,完成3D场景开发,3D设计效果所见即所得。无需代码编写,支持从PC到移动端设备的快速流转, 可大幅提升3D应用开发效率。
主要功能
ArkGraphics Editor编辑器当前主要支持功能如下:
编辑器工程的新建、打开、保存功能。
支持导入gltf格式的3D模型和image图片。
支持相机新增、修改、删除。
支持3D场景里模型的缩放、移动、旋转等拖动操作。
支持3D场景节点新增、修改、删除功能。
支持3D场景节点的属性设置,包括位置、颜色,旋转、缩放功能。
支持3D模型的动画新增、修改、删除功能。
支持3D模型的材质新增、修改、删除功能。
支持3D模型的ShaderGraph新增、修改、删除功能。
支持环境光的添加和设置。
ArkGraphics Editor插件支持的主要功能如下:
支持在DevEco中预览3D场景文件(.Scene)。
可点击“Open ArkGraphicsEditor”打开编辑器程序编辑3D资源。
插件的安装及编辑器的使用
前往下载中心下载最新版本ArkGraphics Editor插件。
点击DevEco Studio菜单项的File,选择Settings,选择左边列表的Plugins。
点击Plugins窗口的顶部设置按钮,选择Install Plugin from Disk...。
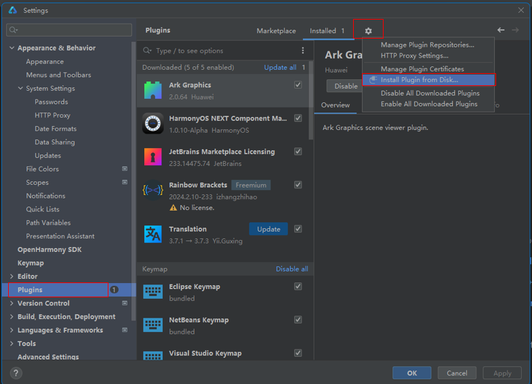
选择下载的插件,进行安装。
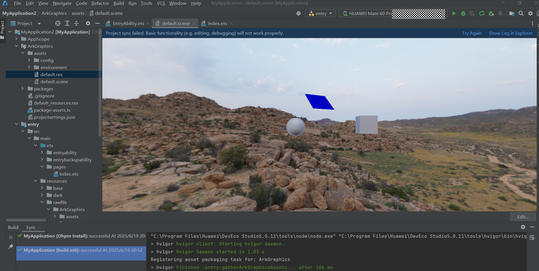
安装成功后,关闭DevEco Studio,再重新打开,选择3D工程里的*.scene文件,可在DevEco Studio里打开显示3D场景内容。
前往下载中心下载最新版本ArkGraphics Editor编辑器,并进行安装。
插件主要用来预览,当开发者需要进行3D编辑开发时,可点击“Open Ark Graphics Editor”打开3D编辑器对3D模型进行编辑。

要使用ArkGraphics Editor编辑器,需要满足以下条件:
对应设备已安装Visual Studio 2022 Community。
Visual Studio 2022 Community已安装使用C++ 进行桌面开发的选项。
编辑器生成的3D资源文件,目前只支持在HarmonyOS 6.0.0及以上版本的设备上加载呈现。
创建使用3D编辑器资源的工程
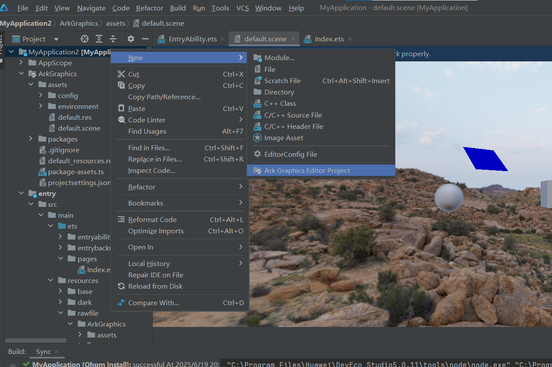
创建一个新工程或在已有工程下,右键工程名,选择New,选择Ark Graphics Editor Project。
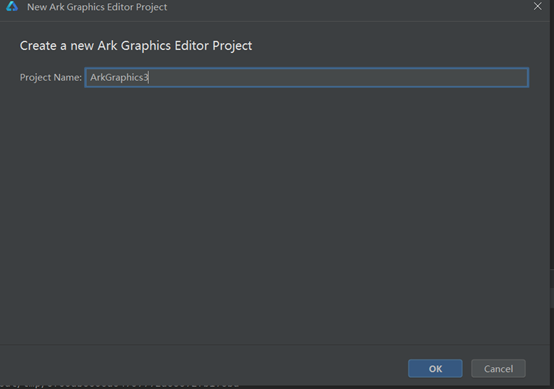
输入3D资源工程名。
双击default.scene,可显示创建的3D场景资源。
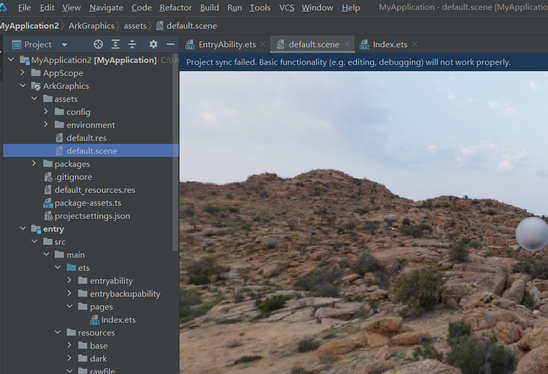
点击右下角Editor,可打开编辑器编辑3D资源,编辑保存后,可显示编辑后的资源。
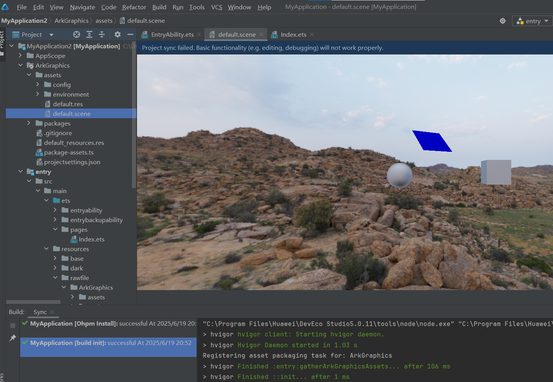
修改复制资源脚本文件。
脚本文件路径:xxx/MyApplication/entry/hvigorfile.ts
运行工程时会执行该脚本将3D资源复制到assets目录下。
// entry/hvigorfile.ts
import { hapTasks } from '@ohos/hvigor-ohos-plugin';

import { getNode } from '@ohos/hvigor';
import * as MyEditorProject  from '../ArkGraphics/package-assets';
MyEditorProject.packageAssetsToModule(getNode(__filename));

export default {
    system: hapTasks,  /* Built-in plugin of Hvigor. It cannot be modified. */
    plugins:[]         /* Custom plugin to extend the functionality of Hvigor. */
}
修改Index.ets,加载3D资源。
注意Index.ets代码内容中加载的目录名与3D资源工程名保持一致。
// Index.ets
import * as scene3d from '@ohos.graphics.scene'

@Entry
@Component
struct Index {
  scene: scene3d.Scene | null = null;
  cam: scene3d.Camera | null = null;
  @State sceneOpts: SceneOptions | null = null;
  @State statusText: string = "";

  onPageShow(): void {
    this.Init();
  }

  Init(): void {
    if (this.scene == null) {
      this.statusText = 'Loading scene. Please wait.'
      const resource = $rawfile('ArkGraphics/assets/default.scene');

      scene3d.Scene.load(resource).then(async (scene: Scene) => {
        this.scene = scene;

        this.cam = this.scene.root?.getNodeByPath("Perspective Camera") as scene3d.Camera;
        this.cam.enabled = true;

        this.sceneOpts = { scene: this.scene, modelType: ModelType.SURFACE };
        this.statusText = 'Done.'
      }).catch(() => {
        this.statusText = 'Failed to load scene.'
      })
    }
  }

  build() {
    Row() {
      Column() {
        Text('Ark Graphics Scene Example 3')
        if (this.sceneOpts) {
          Component3D(this.sceneOpts).width('70%').height('70%')
        }
        if (this.statusText) {
          Text(this.statusText)
        }
      }.width('100%')
    }
    .height('100%')
  }
}
完成以上操作后,可在真机运行工程,观察3D资源加载效果。

编辑器生成的3D资源文件,目前只支持在HarmonyOS 6.0.0及以上版本的设备上加载呈现。