开发者经常需要在应用中显示一些图片,例如:按钮中的icon、网络图片、本地图片等。在应用中显示图片需要使用Image组件实现,Image支持多种图片格式,包括png、jpg、jpeg等格式,不支持apng和svga格式,具体支持格式和用法请参考Image组件。
Image通过调用接口来创建,接口调用形式如下:
Image(src: PixelMap | ResourceStr | DrawableDescriptor)
该接口通过图片数据源获取图片,支持本地图片和网络图片的渲染展示。其中,src是图片的数据源,加载方式请参考加载图片资源。
如果图片加载过程中出现白色块,请参考Image白块解决方案。如果图片加载时间过长,请参考预置图片资源加载优化。
[h2]存档图类型数据源
存档图类型的数据源可以分为本地资源、网络资源、Resource资源、媒体库资源和base64。
-
本地资源
创建文件夹,将本地图片放入ets文件夹下的任意位置。
Image组件引入本地图片路径,即可显示图片(根目录为ets文件夹)。不支持跨包、跨模块调用该Image组件。

从DevEco Studio 6.0.0 Beta2版本开始,新建工程或模块时,默认创建的模块不会对非resources目录下的资源进行打包,需使相关模块:build-profile.json5中buildOption > resOptions > copyCodeResource > enable设置为true,详见resOptions中copyCodeResource相关介绍。
// 'images/view.jpg'需要替换为开发者所需的资源文件
Image('images/view.jpg')
  .width(200)
加载本地图片过程中,如果对图片进行修改或者替换,可能会引起应用崩溃。因此需要覆盖图片文件时,应该先删除该文件再重新创建一个同名文件。
-
网络资源
引入网络图片需申请权限ohos.permission.INTERNET,具体申请方式请参考声明权限。此时,Image组件的src参数为网络图片的链接。
当前Image组件仅支持加载简单网络图片。
首次加载网络图片时,Image组件需要请求网络资源;非首次加载时,默认从缓存中直接读取图片。
更多图片缓存设置请参考setImageCacheCount、setImageRawDataCacheSize和setImageFileCacheSize。这三个图片缓存接口主要用于支持简单、通用的场景,后续不再继续演进,且在灵活和扩展性方面存在一定限制,例如:
- 无法获取当前缓存占用信息。Image组件目前不支持查询磁盘缓存的实时状态,包括文件总大小和文件数量。
- 缓存策略不可定制,缺乏缓存状态观测能力。开发者无法通过接口感知缓存命中率、淘汰次数等运行时的指标,难以基于实际缓存效果进行动态调优。
对于复杂情况,推荐使用ImageKnife,该图像库提供了更灵活、可扩展的缓存策略以及完善的生命周期管理能力,更适合复杂业务需求。
网络图片必须支持RFC 9113标准,否则会导致加载失败。如果下载的网络图片大于10MB或一次下载的网络图片数量较多,建议使用HTTP工具提前下载,提高图片加载性能,方便应用侧管理数据。
在显示网络图片时,Image组件在机制上会依赖@ohos.request.cacheDownload (缓存下载),开发者可参考示例3(下载与显示网络gif图片)了解具体用法。
缓存下载模块提供独立的预下载接口,允许应用开发者在创建Image组件前预下载所需图片。组件创建后,Image组件可直接从缓存下载模块中获取已下载的图片数据,从而加快图片的显示速度,优化加载体验,并有效避免网络图片加载延迟。网络缓存的位置位于应用根目录下的cache目录中。
// $r('app.string.LoadingResources')需要替换为开发者所需的资源文件,资源文件中的value值请替换为真实路径 Image($r('app.string.LoadingResources')) -
Resource资源
使用资源格式可以跨包/跨模块引入图片,resources文件夹下的图片都可以通过$r资源接口读取到并转换到Resource格式。
图1 resources
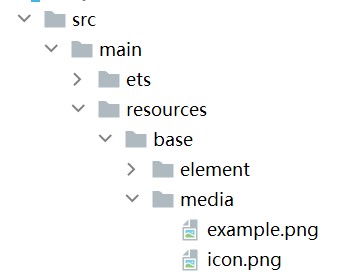
调用方式:
// 请将$r('app.media.icon')替换为实际资源文件
Image($r('app.media.icon'))
还可以将图片放在rawfile文件夹下。
图2 rawfile
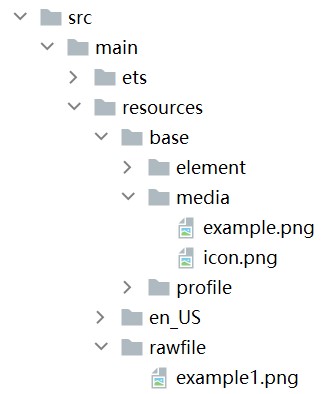
调用方式:
// $rawfile('example1.png')需要替换为开发者所需的资源文件 Image($rawfile('example1.png')) -
媒体库file://data/storage
支持file://路径前缀的字符串,用于访问通过选择器提供的图片路径。
- 调用接口获取图库的照片url。
import { photoAccessHelper } from '@kit.MediaLibraryKit'; import { BusinessError } from '@kit.BasicServicesKit'; import { hilog } from '@kit.PerformanceAnalysisKit'; const DOMAIN = 0x0001; const TAG = 'Sample_imagecomponent'; @Entry @Component struct MediaLibraryFile { @State imgDatas: string[] = []; // 使用PhotoViewPicker唤起图片选择器,选择图片并且渲染到页面中 // 获取照片url集 getAllImg() { try { let photoSelectOptions:photoAccessHelper.PhotoSelectOptions = new photoAccessHelper.PhotoSelectOptions(); photoSelectOptions.MIMEType = photoAccessHelper.PhotoViewMIMETypes.IMAGE_TYPE; photoSelectOptions.maxSelectNumber = 5; let photoPicker:photoAccessHelper.PhotoViewPicker = new photoAccessHelper.PhotoViewPicker(); photoPicker.select(photoSelectOptions).then((photoSelectResult:photoAccessHelper.PhotoSelectResult) => { this.imgDatas = photoSelectResult.photoUris; hilog.info(DOMAIN, TAG,'PhotoViewPicker.select successfully, photoSelectResult uri: ' + JSON.stringify(photoSelectResult)); }).catch((err:Error) => { let message = (err as BusinessError).message; let code = (err as BusinessError).code; hilog.info(DOMAIN, TAG,`PhotoViewPicker.select failed with. Code: ${code}, message: ${message}`); }); } catch (err) { let message = (err as BusinessError).message; let code = (err as BusinessError).code; hilog.info(DOMAIN, TAG,`PhotoViewPicker failed with. Code: ${code}, message: ${message}`); }; }; // aboutToAppear中调用上述函数,获取图库的所有图片url,存在imgDatas中 async aboutToAppear() { this.getAllImg(); }; // 使用imgDatas的url加载图片 build() { Column() { Grid() { ForEach(this.imgDatas, (item:string) => { GridItem() { Image(item) .width(200) } }, (item:string):string => JSON.stringify(item)) } }.width('100%').height('100%') } } - 从媒体库获取的url格式通常如下。
// 'file://media/Photos/5'需要替换为开发者所需的资源文件,资源文件中的value值请替换为真实路径
Image('file://media/Photos/5')
  .width(200)
- 调用接口获取图库的照片url。
-
base64
路径格式为data:image/[png|jpeg|bmp|webp|heif];base64,[base64 data],其中[base64 data]为Base64字符串数据。
Base64格式字符串可用于存储图片的像素数据,在网页上使用较为广泛。
[h2]多媒体像素图
PixelMap是图片解码后的像素图,具体用法请参考Image Kit简介。以下示例将加载的网络图片返回的数据解码成PixelMap格式,再显示在Image组件上。
import { http } from '@kit.NetworkKit';
import { image } from '@kit.ImageKit';
import { BusinessError } from '@kit.BasicServicesKit';
import { hilog } from '@kit.PerformanceAnalysisKit';
const DOMAIN = 0x0001;
const TAG = 'Sample_imagecomponent';

@Entry
@Component
struct HttpExample {
  outData: http.HttpResponse | undefined = undefined;
  code: http.ResponseCode | number | undefined = undefined;
  @State image: PixelMap | undefined = undefined; // 创建PixelMap状态变量

  // 使用createHttp接口将加载的网络图片返回的数据解码成PixelMap格式,再显示在Image组件上
  aboutToAppear(): void {
    http.createHttp().request('xxx://xxx.xxx.xxx/example.png', // 需要替换为开发者所需的资源文件,资源文件中的value值请替换为真实路径
      (error: BusinessError, data: http.HttpResponse) => {
        if (error) {
          hilog.error(DOMAIN, TAG, `hello http request failed. Code: ${error.code}, message: ${error.message}`);
          return;
        };
        this.outData = data;
        // 将网络地址成功返回的数据,解码成PixelMap格式
        if (http.ResponseCode.OK === this.outData.responseCode) {
          let imageData: ArrayBuffer = this.outData.result as ArrayBuffer;
          let imageSource: image.ImageSource = image.createImageSource(imageData);
          let options: image.DecodingOptions = {
            'desiredPixelFormat': image.PixelMapFormat.RGBA_8888,
          };
          imageSource.createPixelMap(options).then((pixelMap: PixelMap) => {
            this.image = pixelMap;
            imageSource.release();
          });
        };
      });
  };

  build() {
    Column() {
      // 显示图片
      Image(this.image)
        .height(100)
        .width(100)
    }
  }
}
[h2]可绘制描述符
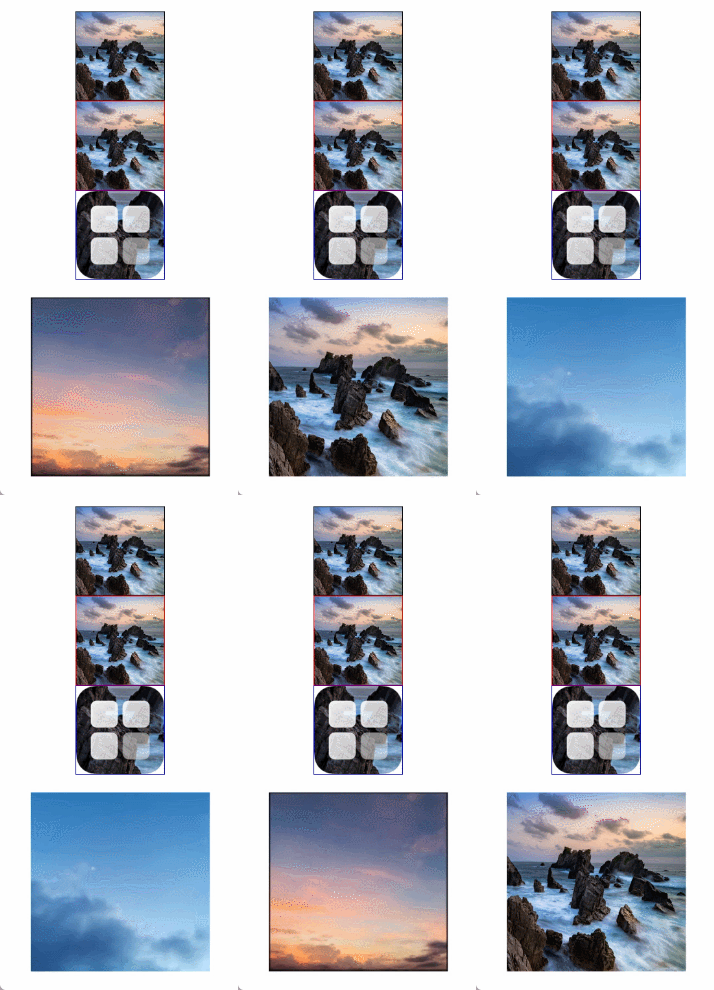
DrawableDescriptor是ArkUI提供的一种高级图片抽象机制,它通过将图片资源封装为可编程对象,实现了传统Image组件难以实现的动态组合与运行时控制功能。开发者可利用它实现图片的分层叠加(如徽章图标)、动态属性调整(如颜色滤镜)、复杂动画序列等高级效果,适用于需要灵活控制图片展现或实现复杂视觉交互的场景。详细使用方法,请参考DrawableDescriptor。
通过DrawableDescriptor显示图片及动画的示例如下所示:
import {
  DrawableDescriptor,
  PixelMapDrawableDescriptor,
  LayeredDrawableDescriptor,
  AnimatedDrawableDescriptor,
  AnimationOptions
} from '@kit.ArkUI';
import { image } from '@kit.ImageKit';

@Entry
@Component
struct DrawableDescriptorType {
  // 声明DrawableDescriptor对象
  @State pixmapDesc: DrawableDescriptor | null = null;
  @State pixelMapDesc: PixelMapDrawableDescriptor | null = null;
  @State layeredDesc: LayeredDrawableDescriptor | null = null;
  @State animatedDesc: AnimatedDrawableDescriptor | null = null;
  // 动画配置
  private animationOptions: AnimationOptions = {
    duration: 3000,
    iterations: -1
  };

  // 开发者可利用DrawableDescriptor实现图片的分层叠加(如徽章图标),动态属性调整(如颜色滤镜),复杂动画序列等高级效果
  async aboutToAppear() {
    const resManager = this.getUIContext().getHostContext()?.resourceManager;
    if (!resManager) {
      return;
    };
    // 创建普通DrawableDescriptor
    // 请将$r('app.media.landscape')替换为实际资源文件
    let pixmapDescResult = resManager.getDrawableDescriptor($r('app.media.landscape').id);
    if (pixmapDescResult) {
      this.pixmapDesc = pixmapDescResult as DrawableDescriptor;
    };
    // 创建PixelMapDrawableDescriptor
    // 请将$r('app.media.landscape')替换为实际资源文件
    const pixelMap = await this.getPixmapFromMedia($r('app.media.landscape'));
    this.pixelMapDesc = new PixelMapDrawableDescriptor(pixelMap);
    // 创建分层图标
    // 请将$r('app.media.foreground')替换为实际资源文件
    const foreground = await this.getDrawableDescriptor($r('app.media.foreground'));
    // 请将$r('app.media.landscape')替换为实际资源文件
    const background = await this.getDrawableDescriptor($r('app.media.landscape'));
    this.layeredDesc = new LayeredDrawableDescriptor(foreground, background);
    // 创建动画图片(需加载多张图片)
    // 请将$r('app.media.sky')替换为实际资源文件
    const frame1 = await this.getPixmapFromMedia($r('app.media.sky'));
    // 请将$r('app.media.landscape')替换为实际资源文件
    const frame2 = await this.getPixmapFromMedia($r('app.media.landscape'));
    // 请将$r('app.media.clouds')替换为实际资源文件
    const frame3 = await this.getPixmapFromMedia($r('app.media.clouds'));
    if (frame1 && frame2 && frame3) {
      this.animatedDesc = new AnimatedDrawableDescriptor([frame1, frame2, frame3], this.animationOptions);
    };
  };

  // 辅助方法:从资源获取PixelMap
  private async getPixmapFromMedia(resource: Resource): Promise<image.PixelMap | undefined> {
    const unit8Array = await this.getUIContext().getHostContext()?.resourceManager.getMediaContent(resource.id);
    if (!unit8Array) {
      return undefined;
    };
    const imageSource = image.createImageSource(unit8Array.buffer.slice(0, unit8Array.buffer.byteLength));
    const pixelMap = await imageSource.createPixelMap({
      desiredPixelFormat: image.PixelMapFormat.RGBA_8888
    });
    await imageSource.release();
    return pixelMap;
  };

  // 辅助方法:获取DrawableDescriptor
  private async getDrawableDescriptor(resource: Resource): Promise<DrawableDescriptor | undefined> {
    const resManager = this.getUIContext().getHostContext()?.resourceManager;
    if (!resManager) {
      return undefined;
    };
    return (resManager.getDrawableDescriptor(resource.id)) as DrawableDescriptor;
  };

  build() {
    RelativeContainer() {
      Column() {
        // 显示普通图片
        Image(this.pixmapDesc)
          .width(100)
          .height(100)
          .border({ width: 1, color: Color.Black })
        // 显示PixelMap图片
        Image(this.pixelMapDesc)
          .width(100)
          .height(100)
          .border({ width: 1, color: Color.Red })
        // 显示分层图标
        if (this.layeredDesc) {
          Image(this.layeredDesc)
            .width(100)
            .height(100)
            .border({ width: 1, color: Color.Blue })
        }
        // 显示动画图片
        if (this.animatedDesc) {
          Image(this.animatedDesc)
            .width(200)
            .height(200)
            .margin({ top: 20 })
        }
      }
    }
    .height('100%')
    .width('100%')
    .margin(50)
  }
} 
显示矢量图
Image组件可显示矢量图(SVG格式的图片),SVG标签文档请参考SVG标签说明。
如果SVG图片没有原始大小,需要给Image组件设置宽高,否则不显示。SVG图片不支持通过image标签引用SVG格式和gif格式的本地其他图片。
SVG格式的图片可以使用fillColor属性改变图片的绘制颜色。
// 请将$r('app.media.cloud')替换为实际资源文件
Image($r('app.media.cloud'))
  .width(50)
  .fillColor(Color.Blue)
图3 原始图片

图4 设置绘制颜色后的SVG图片

[h2]矢量图引用位图
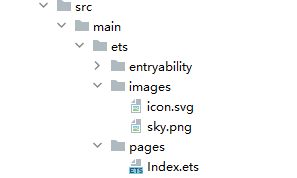
如果Image加载的SVG图源中包含对本地位图的引用,则SVG图源的路径应当设置为以ets为根目录的工程路径,同时,本地位图的路径应设置为与SVG图源同级的相对路径。
Image加载的SVG图源路径设置方法如下所示:

从DevEco Studio 6.0.0 Beta2版本开始,新建工程或模块时,默认创建的模块不会对非resources目录下的资源进行打包,需使相关模块:build-profile.json5中buildOption > resOptions > copyCodeResource > enable设置为true,详见resOptions中copyCodeResource相关介绍。
// 'images/icon.svg'需要替换为开发者所需的资源文件
Image('/images/icon.svg')
  .width(50)
  .height(50)
SVG图源通过<image>标签的xlink:href属性指定本地位图路径,本地位图路径设置为跟SVG图源同级的相对路径:
<svg width="200" height="200">
  <image width="200" height="200" xlink:href="sky.png"></image>
</svg>
文件工程路径示例如图:
[h2]设置图片缩放类型
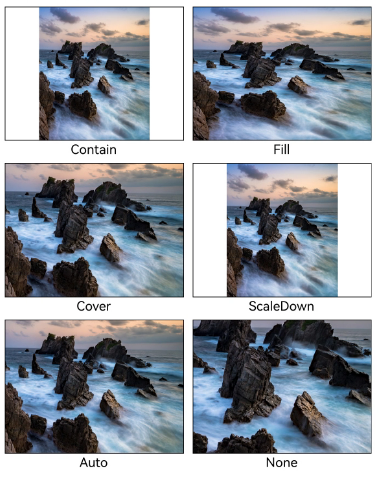
通过设置objectFit属性,可以使图片在高度和宽度确定的框内进行缩放。
@Entry
@Component
struct ImageScalingType {
  scroller: Scroller = new Scroller();

  build() {
    Scroll(this.scroller) {
      Row() {
        Column() {
          // 请将$r('app.media.img_2')替换为实际资源文件
          Image($r('app.media.img_2'))
            .width(200)
            .height(150)
            .border({ width: 1 })
            // 通过设置objectFit属性,可以使图片在高度和宽度确定的框内进行缩放
            // 保持宽高比进行缩小或者放大,使得图片完全显示在显示边界内
            .objectFit(ImageFit.Contain)
            .margin({bottom:25,left:10})
            // overlay接口暂不支持深色模式
            .overlay('Contain', { align: Alignment.Bottom, offset: { x: 0, y: 20 } })
          // 请将$r('app.media.img_2')替换为实际资源文件
          Image($r('app.media.img_2'))
            .width(200)
            .height(150)
            .border({ width: 1 })
            // 通过设置objectFit属性,可以使图片在高度和宽度确定的框内进行缩放
            // 保持宽高比进行缩小或者放大,使得图片两边都大于或等于显示边界
            .objectFit(ImageFit.Cover)
            .margin({bottom:25,left:10})
            // overlay接口暂不支持深色模式
            .overlay('Cover', { align: Alignment.Bottom, offset: { x: 0, y: 20 } })
          // 请将$r('app.media.img_2')替换为实际资源文件
          Image($r('app.media.img_2'))
            .width(200)
            .height(150)
            .border({ width: 1 })
            // 通过设置objectFit属性,可以使图片在高度和宽度确定的框内进行缩放
            // 自适应显示
            .objectFit(ImageFit.Auto)
            .margin({bottom:25,left:10})
            // overlay接口暂不支持深色模式
            .overlay('Auto', { align: Alignment.Bottom, offset: { x: 0, y: 20 } })
        }

        Column() {
          // 请将$r('app.media.img_2')替换为实际资源文件
          Image($r('app.media.img_2'))
            .width(200)
            .height(150)
            .border({ width: 1 })
            // 通过设置objectFit属性,可以使图片在高度和宽度确定的框内进行缩放
            // 不保持宽高比进行放大缩小,使得图片充满显示边界
            .objectFit(ImageFit.Fill)
            .margin({bottom:25,left:10})
            // overlay接口暂不支持深色模式
            .overlay('Fill', { align: Alignment.Bottom, offset: { x: 0, y: 20 } })
          // 请将$r('app.media.img_2')替换为实际资源文件
          Image($r('app.media.img_2'))
            .width(200)
            .height(150)
            .border({ width: 1 })
            // 通过设置objectFit属性,可以使图片在高度和宽度确定的框内进行缩放
            // 保持宽高比显示,图片缩小或者保持不变
            .objectFit(ImageFit.ScaleDown)
            .margin({bottom:25,left:10})
            // overlay接口暂不支持深色模式
            .overlay('ScaleDown', { align: Alignment.Bottom, offset: { x: 0, y: 20 } })
          // 请将$r('app.media.img_2')替换为实际资源文件
          Image($r('app.media.img_2'))
            .width(200)
            .height(150)
            .border({ width: 1 })
            // 通过设置objectFit属性,可以使图片在高度和宽度确定的框内进行缩放
            // 保持原有尺寸显示
            .objectFit(ImageFit.None)
            .margin({bottom:25,left:10})
            // overlay接口暂不支持深色模式
            .overlay('None', { align: Alignment.Bottom, offset: { x: 0, y: 20 } })
        }
      }
    }
  }
} 
[h2]图片插值
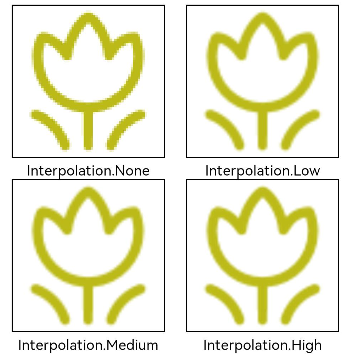
当原图分辨率较低并放大显示时,图片会变得模糊并出现锯齿。这时可以使用interpolation属性对图片进行插值,以提高显示清晰度。
@Entry
@Component
struct ImageInterpolationType {
  build() {
    Column() {
      Row() {
        // 请将$r('app.media.grass')替换为实际资源文件
        Image($r('app.media.grass'))
          .width('40%')
          // 使用interpolation接口对图片进行插值,显著提升清晰度
          .interpolation(ImageInterpolation.None)
          .borderWidth(1)
          // overlay接口暂不支持深色模式
          .overlay('Interpolation.None', { align: Alignment.Bottom, offset: { x: 0, y: 20 } })
          .margin(10)
        // 请将$r('app.media.grass')替换为实际资源文件
        Image($r('app.media.grass'))
          .width('40%')
          // 使用interpolation接口对图片进行插值,显著提升清晰度
          .interpolation(ImageInterpolation.Low)
          .borderWidth(1)
          // overlay接口暂不支持深色模式
          .overlay('Interpolation.Low', { align: Alignment.Bottom, offset: { x: 0, y: 20 } })
          .margin(10)
      }.width('100%')
      .justifyContent(FlexAlign.Center)

      Row() {
        // 请将$r('app.media.grass')替换为实际资源文件
        Image($r('app.media.grass'))
          .width('40%')
          // 使用interpolation接口对图片进行插值,显著提升清晰度
          .interpolation(ImageInterpolation.Medium)
          .borderWidth(1)
          // overlay接口暂不支持深色模式
          .overlay('Interpolation.Medium', { align: Alignment.Bottom, offset: { x: 0, y: 20 } })
          .margin(10)
        // 请将$r('app.media.grass')替换为实际资源文件
        Image($r('app.media.grass'))
          .width('40%')
          // 使用interpolation接口对图片进行插值,显著提升清晰度
          .interpolation(ImageInterpolation.High)
          .borderWidth(1)
          // overlay接口暂不支持深色模式
          .overlay('Interpolation.High', { align: Alignment.Bottom, offset: { x: 0, y: 20 } })
          .margin(10)
      }.width('100%')
      .justifyContent(FlexAlign.Center)
    }
    .height('100%')
  }
} 
[h2]设置图片重复样式
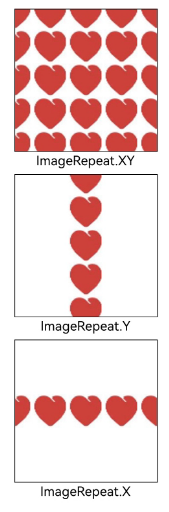
通过objectRepeat属性设置图片的重复样式方式,重复样式请参考ImageRepeat枚举说明。
@Entry
@Component
struct ImageRepetitionStyle {
  build() {
    Column({ space: 10 }) {
      Column({ space: 25 }) {
        // 请将$r('app.media.ic_public_favor_filled_1')替换为实际资源文件
        Image($r('app.media.ic_public_favor_filled_1'))
          .width(160)
          .height(160)
          .border({ width: 1 })
          // 通过objectRepeat属性设置图片的重复样式方式
          // 在水平轴和竖直轴上同时重复绘制图片
          .objectRepeat(ImageRepeat.XY)
          .objectFit(ImageFit.ScaleDown)
          // overlay接口暂不支持深色模式
          .overlay('ImageRepeat.XY', { align: Alignment.Bottom, offset: { x: 0, y: 20 } })
        // 请将$r('app.media.ic_public_favor_filled_1')替换为实际资源文件
        Image($r('app.media.ic_public_favor_filled_1'))
          .width(160)
          .height(160)
          .border({ width: 1 })
          // 通过objectRepeat属性设置图片的重复样式方式
          // 只在竖直轴上重复绘制图片
          .objectRepeat(ImageRepeat.Y)
          .objectFit(ImageFit.ScaleDown)
          // overlay接口暂不支持深色模式
          .overlay('ImageRepeat.Y', { align: Alignment.Bottom, offset: { x: 0, y: 20 } })
        // 请将$r('app.media.ic_public_favor_filled_1')替换为实际资源文件
        Image($r('app.media.ic_public_favor_filled_1'))
          .width(160)
          .height(160)
          .border({ width: 1 })
          // 通过objectRepeat属性设置图片的重复样式方式
          // 只在水平轴上重复绘制图片
          .objectRepeat(ImageRepeat.X)
          .objectFit(ImageFit.ScaleDown)
          // overlay接口暂不支持深色模式
          .overlay('ImageRepeat.X', { align: Alignment.Bottom, offset: { x: 0, y: 20 } })
      }
    }.height(150).width('100%').padding(8)
  }
} 
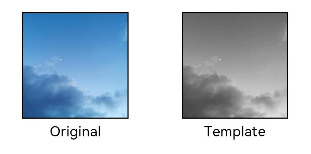
[h2]设置图片渲染模式
通过renderMode属性设置图片的渲染模式为原色或黑白。
@Entry
@Component
struct SetImageRenderingMode {
  build() {
    Column({ space: 10 }) {
      Row({ space: 50 }) {
        // 请将$r('app.media.example')替换为实际资源文件
        Image($r('app.media.example'))
          // 通过renderMode属性设置图片的渲染模式为原色或黑白
          .renderMode(ImageRenderMode.Original)
          .width(100)
          .height(100)
          .border({ width: 1 })
          // overlay接口暂不支持深色模式
          .overlay('Original', { align: Alignment.Bottom, offset: { x: 0, y: 20 } })
        // 请将$r('app.media.example')替换为实际资源文件
        Image($r('app.media.example'))
          // 通过renderMode属性设置图片的渲染模式为原色或黑白
          .renderMode(ImageRenderMode.Template)
          .width(100)
          .height(100)
          .border({ width: 1 })
          // overlay接口暂不支持深色模式
          .overlay('Template', { align: Alignment.Bottom, offset: { x: 0, y: 20 } })
      }
    }.height(150).width('100%').padding({ top: 20,right: 10 })
  }
} 
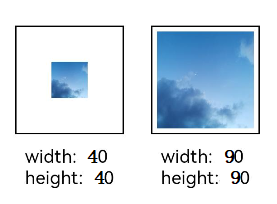
[h2]设置图片解码尺寸
通过sourceSize属性设置图片解码尺寸,降低图片的分辨率。
原图尺寸为1280×960,该示例将图片解码为40×40和90×90两个尺寸。
@Entry
@Component
struct SetImageDecodingSize {
  build() {
    Column() {
      Row({ space: 50 }) {
        // 请将$r('app.media.example')替换为实际资源文件
        Image($r('app.media.example'))
        // 使用sourceSize接口对图片设置解码尺寸,降低图片分辨率
          .sourceSize({
            width: 40,
            height: 40
          })
          .objectFit(ImageFit.ScaleDown)
          .aspectRatio(1)
          .width('25%')
          .border({ width: 1 })
          // overlay接口暂不支持深色模式
          .overlay('width:40 height:40', { align: Alignment.Bottom, offset: { x: 0, y: 40 } })
        // 请将$r('app.media.example')替换为实际资源文件
        Image($r('app.media.example'))
        // 使用sourceSize接口对图片设置解码尺寸,降低图片分辨率
          .sourceSize({
            width: 90,
            height: 90
          })
          .objectFit(ImageFit.ScaleDown)
          .width(100)
          .height(100)
          .aspectRatio(1)
          .border({ width: 1 })
          // overlay接口暂不支持深色模式
          .overlay('width:90 height:90', { align: Alignment.Bottom, offset: { x: 0, y: 40 } })
      }.height(150).width('100%').padding(20)
    }
  }
} 
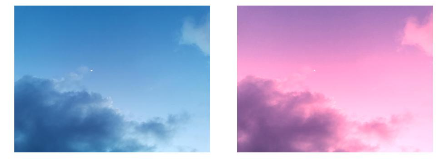
[h2]为图片添加滤镜效果
通过colorFilter调整图片的像素颜色,为图片添加滤镜。完整的示例及开发指导请参考基于colorFilter实现图片滤镜效果。
@Entry
@Component
struct AddFilterEffectsToImages {
  build() {
    Column() {
      Row() {
        // 请将$r('app.media.example')替换为实际资源文件
        Image($r('app.media.example'))
          .width('40%')
          .margin(10)
        // 请将$r('app.media.example')替换为实际资源文件
        Image($r('app.media.example'))
          .width('40%')
          // 通过colorFilter调整图片的像素颜色,为图片添加滤镜
          .colorFilter(
            [1, 1, 0, 0, 0,
             0, 1, 0, 0, 0,
             0, 0, 1, 0, 0,
             0, 0, 0, 1, 0])
          .margin(10)
      }.width('100%')
      .justifyContent(FlexAlign.Center)
    }
  }
} 
[h2]同步加载图片
一般情况下,图片加载流程会异步进行,以避免阻塞主线程,影响UI交互。但是特定情况下,图片刷新时会出现闪烁,这时可以使用syncLoad属性,使图片同步加载,从而避免出现闪烁。不建议图片加载较长时间时使用,会导致页面无法响应。
// 请将$r('app.media.icon')替换为实际资源文件
Image($r('app.media.icon'))
  .syncLoad(true)
[h2]设置图片拉伸
通过Image组件的resizable属性实现精准图片拉伸,其核心原理是:使用特定规则划分图片的固定区域与可拉伸区域,当图片拉伸时,仅对可拉伸区域进行拉伸,固定区域保持原始尺寸与形态不变。
resizable属性参数类型为ResizableOptions,支持使用slice(slice: { left, right, top, bottom })和lattice(lattice: DrawingLattice)两种图片拉伸方案。完整示例及开发指导请参考基于resizable实现图片拉伸效果
事件调用
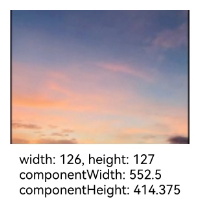
通过在Image组件上绑定onComplete事件,图片加载成功后可以获取图片的必要信息。如果图片加载失败,也可以通过绑定onError()回调来获得结果。
import { hilog } from '@kit.PerformanceAnalysisKit';
const DOMAIN = 0x0001;
const TAG = 'Sample_imagecomponent';

@Entry
@Component
struct EventCall {
  @State widthValue: number = 0;
  @State heightValue: number = 0;
  @State componentWidth: number = 0;
  @State componentHeight: number = 0;

  build() {
    Column() {
      Row() {
        // 请将$r('app.media.ic_img_2')替换为实际资源文件
        Image($r('app.media.ic_img_2'))
          .width(200)
          .height(150)
          .margin(15)
          // 图片加载成功后,通过onComplete获取图片必要信息
          .onComplete(msg => {
            if(msg){
              this.widthValue = msg.width;
              this.heightValue = msg.height;
              this.componentWidth = msg.componentWidth;
              this.componentHeight = msg.componentHeight;
            };
            hilog.info(DOMAIN, TAG, `${msg}`);
          })
          // 如果加载失败,使用onError触发回调函数获取结果
          .onError(() => {
            hilog.info(DOMAIN, TAG, 'load image fail');
          })
          // overlay接口暂不支持深色模式
          .overlay('\nwidth: ' + String(this.widthValue) + ', height: ' + String(this.heightValue) + '\ncomponentWidth: ' + String(this.componentWidth) + '\ncomponentHeight: ' + String(this.componentHeight), {
            align: Alignment.Bottom,
            offset: { x: 0, y: 60 }
          })
      }
    }
  }
}