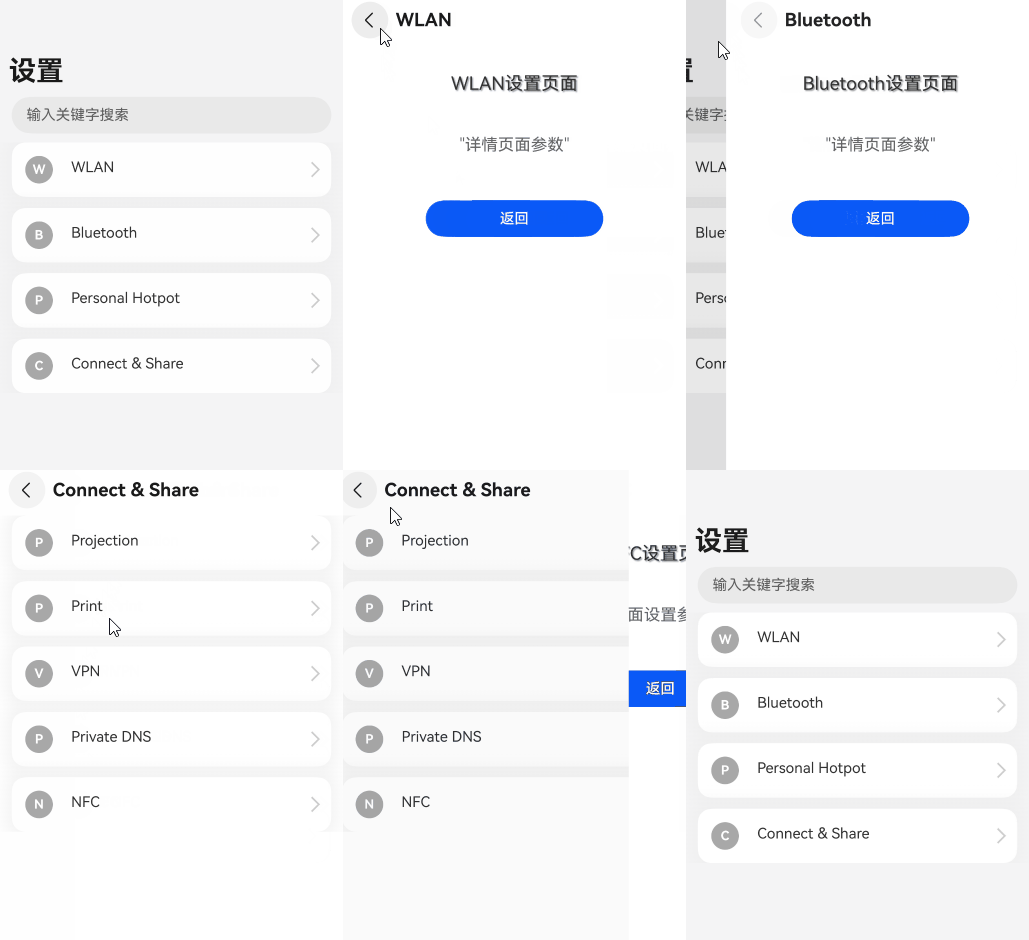
Navigation路由相关操作均基于导航控制器NavPathStack提供的方法实现,每个Navigation都需要创建并传入一个NavPathStack对象,用于管理页面。NavPathStack主要提供了页面跳转、页面返回、页面替换、页面删除、参数获取、路由拦截等功能。
在API version 9,Navigation需要配合NavRouter组件实现页面路由。从API version 10开始,更推荐使用NavPathStack实现页面路由。
路由相关的几个关键概念:
- 路由表:定义了页面名称和NavDestination页面的映射,若跳转时传入的页面名称未在路由表里注册,会跳转失败。系统提供了系统路由表和自定义路由表两种实现方式。
- 路由栈:NavDestination页面以栈结构管理,每个Navigation都有自己的路由栈,不可共享。路由栈主要由NavPathStack控制,此外可通过NavPathStack.getPathStack获取完整路由栈信息。
- 页面转场:页面跳转动画,Navigation默认提供了页面切换的转场动画,也支持开发者自定义转场动画。

-
NavPathStack对象和Navigation需要一一对应,不可复用。
-
NavPathStack主要控制的是NavDestination页面跳转、删除等,无法直接操作NavBar导航栏,若想跳转到NavBar页面只能通过clear清空路由栈的方式。
-
不建议开发者通过监听生命周期的方式管理自己的路由栈,可通过NavPathStack.getPathStack查询路由栈。
-
在应用处于后台状态下,调用NavPathStack的栈操作方法,会在应用再次回到前台状态时触发刷新。
[h2]构建导航根容器
首先,开发者需要创建一个Navigation作为导航根容器,并创建一个NavPathStack对象作为构造入参传给Navigation组件,以实现二者的绑定,后续的路由操作均基于该NavPathStack展开。
@Entry
@Component
struct Index {
  // 创建一个导航控制器对象并传入Navigation
  pageStack: NavPathStack = new NavPathStack();
  // ...
  build() {
    Navigation(this.pageStack) {
      // ...
    }.title('Main')
  }
}
[h2]构建子页面
为每个NavDestination声明对外的实例化方法,如代码中的PageOneBuilder,执行该方法会创建一个PageOne的自定义组件,该组件就是一个Navigation的子页面。
@Builder
export function PageOneBuilder(name: string, param: string) {
  PageOne({ name: name, value: param });
}

@Component
export struct PageOne {
  navPathStack: NavPathStack = new NavPathStack();
  name: string = '';
  @State value: string = '';
  context = this.getUIContext().getHostContext();

  build() {
    NavDestination() {
      // ...
    }.title(`${this.name}`)
    // ...
  }
}
[h2]配置路由表
系统提供了系统路由表和自定义路由表两种实现方式,此处以系统路由表为例。将子页面中写好的实例化方法与它的name(开发者自定义)在路由表配置文件中注册,配置文件需要自行创建,路径:entry/src/main/resources/base/profile/router_map.json。
{
  "routerMap": [
    {
      "name": "basicPageOne", // 路由页面的唯一标识符
      "pageSourceFile": "src/main/ets/pages/PageOne.ets", // 源码所在路径
      "buildFunction": "PageOneBuilder" // 页面的实例化方法名称
    }
  ]
} 创建好路由表后,需要将其注册到工程中,在工程配置文件module.json5中的module字段里配置"routerMap": "$profile:router_map"。
[h2]路由栈获取
Navigation根容器和子页面以及路由表配置完成后,即可通过调用NavPathStack的API来实现页面之间的跳转。上文提到在一个Navigation容器中,只有一个NavPathStack对象,那么在子页面里执行路由操作就需要获取此NavPathStack对象,有两种方式:
-
方式一:使用AppStorage存储与获取。
@Entry
@Component
struct NavigationPage {
  navStack: NavPathStack = new NavPathStack();

  aboutToAppear(): void {
    AppStorage.setOrCreate<NavPathStack>('basicNavigationStack', this.navStack);
    // ...
  }

  build() {
    Navigation(this.navStack) {
      // ...
    }
  }
}
@Builder export function BasicNavDestinationBuilder() { BasicNavDestination(); } @Component struct BasicNavDestination { // 在NavDestination中获取导航控制器 stack: NavPathStack = AppStorage.get<NavPathStack>('basicNavigationStack')!; build() { NavDestination() { // ... } .title('BasicNavDestination') } } -
方式二:NavDestination.onReady生命周期回调中获取。
@Builder
export function PageOneBuilder(name: string, param: string) {
  PageOne({ name: name, value: param });
}

@Component
export struct PageOne {
  navPathStack: NavPathStack = new NavPathStack();
  name: string = '';
  @State value: string = '';
  context = this.getUIContext().getHostContext();

  build() {
    NavDestination() {
      // ...
    }.title(`${this.name}`)
    .onReady((ctx: NavDestinationContext) => {
      // 通过NavDestinationContext获取当前所在页面的导航控制器
      this.navPathStack = ctx.pathStack;
    })
  }
}
[h2]基础操作
从API version 12开始,导航控制器允许被继承。开发者可以在派生类中自定义属性和方法,也可以重写父类的方法。派生类对象可以替代基类NavPathStack对象使用。重写NavPathStack的示例代码请参考定义导航控制器派生类。下文介绍了NavPathStack里提供的基础路由操作接口。
页面跳转
NavPathStack可以通过Push相关的接口(如pushPath、pushPathByName、pushDestination、pushDestinationByName)实现页面跳转。跳转方式主要分为以下三种:
-
普通跳转:通过页面名称跳转,并可以携带参数。
this.pageStack.pushPath({ name: 'pageOne', param: 'PageOne Param' });this.pageStack.pushPathByName('pageTwo', 'PageTwo Param'); -
带返回回调的跳转:跳转时添加onPop回调,能在页面出栈时获取返回信息,并进行处理。
let DOMAIN = 0x0000; this.pageInfo.pushPathByName('temp4-pageTwo', 'temp4-pageTwo Param', (popInfo) => { hilog.info(DOMAIN, 'testTag', 'Pop page name is: ', popInfo.info.name, 'result: ', JSON.stringify(popInfo.result)); // ... }); -
带错误码的跳转:跳转结束会触发异步回调,返回错误码信息。
const DOMAIN = 0x0000;
this.pageStack.pushDestination({
  name: 'pageTwo', param: 'PageTwo Param'}).catch((error: BusinessError) => {
  hilog.error(DOMAIN, 'testTag', '[pushDestination]failed', 'error code = ', error.code,
    'error.message = ', error.message);
}).then(() => {
  hilog.info(DOMAIN, 'testTag', '[pushDestination]success.');
});
const DOMAIN = 0x0000; this.pageStack.pushDestinationByName('pageTwo', 'PageTwo Param').catch((error: BusinessError) => { hilog.error(DOMAIN, 'testTag', '[pushDestinationByName]failed', 'error code = ', error.code, 'error.message = ', error.message); }).then(() => { hilog.info(DOMAIN, 'testTag', '[pushDestinationByName]success.'); });
页面返回
NavPathStack可以通过pop相关接口实现页面返回,参考示例如下。
// 返回到上一页
this.pathStack.pop();
// 返回到上一个pageOne页面
this.pathStack.popToName('temp4-pageOne');
// 返回到索引为0的页面 this.pathStack.popToIndex(0);
// 返回到根首页(清除栈中所有页面)
this.pageStack.clear();
页面替换
NavPathStack可以通过Replace相关接口(如replacePath、replacePathByName、replaceDestination)实现页面替换,参考示例如下。
// 将栈顶页面替换为pageTwo
this.pageStack.replacePath({ name: 'pageTwo', param: 'PageTwo Param' });
this.pageStack.replacePathByName('pageTwo', 'PageTwo Param');
const DOMAIN = 0x0000;
// 带错误码的替换,跳转结束会触发异步回调,返回错误码信息
this.pageStack.replaceDestination({ name: 'pageTwo', param: 'PageTwo Param' })
.catch((error: BusinessError) => {
hilog.error(DOMAIN, 'testTag', '[replaceDestination]failed', 'error code = ', error.code,
'error.message = ', error.message);
}).then(() => {
hilog.info(DOMAIN, 'testTag', '[replaceDestination]success.');
}) 页面删除
NavPathStack可以通过Remove相关接口(如removeByName、removeByIndexes、removeByNavDestinationId)实现删除路由栈中特定页面的功能,参考示例如下。
// 删除栈中name为pageTwo的所有页面
this.pageStack.removeByName('pageTwo');
// 删除指定索引的页面 this.pageStack.removeByIndexes([1]);
// 删除指定id的页面
this.pageStack.removeByNavDestinationId('1');
移动页面
NavPathStack可以通过Move相关接口(如moveToTop、moveIndexToTop)实现移动路由栈中特定页面到栈顶的功能,参考示例如下。
// 移动栈中name为pageTwo的页面到栈顶
this.pageStack.moveToTop('pageTwo');
// 移动栈中索引为1的页面到栈顶 this.pageStack.moveIndexToTop(1);
[h2]单例跳转
通过设置LaunchMode为LaunchMode.MOVE_TO_TOP_SINGLETON或LaunchMode.POP_TO_SINGLETON,可以实现Navigation路由栈的单实例跳转。单实例跳转的规则如下:
- 如果指定为LaunchMode.MOVE_TO_TOP_SINGLETON,系统会从栈底到栈顶查找具有指定名称的NavDestination。找到后,该页面将被移动到栈顶(replace操作会用指定的NavDestination替换当前栈顶)。
- 如果指定为LaunchMode.POP_TO_SINGLETON,系统同样会从栈底到栈顶查找具有指定名称的NavDestination。找到后,会移除该NavDestination上方的所有页面(replace操作会用指定的NavDestination替换当前栈顶)。
当栈中存在的NavDestination页面通过单实例方式移动到栈顶时,将触发onNewParam回调。
有关单实例跳转的示例代码,可以参考使用导航控制器方法。
[h2]参数获取
NavDestination子页第一次创建时会触发onReady回调,可以获取此页面对应的参数。
@Component
struct Page01 {
  pathStack: NavPathStack | undefined = undefined;
  // ...
  pageParam: string = '';
  build() {
    NavDestination() {
      // ...
    .title('Page01')
    .onReady((context: NavDestinationContext) => {
      this.pathStack = context.pathStack;
      this.pageParam = context.pathInfo.param as string;
    })
  }
} NavDestination组件中可以通过设置onResult接口,接收返回时传递的路由参数。
class NavParam {
  desc: string = 'navigation-param'
};
const DOMAIN = 0x0000;
// ...
@Component
export struct PageOne {
  // ...
  build() {
    NavDestination() {
      // ...
    }
    // ...
    .onResult((param: Object) => {
      if (param instanceof NavParam) {
        console.info('TestTag', 'get NavParam, its desc: ' + (param as NavParam).desc);
        return;
      }
      console.info('TestTag', 'param not instance of NavParam');
    })
  }
} 其他业务场景,可以通过主动调用NavPathStack的获取接口(如getAllPathName、getParamByIndex、getParamByName、getIndexByName)获取指定页面的参数。
// 获取栈中所有页面name集合
this.pageStack.getAllPathName();
// 获取索引为1的页面参数
this.pageStack.getParamByIndex(1);
// 获取pageOne页面的参数
this.pageStack.getParamByName('pageOne');
// 获取pageOne页面的索引集合
this.pageStack.getIndexByName('pageOne');
[h2]路由拦截
NavPathStack提供了setInterception方法,用于设置Navigation页面跳转拦截回调。该方法需要传入一个NavigationInterception对象,该对象包含多个回调函数,如willShow、didShow等,不同回调函数的调用时机不同,可根据业务需要选择拦截时机。

- 无论是哪个回调,在进入回调时路由栈都已经发生了变化。
- interception回调时机比willShow更早,也可以做拦截重定向的能力,区别是,前者触发时不会创建被拦截的页面,willShow触发时会创建被拦截的页面然后销毁。
以willShow为例,在回调中通过修改路由栈实现路由拦截重定向。
const DOMAIN = 0x0000;
this.pageStack.setInterception({
  willShow: (from: NavDestinationContext | 'navBar', to: NavDestinationContext | 'navBar',
    operation: NavigationOperation, animated: boolean) => {
    if (typeof to === 'string') {
      hilog.info(DOMAIN, 'testTag', 'target page is navigation home');
      return;
    }
    // 将跳转到PageTwo的路由重定向到pageOne
    let target: NavDestinationContext = to as NavDestinationContext;
    if (target.pathInfo.name === 'pageTwo') {
      target.pathStack.pop();
      target.pathStack.pushPathByName('pageOne', null);
    }
  }
}) [h2]创建导航首页
实现步骤为:
-
使用Navigation创建导航主页,并创建导航控制器NavPathStack以此来实现不同页面之间的跳转。
-
在Navigation中增加List组件,来定义导航主页中不同的一级界面。
-
在List内的组件添加onClick方法,并在其中使用导航控制器NavPathStack的pushPathByName方法,使组件可以在点击之后从当前页面跳转到输入参数name在路由表内对应的页面。
@Entry
@Component
struct NavigationDemo {
  @Provide('navPathStack') navPathStack: NavPathStack = new NavPathStack();
  private listArray: Array<string> = ['WLAN', 'Bluetooth', 'Personal Hotspot', 'Connect & Share'];
  context = this.getUIContext().getHostContext();
  build() {
    Column() {
      Navigation(this.navPathStack) {
        // 请将$r('app.string.enterKeyWordsToSearch')替换为实际资源文件,在本示例中该资源文件的value值为"输入关键字搜索"
        TextInput({ placeholder: $r('app.string.enterKeyWordsToSearch') })
          .width('90%')
          .height(40)
          .margin({ bottom: 10 })

        // 通过List定义导航的一级界面
        List({ space: 12, initialIndex: 0 }) {
          ForEach(this.listArray, (item: string) => {
            ListItem() {
              Row() {
                Row() {
                  Text(`${item.slice(0, 1)}`)
                    .fontColor(Color.White)
                    .fontSize(14)
                    .fontWeight(FontWeight.Bold)
                }
                .width(30)
                .height(30)
                .backgroundColor('#a8a8a8')
                .margin({ right: 20 })
                .borderRadius(20)
                .justifyContent(FlexAlign.Center)

                Column() {
                  Text(item)
                    .fontSize(16)
                    .margin({ bottom: 5 })
                }
                .alignItems(HorizontalAlign.Start)

                Blank()

                Row()
                  .width(12)
                  .height(12)
                  .margin({ right: 15 })
                  .border({
                    width: { top: 2, right: 2 },
                    color: 0xcccccc
                  })
                  .rotate({ angle: 45 })
              }
              .borderRadius(15)
              .shadow({ radius: 100, color: '#ededed' })
              .width('90%')
              .alignItems(VerticalAlign.Center)
              .padding({ left: 15, top: 15, bottom: 15 })
              .backgroundColor(Color.White)
            }
            .width('100%')
            .onClick(() => {
              // $r('app.string.detailsPageParameters')需要替换为开发者所需的字符串资源文件,资源文件中的value值为“详情页面参数”
              this.navPathStack.pushPathByName(`${item}`,
                // 将name指定的NavDestination页面信息入栈,传递的参数为param
                this.context!.resourceManager.getStringSync($r('app.string.detailsPageParameters').id));
            })
          }, (item: string): string => item)
        }
        .listDirection(Axis.Vertical)
        .edgeEffect(EdgeEffect.Spring)
        .sticky(StickyStyle.Header)
        .chainAnimation(false)
        .width('100%')
      }
      .width('100%')
      .mode(NavigationMode.Auto)
      // $r('app.string.settings')需要替换为开发者所需的字符串资源文件,资源文件中的value值为“设置”
      .title($r('app.string.settings')) // 设置标题文字
    }
    .size({ width: '100%', height: '100%' })
    .backgroundColor(0xf4f4f5)
  }
}
[h2]创建导航子页
导航子页1实现步骤为:
-
使用NavDestination来创建导航子页PageOne。
-
创建导航控制器NavPathStack并在onReady时进行初始化,获取当前所在的导航控制器,以此来实现不同页面之间的跳转。
-
在子页面内的组件添加onClick,并在其中使用导航控制器NavPathStack的pop方法,使组件可以在点击之后弹出路由栈栈顶元素实现页面的返回。
@Builder
export function PageOneBuilder(name: string, param: string) {
  PageOne({ name: name, value: param });
}

@Component
export struct PageOne {
  navPathStack: NavPathStack = new NavPathStack();
  name: string = '';
  @State value: string = '';
  context = this.getUIContext().getHostContext();

  build() {
    NavDestination() {
      Column() {
        // $r('app.string.settingPage')需要替换为开发者所需的字符串资源文件,资源文件中的value值为“设置页面”
        Text(`${this.name}${this.context!.resourceManager.getStringSync($r('app.string.settingPage').id)}`)
          .width('100%')
          .fontSize(20)
          .fontColor(0x333333)
          .textAlign(TextAlign.Center)
          .textShadow({
            radius: 2,
            offsetX: 4,
            offsetY: 4,
            color: 0x909399
          })
          .padding({ top: 30 })
        Text(`${JSON.stringify(this.value)}`)
          .width('100%')
          .fontSize(18)
          .fontColor(0x666666)
          .textAlign(TextAlign.Center)
          .padding({ top: 45 })
        // $r('app.string.return')需要替换为开发者所需的字符串资源文件,资源文件中的value值为“返回”
        Button($r('app.string.return'))
          .width('50%')
          .height(40)
          .margin({ top: 50 })
          .onClick(() => {
            // 弹出路由栈栈顶元素,返回上个页面
            this.navPathStack.pop();
          })
      }
      .size({ width: '100%', height: '100%' })
    }.title(`${this.name}`)
    .onReady((ctx: NavDestinationContext) => {
      // 通过NavDestinationContext获取当前所在页面的导航控制器
      this.navPathStack = ctx.pathStack;
    })
  }
}
导航子页2实现步骤为:
-
使用NavDestination,来创建导航子页PageTwo。
-
创建导航控制器NavPathStack并在onReady时进行初始化,获取当前所在的导航控制器,以此来实现不同页面之间的跳转。
-
在子页面内的组件添加onClick,并在其中使用导航控制器NavPathStack的pushPathByName方法,使组件可以在点击之后从当前页面跳转到输入参数name在路由表内对应的页面。
@Builder
export function PageTwoBuilder(name: string) {
  PageTwo({ name: name });
}

@Component
export struct PageTwo {
  navPathStack: NavPathStack = new NavPathStack();
  name: string = '';
  private listArray: Array<string> = ['Projection', 'Print', 'VPN', 'Private DNS', 'NFC'];
  context = this.getUIContext().getHostContext();
  build() {
    NavDestination() {
      Column() {
        List({ space: 12, initialIndex: 0 }) {
          ForEach(this.listArray, (item: string) => {
            ListItem() {
              Row() {
                Row() {
                  Text(`${item.slice(0, 1)}`)
                    .fontColor(Color.White)
                    .fontSize(14)
                    .fontWeight(FontWeight.Bold)
                }
                .width(30)
                .height(30)
                .backgroundColor('#a8a8a8')
                .margin({ right: 20 })
                .borderRadius(20)
                .justifyContent(FlexAlign.Center)

                Column() {
                  Text(item)
                    .fontSize(16)
                    .margin({ bottom: 5 })
                }
                .alignItems(HorizontalAlign.Start)

                Blank()

                Row()
                  .width(12)
                  .height(12)
                  .margin({ right: 15 })
                  .border({
                    width: { top: 2, right: 2 },
                    color: 0xcccccc
                  })
                  .rotate({ angle: 45 })
              }
              .borderRadius(15)
              .shadow({ radius: 100, color: '#ededed' })
              .width('90%')
              .alignItems(VerticalAlign.Center)
              .padding({ left: 15, top: 15, bottom: 15 })
              .backgroundColor(Color.White)
            }
            .width('100%')
            .onClick(() => {
              // $r('app.string.pageSettingParam')需要替换为开发者所需的字符串资源文件,资源文件中的value值为“页面设置参数”
              this.navPathStack.pushPathByName(`${item}`,
                this.context!.resourceManager.getStringSync($r('app.string.pageSettingParam').id));
            })
          }, (item: string): string => item)
        }
        .listDirection(Axis.Vertical)
        .edgeEffect(EdgeEffect.Spring)
        .sticky(StickyStyle.Header)
        .width('100%')
      }
      .size({ width: '100%', height: '100%' })
    }.title(`${this.name}`)
    .onReady((ctx: NavDestinationContext) => {
      // NavDestinationContext获取当前所在的导航控制器
      this.navPathStack = ctx.pathStack;
    })
  }
}
[h2]创建路由表
实现步骤为:
-
router_map.json中配置全局路由表,导航控制器NavPathStack可根据路由表中的name将对应页面信息入栈。
{ "routerMap" : [ { "name" : "WLAN", "pageSourceFile" : "src/main/ets/pages/PageOne.ets", "buildFunction" : "PageOneBuilder" }, { "name" : "Bluetooth", "pageSourceFile" : "src/main/ets/pages/PageOne.ets", "buildFunction" : "PageOneBuilder" }, { "name" : "Personal Hotspot", "pageSourceFile" : "src/main/ets/pages/PageOne.ets", "buildFunction" : "PageOneBuilder" }, { "name" : "Connect & Share", "pageSourceFile" : "src/main/ets/pages/PageTwo.ets", "buildFunction" : "PageTwoBuilder" }, { "name" : "Projection", "pageSourceFile" : "src/main/ets/pages/PageOne.ets", "buildFunction" : "PageOneBuilder" }, { "name" : "Print", "pageSourceFile" : "src/main/ets/pages/PageOne.ets", "buildFunction" : "PageOneBuilder" }, { "name" : "VPN", "pageSourceFile" : "src/main/ets/pages/PageOne.ets", "buildFunction" : "PageOneBuilder" }, { "name" : "Private DNS", "pageSourceFile" : "src/main/ets/pages/PageOne.ets", "buildFunction" : "PageOneBuilder" }, { "name" : "NFC", "pageSourceFile" : "src/main/ets/pages/PageOne.ets", "buildFunction" : "PageOneBuilder" } ] } -
工程配置文件module.json5中配置{"routerMap": "$profile:router_map"}。