The capability of barcode scanning by default UI offers a consistent scanning UI at the system level, which includes a camera preview stream, a scanning entry for the photo gallery, and a prompt to turn on the flash light in dim light conditions. The system-level camera permission is pre-granted for the default scan UI and the camera remains securely accessible when the UI is opened. It means that you do not need to request the camera permission again. This capability can help you develop various barcode scanning scenarios for your atomic service.
Use Cases
This capability provides a default scanning UI and a scanning entry for the photo gallery to recognize single or multiple barcodes simultaneously. It can recognize multiple barcode types described in ScanType. Your atomic service can leverage this capability to scan barcodes in various scenarios, eliminating the need for third-party libraries.
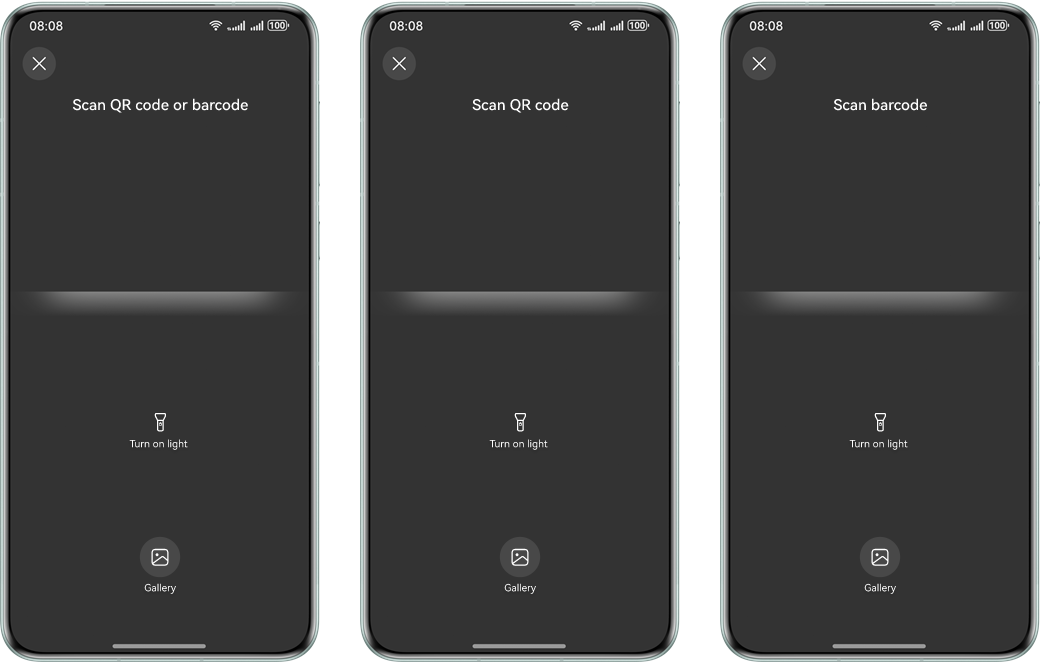
Default scanning UI:

-
If it is the first time the default scanning UI is opened, your app shows a privacy banner notification to the user.
-
The user can either tap Learn more for detailed instructions on secure camera access or tap the close button to dismiss the notification. After the privacy banner notification is dismissed, it will not reappear upon subsequent openings of the atomic service's scanning page; instead, an access security tip will display briefly and automatically disappear after three seconds.
-
Since API version 6.1.0(23), the title of barcode scanning by default UI can be dynamically displayed based on the setting of scanTypes of ScanOptions.
- For API versions earlier than 6.1.0(23), the title is displayed as "Scan QR code or barcode".
- For API version 6.1.0(23) and later:
- If scanTypes is set to ALL, FORMAT_UNKNOWN, or contains both barcode and QR code types, the title is displayed as "Scan QR code/Barcode".
- If scanTypes is not set, the title is displayed as "Scan QR code/Barcode".
- If scanTypes contains only the barcode type, the title is displayed as "Scan Barcode".
- If scanTypes contains only the QR code type, the title is displayed as "Scan QR code".
Constraints
-
Since API version 26.0.0, you can use the isDefaultScanSupported API to check whether the current device supports barcode scanning on the default UI.
-
Since API version 6.1.0(23), the title of barcode scanning by default UI can be dynamically displayed based on the setting of scanTypes of ScanOptions.
-
Since API version 6.1.0(23), barcode scanning by default UI is supported on wearables with rear cameras. You can call the getSupportedCameras API to check whether a wearable has a rear camera.
-
Since API version 6.0.0(20), the function of barcode scanning by default UI supports the floating window and split-screen scenarios.
-
Gallery-based barcode scanning can only recognize one barcode at a time.
Flowchart
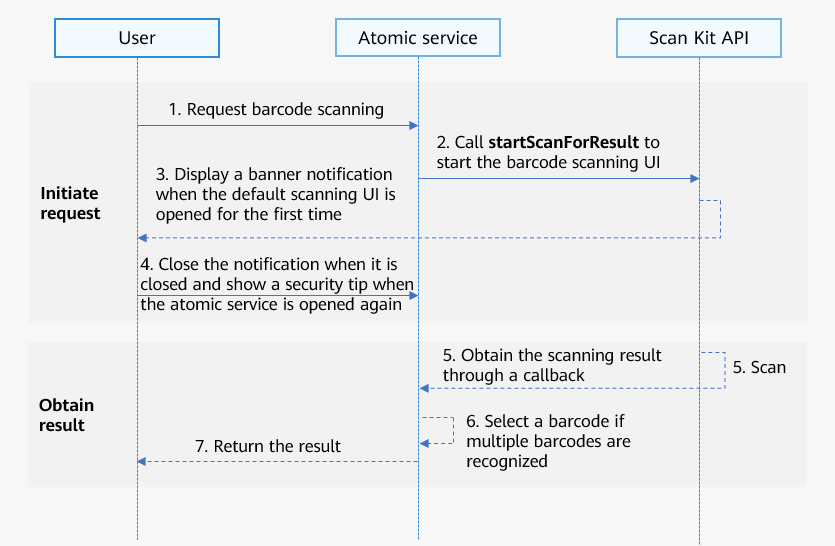
The flowchart for using this capability is as follows.
-
A user sends a barcode scanning request to your atomic service.
-
Your atomic service calls the startScanForResult API of Scan Kit to open the barcode scanning UI.
-
If it is the first time the default scanning UI is opened, your atomic service shows a privacy banner notification to the user.
-
The user can tap the close button to dismiss the notification. Upon subsequent openings of the app's scanning page, the privacy banner notification will not reappear; instead, an access security tip will display briefly and automatically disappear after three seconds.
-
Scan Kit returns the barcode scanning result using a callback or promise.
-
If multiple barcodes are recognized, the user needs to select one barcode to obtain the barcode scanning result. If only one barcode is recognized, the barcode scanning result can be directly returned.
-
Your atomic service sends the barcode scanning result to the user.
API Description
The APIs use either a callback or promise to return the result. The APIs that use a callback provide the same functions as their counterparts that use a promise. The startScanForResult API is used to open the barcode scanning UI in your atomic service. For details about the API, please refer to API Reference.
| API | Description |
|---|---|
| startScanForResult(context: common.Context, options?: ScanOptions): Promise<ScanResult> | Opens the default scanning UI to scan barcodes. This API uses ScanOptions to set barcode scanning parameters and return the barcode scanning result. This API returns the result asynchronously through a promise. |
| startScanForResult(context: common.Context, options: ScanOptions, callback: AsyncCallback<ScanResult>): void | Opens the default scanning UI to scan barcodes. This API uses ScanOptions to set barcode scanning parameters and return the barcode scanning result. This API returns the result asynchronously through a callback. |
| startScanForResult(context: common.Context, callback: AsyncCallback<ScanResult>): void | Starts the default UI to scan barcodes and returns the scanning result. This API returns the result asynchronously through a callback. |

The startScanForResult API must be called in the lifecycles of the UI and component. To use the scanning UI in full screen or immersive mode, please refer to Immersive Effect Development.
Development Procedure
Scan Kit provides a default UI for barcode scanning capabilities. The barcode scanning API directly controls the camera for optimal zoom control, automatic exposure adjustment, auto-focus, and other operations, delivering a smooth barcode scanning experience while reducing your development workload.
The following describes how to call the startScanForResult API of Scan Kit to open the barcode scanning UI:
-
Import the module for scanning barcodes using the default UI. In the code, scanCore provides definition of scanning types and scanBarcode provides methods and parameters for opening the default scanning UI.
import { scanCore, scanBarcode } from '@kit.ScanKit'; // Import the required log and error code modules. import { hilog } from '@kit.PerformanceAnalysisKit'; import { BusinessError } from '@kit.BasicServicesKit'; -
Call the startScanForResult method to open the default scanning UI.
- Obtain the scanning result using a promise.
@Entry @Component struct ScanBarCodePage { build() { Column() { Row() { Button("Promise with options") .backgroundColor('#0D9FFB') .fontSize(20) .fontColor($r('sys.color.comp_background_list_card')) .fontWeight(FontWeight.Normal) .align(Alignment.Center) .type(ButtonType.Capsule) .width('90%') .height(40) .margin({ top: 5, bottom: 5 }) .onClick(() => { // Define scanning parameters. let options: scanBarcode.ScanOptions = { scanTypes: [scanCore.ScanType.ALL], enableMultiMode: true, enableAlbum: true }; scanBarcode.startScanForResult(this.getUIContext().getHostContext(), options) .then((data: scanBarcode.ScanResult) => { hilog.info(0x0001, '[Scan CPSample]', `Succeeded in getting scanResult by promise with options, scanType: ${data.scanType}`); }) .catch((err: BusinessError) => { hilog.error(0x0001, '[Scan CPSample]', `Failed to get scanResult by promise with options. Code: ${err.code}, message: ${err.message}`); }); }) } .height('100%') } .width('100%') } } - Obtain the scanning result using a callback.
@Entry
@Component
struct ScanBarCodePage {
  build() {
    Column() {
      Row() {
        Button('Callback with options')
          .backgroundColor('#0D9FFB')
          .fontSize(20)
          .fontColor($r('sys.color.comp_background_list_card'))
          .fontWeight(FontWeight.Normal)
          .align(Alignment.Center)
          .type(ButtonType.Capsule)
          .width('90%')
          .height(40)
          .margin({ top: 5, bottom: 5 })
          .onClick(() => {
            // Define scanning parameters.
            let options: scanBarcode.ScanOptions = {
              scanTypes: [scanCore.ScanType.ALL],
              enableMultiMode: true,
              enableAlbum: true
            };
            // Open the barcode scanning UI.
            scanBarcode.startScanForResult(this.getUIContext().getHostContext(), options,
              (err: BusinessError, data: scanBarcode.ScanResult) => {
                if (err) {
                  hilog.error(0x0001, '[Scan CPSample]',
                    `Failed to get scanResult by callback with options. Code: ${err.code}, message: ${err.message}`);
                  return;
                }
                hilog.info(0x0001, '[Scan CPSample]',
                  `Succeeded in getting scanResult by callback with options, scanType: ${data.scanType}`);
              });
          })
      }
      .height('100%')
    }
    .width('100%')
  }
}
- Obtain the scanning result using a promise.
Emulator-based Development
Since API version 6.0.0(20), using the Emulator for developing the function of barcode scanning on the default UI is supported. For details, please refer to Running Your App on the Emulator.
On the Emulator, the camera stream for barcode scanning on the default UI is flipped horizontally, and black borders will appear at the top and bottom of the scanning UI due to the fixed resolution of the camera stream.