Starting from API version 24, HAP packages support integrating, loading, and independently running bin files, extending the capabilities of appslications. You can embed binary tools and executable programs of various platforms into criterion HAPs to complete program scheduling, script parsing, and task execution based on the HarmonyOS runtime environment, making up for the weakness that localized binary tools cannot be directly invoked. Based on this capability, applications can implement extended functions such as external script parsing and third-party tool invoking. In addition, the entire running process of the bin file is controlled by the system security mechanism, ensuring both function scalability and system security.
Basic Concepts
-
BIN file: binary program file, which is an executable program file in ELF format.
-
Section of an ELF file: a basic unit used to carry binary content in an ELF file.
Permissions Control
Similar to application permission control, when the bin file integrated in the application package needs to use permission-protected system capabilities (for example, loading the shared library signed by the binary certificate) during running, the corresponding permission needs to be declared. After the declaration, the bin file can be authorized during running and will not be intercepted by permission control when the protected system capabilities are used.
[h2]Declaring Permissions for a Bin File
The permission declaration of the bin file is stored in the .permission section of the binary program file. When the bin file is executed by an integrated application, the system grants permissions based on the permissions stated in this section.
-
Content of the .permission section
The .permission section stores permission declaration data in JSON format.
Attribute Description Data Type Initial Value Allowed requestPermissions List of permissions declared by the binary program. Array<RequestPermission> Yes. The default value indicates that no permission is declared for the binary program. -
RequestPermission Label
Attribute Description Data Type Initial Value Allowed name Name of the permission required by the bin file. string Yes. The default value indicates that no permission is declared for the binary program. 
-
The permission name declared in the tag must be the same as that in the system application permission list. Otherwise, the permission declaration in the tag is invalid.
-
The permission declared by the bin file cannot exceed the permission declared by the application that integrates the bin file. Otherwise, the installation fails.
-
-
Example of the .permission section
For example, to declare the permissions ohos.permission.A, ohos.permission.B and ohos.permission.C for the bin file, compile the .permission section in the following format:

The permission names in the following JSON example are only examples. Developers need to set available permission names based on the app permission list.
{
  "requestPermissions": [
    {
      "name": "ohos.permission.A"
    },
    {
      "name": "ohos.permission.B"
    },
    {
      "name": "ohos.permission.C"
    }
  ]
}
[h2]Permission Management During Installation and Startup of a .bin File
When you install the HAP file that integrates the bin file, the system verifies the legitimacy of the declared permission on the bin file in the HAP file.
For a bin file that has been installed with a valid permission declaration, the system grants the declared permission to the bin file when the bin file is loaded. After the permission is enabled, the bin file can use the controlled system capabilities protected by the permission during running.
The .bin file integrated in the app is installed on the device with the HAP. The following conditions must be met during the installation process:
-
The permission declared by the .bin file cannot exceed the permission declared by the HAP that integrates the .bin file. Otherwise, the HAP installation will fail.
-
If the .bin file contains the .permission section, the .permission section must be in valid JSON format. Otherwise, the HAP application integrated with the .bin file will fail to be installed.
Permission Scope
-
The system has opened up application permissions for applications and binary files. The bin file can obtain all permissions whose authorization mode is system_grant and permission APL level is normal, system_basic, and system_core.
-
The permission declared by the bin file integrated in the application cannot exceed the permission declared by the HAP application that integrates the bin file. Otherwise, the installation will fail.
Permission inheritance
The system provides a mechanism for the bin file integrated in the application to inherit the permission of the parent process. The inheritance permission ohos.permission.INHERIT_PARENT_PERMISSION can be added to the permission declaration of the bin file. After the permission is declared in the bin file, the authorization mode system_grant of the parent process can be obtained during startup and loading, the permission level is normal, system_basic, and system_core.

Integrating the BIN File into the HAP
After the bin file is started, if the protected system capabilities need to be used, the required permissions must be independently declared.

If permission-protected system capabilities are not required during the running of the .bin file, you do not need to declare permissions for the .bin file. In this case, skip this section.
Add the .permission section to the bin file and declare the required permissions. For details, see Declaring Permissions for a Bin File. In addition, the same permission must be declared in the module.json5 configuration file of the HAP file.
The .bin file is in the ELF format. Therefore, you can add the .permission section in multiple ways. This document provides the following two methods for reference:
-
Using the objcopy Command Tool
Run the objcopy --add-section command to add the .permission section to the bin file. The command format is as follows:
objcopy --add-section .permission=<file> input output
Parameter description:
Parameter Description -file The content is used as the file of the .permission section. -input Binary file to which the .permission section needs to be added -output Output binary file after the .permission section is added Example:
Add the .permission section to the .bin file EXAMPLE. The section content is obtained from the module.json file, and the output file is EXAMPLE_OUT.
objcopy --add-section .permission=module.json EXAMPLE EXAMPLE_OUT
Command Line Tools supports the objcopy command. You can also use other objcopy tools.

Using objcopy tools from different sources (such as the llvm-objcopy tool for Windows) may damage the bin file structure, causing unexpected problems during loading. You are advised to compare attributes such as the file size after the objcopy operation is performed to check whether the file is different from the original file.
-
Use the signing tool binary-sign-tool.
binary-sign-tool The signing tool is used to sign bin files on the PC/2in1 device and supports the addition of .permission sections to them.
In the signature command, the file specified by the -moduleFile parameter is the content to be added to the .permission section of the bin file.
[h2]Declaring the .bin File in the HAP Project
Add the libs{abi} directory to the entry directory of the HAP project. The value of {abi} must be the same as the ABI type of the device where the HAP is deployed. Then, place the bin file EXAMPLE with the .permission section in this directory.
For example, to deploy the HAP on a PC/2in1 device of the ABI type arm64-v8a, place the .bin file EXAMPLE in the following directory:
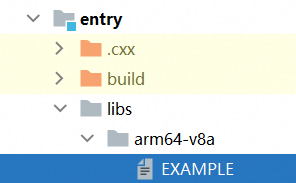
Configure executablebinarypaths in module.json5 to declare executable bin files contained in the HAP. This label is used to configure the path of the bin file. The path is a relative path and must be prefixed with libs/{abi}/. {abi} indicates the CPU architecture type of the device, for example, arm64-v8a, x86_64, and armeabi-v7a.
{
  "module": {
    // ...
    "executableBinaryPaths": [
      {
        "path": "libs/arm64-v8a/EXAMPLE"
      }
    ],
    // ...
  },
}
[h2]Compiling and Packing the HAP
To integrate the .bin file into the HarmonyOS Ability Package, perform the following steps:
-
The HAP is set to unzip mode.
Set extractNativeLibs to true in module.json5 so that the libs library is automatically unzipped to the installation directory during application installation. This ensures that the bin file can be loaded and run properly.
-
Configuring the libs Library Packaging Option for the HAP
Set collectAllLibs to true in bundle-profile.json5 by referring to nativeLib so that the .bin file can be packaged into the HAP. The following is an example:
{ // ... "buildOptionSet": [ { "name": "debug", "nativeLib": { "collectAllLibs": true, } } ], // ... } -
The strip tag configuration of the debug packet is incorrect.
In the development and debugging scenario, the debug package needs to be configured additionally. See Configuring for C++ Builds for details about the debugSymbol tag. This tag is used to remove the symbol table and debug information from .so files. The following is a configuration example of debugSymbol in the module-level build-profile.json5 file:
{
// ...
  "buildOptionSet": [
    {
      "name": "debug",
      "nativeLib": {
        "collectAllLibs": true,
        "debugSymbol": {
          "strip": false,
          "exclude": []
        }
      }
    }
  ],
}
After the preceding configurations are complete, start the HAP compilation. DevEco Studio packs the .bin files into the HAP project during the compilation.
-
Quickly Obtaining Binary Files from Configuration Items
When a large number of bin files need to be written to the executableBinaryPaths field, if collectAllLibs is set to true, you can use the following plug-in to implement automatic writing (the following plug-in is configured in hvigorfile.ts of the hap module):
// ...
// Obtain the current hvigorNode object.
const node: HvigorNode = getNode(__filename);
hvigor.nodesEvaluated(async () => {
  node.registerTask({
    name: 'default@CustomTask',
    run() {
      // Obtain the context information of the HAP module.
      const context = node.getContext(OhosPluginId.OHOS_HAP_PLUGIN) as OhosHapContext;
      // Obtain the root directory of the build product.
      const buildProductRoot = context.getBuildProductRootPath();
      // Concatenate the full path of the module.json file. This file contains the executable file settings of the module.
      const moduleJsonPath = path.resolve(buildProductRoot, 'build/${product}/intermediates/package/${target}/module.json');
      if (!fs.existsSync(moduleJsonPath)) {
        return;
      }
      // Read and parse the module.json file as a JSON object.
      const jsonContent = FileUtil.readJson5(moduleJsonPath);
      // Concatenate the basic path of the libs directory. This directory stores the compiled library files.
      const libsBasePath = path.resolve(buildProductRoot, 'build/${product}/intermediates/libs/${target}');
      // Call the function to process the ELF file and add the path of the executable file to module.json.
      processElfFiles(jsonContent, moduleJsonPath, libsBasePath);
    },
    dependencies: ['entry:default@GeneratePkgModuleJson'],
    postDependencies: ['entry:default@ProcessCompiledResources'],
  });
});
// ...
Installing a HAP Containing a bin File
The HAP package that integrates the .bin file does not have an independent installation package. It is installed and deployed based on the standard HAP package. The embedded binary programs and script resources are installed on the device together with the HAP package. The installation process is the same as that of a common application. After the application is installed, the bin file is automatically unzipped to the application installation directory.
/data/app/el1/bundle/public/<bundleName>
-
Direct installation using DevEco Studio
It is applicable to quick debugging in the development phase. After the project is compiled, use DevEco Studio to connect to the device and click Run to install the project. The tool automatically pushes the HAP package that contains the binary resources and script files to the device, and decompresses and installs the package.
-
Using HDC for installation
It applies to batch deployment, automatic test, and offline installation scenarios. Use the debugging tool HDC to run the installation command to install the HAP package that contains binary resources.
The core operation process is as follows: Connect to the device through the HDC, check whether the device connection status is normal, and then run the hdc install command to install the HAP.