Introduction
Since API version 18, the system has supported cross-device collaborative connection and communication for applications, including data transmission. This feature uses the distributed component management framework to enable collaboration among applications on multiple devices, that is, applications on different devices work together to complete the same service scenario. It is now one of the core capabilities of the distributed system. A typical example is a photo control application on a smartwatch that remotely invokes the camera on a phone and performs real-time bidirectional data interaction across devices.
[h2]Available Capabilities
- Cross-device application launch: launches associated applications in a distributed networking environment to enable multi-device service collaboration. Application adaptation is required.
- Cross-device data interaction: transmits data across devices. The supported data types vary by application type. System applications can transmit text, byte streams, images, and transport streams, whereas third-party applications support only text transmission.
[h2]Basic Concepts
Before you start developing cross-device connection management for applications, familiarize yourself with the following concepts:
-
Distributed Management Service (DMS)
DMS is the distributed component management framework that provides distributed component management capabilities.
-
UIAbility
UIAbility describes the UI interaction capabilities of an application. It is responsible for managing the lifecycle of application pages, user interaction, and UI rendering.
-
Byte stream
A byte stream is data of the ArrayBuffer Object type and can be used to store binary data such as image or audio data.
[h2]Implementation Principles
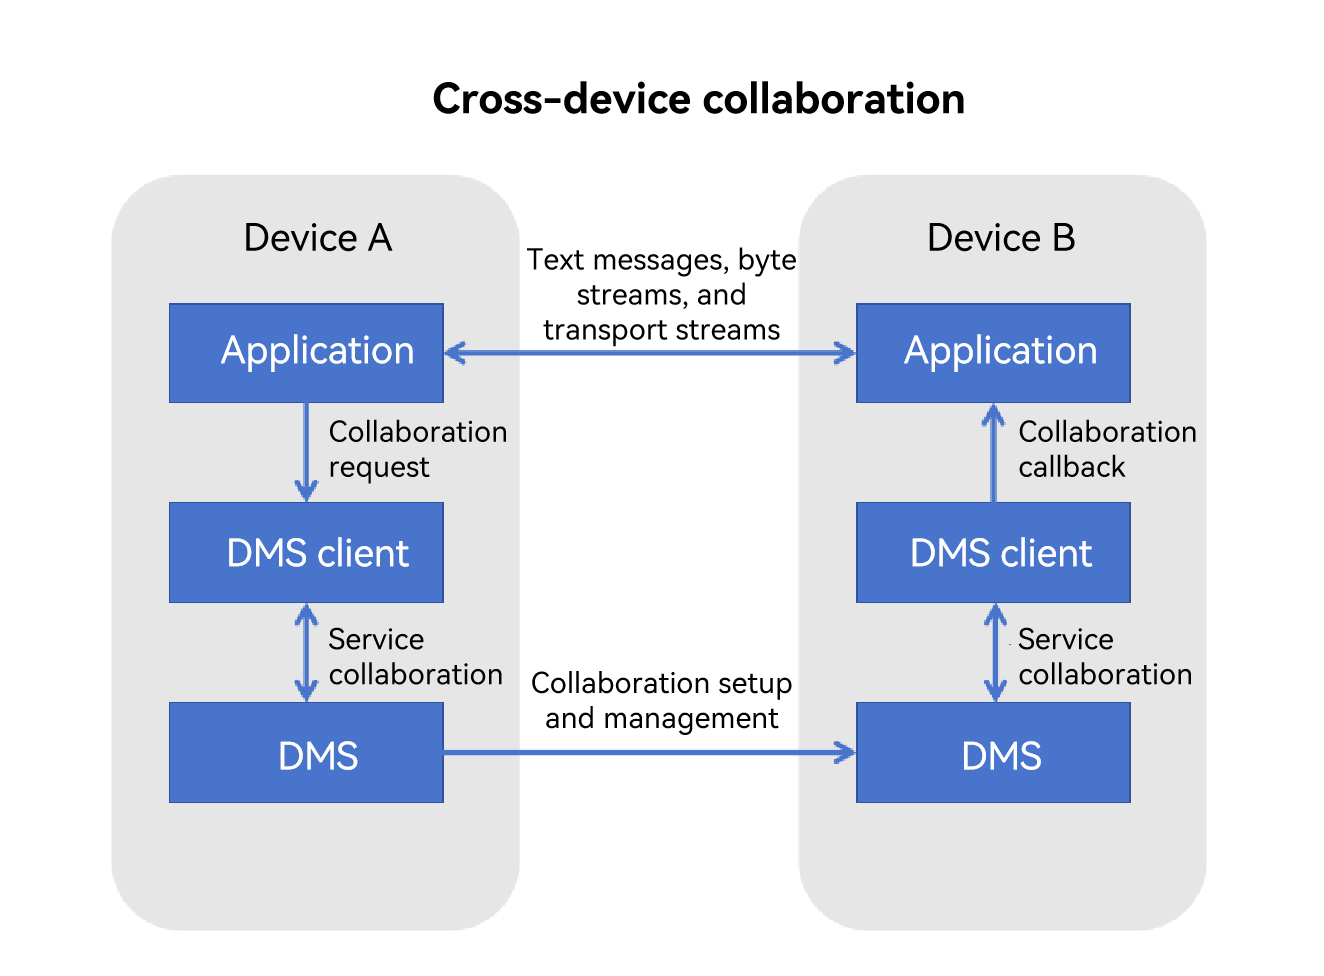
Cross-device connection management for applications relies on the distributed component management framework. It encapsulates JS objects on top of this framework, uses distributed component management framework services to establish collaboration relationships and connections between applications, and relies on the system for data interaction capabilities.
Figure 1 Operating mechanism of cross-device application connection
[h2]Constraints
-
This feature is available only on devices running API version 18 or later.
-
If the two devices are signed in with the same account, collaboration is supported between applications with the same or different bundle names. If the devices are not signed in with the same account, the system verifies the application AppID, and collaboration is supported only between applications with the same AppID.
-
After service collaboration is complete, end the collaboration state in a timely manner. For system security and proper resource utilization, if an application has not requested a continuous task, the collaboration lifecycle ends when the screen is locked or the application stays in the background for more than 5 seconds.
-
The distributed component management framework does not review transmitted content during collaboration. If privacy-sensitive data is involved, it is recommended that the application notify users by using measures such as dialog boxes.
[h2]Environment Requirements
Prepare devices A and B that can sign in to a HUAWEI ID. The devices must be successfully networked with each other by calling the Device Manager APIs.
[h2]Setting Up the Environment
- Install DevEco Studio on the PC. DevEco Studio 4.1 or later is required.
- Update the public-SDK to API 18 or later.
- Connect either debugging device, device A or device B, to the PC using a USB cable.
- Enable Wi-Fi and Bluetooth on devices A and B. If the devices are signed in with the same HUAWEI ID, they automatically form a network. If they are not signed in with the same HUAWEI ID, first use Discovering Devices and Binding a Device to establish a trusted relationship and complete networking.
[h2]Verifying the Environment
Run the following shell command on the PC:
hdc shell
hidumper -s 4700 -a "buscenter -l remote_device_info"
If networking is successful, the command output displays the number of networked devices, for example, remote device num = 1.
How to Develop
Cross-device connection management for applications can use the distributed component management framework to launch the peer device and send messages. The following sections describe the implementation.
[h2]Available APIs
The following table describes the APIs for cross-device connection management. For details, see @ohos.distributedsched.abilityConnectionManager (Cross-Device Connection Management).
Table 1 abilityConnectionManager APIs
| API | Description |
|---|---|
| createAbilityConnectionSession(serviceName: string, context: Context, peerInfo: PeerInfo, connectOptions: ConnectOptions): number; | Creates a session between applications. |
| destroyAbilityConnectionSession(sessionId: number): void; | Destroys a session between applications. |
| connect(sessionId: number): Promise<ConnectResult>; | Connects to the ability on the source side. |
| acceptConnect(sessionId: number, token: string): Promise<void>; | Connects to the ability on the sink side. |
| disconnect(sessionId: number): void; | Disconnects the ability connection. |
| on(type: 'connect' | 'disconnect' | 'receiveMessage' | 'receiveData', sessionId: number, callback: Callback<EventCallbackInfo>): void | Listens for the events. |
| off(type: 'connect' | 'disconnect' | 'receiveMessage' | 'receiveData', sessionId: number, callback?: Callback<EventCallbackInfo>): void | Cancels listening for the events. |
| sendMessage(sessionId: number, msg: string): Promise<void>; | Sends a text message. |
| sendData(sessionId: number, data: ArrayBuffer): Promise<void>; | Sends an ArrayBuffer byte stream. |
[h2]Development Procedure
Using the cross-device application management module, the application on device A launches and connects to the application on device B. After the connection is established, devices A and B register callback listeners for the corresponding events through the on API. Device A or device B then sends messages and byte streams through the sendMessage and sendData APIs, and the peer end proceeds with the follow-up collaborative service based on the received callbacks.
Importing the AbilityConnectionManager Module File
import {abilityConnectionManager, distributedDeviceManager } from '@kit.DistributedServiceKit'; Discovering Devices
The application on device A must discover and select the networkId of device B from DeviceBasicInfo as the input parameter of the collaboration API. You can call the distributed device management APIs to discover and select the peer device. For details, see Querying Device Information.
Initiating a Session Between Applications
Devices A and B perform different operations when creating a session and establishing a connection. In the following procedure, device A acts as the connection initiator and device B acts as the receiver.
1. Device A
The application calls createAbilityConnectionSession() to create a session and obtain the sessionId. It then calls connect() to start the ability session connection. At this point, the application on device B is launched.
let dmClass: distributedDeviceManager.DeviceManager;

function initDmClass(): void {
  // createDeviceManager is a system API.
  try {
    dmClass = distributedDeviceManager.createDeviceManager('com.example.remotephotodemo');
  } catch (err) {
    hilog.error(0x0000, 'testTag', 'createDeviceManager err');
  }
}

// Obtain the device ID of device B.
function getRemoteDeviceId(): string | undefined {
  initDmClass();
  if (typeof dmClass === 'object' && dmClass !== null) {
    hilog.info(0x0000, 'testTag', 'getRemoteDeviceId begin');
    let list = dmClass.getAvailableDeviceListSync();
    if (typeof (list) === 'undefined' || typeof (list.length) === 'undefined') {
      hilog.error(0x0000, 'testTag', 'getRemoteDeviceId err: list is null');
      return;
    }
    if (list.length === 0) {
      hilog.error(0x0000, 'testTag', 'getRemoteDeviceId err: list is empty');
      return;
    }
    // Use a dialog box to select the device.
    return list[0].networkId;
  } else {
    hilog.error(0x0000, 'testTag', 'getRemoteDeviceId err: dmClass is null');
    return;
  }
}
createSession(): void {
// Define peer information.
const peerInfo: abilityConnectionManager.PeerInfo = {
deviceId: getRemoteDeviceId()!,
bundleName: 'com.example.myapplication',
moduleName: 'entry',
abilityName: 'EntryAbility',
};
const myRecord: Record<string, string> = {
'newKey1': 'value1',
};
// Define connection options.
const connectOption: abilityConnectionManager.ConnectOptions = {
needSendData: true,
startOptions: abilityConnectionManager.StartOptionParams.START_IN_FOREGROUND,
parameters: myRecord
};
console.info(TAG + JSON.stringify(peerInfo))
console.info(TAG + JSON.stringify(connectOption))
let context = this.getUIContext().getHostContext();
try {
this.sessionId = abilityConnectionManager.createAbilityConnectionSession('collabTest', context, peerInfo, connectOption);
hilog.info(0x0000, 'testTag', 'createSession sessionId is', this.sessionId);
abilityConnectionManager.connect(this.sessionId).then((connectResult) => {
if (!connectResult.isConnected) {
hilog.info(0x0000, 'testTag', 'connect failed');
return;
}
}).catch(() => {
hilog.error(0x0000, 'testTag', 'connect failed');
})
} catch (error) {
hilog.error(0x0000, 'testTag', error);
}
} 2. Device B
After the application on device A calls connect(), the application on device B is launched in collaboration mode. During launch, the collaborative lifecycle function onCollaborate() is triggered. You can configure the calls to createAbilityConnectionSession() and acceptConnect() in this API.
onCollaborate(wantParam: Record<string, Object>): AbilityConstant.CollaborateResult {
  hilog.info(0x0000, 'testTag', '%{public}s', 'on collaborate');
  let param = wantParam['ohos.extra.param.key.supportCollaborateIndex'] as Record<string, Object>
  this.onCollab(param);
  return 0;
}

onCollab(collabParam: Record<string, Object>) {
  const sessionId = this.createSessionFromWant(collabParam);
  if (sessionId == -1) {
    return;
  }
  this.registerSessionEvent(sessionId);
  const collabToken = collabParam['ohos.dms.collabToken'] as string;
  abilityConnectionManager.acceptConnect(sessionId, collabToken).then(() => {
    AppStorage.setOrCreate<number>('sessionId', sessionId);
  }).catch(() => {
    console.error(TAG + `acceptConnect failed` );
  })
}

createSessionFromWant(collabParam: Record<string, Object>): number {
  let sessionId = -1;
  const peerInfo = collabParam['PeerInfo'] as abilityConnectionManager.PeerInfo;
  if (peerInfo == undefined) {
    return sessionId;
  }
  // Define connection options.
  const options = collabParam['ConnectOption'] as abilityConnectionManager.ConnectOptions;
  try {
    sessionId = abilityConnectionManager.createAbilityConnectionSession('collabTest', this.context, peerInfo, options);
  } catch (error) {
    console.error(error);
  }
  return sessionId;
}
Enabling Event Listening
After the application successfully creates a session and obtains the sessionId, you can call on() to listen for the corresponding events and notify listeners by triggering callbacks so that the corresponding services can be executed.
registerSessionEvent(sessionId: number) {
  abilityConnectionManager.on('connect',sessionId,(callbackInfo) => {
    AppStorage.setOrCreate<boolean>('isConnected', true);
    AppStorage.setOrCreate<string>('receiveMessage', 'connect success');
  });
  abilityConnectionManager.on('disconnect',sessionId,(callbackInfo) => {
    abilityConnectionManager.destroyAbilityConnectionSession(sessionId)
    AppStorage.setOrCreate<boolean>('isConnected', false);
    AppStorage.setOrCreate<string>('receiveMessage', 'session disconnect');
  })
  abilityConnectionManager.on('receiveMessage',sessionId,(callbackInfo) => {
    AppStorage.setOrCreate<string>('receiveMessage', callbackInfo.msg);
    if (callbackInfo.msg == 'startStream') {
      hilog.info(0x0000, 'testTag', 'startStream');
    }
  })
  abilityConnectionManager.on('receiveData',sessionId,(callbackInfo) => {
    let decoder = util.TextDecoder.create('utf-8');
    let str = decoder.decodeToString(new Uint8Array(callbackInfo.data));
    AppStorage.setOrCreate<string>('receiveMessage', str);
  })
}
Sending messages
After the applications are successfully connected, you can call sendMessage() on device A or device B to send text messages to the peer application.
import { abilityConnectionManager } from '@kit.DistributedServiceKit';
import { hilog } from '@kit.PerformanceAnalysisKit';
import { BusinessError } from '@kit.BasicServicesKit';

abilityConnectionManager.sendMessage(this.sessionId, 'message send success').then(() => {
  hilog.info(0x0000, 'testTag', 'sendMessage success');
}).catch((error: BusinessError) => {
  hilog.error(0x0000, 'testTag', 'sendMessage failed');
});
2. Sending byte stream data
After the applications are successfully connected, you can call sendData() on device A or device B to send byte-stream data to the peer application.
import { abilityConnectionManager } from '@kit.DistributedServiceKit';
import { hilog } from '@kit.PerformanceAnalysisKit';
import { util } from '@kit.ArkTS';

let textEncoder = util.TextEncoder.create("utf-8");
const arrayBuffer  = textEncoder.encodeInto("data send success");

abilityConnectionManager.sendData(this.sessionId, arrayBuffer.buffer).then(() => {
  hilog.info(0x0000, 'testTag', 'sendData success');
}).catch(() => {
  hilog.error(0x0000, 'testTag', 'sendData failed');
});
Ending Collaboration
After service collaboration is complete, end the collaboration state in a timely manner. If collaboration is still needed in the near future, you can call disconnect() to disconnect the applications while retaining the sessionId, so that the same sessionId can be reused next time. If collaboration will not be needed in the short term, you can directly call destroyAbilityConnectionSession() to destroy the session. In this case, the connection is automatically disconnected.
import { abilityConnectionManager } from '@kit.DistributedServiceKit';
import { hilog } from '@kit.PerformanceAnalysisKit';

hilog.info(0x0000, 'testTag', 'disconnectRemoteAbility begin');
if (this.sessionId == -1) {
  hilog.info(0x0000, 'testTag', 'Invalid session ID.');
return;
}
abilityConnectionManager.disconnect(this.sessionId);

hilog.info(0x0000, 'testTag', 'destroyAbilityConnectionSession called');
abilityConnectionManager.destroyAbilityConnectionSession(this.sessionId);
[h2]Debugging and Verification
After application-side development is complete, install the application on devices A and B. Then perform the following test:
- Tap the Connect button in the application on device A. The application on device B is launched.
- Tap the sendMessage button in the application on device A. The application on device B triggers the callback of the on() API and receives the string.
- Tap the sendData button in the application on device A. The application on device B triggers the callback of the on() API and receives the byte stream.
- Tap the disconnect button in the application on device A or device B. The devices disconnect from each other, and the callback of the connect() API is triggered to report the disconnection information to the applications on both devices.
[h2]What should I do if the application on device A fails to start the application on device B?
Possible Cause
-
Devices are not networked with each other. As a result, when device A initiates the connection, the peerInfo.deviceId attribute in createAbilityConnectionSession() is not set correctly.
-
Multiple devices are networked with each other. When device A initiates the connection, the peerInfo.deviceId attribute in createAbilityConnectionSession() is set to the deviceId of another device instead of device B.
Solution
-
For cause 1, enable USB debugging on devices A and B, and connect the devices to the PC using USB cables. Run the following shell command:
hdc shell
hidumper -s 4700 -a "buscenter -l remote_device_info"
If the command output is remote device num = 0, networking has failed. Ensure that the devices are signed in with the same HUAWEI ID and connected through Bluetooth. If networking succeeds, the command output displays the number of networked devices, for example, remote device num = 1.
-
For cause 2, add a device selection list when querying and selecting devices to ensure that the expected device is selected.
[h2]What should I do if the ongoing service collaboration is interrupted after the application screen is locked or the application is running in the background for a period of time?
Possible Cause
During collaboration, DMS listens for the lifecycle of the application. If the screen is locked or the application remains in the background for 5 seconds, the collaboration state of an application that has not requested a continuous task is ended.
Solution
Apply for a Continuous Task (ArkTS) to remove this limitation.